What design solutions are there for water-based paint? Technology for painting walls with water-based paint
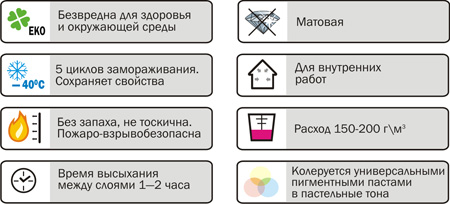
There are many different ways to decorate a room. One of the most common is the painting of walls and ceilings with water-based compositions. The popularity of this coating is due to its distinctive features: this paint does not have a strong chemical odor, dries quickly, is non-toxic, and is not afraid of washing and cleaning. In addition, thanks to tinting, you can get almost any shade.

However, water-based paint, like any other material, has its own characteristics and special requirements to drawing.
Application features
A water emulsion is a definition of a large group of dyes based on an aqueous emulsion. All of them have different characteristics and their application features. However, there are a number of features that unite all types of dyes: so the coatings do not fade, do not crack, are easy to apply and dry quickly, are quite wear-resistant, odorless and environmentally friendly.


Almost any surface can be painted, however, due to the high water content, water emulsion is not used for painting metal and ceramics, since it is from these materials that it simply drains.
It is also important to note that this kind of paint has a very low price. In addition, in large retail outlets, you can tint the base for free or at a low cost, which will help you get almost any desired color.
With all the advantages, there is also a significant disadvantage. Using a water-based emulsion in very humid rooms with low temperatures or frequent temperature changes, for example, in a bathroom, as well as making mistakes in dilution, application or other application technologies, you can encounter quite an unpleasant consequence- fungus.
Adding special antifungal compounds to the paint will help to avoid this. Many modern manufacturers initially add antifungal agents to water-based paint.


What options for water-based dyes are offered on the market today.
- Acrylic water-based paint. This option is by far the most common option used for painting almost any surface. Distinctive feature of such paint is its increased moisture resistance. Surfaces painted with such compositions can be washed with any cleaning agents. Painting can be done even on metal surfaces which must first be well primed. Acrylic paint is perfect option for inexperienced users, because it does not flow and lays down without gaps, and can also be applied by any convenient way: using a roller or brush.


- The cheapest option, which is used exclusively in dry rooms, is polyvinyl acetate aqueous emulsion. Such a coating can quickly crack and wear off even with a slight mechanical impact.
- As opposed to polyvinyl acetate, there is the most expensive representative of the line - latex dye. This option has the maximum level of moisture resistance, so it is suitable for painting the entire room.
Most often, however, it is used for coloring streams. When using such a coating, you can get both a matte and glossy finish. You can find out about the type of coating by special markings on the packaging.
 Polyvinyl acetate

 latex
latex
- Least susceptible to pollution silicone coating. It can be applied to plaster, over wallpaper, drywall, plywood, fiberboard and other surfaces. In addition, both paper and any kind of vinyl wallpaper can be painted.

- A variant of glass fiber can be obtained by painting the surface silicate water emulsion. On a primed drywall or wood surface, a silicate coating can last up to 25 years.

When stained with any type of water emulsion it is necessary first of all to calculate the required amount of paint. This is especially true if the paint is pre-tinted. Mixture consumption per 1 sq. the meter of the room can be found in the annotation to the product. In addition to the required amount, it is worth laying 10-15% of the total mass plus - just in case.

Since the layer of paint is usually extremely thin, it is necessary to carefully level the surface to be painted, after removing old coatings, unless painting is to be done over.
How to dilute the paint?
One of the most important conditions comfortable and economical application of water-based paint is to bring it to the required viscosity. Too liquid paint will drain, will not be able to qualitatively paint over the surface and fill in the existing small irregularities or roughness, and too thick will have a very large consumption of material per square meter. surface meter. Besides, too thick a layer of paint may cause the material to peel off.
So how to dilute the paint, if its consistency requires it? The easiest way to breed is, of course, the most common water. There are also special dilution solutions, but water is the most accessible and simplest material.

In order to dilute the paint, you need to take a clean container, the size of which will depend on the parameters of the surface and the amount of paint that will be needed for painting. With a large consumption of paint, it can be diluted directly in the factory container.
The dilution process itself is extremely simple: it is necessary to gradually add additional water to the paint, while the mixture must be thoroughly mixed. It is best to mix the components with the most suitable device for this - wooden stick. The proportions of water emulsion dilution with water will be determined by the initial density of the paint.
A special recipe exists for diluting heavily thickened paint, which has already acquired the consistency of a paste. Here, the same water with which it needs to be diluted will help to make it again suitable for work. Only under these circumstances should it be heated.

Sometimes, to obtain a colored water emulsion of the required consistency, there is no need to dilute it with water - it is enough to carry out the tinting process. The procedure will be similar to the one described earlier.
- In clean dishes, you need to add the amount of paint necessary to color the entire selected area, otherwise it can be extremely difficult to get into color with additional tinting.
- Then all this paint must be mixed until smooth with a clean stick or with a construction mixer.
- Without ceasing to interfere, drop by drop, you need to start introducing the dye. Continue such actions should be until the paint has acquired the desired shade.
In addition, during the tinting process, you can add a special pigment that will help make the selected pearlescent paint. This action will help to achieve a very interesting end result.

Preparatory work
Irregularities, streaks, stains or other blotches can spoil the whole impression of fresh coloring. To prevent this from happening, it is important proper preparation surfaces for coating.

First of all you need to completely clean the surface of old coatings, be it wallpaper or paint. If the wallpaper does not peel off well, you can help yourself by wetting it with water from a spray bottle. After the water is absorbed, the wallpaper will easily move away from the walls or ceiling.


If the prepared plane has various irregularities, the surface should be puttied / plastered and primed. Do not forget that before painting you need to let the putty dry completely.

It must be remembered that, depending on the type of plaster and its manufacturer, the period complete drying the applied layer can be up to 30 days, so it is necessary to carefully study the properties of the mixtures before plastering or puttying the surface with them.
The prepared surface should be free from dust, stains and possible dirt particles, if necessary, the walls can be washed with a solution of water with the addition of a mild cleaning agent. After cleaning, it is important to wait until the surface is completely dry.

When the surface is as clean and dry as possible, you can proceed to the next final stage before painting - primer. Most often, universal polymer compositions of various manufacturers are used for this stage. It is these types of primers that are suitable for processing most types of materials, be it brick, concrete, cement, drywall.


It is better to primer from the upper left corner, gradually moving to the lower right. Proper and high-quality priming of the surface will help ensure a more reliable adhesion to the coating, as well as remove dust residues if necessary. When applying a primer, you can use any handy tool: roller, brush, even cloth.
After such careful preparation, you can safely apply paint without fear of peeling, unevenness and other unpleasant defects. Application is best done in two stages: first, apply a thin base color, and then fix it with another thin layer on top of the first. Dry the layers thoroughly between applications.


Subtleties of application
Applying paint, like any other stage of the staining process, has its own subtleties and rules.
So, regardless of the tool with which the staining will be done, you will additionally need a flat brush. With its help, it will be necessary to paint the least accessible places in the room: corners, joints with windows and doors, as well as very small decor details.

With the painting of corners and joints, the entire responsible painting process should begin.. Moreover, the upper corner furthest from the doorway is decorated first. At this stage, there is nothing complicated: you need to take a flat brush, dip it halfway into the paint (it is more convenient if the paint from the general container is poured into a separate paint container), wring it out and start painting with light movements.
Along the entire perimeter, it is necessary to lay a strip of paint 30-40 centimeters wide. Such preparatory work will help to more evenly apply the coating with a roller, spray gun or airbrush in the future.
The main staining will be carried out in three stages: Stage 1 - 1 layer. There are some nuances here: each of the three layers should have its own direction of staining - this will help to avoid unpainted places, bumps, spots, too thin coverage.
So, it is correct to apply mixtures in layers, focusing on the location of the window: 1 layer should follow in parallel sunbeams, 2nd layer will be applied perpendicular to the first, but it is necessary to complete the work with a layer whose direction will move exactly towards the window.

Painting is most conveniently done using a simple roller.. This, of course, is not as fast and smooth as when using an airbrush, but this method is the most budgetary. In addition, the roller can be easily bought at any store, and after finishing repair work just throw it away without littering the house with unnecessary items.


Leave between coats required amount time for complete drying of the layer. Only after complete drying of one of them, you can start applying the second and third.
Applying paint to a wet layer is fraught with peeling and spreading of the material.
How to paint a wall the right way water-based paint see the next video.
How long does it dry?
Water-based dyes are considered the fastest drying among other coloring emulsions, however, the time for complete drying may vary depending on the type of paint, the material to which it will be applied, and even the manufacturer.
In order to determine the drying time of one or another option, it is necessary to study the annotation to the product. It is there that the manufacturer places more accurate information about the drying time of the dye. This indicator can vary from 2 hours to a day.
What happens to the paint during the drying process and why does this process happen so quickly? This pattern is possible due to the special composition of the mixture. So, any water emulsion contains water and a special binder. The applied paint, under the influence of oxygen, gives up all the water, which simply evaporates from the surface, leaving only the binder, which remains on the surface in the form of a colored film.
The application of coating materials by roller is a popular solution for finishing works. Specialized rollers for different paint formulations and surfaces are an example of a combination of simplicity and ease of use with ease of learning even by non-professional painters.
Painting walls with a roller: the choice of tools and features of the process
Roller - for painting. It simplifies the process of applying paint, speeds up the processing of large surfaces, and reduces the consumption of the coloring composition.
Roller work allows you to control the thickness of the layer and correct the unevenness of the application, while the paint is not yet dry.
The result of using the tool is a uniform coating.
Wall painting with a roller: a simple solution
The choice in favor of the roller pays off with the numerous advantages of working with it:
- ease of distribution of the coloring matter;
- lack of accumulations of paint that form smears, stains, smudges;
- ease of manipulation due to the reciprocating rotation of the mechanism;
- the possibility of using stencil and texture nozzles;
- less chance of lint or bristles falling out compared to a brush.
Painting technique: existing options
 When using a roller, attention should be paid to the quality of painting: a lack of paint on the tool can lead to the formation of unpainted spots that are difficult to notice during the work process. Such "bald spots" will have to be duplicated with an additional layer of paint, since dotted strokes will stand out from the overall uniformity of the coating.
A common method of roller work is the “letter W” technique: vertical stripes slightly overlap each other at the junction, allowing you to quickly paint a large area. The speed of staining in this way does not allow the paint to dry before the end of the work, which makes the resulting layer even, visually complete.
Painting the "letter W" requires room for manipulation, so it's best to do it in an empty room. In this case, the long handle of the roller gives special convenience.
Another way to avoid gaps and stripes is the “squares” technique. It consists in the conditional division of the wall into squares at the corners, which are painted alternately, and then connected into a single coating with horizontal stripes. This method depends on the illumination of the room and takes into account the direction of light from the window.
Painting with "squares" requires speed to avoid premature drying, so it is more often used by professionals. Fans also need to monitor the degree of drying of the paint in order to prevent coating on an already dry place.
Roller selection
The whole variety of rollers is based on the difference in their purposes (use for various surfaces, areas of the surface to be painted).
The size
 Rollers are divided into three types according to their size.
- Mini - designed for local work on small areas, in the corners, for stencils. Also, rubber-based mini-rollers are used to strengthen the seams, increasing the adhesion of the coating to the wall.
- Midi - medium size rollers, convenient for most painting activities. They are used when painting walls, floors, ceilings, and the correct selection of a fur coat allows you to work with all types of paint.
- Maxi - large rollers, when using which it is difficult to track the uniformity of application and the absence of gaps. The use of maxi-rollers was found in priming work on large areas, as well as in the creation of the primary coating layer, which will be covered by subsequent finishing.
A variety of roller sizes is also observed in the range of highly specialized rollers for uneven surfaces, aggressive coloring compounds, or bitumen.
Foam rubber
 Highly absorbent and suitable for most surfaces. The foam nozzle is chosen for water-based or adhesive-based paints and for varnishes.
It is impossible to work with a foam roller with water-based and oil compositions, since during operation they will destroy the structure of the material, which will lead to the formation of lumps on the paint.
Velours
 Gives a smooth surface, used for ceilings or finishing layer on walls. Velor is suitable for the use of water-based and oil paints, however, it does not absorb solutions well, which is why you often have to pick up paint from a pallet.
Polyamide
Synthetic roller coats are universal: they are suitable for all types, they are not afraid of aggressive solvents, they absorb and release paint. In addition, polyamide rollers are easy to clean after painting, so they last for a long time.
Fur
 Fur rollers differ in the degree of fluffiness and give excellent result even on uneven walls due to the length of the pile. Fur coats (artificial or natural) are used for water-dispersion, oil, alkyd compounds, they are distinguished by spray-free coating. Fur rollers help to create a uniform layer of paint even on surfaces with cracks, drops, chips. Suitable for painting large areas.
How to paint the walls correctly
 Roller selection also depends on the type of coating to be applied. Each paint has features, the timely consideration of which will make the work with a roller high-quality and effective.
water-based paint
The best choice would be rollers coated with velor or pile.
Velor fur coats have a weak absorbent power, so they are better suited for small sizes of painted surfaces.
Pile rollers are an expensive option (especially those made from natural materials), but they have a number of advantages:
- the ability to select the length of the pile to create layers of a certain thickness (for a thin pile - a short pile, for a thick one - a long one);
- used for uniform painting of the wall and for decorative finishes;
- long-term operation;
- the presence of a special elongated pile for porous, rough surfaces.
enamel
 Enamel paint is used to obtain a glossy surface, so the requirements are for the initial smoothness of the wall and for the material of the roller, which should not leave particles or air bubbles. Creating a glossy finish requires a natural wool roller big size- this will allow you to have time to apply enamel without drying stripes.
silicate paint
The peculiarity of applying silicate paint with a roller is that the material of the fur coat must gain and give the same from strip to strip, otherwise the difference in the thickness of the layers will be noticeable visually. For silicate compositions, synthetic rollers and special pallets are selected with a place for rolling in the form of a grid, which removes unnecessary excess.
Other types of paints
 The modern variety of types of paints and varnishes can create difficulties when choosing a roller. In this case, it is better to contact a consultant in the store, who will select the tool, taking into account the characteristics of the paint. In addition, it is worth paying attention to the instructions for use, where compositions suitable for the roller should appear. So, for painting latex walls, a roller with a minimum synthetic pile is suitable, and when applying alkyd mixtures, you can not do without a brush, which should also be suitable for marking.
 To avoid defective areas on the surface to be painted, it is necessary to follow a number of mandatory instructions for working with the roller.
- The fur coat should be checked for pile quality in the store ( quality tool- this is when, when held with the palm of the hand, the structure takes on its original form, with a slight twitch, the hairs of the fur coat do not separate from the roller).
- The metal frame of the roller should not have extraneous stains old paint, rust; the rotation mechanism must be smooth, free.
- Although the roller allows you to quickly paint the surface, when working with a specific coloring composition, it is necessary to calculate the exact time of its drying. Divorces and stripes are most often formed at the junctions of different layers, therefore, compliance with technologies for paints, varnishes, liquid wallpaper will avoid poor quality results.
Thus, the use of a roller - best option combination of price and quality: the tool does not require large financial costs, is suitable for all surfaces and is easy to use.
Useful video
Currently, there are many new wall finishing materials on the construction market. Nevertheless, painting walls with water-based paint is still quite popular. Using water-based paint, they give the surface of the walls both the desired color and the required texture. All this depends on the method of applying water-based paint, as well as on the use of various tools (in particular, textured rollers). If you follow necessary rules and technological methods, the use of water-based paint will allow you to get a stunning effect.
Wall painting tools

- the topic of a separate conversation, here, too, there are subtleties. We will assume that the walls are leveled and plastered or they have already been coated for painting (wallpaper, tiles, cork, etc.).
Wall preparation for painting
Clean the entire surface to be painted, and also the space around it at a distance of 1 - 1.5 meters. In order not to accidentally stain the ceiling with paint, glue a masking tape on the border with the surface to be painted, the same is done at the joints with adjacent walls. The floor is covered with cellophane, paper or just old newspapers at a distance of about 1 meter from the surface to be painted.
First you need to prime the surface. This is necessary for several reasons. Firstly, primer significantly improves adhesion, that is, the adhesion of paint to the surface; Secondly, the absorption capacity becomes the same over the entire area of the wall, in connection with which the paint itself lays down more evenly, spots do not form. The primer dries well after about 4 - 6 hours with the formation protective film. Drying time is indicated in the instructions for the primer. In addition, the drying of the primer is determined tactilely.
Cooking paint
Since the emulsion is sold concentrated, thick in its consistency, it needs to be diluted with water so that it can be applied evenly over the entire surface.
After adding water, water-based paint must be mixed with a mixer or drill with a mixing nozzle. But if you plan to create a rough surface using water-based paint, it is, of course, not diluted.
It is possible to prepare water-based paint before starting work, but when starting work, it will still need to be mixed again, as it tends to settle. So, we have reached the necessary thickness of the paint, it is now necessary to give it the desired shade. For this there is wide range colors, mixing which in certain proportions get one or another color of paint. It is better to do this when buying paint and color. Most hardware stores offer a computer-controlled automatic color matching service. Thus, it is possible to obtain the required amount of water-based paint of the desired color scheme for painting all the walls of the room. In this case, the color of one wall will not differ from the color of the other. If you mix by hand, then this effect will be almost impossible to achieve. In this case, it is desirable to prepare the paint based on the entire wall, then the difference in the shade of one wall from another can be explained by lighting or a special flight of fancy. But I don't think this is an option. After all, you will know what the reason is.
How to apply water-based paint
To paint the walls, you need a certain tool - a set of rollers, brushes and sponges. It all depends on what effect you want to get. If uniform paint application is required, this is done using a roller. Typically, rollers are used that have a soft pile, not very long. However, to create a surface with a texture, rollers are used different and with different piles. Brushes paint small areas and places of contact with other surfaces. Paint of different thicknesses is applied with a sponge, the wall becomes textured, voluminous.
- Paint tray (sold in construction stores, not expensive) is filled with paint by one third of the volume. A strip is drawn along the perimeter of the wall with a brush in order to prevent accidental contamination of the adjacent wall with a roller.
- Next, it is necessary that the roller is completely saturated with paint. To do this, it is dipped into a tray of paint and carried out on any foreign surface (for example, on a sheet of thick cardboard). When the pile on the roller is completely saturated with paint, you can start painting the walls.
- It is better to start painting from the top of the wall. This is done so that drops or drips of paint do not fall on the already painted surface.
How many coats of paint do you need
Paint should be applied in two or even three layers. This is necessary so that the painted surface is even and uniform. And the point here is not the amount of paint, but the fact that all subsequent layers, except for the first, will not be absorbed into the applied putty and primer. Therefore, do not use a lot of paint for applying the first layer, anyway, excess paint will drain. It is necessary to apply a small but sufficient amount of paint and rub it.
Each subsequent layer of paint is applied after the previous one is completely dry. During the drying of the paint, in no case should drafts be allowed, and it is also necessary to ensure that the surface to be painted is not contaminated.
Wall painting methods
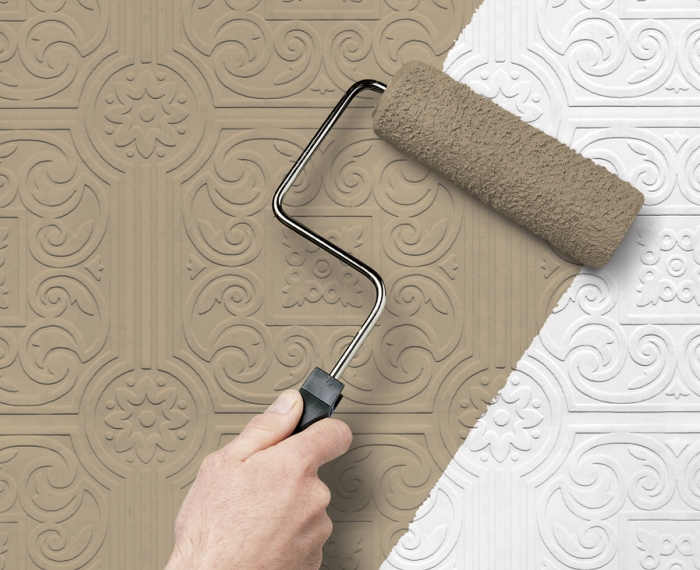
Often when applying water-based paint on textured surfaces (for example, on decorative plaster) the foundation with the base color is applied first. This is done with a roller having medium, relatively stiff bristles to fill all the recesses, or with a spray gun. Then, with a roller without bristles or a sponge, cover those areas of the texture that protrude with paint that has a slightly different shade. With this technique, volume, depth and the desired visual effect are achieved.

In addition, the necessary texture can be given to the wall with the help of the paint itself. For this purpose, water is not added to the paint, the paint remains thick. If you apply the simplest technique - use a smooth roller, then the surface of the wall will turn out to be somewhat uneven, as if in pimples. However, if you still add a little water, the pattern will be somewhat blurry. But the most amazing effect is achieved when using textured rollers or rollers with glued pieces of material (leather, for example). In addition, you can use special rollers designed to apply applications. In this case, a complex and beautiful pattern is formed on the surface of the wall. It is only necessary to remember that with this method of painting, material consumption increases sharply.
How to paint the walls in the kitchen
Kitchen- a special room and the painting of the walls here has its own characteristics. First, not all walls should be painted completely. On sections of the walls near the gas or electric stove, next to the cutting tables, it is more expedient to glue the sinks tile. Secondly, the surfaces in the kitchen need periodic wet treatment (preferably with the use of disinfectants), so the paint must be selected as resistant to moisture as possible, in addition, it is advisable to apply a special varnish after painting, but it must have a water base (such are sold in building stores).
Painting the walls in the bathroom
But in the bathroom with water-based paint, you can paint the walls only if it is sufficiently effective. supply and exhaust ventilation, since this paint does not withstand temperature and humidity fluctuations well. Therefore, it is better to use other materials for decorating the walls in the bathroom. For example, tiles.
In the process of drying water-based paint in any room, drafts, changes in temperature and humidity should be prevented.
Do-it-yourself wall painting with water-based paint
Painting walls with water-based paint is a simple type of finish that everyone can handle with their own hands. Spreading it finishing material due to its variety of properties, availability, environmental friendliness.
The choice of water-based paint
The choice of mixture for painting depends on the desired end result, the price of the material, its properties. The benefits of water-based paint and application tips in video from the finishing experts
Varieties in composition
For each room there is an optimal variant of water-based paint, in all of them water acts as a solvent, the mixture does not irritate the skin, respiratory tract. When working with it is not needed protective equipment for hands and respiratory tract. Easy to clean from clothes and tools under running water.

Acrylic
The most common is acrylic water-based paint. Manufacturers offer many options with different properties.
It is produced in various degrees of whiteness, on which the price depends. Low whiteness is good for tinting in soft colors. To obtain a bright saturated color, a colorless base is purchased. High whiteness is usually chosen for application to the ceiling, it is not advisable to buy it for tinting - to drown out the snow-white pigment, you need to use a lot of color.

Latex additives create a more flexible, wear-resistant compound. Depending on the amount of latex, there are several types of finishing surface, which:
- not afraid of water, resistant to detergents- a lot of latex;
- wiped with a damp cloth, but afraid of a stronger impact - enough latex;
- does not wash, but does not grind when held by hand - little latex;
- grinds - no latex.
The price of the mixture increases in direct proportion to the amount of latex

Washable water-based paint withstands frequent washing, it is chosen for painting the walls of corridors, kitchens, children's rooms. Some use inexpensive, low-latex paint for children's rooms, and when blots appear on the wall, they are simply repainted. Such redecorating easy and cheap to make by hand, the surface of the walls will always be updated. But for this, there must be residues of the mixture of the same color. It is impossible to make an absolutely identical shade with your own hands, so there are free service computer tinting. This is very convenient, because if there is a shortage of water-based paint, you can return for additional purchase and get exactly the same shade.
Silicone
For rooms with permanent high humidity silicone water-based paint is used. It is vapor-permeable, prevents the formation of mold and mildew on the walls, and is ideal for do-it-yourself processing of mineral surfaces. Expensive but very durable. Can be used for interior painting ground floor, baths, saunas, pools.

silicate
Silicate water-based paint - an aqueous solution of liquid glass. When painting walls, it creates a very durable coating that allows air to pass through and is resistant to temperature changes, retains translucency even in color. Skillful DIY application can create the effect of a fresco or Venetian plaster.
It is used for outdoor work, for interior painting of basement walls, saunas, swimming pools. Coating service life up to 20 years.

Mineral
Water-based paint made from cement or slaked lime is the cheapest type of wall painting. It is used when undemanding to decorative qualities and service life. It can be used for painting walls in utility rooms. The addition of color improves the decorative qualities, it is more expedient to make the color for such cheap painting with your own hands. There are no external differences from more expensive water-based paints, but you should not hope that the surface of the walls will remain unchanged for a long time.

Polyvinyl acetate
Do-it-yourself wall painting with polyvinyl acetate water-based paint has high strength, resistance to pollution, and ease of cleaning. The mixture is thick and inexpensive, it can be applied directly to the plastered wall. It is used for painting walls in rooms with high traffic.

Textured
Acrylic water-based paint with the addition of grains of various textures can imitate decorative plaster when painting. The relief of such a coating is much less, but the application technology is simpler and the cost is lower. At correct application and forming a pattern with your own hands, you can create an original wall design.

All types are available in various degrees of smoothness: matte, glossy, semi-gloss, semi-gloss. At a washable matte wall, with frequent washing, the top decorative layer wears out. The same goes for glossy finishes. For places of frequent contact, strong abrasion, you should choose the option of semi-gloss or semi-gloss painting of the walls.

Material consumption - important indicator, it depends on the viscosity and hiding power. Very often, a water-based mixture, which is more expensive per unit volume, turns out to be cheaper in total consumption due to fewer layers required and better elasticity.
For quick painting walls with your own hands, it is convenient to use a water-based mixture with a guarantee of hygroscopicity, which does not flow or drip when applied to walls and even the ceiling. It costs much more, but does not require furniture protection. Used when the value of time is high.
For wallpaper painting, paint of the “wallpaper” category is selected, it is more elastic, applied in a thin layer and does not hide the texture of the base.
Important! When choosing a water-based mixture for painting walls with your own hands, you should take into account the manufacturer's recommendations indicated on the package. They guarantee long-term operation under the necessary conditions.
The more expensive the mixture for painting, the less the possibility of not coping with the application with your own hands.
Foundation types
Water-based paints are suitable for work on all types of substrates. It can be: wood, brick, concrete, metal, slate, glass, plaster, wallpaper. Preparation of the surface of the walls for painting with water-based paint depends on the design features.

AT classic version perfect alignment of the walls with plaster or drywall is required. A weak base should be beaten off and reapplied, otherwise it crumbles, the repair will have to be repeated. You can check its strength by lightly tapping on the wall.

If there is an old layer of decorative coating, it must be removed with an iron brush or special means for removal. The wooden surface is treated with an antiseptic. Concrete, brick, slate, plaster - primed deep penetration. Metal - primer for metal. Glass - concrete contact of fine grain size. Wallpaper - universal primer.
Important! The primer is always a necessary link between the base and decorative coating. It improves the adhesion of the layers.
Painting technology
Painting walls with water-based paint with your own hands is a simple process. But violating the manufacturer's recommendations can spoil the final result.
Roller painting
The staining technology is as follows:

Important! The desire to paint over everything with just one thick layer will ruin the surface, smudges will appear, a visible difference in color due to the thickness of the application.
Spray painting
Painting the walls with water-based paint with your own hands will be much easier with the help of an airbrush. Modern instrument guarantees uniform application and a thin layer. To do this, it is necessary to prepare the mixture: stir, strain through cheesecloth. Water-based paint is poured into the tank, applied to the surface with a spray gun.
Such work requires the absence of furniture or its very good protection with special packages. Painting the wall with an airbrush with water-based paint also occurs in several layers, but they dry much faster. In time, the tool is washed very easily, with the help of an abundance of flow warm water. It can be rented from a hardware store.
Important! When painting walls with an airbrush, you must wear a mask.

Features of applying textured paint
Textured water-based paint is applied with a trowel, coarse brush, roller. The final pattern on the wall depends on the method of painting, the graininess of the mixture, the number of layers.

To create an additional decorative effect from painting, stencils, curly rollers are used on the walls. With the help of fantasy, the material allows you to create your own unique design, but even without using various effects, an interesting texture of the walls is obtained.

Important! Such a mixture can be deformed for 15 minutes, then it becomes viscous, the surface is already deteriorating from exposure. Shaping should take place immediately after painting the wall.
An interesting painting master class from the manufacturer of textured water-based paint is presented in the video:
Walls painted with water-based paint, can be a background for modern design or create your own uniqueness.

The bold experimentation of colors in a teenager's room looks more like a piece of modernist art than a living space. Perfect order must reign here, otherwise the feeling of chaos will crush. It is impossible to stay in such an interior for a long time when the design gets bored - re-painting the walls with your own hands will not be a big deal and cost.
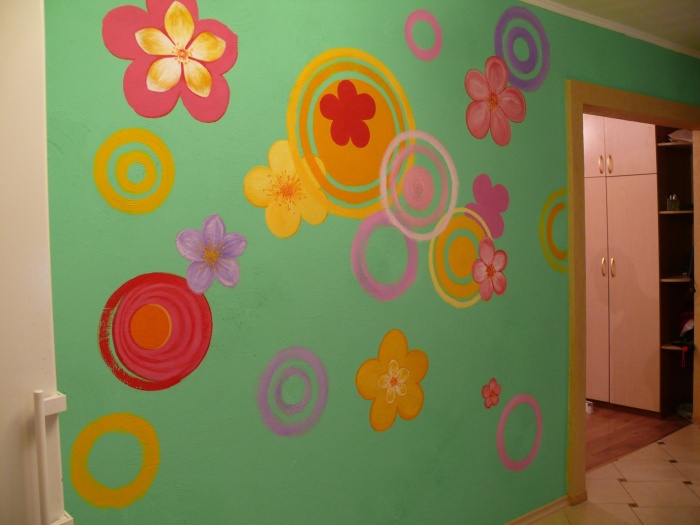
And this cute wall can be in the nursery or occupy part of the corridor. A simple design, created by hand, brings a feeling of warmth, comfort and eternal summer. The drawing is applied with water-based paint in several layers, after the previous one has completely dried. Adjacent walls can be painted in lighter colors.

Painting with bright contrasting stripes is suitable for a spacious room of a dynamic owner. Not everyone can endure such a combination of colors. Only strong personality with precise goals in life will feel comfortable within the walls of such an interior.
Conclusion
Water-based paint is an excellent material for painting walls. The creation of a classic calm design of the room and the fulfillment of desires from the sea of fantasies of the owners is possible with the help of such simple material. Painting any walls is possible with a suitable water-based paint, it can be easily done by hand. For a high-quality finish layer, the correct preparation of the base plays a special role.
Painting is one of the most popular cladding methods. interior spaces. Most often they are painted with water-based compositions, presented on the market in a wide range of manufacturers and colors. Let's talk about the rules for choosing paints and varnishes and the features of painting rooms.
Choosing a water emulsion - which one to use for repairs?
Water-based paints on the market differ in manufacturer, composition and technical specifications. Some materials are suitable only for indoor use, but even in favorable conditions they quickly fade and fall off, others can be used both for interior decoration and for exterior walls, but retain their visual characteristics for many years. That is why it is necessary to be able to choose the right cladding for the house.
The basis of all water-based paints is water, to which mineral or polymer elements are added. When dried, the water evaporates, and the remaining components form a durable film on the surface, which not only gives the walls an attractive appearance, but also protecting building structures from external negative influences.
Painting walls and other surfaces with water-based paint will lead to the desired result only if you can choose the material according to the composition that is fully consistent with the place of its use. According to the components, water-based paint and varnish linings are divided into the following types:
- 1. Mineral. The paint is created using white cement or lime. It is characterized by low cost and good adhesion, but quickly fades in the sun and is easily damaged by mechanical stress.
- 2. Silicate. It is made of liquid glass, which provides the material with high resistance to influence. environment. Can be used for interior and exterior decoration, retains its characteristics for 10 years.
- 3. Acrylic. Creates smooth surface, ideally lays flat on the walls, tightens small (up to 1 mm) cracks, that is, it simplifies the preliminary preparation of walls for painting. due to hygroscopicity acrylic compositions can only be used in dry rooms. Latex is added to some paints of this type, which provides the material with moisture resistance and minimizes vapor permeability.
- 4. Silicone. Modern paint capable of closing cracks up to 2 mm wide, creating a dense film on the painted surface. It passes water vapor and retains its qualities for a long time, but it is very expensive.
After determining the type of water-based cladding that is most suitable for you, you need to select a manufacturer. We recommend purchasing formulations only from well-known companies. It is better to pay more for a cladding and enjoy its excellent performance for a long time than to save money and repaint the surface again after a few months.
According to professionals, it is better to choose paints from the following brands:
- Marshall;
- Finncolor;
- Empils;
- Alpina;
- Dufa;
- Tikkurila;
- Beckers;
- Dulux;
- Sherwin-Williams;
- parker paint.
The compositions of these brands are guaranteed to make the designed surfaces attractive, protect them from negative influences and will serve you as long as possible.
Preparatory work - what needs to be done before staining?
To qualitatively paint the walls, you must first prepare the surface. The wall must be even, for this it can first be pasted over with wallpaper for painting or putty on bumps and primed. Water-based compositions can not be applied over whitewash and oil paint. If this is the case for you, then the old cladding must first be removed before plastering, level the wall and only then paint.
To dismantle the old water-based emulsion, first clean off everything that can be done with a spatula, then moisten the old coating from all sides hot water– Wet the roller and carefully roll over the surface several times. Then leave the wall for 5 minutes, then repeat the procedure. After 2-3 treatments with hot water, the paint swells up and can be easily cleaned with a spatula. This technology is also suitable for removing whitewash, but it is better to use not hot, but cold water.
After removing the whitewash, it is necessary to thoroughly soak the wall with a solution of soda to neutralize the remaining lime particles.
If you need to remove from the wall oil paint, then you can use special chemical cleaners, but they are toxic and expensive. The second way is to use a drill or grinder with a special nozzle - a brush with metal wire. With this nozzle, you need to clean off the paint at low speeds of the tool.

The next step is to level the wall. If you are using acrylic or silicone lining, minor cracks can be left, the finish will hide them, but all other defects will have to be repaired. First, putty all the recesses and large cracks with putty. After sealing large defects, you need to smooth out minor irregularities, and then prime the walls with a roller.
For better adhesion, you can putty the walls with a thin layer of putty completely. So you get the most even monophonic surface, for finishing which you can use paints and varnishes any color. After the putty dries, the walls are re-primed and only then proceed to painting. The primer must be selected taking into account the type of paint used, for acrylic water-based emulsion you need acrylic primer, for silicone - silicone, etc.
Finishing rules - we tint the paint and choose a roller
Water based paint has White color, however, by adding a coloring pigment to it, you can get any shade from the RAL palette. To give the material desired color you can order tinting in the store, where it will be done in special automatic devices, or separately buy a color scheme and add it to the water emulsion yourself.
We recommend using automatic tinting, since when you add it yourself, you determine the shade by eye, so you are unlikely to be able to accurately calculate the right amount of pigment, plus you will have to knead the amount of material at a time, which should be enough to color all surfaces. It is almost impossible to repeat the color previously made by eye.
Rollers can be used to apply enamel different types. Cheap foam tools are the most common and can be bought at any store. Them main disadvantage is that they absorb a lot of paint and because of this, microscopic bubbles can form on the wall. Such bubbles can adversely affect the attractiveness of the lined surface - the wall may look rough and uneven. Less problems occurs when using dense foam rollers, but they are much less common in stores.

Velor rollers are much less common, you usually have to look for them in specialty stores. They allow you to apply paint to the surface as evenly as possible. The disadvantage of velor is that it does not absorb liquid well, therefore very little paint remains on the roller, which means that the staining procedure can be significantly delayed. Although this disadvantage can be an advantage when painting the ceiling.
Fleecy rollers are the best choice for painting surfaces with a do-it-yourself emulsion. On the market there are such rollers with different length pile, which determines the layer of typed and applied paint. If you are tiling well-putty surfaces, then you can use tools with any length of pile, the only thing is not to take the most "hairy" ones, when using them, the paint may splatter.
Fleece rollers are made from different materials. Felt and fur tools are considered the best, they are more expensive than others, but they will last you a very long time. Available artificial materials are much cheaper, but also wear out much faster. Polyamide pile is also suitable for water-based emulsions, which allows you to apply paint without streaks. If you need to paint non-woven wallpaper with a soft texture with enamel, then we recommend using fleecy rollers made of natural fur or polyamide fiber with a pile length of 6 to 14 mm.
Proper application of cladding is the key to an attractive surface
When all necessary materials purchased, and the wall is ready for work, you can proceed to the most important thing - painting surfaces. The job may seem complicated only if you have not worked with paints before, in fact, anyone who is able to figure out which end of the roller to hold on to can handle it.
First you need to set the boundaries of the surface to be painted - protect the skirting boards, platbands and other interior elements from contamination with masking tape. Pour ready-to-use paint into the paint tray and attach a handle to the roller so that you can apply the cladding to the entire wall from floor to ceiling.
It is best to apply paint from one of the corners of the surface to be decorated. Paint with a brush the corner itself and part of the wall adjacent to it at a distance of up to 50 mm from the corner. Next, take a roller, dip it in paint, crimp it and start working from above, rolling the lining down. Paint over a solid strip of the wall, moving the roller only up and down. When applying the next strip, try to go 5-7 cm on the already painted surface, so you will avoid the appearance of poorly painted borders between the stripes.
We recommend painting quickly, because the water emulsion begins to harden within 10-20 minutes after application. Do not take breaks, you will spend only a couple of hours on all the work. If you stop for a while and one of the strips dries out, it is likely that its border will be noticeable even after the lining has completely dried.
It is possible to paint over the second corner only after a distance equal to the width of one roller remains before it. This way you can finish one wall in one strip and move on to the next one before the corner dries out. To give the wall brightness and richness, it needs to be covered with 2-3 layers of paint. Each next layer can be applied only after the previous one has completely dried.
