How to stick plastic wall panels on the ceiling or walls in the bathroom: requirements for finishing materials, care after installation. How to finish a toilet in an apartment Sheathing a bathroom with wall panels
Do-it-yourself repairs in an apartment are always the pride of any home master. But what if there is absolutely no experience in construction and decoration?
In this case, it is better not to touch complex rooms, such as a living room or a kitchen, but you can work out, quite well, on the decoration of the toilet. Firstly, this is the smallest room in the apartment and there is not a wide variety of finishing materials. In addition, if in the end nothing happens, you can turn to specialists, and they will redo everything, without tangible damage to the wallet.
The most common material for finishing the toilet is plastic panels, and it's not just about the ease of installation, there are a number of advantages that speak in favor of this option:
- A wide variety of colors and patterns that are great for decorating the toilet.
- Ease of aftercare. Plastic panels are absolutely not afraid of water and detergents.
- Minimum financial costs for finishing work, even when taking into account all the necessary components.
- There is no need for a huge number of tools. Everything you need to finish the toilet with plastic panels can be found at any home master.
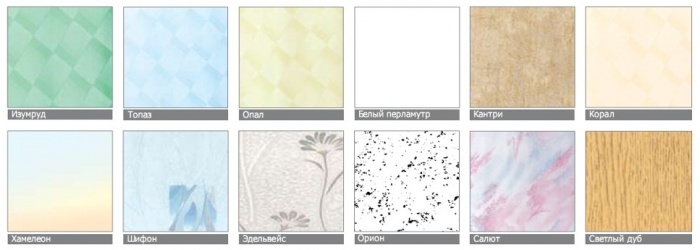
The choice of plastic panels for finishing the toilet

As is often the case, due to the high demand for plastic panels, many unscrupulous manufacturers have appeared on the market. It is very difficult to determine the quality of plastic by eye, and to the average buyer they all seem the same. But this is not so, and in order not to become a victim of scammers who save on the quality of their products, you need to follow a few simple tips:

The right choice of panels for the toilet is already 50 percent the key to a successful repair. It's much easier to spend an extra hour in the store than redoing all the decoration next year, or even earlier.
Important ! When buying plastic panels for finishing the toilet, you should always take two to three segments in stock.
If at the end of the repair it turns out that the initial calculations were incorrect, there may no longer be exactly the same panels in the store.
Preparation for the installation of plastic panels

A good master, any repair begins with preparatory work and making lists of everything you need. If this is not done, you may have to run to the hardware store more than once for the missing materials or tools. Often, this takes much more time than the entire renovation, especially when it comes to such a small room as a toilet.
List of necessary materials for finishing the toilet

- Plastic panels with a small margin.
- Decorative elements: corners, plinths. It is also necessary to take with a margin.
- Wooden beam with a thickness of not more than 2 cm. The quantity is determined based on the installation horizontally, with a distance of approximately 30-50 cm.
- Impregnation for wood, preventing rotting, and a brush for its application.
- Wall primer with antibacterial effect and roller for its application.
- Dowels with a diameter of 6 mm and a length of 60-80 mm.
- Staples for a construction stapler.
- Glue for plastic. It will be needed to install external decorative corners.
- Wood screws. Needed to finish the riser in the toilet with plastic panels.
- Plastic wrap or thick cloth to protect the plumbing in the toilet.
Advice ! No need to save on consumables such as screws or staples. Fasteners are never superfluous in the economy, and in finishing work, its lack can affect the service life of the entire repair.
List of necessary tools for finishing the toilet

- Perforator or drill with impact mode, as well as a drill for them, corresponding to the selected dowels.
- A hammer.
- Pencil, tape measure.
- Hacksaws for wood and plastic, or electric jigsaw.
- Sharp construction knife.
- Metal spatula. You will need to remove old paint from the walls, if any.
- Construction stapler.
- Level with horizontal and vertical indicators.
Warning ! you should not cut the bar and plastic panels with a grinder. As a result, a lot of acrid smoke is formed, which the neighbors can take for a fire, and then they will have to explain for a long time.
When both lists are collected and everything you need to finish the toilet is at hand, you can get to work.
Preparation of the base for plastic panels
The quality and durability of any finish largely depends on the preparation of the base. Unlike more complex rooms in an apartment, decorating a toilet does not take much time and effort, so each step needs to be given special attention. It's better to spend two extra hours today than to redo everything later.
First of all, it is necessary to completely clean the walls and ceiling in the toilet from old finishes or paint. This is done with a spatula and a light hammer, which tap the surface. Coating that has become unusable will immediately disappear.

Next, the bars are prepared. They must be cut to the desired length based on the horizontal fastening to the wall. When all the wooden elements are ready, they are treated with impregnations and taken out to dry on a balcony or stairwell.
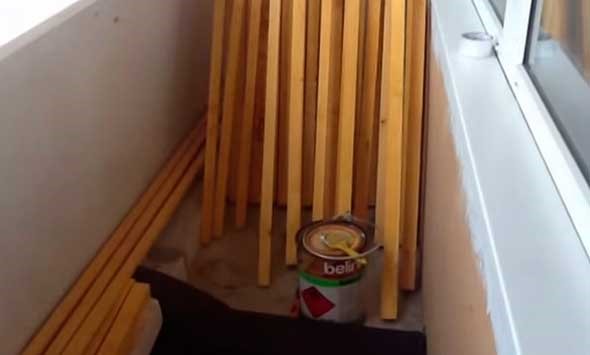
Important ! The size of the bars should be a few centimeters smaller than the toilet room. This is necessary so that the tree has the ability to expand.
In the meantime, the bars are drying, there is time to continue preparing the walls in the toilet for finishing. They need to be plentifully passed with a primer-antiseptic, it prevents the formation of mold and harmful fungus. Impregnation is done using a foam roller. It takes about an hour to dry completely, at room temperature, which means you can take a short break and take a breath.

Installation of wooden crates under plastic panels
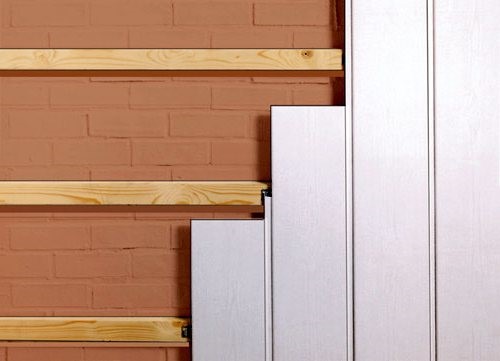
When the walls in the toilet and the wood are completely dry, you can proceed with the fastening. First of all, a bar is fixed a couple of centimeters above the floor, around the entire perimeter of the toilet room. In the same way, a beam is passed under the ceiling.

If the ceiling in the toilet will also be finished with plastic panels, then the crate is also needed on it, the fastening technology is no different from the wall:
- The bar is applied to the surface, and a hole is drilled through the tree into the hay using a perforator. The first fastening should be about five cm from the edge. A dowel is driven into the hole. The second edge is attached in the same way. Now, when the bar is fixed, it is additionally strengthened, with a step of 30-50 cm between the dowels.
- When the bars around the perimeter of the toilet room are installed, using a tape measure, the distance between the lower and upper bar is measured. It is divided into two, and another bar is attached exactly in the middle of the wall.
- The resulting two sections are once again divided in half, and the timber is placed again. Do this until the distance between the guides is about 50 cm.
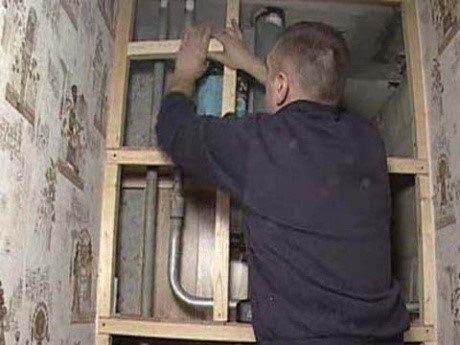
- Certain difficulties may arise with communications, which also need to be finished with plastic panels. To do this, boxes are made from the same bar as the crate, which are attached to the wall and floor of the toilet. You can connect the bars to each other with wood screws.
Advice ! if spotlights are planned as ceiling lighting in the toilet, the bar must be mounted below the ceiling, at least 15 cm. Do this with the help of profile fasteners.
For more details on how this is done, see the video.
Installation of plastic panels in the toilet
Before installing plastic panels, it is necessary to attach guide moldings to the corners of the toilet and to the ceiling.

All finishing strips are fastened with staplers to the bars

Do-it-yourself installation of plastic panels in the toilet always start from the left edge and ridge to the corner. With the help of a construction stapler, fastening brackets are driven into the corner groove and ridge on the other side of the panel.
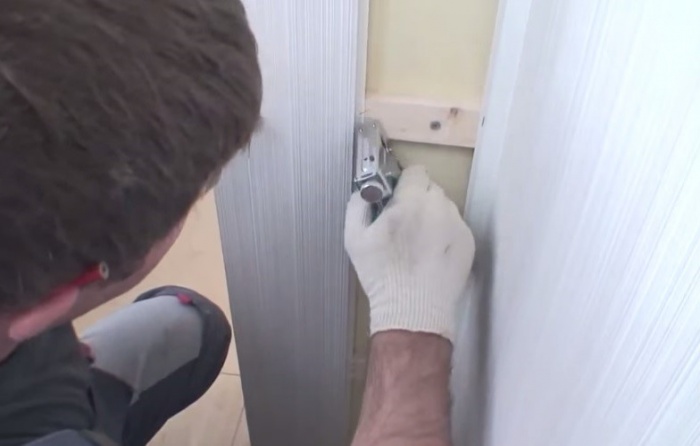
Important ! The first panel must be installed strictly according to the level. All other trim elements will be guided by it.
The second plastic panel is inserted into the groove of the first and its ridge is also fixed with staples on each wooden rail. All installation steps are clearly shown in the video
After the walls of the toilet are completely covered with panels, they finish the boxes that close the communications. Here, perhaps, each panel will have to be cut to length, subsequently these places will be closed with decorative corners.
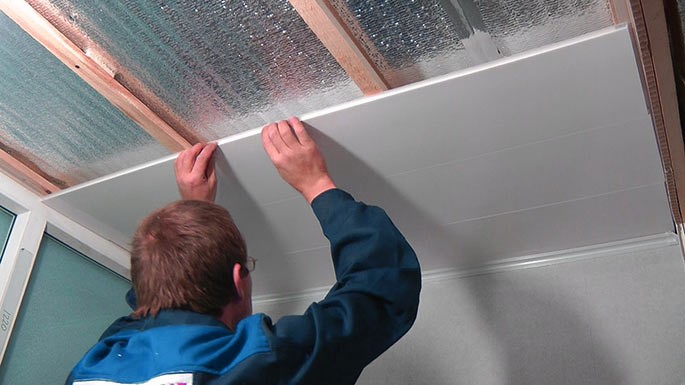
In the same way, plastic panels are mounted on the ceiling of the toilet. But here it is important to immediately make holes in the places of the lamps, and bring out the electrical wires.
Installation of decorative elements on plastic panels
The easiest way is to use the outer corners in the decoration of the toilet, they are much more convenient to install and are not inferior in quality to those into which plastic panels must be inserted.
Glue for plastic is applied to the corner and applied to the junction of the panels. Good glue sets in a few seconds, so it is important to have time to glue the corner before it dries.

Using the same glue, floor and ceiling plinths are fixed. Possible excess glue is removed with a soft cloth, and on this, finishing the toilet with plastic panels with your own hands can be considered finished.
The matter remains for the installation of the necessary accessories and fixtures, but this is a topic for a separate discussion.
Conclusion
As you can see, there is nothing complicated in decorating a toilet with do-it-yourself panels. All stages of repair will take a maximum of two days. Even if this is the first independent repair in the apartment, it will allow you to gain invaluable experience, and perhaps the next step will be more complex premises that also require repair and decoration.

And in order to avoid the most common mistakes when repairing a bathroom, you can watch the video
Reading time ≈ 3 minutes
To date, plastic panels are widely used for various types of repairs. Their main advantage is the principle of the constructor, which allows you to disassemble the panels if necessary. Thanks to the design of plastic panels, improved walls will be able to "breathe", and this is important in conditions of increased humidity. The huge popularity of such material was ensured by its economy in comparison with tiles, wallpaper, stone.
Preparation for repair
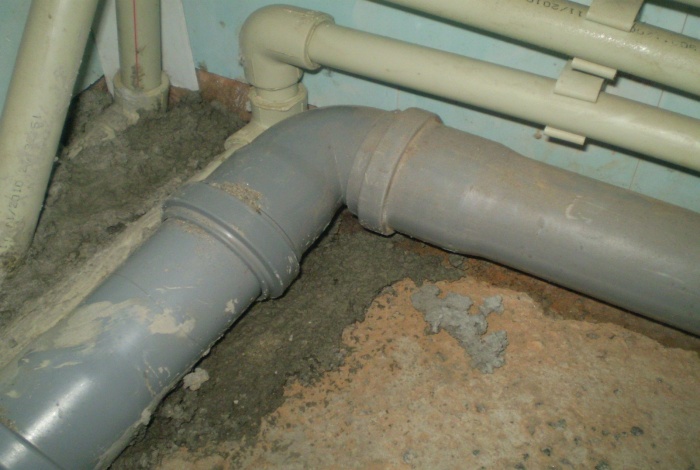
Repair of the toilet with plastic panels takes 1-2 days. First, you need to decide on plastic panels, with a thickness of 8 mm, which are much more practical than 5 mm. After all, the less the thickness of the PVC panel, the more likely the lock will break during assembly, which contributes to the appearance of cracks at the joints. The amount of plastic needed will depend on the perimeters of the room, but 10-15% of the material will need to be added, as there will be a lot of scraps in the process. When working, you need to pay attention to the water supply, which must remain open or there must be unhindered access to it.

When lining the toilet, metal profiles UD and CD are used. In addition, dowel-nails 6x40, hanging brackets for attaching the profile, white silicone glue, press washers with dimensions of 3.9x16 are useful.
Of the tools will be involved: grinder, water level, hammer, puncher, cutter.
Installing panels on the ceiling

Repairing a toilet with plastic panels with your own hands is quite simple. You just need to follow these steps in sequence:
- assemble a frame consisting of a metal profile for attaching plastic panels to it;
- we beat off the ceiling level line using the water level;
- we fix the UD profile along the ceiling line using dowel-nails. Further to the UD profile, thanks to the press washers, we fix the CD profile. Each strip of the CD profile must be fixed at a distance of 60-70 cm and shot in two places so that the ceiling does not sag over time;
- it is recommended to start a set of panels from the side with the best view, because with a high degree of probability the last strip will need to be cut.

First, we attach the starting strip, from which we will begin the installation of plastic. We attach each strip of plastic with a press washer to the CD profile.
You need to be very careful with plastic, which is fragile and if careless movement can break the lock. You can watch videos and photos of repairing a toilet with plastic panels in this article.
Wall repair

The principle of working with walls is similar to the process on the ceiling. First, we collect a metal frame from profiles, taking into account all levels. And do not forget to make a vertical partition, which will increase the rigidity of the structure. To join the strips at the corners, an internal corner is used. As in the case of the ceiling, we start typing plastic from the side with the best view. The outer corner is used in the process of joining plastic, when repairing a toilet with plastic panels, to close the sewer pipes. The upper skirting boards or baguettes are fastened with silicone glue, but the lower ones can be shot with dowel-nails.
August 2, 2016Specialization: Capital construction works (laying the foundation, erecting walls, constructing the roof, etc.). Internal construction works (laying of internal communications, rough and fine finishing). Hobbies: mobile communication, high technologies, computer equipment, programming.
Recently, my eldest son and I had an argument about how to finish the walls in the toilet. He also followed in my footsteps and is now receiving a higher architectural education. So the debate we have, sometimes, there are serious.
We discussed for a long time how to glue the walls in the restroom, whether it is possible to make a shower from plastic panels, what to do if the wall between the toilet and the bathroom is broken. Many copies were broken and we never came to a common denominator.
Therefore, I decided to tell you about the most popular, from my point of view, methods of decorating just a restroom and, if the wall between the toilet and the bathroom was demolished, the entire plumbing room.
This is not a finishing guide, but an overview of the possibilities. After familiarizing yourself with them, you can choose the right option for yourself. After all, most likely, your significant other is already planning repairs in the near future.
Popular options for wall decoration in the restroom
I’ll make a reservation right away, I will offer both my favorite ways of finishing, and those that my son prefers. Therefore, to make it easier for you to choose than to finish the toilet, I will give both the pros and cons of each option.

For the vast majority of our compatriots, the bathroom and toilet are the smallest rooms in the home. That is why, by the way, many people ask how to demolish the partition between the toilet and the bathroom in order to make one, more spacious room.
However, due to the specifics of use and the internal microclimate, characterized by high humidity and significant temperature fluctuations, it is necessary to use finishing materials to repair the toilet, which can not only decorate the walls, but also protect them from adverse external factors.
Option 1 - Wallpaper on the walls
This way of finishing the room comes to mind first. In principle, I have seen toilets covered with wallpaper more than once. However, the specificity of this particular method of finishing lies in the fact that the wallpaper should not be chosen expensive and beautiful, but those that will withstand use in the toilet.

There are several varieties of wallpaper that differ from each other not in price and appearance, but in technical characteristics. I made a brief overview of the varieties available for sale in the table below.
| wallpaper type | Characteristic |
| Paper | In the toilet you need to buy wallpaper, coating with a hydrophobic layer. In this case, the wall decoration will better resist getting wet. In addition, the only way you can somehow wash the walls. |
| Vinyl | The material is absolutely safe, strong enough and does not collapse when wet. To give your closet a nice and stylish look, I suggest using smooth or foam tapestries. It is better to refuse embossing, since this relief on vinyl is very difficult to wash. I want to say a few words about vinyl film. Yes, it is easy to glue, and it washes well. But believe me, it is unlikely that you will be satisfied with the appearance of the restroom after such a finish. |
| fiberglass | Wallpaper with specific performance properties. Excellent resistance to moisture and open fire. Do not collapse under the action of household detergents. They have an attractive appearance. |
Even in the case of buying especially durable moisture-resistant wallpaper, I recommend finishing some sections of the walls with other materials (tiles, plastic). Especially in those places where frequent contact with water is expected. After all, neither vinyl, nor paper, nor fiberglass will simply stand up to such treatment.
Personally, I can say this. If you have already decided to decorate the toilet with wallpaper, then buy products based on fiberglass. This is the only way to achieve the optimal ratio of technical characteristics and appearance. But the cost of such a solution will be quite high, so you can choose other materials.

The only thing you need to take care of is to align the walls and buy special glue. And it is better to hire an experienced master for this case. After all, it will be very disappointing if expensive building material is damaged.
Option 2 - Liquid wallpaper
I singled out this finishing option in a separate section, since liquid wallpaper, although called wallpaper, has nothing to do with strips of paper that are glued to the wall. But they are great for decorating toilets - they tolerate moisture well and look just great.

Another advantage that captivates me is the simplicity of the finishing process. They can be applied to any surface:
- brick;
- plaster;
- drywall sheets;
- ceramic tiles;
- glass.
Liquid wallpaper is sold in the form of ... a dry powder, from which a special solution is made before use according to the manufacturer's recommendations. The material immediately acts as a plaster, filling all the cracks and irregularities, so nothing needs to be leveled beforehand.
I recommend using liquid wallpaper in new homes (that have not yet structurally shrunk). As the geometry of the walls changes, the finish will not crack or peel off. Significant temperature fluctuations are also not terrible for the decor, so several times I decorated them with a toilet in a country cottage, where it was not supposed to turn on the heating in winter.
The advantage of these wallpapers is a wide variety of colors and textures. Often, fibers of cellulose, cotton, wool, and so on are added to the wallpaper. I also met options with the addition of mica.
If you correctly use the presented opportunities, you can create truly amazing toilet interiors. No paint or tile can compare.

I consider the unique ability of wallpaper to be the ability to absorb water vapor, creating a healthier indoor climate. At the same time, unpleasant odors do not accumulate in the walls. Therefore, if you regularly wash the walls, they will always remain clean and the air fresh.
These wallpapers are not glued, but applied to the wall with a spatula. Then they are leveled and, voila, the toilet is ready (if everything was so simple).
Option 3 - Tile
This method is considered a classic. Ceramic tiles for wall decoration in the toilet endure mechanical stress and high humidity (including direct contact with water). Another plus I would call a large variety of sizes, colors and textures. And if you add friezes to this, then there are many design options that even come to my mind.

Well, of course, I will not surprise anyone if I say that the tiles in the toilet will last much longer than all other types of finishes.
The disadvantage of tiles can only be called the complexity of wall cladding. Firstly, this requires considerable experience, secondly, the process itself does not shine with cleanliness, and thirdly, you need to know how to level the surface of the walls under the tile and prepare them for cladding.
That is, you need to act according to the following scheme:
- Align the walls in the room. First, plaster is used for this, then putty, then a primer. And only at the end of everything you can start laying the tiles.
- Disguise engineering communications. This must be done before you start lining. Often, plasterboard sheets on the crate are used to hide water and drain pipes. And they are already tiled.
The built-in toilet in the wall can reduce the complexity of working with pipes. In this case, a special installation is included with it, so you don’t have to think about connecting pipes to the tank and attaching the cuff to the toilet.
- Lay tiles. Here you need special skill to lay the tiles evenly and with the same distance between the parts.
- Rub the seams. For this, a special grout is used. By the way, choosing a fugue (grout) of a certain color, you can pleasantly diversify the design of the tiled walls in the toilet.
Laying tiles in the toilet is not an easy process.
To the same way of finishing, I would include a mosaic. In fact, the same ceramic tile, but in very small sizes. I often had to finish curved surfaces of complex shape with it.
The material itself has a long service life, and by alternating elements of different colors and shades, you can create real works of art on the walls of the toilet.
By the way, if you didn’t know, the mosaic comes in different geometric shapes:
- classic square;
- round;
- triangular.
In the store, I met various varieties that differ in color and size.

Laying the mosaic is quite difficult. Although it is not sold in individual tiles, but in the form of rolls, where each individual small detail is attached to the grid. Naturally, the preparatory work will need to be carried out in full.
If during operation one or more mosaic elements have fallen off, they can be easily attached to the wall using “liquid nails”.
From myself I want to add a few brand tips. You will undoubtedly appreciate them if you decide to use ceramic tiles to decorate your own toilet:
- Do not use floor tiles for wall cladding. Floor ceramics are too heavy and often contain additional heavy decorative elements. The adhesive used to mount the tiles will not hold such elements, and they will fall off (well, if not on a new toilet or your mother-in-law's beloved cat).
- Wall tiles, on the other hand, are not suitable for floors. She is too thin and fragile. It is dangerous to lay it on the floor, as it does not have an anti-slip coating. The slightest bit of moisture - and you get a big "boom" in the toilet when someone crashes to the floor.
- It is not necessary to buy expensive tiles for finishing a home toilet, which are designed for intensive use (for example, for public toilets). Considering that many more people will go to your restroom (even if relatives from Riga come), the strength of an ordinary tile will be quite enough.
- Before buying a tile, I would advise you to make a plan of the room with dimensions, and then go to the store. Most salons will help you plan your tile layout on your computer. Often this service is free.

Option 4 - Plastic panels
To use plastic wall panels for the bathroom and toilet, I can advise those who do not want to spend a lot of money on repairs. However, this does not mean that the restroom will be ugly and unhygienic. Polymer panels do not deteriorate from water, are easy to clean and have an attractive appearance.

In the store, I bought both plain and multi-colored panels. Several times I decorated the toilet with details with three-dimensional images. It turned out very even nothing. However, this is not found in an ordinary supermarket, you will have to order individually.
The advantages of using plastic panels for finishing latrines are obvious:
- The material has a long service life. At the same time, all its technical characteristics remain unchanged, regardless of the humidity and temperature in the toilet.
- Panels keep their color unchanged.
- Due to the smooth surface, the products are easy to clean and wash with common household detergents.
- Using panels with glossy surfaces that reflect light, you can visually expand the boundaries of the toilet.
- If desired, you can pick up panels of large width and make the walls of the toilet seamless (only with corners in the corners of the room).

All polymer panel options on the market are great for toilet renovation. I can only give a few tips that are important to me personally:
- I prefer to buy products with a thickness of 8 mm for finishing toilets. It is they who are strong enough to maintain integrity under strong mechanical stress (for example, if someone leans on the wall in the restroom).
- Installing panels is much easier than tiling walls or wallpapering. They do not need to be pre-aligned, as the parts will be attached to the crate.
- PVC panels have antiseptic properties. That is, inside the crate, contrary to popular belief, mold will not begin to grow and fungi will develop, which can cause allergies or a more serious illness.
- Panels can be used not only for walls, but also for the ceiling.
- Under the walls with such a finish, it is easy and at no additional cost to hide any engineering communications.
If the walls of the toilet have already been leveled, then you can not bother with the installation of the crate at all. You can simply stick the panels on a pre-cleaned surface using mounting adhesive.
Despite the strength, the plastic bursts on impact. Therefore, I do not advise training boxing punches in the toilet.
Option 5 - Paint
This method is one of the fastest and easiest. There is hardly a person who does not know how to paint this or that surface with his own hands. Again, the paint design is only limited by your imagination. You can use different options and textures, stencils and patterns and so on.

Often in my practice, I met with cases when the paint from the walls in the toilet room peeled off and peeled off. To prevent this from happening, in addition to knowing how to paint the walls, you need to know how to properly prepare them.
I always prepare the walls in the following sequence:
- I plaster uneven walls on lighthouses;
- I apply a layer of starting putty, which evens out significant defects;
- I cover the wall with finishing putty;
- I clean the surfaces with a special mesh;
- I paint.
In principle, in terms of labor intensity, everything is not so simple, but here you can save money, since paint is cheaper than, for example, tiles or liquid wallpaper.
Option 6 - Designer finishes
Well, the last finishing option is the design repair of the toilet. The name speaks for itself. Such a design option for sanitary facilities can only be afforded by people who are not constrained by money.

The work on drawing up a sketch is carried out by a specialist in the design of premises. In his work, he can use any materials available. I helped to make repairs in the toilets, for the decoration of which were used:
- granite;
- marble;
- malachite;
- onyx and so on.
Naturally, we are not talking about cramped rooms in standard city apartments. Designers are finishing the toilets, which are part of spacious country cottages. As a result, their imagination is not limited by the area and other similar factors.
Designer finishes are characterized by the use of various accessories. I saw in the toilets and curtains, and lanterns, and other products.
And a few more points that I have no right not to mention. They will be useful to you during the repair, regardless of which wall decoration option you have chosen:
- Even if you are not going to change the toilet, you need to dismantle it before starting work.. So it will be more convenient for you to work, and the faience product will remain intact.
- Before installing any type of finish, I recommend impregnating the walls with special antiseptics..
- Skirting board for the joint between the walls and the floor, buy with a hidden mount. It looks more aesthetically pleasing in combination with any kind of finish.
- Do not combine more than two finishing materials in one toilet. It will turn out clumsy and ugly.
- You will need power tools to carry out repairs. If you are not a builder, you do not need to buy them. It's easier to rent. Now many stores provide this service. And quite inexpensive.

- If your toilet is small, I recommend giving preference to solid colors without patterns..
Well, the last. Do not be lazy and do not spare money and change the sewer and water pipes to polymer ones (if you have not done this before). After all, it will be very disappointing to destroy the beauty you created in the event of a sewer break.
Conclusion
Here are the options for decorating the walls in the toilet, we argued with our son. A definite conclusion was not reached, since each option has both advantages and disadvantages. If you have already finished or are just planning repairs in the restroom, write in the comments how you decided to decorate the walls. This will be of interest to many readers, perhaps I missed something interesting.
And if you don’t want to write, watch the video in this article. There you can find many interesting points regarding the repair.
Traditionally, the toilet is one of the smallest rooms in the apartment. At first glance, there is nothing complicated in its decoration, but this is not entirely true. The appearance of the bathroom affects the overall impression of the apartment. No less important will be the provision of convenience and comfort in it. It will be rational to use the available square meters to the maximum, which should be thought out and calculated in advance.
The best options for wall decoration in the bathroom
Due to its specificity, the toilet room requires the use of suitable finishing materials - moisture resistant, easy to clean, durable. Consider the most popular of them, traditional and come into use relatively recently.
Tile
This finishing method can be considered classic. Ceramic tiles have a number of advantages: moisture resistance, ease of cleaning, long service life, strength, reliability, aesthetics, hygiene, the ability to choose a variety of combinations in the design of walls. The disadvantages of such a coating include a rather laborious laying process, more significant material costs and the need for even walls.
If you need to first level the walls, then the order of laying the tiles is as follows:
- Align the walls with , then , and finally .
- We mask engineering communications - it is better with the help of plasterboard sheets on the crate, on which we put tiles on top.
- We are engaged in the actual laying of tiles, trying to do it evenly and in accordance with the details with each other.
- We overwrite the seams with a special grout.
Decorating a toilet with a mosaic is also quite time consuming, but it allows you to achieve very different effects - in combination with tiles of a regular size, or by itself. Mosaics can be used to create entire artistic canvases, which will give the toilet uniqueness and exclusivity. It is sold in rolls and comes in different shapes - square, round, triangular. Before working with mosaics, it is also necessary to prepare the walls accordingly.

Now the so-called 3D tile has come into fashion - a special combination of tile and carbon film, on which the effect of a three-dimensional image is obtained. This solution contributes to the visual expansion of space, although it does not apply to budget ones.
Tiling involves the use of its elements strictly for their intended purpose. You can not use floor tiles in wall decoration - they are too heavy and can fall off at the most inopportune moment. It is also not recommended to lay wall tiles on the floor - for such a purpose it is thin and fragile, moreover, slippery, which can be fraught with falls and injuries at the slightest increase in humidity.

You can choose tiles with standard strength, since at home they are not subjected to such heavy loads as in public places.
Paneling
Paneling is one of the budget options for decorating toilet walls.
Plastic panels are moisture resistant, easy to clean with conventional products, easy and quick to install, you can choose different colors and combinations of patterns.
In addition, PVC panels can sheathe uneven walls, as well as hide communications under them. But their resistance to mechanical damage is not so high, moreover, in most cases, preliminary wall lathing is required. And for small rooms, this is contraindicated, as it steals part of the usable area.

If the walls in the toilet were previously leveled, then you can do without the crate, and install the panels on a pre-cleaned surface using mounting glue.
Alternatively, you can use MDF or wood panels, but they are suitable for more or less spacious rooms, and besides, they are more difficult to clean, as these materials tolerate moisture less well.
Wallpapering
One of the inexpensive options for decorating the walls of the toilet is to paste them with wallpaper. It is highly desirable to choose washable wallpapers - they are resistant to moisture, temperature changes and household chemicals.

In general, the choice can be made from the following types of wallpaper:
- paper - it is better to choose models with a hydrophobic layer in order to be able to perform wet cleaning;
- vinyl - durable and safe, you can find many colors and patterns. In their structure, smooth or foamed canvases will be more practical, which will facilitate their washing;
- fiberglass - beautiful, resistant to moisture, fire and detergents. But this type of wallpaper will cost more than others.
The liquid wallpaper
Finishing the toilet with liquid wallpaper is a new type of wall decoration that is easy to use and resistant to moisture. Liquid wallpaper is sold in the form of a powder, from which a solution is made that fills cracks and flaws in the wall. Therefore, you can do without preliminary alignment. The solution is applied with a roller or spatula to any surface. The composition of the powder may include fibers of cotton, wool, cellulose, mica. Liquid wallpaper does not crack or peel off even with temperature changes, in addition, it can be produced in different colors and with different textures.
Wall painting
The interior decoration of the restroom with paint is an affordable and quick finishing option for most of our compatriots. There is a wide choice of paint on the market, in addition, you can use all kinds of stencils and patterns. It is better to choose latex-based paint, as it is easy to care for, it is resistant to moisture and dirt. But the coloring will look good only on perfectly flat walls. To level them, you must first plaster, then apply the starting putty to level significant defects. At the end, finishing putty is applied and the surface of the wall is cleaned, after which painting is already carried out.

Designer wall decoration
People who are not limited in funds can decorate their bathroom with more expensive finishing materials. These are granite, marble, onyx, malachite, "front brick", pebbles on a grid, tempered glass and the like. But such materials are best used in fragments, since not all are easy to clean due to their structure.
A new fashion trend - plants on the walls, moss or greenery, looks unusual, but quite expensive and not so easy to care for. You will need a special irrigation system built into the bathroom.
A good option would be to combine several types of finishes on the wall. For example, the bottom, which is most exposed to pollution and, accordingly, needs frequent wet cleaning, can be finished with PVC panels, and the top with wallpaper or other material that you like. The original combination will come from mosaic and ceramic tiles.

Finishing the floor and ceiling in the toilet
Since the plumbing room is characterized by somewhat high humidity, it is also better to finish the ceiling and floor from waterproof and durable materials.
To finish the ceiling, you can use:
- tension structures are not a cheap option, but they are aesthetic, non-toxic, durable, hide irregularities, are resistant to moisture and temperature extremes;
- suspended plasterboard structures are a less expensive option, which also hides irregularities and communications. Such a ceiling has excellent sound and heat insulation, is resistant to temperature changes, and is easy to care for;
- slatted canvas - fastened to the installed mounting system. The material is durable, resistant to damage, but expensive;
- plastic panels - have many of the advantages described above, but a nice bonus is the availability of finishes at a price and ease of installation;
- plaster - the easiest way to decorate the ceiling, also not expensive. If desired, the ceiling from above can be painted with moisture-resistant paint.
At the end of the finishing work, you can take up the floor. The best choice would be a tile specially designed for flooring - it is quite durable and non-slip, moreover, the most hygienic, comfortable and easy to clean.
Not so long ago, a novelty appeared in the interior - self-leveling 3D floors, consisting of a polymer material with a 3D image and a protective transparent PVC layer. Due to their high cost, they are popular in bathrooms, and create amazing effects, embodying any fantasy of the artist and customer.

Self-leveling 3D floors
Color solutions in the interior of the toilet
When choosing a color scheme for a sanitary room, first of all, you should remember the old truth: dark colors narrow and reduce space, while light colors expand, visually increase. Therefore, the first thing to consider is the size of the room. Since in most apartments the toilets are just small in size - usually 2-3 square meters - you should give preference to light finishing materials with a little addition of darker or brighter colors. A toilet completely decorated with just one color looks uncomfortable.
A narrow and long toilet can be visually expanded and lowered using a horizontal division into two parts. The bottom of the wall is decorated with a darker or brighter color, and the top is lighter and more neutral. A horizontal strip along the wall visually brings the ceiling closer, and a vertical one moves it away. There can be several such strips, and not necessarily solid.
The second color can be added using an accent area, which is created not only with the help of a finishing material of a different color, brighter, but also with another material.

In order for the toilet to be in the same composition with the overall design of the apartment, it is most rational to organize most of the decoration using neutral tones and dilute it with bright accessories to match the overall design.
You can make the room look less tall by using a piece of material in the wall decoration of the same color as the floor - for example, narrow strips of tiles on the wall, the same as on the floor.
Location of furniture and fixtures in the bathroom
Traditionally, the toilet is located at the opposite wall from the entrance, exactly in the middle. If the area of the room allows, then you can additionally install a small sink for washing hands in the toilet. Fortunately, today the market has plumbing of various shapes and sizes. If there is an area on the sides of the toilet, but it is not enough to install something else, then you can move the toilet to one of the walls. Thanks to this rearrangement, you can free up valuable space for something else. Additionally, you can install a washing machine or bidet in the toilet - if desired and necessary.
A corner toilet will work well with a corner sink, which is useful for small spaces.

Ideas for disguise and additional convenience in the toilet
The modern finish of the toilet takes on a complete look with the final organization of the interior. Having thought over the disguise of communications that are in plain sight, and furnishing the toilet with as comfortable furniture as possible, we will get a comfortable and convenient bathroom in which it is pleasant to be and satisfy household needs.
You can mask pipes and hoses using a special box made of plastic or drywall, utility cabinets or roller blinds.
In the event of leaks, the pipes must be quickly accessible. An inconspicuous hatch is suitable for this, although it can be distinguished as a separate interior accent on the wall surface. Above the box, you can organize shelves or niches for storing all kinds of little things or decorative elements.
If space permits, you can put some useful furniture in the bathroom. Instead of a regular sink, you can put a sink with a cabinet that can accommodate a lot of useful things. A rack or a cabinet, a cabinet can act as additional storage space, especially if there is not enough space in the apartment. You just need to remember to choose furniture and accessories in accordance with the chosen interior style. A mirror on the wall will visually expand the room and act as a useful addition to the sanitary room.
Taking into account all of the above, there are many comfortable, functional and aesthetic options for finishing the toilet room. You can bring to life any interior, from classic to unusual, with the help of modern materials, ideas and imagination.
For every home master, do-it-yourself repairs are a matter of special pride. However, what to do if the owner of the apartment has no experience in construction and finishing work? In such a situation, it is better to refuse to carry out repairs in the living room and in the kitchen with your own hands. To gain the necessary experience in renovating premises, you can start small - clean up the toilet.
This choice is quite logical, since the bathroom is the smallest among the premises of the apartment. In addition, a wide variety of materials are offered on the market, which allows the home master to implement absolutely any design when performing repairs in this room. Ideas for decorating the toilet can be found on the Internet. Even if the repair in the toilet with your own hands fails, there is always the opportunity to turn to real professionals. They will fix all the bugs in the design of the toilet and make the room beautiful.
When creating a toilet design, many apartment owners use material such as plastic panels. They are inexpensive, and with their help you can independently repair the bathroom.
Types and characteristics
PVC panels are made by forcing the initial liquid mass through a forming hole. As a result, air space is formed in the panels. This feature of the material ensures its low weight. Manufacturers produce plastic panels in the following sizes:
- width - 12.5-50 cm;
- length - 260-300 cm;
- thickness - 8-12 mm.
According to such a criterion as the scope of plastic panels are divided into wall and ceiling. The former are distinguished by higher strength characteristics and have good resistance to mechanical damage. If we talk about ceiling, then their feature is good flexibility and minimal weight.
Many people, when it comes to bathroom renovations, opt for PVC slats. They make such a decision, focusing on the advantages of this material. Among his most significant virtues can include the following:

Disadvantages of PVC panels
Like any material, PVC panels have certain disadvantages. It is worth knowing about them for apartment owners who have conceived DIY bathroom decoration.
When the toilet is finished with this material, it is fixed on the rails. As a result, the free space in the room is reduced. This is especially not liked by those apartment owners who have standard separate bathrooms.
If your apartment is subjected to a flood, then the task of drying the room will become quite difficult. Water will easily seep into the interpanel seams, and it will evaporate for a long time. This can lead to the occurrence of such unpleasant phenomena as mold and fungus. In some cases there is a need for partial dismantling of the panels.
The choice of plastic panels for finishing the toilet
 Each apartment owner, when performing repairs, of course, strives to get an interesting design of the room as a result. Such a desire arises not only during the repair of the living room, but also when the lining of the toilet is carried out, which should also look attractive. Many people opt for plastic panels, which are inexpensive and easy to install.
A beautiful toilet can be obtained if you approach the task of choosing it correctly. And to do this is not so easy. And it's not just that there is a wide variety of PVC panels on the market. Often unscrupulous sellers offer defective products. In order to buy really high-quality material, it is necessary when choosing plastic panels to remember the following recommendations:
- plastic panels that will be used to decorate the toilet in your own apartment should be made of PVC with additives that increase the elasticity of the material. The smaller they are, the more brittle the plastic is. The presence of additives in the composition of the material can be determined in a fairly simple way. It is necessary to take the panel at arm's length and begin to bend. Do this until you feel strong resistance. If the plastic has high quality characteristics, then it can be easily bent into a ring. The worse the quality of the material, the smaller the bending radius;
- When choosing PVC panels, you should pay attention to the material from which the lamellas are made. It should not emit any odors. If you feel a chemical smell, then you should refuse to purchase such panels and look for something else.
How to sheathe a toilet with plastic panels?
Finishing the toilet with plastic panels with your own hands is not a difficult task. If you have the skills to work with a tool, then you can easily master the installation of PVC panels. Competently carrying out this work will allow you to create an interesting design in the toilet. To make your wish come true - make quality toilet repairs in the apartment, you need to find free time in your schedule and prepare the necessary materials and tools before starting work.
Of course, in order to create a beautiful toilet in your apartment, you cannot do without materials and tools. To cover the toilet with plastic panels, you will need:

Do not immediately rush to the store to purchase panels. First, you should measure the area of \u200b\u200bthe toilet in which you plan to carry out finishing work. When you receive material calculations, then 15% should be added to this amount, which will be used for cuts.
Preparatory work
Covering the toilet with PVC material for many apartment owners is the best solution when renovating a bathroom. For to make everything go smoothly and in the end you got a beautiful toilet with an interesting design, repairs in this room should begin with preparatory work. Experts recommend that the first step is to remove the old finishing material from the walls. This will slightly increase the usable space of this room.
Even before the start of work, work should be carried out to replace water pipes and electrical wiring. Walls before installation of the material should be treated with a primer. Choose a primer that has antibacterial properties. In this case, at high humidity, mold and fungus will not appear on the walls under the panels.
Before you start working with plastic panels, you should also think about where the sink and cabinets will be placed in the bathroom. In these places, additional strips should be provided. It is on them that the accessories will be fixed. Before doing material installation, it is necessary to keep the lamellas at room temperature for several hours.
How to finish the toilet with plastic panels: installation
 The first step is to fix the aluminum profile rails or plastic rails on the wall. In a horizontal orientation, the installation of a wall crate is performed. The ceiling is laid perpendicular to the direction of laying the material. A step of 50 cm is maintained between the guides. Some designers opt for a diagonal fastening of the material. If you like such an original design option, then you should know that its implementation will lead to an increase in material costs.
You can immediately fix the U-shaped corner profiles. Next, the first panel is carefully inserted and fixed with prepared self-tapping screws. Some craftsmen use a construction stapler to secure the panels. . However, this type of fixation can only be used in relation to the wooden crate, which is a completely unsuitable material in the toilet.
Next, step by step, you should fasten the following panels, which must be pressed very tightly to the previous ones. The crucial moment when installing PVC lamellas in the toilet is the fastening of the last panel. An accurate calculation of the remaining width must be made. If you do not pay attention to this moment, you can ruin the entire structure.
You can proceed to work such as lining the ceiling in the toilet only after all the work on mounting the panels on the walls has been completed.
If your plans include spot lighting in the toilet, then you need to cut holes according to the size of the lighting fixtures. In addition, it is necessary to make holes in the installation sites of sockets and switches, as well as ventilation pipes. Cutting material for wall and ceiling decoration must be done from the front using a jigsaw or hacksaw with a tooth pitch of 1 mm.
When the panels are fixed, you can proceed to install the decorative plinth. You can choose products made of plastic or ceramic.
Conclusion
 When repairing a toilet, many apartment owners choose PVC panels for surface finishing. To get a beautiful finish of the toilet with plastic panels, photo design projects on the Internet should be studied first. This will help determine the design of the room.
It is not difficult to create a beautiful toilet in your home. Just need to find free time and prepare materials and tools. High-quality repair of the toilet with plastic panels will allow you to get an aesthetic design of this room. Its original design will be a source of pride for the home master.
Finishing the walls of the toilet with plastic


