Decorative wall covering with your own hands. Do-it-yourself decorative plaster - we make it from ordinary putty. How to make decorative plaster from ordinary putty
Russia, Moscow region, Moscow +79041000555
Applying decorative plaster with your own hands: video, methods and rules for performing work
It takes ~7 minutes to read

Save
External and internal walls are plastered to protect against the harmful effects of the environment and level the surface. Modern plastering techniques allow you to apply the finish so that the layer will simultaneously serve as a decorative decoration for the interior or exterior. When applying a layer of plaster or starting putty on the surface of the material, a certain texture is created, then staining is performed using a special technology. Other techniques allow you to apply a finishing layer in the form of artistic figures that stand out from the general background. So how do you do it yourself? We will tell in this article (video at the end).

Save
Save
Decorative plaster device
To make the work done look perfect, you need to align the walls for applying a layer of starting putty. Experienced craftsmen level not only the surface of the wall, but the corners and connecting lines of the walls with the floor and ceiling. To create a 90˚ vertical angle, use a building level and a corner. The line for leveling the connection of the wall with the ceiling is applied using a beating (colored thread), which serves as a guideline for applying the layer thickness.

Save
Stages of preparatory work:
- tap the surface with a hard object (hammer) and reveal a weakly adhering coating, it is removed;
- paint, whitewash or wallpaper is completely removed from the rest of the area, cracks are separately embroidered;
- the wall is leveled with a starting mortar, while a plaster plastic mesh is glued in places of greatest thickness, if possible, then the entire area is glued. This will prevent cracking of the layer during operation;
- sometimes it is easier and faster to use sheets of drywall, which can be placed on the frame or glued to the surface along pre-exposed beacons;
- the surface is primed once with a weak solution (for deep absorption), the second time the solution is made according to the technology from the primer label (to fix the surface).
Preparation of the composition
Ready-made dry mixes are purchased in the store, designed to level the unevenness of the walls, they are packaged in waterproof bags and require dilution with water to start work. There are also ready-made, already diluted mixtures on sale that can be applied to the surface immediately after opening the plastic bucket. To save money, they buy dry mixes, after several times of training, the mass is easily mixed with water with a nozzle on a drill like a whisk.

Save
For the first time, a small amount of dry matter is diluted, since the resulting solution can dry quickly, so a large amount of the solution is not prepared. To calculate the required number of bags, a preliminary calculation is used, which looks like this:
- for plastering with coarse-grained (starting) compositions per 1 sq. m with a thickness of 1 mm takes 1.8–2 kg of dry matter, if a thick layer is required, then the norm is multiplied by the layer thickness in millimeters;
- under the same conditions, the consumption of medium-grained material will be 1.5–1.7 kg per square, while the calculated layer thickness is also taken as 1.0 mm;
- to make a layer with small dry mixtures 1 mm thick, 0.9–1.1 kg of substance will go per square area.
Water is poured into a clean container, then the mixture is poured (not vice versa), water is used at room temperature. For proper kneading, the entire amount of dry matter should be poured at once, if the solution is thick, it is better to add a little water. It is worse to add a dry component to a liquid solution, since lumps that are difficult to break are obtained.
After stirring, wait about 1 minute and use the mixer again. Sometimes color pigments are added directly to the finished solution or paint is applied to the finished layer.
Applying plaster to the wall
After careful preparation of the wall and preparation of the mortar, do-it-yourself decorative plaster is made, a video of the process can be viewed below. The finished starting composition is collected on a spatula and applied to the wall. Experienced craftsmen work with a large tool (60-80 cm), it is more convenient for them to smooth the surface. For those who do the work with their own hands for the first time, it is recommended to start with a spatula 45 cm long and additionally use a cap spatula, the width of which is 6–8 cm. They remove excess mortar from the handle of a large spatula and shift the mass closer to the edge of the working surface.
The thickness of the mortar layer on the wall is adjusted during application, trying not to apply too much, but not to shave so that surface defects will be visible. The work consists in applying the entire mass at a time, since you need to have time to apply the drawing before the solution completely solidifies. During plastering, a grid is applied, if it is in pieces, then it is glued with overlaps.
Method for obtaining a decorative pattern by rubbing

Save
They take an ordinary trowel and rub the surface until the solution on the wall has completely set. . For drawing a picture, there are certain technologies:
- Rain is obtained after rubbing the area with a plastic trowel with vertical movements (up and down), sometimes the direction of the rain threads is made oblique, for this the movements are changed to oblique. To keep the rain threads straight, use the markings with thin masking tape.
- The decorative lamb pattern is obtained by rubbing the base with short circular motions, which will result in a pattern resembling curls of lamb's hair.
- There is also a technology of movements, which will result in a carpet pattern. To do this, select a small area and move the trowel first with vertical movements, then they are replaced by a horizontal direction.
If at one time it is not possible to make the entire wall, then the drawing is not done until the very border of the material applied today. After the plaster is done, the edges are joined on the next area, only after that the selected pattern is applied.
Applying a coloring layer
Before painting, the surface is sanded to smooth out too sharp transitions and defects, this is done after the solution has dried - in about a day. Sometimes thick layers do not dry out and look like dark spots, you need to wait until it dries completely. To speed up, you can turn on the heat fans by directing the jet to the problem area. After sanding, before painting, the walls are treated with a layer of soil.
Usually the first layer of paint is made darker, the second is applied lighter, but after the first has completely dried. They paint with a dark color, carefully filling in all the cavities and irregularities, using a brush for this. And the second one is placed so that only convex elements fall into the working area, and the depressions are not affected.
Textured plastering device
Such dry mixes in bags or ready-made solutions in buckets are purchased at hardware stores. Mixtures dry more slowly, so you can prepare the mortar in a much larger container and treat the wall surface at a time.
Finishing
The alignment of the walls is done with coarse-grained mixtures intended for large thicknesses, and the textured mixture is already applied to a flat surface with a layer of about 3 mm. The material is applied with a spatula. After applying the mass, without waiting for it to set, a textured layer is applied using various devices.
Options
To do this, use the following tools and devices:
- rollers;
- stencils for stamping;
- spatulas and trowels;
- crumpled rags.

Save
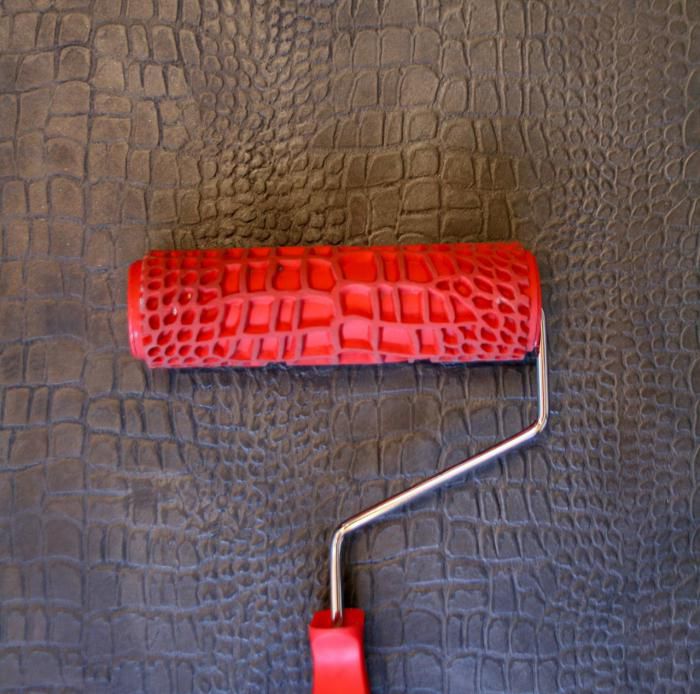
Each method takes a little practice, so it's best to try covering the surface somewhere inconspicuous. It is convenient to work with a roller, since with the help of its textured sides you can apply small and large drawings. The complexity lies in wait for the master, who decides to make such a texture with his own hands, in that when the roller moves, the structural putty is pulled together with a thin layer in the direction of travel - at the end of the work, an unexpected thick layer of material is obtained.
To avoid such a nuisance, before applying the textured mass, the wall is divided into strips or squares using masking tape 3 to 5 centimeters wide. The plaster is applied to the space between the tapes, then processed with a roller, while the excess mass is on the tape. The strips are removed, after the total area has dried, the cavities are filled and again passed with a roller. Sometimes even squares, rhombuses or stripes look advantageous even without filling, creating a kind of decorative composition.
It is more convenient to work with stamps: they are imprinted into the soft surface of the layer with a selected frequency, while observing the depth of indentation. Ready-made stamps can be bought at the store or made by hand, embodying a pre-conceived idea. After the material has dried with a spatula and a float, unsuccessful and protruding elements are removed, and then the surface is primed before painting.
You can use various materials at hand for texture, for example, an old rag is wound onto a roller and passes are made over the area. It turns out a kind of pattern that imitates the surface of marble veins, only convex. Do not forget after a short pass to clean the roller from the accumulated putty, change the rag.
The painting of the surface with the applied textured pattern is done after the layer has dried, the correction of unsuccessful bulges, and the obligatory primer. The entire surface is painted with one color, irregularities give a shadow, the texture is emphasized in a favorable color. Sometimes two-tone coloring is used according to the principle of dark depressions and surface tinting of convex elements. Layers are applied at intervals necessary for the previous one to dry.
How to make figured artistic plaster
To perform such a drawing, you need to evaluate the chosen design of the room and decide on the placement of the artistic drawing. Some types of interior developments do not provide for the insertion of stucco molding (which, in fact, is an artistic plaster finish). But artistic drawings on the walls will decorate any room in the classical style, baroque, rococo and other interiors. Save
If the performer of artistic plastering with his own hands cannot independently draw a picture on the wall, then stencils are used, which are made of plywood, hardboard, chipboard, MDF, OSB and other remnants of building materials that have a thickness. A pattern or repeating elements are cut out in the plane of the material, which will then be applied to the wall area.
The stencil is carefully attached to the surface. If the thickness of the sheet is small, then you can use adhesive tape, but more often after applying the putty, the device begins to move under weight and spoil the pattern. It is recommended to use a fixing adhesive. Putty is applied in an even layer inside the pattern, trying not to impose excess material on the body of the stencil.
The thicker the stencil, the more the pattern will protrude above the wall surface. The device is removed carefully, without damaging the edges of the pattern. If this happens, then using a soft putty, you can correct the pattern with a thin spatula, fingers or a brush. The coloring of the picture takes place according to the intended palette, including the imagination of the master.
SaveStucco molding requires an initial level of skill from the performer. The putty is applied to the wall with the help of the hands, then any figure is formed from it directly on the square. Often the corners in the room are decorated with decorative branches, curly leaves, and window and door slopes are also decorated. In the nursery, on the walls and ceiling, you can depict your favorite characters from fairy tales and cartoons, make a flower wall.
Drawings are made on a smooth background or placed on plaster. Sometimes, to complete the composition, the drawing is framed with an artistic frame made of a ready-made foam plastic frieze, then you get a real picture on the wall, made by yourself.
Do-it-yourself home repairs are always a source of pride for the owner and his household, and the creative process itself sets a person up for good deeds and accomplishments. Decorative, textured and artistic plaster will unite loved ones even more and become the basis of coziness and comfort in the house.
Video: how to make decorative plaster from putty with your bunches
Do-it-yourself decorative plaster from ordinary putty is gaining more and more popularity as an affordable type of finish, since almost everyone is looking for a middle ground when making repairs in their home, and the best price-quality ratio.
Advantages of homemade plaster
Modern repairs are expensive in terms of both purchased materials and hired labor. The work of a plasterer-finisher costs a lot of money. The desire of everyone to save money is understandable and reasonable: no one wants the repair to drag on for many months, if not years, because of the high cost of the material and the work being done. So that he does not become a family curse, you need to look for the most rational way out of this situation. However, the solution is obvious: to make the material yourself. It is this option that will suit the vast majority of people who want to make an inexpensive and beautiful repair of their apartment.
There are plenty of tools for this, and it’s not difficult to purchase them - there would be a desire to complete the pattern.
The use of textured and structural rollers
 An easy way to make textured plaster from ordinary putty with your own hands is to use a special roller. Getting the desired quality of finish in this way is quite simple.
Depending on the working surface, this tool produces the desired result - a coveted pattern on the wall.
Rollers differ in the material of their manufacture:

 In addition to the listed rollers, there are also tools made of foam rubber, fabric, polyethylene, with a spirally fixed cord. With their help, you can achieve a rough surface with a pattern.
Important! Do not press too hard on the tool while working - a clear drawing is obtained only with minimal effort. The tool must be driven from top to bottom without stopping, firmly pressing against the already finished strip.
These tools fall into two categories:

Homemade finishing tool
It is not necessary to use only those tools that are sold in stores. With junk materials on hand, you can make a roller that will create an unusual, unique pattern.
You can use, for example, a finished roller, but make your own adjustments to its design. Examples:

There are as many options for such home creativity as you like: polyethylene, twine, rope, threads are used. The foam roller can be cut into abstract shapes, slits, etc.
Important! When working with structural and textured rollers, you need to work smoothly, without making sudden movements.
Other Required Tools
You can apply the pattern using other devices:

In addition to the listed tool, you can use a lot more, from a brush-brush to a Venetian trowel (trowel). Even a simple broom can give a wall a unique pattern.
Decorative plaster from ordinary putty
Of course, you should not discount simple types of finishes, which are quite attractive in appearance, using the most common putty, both starting and finishing. How to make textured plaster with your own hands? Very simple, and this option is widely used in recent times. “Branded”, ready-to-use putty costs about three times more than regular putty, and it will not be difficult to make it yourself.
Now let's talk about how it can be done and how to work with a homemade mixture.
Materials for decorative putty plaster:
- PVA glue - 200 g
- Gypsum-based mixture - 6 kg.
- Water - 2l.
 First, we apply a layer, which is called the main one - this is done with a wide spatula. When this layer dries, we proceed to decorating. There are many ways to create a textured surface. You can apply the composition with spatulas of various sizes and textures - from smooth to jagged. They can be combined.
You can do this with one spatula, applying strokes in different directions. Even the most ordinary broom, as already mentioned, is used to create a pattern, and the result is achieved when impressions are made on plaster with a broom - from chaotic to strictly directed strokes.
There are many ways to apply, you need to either choose the one that you like.
Applying decorative putty
Each of us would like to get a beautiful appearance of our own home at minimal cost. One of the easiest methods to get what you want is to buy finishing putty. It is the finishing one, if the purpose of the finish is a soft texture.
There are many ways to get a beautiful surface when using decorative wall putty. Here is one of them, quite popular.
Tools:
- Brush-brush.
- A napkin rolled into a cone or a trowel (trowel).

 Still, it’s better to work together, because you need to do everything quickly, preventing the mixture from drying out prematurely so that transitions are not visible. After all, one of the main advantages of this finish is the absence of joints on the surface.
Of course, this option is far from the only one. It's all about your personal preference and taste. Your imagination must work for you!
Various application methods
How to do:
- The plaster is dried before painting.
- If there is such a need, it must be processed with fine-grain sandpaper.
- The paint is applied in two layers. The base layer - a dark shade - is applied with a long pile roller.
- After complete drying - a lighter color. The roller is short-haired.
Painting methods:

 Everything will depend on the drawing. In any case, the background paint is applied in two layers. After finishing work, two layers of varnish are applied.
Of course, the home-made composition is simple to manufacture, and gypsum-based mixtures are inexpensive, but they will not replace 100% branded decorative wall putty, which includes marble and granite chips. In no case should it be compared, for example, with Venetian plaster, which is applied only by masters, and even then not by everyone. Nevertheless, the option described above is available to anyone who wants to add variety to the interior of their home. It will give odds to both wallpaper and painting both in appearance and durability of the coating.
The order was for painting and plastering work in the kitchen with an area of 8 sq.m. It was necessary to plaster, plaster the walls and apply decorative plaster. The master did everything carefully, I liked the quality. Satisfied. There was a technical break - they were waiting for the walls to dry. Decorative...
The plastering was also done fairly quickly. It was critical for me to do everything on time until the end of September. Master requirements withstood. Everything is fine.
Grade 5Pros: In 9 days, on an area of 100 m2, we got: perfectly aligned walls, snow-white ceilings and columns, mother-of-pearl decorative wet silk plaster and textured travertine plaster, divinely glued designer vinyl wallpapers with a selection! Bonus Lyudmila restored to...
voluntarily started slopes in the bath, after the door vandally installed by installers. We got all this luxury for adequate money, according to a predetermined estimate. Cons: They simply do not exist Description: I want to express my deep gratitude to Lyudmila for the implemented design project! Lyudmila owns all types of decorative plastering and works with different manufacturers of decorative coatings, skillfully combining them, so for little money, a very effective repair of walls and ceilings came out. The master is really of the highest level, the work was done ahead of schedule, for absolutely reasonable money. In the course of work, one could come to her for advice on the best and how to do it, they always received a qualified answer. Luda has a very economical approach to materials, almost everything is left, and even wallpaper (of which very few were bought))). There is nothing to say about the order after the repair, by itself everything is clean and tidy. For many years of building a house, for the first time we encountered such a golden man, we really had a Perfect renovation. I recommend it to everyone, you will not regret it, the master - deeds and words! Hurry up, otherwise I'm afraid Luda will soon be snapped up!!!
Grade 5+It was necessary to perform decorative plastering of the ceiling in a room of 20 sq.m, install moldings and a backlit cornice. Andrey Valentinovich did an excellent job! All stages of finishing were observed. Before starting work, the master presented a 3D visualization, how the rooms will look...
finishing. Also, the master carried out a competent calculation of finishing materials. In the course of work, Andrey Valentinovich proposed design solutions that hide the flaws of the walls. The work was completed on time, payment was after the completion of all work, without prepayments. We were very pleased with the result of the work. Our ceiling is now a work of art! Many thanks to Andrey Valentinovich!
Grade 5+Our order was for decorative plaster and ceiling painting. Foreman Eduard Gennadievich worked for us. Excellent master, hands grow from the right place. He worked calmly, in no hurry, measuredly and professionally. The result makes us very happy. Thank you master!!!
Grade 5I really enjoyed working with Ilya. Chose a specialist for his work. In the photographs of his work, I saw what I wanted to see in my new apartment. I turned to Ilya for applying decorative plaster on the walls. I liked that Ilya very responsibly, competently and creatively approached...
task. He promptly arrived at the site and took all the measurements, provided several options for painting, constantly kept in touch with us. Ilya proved himself to be a high-class professional, although the cost of this service is far from being the highest. He offered his options, carefully listened to our wishes. In a lively discussion, the final version was born, which suited all family members. We are very pleased with the result. Ilya is a polite, intelligent, pleasant young man. Understands and feels the customer without further ado. A true professional in his field. Anyone who is still looking for a specialist in decorative plaster, do not waste time, contact Ilya.
Grade 5+Natalia, Lyubertsy, Kotelniki
Order services: Decorative plaster.
I placed an order for dismantling the wall from decorative plaster and preparing the wall for a new application of a decorative element on the walls. The master arrived, told us that we were wrong and in fact on the wall we don’t have a Venetian, but decorative plaster covered with craquelure varnish. Reassured me...
He said that he would complete the task, he immediately said how. At the same time, he did not at all "powder his brains" about how difficult and difficult all this is. I just sat down and relaxed, and the master gave the result within 1 day. The work and professionalism of the master, estimating it as the maximum possible according to any of the ratings! He is smart!
Grade 5+With the help of decorative plaster, it is easy and simple to create expressive and unique patterns on the surface of the walls. Admiring the showiness of the facade, we can conclude that only specialists can perform such a task. However, it is not. The main role in the creation of original reliefs is played not by the skill of a specialist, but by the material used by him: decorative plaster.
Types of decorative plaster
Its composition includes special substances: fillers. They help create a beautiful drawing. No special and expensive tools are required for this. But it is necessary to choose the right plaster mixture and know the technology of its application.

The composition of decorative plaster mixtures differs from the composition of ordinary ones not only in the presence of a filler. If the material is intended for facade (exterior) work, it also includes additional components that provide increased resistance of the facing surface to moisture, temperature extremes, and ultraviolet radiation.
Drawing effects that can be obtained using special techniques for applying decorative plaster:
- aging;

- cracking;

- adding volume;

- rough surface texture;

- "silk";

- planes with different relief depths.

There are three types of decorative plasters:
- mineral;
- textured;
- structural.
All of them have their own characteristics both in terms of composition and application rules.
Mineral decorative plasters

The basis of mineral plasters is natural. As a filler, crumbs and dust of various valuable types of stone are used: granite, marble, onyx, malachite. Included quartz sand of different grain sizes. Cement and gypsum act as a binder. Cement-based plasters are classified as facade. Mixtures with a gypsum binder are used exclusively for interior work.

Mineral decorative plaster "Bark beetle" 2 mm. Premium quality. For outdoor work

All types of mineral plasters must be prepared for use by adding the dry mix to water in the proportion indicated by the manufacturer.

The finished mixture can be applied to the wall in several layers. The final stage of work is waxing or staining. Wax serves as a protective and decorative coating.

Since all types of mineral plasters are diluted with water, they do not have a long "lifetime" of the batch. Therefore, it is recommended to cook so much of the mixture so that it can be worked out before it starts to harden. One of the advantages of mineral dry plaster compositions is that they have a much lower price than ready-to-use acrylic ones.
Textured plasters

Textured plasters are dough-like mixtures that can be tinted to any color during kneading, or coated with paint after the top coat has been applied and hardened. This type of plaster is characterized by unsurpassed plasticity, which allows you to create real masterpieces on the walls.

This effect is ensured by the mixtures of natural fibers included in the composition, which can be cotton, linen, wood. Some manufacturers use ground brick as a filler. With the help of mixtures of this type, you can create relief paintings, bas-reliefs and panels.

The popular "Venetian" plaster is not a separate type of decorative plaster, but belongs to the category of textured mixtures. It is called "Venetian" because of the special composition, which allows the use of a special application technique, which provides a spectacular wall pattern.

Structural plasters
Plasters of this type are heterogeneous granular masses. Potassium silicate (silicate plasters), synthetic latex (latex plasters), cement-lime composition act as a binder. There are two types of structural plasters:
- water based;
- solvent based.
Hence the classification of these mixtures: water-soluble and organic. The main representatives of this type of finishing mixtures are Bark beetle and Fur coat.


They are most often used in the decoration of facades. The reason is simple: these mixtures are easy to apply, form an attractive surface pattern, and have excellent wear resistance. In addition, they have another advantage: an affordable price.
To dilute organic mixtures, white spirit is mainly used. It should be noted that it does not dissolve anything in the plaster mass. He just dilutes it to the desired consistency. Therefore, experts call any liquid introduced into the finishing composition not a “solvent”, but a “diluent”.

Acrylic plaster "Ceresite"

Stone plaster "Ceresite"
Among structural mixtures, acrylic plaster is the most popular. Its distinctive feature is that it is ready for use immediately after purchase. These mixtures do not need to be diluted with water or solvent. This fact is their undoubted advantage. In addition, acrylic plasters are much more elastic and durable.
They have higher adhesion (adhesion to the base) than mineral and solvent-based structural. Acrylic can be applied to almost any surface: wood, brick, concrete, aluminum.
In sealed packaging, acrylic plasters retain their properties from 6 months to 1.5 years. Some manufacturers produce mixtures with a shelf life of up to 2 years. Another advantage of acrylic compositions is that the walls treated with them can be painted.

"Small bark beetle", decorative acrylic plaster for indoor and outdoor use

The only drawback of these mixtures is lower vapor permeability than mineral ones. However, it is sufficient to use this material for the installation of a "wet" facade, which is also a heat insulator.
Specifications
Prices for various types of decorative plaster
Decorative plaster
Techniques for applying decorative plasters
Mineral plasters must be prepared for use by diluting with water. On average, up to 30% liquid is required. All manufacturers indicate the required proportions on the product packaging. Mineral mixtures are applied in two layers.
The use of any plaster compositions requires careful surface preparation. The walls must be inspected for deep cracks, to make sure that the bearing surface is strong enough and does not require major repairs.

The next stage of work is priming. To accomplish this task, deep penetration primers are used, designed for external finishing work.

Plastering of the facade starts from the corner of the building. The work is carried out in stages, gradually applying the mixture to areas of a small area. The first layer is the base. It is applied with a spatula in such a way as to avoid overlaps and to obtain as even a surface as possible. For leveling, you can use a spatula with a wide blade or a rule.

The main work on decorating the facade takes place at the next stage of work: when applying the second layer.

Tools for creating a decorative surface
For applying decorative plasters, special textured rollers are used. They differ from ordinary ones only in that they are equipped with rollers with a relief surface.

Depending on the material of which the roller consists, there are several types of rollers:
- wooden;
- rubber;
- plastic;
- leather;
- pile.
Standard sizes:
- with roller width up to 30 cm (short rollers);
- with roller width up to 50 cm (medium length);
- with roller width from 50 cm (long rollers).
It is conditionally possible to divide all types of rollers into textured and structural. The latter have a more embossed surface than the former. Textured are designed to create an imitation of marble, natural stone, textiles. Plasters "Bark beetle" and "Fur coat" are applied with textured rollers.
Structural rollers are designed to obtain a pronounced relief pattern, consisting of a repeating rather complex pattern. Outwardly, it creates the effect of voluminous wallpaper. The decoration technique using these tools is more complex than when using textured rollers.

Structural work requires the utmost care and attention. The rollers of these tools are usually made of wood or plastic. The use of such rollers requires compliance with several rules.
- Surface decoration is performed on the base, already frozen and leveled layer. For application, a liquid batch is used. If you work with a dense composition, the recesses of the relief texture of the nozzle will quickly fill with a mixture, so you will not be able to get a pronounced pattern.
- The pattern is applied in stripes, rolling the roller in the direction from bottom to top or from top to bottom.
- Each next strip should fit snugly against the previous one, but not overlap it.
- When decorating walls, they try to avoid pressing on the roller. In this case, the relief of the pattern will be of the same depth.
- During work, the surface of the wall is moistened using a sprayer or a paint brush.
- The roller is periodically dipped into a container of water, washing off the adhering plaster mixture from it.
Prices for textured rollers
Textured rollers
How to get an invoice "Marsiniada"
Structural plasters are used to obtain the "Marsiniada" texture. With this technique, a stylish and effective pattern is created, which is suitable for wall decoration indoors and outdoors.

According to the instructions, the structural mixture "Desan Versazhel" is required for plastering. However, the surface pattern is obtained using a special technique, and not due to any particular composition. Therefore, any suitable structural plaster can be used to create the Marsiniada texture.


Execution technique
Step 1. Open a container with wet plaster and mix the composition thoroughly with a spatula.
Step 2 Using a trowel or stainless steel spatula, apply the mixture to the wall, trying to obtain a uniform layer up to 5 mm thick.

Step 3 Immediately after applying the plaster, it is covered with a dense plastic film. Smooth out all the waves with your hand so that the film sticks to the plaster mixture.
Step 4 Perform a series of movements with the palm of your hand, trying to move part of the film without leaving a fingerprint. Thus, a thin layer of plaster is displaced over the entire surface of the wall. Make sure that no air bubbles remain under the film.


Step 5 Wait for the relative hardening of the plaster mixture (at least 12 hours).
Step 6 Carefully remove the plastic film.

Step 7 After the walls have completely dried (after 24 hours), the surface is treated with fine-grain sandpaper.

Step 8 Using a dry paint brush or rags, dust is removed from the wall.
Step 9 Apply a layer of finishing primer with a brush or roller.
For more reliable protection of the plastered surface, a layer of varnish or paint can be applied to the wall. To perform this task, use any most convenient tool: spray gun, roller, paint brush.

An important point: the varnish or paint is rubbed on the plaster with a soft foam sponge until it dries. This allows you to fill in all the recesses of the relief pattern and gives the surface a finished look. While working with a sponge, it is periodically thoroughly washed with water and squeezed out. You can apply several layers of varnish or paint. In this way, the desired façade color shade is obtained.

How to get the invoice "Corals"
To obtain the "Corals" pattern, structural plasters are used with a filler of fine or medium grain size.
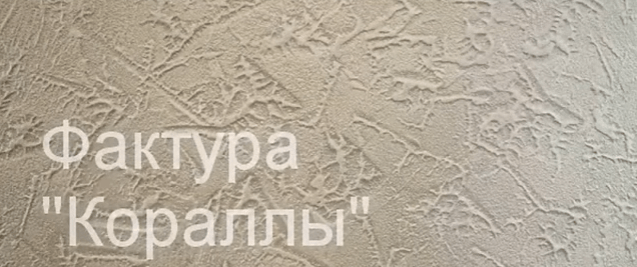
Step 1. Open the container with the composition and mix it thoroughly.
Step 2 A uniform layer of plaster mixture is applied to the wall. Use a trowel, trowel or stainless steel spatula.

Step 3 Smooth the applied layer with a spatula with a wide metal blade.
Step 4 Take a spatula with a rectangular blade and gently press it against the surface of the wall. This is an important stage of work, so you need to be extremely careful.

To obtain a drawing, follow the following technique:
- apply a spatula to the wall with the entire area of \u200b\u200bthe sole;
- the spatula is taken away with a jerky movement;
- apply a spatula to the wall, changing its direction: perpendicular or obliquely relative to the previous print;
- tear off the adhered sole of the spatula from the plastered wall.
Step 5. After 15-20 minutes, the pattern is slightly smoothed with the same tool, leveling its relief.

Step 6 After 24 hours, the wall is treated with fine-grain sandpaper.

Step 7 Apply a protective composition: finishing primer, varnish or paint.


Thus, a beautiful relief pattern "Corals" is obtained. The density of prints can be any. But the most effective pattern without overlapping prints.

Video - How to apply decorative plaster with your own hands
Video - Decorative plaster, granite chips based on natural stone
Decorative plasters, or decorative textured coatings, do not require further processing or surface finishing. They can be applied to walls and partitions made of any material - be it brick, concrete, drywall, wood or ordinary plaster. But the plaster hardens very quickly, so it is quite difficult to carry out finishing work with it on a large surface.
In addition, the use of decorative plaster for wall decoration requires mandatory thorough surface preparation (treatment with a primer, putty, grouting materials).
Typically, decorative plaster is available in the form of a dry or ready-to-use thick mixture. The basis of such materials includes a polymer binder, a filler (marble or granite chips, sand, lime), on which the texture of the future coating depends, as well as a liquid base - water.
Dry plaster in packages
The composition of decorative plaster often includes other additives that provide additional properties (different surface structure, protective anti-shock properties).
There are also special, separately sold additives for giving decorative plaster a particular color.

Plaster with colored additives
If the coating is made in the form of a dry mixture, it must be diluted with water in the required proportion. The plaster is applied quickly enough: first with a brush, and then with a spatula, or with another tool, or with a special tool right away (which one should be indicated in the instructions for using decorative plaster). Such a tool can be a roller, brush, trowel, trowel.

Stretch plaster is always applied with a trowel, from bottom to top. Such plaster is characterized by a denser grain structure. Outwardly, it is very different from ordinary plasters.
The use of decorative plaster provides many possibilities. For example, with the help of various molding tools, you can additionally create different types of textures.
Plaster consumption is measured in kilograms per square meter of surface and usually ranges from 1.5 to 3 kg.
Decorative synthetic plaster is also used for finishing both interior walls and facades. Depending on the granulation and the direction of grouting of such plaster, it is possible to create an individual structure of the walls of the interior. Such plaster is usually used as a finishing coat, but can be additionally coated with paint.

Decorative plaster in the room
Grout mineral plaster is characterized by a high content of natural grains, does not contain artificial resin. Differs in high ability to pass pairs of water. It is used for external and internal works.
Before covering the walls with decorative plaster, apply a preparatory layer of ordinary plaster over the beacons, consisting of spray and primer. The surface of the preparatory layer is scratched, giving it a roughness for better adhesion to the decorative layer. A well-seasoned preparatory layer is covered with a decorative mortar. Moreover, it can consist of two, three or more layers.

First, a spray from a decorative solution is applied to the preparatory layer, then a layer or layers of soil and, if required, a coating from the same solution.
Creating decorative plaster from ordinary
Decorative plaster "Wave"
A variety of textures for future coloring can also be “depicted” on ordinary plaster. For example, “waves” look great on lime-sand plaster.
To reproduce them on the surface, on fresh or previously rubbed plaster, notched and moistened with water, a second layer of mortar is applied in straight or curved stripes and smoothed with a spatula. Thus, a wavy surface is obtained.

Plaster "Wave"
Plaster "Traverine"
To create travertine (lime tuff) on the wall, a thin layer of colored mortar is applied by throwing on the prepared plaster surface. After that, smooth it with a spatula or steel trowel. The result is embossed islands on a smooth worn background - the so-called decorative "stones".

Plaster "Traverine"
For the process of applying this type of joke, see the video:
Stone plaster
To create a texture “under the boulders”, a plastic colored solution is applied to the soil, quickly leveled with a trowel and then the surface is cut with a hard hair or bristle brush. When trimming, the brush should be held strictly perpendicular to the surface. A hard brush is needed because only it gives clear, sharply defined “boulders”.

Stone plaster
Plaster "Dune"
Under the dunes, the colored solution is also first leveled with a trowel, and then the grater is placed with a little pressure and immediately torn off. The solution sticks to the grater and, together with it, is pulled away from the surface, which causes roughness on the surface. Outwardly, these roughnesses are very similar to sand dunes. If you want the dunes to be wavy, the grater can be torn off not straight, but slightly shifted to the side. To obtain the texture of small dunes, the mortar is first allowed to set a little. After that, it is slightly overwritten, put a grater on the surface and tear it off.

Plaster "Dune"
Watch how to apply Dune on the wall in a short video:
Plaster "Furrows"
The texture “under the furrows” is obtained using a bevel with semicircular teeth, which is made from a steel strip or wood. It has up to 30 mm width with sinuses between the teeth 10-15 mm. The teeth are sharpened in one direction. A sedentary solution is applied to the prepared soil, quickly leveled with a trowel, then they take the rule in their left hand and apply it to the solution that has not yet set. Now you need to attach the bevel to the rule with your right hand and drive it with the sharpened side of the teeth forward at an angle of 45 ° to the surface. Thus, even furrows are obtained. Their size and shape, of course, depend on the shape of the teeth of the bevel.

Plaster "Furrows"
Plaster "under a fur coat"
By spraying, throwing the solution through the net, shaking off the solution from a broom or brush.

Methods for applying plaster "under a fur coat"
Spraying through the net and from the broom is carried out with any solution (even with coarse aggregate). Only mortar with fine aggregates is suitable for spraying from a brush. To get a dense spray without skipping, repeat it several times until there are no uncovered spots on the surface. You can also use a special spray tool (it looks like a fan).
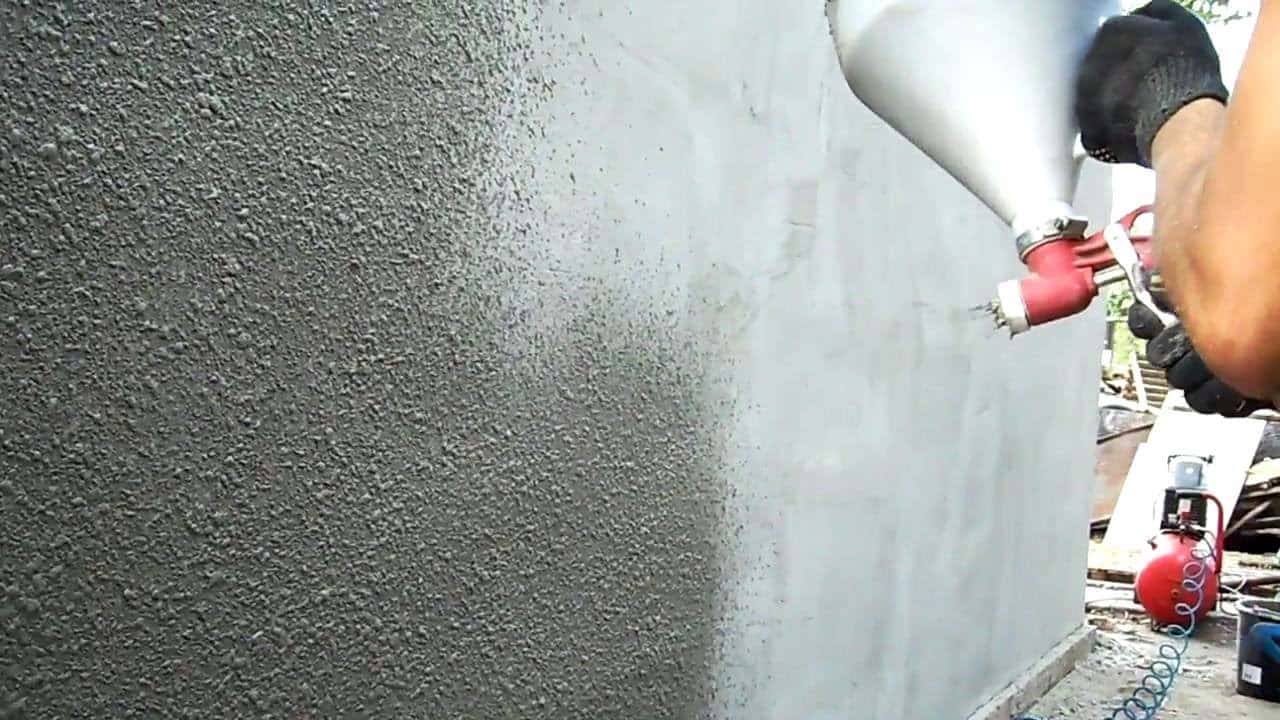
Spray plastering under a fur coat
Spraying on the grid is performed as follows. Stretch a grid with cells from 2.5 to 10 mm on a wooden frame measuring 100 x 100 or 100 x 50 cm (the specific size depends on the size of the texture). Stretch the wire diagonally from the back of the frame. It is necessary so that the mesh does not bulge or vibrate during operation. Attach the mesh to the wire, tie it. In order for the frame to always stand at the same distance from the wall, nail planks 10-25 cm thick to it.

Spraying plaster "under a fur coat" through the grid
The frame is attached to the surface of the soil and a solution is thrown through the mesh with a spatula from a falcon. Passing through the mesh, the solution remains on the surface in the form of tubercles. To make the texture the same for you, try to apply the solution with the same force.
When spraying from a birch broom, hold it with your right hand, and in your left take a round stick with a diameter of 4-5 cm, a length of 50-60 cm. Take the solution onto the broom and hit it against the stick, shaking it onto the wall surface. The size of the resulting texture will depend on the thickness of the broom rods, the density of the solution and the shaking force. Stir the solution from time to time during operation so that it does not delaminate.

Spraying plaster "under a fur coat" with a broom
To get a finer texture, spray with a brush. It is better to use a stiff hair or (best option) bristle brush. The brush is held with the left hand and, having been dipped into the solution at half the height of the hair, is brought to the surface with the bristles up. Then they pass along the bristles with a stick or a board (it is held in the right hand), and the solution from the brush flies off to the surface to be plastered. A thick texture, similar to the pile of a fur coat, will remain on the wall.

Brush for applying plaster "under a fur coat"
To get a texture similar to snow flakes, spraying is performed with flakes of a creamy plastic solution. The wall will be especially spectacular if the flakes of a white solution are applied to colored plaster. In this case, the colored solution is first applied, leveled and overwritten, and then sprayed over it. You need to do this without waiting for the plaster to dry.
To create a texture with a sponge, a solution of a creamy consistency is applied to the soil, it is quickly leveled and immediately end blows are applied to it with a sponge. After that, a relief remains on the surface of the plaster, the appearance of which depends on the shape of the pores of the sponge. So that the solution does not stick to the sponge, it must be moistened in soapy water and squeezed lightly.

Instead of a sponge, you can use a relief roller
To obtain relief patterns on a non-hardened plastered surface, special stamps or any convex objects can be used: shells, dense leaves, branches, and the like. Pieces of stone, brick, multi-colored glass fragments, shells can simply be pressed into the still soft plaster. It will harden and hold the mosaic together.

To give relief to the plaster, you can use a variety of objects
Plaster "sgraffito"
Another way to decorate walls using plaster is called "sgraffito" (scratched). This technique consists in scraping off thin layers of specially applied colored plaster. If there are several such colored layers, the resulting drawing will be voluminous and multi-colored, reminiscent of a fresco.

Wall decoration using the "sgraffito" method
Now let's move on to the consideration of techniques for decorating walls using terrasite plaster. This type of plaster consists of a large amount of fluff lime mixed with white cement, white sand, marble chips, glass, mica and other materials. The peculiarity of terrazitic plaster is given by the addition of mica and anthracite fines (up to 10% of the volume of cement).

A variety of terrazitic plaster
Stucco-hatching
The texture “for hatching” (straight or shifted strokes) with irregularities from 2 to 5 mm is obtained from fine-grained mixtures using a freshly applied mortar. The solution (in the range from 1 to 6 hours after application) must be processed with a notch with nail combs or a toothed scraper. The applied cement mixture can be processed with a trojan or scarpel. On the hardened solution, work begins no earlier than 6 days after its application.
Plaster "Rock"
The texture “under the rock” resembles a chipped stone, and it is made from a hardened mortar with a large aggregate by forging with a chisel or tongue. The sheet pile is driven into the mortar, thereby knocking out pieces and leaving recesses that form a uniformly granular surface. If the processing is carried out with a chisel or scarpel, cutting off pieces of the mortar, the surface will look like a torn or chipped natural stone.
Technology of application and texture of stone plaster
The surface of stone plaster before processing is divided into separate "stones". To do this, with the help of a chalked cord, lines of rows of “stones” or rustication of “seams”, as well as straps and other straight-line details, are pierced. After that, they begin to finish the plaster for one or another texture.
Invoice "under a fur coat" performed with different instruments. If you perform a notch with bush hammers with large teeth, the result will be a coarse-grained texture, with fine teeth - a fine-grained one, and when forging with a tongue, an especially coarse-grained texture will come out. Keep in mind: with large and long spikes of bush hammer teeth, the texture is deeper and larger.

For hatching grooves work is done by a bush hammer, only instead of teeth it should have blades. The depth of the grooves will be determined by the size of the teeth. The first forging is led along the line broken off by the cord, and the subsequent ones are parallel to it. To get a texture with the division of the entire surface into stripes, you need to use a trojan or gear.

Buchard and the Trojan
Invoice "under the dunes" on stone plaster is done with a chisel. The surface of the wall must first be cleaned with steel brushes or rubbed with bars. And then, with a well-compacted and rubbed surface of the plaster, you need to cut off a thin layer so that small depressions form.

Types of chisels
Under torn stone or coarsely chipped sandstone invoice make dowels, chisels, scarpels. First, a solution is applied to the surface with a layer of 4-6 cm, it is compacted and the surface is divided into “stones”. When the mortar sets, cut through or rusty, and then process the surface as needed to obtain a texture. A chisel or tongue is driven into the applied hardened plaster and pieces of mortar are broken off in different places to form large irregularities. If you want to get an texture for hewn sandstone, small pieces of plaster are chipped off with a chisel.

Fur coat and broken stone finish
Coarse-grained and fine-grained textures received in two doses. First, a cement mortar is applied - in small or large throws, - then a mortar for stone plaster is prepared and applied in a layer up to 10 mm thick over the set soil layer. The top texture can be fine-grained or coarse-grained depending on the filler.
Applying Venetian plaster
For best results, the surface to be covered with Venetian plaster should be as smooth, uniform (white) and non-absorbent as possible. You can not apply plaster on wood and metal - over time, the coating will crack.

Venetian plaster
Tools for Venetian plaster
To prepare and cover the walls with Venetian plaster, you will need the following tools:
- two brushes - maklovitsa and flute,
- roulette,
- long line,
- level,
- pencil,
- dosing syringe,
- measuring cups,
- mixing containers,
- mixer,
- ladder,
- bucket with water,
- sandpaper (no. 120 and 220),
- grinding grater,
- two stainless steel trowels 250 and 200 mm wide,
- wide and narrow spatulas made of polished forged stainless steel.
It is advisable to round off the working edges of the tools and polish them with a fine-grained sandpaper, completely removing scratches, burrs and other defects.
Before applying Venetian plaster, make sure the substrate is carefully prepared. With insufficient quality preparation of the base, cracks may appear on the surface that cannot be repaired.

Stages of applying Venetian plaster
The depth and transparency of the coating is achieved by a special application technique.
The master applies several very thin layers of coating on the wall, consisting of randomly located spots of material. The combination of many such spots and their layers creates the illusion of depth in the pattern of natural material. The number of layers varies from 2 to 10, but the total thickness hardly exceeds 1 mm. Each layer must be smoothed (pressed) manually with a spatula, grater, trowel until a completely even, smooth and glossy surface is obtained. Even for an experienced specialist, it takes almost an hour to work with 1 m² of one layer.
The first layer is usually made from a material that contains finely ground marble chips. It is applied to the surface with a steel trowel or spatula in the same way as putty. After 4-6 hours, covering, glazing layers can be applied to this layer, which will create the texture of the coating pattern.

Applying the first layer of plaster
If you want to get a matte finish, then the second and subsequent layers are made from the same material as the first. A glossy surface is obtained using a finely dispersed material mixed with a selected dye.
Getting started, apply a small amount of material with a spatula to the working surface of a long float. Now start working from any top corner. Proceed in the same way as when applying the finishing putty, applying the mixture in an even layer. Cover the areas near the floor with an upward movement. Press the ironer firmly against the wall, holding it at an angle of 10-15° to the surface. Make sure there are no gaps.
When the first layer dries, start applying the next one.
First mix the coating material: add dye to it (if you bought a “semi-finished product”) and mix everything thoroughly again.
Next, along the edge of the short trowel, apply a small amount of material with a narrow spatula and smear it with arbitrary strokes using arcuate short movements. Each movement should be approximately equal to the length of the float. If there is an influx on the wall at the end of the movement, disperse it with a straight-line movement at an angle to the influx line. Alternate spreading and acceleration movements and arbitrarily change their length and direction. At the floor, apply the coating in arcuate movements, starting from the bottom. Finish when the second layer covers an area of about 0.7 x 0.7 m.

The stage of applying Venetian plaster
Now level the coating on this area with long strokes of the float in arbitrary directions. Every 2-3 strokes, clean the ironer and wipe it with a damp cloth. Increase the pressing force and the slope of the trowel plane to 20-25°. The result should be a uniform thin layer.
After 10 minutes, start smoothing the coating with the edge of a wide (200 mm) trowel. The movements of the spatula from top to bottom should be slightly intersecting. As gloss appears (this comes from heating and polymerization of the material), loosen the pressure on the spatula. If this is not done, the resulting crust can be damaged.
To finally gloss the surface, you need to smooth it with a clean trowel. At the same time, it is strongly pressed with both hands and held at an angle of 5-12 ° to the plane of the wall. When glossing the area near the floor, move the strokers from the bottom up and slightly cross them.

The next stage of applying Venetian plaster
When finished, proceed to apply the second layer to the next area, repeating successively all the steps of the operation.
The pressure on the trowel at the beginning and end of the movement is weakened (as when scraping). This allows you to change the thickness of the material layer. When smoothing and glossing, the movements of the trowel should cross the boundaries of adjacent areas. To get the desired texture, change the size of the trowel, the length of the strokes, the gaps between them, as well as the force of pressure on the tool.
When working in corners, openings, ledges and other difficult places, direct the spreading movements from the boundary line into the area. If necessary, use a spatula instead of a spatula.
Before the second layer is dry, start applying the next layer in random spots. At the same time, the entire finishing cycle is repeated in sections. Apply as many coats (moleno of different colors) as needed to achieve the desired result.
If you accidentally damage the surface, apply the first coat of material with a narrow trowel to and around the area. When it dries, repeat the entire operation to apply the next layer.
You can use the premises after the completion of all work in a day, but it is better not to rush. The walls will dry out completely in a week.

Venetian plaster
After all layers have dried, you can cover the walls with natural beeswax. It will enhance the shine of the coating and give a feeling of optical illusion. Waxing gives the coating additional moisture resistance. Some plasters produced today do not need to be waxed: all the necessary components are already contained in the material.
Wall decoration with decorative plaster: 10 types of textures with your own hands
