We install sewerage systems in houses and apartments. Replacing sewer pipes in an apartment Sewer distribution in an apartment
Installation of sewerage helps to cope with several tasks at once: removal of processed water and waste, absorption unpleasant odors, level up comfortable stay. If in a city apartment there is a question about the feasibility of installing sewer system It’s not even worth it, then in private and country houses things are much more complicated.
The installation of sewerage is complicated by the lack of a centralized network for collecting wastewater. However, you can easily solve the problem if you install an autonomous drainage system.
The process is not the simplest, but following qualified recommendations will help you install the sewer system yourself and save significant money.
You can conditionally divide the installation sewer pipes in two stages: internal and external work.
How to properly install internal sewerage elements
Currently, it is allowed to install sewer pipes in an apartment made of plastic and cast iron. Plastic is optimal choice for drainage, since this material is completely inert and does not enter into chemical reaction with an aggressive wastewater environment, does not lend itself to corrosion and rust, which means it lasts for many years. The cost of sewer installation is significantly reduced if plastic products are used.
Basic rules for installing pipes in an apartment and country house general:
- Installation of the sewerage system is carried out using pipes with a diameter of 110 mm for the toilet and riser, and 50 mm for all other plumbing fixtures. The toilet unit is subject to increased load, and therefore requires a more powerful and efficient outlet.
- In an apartment, a pipe is laid from the toilet to the outlet of the riser, in one-story house installation is possible without a riser, directly to the street.
- Installation plastic sewer must be performed using special elements - oblique tees and crosses.
- A pipe leads from the toilet to the riser at an angle of 45 degrees or less.
- Horizontal turns of the sewer pipe in an apartment at right angles are not allowed; all turns must be made using a 45-degree bend.
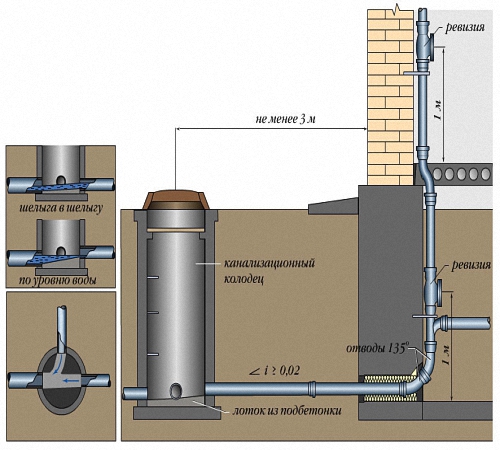
- In the apartment multi-storey building an inspection device is provided at pipe turns, as well as on the central riser every 3 floors.
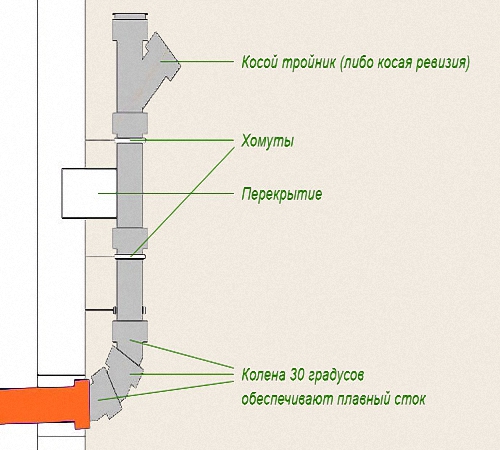
- The sewer riser must be equipped with a device for ventilation, both in an apartment and in a country house. It is recommended to install the vent pipe at a height of at least 0.5 m above the roof level.
- Do-it-yourself sewer installation must provide for the slope of the drainage pipe. Its value is calculated depending on the diameter of the pipeline.
- Building codes allow the installation of sewer piping in walls and floors. It is also possible to install open-type elements available for visual viewing.

Places where sewer pipes are connected and turned can accumulate debris over time; to remove it, it is necessary to provide inspection devices when installing sewer pipes with your own hands.

The lack of slope of the sewer pipe in the apartment complicates the natural drainage of wastewater, and an excessive slope (more than 1-2 cm per linear meter) increases the noise level, provokes congestion when passing a large volume waste water.
If sewerage is being installed closed type(in the walls or in the floor), the rules govern the winding of the drain soft material to eliminate the gap between the ceiling or foundation and the pipe.
An example of installation in specially equipped grooves is shown in the figure:

- Drainage elements installed in the floor must be of a rigid type, flexible pipes may be used to connect plumbing fixtures.
- Slicing plastic products can be done with a hacksaw or grinder; the socket should be lubricated with silicone-based lubricant before joining.
- The pipes are secured to the floor and walls of the building using special clamps.
Fastening drainage elements in the floor can be accompanied by some difficulties, especially at the junctions of old cast iron pipes with new plastic ones. If there is a mismatch in the diameter of the line, a rubber cuff and a special plastic compensator should be used.
- The toilet can be installed using a flexible corrugation or a special pipe. There are options for connecting a toilet with a vertical, horizontal or oblique outlet.
Special attention attention should be paid to securing the toilet to the floor. Most often, the base of the toilet has holes for fastening with bolts. You can also use concrete mortar for a stronger connection to the foundation.
The installation of a drainage system in the apartment can now be considered complete. Next, you need to connect all the plumbing fixtures and perform a test run. In a country house it is also necessary to carry out additional installation external sewerage.
Installation of external sewerage on the site
The laying of sewer pipes in the ground is carried out according to a pre-planned layout of drainage lines on the site. The depth of laying the sewer pipe is calculated taking into account a number of parameters:
- The depth of soil freezing in a given area;
- Terrain;
- Features of the materials used;
After calculating the depth and creating a work plan, sewer pipes are laid in the ground. You can dig trenches for laying highways manually or using construction equipment.

Basic rules for external drainage installation:
- Drainage lines should be placed at a slope to allow natural drainage of water through the system.
- The bottom of the trench for laying pipes must be compacted with a layer of sand 15-20 cm high.
- If, for technical reasons, the drainage system cannot be laid at the required depth, it should be insulated with insulating materials to prevent freezing and damage to the device.
- It is necessary to install wells at turns and changes in depth of the sewer main.
- The connection of elements made of different materials is not allowed.
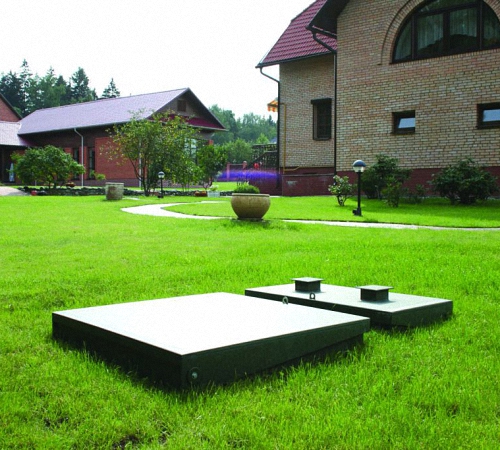
- After completing the preparation of trenches for the removal of recycled water, installation of sewerage from concrete rings or other treatment facility at the request of the owner.
- Before installing a septic tank, cesspool must be equipped with a rigid concrete foundation.
- The number of concrete rings used depends on the depth of the hole.
- The space between the walls of the septic tank and the ground must be filled with earth.
- At the bottom of the filter well, you can additionally create a mound of sand or other material for cleaning.

Installing a sewer system will not take much time and will help you ensure proper sanitary, hygienic and household conditions for living in an apartment or country house. Maintenance of the sewer system is extremely simple and includes regular preventive cleaning and periodic replacement of worn-out elements.
Dismantling the old sewer system in an apartment is in many ways a more responsible procedure than in a private house. After all, in case of mistakes, not only your home, but also your neighbors’ apartments may suffer. For this reason, many owners hire a professional team to work with sewerage, whose services are not the cheapest. But if you want to save money and are the happy owner of skillful hands, you can replace the apartment sewer system yourself.

Where to start?
The first thing you should do on the way to a new indoor sewage system is to draw a future network. It is important to do this even if you plan to replace pipes and some plumbing equipment, and not redo the sewer system by changing the position of sanitary fixtures and the location of the pipes.
It is not necessary to draw up a drawing, as is done in design organizations, but the diagram should be as detailed as possible.
The plan should show:
- lengths of all pipes to scale;
- be sure to indicate the diameters of the pipelines, their number, as well as the number and locations of all connecting elements and water seals;
- sketch out the sanitary equipment and its location;
- riser location;
- the number of pipes and the distance from them to the walls;
- location of inspection hatches;
- pipeline slope.
In order to correctly draw up a plan for arranging a drainage system, as well as implement it, it is necessary to take into account the nuances of installing an internal sewer network.
Rules for arranging sewerage in an apartment

Since the sewerage replacement will take place in apartment building, in which apartments located above each other have a common riser, then do not forget to notify your neighbors about the upcoming work. After all, you will cause them a number of inconveniences, which is better to warn them about.

In addition, you will have to agree with the organization that maintains the house to turn off the water supply. So, you will at least protect yourself from the activities of forgetful neighbors related to the bathroom.

From a purely technical point of view, it is necessary to take into account the following nuances.
- Many experts do not recommend replacing a cast iron riser unless absolutely necessary, since this material is really durable, and dismantling a cast iron pipe is a complex process, which, if necessary, is best left to professionals.

- Modern material, most suitable for installation on our own, are pipes and fittings made of plastic.


- An important condition when installing wiring is to maintain a slope for each linear meter of the pipeline. The amount of slope depends on the diameter of the pipe. If the cross-section of the pipes is 5 cm, then the slope should be about 3 cm, with a diameter of 11 cm - 2 cm. Changing the slope should not be allowed in both larger and smaller directions, because this will ultimately lead to blockage.

- The diameter of the pipes depends on their purpose. The riser, which will receive waste in large portions, should have a cross-section of 100-110 mm. This applies, for example, to a vertical pipe that collects wastewater from a toilet, washing machine and dishwasher.
If the installation of the latter is not planned, and the bathroom has a separate riser, then the vertical pipeline receiving water from the kitchen can have a diameter of 5 cm. For sewer wiring, it is better to use pipes with a diameter of 4-5 cm. - It is important to consider that the sewer system is subject to dynamics during operation. For this reason, when making a socket connection, it is necessary to insert the smooth end of one pipe into the socket of the other not completely, leaving a gap of 10 cm.
This compensates for the increase in pipe length as temperatures rise. Another dynamic is associated with the creation of internal tension in the pipeline, which is regulated by two types of fastening the riser using clamps, which will be discussed below. - It is recommended to install grease traps on pipes that drain water from kitchen sinks and dishwashers.

- Of all the plumbing fixtures, the toilet should be located at the lowest point of the intra-apartment sewer network.
- It is mandatory to have water seals after the plumbing, in which liquid remains, preventing the penetration of foul odors into the room.

Water seal for sewerage
- If, during the operation of the old network, a characteristic odor emanated from the plumbing drains, and when flushing water from the toilet or washing machine, a loud squelching sound was heard from the pipes, then this indicates poor ventilation of the riser. Perhaps the drain pipe is clogged. Then you need to call a locksmith from the organization servicing your home. However, in some cases, simply cleaning the ventilation is not enough. Then the riser is equipped with a check valve.

After all measurements have been made, a diagram has been drawn up, taking into account all the nuances, and selected and purchased necessary materials, you can begin the dismantling process if we are talking about replacing the old network.
Dismantling the old network

Used pipes can only be removed when the water supply is turned off.

They start by dismantling the riser. It’s easier if this vertical pipe is replaced at the same time for all neighbors. However, this option is rare.
It is much more common to change the system in only one apartment. Let's consider this option.
Work related to dismantling the riser is dangerous and requires a certain skill, so it is better to invite a specialist to carry it out. In any case, you can’t do without a partner.
Step 1. Secure the riser from above using two half-brackets connected to each other with studs mounted into the wall. A rubber gasket must be placed between the half-brackets and the pipe itself. This measure will allow, when removing part of the riser, not only to avoid the fall of its section coming from the neighbors living above, but also to compensate for the vibration that will appear during the dismantling process.
Step 2. First, all plumbing fixtures are separated from the sewer network. The bathroom is emptied as much as possible.
Step 3. Cut off the pipe going to the tee, leaving small area pipeline. This measure will make it easier to dismantle the tee in the future.

Pay attention! Cutting old pipes must be done carefully not only if you plan to preserve the riser or at least the tee. The reason for caution is the fragility of cast iron. During dismantling, vibration is created, which can damage the riser itself, and a fragment can clog the pipe.
Step 4. 2 oblique cuts are made in the center of the riser so that the maximum distance between them is 12 cm.
Step 5. By inserting wedges first into the lower and then into the upper cut, using a chisel and hammer, carefully remove the section of pipe between the cuts.
Step 6. While one person is holding on top old pipe, the other cleans the top joint of old pipes. If the sealing is done using sulfur, then you can heat the joint with a burner. The sulfur will melt and can be removed with a knife.
Step 7. Rock the pipe together with the crosspiece in order to then pull them out of the socket of the pipe going to the neighbors below. This joint can also be secured with sulfur.
Step 8. Clean the socket of the pipe going to the neighbors from the old sealant.
The old riser has been removed and you can begin installing a new one.

Installation of a new riser
If you removed not only part of the riser, but also the tee, installation of the vertical pipe can be done according to the following scheme.
Step 1. A rubber seal lubricated with sealant is inserted into the socket of the lower pipe, freed from the old sealant.

Step 2. Now a tee is installed in the socket.

Pay attention! In some cases, the connection between the cross and the socket may not seem strong enough. This can be corrected by using special silicone or plumbing tow.
Step 3. Mark the axis of the riser on the wall with a pencil.
Step 4. Assemble the riser without rubber seals and install it in place for testing. At this point, you can mark the mounting locations of the fasteners on the wall. IN standard apartments 3-4 clamps are enough. If there are any errors in the assembly of the riser, they are corrected.
Pay attention! Don't forget about the inspection hatches on the riser. They will help in inspecting the vertical pipe for blockages and cleaning it.
Step 5. Mount the brackets into the wall.
Pay attention! It is advisable to use brackets, since it is not recommended to install the pipe close to the wall.
Step 6. Assemble the riser for finishing, this time using rubber seals and sealed lubricant. At the top it is connected to a cast iron pipe with a cuff, and the lower part is inserted into the tee. Fix the riser to the wall with clamps.

There are 2 types of fixation.
- Near the sockets, rigid fastening is used, carried out using tightly tightened clamps with rubber gaskets.
- Additional fixation can be achieved with a floating connection, which is made with the same clamps. In this case, a rubber gasket is not used, and the fasteners are not tightened too much.
The installation of the riser is complete. You can start wiring.
Video - Replacing a sewer riser
It makes no sense to dwell in detail on the dismantling of old horizontal sewer pipes. The main thing is to free the pipes from the concrete and carefully disconnect them from the tee. Since the pipeline is old and there is no need to maintain its integrity, dismantling it is much easier.

The principle of installing new wiring is not much different from installing a riser.
Step 1. First, draw the axis of future pipes on the wall with a pencil, observing the slope. Often a groove is made in the wall, in which wiring secured with clamps is laid.

Pay attention! The width of the groove should be slightly larger than the diameter of the pipeline laid in it.
Step 2. Roughly assemble the pipeline without gaskets and attach it to the wall.

Pay attention! The sockets must face the movement of water.
Step 3. Assemble the pipeline from its entry point into the tee to the plumbing fixtures. All connections are made using rubber seal and sealant. The ends of the pipes must be chamfered and free from irregularities.

Installation of sewer pipes
Pay attention! Some of the clamps must rigidly fix the pipe, while in others the pipeline must have a floating stroke to compensate for the vibration of the pipes during the movement of water.
Step 5. The toilet is connected to the riser using a corrugated pipe with a diameter of at least 10 cm.

Step 6. Connect the rest of the sanitary equipment to the wiring.
After installation, carry out first visual inspection for tightness. Then you can turn on the water and use it to accurately check the strength of the connections.
Video - How to connect plastic pipes
Checking pipe joints
To make sure that the pipes are tightly connected to each other in the outlet and riser, you must proceed as follows.
- Drain the bathtub by closing the overflow hole.
- Release the drains and simultaneously open the hot and cold valves. cold water at full capacity.
- Plug the toilet drain hole. It is convenient to use a plunger for this.
- Fill the toilet with a bucket of water to the brim and open the drain.
- Ask the neighbors above to drain the water to check the tightness of the riser.
If the work is done efficiently, there should be no water at all at the joints.
like this difficult work work needs to be done to replace the sewer network inside the apartment. If you doubt that you can do this efficiently and in a short time, then contact the specialists. After all, the neighbors also don’t come and wait while you figure out the nuances of dismantling the old and installing a new network on site.
Video - Laying plastic sewerage
Major repairs are never complete without replacing the sewer system. But the prices for repair specialists force us to transfer this work to next years or get down to business on your own. Without prior experience, it will be very difficult to install sewer pipes with your own hands, but the tips and recommendations from our article will help you install them at a high level.
Start of work
One of the main components of any apartment is the sewerage system. This system into the room is non-pressure and performs the function of discharging general wastewater. They must be delivered from the apartment to the common riser of the house. That is, in order to fulfill its immediate tasks, the sewer system must be at a certain slope. In this case, it is necessary that the angle of descent allows you to set the direction of the wastewater and allow it to move quickly.

You need to start work with the layout of the sewer system. If the owners of the apartment are simply satisfied major renovation With the replacement of old pipes, the task becomes much easier. If you have moved into a new building and there is no sewerage system, then you will need to address the issue of how the sewerage system is arranged in an apartment building. Neighbors or housing and communal services workers can help in this matter.
What actions need to be taken at the planning stage? First of all, you need to decide on the future locations of plumbing fixtures and other important details of the bathroom. Secondly, it is necessary to calculate correct angle installation of sewer pipes. Thirdly, you will need to choose the right materials for repair work.
Selection of materials
High-quality do-it-yourself sewerage installation in an apartment largely depends on correctly selected materials for the work. Of course, most important detail pipes will become. Previously of this material there was a very narrow choice. The most popular sewer pipes were cast iron, but in our advanced century many new varieties have appeared. Now, most often in their apartments, owners use plastic pipes:
- Polyethylene - their main advantage low price. But we do not recommend stopping at this option, because besides the cost, pipes have no other advantages. They are highly susceptible to deformation, have low heat resistance and are rather unreliably sealed. Only “alternative” manufacturers continue to supply polyethylene pipes for sale. But doing sewer repairs that will last a couple of days is not profitable and stupid.
- PVC - average cost. The hydraulic resistance of these pipes is considered to be the lowest. They can be connected to each other using dichloroethane glue. But there are also disadvantages. First of all, limited heat resistance (up to 80°C), low strength and resistance to chemicals. PVC pipes are cleaned exclusively using a plunger or an ultrasonic emitter.
- Polyisopropylene is one of the most expensive pipes on the market. at the moment. Doesn't have that much smooth surface, like PVC, but otherwise ahead of other types of sewer pipes. Withstands temperatures in excess of 130°C, so durable and resistant that they can withstand mechanical and chemical cleaning.
In addition to the pipes, it is necessary to purchase material for connecting them. The best option will become silicone grease. It was created intended for the installation of sewer pipes. By using silicone lubricant, the owner will be able to finish renovation work V as soon as possible, and will also reduce hydraulic resistance. If your choice fell on polypropylene pipes, then you need to take into account that special cuffs are required for their installation. If they are unsuccessfully joined, the pipe will deform and create tension in this part of the sewer due to sudden temperature changes. But with the help silicone grease this can be avoided.
Calculation of the angle of inclination
As already mentioned above, selecting the angle of inclination for a sewer pipe is a very important step. If the slope is too small, wastewater will not be able to be delivered to the right place, and if it is too large, then the water will go away quickly, and contaminants attach to the walls of the pipes, which will create permanent blockages. Therefore there are clearly defined limits of values. The minimum for a pipe with a diameter of 5 cm will be an inclination angle of 3 cm/m, 11 cm - 2 cm/m, 16 cm - 0.8 cm/m, 20 cm - 0.7 cm/m. The maximum does not depend on the diameter of the pipe and is 15 cm/m (the exception will be options over one and a half meters long). A right angle for the sewer becomes possible when it is positioned vertically.
Maintaining the angle of inclination in an apartment with your own hands is quite difficult, since you need to take into account not only the parameters, but also the design features of the sewer pipes. Therefore, at this stage of work it is better to take the help of a specialist.
Sewage system diagram
When replacing a sewer system with a newer one, the stage with the diagram disappears by itself, since it is enough to remember the location and install it according to the same principle. But in cases where problems have arisen with old pipes or they are completely absent in the new premises, then the quality of this item will be the main guarantee of a well-done job.
The connection diagram for plumbing fixtures should include the following items:
- rooms in which work is expected to be performed;
- in each of these rooms we indicate the location of the parts of the sewer system (it is necessary to indicate the dimensions of the elements and their distance from the walls). Moreover, the details are not only bathroom fixtures, but also complete wiring;
- location of all fittings and service elements;
- the place where the central sewer riser is located.
Afterwards, it is advisable to give the drawn up diagram to specialists to check its correctness (the cost of such a service will not be too high).

Dismantling old pipes
After all previously completed actions, you can proceed directly to the repair work itself. If the house previously had a sewer system, then the first thing you need to do is get rid of it, that is, dismantle the old pipes. At this stage, relations with neighbors will play an important role. To do the dismantling yourself, we perform the following steps one by one:
- We select places in the walls where pipes are embedded. You can choose another way to solve this problem, but the main thing is that the pipeline is “freed” from the walls.
- We remove all bathroom appliances located in rooms such as the kitchen and bathroom, and free the rooms themselves from unnecessary things.
- In the places where new parts will be installed, draw contours on the surfaces with a pencil.
- We agree with the neighbors to turn off the water for a certain time.
- We block the riser on the floor.
- You will also need to remove the toilet bowl and toilet flush barrel.

- Disconnect the sewer line from the riser. To complete this process, you will need to cut the pipe in two places, the distance between them should be within 12-15 cm. Then we drive a wedge into the cut, which is located further from the riser. The last step is to disconnect the entire pipe and break out the trim.
- We drill holes along the previously drawn contour (or you can beat the contour with a chisel and hammer) and remove the remainder of the pipe. However, you need to remember that cast iron is quite fragile, and therefore you need to perform actions with the utmost care.
- We begin to clean the internal outlets of the draw pipe and toilet. Next, we plug them tightly using unnecessary rags.
- We open the riser and supply water, which we inform our neighbors about. The main thing is to warn them how soon you will have to start working again.
- Next, we dismantle the pipeline, starting from the far end.

Installation work
After removing the old pipes, we proceed to installation. There are two types: rough and finishing. Today we will consider the second option, in which installation is carried out starting from the riser. The basic rule of this type of installation: the size is adjusted not to the next, but to the previous sewer pipe. If you do the opposite, the wiring simply will not hold.
Instructions for installing sewerage in an apartment are as follows:
1. The first step is to make the transition from cast iron pipe to plastic. To do this you will need to install a special cuff. It is located in the riser outlet.
2. Having secured the cuff in the 1st section of the sewer pipe, we check whether the mounting pipe is secured.
3. Let's move on to trimming. This must be done carefully, observing the dimensions.
5. We complete the installation using sealant;
6. We assemble the remaining pipeline behind the pipe sections using the same principle.
7. To install the riser, you need to adjust the toilet pipe to the exact size, and then put it on the sealant, and install the toilet back.
8. As soon as the sealant has completely hardened, it is necessary to check for sewer leaks, soundproof it and install a water seal.

Many people are interested in whether a water seal is an important part in sewer installation. Without it, the pipes, of course, will work, but its installation is necessary. The purpose of a water seal in a sewer system is to prevent unpleasant odors. Therefore, if you do not want to hear the stench of sewerage, do not skimp on this detail.
Installation Notes
By following all the steps for installing pipes, the apartment owner will be able to independently install the sewer system. But sometimes these repairs become too difficult to complete. That's why we found useful tips for installing sewerage in an apartment from real professionals:
- Be sure to wear protective clothing before installing pipes;
- To avoid problems with installing the cuff, lubricate it liquid soap. Then the part will be able to fit into the pipe section much easier;
- to be more confident in the reliability of the system connection, before installation, lubricate the ends of the pipe with glycerin lubricant;
- if you do not live on the top floor, it is not recommended to replace the riser;
- socket connection of pipes is carried out using rubber seals.

Sealing connections
To perform sealing you will need to perform the following steps:
- selecting the correct sealant. To install sewer pipes, you need to purchase neutral, silicone, and polyurethane pipes;
- It is necessary to process each of the plastic gaskets. Do not apply sealant in a thick layer, this will only worsen the quality of work. Also, do not forget to install rubber gaskets in the couplings;
- Next, you will need to apply sealant to the surface of the mounting pipe and to the outer wall of the mating sewer pipe;
- we fix the pipes in couplings;
- We wrap the resulting joints with cling film and level the sealant, without pressing too much, using any tool (spatula, brush, roller, etc.);
- the film should remain on the joints until the sealant has completely hardened.
After completely sealing the sewer, you can begin to use it. But first you need to check installed system for a leak.

Checking for leaks in the sewer system
Checking for leaks is a mandatory step. If you skip this process in the future, the sewer may simply break through and flood all the neighbors below. To check for the presence of a leak, fill the bathtub full. Next, you need to open all existing taps in the room and remove the plug from the bathtub. If everything has flowed out and no puddles have appeared, you can sleep peacefully, the sewage system is done at the highest level.
Conclusion
By adhering to the rules for installing pipes and the tips described in the article, you can easily and easily make a sewer system in your apartment with your own hands. The main thing is to carry out all processes conscientiously and remember that the comfort of your home will depend on the quality of the completed system. If, after reading the information presented, you still have questions, we recommend watching the video on how to make a sewer system in an apartment yourself. It is located below:
The sewerage system is a necessary part of communications in both apartment and private buildings. It has long become the norm to have a comfortable toilet, shower or bathtub in your home, kitchen sink with hot and cold water. The modern level of comfort also involves the use of household appliances: dishwashers and washing machines. The sewer network collects used water and liquid waste and discharges it into the main sewer.
Sewage system in the apartment
The system includes the following elements:
- risers - vertical pipes of large cross-section;
- horizontal pipes designed to drain wastewater into the riser;
- fittings (couplings, crosses, bends, pipes, etc.) for combining pipes into a single network;
- water seals (siphons) that prevent the spread of unpleasant odors.
For fixation vertical pipes Brackets are also used.
Laying a sewer system is somewhat similar to assembling a construction set. Its elements are designed in such a way that they can be connected without the use of special equipment.
Requirements for internal sewerage pipes
The installation of a sewer system in an apartment does not require large loads on the pipes. But the level of strength of the products must be sufficient to ensure long-term operation of the system. In addition, internal sewage pipes must meet the following requirements:
- withstand high temperature and aggressive chemical influences;
- have a smooth inner surface in order to freely remove waste;
- be compatible with the external part of the sewer;
- provide the ability to connect plumbing equipment.
Ease and convenience of installation is another important consumer quality of pipes. Ideally, you can install the sewer system in your apartment with your own hands.
Attention! A competent approach to the selection of components is a guarantee of reliable and silent operation of the network for a long time.
Sewage pipes: overview
Just a few decades ago, the question of choosing suitable pipes simply did not arise. The only way to install sewerage was to use cast iron and steel products. You can still see such pipes in old housing stock. But in a new building, the system will most likely be equipped with components made of plastic.
Traditional metal pipes are giving up their positions. But they have certain advantages and their use should not be completely ruled out.

Cast iron pipes
Very strong, durable and reliable products. Able to withstand high pressure and high temperature. The main advantage of such pipes is quiet sewage. Of course, there is noise, but it is much quieter than when using plastic.
Reasons why cast iron is losing its popularity:
- high price;
- heavy weight;
- complex installation;
- processing difficulties (excess length can only be sawed off with a powerful grinder);
- rough inner surface.
The last point is the most important disadvantage of using cast iron pipes for sewage - sediment accumulates on the walls, the clearance narrows, and wastewater flows worse and worse. The system has to be cleaned frequently.
PVC pipes
These are the first plastic pipes to appear on the market.
Polyvinyl chloride is a cheap, lightweight, easy-to-process material. The pipe, made from PVC, is quite durable and UV resistant. But the cold reduces the elasticity of the material, it becomes very fragile and breaks easily. For this reason, PVC pipes are mainly used for internal sewerage installations. They are suitable for a system in which liquid waste is removed by gravity.
Polyvinyl chloride becomes soft at temperatures above 70°C, it is also susceptible to aggressive chemicals(including some pipe cleaners).
A very unpleasant quality of the material is that when burned it emits poisonous phosgene gas.
PVC-U (unplasticized polyvinyl chloride)
To produce the next generation of pipes, an improved version of polyvinyl chloride was used - unplasticized. It differs from PVC in being much more durable and is suitable for use in both gravity and pressure systems.
Using PVC-U pipes, you can install a water supply system or an external sewerage circuit with a sewage pump.
Attention! Available for PVC pipes large selection fittings. This is very convenient when working indoors, where the system often has a complex configuration.
Polypropylene pipes (PP)
The best choice for installing sewerage in an apartment is pipes made from polypropylene. They are universal, suitable for waste disposal by gravity and under pressure (although in the latter case you have to use special fasteners).

Products marked PP can be cut with a knife if necessary. The use of silicone grease makes it easy to connect components to each other.
The advantages of the material also include the following properties:
- resistance to aggressive chemicals;
- smooth inner surface;
- durability (if the operating rules are followed, they can function for almost 100 years);
- resistance to high (up to 95°C) and low temperatures.
The downside of pipes is that they need sound insulation. Otherwise, you will clearly hear the waste water passing through the riser.
Sewerage layout in an apartment: diagram
Before proceeding with the installation of the sewer system, they draw up a diagram according to which the work will be carried out.
It is convenient to use graph paper for the diagram. First, they draw a plan of the apartment to scale. It is not necessary to mark all the rooms; it is enough to indicate those where the wiring takes place. The room is included in the plan even if the pipe simply passes through it.
If the old sewer system is being replaced, the issue is resolved simply: you can reproduce the existing scheme. But if they mount new system, then for it it is necessary to make calculations and indicate where the pipes will be located, what is the distance between them, their length and diameter, as well as slopes.
The plan must indicate the location of each element of the system indicating the distance from the wall. If the pipe is laid through several rooms, then its parameters should be indicated for each room. This is necessary even in cases where the dimensions of the components are the same.
For a solid pipe passing through a wall, indicate not only the total length, but also the dimensions of each section.
The diagram also shows the location of the central riser, all service units and fittings.

Advice. A project drawn up by a specialist is quite expensive. But mistakes at the planning stage can cost even more later. Therefore it is recommended to show ready-made diagram, made with your own hands, to a professional for examination. This will avoid annoying mistakes.
Points to consider when drawing up a diagram:
- The outlet pipes of different plumbing equipment differ in diameter. The supply to the toilet or bidet is made using pipes with a cross-section of at least 100 mm. For other devices, a pipeline with a diameter of 50 mm is suitable;
- It is impossible to connect outlet pipes of larger diameter to horizontal branches with a smaller diameter;
- When choosing a place to install devices, it should be taken into account that the supply to the siphon should have a length of no more than 1.5 meters if it is rigid, and no more than 0.8 meters if it is corrugated. On a horizontal plane, angles should not be less than 120°, and ideally there should be no horizontal angles at all;
- Drain the washing machine and dishwasher no need to raise it above the floor. The devices are equipped centrifugal pumps, waste water is removed under pressure.
Attention! If possible, you should not purchase household appliances before drawing up a thorough diagram. Otherwise, installation and connection difficulties may arise.
Rules for calculating materials
How many pipes and connecting elements do you need to purchase in order to install a sewer system in an apartment? This can be calculated only after drawing up the diagram.
First of all, they clarify what standard sizes of pipes are available in stores. Particular attention is paid to the length of the sections. If the components are selected correctly, then there is practically no need to cut the pipes.

When purchasing pipes, you must take into account that you can use products with a diameter of 32 mm if:
- the distance from the farthest point to the riser is no more than 7 meters;
- the system has separate risers for each plumbing fixture.
For other conditions, pipes with a diameter of 40 or 50 mm are used. The riser pipe must have a diameter of 110 mm or more.
Sequence of work
The sewage system in the apartment is being installed with your own hands in stages. Replacement of the old network begins with an audit and selection of a dismantling method.
Guided by the diagram, they determine what components and materials need to be purchased.
The purchased pipes and fittings are tried on, and then the fragments of the system are assembled on the floor.
After dismantling the old network, a new pipeline is installed and adjusted. Then they begin the final assembly: seal the joints, install and connect plumbing equipment, connect the pipes to the ventilated sewer riser.

Attention! After the sealant has hardened, it is necessary to check for leaks in the network.
Installing the system, provided that PVC or polypropylene products are used, usually does not cause difficulties even for beginners. Pipes and connecting elements have special design, making assembly much easier. The end of the pipe with a chamfer is inserted into the coupling of another pipe or fitting until it stops, and then pulled back 10-15 mm. The result of this manipulation is a damper gap that compensates for thermal expansion.
Water seal in the sewer
Wastewater has bad smell varying degrees of intensity. To prevent it from spreading throughout the apartment, it is necessary to ensure that all plumbing fixtures have a hydraulic blockage.
There is equipment with built-in water seals (primarily toilets). In other cases, it is necessary to install siphons. They represent curved pipe, in which a water plug forms.
Siphons usually perform a dual function: they form a water seal and connect the pipe to the equipment.

A layer of water, constantly present in the pipe and renewed after each drain, prevents the escape of gases.
If the toilet or sink is not used for a long time, the liquid gradually evaporates, and the unpleasant odor gradually seeps into the room. It is easy to prevent this undesirable phenomenon; just pour it into the drain hole vegetable oil, its layer will prevent evaporation. It’s even easier to fix, you just need to drain the water.
Is it time to change your sewer? Or in new apartment everything needs to be brought to mind? Before you start self-replacement or new sewer wiring in your own apartment, you need to find out how this sewer system works. Because without understanding this issue it will be quite difficult to do anything. And who wants to redo everything later?
In principle, installing a sewer system in an apartment is not complicated. Its task is simple - to supply water from the water collection point to the riser. And since water moves through the pipes by gravity, the system is designed taking this factor into account.
 hidden wiring sewer pipes in the walls
 How does the sewer system work in apartments?
Despite the time at which the houses were built, the structure of the sewage system in them is almost the same. Most often, the wiring starts in the kitchen under the sink, then goes through the toilet and bathtub, from where it cuts into a common riser that runs through all floors of the building. The riser itself eventually goes out onto the roof. This is done for the normal functioning of the ventilation system in the house. Let's consider the main points of the structure of the sewer system:
- The main function of the sewer system is to move water from appliances to the riser;
- The operating principle is gravity, so no additional pressure is needed;
- A certain angle of inclination of pipes is required to quickly move water, determined by building regulations;
- The slope of the pipes must be maintained throughout the entire length of the sewer system, otherwise blockages may occur in the future.
So, before you wonder how to install a sewer system in an apartment, you need to choose optimal angle tilt in the system.
 connecting sewer pipes to the riser
 Naturally, water does not flow uphill, therefore, when installing a sewer system, the inlet pipe should be located above the point where it taps into the riser. And the slope must be uniform along the entire length of the pipeline. IN building codes adopted their own parameters for determining the slope:
- 2% slope for pipes with a diameter from 85 mm to 100 mm;
- 3% slope for pipes with a diameter of up to 50 mm.
For example, if the sink in the bathtub is located at a distance of 2 meters from the riser, then the end of the pipe should rise 6 cm relative to the point of entry into the riser.
What if we increase the angle of inclination in the sewer? After all, this should speed up the water supply. But in reality it turns out that this is the wrong approach, because the water that goes into the sewer is not always clean. Over time, all contaminants settle on the walls of the pipes and blockages form. To avoid this as much as possible, when installing sewers, the principle of self-cleaning of pipes is taken into account (water moves at a certain speed and fills a certain section of the pipe). And this is ensured by the correctly chosen angle of inclination of the pipes.
But there are several devices for which the slope of the pipes is unimportant. This is a washing machine and dishwasher. These devices have pumps that supply water under pressure, so their connection points can be at any height.
Sewer wiring diagram:
- A riser with a cross with three bends (two bends of 50 mm and one of 100 mm);
- Line with a diameter of 100 mm for connecting a toilet;
- A line with a diameter of 50 mm for connecting bathroom plumbing;
- Line with a diameter of 50 mm for connecting kitchen appliances;
- Branches that lead from highways to devices. Their succession to each other is determined by the location of the device itself.
For apartments with a large area, two risers are usually installed.
Installation of sewer system
So, having learned all the nuances of the work and sewage system, you can begin its installation.
 installation of drains and wiring of sewerage for plumbing fixtures
 Before determining the amount of materials, you need to clarify how many water intake points will be in the apartment or already exist. The main materials that will be required include the following: a toilet pipe with a diameter of 100 mm, pipes for other appliances with a diameter of 50 mm; corrugations with a diameter from 32 mm to 50 mm and separate corrugations for washing machine diameter from 20 to 25 mm; cuffs for siphons; connection cuff PVC pipes and cast iron pipe; sealant. When choosing materials, it is better to rely on one manufacturer, otherwise you may encounter the problem of incompatible joints, color range and the like. Among other things, high-quality sewer pipes should not bend or deform.
Now let's pay attention to the tool that you will need to install sewerage in your apartment:
- Grinder (this tool will be necessary for dismantling a cast iron sewer system. To install a new sewer system, they often only use a hacksaw.)
- Hammer.
- Chisel.
- Other essential tools that should always be at hand: screwdrivers, hammer, keys, etc.
- Mounting gun for using sealant.
After all the materials and tools have been prepared, and having realized how to properly install a sewer system in an apartment, we proceed to dismantling the old sewer system. First, you should turn off the water and warn your neighbors that a sewer system will be installed.
When changing it in the bathroom, it is better not to touch the cast-iron riser and not replace it with a plastic one. Since over time the house shrinks and this particular place may subsequently turn out to be a weak link. In addition, sound insulation in plastic pipes leaves much to be desired.
With a toilet, everything is much more complicated. Before installing a new sewer, you need to remove the old one. This is the most time consuming part. If the toilet is installed in such a way that it cannot be removed carefully, you will simply need to break it. If everything is not so scary, then you just need to disconnect the toilet from the mounting location. Next, the pipe connecting the toilet to the riser is dismantled. This is where the fun begins. It’s good if the pipe comes out normally, but if it is filled with sulfur and does not give in, then under no circumstances should you break it, otherwise you may damage the adjacent toilet along with the riser. In this case, you will need a grinder, with which the pipe is cut to the very socket. At the same time, everything is cut into parts and gradually chipped. After the work has been done, you need to remove the remaining parts from the socket. Next, the bell is dried.
 installation of a sewer drain from a sink
 If during installation of the system the riser is constantly filled with water, then it has a slope. In this case, the riser is plugged with a rag and wrapped in a bag. After the socket has dried, sealant is applied to it and a rubber gasket is put on. Since the toilet is the first point of water intake, a pipe with a diameter of 100 mm is used for it. After installing a tee, many people immediately install an adapter for a 50 mm pipe in it. But you don't need to do this. It is better to make a small insert after the tee, the length of which will be about 150 mm, and then you can switch to a 50 mm pipe. If possible, it is better not to use 90° corners and tees, but to take several 45° ones (here we remember about building regulations). Next, the sewer is assembled as a construction set. In this case, each pipe joint must be secured, otherwise the pipes will sag under the weight of water and become deformed over time. Each pipe has a gasket that makes the structure impermeable.
And before connecting two pipes, you need to lubricate the joints with sealant for strength. This is reliable and saves the structure from fractures and leaks. Cuffs of the required diameter are inserted under all the corrugations from the siphons.
Features of internal wiring
The wiring in the apartment is determined by the diagram. And to ensure normal pipe tension, both rigid and floating fasteners are used. Rigid fasteners ensure pipe stability, while floating fasteners provide longitudinal movement. When installing pipes, the following rules should be followed:
- Leakage can be avoided by installing main pipes in the direction of counter flow.
- Shaped parts must not be shortened or deformed.
- The main sewer system is diverted in the direction of the riser.
- You should not use a rectangular transition from the riser to the outlet pipe.
- Can be used both open and closed system wiring. When open, everything is clear - the weight of the pipe is visible.
Closed can be wall or floor. Accordingly, holes are made in the wall or floor, where the pipes are laid. Next, a plasterboard box is placed under the pipes and lined according to desire and design.
Hitting old pipes or shaking them is strictly prohibited.
Particular attention is paid down tube. If it turns out of the crosspiece, then it will be difficult to loosen it and remove it without outside help.
Dismantling cast iron is labor-intensive and dangerous work. The material, although fragile, is heavy, so it’s worth asking for help.
A prerequisite is the presence of water seals that prevent the penetration of unpleasant odors.
 piping under the washbasin and toilet
 To ensure the tightness of joined pipes, you need to:
- Close the drain hole in the bathtub and fill it with water.
- Release the drain and run cold and hot water at the same time.
- Close the drain hole in the toilet, for example with a plunger.
- Pour a bucket of water into the toilet and remove the plunger.
- Ask your neighbors to drain the water to check the operation of the riser and the tightness of the joints.
If the work is done well, no water should appear at the joints. If this happens, it is better to seek help from a specialist.
The installation of a sewer system must be approached carefully, although a minimum of technical skills is required. And as you can see from the article, it is not necessary to call a plumber for help (unless in extreme cases!). With an understanding of the topic and availability good tools, it is quite possible to cope on your own.
