Battery location. Heat transfer efficiency - how best to connect heating radiators. Features of the bottom piping option
Radiators are a necessary element of any heating system that perform their function by releasing heat from the heated coolant circulating in the device. Modern radiators are unified devices that have two lower and two upper technological holes (pipes) for connecting pipes and an air vent.
The choice of the optimal scheme for connecting the heating battery, the installation location and compliance with the installation rules allow you to achieve maximum efficiency in the operation of the heater for a long time.
In this article:
Basic connection methods
Regardless of the type of material (cast iron, steel, aluminum, bimetal) and the type of heating system used (with natural or forced circulation, one-pipe or two-pipe), there are several basic schemes for their connection. Each of these schemes has its own characteristics and can be applied depending on specific conditions.
Types of connection of heating radiators:
- diagonal;
- lateral;
- bottom.
Let us consider in more detail their features, advantages and disadvantages.
Diagonal (transverse)
With a diagonal scheme, the supply pipe is connected to one of the upper radiator pipes, and the outlet pipe is connected to one of the lower pipes located on the opposite side of the device. As a result, the incoming heated coolant is evenly distributed over the entire volume of the inner surface of the radiator, ensuring maximum heat transfer.
In this case, heat loss does not exceed 2%.

Photo of a diagonal connection diagram
It's believed that this scheme provides the most efficient battery operation. The rated power of the device, indicated by the manufacturer in the product passport, is tied specifically to the diagonal type of connection.
Such a scheme is most in demand with a large number of radiator sections (more than 10-12), which ensures uniform heating of the entire area of \u200b\u200bthe device.
The disadvantages include:
- additional pipe consumption;
- complexity and inconvenience of installation;
- unaesthetic appearance.
In multi-storey buildings, this scheme is practically not used.
Lateral (unilateral)
The supply pipe is connected to the upper connection of the device, and the discharge pipe is connected to the lower connection on the same side, i.e. both pipes are connected to one of the extreme sections of the radiator.
This provides a fairly efficient and uniform heating of all sections with low heat losses (up to 2-5%).
The lateral connection scheme is the most common, including in multi-storey buildings with a central heating system, due to the minimum consumption of materials and ease of installation with a sufficiently high heat transfer of devices.
The greatest effect is achieved when connecting batteries with 10-15 sections, as well as in apartment buildings with parallel connection of heaters.
With an increase in the number of sections, the thermal efficiency decreases sharply due to uneven heating of the other side of the radiator.

Lateral battery connection
The inlet pipe will connect to one of the lower pipes, and the outlet pipe to the second lower pipe on the opposite side.
With this connection option, the upper and lower parts of the device may heat up unevenly, and heat losses can be up to 15%. However, this is more common for systems in apartment buildings with a large number of heating devices and long pipes. For autonomous systems of private houses, such heat losses are practically not noticeable.

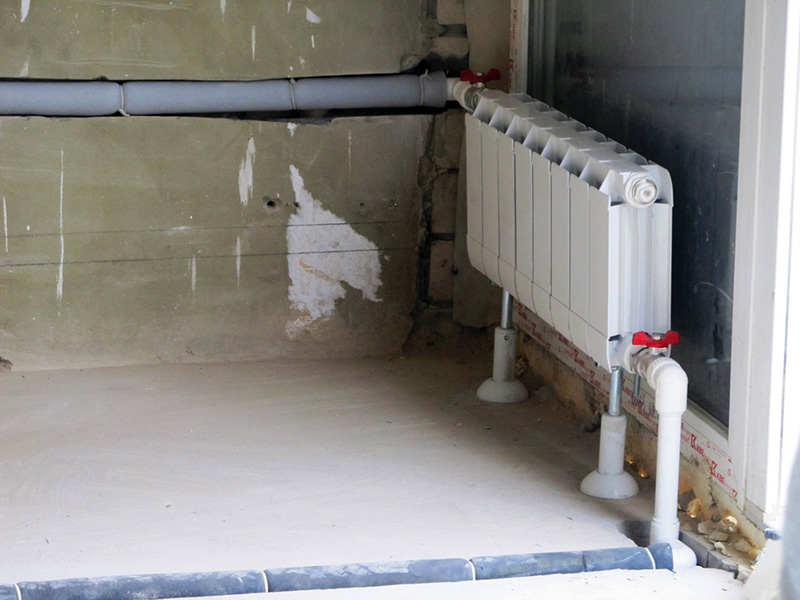
saddle scheme
The most common saddle scheme used for private one-story houses when pipes are laid under the floor or hidden inside it.
This allows you to significantly improve the external design of the radiator, making the pipes almost invisible.
A separate type of the lower circuit is a vertical connection, which is used for certain types of heaters of a special design (and radiators with a lower connection).

Vertical scheme for radiators with bottom connection
For such radiators, the inlet and outlet pipes are located side by side at the bottom of the device. For connection, a special locking and connecting unit is used.
- Benefits: material savings and improved design due to the inconspicuousness of the connected pipelines.
- Disadvantages: uneven heating and reduced heat transfer efficiency.
How to connect the battery with your own hands

All connection methods
Regardless of the type of connection, it is advisable to install stopcocks on the inlet and outlet pipes.
This will allow you to easily turn off and dismantle the radiator in the event of a breakdown without stopping the operation of the entire system to drain the coolant.
Instead of a shut-off valve on the inlet pipe you can install a thermostat with manual or automatic control, which will allow you to adjust the power of the heating device by changing the amount of heated coolant supplied to it.
This will automatically maintain the desired temperature in the room.
How does a wireless thermostat work, read this.
According to many experts involved in the installation of heating systems, it is better to install the thermostat not on the inlet, but on the outlet pipe.
As practice shows, this makes it possible to improve the heat transfer of the heater and increase the efficiency of regulating its operation by limiting the outflow of the cooled coolant from the radiator.
Video with connection examples
To remove air from the internal space of the radiator, an air vent (Maevsky tap) is installed on one of its upper pipes. The air vent will increase the heat transfer efficiency of the device.
Which connection is better - summary.
For autonomous heating systems of private houses, it would be preferable to use a side or bottom connection scheme, as this will reduce material costs, simplify installation and provide a better aesthetic appearance with sufficiently efficient operation of heating devices.
Required tools and materials

The radiator connection kit includes:
- brackets for mounting the device;
- adapter nuts;
- plugs;
- air vent (Maevsky crane);
- "American" quick couplings and stopcocks (in separate configurations).
If these items are not available, you must purchase a universal connection kit or purchase these parts separately.
A more specific list of materials and tools depends on the type of heating pipes. Which pipes are better for heating we considered.
Most often used:
- metal;
- metal-plastic;
- polypropylene.
Connection to metal pipes can be done with:
- welding - the most reliable connection is obtained, which has a fairly aesthetic appearance. However, this will require a gas welding machine and skills in handling it;
- on threaded connections - you will need steel drives, couplings, tees or corners of the required diameter, plumbing flax, grinder or hacksaw, pipe and box wrenches.

To connect the battery for plastic pipes special adapters, chrome or brass corners and tees will be required.
From the tool you will need:
- pipe cutter;
- calibration;
- press tongs;
- cap or sliding wrenches;
- pipe bender
When connecting for polypropylene pipes you need adapters and / or fittings, a special apparatus for welding pipes, a cutter or pipe cutter, ring wrenches.
Where is the best place to install a radiator
The best place is considered to be a window opening, which is the main source of heat loss in the room. With this placement, the heater creates a thermal curtain that prevents the penetration of cold outside air into the room.
You also need to find additional heating points in corner rooms with external walls.
For good circulation of heated air and maximum heat dissipation of the battery stick to these rules:
- the distance from the lower edge of the window opening to the battery is not less than 8-10 cm;
- the distance from the floor level to the battery is not less than 10-12 cm;
- the distance between the battery case and the wall is not less than 2-5 cm;
- the width of the battery surface must be at least 50% of the total width of the window opening.

If you are just going to purchase a radiator, we recommend that you immediately select its width and height in such a way as to ensure the required minimum distances when installing it in your chosen place.
It should also be taken into account that the use of decorative grilles can reduce heat transfer by 10-20%. Therefore, their use is justified if the radiator heats up too much. In this case, the grille will not only improve the appearance of the heater, but also reduce its excessive heat transfer.
Installation order
Installation is carried out in the following sequence:
- When installing a new radiator, the polyethylene packaging film is not removed from it until all work is completed, so as not to accidentally stain or scratch its surface.
- The heating main is blocked and the old radiator is dismantled (if it is replaced).
- Holes for battery mounting brackets are marked and drilled on the wall, observing the minimum required distances from the window sill, floor and wall. After that, the brackets themselves are fixed on the wall.
- Transition nuts, plugs, an air vent, stopcocks and/or temperature controllers are installed on the device, depending on the selected connection scheme. At the same time, to ensure tightness, all threaded connections are wrapped with sanitary flax before assembly and additionally coated with silicone sealant.
- The device is placed on the mounting brackets and aligned strictly horizontally using a level.
- Pipelines of the heating system are connected to it using quick couplings or adapters with their careful sealing.
- The system is pressure tested and a test supply of coolant is carried out. All connections are checked for leaks of the working fluid.
Compliance with all the rules of placement and installation will ensure reliable and efficient operation of both the radiator itself and the entire heating system.
In the conditions of cold weather of the off-season and severe frosts in the winter, the heating system must provide the most comfortable temperature in all areas of the house. The correct installation of the heating network depends on many factors: the total length of the structure, the area of \u200b\u200bthe house, the number of batteries and how they are connected to the central risers. It turns out that for each building an individual heating system is selected. Many homeowners, especially those living in apartment buildings, often ask themselves the question: how to connect the heating battery correctly?
Two types of heating systems
 Heating systems of houses are divided into two types: one-pipe, as a more economical option, and two-pipe, which has more advantages. Let's take a look at them and list the main differences.
Single pipe system

In a single-pipe system, hot water flows through pipes from top to bottom. It is evenly distributed over the heating device and exits through another pipe, again falling into the same pipe. This type of heating network is more typical for houses with many floors. It is easy to install and does not require a lot of materials. The system has its drawbacks:
- The temperature of radiators on the first floors of an apartment building is significantly lower than on the upper ones, since the water gets into them is no longer so hot.
- It is not possible to change the degree of heating in individual apartments.
- To eliminate the leak as a result of an accident and replace the battery on one floor, it is necessary to turn off the entire riser.
- To install autonomous heating of a separate apartment, it can be difficult to disconnect from the general system.
Thinking about how to connect radiators so that it is warm in the apartment on the lower floor, you can use a circulation pump that will distribute hot water to all radiators. For the owners of your home, you can be advised to increase the number of sections in the heaters in the back rooms, which will increase heat transfer.
To avoid stopping the heating in the riser, which occurs as a result of a blockage or leak in a separate device, they are installed with a bypass - a jumper between two wires.
Two-pipe system

The correct connection of heating radiators with a two-pipe system is more often used to heat a private house, a cottage. Its advantage, compared to a single-pipe one, is that all radiators, including those remote from the boiler, have the same temperature.
The effectiveness of this system affects its higher cost. After all, you have to mount two contour pipes. The first brings hot water to the radiator, which is drained through the second. Batteries in such a system are mounted in parallel. The advantages of this pipe installation:
- hot coolant is distributed over the radiators most evenly;
- it is possible to regulate the temperature in each room;
- if a separate battery is repaired, the rest of the heating system continues to work.
Basic schemes for connecting radiators to a thermal system
It is sometimes not clear to a layman how to connect the battery correctly and why the radiator is connected to the pipes in different ways. The bottom line is that different connection options work differently, giving their own percentage of heat transfer from the heater, the direction of movement of the coolant flow and its intensity.
Batteries in two-pipe and one-pipe systems are connected in several ways: lateral, diagonal, bottom and others.
Side

The most common connection method. It consists in the fact that one pipe with a hot coolant, the supply, is connected to the upper branch pipe, and a return pipe is connected to the lower one, through which the slightly cooled hot water leaves. For such a connection, there is a limit on the number of sections in the radiator, they should not be more than 15.
Diagonal

This method of connecting the battery to the heating system is used for long radiators. The coolant is connected as follows: the supply goes to the upper pipe on one side, and the return is located on the lower pipe on the other side. Hot water has the ability to be most evenly distributed throughout the heating device.
Lower

This connection method is found in houses in which the pipes of the heating system are hidden under the floor. It can be mounted not only in single-pipe heating systems, but also in two-pipe systems for low-rise buildings in the private sector. This connection method is not the most efficient. Often you have to add a circulation pump to the system.
There are other ways to connect radiators. For example, one-sided lower, in which the supply and return are side by side. Pipes in such a scheme are almost invisible, but good heating requires batteries with a large number of sections.
When deciding how to properly connect heating batteries, you need to pay attention to the effectiveness of the connection method. When calculating the power of the heater, various coefficients are used that increase and decrease. They are most directly related to the method of connecting a radiator with a central riser. Various schemes have such indicators:
- lateral - K is equal to 1, 0;
- diagonal - K is 1.1-1.2;
- lower - K is 0.7-0.9.
As you can see, a heating radiator can have the highest efficiency coefficient if it is correctly connected using a diagonal method. But each homeowner decides for himself which type of connection to use.

Installing the Battery: Necessary Factors
Place
The connection of heating radiators in an apartment or house usually occurs according to certain rules. Batteries can be placed anywhere in the room. It depends on the wishes of the owners. But it will be more expedient to choose a location where there is heat loss in order to reduce their magnitude and get a feeling of comfort.
The most tangible heat loss occurs through the glass windows. And no matter what modern technologies are used in the creation of the latest double-glazed windows, they will have more heat loss than walls. Therefore, in apartment buildings, radiators are located in rooms under windows, where they limit the area with cold air.

When installing a radiator, the following requirements are usually observed:
- the distance from the window sill to the top of the radiator should be at least 5-10 cm;
- to the wall - 2-5 cm;
- to the floor - 8-12 cm.
Before you properly connect the heating batteries in the apartment, you should calculate the length of the radiator or the required number of sections. This can determine whether the room is warm and cozy even on very cold days. There are several ways of such calculations based on complex formulas and coefficients.
A non-specialist, owner or apartment dweller, can make simpler calculations. You only need to know the parameters of your premises and the power of the selected batteries. 100W of radiator power can heat well 1 m² of room. We multiply the area of the room by 100. The value of the total battery power is obtained. We divide the value we obtained by the power of one section, indicated in the documentation. We get the required number of sections.
There is also a simpler old rule for the correct connection of a heating radiator. The battery section is designed for heating 2 m² of a room, in which the ceiling height does not exceed 2.7 m. When calculating the number of sections, we round up. This scheme is not suitable for corner apartments and private houses with large rooms and high ceilings. There, the calculation is made individually.

Installing the battery step by step

Before you properly connect a heating radiator in an apartment, you need to consider whether it is worth installing a system for possible regulation of the heat supply. It can be created in automatic and manual mode.
No need to save on the installation of manual devices that provide additional safe operation of radiators: faucets, valves, valves. They will help in critical situations to quickly turn off the radiators. They are also indispensable during the repair of individual batteries, then there will be no need to stop the heat supply throughout the house.
When deciding how to connect the heating battery correctly, you can use this instruction:
- First, make the necessary markings before attaching the brackets, then mount them to the wall.
- Mayevsky cranes are installed on the batteries, special devices that help to bleed air from the batteries in cases of air jams.
- They install plugs and regulators for heat supply, valves and other mechanisms.
- Having placed the radiator on the brackets, align it horizontally with respect to the floor.
- Connect the battery to the general thermal system using transitional runs.
- A preliminary test of the battery is carried out to check the reliability with the start-up of the coolant.
You need to know! Unauthorized transfer, installation and connection of heating radiators can subsequently create many problems, both for the owner of the apartment where these actions were performed, and for neighbors who will have a violation of the thermal regime of the premises. These works are carried out only with the permission of the management company and after an examination by a specialist.
Useful tips for those who connect heating batteries on their own

Some owners consider the ways of connecting radiators to the heating system of the house not as important as the material from which they are made. So, heat transfer is higher for bimetallic batteries than for those made of cast iron. But with an incorrect connection scheme, such radiators will have a lower heat transfer coefficient. If bimetallic heating devices are connected to pipes in the lower way, then heat loss will be 12%, which will affect the temperature regime of the room and fuel loss.
Experts recommend how heat transfer can be increased if a heating radiator is connected correctly. To do this, a reflective panel is attached behind it. Her role can be played by an ordinary piece of plywood or fiberboard wrapped in aluminum foil. But in this case, the distance from the wall to the battery should be at least 1.5 cm.

On the connections to the heating device, it is advised to install regulating and locking mechanisms. This is required both for balancing and for the possibility of removing the radiator in case of replacement and flushing.

Are you planning to change the heating devices in your own house? For this, knowledge about the types of battery wiring, how to connect and place them is useful. Agree, because its efficiency directly depends on the correctness of the chosen scheme for connecting heating radiators in a particular house or room.
Proper connection of batteries is a very important task, because it is able to provide a comfortable temperature in all rooms at any time of the year. It is good when fuel consumption is minimal, and the house is warm on the coldest days.
We can help you figure out what you need to get the most out of your radiators. In the article you will find a lot of useful information about how to connect batteries and how to implement them without involving specialists. Schemes are given, as well as video materials that will help you visually understand the essence of the issue.
An efficient heating system can save you money on fuel bills. Therefore, when designing it, decisions should be made carefully. After all, sometimes the advice of a neighbor in the country or a friend who recommends such a system as his is not at all suitable.
Sometimes there is no time to deal with these issues. In this case, it is better to turn to professionals who have been working in this field for more than 5 years and have grateful reviews.
Image gallery
The first option involves the use of physical laws without the purchase and installation of additional devices. Suitable when water is used as the heat carrier. Any non-freeze will circulate worse through the system.
The system consists of a boiler that heats water, an expansion tank, supply and return pipelines, batteries. Water, heating up, expands and begins its movement along the riser, visiting the installed radiators in turn. The cooled water from the system flows back to the boiler by gravity.
With this circulation option, the horizontal pipeline is installed with a slight inclination towards the movement of the coolant. This system is self-regulating, because depending on the temperature of the water, its quantity also changes. The circulation pressure increases, allowing the water to evenly heat the room.
With natural circulation, two-pipe and one-pipe schemes with an upper wiring are used, two-pipe with a lower one. It is advantageous to use such methods of connecting radiators to the heating system for small rooms.
It is important to equip batteries with air vents to remove excess air or install automatic air vents on risers. The boiler is best located in the basement, so that it is lower than the heated room.
For houses with an area of 100 m 2 or more, the coolant circulation system will have to be changed. In this case, you will need a special device that stimulates the movement of water or antifreeze through the pipes. We are talking about . Its power depends on the area of the heated room. The use of a pump for forced circulation allows the use of antifreeze as a coolant. In this case, it is necessary to install a closed-type expansion tank so that the fumes do not harm the health of the residents of the house.
The circulation pump is used in two- and one-pipe circuits with a horizontal and vertical heating device connection system.
The heating system is necessary in order to ensure the most comfortable temperature in the house, which depends on many factors. These include the method of laying pipes, and the number of radiators, and the total length of the system, the area of \u200b\u200bthe house, etc.
And, therefore, a system is selected individually for each house, so many are wondering - how to connect the heating battery correctly?
Connection methods
There are ways to connect heating batteries with your own hands, which can often be found in private homes:
- Unilateral. It consists in the fact that the supply pipe and the return pipe are connected on one side to the first section: the direct one is connected to the upper part, and the reverse one to the lower one.
In this way, uniform heating of all radiators is carried out. However, it is recommended to use this connection when there are many sections or in tall buildings with a parallel connection; - Saddle and bottom connection ideal for systems where the pipes are hidden under the floor. In this case, both main pipes are connected to the branch pipes of the opposite sections in the lower part. This method is ineffective, since power losses are within 15 percent;
- Diagonal. It is used when there is a large heating system with an appropriate number of sections. This connection method produces a uniform distribution of the coolant and maximum heat transfer from the devices.

Place to connect
In principle, the connection of the heating battery should be carried out in a certain place where it is possible to create protection against the ingress of cold air from the street and at the same time heat the room well. That is why radiators are often located under window sills.
At the same time, it is necessary to observe a certain distance from the device to the wall - up to about 5 centimeters, and to the floor - 10 centimeters. If you follow these recommendations, then the warm air from the radiator will create a kind of thermal curtain.
Important. The window sill should not obscure or cover the radiator, because this will significantly reduce the efficiency of heat release.
In some cases, radiators are covered with a screen, usually this is done when they are very hot.
The main types of heating systems
To date, there is a connection of heating batteries in a private house using two heating systems: one-pipe and two-pipe.
- In the first option, water enters the pipes from above (the tank is located on the mountain) and thus spreads through the pipes.
This is a fairly common system, but with this option there is no way to regulate the temperature, since this requires additional options. - The second option is that warm water flows through one pipe, and the cooled water goes through another. Batteries in this case are connected in parallel.
Such a scheme for connecting heating batteries is common in cottages and houses. It is characterized by the same temperature of all radiators, and temperature control is carried out in the supply pipe using a thermostat.
In any case, heating battery connection schemes can be designed according to a vertical or horizontal system. In the first, the heating devices are connected to a vertical riser, and in the second, they are connected to horizontal pipelines.
Any scheme for connecting a heating battery can be carried out by connecting pipes with an energy carrier to a radiator in a lower or lateral way.

The structure of the radiator
Usually a standard heater consists of the heating element itself (radiator) and additional parts, as shown in the figure below.

In this case, the installation is carried out when a thermostat is needed in the heat supply system. Since many people connect heating batteries with their own hands, this scheme will be interesting for them.
But before you understand and determine for yourself how to properly connect radiators in your particular case, you need to familiarize yourself with a variety of videos and photos in our website gallery. They will tell you in detail about the pros and cons of a particular system, as well as help you choose pipes and other additional elements.
Naturally, it is better to start installation in the warm season, so that later in the cold season you will not be left without heating. Therefore, prepare everything in advance, buy everything in order to quickly complete all the necessary work.
The big advantage is that the scheme for connecting heating batteries in a private house can be very different, and you are not in a certain "technical" framework.
Advice!
When replacing batteries, do not forget to install a Mayevsky valve, with which it is easy to bleed air from the system.
And so that the room is not very stuffy, a valve is installed that partially or completely shuts off the heat supply.
Shut-off valves
It is clear to everyone that the shut-off valves play an important role when connected, since it not only provides water supply, but also distributes the coolant over the radiator. Control and shut-off valves are placed on the return and supply pipes. Shut-off valves are necessary to cut off the water supply to the battery in order to replace or repair it.

Tying a radiator with a bottom connection may not imply the installation of a bypass and adjustment devices. Shut-off valves are provided in most two-pipe systems with lateral or diagonal connections. Usually, the instruction requires that you always provide easy access to the shut-off and control elements, even if the radiators are closed.
Battery selection
This is an important stage in the construction of heating, because the material from which the radiators are made directly affects their heat transfer, and, accordingly, the temperature in the room. You must also correctly calculate the number of sections in the room.
According to the material from which the batteries are made, they can be divided into:
- cast iron;
- Bimetallic;
- aluminum;
- steel;
- Copper-aluminum.
Aluminum batteries have a power of one section of about 192 W, and an operating pressure of 16 atm. They have good heat dissipation and fast heating. Used in autonomous and central heating options.
Their main disadvantage is that they are sensitive to the composition of the water, so they are quickly destroyed by internal corrosion. Also, these devices are subject to sudden changes in pressure in the system.

Cast iron batteries have section power from 79 to 160 W, and pressure from 10 to 15 atm. They can operate at high coolant temperatures - up to 150 degrees Celsius. Their minus is a lot of weight, and the plus is the usual installation and resistance to various pressure drops.

Bimetallic radiators have a power of about 200 W and a working pressure of about 35 atm. They have a steel core and an aluminum body. Often such batteries are used in offices or apartments with central heating.
Their advantages: lightness, practicality, resistance to the internal environment, high heat transfer. The downside may be a higher price compared to the rest.

Important!
Even if you choose the right battery and calculate the number of sections correctly, you should know one piece of advice - the better the thermal insulation of your home, the higher the efficiency of your system.
Conclusion
Installing heating elements is a crucial step towards creating an efficient heat supply. To carry out these works, it is necessary to calculate everything to the smallest detail and consult with several specialists.
The maximum return on the heating system in a private house will be if the owner chooses radiators that are optimal in terms of power and other characteristics, connect them according to a correctly drawn up scheme, and ensure appropriate operation and maintenance of the entire system. The schemes developed by specialists in a private house are aimed specifically at selecting the optimal installation option for any architectural housing solutions. The general scheme for piping and connecting heating devices, a boiler and valves for a one- or two-story building may look like this:
Features of the installation of heating radiators
Each private house is an individual and unique building, therefore, a specific scheme for connecting heating batteries in a private house is drawn up based on the realities of housing and its architecture. Violation of the installation can lead to the fact that the radiators will warm up unevenly, air jams will occur, the movement of the coolant will be difficult, and the efficiency of the boiler and energy consumption will be minimized.
You can draw up a scheme yourself, having at least some experience in home and construction work, but it is easier and more efficient to contact the appropriate company, leaving the organization to take responsibility for the quality work of heating in your home. When developing and implementing a piping and installation scheme for all communications, attention should be paid to the following points:
- Check the compliance of the theoretical installation of pipes and radiators with the actual characteristics of the purchased devices and materials, using calculations of similar schemes;
- Ensure the correct and consistent connection of the system components - these are pipes, shut-off, control and control valves, a heating boiler and pumps;
- Select materials, assemblies and parts that are best suited for the selected scheme.

The next stage is the choice of the location and the scheme for connecting radiators in accordance with the existing SNiP:
- There must be a distance ≥ 10-12 cm between the floor and the lower edge of the battery;
- There should be a distance of ≥ 8-10 cm between the window sill and the upper edge of the radiator;
- There must be a distance of ≥ 2 cm between the rear wall of the radiator and the wall of the house;
- It is undesirable to place radiators in niches or cover them with decorative screens.
Important: If you neglect these simple rules, then the heat transfer coefficient of the radiator will decrease significantly, causing disruptions in the operation of the entire heating system.

The optimal place for installing radiators in any room is under the window, and if there is no window, next to the door. That is, the heat source must stop the outgoing flows of cold air. If there are several windows in the room, then, if possible, it is recommended to place radiators under each window, connecting them in series. If the room is angular, then several radiators should also be installed along the cold wall. Such a scheme for connecting heating in a private house will not be much more expensive, but it will provide heat to any room, even unsuitable for heating.
Modern heating schemes imply that each radiator has the option of manual or automatic heating control - valves or valves, automatic thermostats. These mechanisms allow you to adjust the heat transfer of a single radiator in manual or automatic mode. 
Types of piping
It is recommended to connect batteries or radiators in one of two options - this is a single-circuit (single-pipe) and double-circuit (two-pipe) radiator connection scheme. Heating along one circuit is common in high-rise buildings, since in them hot water is first supplied upward, and after bypassing all the radiators, it is supplied to the boiler through the return pipe (return pipe). Such a solution does not oblige the use of a circulation pump, since water, when supplied from above, itself creates pressure to move the coolant. If the boiler is located below the upper floor, then a circulation pump must be connected. 
Advantages of a single-circuit piping scheme:
- Cheap circuit parts and assemblies, low labor costs, a small amount of materials used;
- Easy installation and maintenance of the system;
- The possibility of combining with other heating systems - "warm floor" and non-standard heating devices - registers or home-made batteries;
- Installation in rooms with any architecture and geometry;
- Aesthetically minimalist design.
Flaws:
- Complex hydraulic and thermal calculations;
- Pressure and heat transfer on a single radiator can be adjusted, but changes in heat transfer will affect other heating devices;
- The need to create high pressure in the pipes - naturally or by force.
Important: When operating a single-circuit system, sometimes there are difficulties with the free circulation of hot water or antifreeze, which are completely solved by including a pump for forced circulation of the coolant in the circuit.

Connecting batteries through two pipes at home is based on the principle of parallel connection of all batteries in the house. Thus, the supply pipe is not structurally connected with the pipe for returning the cooled water to the system, but together the pipes are combined only at the end point.
Advantages of a two-circuit scheme:
- It is possible to install automatic thermostats on each radiator;
- Convenient maintenance and good maintainability of the system - any work can be carried out on a local site without turning off all the heating in the house;
Flaws:
- Installation of a two-pipe circuit is more expensive, the assembly and configuration time for all elements and assemblies is higher than that of a single-circuit heating circuit.

Solutions for connecting radiators
In addition to the existing and tested solutions for piping options for heating, several working schemes have been developed and implemented on how to properly include radiators in the circuit. These are the following solutions:
Lateral or one-sided connection of radiators in the system: the hot water supply pipe and the coolant return pipe are connected on one side of the radiator. Such a connection solves the problem of equal heating of each section of the radiator, the cost of purchasing components and parts is minimal, the volume of coolant in the system also tends to a minimum. Such a scheme is often used in high-rise buildings, where there is always a large number of batteries or radiators. If the radiator in the side circuit is multi-section, then the far sections will warm up much weaker, therefore the optimal number of sections for any radiator or battery option is 12. If this solution is not suitable, it is better to turn on the device in a different way - with a lower or diagonal connection. 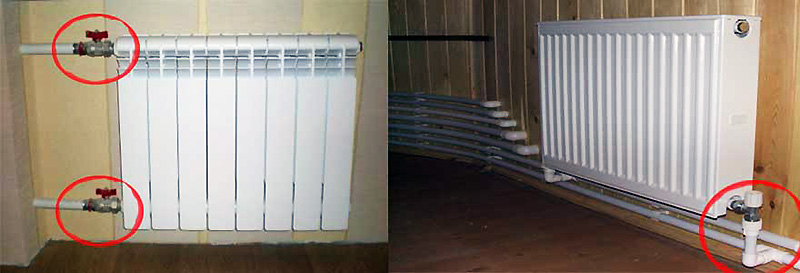
A diagonal or cross connection is suitable for heating appliances with more than 12 sections. It is called a diagonal circuit because the supply pipe is supplied from above and the return pipe is from below, with both pipes located at opposite ends of the battery. Here, the supply pipe, as in the previous connection diagram, is connected from above, and the return pipe is connected from below, but they are supplied from opposite sides of the radiator. When organizing such a connection, the device warms up in all sections evenly, which increases heat transfer throughout the system. 
The lower connection or "Leningrad" is suitable for heating systems with hidden pipes - in walls or under floors. Both pipes - both the supply and the return - are connected to the radiator from below, to the opposite sections on the radiator. There is only one drawback of such a scheme - high heat losses, which can reach 12-14%. Heat leakage can be minimized by including air valves in the circuit, which will remove air from the pipes, increasing the heat output of the radiator. So that the radiator can be repaired and serviced with such a connection, the supply and return are equipped with special valves, and for regulation - with an automatic thermostat that cuts into the coolant supply pipe. 
Installation of radiators
You can develop and connect the heating system in your home on your own, without spending money on the services of professionals. Moreover, the connection schemes are simple and do not require the use of special tools and expensive materials. It is only important to observe the technology and sequence of operations. If all connections are sealed and assembled according to the scheme, then there will be no problems with starting and subsequent operation of the heating, and the cost of materials and work will be minimal. 
How to install a new radiator:
- Before dismantling the old radiator and installing a new appliance, it is necessary to turn off the heating with the main valve on the boiler;
- Mounting points for the new radiator are marked. Typically, the radiator is hung on the brackets included in the kit, which are attached to the wall with dowels;
- The radiator is assembled - adapters are screwed into the mounting holes on the FUM tape or tow, which are supplied with the radiator.

Important: there should be four adapters for connecting a radiator: two with a left-hand thread, and two with a right-hand thread.
- Threaded holes in radiators that will not be used for connection are closed: one with a Mayevsky tap, the rest with locking caps. FUM or tow is wound: on the right - clockwise, on the left - counterclockwise;
- Ball valves are connected to the connection points to the pipes;
- The radiator is fixed in place with brackets, and connected to the pipes - do not forget to use winding to seal;
- The system is being pressure tested, commissioning is being carried out.
Before connecting a battery or a heating radiator to a system organized according to any scheme presented, you should select the type of piping and the scheme for connecting pipes and radiators. You can do the work on piping, assembling the circuit and connecting radiators with your own hands, correlating your own requirements for building codes and installation technology. 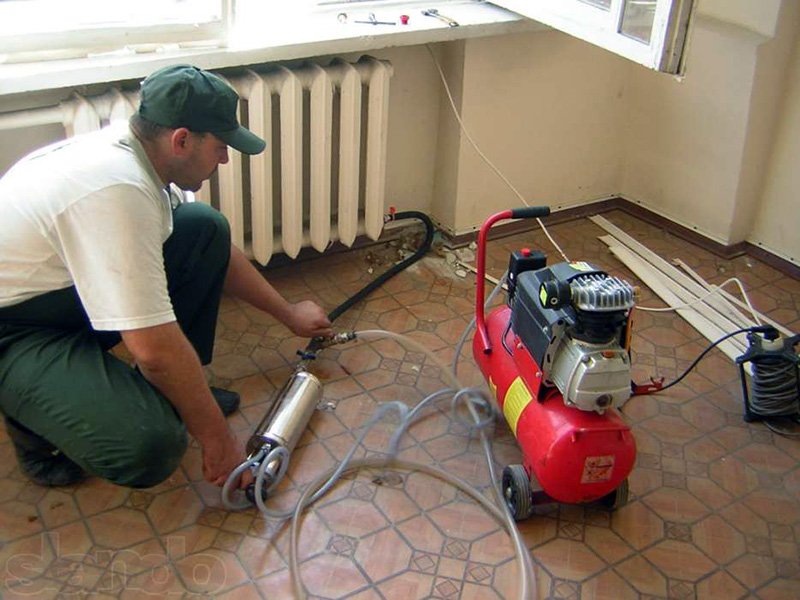
- Work in the opposite direction - the supply pipe is confused in places with the return pipe. The error is visible during commissioning - the radiators do not warm up well, air jams immediately form;
- Radiators are closed with decorative grilles and screens that make it difficult to access the thermostat. The movement of warm air is limited, the regulator can turn off the boiler when the radiators are slightly warmed up, which in general leads to a 20% loss of heat transfer. Therefore, the screens should be as lattice as possible, and not deaf. Without valves, the batteries will warm up unevenly;
- Installing the thermostat head in a vertical position will cause interruptions in its operation. Correcting the situation is simple - just change the position of the head.