Street crafts from plastic bottles. Crafts from plastic bottles with your own hands: for the garden and garden, at home and in the country. Christmas tree from plastic bottles
many owners personal plots and dachas make a lot of efforts not only to obtain generous harvests fruits and vegetables, but also ennobling the appearance of their "territory". flowerbeds, fences, garden paths, alpine slides, sculptures of animals and fairy-tale characters - today on the shelves of specialized stores is presented wide selection original elements decor. Of course, in the capable hands of an experienced landscape designer your garden or garden will noticeably change, but not everyone can afford the services of a professional. In this case, you can use a lot of available materials and things that can be found in every home. So, in any country house, empty plastic bottles of various “calibers” from under water, beer or milk periodically accumulate - they make excellent decorations for a garden or vegetable garden. What crafts from plastic bottles can you do with your own hands? We picked simple master classes for beginners with step by step description, photos and videos on making original crafts from plastic bottles - we will be happy to share new design ideas with you. In addition, this material is quite strong and durable, which means that your plastic products can last for several years. So, let's start creating masterpieces that will give your garden or vegetable garden a unique "touch" of charm and creativity.
Original crafts from plastic bottles for the garden - a master class with a step-by-step description and photo
Plastic is an extremely convenient, affordable and malleable material from which you can create the most amazing products. So, today we will master a simple master class with a step-by-step description and a photo on making original crafts from plastic milk bottles. With the help of such cute plastic "daisies" your garden or vegetable garden will acquire a beautiful "blooming" look and will compare favorably with neighboring "land holdings". Before starting work, empty bottles must be thoroughly washed and labels removed.
Necessary materials for gardening crafts from plastic bottles:
- plastic bottles white and green - 3 pcs.
- lids - preferably yellow or orange
- scissors
- two types of wire - soft and hard
- felt-tip pen
A step-by-step description of a master class on creating crafts from empty plastic bottles, with a photo:
- With the help of scissors, we cut off the lower part from the bottles - for work we need only the “top” with the neck.

- Then we cut off the neck of two bottles.

- We make the core of our “chamomile” from an orange (yellow) lid, after removing from its surface all the dates of manufacture and the expiration date of the “former” milk or kefir. Now, in a circle of each plastic blank, we cut out eight petals - to obtain equally even elements, you can use a stencil or template.

- On the first blank with a neck, alternately put on the second and third, and then twist the lid. We bend the petals to the sides, trying to give the flower the desired volume.


- In the “core” cover with a drill or a hot nail, you need to make two holes through which we stretch a piece of soft wire. To make a “stem”, you will need a rigid wire of the required length - a finished “flower” is screwed to its end. We cut out green "leaves" from a plastic bottle and fix it on a "stem" wrapped with electrical tape of the same color. Everything, our craft from multi-colored plastic bottles is ready! By a similar principle, we make two more snow-white "daisies" and "plant" them between garden beds or in cozy corner your garden.


Unusual garden crafts from empty plastic bottles with your own hands step by step - a master class with a photo for beginners
Today, plastic containers are considered the most convenient and affordable packaging material for many liquid food products. Sweet soda and iced tea mineral water, vegetable oil, milk and kefir - all these foods and drinks are sold in plastic bottles of various shapes and sizes. Despite the obvious benefits of plastic, the problem of recycling this “too” is acute in the world. durable material, which even in the soil does not decompose for hundreds of years. However, from empty plastic bottles, you can make unusual decor elements for your backyard, garden or playground with your own hands. We bring to your attention a master class with photos for beginners on creating a palm tree from plastic bottles. Such an evergreen tropical "guest" will delight with the freshness of colors even in cold winters and will become a real decoration of your local area.
We stock up on materials and tools for the master class "Crafts from plastic bottles with our own hands":
- plastic bottles - green and Brown color
- stationery knife
- scissors
- strong adhesive tape
- plastic tube or metal rod
- thick rope or braided wire
Crafts from plastic bottles with your own hands - how to do it step by step, photo:
- Before starting work, all bottles must be washed and labels removed. At this stage, we proceed to the manufacture of the leaves of the plastic "palm tree" - we cut off the lower parts with the bottoms of the green bottles. These elements can be set aside.

- We cut the upper part of the bottle into “noodles” - thin vertical stripes (as in the photo). It should be borne in mind that the splendor of the "leaves" depends on the diameter of the plastic container, so it is better to think over this point in advance.

- Alternatively, we cut each “top” of the bottle into four parts in the form of “petals”, which we then cut with “teeth” - alternative way production of palm leaves.

- Ready blanks for leaves must be strung on a rope or braided wire - alternately, tightly stacked to each other. We screw the lid to the first blank, which we will need a little later to fix the "petiole".


- To get a beautiful and lush crown, you will need at least 5 - 7 leaves - we make them according to the above instructions.

- Now let's take a "tree" trunk - take a brown plastic bottle and cut off the bottom (as in the photo).

- Then we make several cuts from the bottom up, a little short of the neck of the bottle. The result should be "petals" of the same width.


- The finished workpiece-fragment of the trunk of the "palm tree" in expanded form resembles a flower with petals.

- We proceed to the assembly of the "trunk" from a variety of brown blanks - according to the principle of collecting leaves. To give the structure the necessary rigidity, we place a metal rod or tube inside the plastic “barrel”.

- We begin to collect the "palm tree" into one whole from different elements. So, we attach the “leaves” to the top of the “trunk” with glue or tape - in the form of a spreading crown.
The list of materials for the master class "Garden swan from plastic bottles":
- large plastic bottle - 5 l capacity
- milk and kefir bottles - each 300 ml
- hose
- hard wire
- scissors
- black marker
- lighter
- paints
Step-by-step instructions for a master class on making crafts from plastic bottles, photo:

Original crafts for the garden from plastic bottles, a master class on video
Multi-colored bright flower beds are an invariable decoration of each suburban area. On the video you will find detailed master class for manufacturing garden bed from ordinary plastic bottles.
How to make crafts from plastic bottles for the garden - a step-by-step description of the master class, video
It is quite simple to create a piece of paradise on your personal plot - just “settle” in the garden a fabulous “peacock” made with your own hands from plastic bottles. With the help of our master class on video, you can easily master all the intricacies of the fascinating process of making a "bird" with luxurious plumage.
What to do for the garden and garden? We have selected simple master classes with a step-by-step description for beginners, photos and videos on creating original crafts from empty plastic bottles with your own hands. different shapes and volume. Let our ideas help you realize all your creative ideas and dreams!
The family hearth for each of us is a sacred repository of kind hearts, warm and affectionate words, gentle kisses and caring hands. This is the place where everyone rests in soul, filled with positive and positive energy, feel relaxed and cheerful, fun and at ease. And so that the reigning idyll is not exhausted over time, daily caring housewives and hosts, including, strive to equip every corner of their “royal” possessions as best as possible. And this does not mean that you need to rearrange dishes, furniture and furniture from place to place all day long. household appliances, grow your favorite flowers, keep order and cleanliness. This, of course, is of great importance for the prosperity of harmony in your home, but it would also be nice to pay attention to the adjacent areas to your home - this is a garden and a vegetable garden. Of course, growing vegetables, fruits and berries is useful and cost-effective, but in addition, we offer you to add some zest to well-groomed land plantations - decorate your backyard property with various handicrafts made from plastic bottles. Many people have such good stuff and a full cart, and all this, as is commonly believed, will come in handy on the farm, but it’s better to turn the old and unnecessary into something original new that will benefit and delight the environment. So, dear friends, the topic of our article is directly related to needlework. If you are interested, then we provide 10 photos of do-it-yourself plastic bottle planter ideas for the garden and vegetable garden made at home. Our creative ideas are meaningfully disclosed to you through prepared master classes with step-by-step instructions. Check them out and get creative. You and your kids will definitely love this!
Beetle "Ladybug" from plastic bottles
To make your garden and vegetable garden take on a bright outline, we recommend using our step-by-step master class with detailed instructions course of action. We will make cool crafts from plastic bottles in the form of colorful ladybugs. If you have children or grandchildren, you should definitely like this idea with a visual photo, and especially the younger generation. Arm yourself with the necessary improvised material and forward to exciting creativity.
For work you will need:
- plastic bottles - liter and two-liter;
- stationery knife;
- scissors;
- dye;
- brush;
- small foam ball;
- toothpick;
- disposable fork;
- candle;
- manicure tongs;
- ready-made eyes;
- glue gun.
Manufacturing process:
- At the beginning of creative work, we need to prepare construction material for the body of the beetle. To do this, we take all the bottles that you have - from small to large, and cut off the bottom of them with a clerical knife.
- Finished parts should be covered with your chosen paint of bright colors on both sides - inside and outside. If stains remain during the decor process, it is advisable to repeat the steps. After that, it is recommended to dry your blanks.
- In the meantime, we begin to form the head of the beetle. To this end, you need to take a small foam ball and cut it into two parts with a clerical knife, one of which will be slightly larger. She is what we need to work. We need to cut off the edge of this foam part slightly so that the future head of the insect fits snugly against the body.
- After we have made the head of the craft with our own hands, it should be painted black on all sides. We take a toothpick and stick it into the beveled edge of the part. This will be our holder during the design of the product. After the decor process, we take some time to dry the elements of the body.
- Now we need to make antennae for our bug from a disposable fork. To do this, light a candle and slightly bend the ends of the cloves of the cutlery with a flame. And when you succeeded, you need to cut off all the teeth of the fork to the base with nail clippers.
- When all the details are ready, you can start assembling the bug. We attach the foam head with a glue gun to the body made of a plastic bottle.
- We need to revive the face of the insect with ready-made shop eyes, the antennae we created earlier. We attach them to the holes made with ordinary nail scissors with glue.
- The final step of our creative work will be decorating the back of the ladybug with black dots. For such a move, you need black paint. After that, you need to carefully dry the craft, then put it in the garden or in the garden, wherever you want. Believe me, the neighbors will be simply amazed by your resourcefulness and creativity.
Flowerpot "Merry pig"

To make wonderful crafts from plastic bottles with your own hands for the garden and garden, you need a little patience and skill. In order to somehow help you in this skillful business, we provide step by step wizard a class with meaningful instructions, thanks to which you will create unique piglets in the form of a flowerpot or other vegetation. So let's get started.
For work you will need:
- plastic five-liter bottle (for the body);
- plastic two-liter bottle (for ears);
- water-repellent paint in pink and black;
- scissors;
- tassel;
- glue gun;
- stationery knife.
Manufacturing process:
- We take a five-liter container and cut out one of its sides with a clerical knife, leaving room for the muzzle and back of the piglet.
- Separately, from this improvised material, we make with our own hands the ears, the tail of the animal, and, if desired, the legs from the trimmed necks of plastic bottles.
- After preparing the torso and all its constituent elements, we need to paint all the details in pink color water repellent paint.
- Draw the eyes and nose of the animal in black, as in the photo idea.
- Through glue gun we attach the ears to the product and its protruding tail. If you want, you can add hooves, they also need to be glued. After drying, our craft is ready for use in the garden or vegetable garden as a decorative and unusual flowerpot for vegetation.
Flowers "Daisies"

To decorate and effectively complement your garden and garden, you will, of course, need flowers. However, attention, the topic of our article today, as you remember, is related to crafts from plastic bottles, so the plant riot will be made with your own hands from this improvised material. You will certainly like our idea, so go ahead, dear friends!
For work you will need:
- tree trunk;
- multi-colored paint;
- plastic liter bottles;
- stationery knife;
- scissors;
- glue gun.
Manufacturing process:
- First we need to prepare the "stem" for our future flower. We take a thick stick or a strong branch, remove and sharpen the extra knots, and then paint our trunk green.
- From one liter container, we will have to cut off the bottom, since we will use it for the base of the flower. Color it yellow.
- Then we prepare our "petals" of the plant. We take liter or half-liter plastic bottles and paint them in colorful colors.
- When our flower base and "petals" dry up, you need to put them together, as in the photo. For this purpose, we need a glue gun.
- Do not forget to attach leaves made of the same material as the flower itself to the stem of the plant. We also attach them with glue. Here, in principle, our craft "Chamomile" for the garden and vegetable garden is ready. You need to create more such products with your own hands so that the view seems richer and richer.
Plastic bees in the garden

To make your garden or garden come to life, you need to decorate it with bees. Such hand-made products from plastic floors liter bottles hanging on stunted trees will cause a lot of admiration and smiles among your relatives, children, grandchildren and acquaintances. Our step-by-step master class with a photo idea will be useful and informative for you. Study it and get down to creative work immediately in order to quickly make a wonderful craft at home.
For manufacturing you will need:
- plastic half-liter bottles;
- black and yellow paints;
- stationery knife;
- scissors;
- brush;
- loop thread.
Work process:
- To make beautiful cartoon bees, we need to take half-liter plastic bottles with caps and decorate them with paints, giving them a natural striped color.
- When the craft is dry, attach wings to it, cut from the same material at hand as the insects. We make small cuts with a clerical knife, almost at the base of the expansion of the container, and insert our blanks into them. For reliability, fix the work with universal glue.
- The final step will be the formation of a loop on the back of the bee and hanging it on the tree you like. This is how elementary you can simply create a cool decorative product with your own hands, even with children for the garden. They will be delighted with your ideas and fantasies.
fly agaric

Amanitas will also look great in your garden or vegetable garden. Make them with your own hands from plastic bottles and place them somewhere in the grass with a small family. Such a craft will not leave anyone indifferent, especially small children. View our photo idea and proceed to a step-by-step master class.
For work you will need:
- plastic bottles;
- paints - red and white;
- brush;
- glue gun;
- scissors;
- stationery knife;
- your fantasy.
Process of creation:
- We cut off the bottom of a two-liter plastic bottle and immediately paint it red with white patches, as in nature with a fly agaric.
- We make the leg with our own hands from the same improvised material only from the remnants. We twist the plastic with a kind of tube, fasten it with a glue gun, and then completely transform it with white paint.
- Do not forget about the "skirt" of the fly agaric, located on the leg of the mushroom. We also form it from a small segment flexible material and fasten it with a glue gun, and then dress it in a white tone.
- The parts of the future product prepared by us are connected using the same glue. So our original fun craft for the garden is ready, which will gather a lot of onlookers around it! Here you will see!
Penguins from plastic bottles

In order for your DIY plastic bottle craft for the garden to turn out interesting and bright, you need to put all your effort into this creative activity, patience and creativity. Well, for example, look at our photo idea and try to make it a reality, through the provided step-by-step master class with detailed description course of action.
For creativity you will need:
- plastic liter, five-liter or six-liter bottles;
- paints - black, red, white;
- stationery knife;
- scissors;
- glue gun;
- paint brush.
Manufacturing process:
- In order for our future craft to turn out believable, it is necessary to comply with all the norms of the natural color of the bird. We take a six-liter bottle and, without cutting off the neck, decorate it with black and white paints, as in the photo provided.
- From a two-liter container, cut off the top, slightly beveled type. It will become the head of our northern bird after we skillfully transform it with black paints, equip it with eyes and a red beak, made by hand from plastic waste, rolled into a sharp thin cone and glued together.
- We should carefully fix the finished penguin head to the body with a glue gun.
- Wings, as well as the beak, we create from the waste of the container, painted in the black color characteristic of this bird.
- We form the paws from two flattened liter plastic bottles, repainted red and attached back with glue under the weight of the penguin's body. Our product is ready to decorate the garden! Now choose a suitable place on your land plantation for the settlement of guests from the snowy north.
beautiful pink flamingo

A handicraft in the form of a flamingo will look quite beautiful and exotic on your land plot in the garden or vegetable garden. It is also easy and simple to do with your own hands at home using plastic bottles and paints, and, of course, your spiritual and creative investment. Like any other work on the creation of decorative products, it will require maximum patience and diligence, since the external aesthetic appearance of your creation will depend on this. Let's get started.
For creativity you will need:
- plastic six-liter bottle or food canister;
- foam ball;
- silicone hose;
- thick flexible wire;
- stationery knife;
- glue gun;
- scissors;
- brush;
- two metal twigs or sticks;
- water-repellent paints of pink, pale red, black and white color.
Manufacturing process:
- At the beginning of the creative work, we will need to make with our own hands all the necessary details for our crafts. First, we make the head of an exotic bird out of a foam ball. Masterfully, but extremely carefully, we wield a knife to achieve this intended goal. We look at the photo idea provided by us and try to create something similar or even better.
- As for the torso itself, for its manufacture you will need a six-liter plastic bottle or a canister made of the same material. We cut off its neck, mask the resulting hole with a petal of this improvised material and a glue gun.
- Subsequent creative work will be associated with the creation of the "plumage" of the flamingo. We cut it out of the same material as the container itself. Their number should correspond to the size of the body in order to cover both the top and, if desired, the bottom of the bird. After the constituent elements are ready and painted over with pink paint, we attach them to the back of the flamingo with a glue gun from the beginning of the plastic bottle to its very bottom.
- Now we connect the head of the bird with the body. For this we need a long narrow neck. We take a strong, but flexible wire and a silicone hose, push it inside metal element. By the way, the length of the neck is purely your own business. The wire pin that came out on one side is built into the foam head, which also needs to be painted pink in advance for convenience and draw the eyes and beak in the appropriate colors. The connection of these two parts - the base of the neck and head, should be tight and neat. We will need to insert the second end of the wire and silicone hose into the body of the flamingo. Just below the disguised neck of the container, we make a small hole where e and insert our product in the form of a neck. We fix everything with universal glue.
- It remains to install our product on the legs. We make them from wooden sticks or from metal rods. We cut out the limbs from a plastic bottle, attach the wire to the legs and paint over the entire structure with a pale red color.
- From the bottom of the body we make two small holes for attaching the legs. We stick them in and fix them with glue. Our adorable DIY craft is complete! Give her the most prominent place in the garden or vegetable garden so that everyone, even passers-by, can admire such beauty.
Cheerful gnome and his girlfriend from plastic bottles

To make your craft from plastic bottles with your own hands for the garden unusual and catchy, we recommend using our prepared photo idea. The dwarf and his girlfriend will decorate your land, giving it a certain fabulousness and carefree childhood.
For work you will need:
- plastic liter bottles - 4 pcs.;
- plastic five-liter bottles - 2 pcs.;
- disposable flower pots - 2 pcs.;
- water-repellent paints in green, red, black, white and pink;
- scissors;
- brush;
- gray yarn;
- glue gun;
- stationery knife;
- plastic kinder egg - 1 pc.;
- decorative elements: a basket with artificial fruits, any garden tools.
Manufacturing process:
- First of all, let's create a gnome. We take a five-liter bottle and cut two opposite holes on the sides, equal to the volume of a liter container. This will be the place for future hands.
- We will create hands from the same material at hand as the body of our product. We cut off the top of the containers and insert them into the pre-made holes on the body of the craft. We fix everything with a glue gun for reliability.
- Now we make out the appearance of the product. With green paints we draw clothes, and with black - additional accessories in the form of a belt and cuffs.
- We dress the fingers and face of the gnome in soft pink or beige.
- With a convenient brush we depict eyes, a mouth, cheeks, and a nose with glue from a half of a kinder egg, the same color as the face.
- We make eyebrows and a beard with our own hands from gray yarn. Having cut off the required length, we fasten the parts to strong glue.
- We plant a flower pot on the head and transform it into red color with a black drawn strap for beauty.
- Since we have a gnome - a hard worker, we insert a mini-shovel and rakes into his hands, and then we proceed to create his girlfriend - an assistant.
- From a five-liter bottle, we make the body of a girl with similar actions, cutting off the neck of the container and making holes for the hands.
- We also make hands from the same material and attach them to the body with glue.
- We put a flower pot on the head and paint it white. As a decor - any artificial flower.
- We paint the face with a delicate pink color, glue a pink nose from a kinder egg, draw eyes, a mouth.
- Weave pigtails from gray yarn and fasten them under the do-it-yourself hat.
- The shirt on the gnome's girlfriend will be white with green cuffs and a bow around the neck.
- The skirt can be made of plastic, heated slightly over a fire and taking the form of some coattails. If this is too complicated for you, then simply - simply draw a skirt with black paint.
- We insert a basket with artificial fruits into one handle of the product created by us, and some flowers into the other. Such cool helpers appeared in your garden or vegetable garden. Make a lot of these creations and you will see how great it is!
Palm trees from plastic bottles

Very simple and original craft from plastic bottles is a palm tree. It will look great in your garden or garden, where there is a flower bed or a well-groomed lawn. It is quite easy to make such a product with your own hands, especially since our step-by-step master class with a photo idea will explain everything in detail and clearly to you.
For work you will need:
- any plastic bottles;
- scissors;
- stationery knife;
- wire;
- glue gun.
Manufacturing process:
- We pre-prepare our building material. Cut off the bottoms of plastic bottles. Their number should correspond to the height of the future palm tree.
- After that, we form our exotic tree with our own hands, planting the cut products on top of each other.
- As a fixer, you can use a glue gun or simply make a metal twig, a wooden stick or something else as a base - a rod and place it in the middle of a palm tree trunk.
- We make the top of the edged "sheets" of plastic. We cut the edges of each finely and assemble the finished composition into a bundle, which must be fastened with a piece of wire.
- We insert ornamental vegetation into the top of the trunk and once again secure ourselves with a piece of wire.
- The finished tree can be covered with paint, draw some patterns. In general, everything is at your discretion, dear friends! The craft will perfectly complement your garden or vegetable garden, be sure of it!
Videoinstruction
Flowers from plastic bottles

From the bottoms of plastic bottles, you can create cool flowers with your own hands. You have the right to place such bright crafts anywhere: in a garden or vegetable garden, in a flower bed in the yard or outside the yard. Passers-by will be amazed at your needlework skills, and children or grandchildren will ask you to create a fabulous summer corner at home from the same material at hand. Well, let's get to work! Believe me, it's easy! Our master class with a photo idea will provide you Full description manufacturing process for this product. You will cope with this task even with children.
For creativity you will need:
- liter plastic bottles;
- cocktail tubes;
- paints;
- stationery knife;
- scissors;
- tassel;
- glue gun.
Manufacturing process:
- At a plastic bottle, we cut off only the ribbed bottom, which will be our own appearance already resemble a flower.
- The resulting decorative flower We cover with paint of red color, and the middle - yellow.
- The remains of the former improvised material should not be immediately thrown away, from which we will create a mount for the plant. We cut off the neck of the container and a little base, as in the photo. We make a small hole in the lid, into which a cocktail tube can fit. It will become the stem of our decorative product.
- Using a glue gun, we attach the flower to its formed stem, and on the sides are small neat leaves, the veins of which are depicted with paint using a thin brush. The craft is ready! This is an elementary option that will transform any corner of the garden and garden, especially shady places land plot where no flowers grow. Create a wonderful environment with your own hands so that your mood is always on top!
Finally
So our article has come to an end, which has provided you with many interesting photo ideas for crafts made from plastic bottles with your own hands for the garden. This improvised material is quite common and accessible. It lends itself to any of your ideas, actions and desires. Even with children, you can create something extraordinarily beautiful for your own yard and playground. The work, of course, is painstaking, it takes time and effort, but the result is really amazing. Everything around noticeably transforms, changes and breathes with joy and fun. Give free rein to your imagination, listen to the opinion of your child, they sometimes throw up brilliant ideas, and then your creativity will turn into real entertainment for the whole family.

Lovers of cottages and suburban areas are constantly looking for interesting ideas to decorate your summer cottages, so we are pleased to offer several master classes DIY plastic bottle crafts. We have already talked about how to make a palm tree and cats for the garden, and in this article you will learn how else you can decorate a flower bed beautifully.
DIY Materials:
- plastic bottles;
- scissors;
- glue;
- scotch;
- paint for facades or acrylic;
- brushes.
Have you ever thought that a garden is not just a place for growing fruits, flowers and other plants, but also a territory for creativity, which fully reflects the tastes and preferences of the owner? It is easy to make a lot of little things from plastic bottles that will give the site an original look.

Experienced gardeners use bottles to grow seedlings, as well as flower pots. A cache-pot can be made not only by cutting off the neck of a bottle, but also in the form of some kind of animal, for example, a piglet. If you cut off the bottom of the bottle, you get a cylinder, and if you cut off the top, you will get a cone-shaped planter. You can decorate plastic with cloth, corrugated paper or paint.
In stores today you can find many figurines for garden decor, which have a relatively high cost. With the help of our master classes, you can make animals with your own hands at minimal cost.
To make a pig, you need to make several blanks from plastic bottles: a whole eggplant - the body, 4 necks from half-liter bottles - for the legs, a neck from a convex one and a half liter bottle, cut in half - for the ears. Cover by ready product you need acrylic paint to work on plastic, wood and metal.

Fill the body bottle with sand to keep the figure from being blown away by the wind or, when the pig is ready, dig it into the ground. Make slits in the eggplant and insert the ears and legs into them. You can make a twisted tail out of wire. Secure the parts with tape or glue. Half beads can be used as eyes. Now paint the product with paint and wait complete drying. You can paint the piglet not only in pink, but also in brown with spots or white. Since all elements are made of plastic, the finished product is durable when decorating exteriors.
bottle garden hares
The simplest method is to make a bunny out of plastic bottles. Depending on the shape and size of the bottle, you can get a hare for garden decor or a toy for a child.
1. Remove the labels from the bottle and clean it of glue.
2. Coat the bottle with spray paint or enamel.

Hares from a plastic bottle
3. Pour in the sand so that the hare is stable.
4. You can draw a muzzle and paws with paints.
5. If the craft will be used outdoors, make the ears out of plastic and glue them with hot glue. If the bunny is intended to decorate the room, you can cut out ears and paws from cardboard.
A hare from a bottle of milk or kefir will look original. Clean the surface of the bottles from dirt and cover with paint. Instead of a cap, screw a deodorant cap onto a bottle, and the hare will have a round head. Eyes can be drawn or used special fittings. Decorate the bunny with ribbons and the craft is ready.
Hedgehog from a plastic bottle
Materials:
- eggplant 5l;
- 1.5l bottle;
- toothpicks;
- putty;
- dye;
- scotch;
- newspapers;
- plaster bandage;
- cardboard tray for eggs;
- eyes from old toys;
- scissors.
Master class garden hedgehog
1. First of all, you need to make a frame for the hedgehog's body. If you plan to place it in a flower bed, pour sand into the body.
2. Cut off the top of the 1.5 liter bottle and glue it to the eggplant. This will be the muzzle of the hedgehog.
3. Now glue the egg tray on top of the bottle and shape it with newspapers. Secure everything with tape and apply a plaster bandage so that you can insert toothpicks and the surface is even.
4. Blind the muzzle with a plaster bandage.
5. After the mixture dries, cover the product with plaster putty.
6. Insert toothpicks-needles into the hedgehog's body while the putty is still wet.
7. It remains to paint the craft and glue the eyes.
You can create a whole family of hedgehogs to decorate your backyard. The hedgehog will become great idea to participate in craft competitions, as well as for connoisseurs of garden decor and souvenirs.
Useful video: Funny bottle decorations for summer cottages and gardens
By applying the basic principles of working with bottles, you can easily make any figurine for the garden. If you cut holes in the craft, it will turn into an original planter or flower bed. Following our instructions with a photo, even a beginner or parents with their children can make a product from plastic bottles. Fantasize and don't be afraid!
You will need bottles different size- 2l, 1l and 0.5l. Cut off with scissors or a sharp knife from each bottle a bottom 3-4 centimeters high. Then, in the center of each resulting "saucer", drill a hole corresponding to a pre-prepared threaded rod.

It is better to put saucers on the rod between two washers and two nuts. If you use just a metal pin, a wooden knitting needle, or something like that as a rod, then the saucers can be planted on hot melt adhesive.

The bottom of the 2 liter bottle will act as the base of the coaster, so just turn the saucer upside down for stability.

2. Boxes for cakes and cakes from plastic bottles.
 Cakes and cupcakes tend to wind up, and it can be difficult to bring such beauty to the guests safe and sound. Not scary! Make such crafts from plastic bottles with your own hands - boxes for sweets. From a cardboard circle and half a bottle, you get a box for one cake, and in two halves of the bottle you can carry delicious macaroons!
 3. A small box - a case made of plastic bottles with your own hands.
Cut the bottoms 5-7 cm high from two liter bottles. C inside sew on a small zipper by hand.


4. Do-it-yourself organizers and coasters from plastic bottles
Plastic bottles provide great opportunities in the organization of the workplace. From bottles you can make a variety of organizers for magazines and correspondence, tools and sewing supplies, stands for stationery and cosmetics, boxes - baskets for toys and other small items. We simply cut off the neck from the bottles, and then - at your discretion. Several simple options below will give you ideas.


5. Do-it-yourself curtains from plastic bottles.
Unusual DIY crafts from plastic bottles - curtains or light partitions for zoning space. Such curtains look like floating transparent flowers, shimmering in sunshine. Interesting decor not only the interior of the house, but also verandas or terraces in the country. A detailed master class with photos can be viewed.


Crafts from plastic bottles with your own hands for the garden and cottage.
1. Do-it-yourself bird feeders and drinkers.
You won’t surprise anyone with such crafts from bottles. In the surrounding parks and forests, as well as on the balconies, you can see different feeders from bottles and milk boxes everywhere, especially in winter time. But, it may still be interesting for you to look at what other feeders you can build with your own hands from plastic.


2. Vertical wall garden
empty concrete walls houses, garages or fences are just asking to be decorated. It would be a good idea to arrange a vertical garden of plastic bottles with your own hands on bare lifeless walls!

You will need a couple of dozen two-liter plastic bottles, scissors, rope (twine or wire) and two washers per bottle. The process is schematically shown in the figure:

For drainage, you can make a couple of holes in the bottom of the container - a bottle, and lay small pebbles, sand or a special filler in front of the soil. And you can grow a whole garden in such hanging gardens: herbs, spices, flowers, berries and medicinal plants!


3. Caps for seedlings.
From a half of a plastic bottle, excellent seedling caps are obtained that will protect young sprouts from wind and bad weather.

4. A boat made of plastic bottles.
An unusual invention is a boat made of plastic bottles, which is practically in no way inferior to a factory model made of wood or rubber. If you have a desire to acquire such a boat almost for free in order to surf the nearby lake or river, you will find a master class.


5. DIY plastic bottle flower beds
To decorate the garden and fence off flower beds or beds, you can use halves of plastic bottles. Moreover, seedlings can grow under the bottles. Such garden crafts from plastic crafts with their own hands, even children can do it.


6. Nozzle on the hose - watering from a plastic bottle.
beautiful garden idea for soft watering plants in the garden. Take a plastic bottle and make many small holes in it. Then put the bottle on wheels, for example, from an old cart, toy stroller or rollers. Attach a hose to the neck and turn on the water. Small jets from the holes will water the plants like rain, and the wheels will allow the watering nozzle to be mobile.

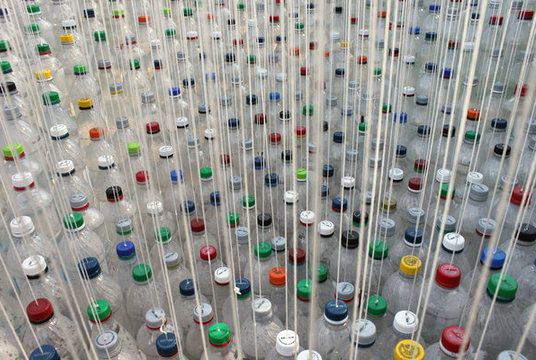
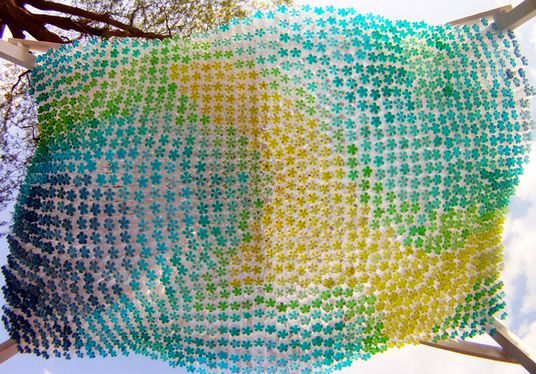
Can human waste in the form of plastic bottles become interesting project for home and garden? How else can they! American designer Garth Britzman created an unusual canopy made of plastic bottles with his own hands for parking.

Such a canopy of plastic bottles gives a shadow, which is important to prevent the car from heating up, but it will not save you from rain. Also, the canopy underneath looks vibrant thanks to the tinted water at the bottom of the bottles.

How to make a canopy from plastic bottles with your own hands?
- As a basis for a canopy, build wooden frame of four vertical bars and horizontal bars.
- Pull a mesh, woven or wire mesh over the crossbars - we will hang bottles on the stack.
- Prepare plastic bottles with caps. In this canopy project, 1500 liter bottles from under different drinks. Remove labels, wash bottles.
- Consider a color scheme for your canopy. It can be a specific pattern, an image (smile, sun, symbol) or just an abstract pattern, a gradient transition of shades, and so on. It is not easy to imagine the whole picture as a whole. However, based on the desired result, start filling the bottles with tinted water. You can pour water to the very bottom. You can color water with both food coloring and water-soluble paints for drawing.
- In each cap, make two holes in the middle and tie a strong thin rope or fishing line. You can punch one hole at a time, thread a rope and reverse side caps tie a large knot.
- Screw the caps with a rope onto the bottles and start hanging them from the net according to the diagram. Bottles can also be hung on different height, this will give the canopy volume. Bottles can be glued together. Then the canopy of plastic bottles will not walk like that from the wind and get tangled in the threads.

7 ways to use plastic bottles in the garden
1. Make a plant watering system
Majority garden plants need to be watered at the roots, especially if you combine watering with fertilizing. A plastic bottle can be turned into a drip irrigation system that delivers moisture and nutrients directly to the roots of plants for a long time. Make several small holes along the entire length of the bottle with any convenient tool. Bury at the same time as planting seedlings. Water from the bottle will slowly flow to the roots. This simple device solves the problem of withered leaves and prevents fungi and mold from developing.

This system can be used outdoors and in flower pots by slightly changing the design. Trim the bottom of the bottle so that the neck buried in the ground does not reach the bottom. Fill the reservoir with water if you leave the plants for a long time without watering. From the bottle, water will slowly seep into the ground and nourish the flowers.

2. Make flower pots
Old bottles and containers will act as a mold for pouring homemade flower pots. Take plastic bottles of an interesting shape, cut off the top. cook cement mortar and fill the molds about a third. Then put another one inside plastic container smaller diameter to create a bowl. The next day, the inner inserts can be removed to make a drainage hole in the bottom (using a drill or any handy tool). After a couple of days, you can remove the outer plastic shell.

3. Make a system for growing seedlings
It’s not enough just to fill the jar with earth and stick the seeds there. They still need to grow. To make everything rise, do it in plastic jars drainage holes, fill the containers with soil and plant the seeds. Put the jars on a pallet covered with small stones or pebbles. Cover with cling film to make a mini greenhouse. The high-speed system for seedlings is ready.

4. Make a self-watering seedling system
Seedling growing methods can be improved and made from plastic bottles into a design that will save you from the need for watering. Cut the bottle in half. Punch a hole in the lid. Take a thin cord 25 cm long, fold it in half, tie a knot approximately in the middle so that you get a loop on one side. Pass the free ends of the string through the hole in the lid and close it. Insert the top of the bottle with the cap down into the bottom. Fill with water so that the ends of the rope are immersed in it. Lay the soil, plant the seeds, water the plants to soak the soil with water. Ready!

5. Grow onions in a plastic bottle
Make it universal vertical garden for fresh greens. Cut off the neck of a large plastic bottle and poke holes in the body (not too low). Fill the soil up to the first hole, cover them with bulbs inserted by the roots inside the bottle. Continue backfilling the soil. Fill the entire container, put on a pallet. Don't forget to water and harvest fresh greens.

6. Make a wasp trap
Finding a hornet's nest in a garden or countryside can be difficult, and clouds of insects interfere with work and rest. Make traps out of unwanted bottles. Cut off the top of the bottle, place it upside down in the second part (without cap). Pour some honey on the bottom. The wasps will be able to go down, but not get out.

7. Make another irrigation system
Everything is simple. As children, we splashed water by punching a few holes in the cap of a bottle. If you make holes in the bottle itself and attach it to the hose, you get a watering can with a wide range.

From seemingly unnecessary things, sometimes you can create very interesting and useful items that allow you to decorate the world around you, and sometimes, besides, it’s also good to save money. Ordinary plastic bottles periodically appear in every home. Every hostess gets rid of them from time to time so as not to litter the apartment. And very in vain!
The life of plastic bottles may not necessarily end in the bin. We offer you to learn how to give them a second life, which will be much brighter and more diverse than the previous one! Crafts from plastic bottles with their own hands can not only please the kids or decorate your home, but also save nature.
Plastic bottles are an affordable material, the scope of which, if desired, can be significantly expanded. Not only adults, but also children can join the exciting creative process. Rally all family members for a common cause!
Many are aware of the deplorable situation with the ecology of our planet. Treatment facilities and processing plants are sorely lacking. But plastic products can decompose from 450 to 1000 years! At the same time, only about 90% of them do not go for processing at all.
Every self-respecting person is obliged to maintain cleanliness and not to litter. And inveterate gardeners and needlewomen hostesses have a competent approach to this issue. For them, plastic bottles are by no means garbage, but very much so. multifunctional item, which served as the basis for a hobby.

Craftsmen, creating beautiful birds and exotic palm trees, thereby take care of the environment. In addition, the main advantages of plastic products are that they are strong and durable. To people who have never done anything like this, it may seem that it is impossible to create a true masterpiece from such waste material. Today we will prove that this is not so!
To make crafts from plastic bottles for beginners, you just need to collect as many multi-colored containers of different sizes as possible, and then it’s up to your imagination!
From such simple material get it done unusual decor for an apartment, decoration for a playground, figurines of birds and insects, flowers, vases and even furniture! The creation process is easy and fun!
So where to start?
Plastic birds - decoration for home and garden
With a desire and some free time, you can try to make your own decorative birds from plastic bottles. They look very impressive and harmonious on a well-groomed lawn, among flowers in a flower bed, and just under a bush or tree near the house.
Snow-white domestic swan
To begin with, we want to tell you how to make a swan out of plastic bottles. To create it you will need:
- plastic bottle 5 l;
- a lot of milk or kefir bottles of 300 ml;
- hose;
- hard wire;
- scissors;
- black marker;
- lighter;
- paints.
Stage 1. Torso.
- We mark the lines on the largest bottle with a marker, as shown in the figure - you need to cut a hole along them, which will later play the role of a planter.
- Pull a rigid wire inside the hose and insert the hose into the bottle through the neck - this is the frame of the swan neck.

Stage 2. Plumage.
- From a white bottle, cut off the bottom and neck.
- Cut the feathers - their shape and width can be arbitrary.
- Make small cuts on the edges of the feathers.
- From the outside, treat each feather with a lighter.
- Start stringing feathers on the wire in 2 pieces, not forgetting to fix.

Stage 3. Final assembly.
- The same white bottles, only with cut bottoms, will serve as the neck of the bird. In our example, 16 of these were used.
- The head of a swan is the upper part of the container with a cut neck.
- In the part of the head where the hose ends and the beak begins, you need to make 2 holes in the bottle and in the hose on opposite sides and fix the structure with wire.
- Build a beak from a bottle cut and painted with red paint.
- Fasten the feathers, moving from top to bottom in a circle.

All! The plastic bottle swan is ready! It remains only to find a suitable place for him and plant your favorite flowers inside.
Pigeons - messengers of good news
The dove is considered a symbol of spiritual purity, and a pair of doves in the house, according to folk beliefs, promise love, prosperity and long life. We present you a master class on making a couple of delicate white doves.
Prepare in advance for work:
- white plastic bottles;
- Styrofoam;
- scissors;
- wire;
- grid;
- paints;
- glue;
- eyes.
The working process:
- We cut off the neck of the bottle, as shown in the picture - this is the body of a dove. We make a breast a la collar.
- We cut the plastic bottle according to the picture.
- We press the incised part inward, forming a body, and tighten it with wire.
- We cut out the bird's head from foam.
- To create feathers, cut the middle part of a plastic bottle of various lengths into strips with rounded ends.
- In each feather we make two holes at the base.
- We fasten the feathers with wire to the grid.
- We attach the finished pigeon tail to the body of the bird.
- We decorate the head of the bird and glue the eyes.

Here we have such cute doves from plastic bottles with our own hands!
Fabulously beautiful proud peacock
To make a firebird from plastic bottles with your own hands, you need to prepare:
- 1.5, 2 and 5 liter plastic containers;
- scissors;
- blue trash bags;
- foil;
- scotch;
- stapler;
- fishing line;
- acrylic paints;
- brush.
Having collected all of the above around you, you can safely get down to business, guided by our instructions and your own imagination. We will act step by step:
Stage 1. Tail.
- Rinse and dry all plastic containers thoroughly, remembering to remove the labels from them. Cut off the bottom and neck of the bottle, leaving only the middle part. It, in turn, should be cut into 3 oblong petals.
- We round one end of each of the petals like a bird's feather. On both sides we make many small incisions. Near the rounded edge, we attach an oval of blue polyethylene and a circle of foil with a stapler. Do the same for the rest of the feathers.
- Cut out a semicircle from the middle part of a 5-liter bottle, to which we attach feathers with a stapler.
- We lay out all the feathers, as shown in the figure.

Stage 2. Torso and head.
- We cut off the neck of a 5-liter bottle, and the bottom of a 2-liter bottle. We fasten them together with adhesive tape.
- We do not throw away the cut elements - we will make a peacock's head out of them. To do this, we twist the neck of the bottle into an oblong funnel and attach it to the bottom of another bottle.
- We connect the head and torso with adhesive tape.
- From garbage bags we cut out the plumage of a bird, which we attach over the entire surface of the peacock's body in overlapping rows.

On a note! To make the weight of the peacock heavier, pour sand inside its body.
Stage 3. Final.
- The tail of the peacock is attached to the body with a rope (for this, a hole must first be made in the place of fastening).
- We attach a stick or two thick wires to the peacock's stomach so that it can then be installed at its destination.
- Peacock from plastic bottles is ready! It remains only to decorate with paints his eyes and beak. From the remnants of plastic, make a crown for the firebird.

Cute DIY plastic insects
Making crafts from plastic bottles is an easy way to make beautiful little things and jewelry. This is a great leisure option for those who want to create something beautiful with their own hands together with the children. In addition, from waste material you can make wonderful toys or even durable didactic material for classes to familiarize yourself with the outside world.
Below are the simplest plastic bottle workshops for creating various insects.
Amazing plastic butterflies
Bright butterflies made of plastic bottles with their own hands can decorate both a city apartment and a gazebo in the country. The process of making them is very simple and exciting, and most importantly - you can connect a child to it!

The set for creativity is standard:
- plastic bottle (its color does not matter);
- scissors;
- a sheet of cardboard;
- pencil;
- wire;
- acrylic paints;
- beads of different sizes.
Creating a butterfly from plastic bottles step by step:
- Cut out the middle part of the bottle.
- Draw a template for the future butterfly on cardboard and cut it out.
- Circle the workpiece, attaching it to the plastic, and carefully cut along the contour.
- Attach the wire to the bend line.
- Decorate the wings as you wish and decorate them with beads.
There are a lot of design options, here are some of the most interesting ones for your inspiration:

Such different ladybugs
You can create plastic ladybugs in many ways, as well as from different parts the bottle itself. We offer you the most popular options.
Option number 1 - Ladybug from plastic bottles
You will need:
- 2 plastic bottles 0.5 l (black plastic) and 1 l (red plastic);
- glue or stapler;
- scissors;
- acrylic paints.
Progress:
- A liter bottle will play the role of the body.
- We cut out the red wings of a ladybug from a bottle that is larger in size.
- We draw black dots on the wings with paint.
- We attach the wings to the body with glue for plastic or a stapler.
- We make eyes and antennae (you can also make them from plastic).

Option number 2 - Ladybug made of plastic spoons
You will need:
- small plastic bottle;
- 2 plastic spoons;
- black and red acrylic paints;
- glue.
Progress:
- We paint the bottle black, and two handles from spoons - red with black dots.
- Glue the cuttings to the neck of the bottle.
- Add eyes and mouth.

Option number 3 - God's cork box
You will need:
- cap from a plastic bottle;
- paints.
Progress:
A tiny ladybug can be made from an ordinary cap by simply decorating it accordingly. It can become both a toy for a baby and a fridge magnet. To do this, just attach a magnet or double-sided tape to it.

Now you know that you should not rush to throw away empty plastic bottles, because you can easily and quickly make cute ladybugs with your baby from them.
Flowers from plastic bottles
DIY plastic bottle flowers not only look beautiful, but also bloom regardless of the season. And the ability to create beauty actually from garbage is beautiful and noble in relation to nature. Plastic flowers will become a unique bright decoration for both an apartment and a summer cottage. Just imagine, the snow has recently melted, buds are starting to bloom on the trees, and amazing blooming daisies, lilies of the valley or roses are already flaunting on your flower bed! Let's quickly master the intricacies of the process.
Delicate white daisies
To make chamomile from plastic bottles, we need:
- white, yellow and green bottles;
- scissors;
- candle;
- awl;
- thermal gun;
- green hard wire.

The manufacturing process is as follows:
- From the middle part of a white bottle (for example, from under kefir), we cut out a circle 8 cm in diameter.
- We make cuts of 3 cm from the edges to the center, which visually divide the circle into 16 equal segments.
- Each petal is rounded with scissors and processed over a candle flame.
- We pierce each corolla of the future color with an awl exactly in the center.
- To create the core of the chamomile, we cut out two small circles from yellow plastic, along the edges of which we make many small cuts. They also need to be processed over a candle.
- Cut out a small triangular segment in one of these circles.
- We cut out a sepal from a green plastic bottle, which we also process with hot air over a flame.
- We make a small hole in the center of the sepal.
- We cut off the wire of the required length, which will serve as a stalk of chamomile and put a sepal on one of its ends.
- Then we string two corollas and a yellow circle-middle.
- We bend the end of the wire and mask it under the middle with a cut out segment, which we glue with a thermal gun.
- We cut out leaves from green plastic, the entire surface of which, with the exception of the handle, is processed over a candle.
- We attach the leaves with cuttings to the stem, wrapping them around it over the flame.
This is how you can make beautiful and durable daisies quite easily!
blooming lilies of the valley
Presented in our master class, lilies of the valley from plastic bottles are best suited for decoration. garden plot or cottages. If you do not have on hand containers of white or blue color, then you can always take those that are and paint them with acrylic paint. As for the sizes, the smaller you want to get the bells from plastic bottles, the smaller the containers in terms of volume are needed.

- To make buds, we only need the tops of bottles with corks. From them we cut out the petals of the desired shape.
- Then we bend and heat each petal over the flame to make it more voluminous and realistic.
- To make the lily of the valley look just like a real one, make small holes in the corks and thread them through the wire.
- To create a bush, wind the wire with a thin spiral cut from a green plastic bottle and hold it over a fire so that the plastic melts slightly.
- Hang the wire with bells on the branches of the bush.
- Cut large green lily of the valley leaves from green bottles.
Luxurious home roses
A bouquet of roses made by hand can not only delight the eye every day, standing on the desktop, but can also become a wonderful gift beloved mother or grandmother. In general, the peculiarity of the manufacture of plastic flowers lies in the understanding of the main principle on the basis of which roses, lilies, cornflowers, and asters are created. Therefore, to consolidate the material covered on daisies and lilies of the valley, we offer you a master class on creating chic roses.

The source materials are the same, so let's go directly to the creative process:
- According to the templates previously drawn on cardboard, we cut out 7 plastic blanks (each next one is smaller than the previous one).
- We make a small hole in the middle of each blank with an awl.
- All the petals are alternately melted over a candle or a lighter, slightly bending upwards.
- From a green plastic bottle, cut out the corolla of the sepal according to the cardboard template. Similarly, we make a hole in it and melt it.
- The role of the stem will be played by a wire wrapped in a green plastic spiral cut from a bottle. The winding must also be slightly heated over the flame.
- We put sepals and corolla blanks on the wire, starting with the largest. We press them firmly against each other, and bend the end of the wire with a loop.
- We cut out leaves from green plastic using a stencil, which should also be slightly melted and fixed with cuttings to the stem.
All! The most beautiful rose is ready! And this is what a small bouquet of roses might look like:

Plastic vases for natural or artificial flowers
Vases from plastic bottles - simple and beautiful crafts, in the manufacturing process of which you can even involve a child. The interior is made up of little things! Having chosen the material that is suitable in color and texture, it will turn out to make a beautiful vase that will look appropriate both in the kitchen and in the living room or in the nursery. So, if you try, you can save money, have fun and create a practical little thing.

To create an incredibly beautiful vase, we only need a bottle, scissors and some free time.
- Cut off the top of the bottle approximately in the middle, leaving enough space for the fringe plexus.
- Make equal cuts from top to bottom.
- Carefully fold all the resulting strips outward.
- Turn the bottle upside down to make sure the cuts are even on all sides.
- Start bending the strips one by one, as shown in the figure.
- Continue until all stripes are intertwined.
In addition to a vase, you can also make products from plastic bottles like a planter. Here are some ideas and examples of their design:


Useful little things made of plastic to give
How many unique creations can be made from the bottles that we send to the bin every day.
Plastic bottles - great material for creativity, which costs almost nothing.
For creative self-expression in a summer cottage, you just need to collect more soda bottles, stock up on scissors, glue and paint. We have tried to collect for you the most different ideas and options and workshops for creating crafts from plastic bottles step by step.
Comfortable and beautiful pouf
To make a cool do-it-yourself ottoman from plastic bottles in the country, you will need only 16 (but more can be) empty soda bottles closed with corks. Turn them upside down and tape 2 pieces together. Then connect all the pairs together. Attach cardboard circles of the appropriate diameter with adhesive tape from above and below.

Wrap a plastic bottle ottoman in foam rubber for extra comfort. Finally sew the day out of it old clothes beautiful cover. No one will even believe what your new item furniture!

Broom for the hostess
With a few plastic bottles and scissors on hand, you can quickly and easily make a broom for an ownerless stalk that has been idle for a long time. To do this, cut off the bottom of the bottle and cut the plastic into small strips, not reaching the neck by 4-5 cm. The same should be done with two more bottles. Then cut them lengthwise, connect and attach to the handle.

Such a broom made of plastic bottles, of course, is unlikely to cope with sweeping litter on the carpet, but it can handle small debris in the yard!
Own palm tree to the envy of neighbors!
Most trees from plastic bottles are made according to the same pattern. For work you will need:
- brown and green bottles;
- scissors;
- paint cans;
- wire.
So, how to make a palm tree from plastic bottles that will delight the eye both in hot summers and in snowy winters, while remaining evergreen:
- Cut off the bottoms of the brown bottles with scissors.
- The collection of a palm tree trunk occurs by inserting one bottle into another and so on until the required height is obtained. In this case, all elements are strung on a wire that passes through the neck.
- The top of the tree is the neck of a green bottle without a bottom.
- Made of green plastic equal parts cut strips imitating palm leaves.
- Don't forget to melt the cuts if you have a curious toddler who might cut himself on them.


A palm tree made of plastic bottles is not afraid of rain, snow, or wind. Having made at least a few of these exotic palm trees, you can coolly transform a flower bed by adding tropical notes to its design.
Before you start working on any product from a PET bottle, we want to give you some useful recommendations in the end:
- To make the craft clean and tidy, before starting work, thoroughly rinse the bottles under running water, dry and remove the stickers from them.
- It is most convenient to cut graceful details according to the template. Draw a pattern on cardboard and, attaching it to the plastic base, circle it with the tip of an awl or a permanent black marker.
- The shape and volume of a plastic element can be given by holding it for some time over the flame of a candle or lighter.
- It is more convenient to paint plastic before cutting, and in the end it remains only to correct the nuances of painting.
- Acrylic paints are best for painting small crafts, while crafts intended for the garden or garden can be painted with spray or car paint from a balloon.
- To keep the finished craft from a plastic bottle longer, cover it with a layer of colorless acrylic varnish.
