Installation of windows in a stone house. Overview of the technology of installing pvc windows in houses made of wooden building materials. Installing windows on wooden support blocks is the easiest option.
Double-glazed windows are undoubtedly better than ordinary windows: with glazing beads dried up from time to time and gaps between the glass and the frame smeared with mastic. But PVC frames are so airtight that they practically do not let air through - they “do not breathe”. The ideal solution would be to install a double-glazed window in a wooden frame. In old houses, the windows are so skewed that it becomes necessary to completely dismantle the window along with the opening. Installing wooden windows with your own hands is not difficult, but delicate. It is necessary to take into account the characteristics of the building materials that make up the building. Regardless of whether the house is wooden, brick or made of standard panels, window installation begins with cleaning the opening.
Fixing window frames
 In a wooden wall, the frames are attached to the casing. In stone - to mortgages or anchors - to brickwork.
The thickness of the frame must correspond to a certain size. It is calculated as follows: the value of the average air temperature over several years of the coldest months, however, a value above 22 cm is already unacceptable. This is important in order to calculate the dew point. If it is on a double-glazed window, the window sill will always be damp. If the air temperature in winter is below 22 0 C, you should take care of additional thermal insulation of the window opening. Or install a double-glazed window with triple glazing.
The distance from the window frame to the inner edge of the wall should be at least 10 cm, and to the outer one.
A cement pad should be installed under the window sill, then nailed to the bottom mortgage. If it is necessary to fasten with dowels to masonry, it is necessary to drill mounting holes in the window sill three-quarters of the diameter of the nails. In cases where the frame is attached to anchors, you should not rush to install the window sill.
Before you start fixing the frame, you should lay a layer of thermal insulation from roofing material or construction silicone.
 Regardless of the material from which the double-glazed window is made: PVC or wood, the instructions should be followed when installing the package. It is necessary to make wedges - ordinary boards, as thick as the size of the gaps between the wall and the frame. One of the edges of the board needs to be cut to a wedge. By inserting the wedges, the position of the frame is adjusted, which is attached to the jamb so as not to pierce the wedge. After fixing the frame, the wedge is removed, the gap is filled with mounting adhesive. If the distance between the frame and the jamb is significant, building silicone should be introduced into it, after which it should be treated with mounting foam.
With a significant skew of the frame, the gap should not be clogged with solid materials - the shrinkage of the house will continue in this place.
Window installation video
Common plastic structures are actively beginning to give way to wooden counterparts. The installation of wooden windows is gaining popularity, since wood compares favorably with plastic structures with its environmental friendliness and the ability to "breathe". You can install wooden windows in the house yourself, observing the correct technology. The installation technique is almost identical to the installation of PVC structures, with the exception of some nuances, which we will discuss below.
Front of installation work
In order to make a high-quality installation of wooden windows yourself, you need to break the work into small steps, thanks to which independent homework will turn into success. So:
- we clean the window opening and take accurate measurements;
- install a window in the opening;
- fix the installed structure;
- create isolation;
- adjusting and setting up fittings;
- We are doing trim work.
The technology of work will be the same regardless of where the installation takes place: be it windows in a frame house or apartment. Intending to carry out the installation of windows in the house, it is advisable to complete the main stages of construction in order to avoid additional pollution. By the way, the installation of wooden windows will be inexpensive. One installation will cost approximately 3 thousand rubles, excluding the cost of consumables.
Preparing the window opening
To begin with, the window opening is cleared of the remnants of past plaster and other technical residues. In the case of brickwork in which voids have formed due to the destroyed material, it is recommended to eliminate them.
 First you need to carefully and carefully prepare the window opening
 The principle of the preparatory stage is to fit to the desired size, which must be carried out with great care, avoiding noticeable errors. All surfaces are cleaned of elements of past plaster and other residues. Installation of wooden windows in accordance with GOST provides for a gap of a fixed width around the perimeter of the box, which, upon completion of alignment of the entire structure inside the openings, is filled with mounting foam.
 Installation of a wooden window according to GOST provides for the presence of gaps between the frame and the opening
 It is not recommended to leave unnecessarily large gaps in the edge areas, preferring a width of 10 to 15 mm, so that subsequently the voids can be well foamed. A gap of 40-50 mm is left along the bottom of the window structure.. Such a nuance is necessary for the high-quality alignment of windows inside the openings. Always remember that before the stage of installing windows in the openings, the geometry and dimensions are first checked. This step allows you to achieve the correct work, excluding possible distortion and disproportion of parts.
Sometimes craftsmen violate technological points by making wall lintels incorrectly, since the window opening is used as a formwork with a window immured inside. Such actions lead to additional financial costs equal to the price of a new design, because the window frame is very tightly placed between the edges.
 If we neglect the technological principles of installation, the design will soon require replacement
 In extreme cases, it may be necessary to completely dismantle wooden windows. Do not forget the GOST recommendations regarding clearances, then the work is guaranteed to be successful.
End-to-End Method
When installing wooden windows, the through-mounting method is often used, which involves the use of dowels in the work. The method is characterized by low cost and relative simplicity, allowing you to do the installation of the window yourself. Upon completion of the installation work, the fixed box will be completely immobile inside the window opening and will be reliably protected from environmental factors.
 Through installation of wooden window blocks is simple and cheap
 The occurrence of accidental distortions, various kinds of displacements and deformations of the structure during installation work is excluded. The use of dowels provides strength of fixation, which cannot be achieved with anchor bolts. Since the dowels are presented in the form of a hollow sleeve, it is impossible for the screws to penetrate deep into the wall. Perhaps these are the main advantages of the through-mounting system, which make it very popular among installers and customers.
It is worth mentioning the secondary advantages. Firstly, the installation of windows using the through method will please you with minimal financial costs. Secondly, it does not require special tools, allowing you to get by with a set of existing ones. In the process of work, it is only necessary to make holes with a drill, fix the dowels and, finally, attach decorative plastic caps over the screws.
 Holes for dowels are made with a drill
 Using the through method, when installing windows, attention must be paid to the correct choice of the place where the dowel holes will be located. The four-stage section of the profiles of window structures allows drilling holes at an exceptionally uniform level. It should be borne in mind that experts strongly do not recommend making holes in different places..
Mounting blocks for window installation
Do-it-yourself installation of wooden windows involves the use of mounting blocks, which makes the process inexpensive and quick to perform. Mostly used pads, the thickness of which is 50 mm. They are a block of wood impregnated with an antiseptic, which is installed on a waterproofing layer. The arrangement is made exclusively horizontal, running parallel to the upper edge of the window structure. In order to ensure correct actions during installation, it is first necessary to free the window frame from frames and other components.
 To install windows on the pads, a perfectly even opening is required
 The structure is installed inside the mounting block, using a laser or a simple level, carefully checking the levels on each side. It is desirable to make the upper and side gaps the same, leaving 10-20 mm each. The number of pads can be determined using a graphic with possible placement options.

Mounting with plates
Plates can be made independently, although many window manufacturers include them in the package. A simple technique is designed to make fixation and fastening especially strong. The method is very simple to perform: the plates are screwed with screws to the window frame on both sides, placing two of them on the top, and two on the bottom.
 The plates provide a secure fixation of the window.
 In the case when the window exceeds 1.5 meters in height, two additional plates are attached to the center of the product. As the wedging of the body inside the opening is completed, the plates protruding from both sides are fixed along the edge of the openings with screws with dowels. Before foaming the seams of a wooden window, protruding wedges can be pulled out. But it should be borne in mind that subsequently it will be necessary to carry out an additional check for the correct horizontal position of the case.

There is another simple way to install wooden windows yourself, which is highly reliable and durable, which we will consider further. When installing wooden windows with double-glazed windows or glass, they must be removed, which is very easy to do: the glazing beads are carefully separated and the glass is carefully pulled out.
 Mounting the frame on self-tapping screws is carried out without glass - it is installed last
 Further, on the sides and along the top of the inner surface of the frame, places for holes are marked, followed by drilling. Before you start drilling, the frame must be inserted into place and carefully aligned with a level. After that, the self-tapping screws are screwed in, taking into account that they can be moved without effort, since the body has yet to be adjusted according to vertical and horizontal indicators. Finally, a double-glazed window is installed and the structure is cleaned of contaminants.
Isolate wooden windows
The correct installation technology of wooden windows provides minimum thermal conductivity and excellent insulation, protecting the room from moisture and air masses. It is important to consider that a high degree of the listed characteristics is achieved by the increased cost of the window, since in order to create a high-quality thermal insulation system, it is necessary to conduct it around the entire perimeter of the case. Preference in this should be given to polyurethane foam for mounting, which is easy to buy in most specialized stores.
 The thermal insulation of the installed window block made of wood is performed using foam
 When filling the space with foam, it is necessary to monitor the thickness of the applied layer, which along the edge part should not go too far when expanding. Excess foam will only stain the space and lead to a banal overrun. It is also necessary to control the humidity, since the ingress of water is unacceptable to ensure the coupling and reliability of work.
Even a rookie will be able to insert wooden windows on his own and with high quality. The main thing is to follow the basic rules and move step by step without missing important details.
Wooden windows are practical and durable. If the windows were installed by professionals and they did it flawlessly, the products are properly maintained, then the window owners will use them for many years.
For people who prefer to do everything with their own hands, the specialists of our company have prepared the following instructions.
Fixing the box with dowels
When inserting wooden windows, it is better to fix them with a dowel through and through. Nothing presses on the box if, when mounting it in the opening, it is leveled. A dowel with a hollow sleeve will allow its original location relative to the opening to remain. This method differs from fastening with anchor plates - some deformation is possible with them. The dowel shoulder is a stopper that prevents the screw from moving towards the wall. Also, with a dowel, the window frame will not overtighten accidentally and will not bend - this method differs from fastening with spacers. For fastening with a dowel, you do not need a special tool or special nozzles - this is how it differs from fastening with a universal self-tapping screw. By hiding the screw head under decorative plastic caps, you can hide defects such as chipped wood.
Workers performing the installation are required to adjust the fittings of wooden windows. After all, sometimes it is the regulation that can reduce certain production shortcomings - the wrong geometry of the beam, minor defects due to violated parameters. It is necessary to carefully select the point of the box for the hole where the dowel and screw will be screwed. In the profile of the box - 4-step section. So, you can drill only at one step - the 2nd from the inner surface. If you drill at the first step, the beam will bend. At the 3rd and 4th steps, it will fall under the influence of precipitation, and the screw will rust.
Wall opening preparation
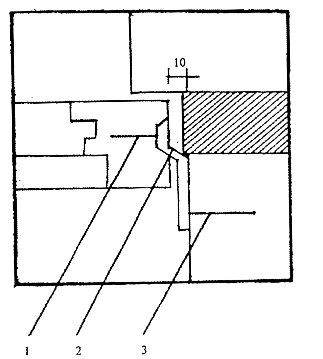
A wall opening is preliminarily prepared in a stone or wooden house. Often at construction sites they practice the use of a box as a component of the formwork - this is how a window lintel is arranged. It is forbidden to wall up the window frame in order to fix the window in the opening during installation. As a result, the window is tightly crimped, there are no technological gaps and mandatory insulation. Bad: the window is loaded with wall structures and does not work properly. Examples of window mounting - in fig. 1 and 2.

Rice. 1. Installation of a window frame in an opening without a quarter:
a - a window opening without a quarter; b - window frame: (1 - drain; 2 - window sill; 3 - plank; 4 - thermal insulation layer; 5 - box plank)

Rice. 2. Installation of the window box in the opening with a quarter:
a - a window opening with a quarter; b - window box (1 - mounting box; 2 - drain; 3 - thermal insulation layer; 4 - insulation; 5 - window sill; 6 - plank)
It is supposed to leave openings for windows with parameters slightly larger than the external parameters of the window frame. The width of the box is 2-4 cm less than the width of the window opening, and its height is 6-8 cm more (the difference is 1-2 cm in the upper part, and 6 cm in the lower part). The opening angles are 90°. The difference in the length of the diagonals is no more than 1 cm. In the case when the opening in the wall is large, it is necessary to spend more insulating material. If the angles of 90° are violated, the box will be skewed. The smoothness of the internal surfaces of the opening is obligatory - there should be no recesses. It is necessary to achieve perfect evenness and horizontal position of the bottom surface of the opening. The layer of material for her is dense. The thickness of the internal waterproofing is greater than the thickness of the window frame.
The insertion depth of the window is carefully verified - this is due to the need to pass the dew point isotherm (10 ° C) inside the structure. This prevents condensation from forming inside the window. If the wall is thermally insulated by laying a layer of mineral wool or foam plastic, then this layer will become a limiter for passing the dew point isotherm. In this regard, the level of installation of the window is precisely the level of the thermal insulation layer. It is technologically and conveniently to mount the window using a mounting block, as in fig. 3.

Rice. 3. Mounting the window on the mounting block:
1, 2, 6 - mounting block; 3 - window opening without a quarter; 4 - waterproofing layer; 5 - block fasteners; 7 - dowel; 8 - waterproofing layer
Make an indent in the opening, parallel to the outer edge of the wall. Then, the mounting block (height - no more than 5 cm) treated with an antiseptic solution is fixed horizontally, and waterproofing from below. It is possible to facilitate the installation of the window by initially removing the sashes. The window box is attached to the mounting block, then its sides are set to the desired position by means of a level. Fix the box using wedges. It is important to observe an equal gap from the edges of the opening to the window frame. See fig. four.

Rice. 4. Places for fixing the box in the window opening

Rice. 4a. Places for fixing the box in the window opening
It is recommended to fasten windows with mounting plates - companies complete windows with them or they can be made separately. Before the box is mounted in the window opening, the mounting plates are mounted in the middle on the box from 2 sides, measuring 25 cm from the corners. If the window size is 1.5 meters, 2 more mounting plates are placed in the center of the sides. They are fixed on the box (fasteners - galvanized wood screws, 4x40). Having initially installed the box, having fixed it with wedges, the mounting plates are fixed on the wall with dowels - as in fig. 5.
Rice. 5. Fixing the window with mounting plates:
1 - wood screw; 2 - mounting plate; 3 - dowel
Fastening with "wood chopsticks"
If there are no dowels, you can use "chopics" made of wood. This type of fastening is more suitable for wooden houses. First, they are hammered into the wall - the placement height is similar to the height of the mounting plates fasteners. The use of wood screws (8x100) is justified here. Occasionally, the window is fixed with a dowel through the box, see fig. 6.

Rice. 6. Fixing the window with screws and dowels
Insulation
Having fixed the window, pull out the wedges to support the box, again check the dimensions of the diagonals of the box, whether they are perpendicular to the plane. Among the properties of wooden windows are low heat transfer, windproofness, and moisture resistance. In order for the window to have the indicated characteristics, it is necessary to isolate the window opening using mounting foam - after application, it will expand, filling the gaps. It is imperative to more clearly dose the amount of foam released into the slot - if not controlled, then the excess will burst the surface and deform the box. This can be avoided by using a plank spacer or a gymnastics bar - its length is adjustable. Many people are skeptical about polyurethane foam as a universal material, they use other materials for insulation. Sometimes they are isolated with waste synthetic fibers; glass or mineral fibers sealed in polyethylene can also be used.
The box is covered with a uniform layer of insulation that does not have gaps. Its thickness should be the same everywhere. The outer side along the gap is treated with waterproofing material. Pay special attention to the gap along the bottom of the frame, metal joints and corners! For their waterproofing, resistant elastic putties based on silicone are good. When the foam hardens, the window sashes are hung - they check how the window works, adjust the fittings and lubricate the moving elements according to the instructions. When opening or deflecting the window sashes, the movement should take place without friction and unnecessary effort. It is necessary to check the equal fit of their surfaces along the window perimeter to the surface of the box.
Hardware setup
Wooden windows are returning to residential buildings. PVC, for all their merits, "does not breathe." And in a wooden frame, you can put exactly the same double-glazed window, and provide the window with an opening mechanism in two planes. In addition, a PVC window that can last as long as a tree turns out to be much more expensive. But in older houses, window openings often turn out to be skewed, and the work of installing custom windows is expensive because of this. However, if you have the basic skills of a carpenter, installing wooden windows with your own hands is quite feasible for you. Next, we will describe how to do this in buildings of various kinds.
Opening: cleaning, measurements, preparation
What's up there?
First of all, if the house is stone, we knock down slopes and plaster along the top of the window opening. Purpose: to find out if there is a lintel in the opening, or if a section of the bearing wall lies simply on the window casing; this is a common construction "hack".
If the house is stone, and there is no lintel - alas, you can’t work further, but you need to consult with the builders to correct the defect. Living in such a house is simply dangerous, especially if it has two or more floors. But do not be alarmed if in a very old house there is a castle made of bricks or stone instead of a lintel: this is in the order of things, quite reliable, and work can be continued. Also, in block houses, lintels, as a rule, do not exist: reinforced concrete slab monoliths are already made at reinforced concrete structures with window openings.
As for wooden houses, they are either assembled on a frame or made in a log house. In them, the window openings either do not carry loads at all, or are lightly loaded, and you don’t have to think much about the lintel.

Mortgages
Now you need to bring down the slopes around the entire perimeter of the window, inside and out, and remove the window sill. If a quarter is provided in the opening - the influx of masonry from the outside onto the opening, this is very good. But now we need to check the presence and condition of mortgages: wooden bars embedded in the wall masonry specifically for window installation.
If the mortgages are in place, we check their condition: we stick an ordinary shoe awl into the tree a third of the length of the rod and pull it back. If it doesn’t go a third from pressing it with your hand, or it’s impossible to pull it back without swinging or grabbing the rod with pliers - this is good, the mortgages are strong. If not, they will have to be replaced.
And if there are no mortgages at all? It’s also okay, it’s possible to insert wooden windows into openings in a stone wall without them.
measurements
A window opening cleaned to masonry (or to casing in a wooden house) must be carefully measured. If several windows are to be replaced, clean and measure all openings. The goal is to determine the configuration of the opening, and according to it, the dimensions of the new window.
Even a house built by the most conscientious builders shrinks over time, and it never happens to be absolutely uniform. The new window should be slightly smaller than the rectangle inscribed in the opening. The gaps that must be maintained are indicated in the figure: 15-25 mm on the sides and top and 40-60 mm at the bottom.

Measurement must be made based on true horizontals and verticals. Without any hassle, it is done with a laser tape measure. If it is not there, on the wall above the opening we draw a horizontal line along the level, and on the side along the same level or plumb line - a vertical line.
For a guarantee, you can beat off the second horizontal on the bottom, the second vertical on the other side, and measure the diagonals of the resulting rectangle. If they are equal - everything is in order, the measurements will be accurate. Windows can now be ordered from them.
How to fix windows?
Before ordering or making windows yourself (see below), you need to decide how the windows will be fixed and how they will open. In a wooden house, there is no choice regarding the method of fastening: through the frame to the casing.
If mortgages are provided in window openings in a stone house, and the opening itself is not very successful, then it is better to fix it here in the same way. The selection criterion will be the difference in the length of the diagonals of the clean opening: if it is no more than 10 mm per 1 m of the length of the diagonal, we fix it through. If it turned out more - you need to fix it with anchors to the wall.
For example: the size of the opening is 90x120 cm. The estimated length of the diagonal is 150 cm (according to the rule for a rectangle). The actual lengths of the diagonals are 1507 and 1494 mm. The spread is 14 mm, and 15 mm is permissible at 1.5 m. Can be fixed through.
In the apartment of an old damp block reinforced concrete house (in Khrushchev) there is also no choice: only to the wall with anchors. In block houses, mortgages for windows are not made. But in a block house with a technical floor or an attic, it can be fixed through and through.
How will the window open?
If the window opening allows fastening through, the window opening mechanism can be any, even when hung on anchors. If it is decided to fix with anchors due to a skewed opening, then it is better to limit yourself to opening in one plane: hinged doors, one turn-around leaf, a folding or tilting leaf or a horizontal-turning leaf.
The fact is that a wooden frame can be warped from an uneven load. Very oblique window openings indicate that the building is shrinking unevenly. Fixings through the frame are rigid connections between the window and the wall, and the opening mechanism in two planes can jam from a much smaller distortion of the frame than a simple one.
What is the length (“thickness”) of the frame?
The length ("thickness") of the frame must be such that the so-called dew point is between the panes. Simply put, fogging of the inner glass is unacceptable. The approximate length of the frame in centimeters can be equated to the average sub-zero temperature over the years in degrees of the coldest month (January - February) in your area, but in any case, not less than 12 cm and not more than 22 cm.

If the frame length is more than 22 cm, it is necessary to provide additional thermal insulation in the opening during installation, or triple glazing, as they do in the Far North. It makes no sense to put a thin double-glazed window in a long frame: then it’s better to put traditional glass on glazing beads and putty. But you can put two thin double-glazed windows: you get quadruple glazing, and you don’t have to think about the dew point at all. True, it will cost money.
It is also necessary to coordinate the length of the frame with the thickness of the wall: the internal slope must be at least 17 cm; outer - at least 10 cm. If the masonry of the opening with a quarter, and this does not allow making an internal slope of the desired width, then the frame can be made shorter: the quarter itself already provides additional insulation.
Installation of wooden windows in stone and concrete
Do-it-yourself installation of wooden windows in the openings of stone and block houses of various types begins with. Under it, it is better to make a cement pad and level its surface to a horizontal plane. An attached (hanging) window sill, mounted after installing the window, does not make the job easier, but it holds much less firmly, especially if the walls are thin. Window sill thickness 30-50 mm; if the window sill is thicker, the lower gap in the opening must be increased in advance by reducing the height of the window.
The window sill is nailed with three or four nails to the bottom mortgage or with 6 mm mounting nails (dowel-nails) to the stone. In the latter case, before installation, it is necessary to drill mounting holes in the window sill with a diameter of 3/4 of the diameter of the nail, mark the places for holes in the wall for the sleeves of the mounting nails, drill holes and drive the sleeves there. Three holes in a row are enough, with the extreme ones indented 150-200 mm from the edges of the opening. The outer edge of the window sill should be flush with the outer edge of the frame. The indentation of a number of mounting holes from the outer edge of the board is one and a half of its thickness.
Note: if it is supposed to be fixed with anchors (see below), then the window sill is not set in advance - it will interfere. Will have to tinker with it later.
Then, if the masonry is with a quarter, insulation from roofing felt or polyurethane foam is applied to the inside of the quarter. Insulation can be laid on building silicone: there will be no load on it, and then it will press against the window frame, so there is no point in messing with fasteners.
Option 1: a good opening in a good wall
If the opening is “quite rectangular”, and the house is dry block or sand-lime brick, then it is advisable to install the window in the simplest and cheapest way: on blocks. Mounting pads are simply pieces of board or slats as thick as the gap between the frame and the wall and 120-150 mm wide. One wide edge of each block is slightly, not to the point, reduced to a wedge.

The location of the blocks for windows of various types is shown in the figure. First put the support pads; then - spacers. The horizontality of the crossbars of the frame is continuously controlled by the level, and the verticality of the sidewalls - by a plumb line. The pads should not sit very tight; it is necessary that any block can be pulled out with your fingers. If necessary, the blocks can be trimmed or removed with a coarse sandpaper.
After leveling the frame, the pads are removed one at a time, starting with spacers; building silicone is applied to the places under them, both on the frame and on the wall, and the block is put back. Streaks and influxes of silicone from the outside are immediately removed with a rag moistened with table vinegar.
After the silicone has hardened, the gap is blown out with construction foam. How to blow out the gap between the frame and the wall is described below. At the end, the influx of foam is cut off with a mounting knife, slopes are made, sashes with glass are installed - that's it, the window is ready.
Note: if you are sure that you will never have a hurricane, you can do without silicone and immediately blow with foam. But the foam is not designed to carry the load, and watching the wind squeeze out the window just when it cannot be repaired is a relative pleasure.
Option 2: a good opening in an unimportant wall
If the house is made of ceramic brick, cinder block, shell rock, etc. weak material, but dry, and the opening is flawless, it is advisable to install the window with a mount through and through. To do this, first of all, holes for fasteners are drilled in the frame: mounting nails with a diameter of 6 mm; hole diameter - 5 mm. The length of the dowel nail should be 80 mm + gap width + frame thickness. For example, if the frame is made of magpie timber, and the gap is 20 mm, then the length of the nails is 140 mm.

On the side of the frame up to 1.5 m long, there should be 3 holes: two with an indent of 150-200 mm from the corners; the third is in the middle. In frame elements more than 1.5 m long, 4 holes are drilled: two extreme ones with the same indent from the corners, the rest - evenly along the length. For very long or high frames, the spacing between the fixing holes should be no more than 600 mm.
Then the frame is placed in the opening, leveled with blocks, as already described, and on the wall, through the holes in the frame, mark the places for the holes for the nail sleeves. The holes for the sleeves are drilled by removing the frame, according to the diameter of the sleeve and a depth in its length + 30 mm for dust and crumbs. It is not necessary to drill holes in the window sill: the frame is simply nailed to it with ordinary nails.
Attention! Holes for fasteners should not pass through the pads. If any of them fell on the block, it needs to be moved.
After drilling, the sleeves are driven into the holes, the frame is placed again and, without removing the pads, they are fixed with nails. Then they take out the pads, blow out the cracks with foam, make slopes and put the sashes. This completes the installation.
Note: if the pads had to be adjusted, they are marked on the ends before being removed. When installing in a skewed opening, this must be done.
Option 3: oblique opening in any wall
It is possible to reliably place wooden windows in a skewed opening only on anchors - metal strips with holes. Anchors can also be made from strips of tin or galvanized steel, but the game is not worth the candle: the price of factory anchors is cheap, and it is much more convenient to work with them.
Anchors are attached at the ends with self-tapping screws along the outer perimeter of the frame so that they stick out inward. These "tails" will then hide under the slopes. The number and location of anchors is the same as holes for fasteners through.

Note: it is often advised to first attach small intermediate fastening strips to the frame, and then use them to fasten the frame to the anchors. This is justified in professional construction of a large volume: one worker quickly, without losing the rhythm, fastens anchors to empty openings, and then two, also without losing the rhythm, move and screw the windows. When installing one or several windows yourself, it makes no sense to spend money on extra fasteners.
The frame with anchors is pushed into the opening to the place and leveled with blocks (do not forget about the level with plumb lines - the opening is oblique!). Then, drilling is marked on the wall through the holes of the anchors, the anchors are bent, holes are drilled for the dowel-nails, the anchors are bent back and fixed with the dowel-nails.
After that, it is MANDATORY to remove the pads; the window frame should hang in the opening on anchors. An oblique opening indicates either the negligence of the builders, or the natural uneven shrinkage of the building, so there should be no rigid connections between the window frame and the walls.
Finally, the gap is blown out with foam (the window sill will be hanging in the oblique opening - nothing can be done) and, as always, the sashes are placed.

Note: sometimes there are tips - to level the opening with a cement screed. Martyshkin's work. No screed will stop uneven shrinkage. Even the most notorious coveners still lay not home-made crooked bricks. The negligence of the builders, which led to uneven shrinkage, hid even during the design. But uneven shrinkage can also begin later, when the properties of the soil change with a completely conscientiously completed project.
How to blow out a gap with foam
To blow out the gap between the frame and the wall with foam, you need to buy or rent a foam gun. The gap is blown in two or three passes with thin "sausages" from the middle inward, and then in the same way, in several passes - from the middle outward. Only with this method of blowing, the pressure from the foam that swells during hardening will be distributed evenly around the perimeter of the frame and will not lead it.
Wooden window in a tree
In a wooden house, installing windows comes down to planting them in a casing on liquid nails. For strength, you can grab through with nails or self-tapping screws. Slots outside and inside and holes with fastener heads are sealed with the same irreplaceable liquid nails, and platbands are also attached to them. But the platbands also need to be strengthened additionally, with ordinary nails or self-tapping screws - there is wind outside.

And what if the casing is oblique, or not in size? In this case, the casing must be adjusted to size and leveled. This is done with beams, planks or slats on liquid nails. For alignment, the necessary ones are driven, as far as necessary, onto a wedge - on a jointer, a small circular saw with a meco-toothed circle or manually, a hacksaw for metal (yes, yes - you need a very fine tooth, and so that you can cut obliquely fibers) or a bow saw or a planer. The latter, of course, requires the working skills of a carpenter.
About blind windows
Windows for installation in houses are used ready-made. Making a good and beautiful window is not an easy task even for an experienced carpenter. But sometimes - in the attic, in the barn, garage or in the country - you need to make a small blank window. Such a window can be made independently by typing a frame of bars and slats.

What should be the profile of the window frame can be seen in the figure. Pay attention to the protrusions highlighted by the lightest at the bottom. These are teardrops. Their purpose is to prevent water from flowing into the frame. They must be made on the lower cross member of the frame, but in no case should they be made on the upper one: there they will turn into moisture traps. And on the sidewalls, they are useless.
***
So, now you know how to install a wooden window in any window opening of any building. As you can see, the work itself is not difficult and not difficult, but it requires preliminary consideration of many different factors, and when it is performed, quick wit and accuracy.
(No ratings yet)
Unlike PVC, wooden windows are distinguished by reliability and environmental friendliness. There is a myth that wood is more expensive than plastic, but this is not true. If we compare the service life, then PVC, which can withstand the same number of years as a tree, will be much more expensive.
However, there is one difficulty that arises when installing wooden windows. In most old houses, you can see skewed, uneven window openings, which are sometimes difficult to handle even for an experienced builder. But if you are at least a little versed in carpentry, this obstacle is quite surmountable. Consider several typical situations for installing wooden windows in different houses.
Preparation of window openings. Is there a ceiling?
If you live in a stone house, you need to find out if there is a lintel in the window opening. To find out, we remove the plaster and slopes on top of the window. If part of the load-bearing wall is not on the lintel, but on the window casing, it is impossible to continue any construction work. It is better to consult with experts to find out how to fix the problem.
Sometimes in old houses there is no lintel, and instead of it there is a stone or brick castle. In that case, there is nothing to worry about. The same is true for block or wooden houses - most often there is no need for a lintel.
Checking wooden mortgages
If the mortgages are in place, you need to make sure that they are not damaged. To do this, it is enough to stick an ordinary awl into them, up to about half. Can the pin be pulled back freely? If the wood is rotten or soft, mortgages will have to be replaced. If they don't exist, that's okay too. There are quite a few ways to install a wooden window without them.
Mortgages are wooden beams embedded in the wall. They are designed to install windows on them.
Measuring window sizes
Regardless of how well the house was built, over time, any structure shrinks. Our task is to find out the exact dimensions of window openings. To do this, we clean everything to masonry, and in a wooden house - to the casing. After that, we take measurements. Thanks to the exact dimensions of the opening, it will be possible to determine the width and height of future windows.
Keep in mind that the window will be slightly smaller than the opening. It will be necessary to make small gaps of 15-30 mm on the right and left sides, as well as 35-55 mm on the top and bottom. To determine the dimensions of the correct rectangle, it is best to use a laser rangefinder. If not, you will have to measure manually. Having established the exact dimensions, it will be possible to safely order windows.
What is important to know
To begin with, it is necessary to clarify a few important points. This will save you from unexpected "surprises" later. You need to define the parameters of the future window:
- Fastener type. If the house is wooden, the windows will be attached to the casing through the frame. Similar fasteners can also be used in Khrushchev, for example, with anchors to the wall. An exception will be Khrushchev with an attic - through fasteners are suitable here. However, in stone houses, everything is much more complicated. If the mortgages and the opening are in order, we attach to the casing. If the window opening is in extremely poor condition, it is best to consult a specialist.
- Opening and closing. In the case of skewed openings, it is better to install windows with a mechanism that moves only in one plane. If this is neglected, due to the heavy load, the tree may lead to the side.
- Frame thickness. It should be in the range of 120-200 mm. It all depends on the lowest possible temperature in your area. If you have it, for example, equal to -15 ° C, the thickness of the frame must be made 150 mm. This is necessary in order to prevent fogging of the glasses inside the package. In addition, pay attention to the width of the slopes: the outer one must be at least 100 mm, and the inner one - at least 170 mm. If the average temperature in your area is over -20°C, additional glazing is required.
Installation of windows in stone houses and block Khrushchevs
Before installing the window, you need to install the window sill, placing it first on an even cement layer. It is best not to use the attached version of the window sill - although it is easier to install, it can also easily collapse.
Usually the thickness of the window sill does not exceed 3-5 cm. We took this into account with you above, making measurements of the future window. There are two ways to fix the window sill:
- To the stone is a difficult way. Before installing the window sill, six holes for dowels must be drilled in the bottom of the stone opening. The extreme holes should be 15-20 cm from the sides of the opening.
- To a mortgage is an easier way of fastening. It is enough to attach the window sill with four nails.
After installing the window sill, we proceed to the installation of the window frame. In order not to break anything, remove all doors and fasteners from it. In Khrushchev or dry sand-lime brick houses, it is best to put the frame on blocks. Here, the installation will not differ much from the installation of PVC windows. The frame is placed on the upper and lower support blocks, and for greater reliability it is fastened with spacers.
Mounting blocks are trimmings of an ordinary board that are inserted in the gaps between the opening and the window frame. They should not fit too tightly, so that any of them can be easily reached.
For greater strength, it will not be superfluous to put the window on silicone, and after it dries, blow it out with mounting foam. So, in the event of a hurricane or strong gusts of wind, the window will remain in place.
Having fixed the frame, put the glass and fasteners in place. That's actually all: the window is installed. Now you need to complete the cosmetic part of the work and close up the window slopes. In this article, we will not consider all the nuances of installing windows in houses with broken walls and emergency window openings. We only note that we will have to tinker a lot to do everything as it should. If you do not have the proper installation experience in such cases, we advise you to contact professionals.
Order wooden windows in Perm
To ensure that wooden windows serve you as long as possible, order them from a reliable supplier. The manufacturing company "Perm DSK" offers quality products at affordable prices. You can order windows of the desired size and configuration from us. If you do not have installation experience, you can use our installation services.
Our company has extensive experience in this field. We give a guarantee on all products and work performed. In addition, for regular customers, we have additional discounts. To place an order, please contact us at one of the phone numbers listed on the site.
