Country crafts or useful tips. Tricky garden tool: making garden tools with your own hands. Video: Homemade manual cultivator for quick and effective weeding
A summer cottage is an area where you can give yourself the freedom to conduct numerous experiments and dream to your heart’s content. This manifests itself not only in interior design, but mainly in the design of a garden or vegetable garden. Inquisitive and inventive owners have long been no longer guided by expensive and standard methods for arranging their plots, since there are many alternative solutions in fact for all areas of activity.

There are several varieties vertical beds, which allow you to optimize the use of free space. Non-standard designs are a great opportunity to create interesting design garden, vegetable garden, summer cottage.

This type of beds is in most cases used for growing ornamental plants or herbs.
Materials for production:

Length drainpipes regulated in accordance with the wishes of the owner of the site. However, you should not make bulky beds, as they can complicate movement around the area.
Creating a bed

Stage 1. Create a container. To do this, take a drainpipe, cut it in half lengthwise and put special plugs on both sides.
Stage 2. We take the prepared metal holders and put them on the resulting frames for the beds.
Stage 3. We make holes in the pipe. They are made in those places where metal fasteners will be located.
Stage 4. We pass a cable or strong rope through the holes made.
Stage 5. Fix the cable/rope using fasteners.
Stage 6. Fill the resulting beds with expanded clay and soil.
Stage 7. Plant the plants in the beds.
Stage 8. We hang the pipes to the selected location. Sometimes a special wooden crossbar is installed for this purpose, or rather a structure in the shape of the letter “P”.
Step 9: Alternatively, a special design can be made for the pipes.

Important! A bed made of drainpipes is not resistant to strong gusty winds, so you should choose a place for it that is not blown from four directions by winds. Otherwise, the frame will quickly collapse, nullifying all your efforts.


A garden bed made from plastic bag, is another modification of vertical beds. It is extremely compact, functional and interesting in appearance. You can make such a bed in a couple of hours.

Materials for production:
- durable polyethylene film;
- sewing machine;
- priming;
- seedling.
In order for the bed to be strong, it is recommended special attention pay attention to thickness polyethylene film, which in this case will act as the “framework” of the structure. Minimum thickness films - 0.2 millimeters.
The process of creating a polyethylene bed

Step 1. We cut out 2 rectangular pieces of film, the size of which corresponds to the size of the bed being created. An allowance of one and a half to two centimeters should be left on each side. The recommended diameter of the bed is twenty centimeters.
Step 2. Sew the rectangles together, leaving only the top part bag.
Step 3. We sew a handle to the future bed, the strength of which will allow it to withstand the weight of the bag filled with soil. It should also be taken into account that when watering the weight will increase.
Step 4. Fill the bag with fertilized soil.
Step 5. We make horizontal cuts on the bag in increments of twenty centimeters. They are necessary in order to plant seedlings in the garden.
Step 6. Plant seedlings.
Step 7. Regularly water the soil and add the necessary fertilizers.
With these simple steps you can get a cheap and useful garden bed.


An integral element of every summer cottage is a compost heap. This is the place where all sorts of biochemical reactions take place to create fertilizers.
To create fertilizers that will satisfy all the requirements for them, you should carefully consider several key steps: creating the container and directly correct production the compost itself. Let's talk about each of them in more detail.

Stage 1. Take eight support posts of the same length.
Stage 2. Process the bottom of the wooden posts motor oil or tar.
Stage 3. We dig the posts into the ground so that they are reliable and stable. If the compost bin will be located next to the fence, then 4 posts (that is, one side) can be attached to the fence. This will avoid having to dig 4 holes.

Stage 4. Between each two adjacent posts we nail the crossbars so that we end up with three independent sections. Be sure to leave gaps that will serve as ventilation holes.

Stage 5. In two sections, we nail the boards horizontally to half the height of the pillars. In these places it is planned to create two small doors.

Step 6. The remaining section will have a large door, so only one board should be nailed. It should be located at the very bottom in a horizontal position, that is, like a regular crossbar.
Stage 7. Install the covers. To do this, you can use one large solid board.
Stage 8. Install the pre-prepared doors.
Stage 9. We provide the doors with handles and latches.
Stage 10. We process the wood using special impregnations.
Stage 11. Paint the box in any color that suits your preferences.

Many gardeners mistakenly believe that any components can be dumped into a compost heap. In reality, to create the right biofertilizer, the “ingredients” must be carefully selected.
Among the required components compost heap the following components:
- peat;
- ash;
- needles;
- tree branches;
- leaves;
- hay or grass;
- wood ash;
- plant roots;
- raw vegetables and fruits, etc.
All elements are randomly mixed in a heap. To speed up chemical reactions It is recommended to cover the pile with a tarpaulin (this is especially true if there is no box).

Trips to the dacha with the family require the presence of entertainment elements on the site that will delight children. The most common way to keep young summer residents occupied is a swing.
Building a swing yourself is not an easy task, but it is quite doable. Of course, you can always take a stick, tie it with a rope and hang the structure on a tree, but this can hardly be called a full-fledged swing. Real craftsmen prefer to build comfortable structures with a comfortable place to sit.

Structural components:
- two logs;
- strong rope.
Indicators:
- log diameter – 85 mm;
- log length – 700 mm;
- distance between ropes – 500 mm.
Making a swing
Stage 1. We stretch the ropes between the logs.
Stage 2. Wrap ropes around each log.
Stage 3. Let the ropes out.
Stage 4. Tighten the ropes to 3 knots.
Stage 5. Attach the swing to the tree.
Important: this swing is designed for only one person.
Garden path from scrap materials
There are several types of garden paths that you can easily make with your own hands.

Step 1. Remove the sidewall from the tire using a knife or saw.

Step 2. Cut the tires.
Step 3. Line the space with corrugated stripes.
Step 4. Paint the path with paint.
Step 5. Sprinkle with stone chips.
This is an economical option for those who do not want to rack their brains and waste time on a full-fledged garden path. Tire paths are usually used for vegetable gardens, as they are easily laid in the ground.

Stage 1. Paint the corks in different colors.
Stage 2. Dig a small trench.
Stage 3. We drive in supports to strengthen the future path.
Stage 4. We construct the formwork using boards.
Stage 5. Install spacers along the edges of the trench.
Stage 6. Place crushed stone deep into the trench and compact it thoroughly.
Stage 7. Make a solution from sand, cement, glue and water.
Stage 8. Pour the solution into the trench.
Stage 9. Press in the plugs in random order. Smooth multi-colored stripes look interesting.

These are the simplest and quick ways make a garden path without purchasing expensive materials.
DIY tools
The expression “everything comes in handy around the house” turns out to be more relevant when it comes to cans. From this plastic container can be done large number irreplaceable tools that are actively used in the process of dacha work.


To make this tool, we only need a sharp knife and the container itself.
Stage 1. Cut off the bottom of the canister.
Stage 2. Mark a cut line for the scoop on the container so that the handle of the canister is the handle of the future tool.
Stage 3. Cut off excess material.
Due to these simple actions we get an excellent scoop with a comfortable handle.

Materials:

Manufacturing
Step 1. Wash the canister thoroughly so that no odor remains in it.
Stage 2. Cut the canister vertically into two parts.
Stage 3. We make a groove on the board using a woodworking machine.
Stage 4. Apply glue to the plywood and insert it into the bottom of the canister.
Stage 5. Paint the resulting shelf using a spray can.
Of course, this design will not withstand a lot of weight, but it is quite suitable for storing small parts.

Materials:
- 40 cans;
- scissors;
- rope;
- paper;
- marker.
Stage 1. Pierce the top of the canisters with a knife.
Stage 2. Make a stencil from paper.
Stage 3. Apply it to the canister and outline it with a marker.
Stage 4. Cut out large holes using scissors.
Stage 5. We stack the prepared canisters in several rows, tying each row by hooking a rope under the handles of the containers.
Stage 6. We tie all the rows around the perimeter for greater strength.
Stage 7. If you plan to lean the cabinet against the wall, then drill it to the surface.
Stage 8. Place heavy objects - stones or bricks - in the bottom row.
The result is a fairly spacious and functional rack that will help get rid of the problem of storing many small parts.

Be resourceful and bold in implementing your ideas. Good luck!
Video – DIY crafts for a summer cottage
Video - We do it ourselves for the dacha
Today, a dacha is not just a garden with a house. Nowadays, the dacha is becoming a place for summer holidays. And any vacation implies a beautiful and cozy environment, so that everything around us pleases our eyes.
Therefore in recent years the fashion for creative design your dacha plot. Moreover, decorating flower beds is not the only possible direction for improving your dacha. Exists huge amount photo with ideas for a summer residence. But the M.Art company offers only modern types of landscaping using the latest technologies.
You can and should decorate the territory of your dacha using available materials: old things, unused furniture, parts from cars, and the like.

Thus, you will not only get rid of trash and decorate your dacha, but also get pleasure and satisfaction from the work done.

We will tell you in detail below about best ideas for a do-it-yourself dacha.
Craft ideas
When decorating a site using available materials, your main assistant should be your imagination. For example, plastic bottles can become both original flower beds and guiding paths.

In addition, it is easy to create animals and birds from bottles and decorate your territory with them. Ordinary stones are also a good material for decoration. They are often used to frame your own pond.

Car tires have long been the best flower beds, but now they have learned to make swans and other animals from them.
Ideas for children's play areas
A dacha is a family place, and if so, it is necessary to provide recreation not only for adults, but also for children. The best thing for children is their own play area.

If they grow on your site big trees– they are well suited for creating a swing. Creating sandboxes, treehouses and slides: here is a partial list interesting ideas for a summer cottage in a children's play area.

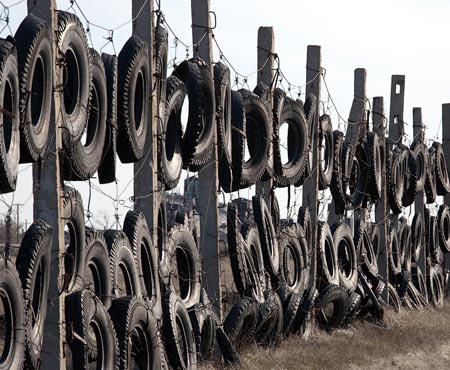
Original fence
If a person is first judged by his clothes, then dachas are judged by his fence. And what more unusual idea decorating the fence, the greater the impression will be made on the guests.

You don't need anything fancy to give your fence its own personality: just paint and imagination.

By cutting out stencils of pictures and then transferring them to the fence, you can achieve impressive results. Any picture made to scale can be a stencil; it’s just a matter of your taste and patience in coloring.

A flowerbed is the best decoration for a garden
One of the oldest, but never out of fashion solutions country decor, are flower beds. Original flower bed contains not only an unusual container (be it a tire, a cart wheel, a jug or a homemade container of a non-standard shape), but also the flowers that grow on it.

Therefore, it is necessary that the color of the flowerbed be one composition with the planted flowers.

In addition, the flowers themselves show how they are cared for and serve as an indicator of the diligence of the summer resident and his love for his garden.

An original idea for a summer cottage is stuffed animals. Very few summer residents use them due to the stereotype of their use as scarecrows. However, if used in creating stuffed animals original decor and not limit yourself to the standard figure of a scarecrow, you will get a very unusual and eye-catching country decoration.
Pay attention!

Decoration of a vacation spot
When you come to your dacha in the summer, you don’t want to hunch over in the garden, but rather relax on fresh air. Therefore, the more comfortable and beautiful you decorate a place for relaxation on the site, the more pleasant it will be to be there.

You can place a lot of things in the recreation area, for example, your own pond. It’s not difficult to make, just dig a hole the size of it, cover it with material that does not allow water to pass through (polyethylene will do), and decorate it beautifully with stones on the sides, then fill it with water - the pond is ready!

Also now they often set up barbecue areas and gazebos at their dachas, and you can hang a hammock from a tree. Garden tiles for transitions, it greatly changes the impression of ordinary walks around the site.
Some people prefer active recreation. For them, the installation of sports equipment at the dacha will be very much to their liking - you can install a horizontal bar, parallel bars and rings - we will get a mini-gym in the fresh air.

How to decorate your site is up to you. With great imagination and due perseverance, summer cottage plot quite capable of even becoming John Tolkien’s “hobby hole”! Or another fabulous corner, good luck!

Photos of ideas for a do-it-yourself garden

Pay attention!


Well, dear summer residents friends, is it time to start choosing gifts for the New Year? Today we have collected for you 20 wonderful things that can greatly facilitate country life.
All these miracles of science and technology are not a brilliant invention, existing “somewhere out there” in a single copy or ripped off from a foreign site of dubious appearance, we found all these things in real internet stores (mostly in two well-known ones: American and Chinese, which have been operating for a long time in our country).
- Scoops for collecting flowers/berries.


An unusually convenient thing for collecting flowers, legume pods, and berries. The configurations and materials of these scoops are slightly different. We liked best the option with steel teeth and a fine mesh bottom through which unwanted leaves that accidentally fall into the scoop fall out.
- Washing machine with water hopper.

Country version of an automatic washing machine. The water used for washing is pre-filled into a special removable tank and fed through a filter into the washing machine. The tank is enough for a full wash (volume from 65 to 100 liters depending on the type of machine).
If there is still a central water supply, such a machine can be connected to it. And use the tank in case of possible interruptions in water (at dachas this also happens when there is a water supply).
- Chair on wheels.


Fulfill country work sitting on a “mobile chair” is just a dream! The seat height is adjustable and the wheels are smart enough to handle any bumps in the road. There are options with additional shelves for baskets and garden tools.
- Holder for sawing firewood of the required size.

Men will appreciate this item. The firewood is firmly fixed in it. They do not need to be constantly moved and supported, each time stopping the chainsaw and then starting it again. Cutting firewood to the required length is also not a problem; there is a ruler here.
For easy storage, the design folds easily and does not take up much space.
- Devices for collecting fruits, cones, nuts from the ground.

We've never seen anything like this before, honestly! It is enough to walk with this gurney, like a vacuum cleaner, about fruit trees and the fallen fruits end up inside the ball, at least according to the anatomy prospectus. There are a lot of apples this year. We really want to try it.
- Hand pads for collecting grass and leaves.

When collecting grass or fallen leaves, you always want to grab as much as possible to get the job done faster. And so...the hands turn... into huge hands!
- Bags for small items and tools on the belt.

It is most convenient to carry the necessary little things and tools with you around the garden in such a handbag. It is small, does not restrict movement, and your hands are always free.
And it looks stylish!
- Folding wheelbarrow.

Another useful transformer for the garden. When folded, such a wheelbarrow cane will easily take up space on a rack with garden tools (rakes, shovels), and when unfolded it will serve as an excellent means for transporting leaves, grass and even relatively heavy loads.
- A device for collecting fruit from trees.

Fruit collectors have appeared on the market for a long time. And many summer residents make such useful things with their own hands, for example from plastic bottles.
Still, we decided to include this device in our article for two reasons. Firstly, the thing is really brilliantly simple and at the same time makes country life a lot easier. And secondly, this particular design presented seems to us one of the most convenient (of those available on the market today).
- Mini mower for “hard to reach places”.

Oh these hard to reach places. You always beware of them: in some cases you can damage flower beds or fences, in some cases you are afraid for the mower itself. This device will save the situation.
- Folding dryer for herbs, berries, fruits.

When folded, a small flat circle, if necessary, turns into a large, convenient drying rack that can be hung in any room directly from the ceiling. Each section of the dryer has a zippered window and is unloaded separately. It is very convenient for drying different types herbs
- Garden mini shower.

Very unusual shower. And not only because it is portable, powered by a small pump (which can be lowered into any barrel). But the water here does not flow from top to bottom as we are accustomed to, but on the contrary, from bottom to top. Of course, you won’t be able to wash your hair, but you can quickly freshen up on a hot day. summer day quite.
- Flexible circle.

Another nice summer helper.
- Automatic 6-row seeder.

How inconvenient it usually is to tinker with small seeds. Landing them smoothly and accurately is an almost impossible task. It becomes even more difficult for older people.
Such a seeder will help you sow everything quickly, evenly, economically, and without bending over the beds. It greatly simplifies the work and minimizes seed consumption.
The seeder has two rollers and a central planting part. The front roller levels the soil, the rear roller closes the furrows and drives the seed shaft.
The seeder has 4 sizes of seed holes and adjustable planting depth.
- Patellar for gardening work with adjustable lifting handles.

To perform many gardening jobs, the summer resident has to kneel. If work continues long time, your legs become numb and it becomes extremely difficult to rise from your knees. This device will be very helpful. The handles are height adjustable.
- An apron for convenient berry picking.

Your hands are free, you don’t need to hold anything, and it’s absolutely impossible to miss.
- Portable shower.

Such a shower will be useful not only at the dacha, but also when traveling and on a hike. When assembled, it easily fits in the palm of your hand. Hangs on any large branch.
- Garden tool holder on wheels.

How convenient it is to take everything at once necessary tools and simply transport them to their place of work. A stand on wheels like this will help with this.
- Miracle shovel/ripper.

Homemade products for the dacha are a special source of pride for the zealous owner. Not everyone can be smart and practical. But take note, bring someone's life to life useful experience, into a masterpiece, many can do.
Original flower bed from car tires
Used tires are a popular material for transforming landscapes and practical structures.
Tire flower beds
Such homemade products for the dacha and garden have gained the greatest popularity. At the same time, classic single flower beds faded into the background. Currently you can see the following options:

Such DIY home and garden projects will take their rightful place in any landscape.
Children's playgrounds made from tires
Grandchildren and children are frequent guests at the dacha. Therefore, they will appreciate the efforts of adults who decided on which to place:
 Options for playgrounds made from tires
 - and cartoon characters made from tires. Bright little animals made from tires will be a special source of pride in front of your friends and neighbors.
- Swing. You can find from ordinary hanging models to rocking chairs made of a semicircle with a board installed instead of a seat.
- Cars, motorcycles. Wheels of different diameters allow you to assemble original racing cars and bikes. Any boy will feel like a real racer and will appreciate the efforts of adults.
- Furniture. Chairs and tables for children's playgrounds and impromptu banquets are the dream of any little lady.
Read also
Heating greenhouses in winter
DIY crafts for playground will provide active, interesting summer for a child.
Useful crafts from tires
Tires are often used for the following structures:
Rubber crafts and homemade items for the garden are popular due to the availability of available materials and wide range applications.
Useful homemade products from plastic bottles
Another popular material for design and practical research. Useful homemade products from plastic bottles are widely used for country life:
Practical DIY crafts for a summer cottage made from plastic bottles have become widespread due to the high availability of the material and ease of processing.
Interesting homemade products for the dacha are waiting for you in this article. You will learn how to make a lawn mower from an old washing machine, make a sink, country shower, dryer made from scrap materials.
Useful homemade products for the garden - do-it-yourself washing
Not everyone has the financial opportunity to buy a Karcher car. If you can't buy it, then why not invent it? A homemade car wash will allow you to do without running water, reduce water consumption and thoroughly wash your car, fence, garden path or other objects.
Here's what you'll need for this homemade garden project:
- plastic canister with a capacity of 5–20 l;
- hose connector kit;
- automobile nipple;
- a piece of hose;
- silicone sealant;
- sharp knife;
- compressor or car pump;
- watering gun.

Take a set of hose attachments, which includes 2 connectors, a 3/4 threaded fitting, and a 1/2 adapter.
Here is the principle of operation of such a homemade product for the dacha: you connect the gun to a hose, attach this device to the bottom of the canister. A nipple will be built into its neck.
Fill the container with water, but not to the top. Then screw on the lid and pump air inside. Pressure will be created here, and the water will flow well when you pull the trigger of the gun. Here's how to assemble such a mini-wash.
Using the tip of a knife, carefully cut a hole in the lid. It should be slightly smaller than the diameter of the nipple leg. Also cut a circle of the required diameter at the bottom of the side of the canister.

Insert the nipple into the cover.

Now, helping yourself with the wire, place the coupling in the hole intended for it. Apply silicone sealant to secure the connection between the coupling and the canister.

It is necessary to tighten the lid and carry out other work only after the sealant has completely hardened. Then you will connect one end of the hose to the water gun and the other to the canister.
Pour water into the container, but not to the top, so that there is room for pumping air. But do not pump too much, so that the canister does not deform or burst under pressure. Look at how the fitting should be tightened and the connectors installed.

If everything is done correctly, then when you press the trigger of the water pistol, the water will shoot out in a good stream. You can adjust the pressure by twisting the tip of the gun.
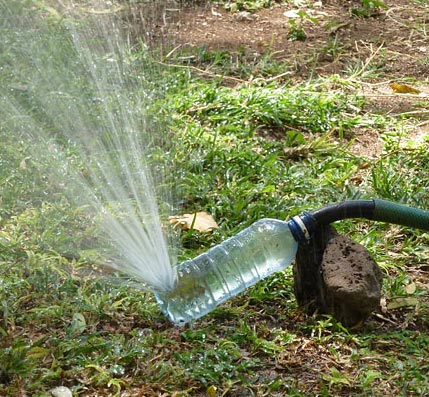
At the dacha you can hardly do without a shower. Try to make something unusual rather than tropical, then you will be able to enjoy water treatments even more.
How to make a rain shower from scrap materials for your summer house?
If you have just recently purchased a plot of land and do not yet have a washing room, then you can take a shower right on the street, enclosing a small area near the fence with a curtain. To make one like this tropical shower, you will need very few components, these are:
- bracket;
- wire;
- flexible hose;
- metal beer can;
- hose adapter;
- awl;
- nails.
Tie the top of the hose with wire to the bracket, and attach the other end to the water supply or pump. When you lower the pump into a barrel of heated water, you will be able to take pleasant water treatments.

You can also make a rain shower head using a disc container as it. In its center you need to fix a plastic adapter that is attached to the shower hose, and the central axis of the discs needs to be removed. Using an awl, make holes at the top of the lid. Seal all fasteners well with sealant. This nozzle is held on a bracket using a thick wire or on a rigid pipe.

If you want to make a rain shower, then you can use plastic pipes for this.

You need to supply water to them, first make many small holes with a soldering iron, and then enjoy the flowing drops. Children really like these water procedures.

But do not forget to first check the water in the container from which it will be poured into the shower; it must warm up in the sun.
And to make a stationary shower, you need to first pour water into a tank or barrel, which will be located under the roof or on the roof of the building. On a warm summer day, the water here warms up well, and you can wash yourself to your heart's content. To be able to do this in cooler weather, then you need to provide a heating system in such containers.
DIY country shower
Before installing it, you need to make a shower stall. If possible, you can make it out of wood, installing this small structure on the base. Put wooden door or limit yourself to a shower curtain like this.

There are more simple options. If you have oilskin fabric, then use it.
Another option is to purchase impregnated fabric or use an old awning or tent.

If you made a fence from corrugated sheets and you have some materials left, then try making a shower for your dacha out of them. Metal pipes you need to dig in according to the markings and fill them with concrete. When it dries, cut sheets of corrugated sheets are welded to the racks. One of them will become the roof.

If you don't have enough wooden planks, then implement the option shown in the next photo on the right. And on the left is a shower that is made like a fence. So the materials for it will cost almost free.

When the shower is ready, you can install a water container on it. To make it warm up better, you can make a kind of coil out of metal or a hose. Then the water will warm up more actively.

These and other homemade products for the garden allow you to make the most of your existing containers.
To be able to receive warm water even when it is not heated by the sun, use electric heating. To do this, you can place the plastic barrel vertically or horizontally. Then it will be necessary to install a shadow on one side, and on the other? water fill fitting. Make an overflow hole to excess liquid flowed out, and you saw that the container was already full.

Now all that remains is to install the tank. This is usually done using a shower roof. You can put a flat tank here, made of iron or plastic. You can also make a canister for the soul from metal or iron barrel. If you need to heat water, then a heating element is installed in the barrel.
Check out other examples of what you can do with personal plot with your own hands.
Interesting DIY crafts for your garden with your own hands
Gardening tools very necessary for working on the ground. Often, the store sells not very high-quality sets. After a short period of use, the handle of the shovel breaks off, or the teeth of the hoe become bent. Therefore, if possible, try to make your own tools.

Take:
- stalk;
- fragment of a water pipe;
- scrap from a two-handed saw;
- screws;
- screws;
- fragment profile pipe cross section 3 cm.

To make the blade, take a scrap of a two-handed saw and draw the outline of the future hoe. Punch two holes.

At the same distance and the same diameter, you need to make 2 holes on the chopper itself, and then cut out a fragment from a two-handed saw.

Drill these holes using a drill and a bit designed for metal work. Connect these two parts using rivets, which are screws.

Now drill a hole in the top of the hoe so you can attach the handle here.

Make also a scoop, which is very interesting to work in the beds. Then such homemade products for the dacha will allow you to acquire a very durable set of tools.
Saw off the required piece of the cutting with a grinder and begin to straighten part of it with a chisel.

Then, using lever tools to help yourself, straighten this part almost completely.

All that remains is to work with the hammer so that the blade of the scoop takes on the desired shape. Using a felt-tip pen, draw the outline of its working part and cut it out with a grinder.

Using an abrasive wheel, clean the edges of the shovel and make them smoother. Now sand the tool with a flap wheel. This is how shiny this shovel will be.

Also drill a hole in it for the handle, then insert it and secure it with a screw.

Cover the handles of both instruments with an antiseptic and then with varnish. Now you can use the tools for their intended purpose. If you want, use the same principle to make a ripper for beds.
It’s very exciting to create things like this for your garden with your own hands. Maybe after you've made the tools, you'll want to make a device that you can use to dry the part harvested. See how one gardener did it.
How to make a dryer for fruits and vegetables?

Look at what materials you need to take for this:
- sheet metal;
- square pipes;
- locking mechanism;
- polycarbonate sheet;
- self-tapping screws;
- 2 door hinges.
- grinder;
- welding machine;
- drill;
- stationery knife;
- tape measure and marker;
- metal scissors;
- with a hacksaw.

The door here will be metal. To make it, cut from iron pipe 4 fragments and weld them into a rectangle. Then you need to sheathe this base with metal using screws with nuts and self-tapping screws. If possible, weld steel sheet. To make a tray holder, attach with reverse side wooden frame frame. Take self-tapping screws for this. In this case, on each side there are 4 wooden blocks for 4 baking trays.

An absorber is installed in the dryer. Take some sheet metal and paint it black. Use heat-resistant paint. When it is dry, place this blank on the bottom of the dryer.
For the absorber, take a thick aluminum or copper sheet, or in extreme cases, steel. These materials conduct heat well.
Now you need to sheathe the outside of the dryer, make the roof transparent, made of polycarbonate. Then they will be able to penetrate here well sun rays. Glass can also be used. Close ventilation windows mosquito net so that insects do not fly here.

Attach hinges and a locking mechanism to the door. Secure the door in place. Look what a wonderful, beautiful and spacious dryer it turned out to be.

All that remains is to make the baking sheets. They must allow air to pass through. First, knock together the frames from the bars, and then attach the metal mesh to them.

Now you can cut fruit and watch how your device will work. Place a thermometer in the dryer to monitor the temperature. It should be between 50–55°C. At lower temperatures, cover the bottom holes by placing a rag here.
In such homemade dryer You can dry not only fruits, but also vegetables, herbs, fish, meat, and roots.
If this design diagram for such a device seemed complicated to you, then you can make a dryer from metal barrel. A hole for the door is cut out in it, and metal mesh racks are inserted inside.

To prevent water from flowing in here and better ventilation, a roof like this is installed on top.

You can upgrade this fixture by installing a fan and an electric heater inside.
If you want to make your own lawn mower, then this is also possible.

Turn the old one into it washing machine, for example, like this one.

And if you still have old bedside table, then you will make it a platform for a future almost self-propelled device. But you only need the door from the bedside table.

Drill holes in the center of the motor shaft. cutting knife make it from an old two-handed saw. It is necessary to saw off it to the size of the desired shape, cut out a recess inside.

Attach two wooden pickets that will become the handles of the mower. Don't forget to secure the motor and extension cord to it. Now you can test such an interesting unit.
If you are interested in other homemade products for the garden, then you will find it useful to watch the following video.
Many interesting ideas await you in the first video.
And with cool homemade products from plastic pipes you can get acquainted if you watch the second story.
