Waterproofing the roof of a house under corrugated sheeting. Is it possible to put corrugated sheets on roofing felt - opinions of experienced Izolon craftsmen under corrugated sheets
Corrugated sheeting is by far the most popular and in-demand material in the construction industry. With its help, fences, outbuildings, garages are erected, interfloor ceilings and the roof is covered. And these are not all areas of application of the material. Let's figure out how corrugated sheeting is laid on substrates, why the latter are needed and what purposes they serve.
Today, corrugated sheeting can be found in two types - galvanized and with polymer coating. Each of these types has a number of advantages. Which one to choose is up to you to decide; a consultant can help in this matter. By the way, our advice to you: if you decide to re-roof roofing corrugated sheeting, entrust the calculations to a professional. Let the company from which you order corrugated sheeting make an accurate calculation required material, but you can easily do the installation yourself - there is nothing complicated about it. The main thing is to have all the tools you might need at hand.
So, remember the basic rule: the material should be transported and, accordingly, loaded only on a solid and flat surface. And the packs should be so long that the edges of the corrugated sheets do not bend.
Care must be taken to ensure that during transportation roofing did not move around the machine, which could lead to mechanical damage to the material. To avoid this, follow maximum speed When transporting, do not drive more than 80 km/h, do not accelerate or brake too sharply.
We load and unload profiled sheets
The corrugated sheets (which, by the way, are packed in bundles) are loaded and unloaded using a lift with soft slings. Traverses are used if one package is more than five meters.
If it is impossible to use the equipment, the corrugated sheet should be loaded and unloaded as quickly as possible. more people (the approximate calculation here is as follows: one person can lift a maximum of one and a half meters of corrugated sheet). All manipulations with the material must be carried out carefully; try not to bend the corrugated sheets, otherwise this may cause deformation of the material. Transfer of corrugated sheets always occurs only vertically!
Under no circumstances should you throw the corrugated sheet onto the floor or drag it along the ground! Doing this is strictly prohibited.
How to fold corrugated sheets correctly
We lift the corrugated sheet onto the roof
Before work begins, the material is delivered to the roof. This can be done, for example, by using logs. They are installed in advance from ground level to the roof. Lifting should be unhurried, and no more than one sheet at a time.
If the weather is too windy, lifting the material is delayed until the wind calms down, otherwise you will deform the corrugated sheet and it will become unusable.
After the corrugated sheet is raised, control measurements are taken. When installing rafter legs, measure the roof slopes, because you may involuntarily deviate from the working design.
Therefore, it is better to play it safe once again: measure the diagonals of the slopes, which will help to measure their squareness (the permissible difference in diagonals is no more than 2 centimeters). Also pay attention to the slope plane. Level measurements are taken. If there are deviations from the planes, there is a possibility that the corrugated sheet will not fit together.
The corrugated sheet should be inclined at least 12 degrees!
Safety precautions
Before installation, the corrugated sheeting should be treated with special enamel, which is intended for coatings treated with polymer.
Naturally, you cannot avoid moving on corrugated sheets. But be extremely careful, the sole of the shoe should be soft, walk along the wave deflections, or along the lathing areas.
The corrugated sheeting is fastened with self-tapping screws; they are screwed into the wave recessions. By the way, when screwing in the bolts, you will definitely get chips; they should be carefully removed with a brush; if this is not done, you risk that the screws will rust over time. If there are cuts, chips or damage, be sure to treat them with a special enamel coating, otherwise corrosive phenomena cannot be avoided.
When conducting roofing works, use gloves, this will avoid injury from corrugated sheeting, because the edges of this material are sometimes very, very sharp.
Before you begin installing the corrugated sheeting, be sure to remove the material from protective film, otherwise over time it will sinter with the polymer with which the material is coated.
A categorical ban on the use of grinders in relation to profiled sheets! This tool can damage the profile so much that irreversible corrosion processes begin on it.
We cut profiled sheets
Of course, roofing work involves... As already noted, using an angle grinder for these purposes is strictly prohibited. However, there are many other tools to help you. For example, cut corrugated sheets with perforated shears; they “take” steel, the thickness of which is up to 0.6 mm.
If you don't have scissors, use drill bits. This method helps to cut sheets up to 0.8 mm thick.
You can also use lever scissors; they cut metal sheets in any direction, however, if their thickness does not exceed 0.6 mm.
The fastest and effective way cutting corrugated sheets, of course, is using electric cutting shears; they are capable of cutting metal up to 1.2 mm in thickness.
How to arrange a drainage system
Device drainage system requires certain tools. Firstly, you can’t do without a strip bender. It is designed to bend the gutter holders of the gutter system up to 4 mm. The need for corrugation pliers is to create a corrugation at the ends of the drain pipes. Such ends provide docking.
Another tool is a sealing gun; it is necessary during the installation of profiled sheets. Gun with staples No. 10. With their help, hydro- and vapor barrier is secured.
A special attachment for the screwdriver allows you to easily and efficiently screw into wooden bases screws with hexagon heads.
Sheathing template, it is organized in order to carefully mark the sheathing steps.
A hammer, tape measure, drill, cord, strip and marker will also help you.
Substrate for profiled sheets
When installing profiled sheets as a roofing material, the operating technology assumes that a heat-insulating roofing layer will be installed underneath it. Along with the waterproofing layer, this two overlaps make the base roofing pie under a profiled sheet. Such a peer performs a very important protective function.
It is extremely important to choose the right thickness of the insulation. It is equally important to protect it from moisture. When the thermal insulation layer gets wet (even by 5%), its heat technical specifications decrease by more than two times. Because of this, the roof will freeze, the finishing of the premises will become icy and damaged. Marks will begin to form on the outside of the roof. And after that, it’s not far before the appearance and spread of fungus, rotting of the sheathing, and so on.
Insulation of the roofing system
The substrate is laid on the rafter system. The frame is covered with a hydro-retaining film. By the way, there is also thermal insulation underneath.
A layer that retains heat, under the reliable protection of a film or membrane that insulates vapor emissions. The attic perimeter is sheathed using OSB or wood. In order for the mixing of air flows (which, by the way, occurs under the ridge) to be effective, they usually install the so-called. "cold triangle"
Attic underlayment
To make the substrate, use a cold roof. What does it mean? We cover the truss with waterproofing. Thermal insulation is located on the ceiling in a horizontal position. On the room side, the waterproofing is protected by a special vapor barrier film or a membrane with taped joints.

Roof insulation
Roof waterproofing
To install a thermal roof, waterproofing membranes are used. They are opened in the valleys even before the main level of waterproofing is installed.
The main waterproofing is opened horizontally along the length of the rafters (avoid sagging). It’s better to start from the cornice to the ridge; make an overlap of one and a half centimeters.
Making the sheathing
The sheathing is usually installed on a material designed to retain moisture. She represents herself wooden beams size 50x50 mm. Before use they are treated with antiseptic agents. Also used in the construction of lathing are edged boards 32x100 mm. The main board (usually placed along the eaves) is always larger than the rest. By the way, at the outlet of the chimney, fire hatch or vent, attaches additional boards.
Only after moisture limiters have been installed and ventilation in the roof space is ready, installation of the sheathing begins. Its thickness is directly dependent on how high the profiled sheets are and the length of the fasteners.
Steps apply at least half a meter. By the way, this distance also depends on how thick the material is and what cross-section the profile has. Wind boards are installed at the ends; they are slightly higher than the sheathing boards, but are installed at a distance equal to the height of the profile.
The profiled sheet is attached to the sheathing with self-tapping screws with rubber washers along the bottom of the sheet; five to seven screws are used per square meter material. The sheets are connected with rivets.
If the corrugated sheeting is installed correctly, the roofing weight is distributed evenly, and the roof will not be affected by any weather conditions.
Comfortable living in a house is impossible without a well-equipped roof. In order to reduce heat loss during the cold months of the year and create a favorable microclimate for people staying in the house, they use different materials, including corrugated sheets.
Thanks to the multi-layer roofing cake containing a layer of thermal insulation, heated air does not leave the room in cold weather conditions. Installing a vapor barrier under corrugated roofing helps maintain low thermal conductivity.
Why do you need a vapor barrier under corrugated sheeting?
Many homeowners are interested in whether it is possible to cover the roof with corrugated sheets without waterproofing, and why it is needed.
In this case, the vapor barrier layer is equipped to achieve certain goals:
- To protect the insulation from the penetration of wet fumes. The fact is that as a result of its wetting, thermal conductivity increases. In addition, penetration of moisture leads to destruction of the material.
- To prevent the accumulation of liquid in the heat-insulating layer and direct water vapor outward.

There is always water vapor in the air of residential buildings. They are partially removed from the premises ventilation system, and the rest remain. Warm air, saturated with vapor, rushes to the ceilings, where it cools, and the resulting moisture penetrates into the roofing materials.
The insulation has a porous structure and therefore absorbs moisture vapor. When wet, the thermal conductivity of the material increases, and it retains heat in the house less well. To prevent moisture from penetrating into the porous structure of the insulation, a vapor barrier is installed under the corrugated sheeting.
The film for arranging a vapor barrier layer is placed on the side of the premises to protect the thermal insulation material and elements roofing structure from vapor penetration.
Features of choosing material for vapor barrier
Let's think about which vapor barrier to choose for the roof so that its efficiency is at the proper level and the cost is affordable. The building materials market offers a wide range of special films for attic and cold roofs used to install a vapor barrier layer.
To accept the right decision regarding whether a vapor barrier is needed under corrugated sheeting, it is necessary to have information regarding a number of factors:
- price;
- efficiency of use;
- expediency.
Before purchasing materials for profile flooring, you need to understand the financial side of construction. If price is the determining factor, then economical products are chosen.

As for efficiency, vapor barrier films differ in their performance characteristics and should be familiarized with them in advance.
When selecting material, take into account the features specific premises. For a heated building, foil film will be the best purchase, but for cold roof from corrugated sheeting, inexpensive glassine will suffice. When erecting a roof on a building that is visited occasionally, a vapor barrier made of polypropylene or ordinary polyethylene film will be required.
Vapor barrier products for roofs
To lay under corrugated sheets or other roof covering vapor barrier layer, films are used.
On construction market The following most popular types are presented:
- Polyethylene film. This inexpensive household material has long been used as a vapor barrier. It traps steam coming from living quarters. Polyethylene is cheaper than membranes and reinforced films. It has a big disadvantage - insufficient strength, since it can be easily damaged during installation. To ensure reliable insulation, the film is laid out in two layers. It is attached with a special stapler to internal lathing, observing a step of 1.0–1.5 meters. If the material is damaged, a patch must be made. To do this, seal the puncture site with construction tape. The joints should also be secured.
- Reinforced polyethylene. It's inexpensive, but it has good quality. It is made from several layers of polyethylene and reinforced with polypropylene mesh for strength. Despite its light weight, this film is quite durable and is more difficult to damage during the fastening process. Due to the reinforcement, the material is more rigid. The film is secured using a special tape. Choice of this material can be called optimal combination affordable price and good quality.
- Glassine. It has been used to create vapor barriers for a long time. It provides reliable protection against moisture, is durable, and has long term service, but, unfortunately, it has a lot of weight. Despite its low cost, glassine is not recommended for use in residential areas. When heated, the material begins to emit bad smell, and after laying the corrugated board, its temperature often rises. For the reason described above, glassine is used when the answer to the question of whether waterproofing is needed under the corrugated roof of a cold roof of a non-residential attic is positive. It is convenient to use for laying waterproofing over the sheathing.
- Polypropylene film. It is a durable material for vapor barrier, laid under profiled sheets. It is produced similarly to polyethylene multilayer film, but it has a relief layer. On films with smooth surface Condensation accumulates, then it collects into drops and they fall to the floor from time to time. Film with a rough surface is produced on the basis of cellulose and viscose. It is able to absorb moisture and this feature prevents the formation of drops. Further, if the air humidity decreases, the collected condensate evaporates. Mount the film with the anti-condensation surface facing the room. For correct execution installation work You need to study the instructions from the product manufacturer. This type of film is one of best options vapor barrier devices under corrugated sheets.
- Foil. At its core, it is a type of polyethylene or polypropylene product. It not only has a reinforcing mesh, but also a thin layer of aluminum that reflects infrared rays and helps retain heat. As a result of using foil film, heat loss is reduced by more than 10%. The cost of such an insulator is higher compared to other types of vapor barrier materials, but its installation allows you to save on heating costs. You also need to know which side to attach the vapor barrier correctly. Lay the aluminum foil film towards the room. A gap of approximately 5 centimeters should be left between it and the wall finishing. There should also be a short gap to the insulation. To fix the film, use self-adhesive tape, and cover the joints with aluminum tape, and then the vapor barrier layer is sealed.
Waterproofing cold roofs - is it necessary?
The space under a cold-type roof is not heated, but the temperature inside is always different from the outside. For this reason, condensation collects at the bottom of the profiled sheets. Therefore, the answer to the question: “When is it built? cold roof do you need waterproofing? unambiguous Of course it is needed. Properly installed waterproofing on the roof under the corrugated sheet will prevent moisture from entering the under-roof space.
This layer will prevent moisture vapor from entering the wooden elements rafter system and other parts of the roof structure. The waterproofing is laid on top of the rafters and then secured with a counter-lattice. Next, install the sheathing and corrugated sheet.

When the waterproofing layer does not prevent steam from escaping outside, then there is no need to install a vapor barrier for a cold roof. Having risen upward, water vapor gets through the film under the corrugated sheet and dries out in that place due to the movement of air currents. In this case, roofing felt, polypropylene, glassine and polyethylene are not suitable. For a cold roof, experts recommend using a non-woven vapor-permeable membrane.
Vapor barrier device
Do you need a vapor barrier for a cold roof? No, because it is installed only for warm roofs, so that moisture does not get into the insulation.
The vapor barrier layer panels are laid with an overlap of approximately 15 centimeters. For the selected type of film, a connecting tape is selected. Planks small size for it can be wooden or metal.
In order for the roof to be airtight and serve flawlessly for many years, it is necessary to choose the right roofing coating. But for greater reliability, it is necessary to adhere to the technology of laying the material and the correct composition of the roofing cake, the layers of which complement each other, thereby increasing the service life of the entire roof. One of the components high-quality coating is waterproofing.
Purpose of a waterproofing layer under corrugated sheeting
An important part of the roofing pie on a warm or cold roof made of corrugated sheets is the waterproofing layer, which is attached directly to the rafters using a construction stapler. To waterproof the roof of a house under corrugated sheeting, a special material is used that does not allow water to pass through, which ensures reliable protection of the wooden truss structure from exposure to moisture.

As part of a corrugated roof, waterproofing is designed to perform the following tasks:
- Providing protection inside corrugated sheets from the formation of corrosion centers. Unlike the front surface, the lower part of the material has only a paint coating, which is the weakest point. Wetting damaged areas leads to inevitable corrosion.
- Preventing the insulation from getting wet. Wet thermal insulation material somewhat loses his performance characteristics, and they are not restored even with completely dry material. Waterproofing laid on top of the insulation provides excellent protection against moisture penetration. It is worth noting that this function is relevant only for a roof made in a warm version, since a cold roof does not need insulation.
- Protection against wetting of the roof truss system. The main material for the manufacture of the roof frame is wood, on which constant contact Rot may form with water. Moreover, this phenomenon is observed even in elements treated with antiseptic agents.

Roofers recommend installing waterproofing on both cold and warm roofs. Neglect of this rule leads to the fact that condensation formed due to the temperature difference on the outside and inside of the roof contributes to a reduction in the service life of the roofing material.
Quality of waterproofing material for the roof of a house
Waterproofing under corrugated roofing is exposed to various aggressive factors, therefore the quality of this material is subject to special requirements. The main features showing the high quality of the material are vapor permeability, stable attitude to different temperatures And high humidity.

When choosing a waterproofing material for a roof under corrugated sheeting, you should carefully study the following characteristics:
- Density indicator. High-quality waterproofing that can hold a certain amount water in case of leakage and receive minimal damage during installation, has a density of 0.04 kg/m 2.
- Vapor permeability coefficient. Efficient output warm air, in which there is a large accumulation of water vapor, provides a material with a vapor permeability of more than 0.75 kg/m2.
- Waterproof. High quality waterproofing is capable of withstanding a water mass pressure of 10 MPa for 10 minutes.
- Possible temperature limits operation. High-quality roof waterproofing under corrugated sheets can be used flawlessly at temperatures from -73 to +100 0 C.
- Fire resistance. One of the properties of corrugated sheeting is high thermal conductivity, therefore, it is best to waterproof such a roof with non-combustible materials.
- Attitude towards ultraviolet radiation. Despite the fact that the waterproofing is covered with a finishing coating, the impact sun rays may still cause harm to this layer. A high-quality waterproofing material must withstand the impact flawlessly ultraviolet rays more than 4 months.
Rules for choosing waterproofing for roofing
The materials used for waterproofing under corrugated sheets are presented on the construction market in a wide range. They have different costs, weights and strengths. However, for a metal profile you cannot use the first material you come across. Before laying corrugated sheets on the roof with your own hands, you need to choose the right waterproofing material. It must have good vapor permeability, have appropriate density and elasticity, and also not allow moisture to pass through.

In this regard, waterproofing materials are divided into three categories:
- Film waterproofing under corrugated sheeting is represented by thin films of polyethylene, which have low weight and high moisture-proof properties. The cost of such materials is insignificant, but they are easily damaged during installation or operation.
- The diffuse membrane is made by analogy with the film material, but from more durable polymers. In addition, the structure of the membrane, consisting of microscopic holes, provides good vapor permeability to the material.
- Rolled bitumen-based waterproofing is widely used for cold roofing. This material is cardboard or fiberglass impregnated with bitumen. Such waterproofing is low in cost, but does not allow the roof to “breathe” at all.
Features of roofing pie with waterproofing

Waterproofing cold and warm roofs has its own characteristics:
- Cold roofing involves the use of materials with high strength characteristics to withstand high blood pressure water in case of leakage. The recommended materials in this case are roofing felt, roofing felt, and fiberglass.
- Carrying out installation warm roof, it is better to use waterproofing material under corrugated roofing with good vapor permeability.
The roof of any building is one of the most important architectural elements of each structure. Not only the comfort of living, but also the operating time of the house depends on its reliability and durability. Repair work can often exceed construction costs new roof, due to this experienced builders We strongly advise you to strictly follow all building codes and regulations. Economically, it is much more profitable not to save on the cost of materials and adherence to technology than to then deal with forced emergency roof repairs.
This question worries many inexperienced developers, especially since some unscrupulous builders always install waterproofing under roofing materials regardless of roof type. In some cases, such actions not only increase the total estimated cost of work, but also have an impact on negative impact for durability wooden structures.

Currently, there are two types of roofs - cold and warm. The first traditional for our country, attic spaces are not used as residential spaces. The second ones appeared relatively recently and are used during the construction of attic houses. In what cases is it necessary to waterproof a roof under corrugated sheeting?
Warm roofs
Complex multilayer structures that can significantly reduce heat loss and provide favorable conditions V attic rooms. Heat loss is reduced through the use of insulation materials; there are currently quite a lot of them. They all have approximately the same density and thermal conductivity, but are fundamentally different in terms of hygroscopicity.
For example, polystyrene foam and expanded polystyrene do not completely absorb moisture, but mineral wool and ecowool have a high ability to increase humidity. The presence of water not only critically increases thermal conductivity, but also has an extremely negative effect on all wooden structures of the rafter system.

Conclusion - it is necessary to take measures to protect hygroscopic insulation from moisture and not interfere with its removal if wet. This means that to waterproof warm roofs, you need to use only modern multilayer membranes; they allow steam to pass through perfectly, but are completely sealed against water. Such membranes must be installed on warm roofs on which mineral wool or other hygroscopic material is used as insulation.

Regarding insulation options polymer materials, then waterproofing is desirable, but not necessary. For them, you can use not only expensive membranes, but also cheap films. The task of waterproofing is simplified; it can be impermeable to both water and steam, and it serves as an additional roofing material.

Prices for PVC membranes for roofing
PVC membrane for roofing
Cold roofs
Some builders install waterproofing for them too. This is explained by the appearance of condensation on metal coatings, additional protection against leaks, etc. But conscientious specialists It is not recommended to install waterproofing for cold roofs. Why?
- Waterproofing significantly reduces efficiency natural ventilation, it is with its help that condensation on a metal roof quickly evaporates.
- The membrane does not allow visual detection and repair of leaks in time. Wooden structures rot, and the likelihood of damage to rafter system elements or metal sheets being undermined by gusts of wind increases.
Conclusion - the benefits of waterproofing for uninsulated roofs are very doubtful. And this despite the fact that additional materials and work always increases the cost of the property.

Prices for corrugated sheets
Corrugated sheet
General requirements for materials
All requirements can be divided into two large blocks.
| Type of requirements | Brief description |
|---|---|
 | Waterproofing materials must be resistant to impact chemical compounds, do not stretch under static loads, meet environmental and fire safety standards. The materials must be easy to install and have a long warranty period. |
 | Density in the range of 0.04–0.06 kg/m2, maximum elongation before breaking is at least 10%. For corrugated sheeting, the vapor permeability of the membrane must be at least 0.75 kg/m2 per day, and the water resistance for 10 minutes must be at least 0.5 MPa. Physical characteristics must remain stable within the temperature range -60°С…+110°С. |
For waterproofing, you need to purchase only modern membranes that do not retain steam and provide optimal conditions operation of wooden structures and insulation.

Assortment waterproofing membranes Decker
| Illustration | Name |
|---|---|
 | Roofing membrane Decker 120. |
 | DEKER 135 membrane is a product of increased strength. Can be used on continuous sheathing. |
 | Decker Wind Facade (roofing) super-diffusion wind-moisture-proof membrane. |
 | Waterproofing membrane Decker Extra 165. Has a grid-like marking that simplifies cutting the membrane when installing complex areas of the roof. It is used without a gap with insulation or on continuous flooring. |
Step-by-step instructions for installing waterproofing under corrugated sheets
Before starting roofing work, you need to prepare all the tools, equipment and materials.


Waterproofing membranes
Stopping installation for organizational or technical reasons always has negative consequences. It is better to draw up a preliminary plan for your actions and think through each stage.
For example, consider the option of waterproofing under corrugated sheets on a warm roof. Attic spaces will be used as residential. On the roof there are several attic windows and a large brick chimney. Such objects significantly complicate the installation process and require increased care and responsibility of roofers.
Important. Some sections of the roof have a continuous sheathing, this is due to the peculiarities of the installation of roof windows and other special designs. The membrane should be slightly raised above the continuous sheathing, this facilitates the process of removing steam from the elements.
For these purposes, slats approximately one centimeter thick are placed on such areas of the roof. Fastening is done with small nails.

If you have an electric or pneumatic nailer, great, the work will be much faster and easier. On a mechanical hammer, you can precisely adjust the impact force depending on the length and diameter of the nails, it is lightweight and has a replaceable hardware magazine.
Prices for popular models of screwdrivers
Screwdrivers
Step 1. Reinstall the drip. The installation of all roofs with waterproofing begins with these elements. Drip caps perform several functions: protect wooden elements from getting wet, improve appearance roofs and drain condensate into a gutter. There is an option when the drip pipes are far from the elements of the drainage system, and water drips onto the facade walls.
The drip tip is made of galvanized steel sheet approximately 0.45 mm thick. Galvanization is done by hot galvanizing, the layer thickness is 20–30 microns. The front and back surfaces are coated with protective decorative polymer paints; the color can be different and is selected depending on the characteristics of the metal profile.
The dropper is fixed with nails in a checkerboard pattern, the distance between the hardware is approximately 30–40 cm. Do not forget to make an overlap of 5–10 cm wide.

Step 2. Glue a special tape at a distance of approximately 1–2 cm from the edge of the drip. It has a very strong adhesive with high adhesion parameters to painted metal surfaces and waterproof membranes. The drip tip must be clean, dry and always free of grease.

Practical advice. Never use ordinary double-sided tape; its technical characteristics do not meet the requirements. The membrane will come off and wind will get under it, which greatly reduces the actual effectiveness of the warm roof. In addition, there is a possibility of snow or rain getting into the resulting cracks. Because of this, the wooden elements of the rafter system or sheathing will get wet, and they will begin to rot with all the very unpleasant consequences.
Step 3. Lift the first roll onto the roof and start rolling it out. Constantly check the position of the edge in relation to the drip edge. The line should be perfectly straight and parallel. Cut off the excess and secure the ends of the membrane with a stapler, the distance between the staples is 20–30 cm.

Inexperienced builders are trying to drive in large number staples with a minimum pitch in the hope that in this way they will significantly increase the strength of the fastening. In fact, everything happens exactly the opposite. Huge number holes noticeably reduces the strength of the membrane, the staples seem to cut it. Because of this, even minor tensile forces tear the waterproofing away from the base. Keep this in mind and follow the recommended fastening spacing for hardware and staples.
Step 4. Remove the protective paper strip from the tape and glue the edges of the waterproof membrane. Press the materials firmly, do not leave gaps, and do not allow wrinkles to appear.

Step 5. Nail the vertical slats of the counter-lattice. They fix the membrane to rafter legs and do not allow it to mix during mechanical stress.

Practical advice. There is no need to stretch the waterproofing too much, this can have two negative consequences. First, slight vibrations of the rafter system due to wind and snow loads can tear the material. Three times - drops of condensate fall under wooden slats and provoke their accelerated decay. If the membrane sags a little, then water flows down the hollows.
The pitch between the nails is approximately forty centimeters; the slats can be impregnated with antiseptics. Step 6. If the cornice board will be fixed to the slats, then their ends must be prepared. This is done in several stages.

Step 6. Attach a special mesh that protects the under-roof space from birds and large insects.

Nail the first counter batten, position it as close to the eaves as possible. Why? The closer the screws securing the first metal sheet are screwed to the edge, the stronger the roof covering. The leverage of the effective breakout forces is reduced, and the breakout moment is automatically reduced. As a result, the reliability of fixation of roofing coverings increases.

Important. Nail the first rail very precisely to the level; it is considered a reference element and all the remaining ones are installed on it. This is exactly the case when you need to measure seven times and nail once.
Step 7 On the outer slats, mark the distance between the counter-lattice, use a special beating rope to mark the lines and continue to assemble the structure along it.


Continued installation of the counter-lattice
Step 8 Nail the cornice board to the ends of the vertical slats.

Chimney waterproofing
These works must be done carefully and in strict accordance with the recommendations of the manufacturers of waterproof membranes.
Step 1. Glue a special one around the perimeter of the chimney double sided tape, it is sold complete with a membrane. The height of the hem is approximately 10 cm; apply tape at the same distance.

If the chimney surface is finished decorative plaster, then the tape sticks to it with difficulty. To make the process easier, use a rubber mallet and protective paper. Attach wax paper to the tape and hit it with a hammer, the tape will be strongly pressed and glued over the entire area of the decorative plaster.

Step 2. Roll out the membrane on the slope until the roll rests against the chimney. Look carefully at what length and on which side you need to cut the material. A decision must be made so that the membrane has minimum quantity cuts and fits tightly around the entire perimeter to the chimney. Don’t rush to cut, try to foresee the consequences of each action. Remember that no tape will provide the same reliable waterproofing as material without cuts. Use only a very sharp knife.

Step 3. Remove the protective film from the tape and stick the material tightly to it.
This must be done in the following sequence:
- again glue the tape around the perimeter at a distance of about 5 cm from the first line. There is no need to maintain exact dimensions; in any case, these materials will later be covered with decorative metal strips during the installation of the metal roof;
- cut pieces of membrane of appropriate sizes, the length should be 15–20 cm greater than the dimensions of the pipe planes;
- glue each piece with an overlap of 5–10 cm.


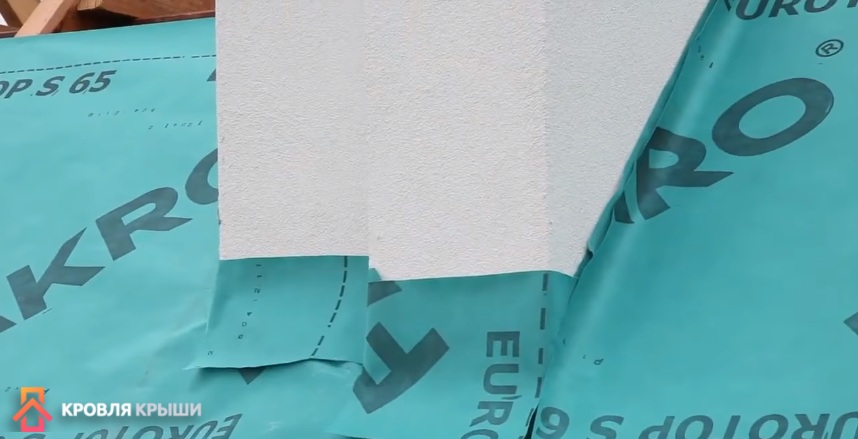
Fakro XDP - salary dormer window, which is based on a vapor-permeable waterproofing membrane

Installation of FAKRO waterproofing around a window
Step 4. Continue laying the waterproofing along conventional technology until the slope is completely finished. Make a bend at the ridge and install the membrane on the other side of the roof.

Next, when installing profiled sheets, do not forget to leave holes to ensure effective natural ventilation. Otherwise, the service life of the roof will be significantly reduced, and very complex and expensive repair work will be required.
Be sure to follow safety rules when working at height; no roof is more expensive than your health. Safety ropes do not restrict movement, as it may seem, and do not interfere with work. On the contrary, with insurance, workers move more confidently and quickly on the roof, which increases labor productivity.
Prices for various types of construction boards
Construction boards
We hope that laying waterproofing under the corrugated sheeting will now not create problems. You just need to choose the right type of coating. Comparative characteristics various types there is corrugated sheeting
Video - Installation of waterproofing
- quite common material in lately, because it is characterized by high quality, durability and practicality, along with an affordable price.
However, for the correct and durable installation of such material, it is necessary to observe several important rules: choose the size you need and choose the right backing for it.
Without knowing the basic rules for installing metal tiles, it is impossible to install them efficiently and effectively.
Subsequence correct installation metal tiles:
- before installation it is necessary to install;
- then lay a layer of hydro- and sound insulation on them;
- install counter lathing;
- Only after completing the previous steps can metal tiles be laid.
Metal tiles have few shortcomings in comparison with other roofing materials. The main ones are high conductivity of external noise and poor thermal insulation. A properly selected substrate will help you cope with these disadvantages..
The backing will protect against external influence environment, will give the design extra strength and durability, will prevent leakage and blowing of the roof, will give comfortable atmosphere in the house and will significantly reduce the level of street noise transmission.
Various materials can be used as a substrate for metal tiles. Usually for this you will need a sheathing, waterproofing film, rafters and insulation.
There are two main types of roofing substrates, which differ in the type of room heating.

 When choosing insulation for a roof, you must first consider the room in which you plan to cover the roof. For residential buildings it is better to choose insulation that is safe for health, for example, mineral wool, cork board or fiberglass. Any type of material is suitable for industrial or non-residential buildings.
The insulation under the metal tiles is laid in a certain way - the slabs are laid in a checkerboard pattern in several layers, this layout allows the seams of adjacent slabs to overlap, which contributes to maximum protection against heat loss.
The thickness of the insulation sheet should be 5 cm, in which case Laying sheets in several layers will allow you to achieve a thickness of 15-20 cm, which is considered the best option.
Creating a ventilation space
Ventilation under the roof– a mandatory element, since it serves several purposes at once:
- removes moisture accumulating under the roof;
- prevents the formation of icy areas and equalizes the temperature over the entire surface in winter;
- prevents the penetration of street heat in hot weather.
A special ventilated roof ridge is designed to remove air, and the air flow occurs through the overhang of the eaves. Without properly installing the ventilation system, you will soon encounter the problem of high humidity, and as a result, the structure will quickly begin to deteriorate.
Metal tiles on roofing felt
 A common type of substrate for metal tiles is roofing felt. This material can be used for an uninsulated attic..
This scheme has a lot of advantages:
- roofing felt - inexpensive substrate, which will significantly save your repair costs;
- installation of the substrate does not require special skills;
- roofing felt - popular building material, so you can buy it everywhere.
However for high-quality installation metal tiles on roofing felt are needed follow certain rules:
- Under no circumstances should sheets be laid directly on roofing felt; this creates favorable conditions for the structure to shift. It is necessary to make the sheathing in two layers: 1 - along the roofing felt, 2 - under the wave of metal tiles;
- as alternative option you can fill ordinary slats along the installed rafters;
- To prevent fire and simplify ventilation of the room, it is worth constructing ventilation holes.
Roofing installation is best left to professionals. However, if you are determined to carry out all the work yourself, then carry it out in accordance with the established requirements. Only in this case can you obtain a durable and reliable design.
