DIY table made of epoxy glue. Stylish furniture in the interior: why you should choose a table made of epoxy resin. Types of epoxy resin tables and their features
If you want to become the owner of unique and very beautiful furniture, pay attention to the table made of epoxy resin. Such products have undeniable advantages and can have a variety of designs and shapes. We invite you to learn more about existing varieties, order of selection finished product and the sequence of making it yourself.
Read in the article
Epoxy resin table: advantages and disadvantages
The choice in favor of epoxy tables is made due to their undeniable advantages. Such products:
- exclusive;
- can have a variety of designs;
- allow the use of a variety of materials as decoration;
- allow the formation of a decorative layer of different colors. However, it can remain transparent. If desired, phosphorescent paint can be added to the resin being poured;
- have high mechanical properties;
- are not deformed;
- can be used in rooms with increased level ;
- keep their shape well;
- allow cleaning with chemicals.

The disadvantages include the high price. It is not possible to buy a table for a small amount. Each product is formed using large amounts of resin, which adds to the cost. Also worth noting high demands to compliance with manufacturing technology. A slight retreat may cause air bubbles to appear.

Structural and decorative features of different types of epoxy resin tables
Similar products are presented in a large assortment. Tables may have different design And design. We invite you to get acquainted with the existing varieties and their features to make it easier for you to navigate available options.

Epoxy resin worktops without support surface
Such products consist entirely of resin. During their manufacturing process, the composition is poured not onto the supporting surface, but directly into the mold to form a monolithic table.


Tabletops made of epoxy resin, wood and other supporting elements
In the process of producing products of this type, the composition is poured onto a base, which can be used as an old piece, piece, or other materials. Quite popular are those formed from wood and. We invite you to get acquainted with possible options.

Wooden table with decorative filling and epoxy resin
Beautiful drawing natural wood, highlighted with epoxy resin, looks quite beautiful in itself. Especially if there are various damages and voids on the surface, which are filled with the composition during the production process. If you add decorative filling, you can become the owner of exclusive furniture. As decorative elements you can use coins, cones, acorns, pebbles, beautiful branches, photos and other items. We invite you to look at photos of tables made of wood and epoxy resin, in the design of which decorative elements were used, and which you can use as an idea for subsequent implementation.
Table made of slab and epoxy resin: features and examples of execution
The slab is formed as a result of longitudinal sawing of trees. As a result, a wooden layer with a unique pattern and arbitrary shape is formed. During the production process from slab, individual elements are connected to each other using epoxy resin, or the tabletop is designed in such a way that the wood is located in the center. We invite you to look at the photo interesting solutions:
Table-river made of epoxy resin: distinctive features
These products got their name due to their characteristic design. the epoxy resin river has an insert in the center of the tabletop, appearance which resembles a river flowing through a mountain gorge. Most often, such products are made from solid wood. The insert is made in blue or green with uneven edges.
We invite you to watch a video that will help you figure out how to make a countertop from epoxy resin with your own hands:
How to choose a product if you decide to buy a table made of wood and epoxy resin: current tips
If you decide to buy epoxy resin, you should immediately decide on its size and configuration. It is not necessary to purchase the products correctly geometric shape: Manufacturers offer interesting asymmetrical options. When choosing, be sure to take into account the stylistic design of the room.

What to do if you decide to make a table from epoxy resin yourself: detailed instructions
If the cost of the finished product seems quite high to you, try making exclusive furniture yourself. To do this, it is enough to deal with technological features and the nuances of the process. We suggest you learn how to make a table from epoxy resin with your own hands without the involvement of a craftsman.

How to make a tabletop support structure: the basics
The frame can be made of metal or wood. Quite popular when doing DIY work wooden tables with epoxy resin, since in this case it is not necessary to use welding machine. Shape and size supporting structure are selected taking into account the dimensions and shape of the future tabletop.

Attention! If the table does not have a supporting surface, you can skip this point.
How to properly prepare a mold for filling: sequence of actions
The base of the tabletop can consist of individual elements or be a single piece. In the latter case, the composition will be poured exclusively in the corners and into existing openings, forming a characteristic pattern. The work is performed in the following sequence:
| Illustration | Description of action |
 | Depending on the selected option, a form for filling is formed. Cover the edges of the inner surface of the mold with a thick film so that the frozen composition lags well behind the base of the mold. |
 | We install the prepared formwork on the base. We place decorative elements inside. We degrease along the contour all joints, the tightness of which should be ensured before pouring begins. |
 | We glue all mating surfaces with adhesive, carefully monitoring the quality of the joint being formed. For this purpose it is worth using silicone sealant. |
How to prepare epoxy resin for pouring a countertop: follow the instructions
To prepare the composition, mix both components. It is very important to follow the manufacturer’s recommended proportions and mix everything thoroughly so that the resin has the appropriate consistency. It is worth calculating in advance how much resin will be required.

Advice! When using special mixers to prepare the solution, work at low speeds to prevent the resin from becoming saturated with air bubbles.
When choosing the right epoxy resin for filling your countertop, pay attention to ArtLine Crystal+:
More details on Otzovik: https://otzovik.com/review_6603877.html
How to fill a countertop with epoxy resin: process features
If the thickness of the layer being formed is less than 5 cm, the composition can be poured at once. For thinner products, two layers will be required. The second should be poured 1-2 days after pouring the first, but before the first layer has completely hardened. To prevent the formation of voids in the corners of the future product, they should be moistened in advance with the prepared solution.
Attention! To form a thin stream, you can use a thin stick, which we lower into the mold while pouring the resin.

Remove all bubbles that rise to the surface. We cover the finished tabletop to prevent accidental ingress of foreign objects. We are waiting until completely dry composition.

We invite you to watch a video that explains how to pour epoxy resin onto a countertop:
All surfaces of the countertop should be subjected to finishing treatment. You should not use coarse sandpaper, as it will be difficult to polish the surface later. Work at low speed to prevent the countertop from overheating.

Advice! When polishing, add water to the treatment area to ensure timely heat removal and prevent the wheels from clogging.
We think you will be interested in a video describing the process of making a table from epoxy resin with your own hands:
Useful tips for working with epoxy resin and safety precautions
When making tables from wood and epoxy resin, remember that:
- In conditions of high humidity, the composition hardens poorly. The likelihood of bubbles forming on the surface increases significantly;
- The rate of polymerization can be increased by increasing the air temperature in the room. Direct heating is not recommended: the formed coating may turn yellow.
Attention! Epoxy resin is toxic, and therefore the composition should be poured in a well-ventilated area.
To ensure your own safety, you should also:
- pour the composition wearing gloves and special clothing;
- when grinding the finished surface, wear safety glasses and respirators;
- If drops of the composition get on the skin, they should be removed immediately using water and soap or denatured alcohol.

How to care for an epoxy resin table: useful tips
In order for an epoxy countertop to retain its presentable appearance and strength characteristics for as long as possible, it must be properly cared for. For care, it is advisable to use dry soft cloth. Wool and flannel are preferred. Heavy dirt can be removed with a damp cloth, and then the surface must be wiped dry. Remaining droplets of water can cause stains.
Attention! The use of formulations containing alcohol or acetone is unacceptable.
Avoid dropping heavy objects onto the table surface from liquid glass. It is better to place hot mugs and plates on a special stand.

An unusual tabletop that embodies creative design ideas will be an expressive highlight of the interior. It successfully combines natural warmth natural wood and the glossy shine of a modern polymer - epoxy resin. Original table will successfully complement the interior space. If you follow the manufacturing recommendations, a hand-made wooden tabletop will delight its owners with its strength, aesthetics, and durability.
Realization of creative ideas
A cozy interior consists of many details. An important place among them is beautiful furniture. Factory-made attributes often do not meet the requirements for individual design. A successful alternative is to create non-standard designs that give the space special expressiveness.
An insatiable urge to surround yourself original things encourages the independent creation of utilitarian objects. Creative embodiment design ideas It will become original, made of wood in tandem with epoxy resin. An exclusive interior attribute will become the highlight of the kitchen, dining room, living room country house, terrace or summerhouse.
Universal polymer: advantages of use
Practical calculation and artistic flair will allow you to create a unique piece of furniture with your own hands. The base of the poured countertop is epoxy resin. Available material attracts many advantages, among them:

- moisture resistance;
- retention of shape after hardening;
- favorable price;
- resistance to deformation.
In small-scale production and at home, the process of cold curing of components is used. The transparent layer obtained after curing does not change color scheme, does not chip, durable, non-toxic. Under the filling you can place all kinds of designer little things - coins, buttons, pebbles, wine corks.
Attention! Epoxy countertops should be used with caution in kitchen environments. Do not place hot objects on it. The best option is to coat the wooden countertop with a protective varnish: this will protect it from a hot frying pan or pot.
Proper preparation: the key to success
When making a wooden tabletop, care must be taken. The surface on which the workpiece lies, the floor, must be covered with polyethylene: leaked resin is difficult to remove.
The next stage is preparation wooden surface. Removing dirt, sanding uneven surfaces, priming. A non-dry surface absorbs dust. It will help protect it from the smallest lint. polyethylene film. It is easy to string on several pegs.
Special equipment will help prevent the smallest fluff from getting onto the countertop. To work you need to prepare:
- disposable painting suit;
- latex gloves;
- protective cap.

Before mixing the components, you should carefully study the instructions: it is important to follow the proportions recommended by the manufacturer.
Density levels
Changing the combination of the main components affects the characteristics of the polymer. The following stages of resin hardening are distinguished:
- liquid;
- medium thickness;
- hard;
- rubbery.
The liquid consistency is optimal for filling any shape: the liquid mixture perfectly fills various recesses and depressions of the tabletop. The viscous consistency, approximately reminiscent of thick honey, is suitable for forming lenses and drops.
Manufacturing stages
First they measure required quantity epoxy, then hardener. To obtain the desired shade, dye is added, and fluorescent pigments are added for spectacular shine. The components are thoroughly mixed: the homogeneity of the mixture contributes to better hardening. Important nuance: No moisture should get into the mixture. High humidity indoors will interfere with the manufacture of countertops.

The critical stage is applying the mixture to the surface. Complete curing takes approximately 15 minutes. Annoying flaws that often disrupt the aesthetics of the product are air bubbles. A hair dryer will help remove them: just slightly warm the surface with it. You can get rid of a small bubble using a syringe or cocktail tube. After correcting the errors, the tabletop is left in the room for 48 hours.
The final stage is 3-fold coating polyurethane varnish. The process must be alternated with grinding.
Attention! A designer creation may change shade (turn yellow from sunlight). If you plan to place the attribute indoors on south side, garden gazebo It is advisable to coat the surface with varnish with a UV filter.
Wood and polymer - beauty is in the details
A successful duet of natural wood with epoxy resin will become great solution for interior decoration. To realize creative ideas, boards with caverns are used. Alternative option- cutting intricate notches on the finished product wooden tabletop. Tabletops framed in polymer resin have many advantages, including:
- external aesthetics;
- unique design;
- waterproof;
- abrasion resistance.
Creative ideas, coupled with skillful hands, will turn an ordinary tabletop into an unusual interior attribute, giving the space individuality, charm, and expressive color.
Epoxy has unique characteristics that allow you to create aesthetically pleasing and incredibly practical things, from small decorations to floors in an apartment or house. Epoxy resin is also used to fill the countertop.
This coating is not afraid of mechanical and chemical damage and looks really impressive, especially when using decoupage or similar techniques. The whole process will require funds personal protection and accuracy, but no special tools or special skills are needed. Read more about the filling method in our article.
Features of the material
The epoxy countertop filler is two-component and includes a hardener and resin. After hardening, the substance does not decrease in volume and does not become covered with cracks; it perfectly fills small irregularities. The material is resistant to moisture, it cannot be scratched, but it melts when exposed to high temperatures.
Typically, epoxy is an expensive material, but it turns out to be cheap when compared with its analogues for treating surfaces with increased stress on abrasion, moisture and mechanical damage. The price of epoxy fill as of 2018 varies between 200 and 800 rubles per kilogram, the wholesale price will be even lower, 180-190 rubles.

When filling the countertop with epoxy, the wood is stabilized: its pores are filled with resin. As a result, the tree becomes invulnerable to ultraviolet radiation, solvents, organics.
In addition to operational properties, epoxy resin also has decorative advantages. With its help, patterns, decorations, and imitations are created. For example, a table with a “flowing river” pattern. Epoxy resin has excellent paintability and allows you to create various shapes(the thicker the consistency, the easier), although this applies more to the glue than to the pouring.
Advantages of a countertop coated with epoxy resin:
- After drying, the substance does not shrink.
- After hardening, the surface becomes perfectly smooth, like glass.
- Resistant to damage caused by mechanical impact(dents, chips, cuts).
- Insensitive to moisture and aggressive cleaning agents household chemicals, therefore does not require a special selection of care methods.
- Under the influence ultraviolet rays does not collapse.
- Looks impressive.

Epoxy resin for pouring countertops also has its disadvantages:
- To do high-quality filling, exact adherence to the proportions of the components will be required.
- It is necessary to work in compliance with safety rules as strictly as possible.
- A sharp drop in temperature will lead to the appearance of white flocculent inclusions in the deep layers.
- When heated strongly, the material will release toxic chemicals. human body substances.
Advice! Dealing with the last two shortcomings is very simple. To remove white flakes that appear, heat the countertop to +50-60˚ C. To prevent the release of toxins during heating, coat the countertop with an additional protective transparent varnish.

There are several types of countertops made using epoxy:
- Made entirely of resin, without support. Similar view most often found in the production of coffee or coffee tables, for which significant loads are not planned.
- Made from boards and coated with epoxy as a protective layer. The role of the base can be played by a board made of any material: solid wood, multiplex, paneled surface, fibreboard, chipboard, OSB, etc. Before pouring, such tabletops are often decorated (with prints, stencil painting, paper elements, according to the decoupage principle, mosaics, flowers, coins, shells - whatever).
- Combined, when resin alternates with fragments of another material, most often wood.
The base can have any shape (square, round), it is important to make the sides of the required height so that after the pour hardens side surfaces the countertops were smooth and level.

Advice! When choosing a material for decorating a tabletop, remember that the more embossed the decoration, the thicker the layer of fill will have to be made; it will take longer to dry.
Review of brands
There are several popular types of epoxy resin that craftsmen use to create countertops:
- QTP-1130 perfect for creating a transparent table top for a desk or coffee table, if the fill layer is no thicker than three millimeters. The resin is particularly transparent and self-leveling.
- "Art-Eco" is most suitable for the production of thin layers, especially when a sufficient amount of hardener is added. In addition, this manufacturer produces excellent colors that allow you to give the epoxy any shade. Reviews about “Art-Eco” on the forums are different, there are good and bad. From negative points the appearance of a yellowish tint in the light and not completely hardening are mentioned.

- "ED-20"- the main disadvantage is the increased viscosity of the substance, which makes removing air bubbles from the mass very problematic. After some time, the ED-20 countertop loses its transparency and becomes yellowish. Craftsman forums are filled with negative reviews about this material, the only advantage of which is its low cost.
- CHS Epoxy 520 (hardener 921OP) is suitable for working with complex fillers (herbarium, coins, lids) and is the best and most popular material for making countertops.
- - characterized by fluidity, and therefore ideal for creating thin layers and for working with fillers (coins, caps, flowers and grass), transparent.

- PEO-610KE- resin Russian production, does not turn yellow over time under direct sunlight and heat.
- EpoxAcast 690 - when hardened, it will not turn yellow, even if it is exposed to direct sunlight or near heating devices.
- MG-EPOX-STRONG from the company Epox is a popular and good quality product. On the forums, some recommend filling the countertop exclusively with this resin.
- Epoxy CR 100 - has excellent chemical resistance, wear resistance, and antistatic properties.
- - has strength, resistance to direct sunlight and water, is used in the manufacture of jewelry, pouring glossy coatings and 3D floors, and creating decorative items.

Advice! When working with use one part hardener to two parts resin.
The quality of the filling will vary depending on the expiration date; there are fakes, and in some cases, factory defects.
As a rule, epoxy and solvent are mixed immediately before pouring in a 2:1 ratio.

In order for a handmade epoxy resin countertop to turn out to be a real work of art, you should take into account several recommendations from professionals:
- the resin will harden faster in a warm room;
- to avoid deformation, do not heat the surface from above;
- near fire or in direct sunlight, the solid resin begins to turn yellow;
- Do not mix the hardener with the resin at high speeds - otherwise bubbles and subsequently voids will appear;
- if there are still bubbles in the layer after leveling, pass the burner over the tabletop, the bubbles will come out - do not linger on the flame over one place;
- the hardened substance delaminates under the influence of extreme cold;
- It is imperative to coat the tabletop with a protective varnish, otherwise the resin will release toxins when heated;
- if uncured areas or spots appear during the pouring process, this indicates uneven mixing of the hardener with the resin due to adhesion of the substance to the walls of the container;
- To prevent uneven distribution of components, pour the filling mixture from one container to another several times while thoroughly mixing with a thick stirrer, spatula or spatula. Try not to bring the tool to the surface of the mass, otherwise there is a high probability of air bubbles appearing.
There is often a negative response to epoxy resin for pouring countertops. As a rule, problems arise when the rules for working with it are violated. Follow the proportions, take into account the advice of professionals, and the work will give excellent result.
It often happens that the surface of a table that is still strong has acquired an unsightly appearance. Or, after the repairs have been completed, you want to add some of your own flavor to standard factory furniture. For craftsmen who prefer creative solutions, there is a great solution: a do-it-yourself epoxy resin countertop. At the same time, such a tabletop will fit perfectly into the interior of any room: the main thing is to choose the right one decorative details and place emphasis.
Advantages and disadvantages of epoxy resin countertops
Epoxy resin is unique material, using the properties of which you can create real masterpieces, from miniature jewelry to finishing large surfaces such as countertops and even floors.
Epoxy casting is a two-component material consisting of a resin and a hardener. One of the most remarkable properties of pouring is the preservation of its original volume after drying. It covers surfaces with an even transparent layer without forming cracks or bulges. Therefore, using epoxy resin, you can turn any surface, no matter how complex its configuration, into a real work of art.
It can be used to cover surfaces with a pre-applied pattern or ornament, as well as with small decorative elements laid out on the surfaces. In this case, the surface of the table will be an interesting 3D image, made according to an individual project.
Table top coated with epoxy resin, except impressive looking acquires a number of advantages in operation over a conventional wooden or plastic surface:
- When dry, the coating does not shrink and acquires a perfectly flat surface;
- It has good resistance to mechanical damage - dents from impacts, cuts or chips;
- Excellent moisture resistance, which is important for kitchen surfaces;
- Not afraid of the aggressive effects of most cleaning chemicals;
- Not subject to destruction under the influence of ultraviolet rays;
- Does not require the use of expensive household chemicals for care.
The main disadvantages that epoxy resin has for pouring countertops include:
- With a sharp decrease in temperature, “white flakes” appear in the depths of the fill;
- Under the influence high temperatures may release toxins during evaporation;
- When preparing the filling, precision in proportions is needed to obtain the desired result;
- The need for strict adherence to safety precautions during work.
In order to remove flakes that appear during hypothermia from the table surface, you can warm it up to 50-60 degrees. You can avoid the evaporation of harmful substances from the epoxy surface if you cover it with a layer of protective transparent varnish, for example, yacht varnish.

Types of Epoxy Resin Countertops
Epoxy resin countertops can be of several types:- Entirely made of epoxy, no supporting surface;
- Epoxy resin coated bases made of wood, chipboard or other material;
- Combined - wooden fragments and resin alternating in a free order.
A tabletop without a supporting surface, only made of epoxy resin, can be made for an elegant coffee or coffee table that is not expected to bear a lot of load. It will look original if you pour epoxy resin into a beautifully shaped ornament made of dried flowers or any other materials. You can also add multi-colored or plain glitter to the transparent fill.

In the second case, epoxy resin for filling countertops serves as a decorative and protective layer for a base made of another material. An old tabletop, solid wood or paneled surface, or multiplex can be used as a base.
The base can be of any shape - round or in straight lines and with corners. The main thing is to create sides for the base of the height required for pouring, so that after hardening the tabletop has even and smooth side surfaces.
As a wooden base, you can take an array with a natural structure, or artificially decorate it with carving, milling, and marquetry. In addition, the old countertop can be removed after thorough cleaning. old paint and polish the varnish, repaint it and decorate it with small pebbles, coins, dried flowers, even buttons.

An example of what a countertop coating looks like after pouring epoxy
Making your own countertop
Since an epoxy countertop can be made with or without a base, we will consider both options - each has its own characteristics.
The tabletop, made only of epoxy resin without a base, looks very impressive due to its transparency and inclusions decorative elements. With certain skills, such a tabletop can be made with the most intricate outlines and an original 3D pattern in an array of hardened resin.
Do transparent table top using glass as a form:
- glass of the required size and shape is thoroughly cleaned, dried and degreased with acetone;
- before pouring, the surface of the glass is rubbed with wax mastic, which, after hardening, is polished with a dry rag;
- polished aluminum corners are used as sides for the mold, the inner surface of which is treated with a paraffin-turpentine mixture - this will allow you to easily remove the frozen tabletop from the mold;
- The corners are attached to the bottom surface of the glass using window putty.
Another option is possible, when a tabletop made entirely of epoxy resin is then inserted into a frame made of a material that matches the style of the product.
In order for the filling to harden properly, it should take 2-3 days. Before this, you cannot remove the tabletop from the mold.
To avoid having to drill holes in hardened resin for attaching the legs, foresee this in advance by marking the places for future fastenings and strengthening small sections of pipe in the form required diameter. After hardening, the sections are removed, and the fasteners for the legs are screwed into their place.
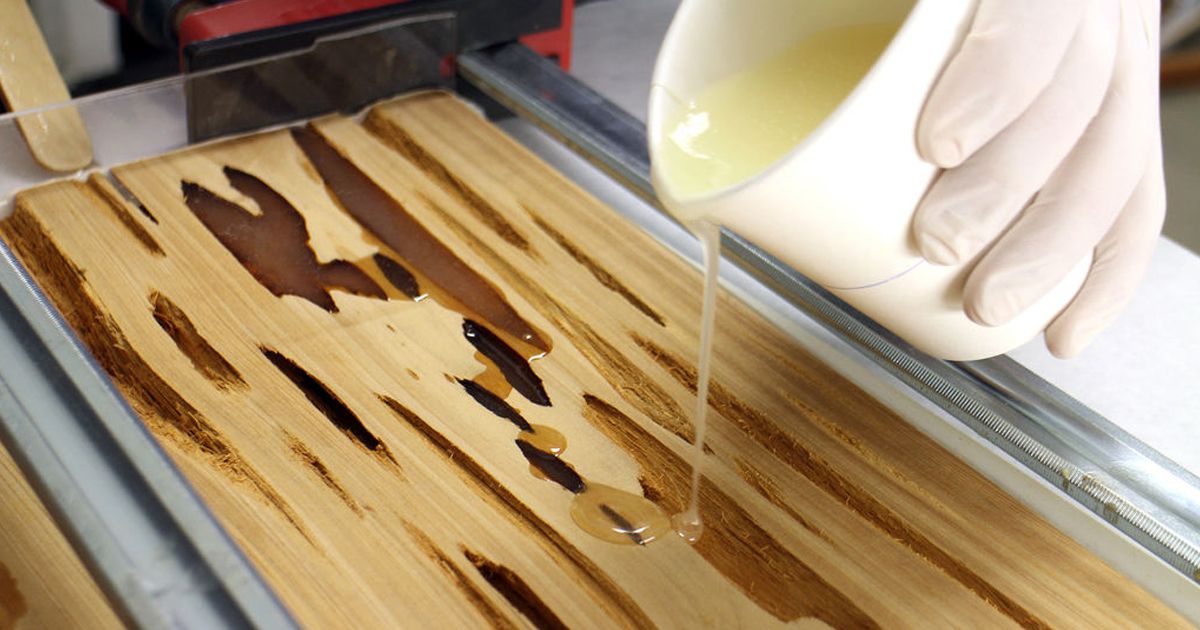
Tabletop on wooden base It’s easier to do because the countertop resin is poured onto an already prepared surface. At the same time, as in the case of glass form, along the edges of the tabletop, sides are made - they can later be removed. Or you can use the option when the wooden sides are part of the tabletop, and the resulting “bathtub” is filled with resin.

The process of pouring epoxy resin with your own hands is not so difficult, but it requires care when working.
The countertops look very nice, where wooden parts alternate with transparent inserts. To do this, you can also use glass as a base, on which wooden fragments are laid out, and the distances between them are filled with epoxy fill.
If you plan to use it as a base old board, then the work must be carried out in two stages: first, existing cavities and cracks are slightly deepened in the board, which are then filled with tinted liquid epoxy resin. After the first layer has hardened, the entire tabletop is poured, while the previously filled recesses stand out beautifully on the transparent surface.
After the pouring work is completed, it is necessary to protect the surface from moisture, dust and insects during hardening - they can significantly ruin the entire work. To do this, stretch polyethylene over the tabletop, mounted on a pre-prepared frame.
After complete crystallization of the material, the surface is polished and coated with a protective varnish.
Rules for working with epoxy resin
There are several rules that must be strictly followed when working with epoxy resin:
- Before pouring, old surfaces must be thoroughly cleaned of old paint, varnish, degreased and polished;
- if it is a new board, it must be thoroughly dried and sanded before work sandpaper;
- when preparing epoxy fill with a hardener, you must first measure the required amount of resin, and then add the hardener to it, strictly observing the proportions and order of mixing the components;
- you need to stir the filling very carefully, but without sudden movements, avoiding the formation of air bubbles;
- all work must be carried out in a ventilated area;
- since resin is difficult to remove from surfaces when it hardens, it is better to cover the floor with polyethylene or paper;
- to work with epoxy, you should tuck your hair under a cap and wear a cotton suit - any lint or hair that gets on the surface to be poured will ruin its appearance;
- You should not carry out work on pouring the countertop in a room with high humidity or not warmed up enough - the air temperature must be at least +22°C;
- you cannot accelerate the crystallization process of epoxy using construction hair dryer– it boils at temperatures above 60°C, forming numerous bubbles.
Filling the wood should be uniform and neat
Conclusion
Even a person with no experience in carpentry is quite capable of making a tabletop from epoxy resin with his own hands.
The main condition for success is strict adherence to the instructions for preparing the filling, compliance with safety rules and the procedure for performing the work. Imagine, create – and enjoy the results of your work!

EpoxyMax is one of the best manufacturers resins and hardeners. The best option is “ED-20” of the highest grade with a capacity of 5 kg
Video: creating an epoxy resin countertop
Photo examples


You can make it from epoxy various items, it is actively used in industry and construction. Unusual jewelry is made from this material, they are poured into prepared molds, and after a day the material hardens thanks to a hardener.
Benefits of epoxy resin
Epoxy items have a number of advantages, first of all, they have good resistance to acidic environments, and chemical compositions. After curing, the workpiece does not emit toxic substances and does not shrink. Items are durable and have a low level of moisture absorption. The resin has a long service life, that is, increased wear resistance.
It takes time to harden; adding a larger portion of hardener does not make the process faster. In order for the resin to quickly harden, the material is heated, increasing the temperature by 10 degrees of the required value.
Some material may harden without heating. The speed of hardening is affected by temperature and the type of material with which you have to work.
Using epoxy to fill various items?
In order for the composition to harden, it is necessary to perform work at a certain temperature -5, +190 degrees. That is, resins can be of two types, cold and hot curing. When doing work with your own hands, you usually use cold-set material, this makes it possible to make products if heating cannot be done for some reason.
In order for manufactured items to be resistant to aggressive substances, it is necessary to perform the work by heating.
Epoxy resin is used in different directions; it is used to impregnate fiberglass, which is used in mechanical engineering or radioelectrics. The material can serve as an excellent waterproofing agent, so the resin can provide reliable protection for basements, swimming pools or flooring. Various room decorations are made from resin to add originality to the interior.
Proper preparation of the composition

To make resin products, it is necessary to prepare materials, that is, epoxy resin and hardener. When working, it must be taken into account that when a lot of resin is heated, it may release large number heat.
There are several types of resin that can cure instantly or after mixing with a hardener. When working with such material, you must comply the right technology, otherwise the resin may boil and deteriorate. Therefore, when choosing a material, you need to consult with the seller about the method of preparing the resin. After hardening, you should get a transparent, uniform piece.
To make large or bulky items, a plasticizer is added to the composition and the temperature is increased, heating the material, the viscosity of the epoxy becomes less. Heat the resin in a water bath, then lower the material into a bowl of water and cool to 50 degrees. This heating method can increase the curing of the resin. If the composition boils, foam will appear on top and the liquid will become cloudy. This mixture is not used; it is necessary to reduce the viscosity of the material; for this, a solvent is added, but this will affect the quality of the product.
Water should not get into the resin or hardener, otherwise the composition will begin to become cloudy. A plasticizer is added to the resin, gradually heating the material. To thoroughly mix all the ingredients, use a special electric mixer or drill with an attachment. Plasticizer is added in amounts up to 10 percent.
Then the hardener is poured, the resin is cooled to 30 degrees in advance. In this case, the ratio of substance and resin is 1 to 10. All components must be well mixed to obtain a high quality product. The hardener is poured in gradually to avoid boiling of the resin.

Self-filling of objects
When performing work, it is necessary to act consistently, adhering to a certain technology. The manufactured item must be of high quality, transparent, and free of air bubbles. It is necessary to achieve uniform hardening of the resin from the inside and outside.
The resin is poured into prepared molds, which are lubricated with Vaseline so that the workpiece can be easily removed. To give the workpiece specific color, use various dyes in powder form. Three hours after pouring the mold, the resin begins to harden. Complete hardening of the product occurs within a week.
Then they begin cutting and sanding the product. When using dyes, the powder in the composition must be thoroughly mixed so that the coloring is uniform. The coloring elements must be of high quality, otherwise the resin may become cloudy.

Safety rules when working with resin
When working, you must remember that the resin releases toxic substances when heated, so you should use all protective equipment.
- When performing work, you must not use food utensils that will later be used for food. Such containers are considered unsuitable for food purposes.
- Hands must be protected with long gloves to avoid burns or allergic reactions. Goggles are worn to protect the eyes, and a respirator will ensure respiratory safety.
- The resin can be stored for about a year, and then is considered unsuitable for making products, so the material must be used within this period.
- If the resin gets on the skin, wash it off with plenty of soapy water. This must be done immediately to avoid burns.
- If the composition is prepared indoors, it should be well ventilated.
- All components must be on hand for quick execution. necessary work. Forms can be made independently or purchased in stores.


How to make jewelry from resin?
To make earrings you will need resin and dried flowers of forest grass. First, prepare the epoxy composition using the instructions, mix all the ingredients, then leave the material until the required viscosity appears, this takes about 2 hours. After this time, air bubbles will disappear from the mixture.
- Stencils of any arbitrary shape are drawn on paper; they can be round, oval or unusual.
- Then you need to prepare the surface; it is covered with oilcloth. There should be no grains or dust particles on the surface. And its structure should be smooth without differences or flaws.
- Stencils are laid on the film, and regular files are placed on top. Resin is poured onto the file and distributed over the entire stencil, the edges are formed using a toothpick. The filling is made up to 3 centimeters high, and the top is covered with an oilcloth dome to prevent dust from getting onto the surface of the product.
- Then the molds are left for a day to harden. After this, the blanks are removed from the film and shaped using a nail file or sandpaper. Thus, the edges of the product are processed.
- Now you need to prepare a new portion of the composition and arrange the dried flowers. To do this, apply a little resin to the product and glue dry blades of grass onto it, leave it to dry, and cover it again with epoxy resin. Give the product its final shape using sandpaper.
- A hole is drilled at the tip of the product into which the eyelet is threaded. After this, the product is considered ready.
To make a resin bracelet, you need to use special form, mold. In this case, the pouring is performed slowly; the more accurately the work is done, the less sanding needs to be done. Twigs and leaves of dried flowers are placed in a circle and straightened with a toothpick. To remove air from the product, place the mold in the oven for 15 minutes, and the temperature should not exceed 80 degrees. Then the mold is taken out and the product is left to harden.

When the bracelet has completely hardened, it is removed from the mold and all uneven areas are sanded with sandpaper. To add shine to the surface of the product, it is coated with acrylic-based varnish. Countertops are also made from epoxy resin; for this you need to prepare old surface, build formwork around the edges, and pour the composition evenly. Dried flowers, coins or other decorative elements can be placed inside the resin. Using resin, they make an original bathroom floor with shells, starfish or other unusual jewelry. Printed drawings are used for beautiful pictures. You can also make unusual decorative ornaments for rooms that will highlight the interior.
