How to lay a vapor barrier correctly on which side. How to lay a vapor barrier on which side, smooth or rough? Basic rules for laying vapor barrier
A vapor barrier is necessary to protect the insulation from intense attacks of household fumes. Smart device The specified barrier affects the frequency of repairs, the service life of finishes and structures, and the formation of the microclimate in the housing being equipped.
In order for the defense to cope with difficult responsibilities, you need to clearly know how to lay a vapor barrier, how to build it a reliable barrier on the path of vaporous moisture that destroys building materials.
A vapor barrier is a thin, almost weightless film material that blocks moisture from entering the body of the roofing pie and rafter system. This barrier is installed on the inside of heated rooms to prevent getting wet and subsequent rotting of the thermal insulation and wooden frame roofs.
If you do not install a vapor barrier, moisture accumulated in the thickness of the insulation will contribute to heat loss. After all, water is an excellent conductor, transmitting both electrical and thermal waves through itself. Then, instead of the task assigned to thermal insulation, which is to insulate the house, the wet material will create a feeling of dampness and dank cold in the rooms.
In addition, the accumulation of moisture in the roofing pie will invariably lead to the settlement of colonies of fungal microorganisms. As a result of their life activity, wooden elements truss structures V as soon as possible will lose their load-bearing capacity and become completely unusable. The same thing will happen with the insulation and other components of the system.
The vapor barrier is always installed as the first layer, if we consider the roofing pie from the side of the space being developed. Since the air, containing vapors of all types and of any origin, is warmer and lighter than itself, but in a less humid and colder form, the vapor, together with warm air currents, according to physical regulations, rushes upward.

According to the natural direction of steam movement, protection from it is installed in the upper zones of rooms with a characteristic high degree of humidity, along the ceilings and slopes of equipped heated attics. The entire wall is protected with a vapor barrier if it separates two rooms with sharply different operating conditions.
As an example, let’s take a partition between an ordinary living room and a home sauna or steam room. In this case, the vapor barrier is placed on the side of the bathhouse objects, and if they are located in the attic or on the second floor, then they are also placed on the floor as a ceiling.
Materials for constructing a barrier
Before we begin to analyze the principles that determine how to correctly and where to lay vapor barriers, it is worth studying the materials used in this area and their defining characteristics.

The most ancient option that protected roofing systems from moisture coming from inside houses was crumpled clay, laid in a dense layer on ceiling beams with flooring. In terms of insulating and environmental qualities, it is unlikely that it has yet found competitors, but the method of constructing such a barrier is not always and not applicable everywhere. True, in eco-houses they give preference to it.
Later, clay was replaced by glassine, which did not have high insulating properties. In addition, it is too easy to accidentally break, which creates significant complications during operation and does not bring joy during maintenance and operation. No one has yet completely abandoned glassine; it is used in budget buildings, and sometimes roofing felt is used instead.
The era of the reign of glassine was interrupted by polyethylene, which was ahead of its predecessors both in terms of technical data and technological indicators. It is easier to work with, it is quite durable, but is not resistant enough to mechanical stress such as punctures and breaks. And ordinary polyethylene can easily be destroyed by traditional atmospheric phenomena: sunlight and low temperatures.

Due to the poor resistance of polyethylene films to phenomena that could critically damage them, improved materials began to be developed based on these polymers. Their creators sought to reduce the disadvantages and enhance the advantages of polyethylene, which was also joined by polypropylene along the way.
As a result of the persistent work of developers of vapor barrier materials, the consumer is now presented with the following options:
- Reinforced films with a base of polyethylene and polypropylene. These are modernized versions of their predecessors of the same name, but with optimized resistance to UV rays and fluctuations in thermometer readings. They are used both in pitched roofs and in ceilings.
- Foil membranes. Polymer films with the working side covered with aluminum foil. They are used where increased heat-saving qualities are required, for example, in steam rooms, because when proper installation act as a reflector that reflects heat waves.
- Anti-condensation membranes. Universal rolled materials, capable of playing the role of both vapor barrier and waterproofing. On the side of steam movement, these materials are endowed with a rough surface that prevents dew from falling. The side facing outwards is smooth and water-repellent.
The listed types have significantly, but not completely, replaced the position of glassine with unreinforced polyethylene. Outdated vapor barrier materials are still used to this day in insulating floors; they are laid under backfill insulation such as expanded clay or dried earth. They are used in cold roof structures of cottages and cabins, in the construction of which insulation was not pursued as a goal.

The principle of taking into account vapor permeability
Vapor permeability is an important characteristic in construction. It indicates how many grams of water contained in the air flow can pass through 1 m2 of insulation or building material in one day. Literally all products used in construction have the designated quality, but their capabilities differ radically.
Brick, all types of foam blocks, and wood allow steam to pass through with varying degrees of intensity. If structures made from them are not equipped with thermal insulation, then a barrier against vaporous moisture is not constructed. The evaporation will simply pass through the slopes and walls with ceilings to the outside, where there is a deficiency of it for the majority of the year.

If structures are equipped with insulating material, there is an urgent need to install a vapor barrier. This more complex scheme usually combines options with different abilities to transmit steam, and some of the building materials generally tend to accumulate moisture that is harmful to them.
It is better not to allow evaporation into the roofing pie of an insulated roof at all. And if something managed to penetrate, then this saboteur moisture should be removed as quickly as possible by all methods available in construction. The list of methods is headed by organizing ventilation of the under-roof space and the attic itself.
With rational and correct construction of the roof structure, steam and condensate formed due to the difference in temperatures outside the roof and inside the heated space do not linger in the roofing pie at all.

The solution to the problem lies in the technologically proven arrangement of the components of the insulation system, which are “lined up” as vapor permeability decreases as follows:
- Vapor barrier. Polymer film with the least ability to transmit moisture suspended in the air. The technical data sheets of most such materials indicate vapor permeability in hundredths and tenths of one gram, which the film can pass through in 24 hours. True, there are options with permeability of several units.
- Thermal insulation. Mainly wadding and non-extruded foam materials with a higher vapor permeability than the previous layer. When selecting insulation for an attic or ceiling, this factor must be taken into account.
- Waterproofing. A polymer film with vapor permeability exceeding that of insulation, or at least equal to it.
An insulation system constructed in this way is perfectly protected from the accumulation of steam and condensate. Even if the vapor barrier does allow a certain amount of fumes to pass through, they will not linger in the insulation. After all, its ability to pass steam is higher. Then, in the path of the steam there will be waterproofing, which is even less likely to retain evaporating water from its inside.

When a certain amount of vapor enters the thermal insulation layer of a well-designed roofing pie, the protective mechanism of the roofing system comes into play. Moisture is removed along with ventilation flows running through the vents, or flows into a gutter along the outside of the anti-condensation film.
Features of fastening vapor barrier materials
To construct a vapor barrier, a wide range of polymer films are now produced that fundamentally perform the same function, but differ in the degree of effectiveness. Well-founded recommendations for choosing products from a manufacturer with an impressive reputation are worth following, because... In addition to production experience, he also has the need to maintain decent quality of the brand.
Good advice, which all manufacturers certainly give, is to purchase a set of basic and consumable materials from one company. This rule must also be followed for the sake of perfect compatibility films and adhesive tapes, their reliable adhesion and normal subsequent operation.

When laying and fastening vapor barriers, the following rules should be observed:
- The vapor barrier film panels are laid from top to bottom. Each subsequent strip must overlap the previous strip on the side of the room. This is so that the vapors that penetrate into the roofing pie during condensation can simply flow towards the eaves.
- The vapor barrier is rolled out according to the factory winding. There is no need to turn anything over; the manufacturer has thoroughly thought out everything for ease of work on the roof. The roll of material should be on top, the rolled out sheet on the bottom.
- The vapor barrier is joined into a single carpet using single- or double-sided tape. In areas of roof penetrations, the fastening of the vapor barrier film is complemented by the installation of slats around ventilation and sewer risers and chimneys. The panels are laid with an overlap of 10–20 cm.
Dormer windows are equipped with a vapor barrier, similar to roofing penetrations. The insulating carpet in the area where they are located is cut according to the envelope principle. The cut corners are turned outward along the window slopes and cut again after the fact so that the material can be used to cover the insulation and its edges can be fixed.
Steam protection does not require connecting the panels with tape if the ceiling on the attic side is insulated with backfill insulation. In such schemes, a film made of polypropylene or polyethylene is laid loosely on concrete slabs with an overlap of 20 cm. In this case, there is no special need to attach the panels to the structure, because the film will be pressed down by the insulating layer.
In such systems, waterproofing is not used for insulation at all; it is installed along the slopes, but the ventilation device is subject to high demands. In addition to standard under-roof ventilation ducts, it is imperative to construct dormer windows and it is desirable to install roof aerators.
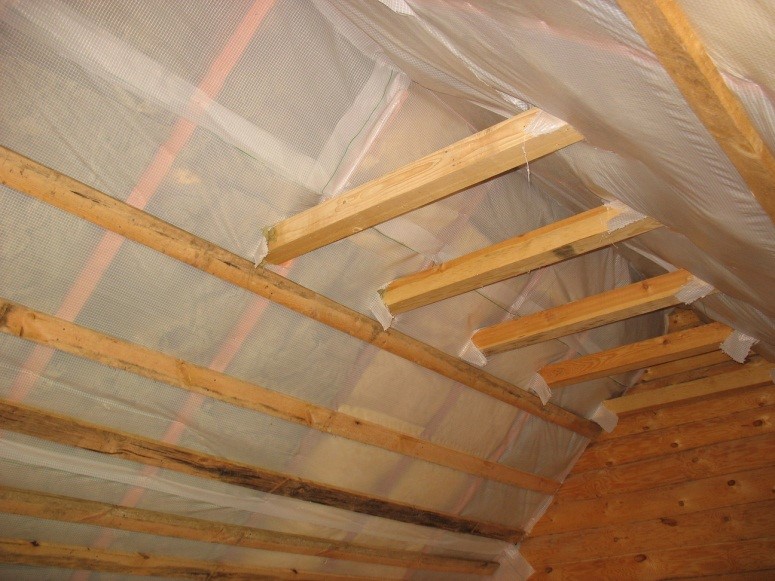
A vapor barrier for equipped heated attics is constructed along the rafters from the inside. Panels of material are installed only perpendicularly rafter legs in contrast to waterproofing, which on steep roofs can be laid along the rafters.

Vapor barriers in attics are laid either over the entire area of the roof structure, including the gable areas, or only along the pitched planes. In the first case, to remove warm air masses, usually saturated with moisture, a combined mechanical ventilation system is constructed, which includes both supply and exhaust devices.
If the vapor barrier is installed only along pitched planes, vapor diffusion will occur through the gable walls if they are made without insulation. For ventilation, it is not necessary to build an artificial system; natural devices can handle the removal of steam and exhaust air: ventilation windows, under-roof vents, conventional aerators.

Another significant difference from the process of laying waterproofing is that the vapor barrier is constructed without breaks in the areas of the hip and ridge joints. Before attaching vapor barrier panels to each other, they are fixed to the rafters with metal brackets.
Polymer films are laid on wooden rafter frames without tension. This is necessary so that during the linear movements characteristic of wood, the lumber does not tear the insulating carpet. The adhesive tape for connecting the panels is unrolled directly from the factory roller and glued as it is unwinded. The double-sided side is attached first with the back side, then the turned side to the master.
On the inside, a lath is placed on top of the vapor barrier carpet, which serves additional element fastening the material and the basis for installing attic cladding. This technological gap will also eliminate the formation of condensation that occurs from direct contact of the casing and the polymer film.
The installation of a vapor barrier along the slopes can be done both before laying the insulation and after the specified work has been carried out. However, the priority is the period after installation, so that if the roofing cake gets wet in the rain, it can be dried naturally.
Another compelling argument for constructing a vapor barrier after installing the pie and laying the roof is that it becomes possible to postpone this stage of work for a while before installing the sheathing. As a result, finishing work can be carried out in winter, and the rainy season will not interfere with their implementation.
Video about the rules for installing vapor barriers
A video with a detailed explanation of the rules for constructing a vapor barrier carpet and laying the components of the roofing pie in a visual form represents the essence of the process:
Vapor barrier is an important component of the roofing pie, the proper installation of which determines the service life of the roof and the conditions in the furnished room. Information about the features of its device is needed as independent craftsmen, and for owners who want to control the actions of a hired team of builders. Armed with useful information, you can eliminate a lot of troubles with the operation of the roof and the house as a whole.
Without a vapor barrier, the service life of the insulation will be short. Moisture will penetrate the layers of material and slowly destroy it. This property is especially important during the cold season, when the temperature difference between indoors and outdoors is significant.
For this reason, a volume of steam is formed in the house, which must leave it without obstacles. In order to correctly carry out the installation of materials that prevent moisture accumulation, you need to know which side to lay the vapor barrier.
Preparatory work for laying vapor barrier
Vapor barrier will increase the operational capabilities of the building
During preparatory work it is necessary to make a choice of the material that will be used in the vapor barrier.
Today, the market for materials suitable for moisture protection offers various options that are suitable for work on floor slabs, ceilings, under the roof, on walls or even on the floor:
- When installing vapor barriers on wooden structures: ceilings, walls or floors, it is preferable to use films with a membrane designed for such cases.
- For floors made of any material - mastics based on polymers and bitumen.
- For ceilings, various surfaces Universal “Izospan” is suitable for walls and floors; it perfectly insulates structures from moisture and condensation accumulation.
- For concrete or wooden walls Foil, polystyrene foam, and mega-isol are suitable.
If the surfaces are not properly prepared, the vapor barrier will not be effective. Complex preliminary work depends on the specific material from which the house is built, whether the walls, floor or ceiling are erected, and also on whether a new building is planned or a major renovation of a dilapidated one is planned.
Surface preparation options depending on the material:
- If it is being built wooden house from scratch, then you first need to saturate all parts of the building with special insect repellents, this is important for the subfloor, ceiling and walls. It is also worth using impregnations against fungi, mold and fires. When this work is completed, you can do the vapor barrier.
- During major renovations, outdated floor coverings and all layers of insulation are dismantled. All surfaces are cleaned, impregnated with products, and only then a layer of material is applied to protect them from moisture.
Concrete buildings do not require separate surface treatment with special substances; it is enough to clean the walls, floor or ceiling.
Vapor barrier helps prevent the formation of mold, mildew and rot in wooden buildings. Installation does not require great skill; it is enough to properly prepare the surfaces and know a few nuances of the work.
We put a vapor barrier on the ceiling
During work, the question very often arises, which side should the vapor barrier be placed on the ceiling and how to lay it correctly?
First, you need to determine where the front and back sides of the vapor barrier are. Typically, vapor barriers have a smooth side and a rough side. A more uneven surface always faces the insulation layer, while a smooth surface always faces the outside.
If in doubt, you can take a small piece of material and cover the mug with it. hot water. Condensation will settle on the side that remains waterproof.
Instructions for installing vapor barrier on the ceiling
Before starting work on the vapor barrier of the ceiling, it is necessary to clean out all irregularities that do not exceed 5 mm, then clean it of dust and dirt, and then prime it and dry it.
The installation of the material depends on its characteristics; most often, vapor barriers are installed indoors on the inner surface of the ceiling or ceiling.
If the climate is such that in winter the temperature can drop to low levels, and the walls are not too thick, then it is recommended to install a vapor barrier inside and outside.
- Vapor barrier material is usually attached to the surface using a stapler.
- Special attention should be paid to the corners; the material should slightly overlap the walls around the perimeter of the ceiling.
- The material must be whole; the use of several pieces is not allowed. It is important that the edge of the canvas overlaps the corner.
- When laying a vapor barrier film, its surface should be as stretched as possible. It is placed only after the insulation layer has already been laid.
- The film, which is laid between the ceiling beams, is secured using nails with a special wide head; a distance of about 30 cm must be maintained between them.
- The connection of film sheets on the ceiling must be done overlapping each other. The joints are hermetically sealed using tape.
Sometimes a vapor barrier is laid on the ceiling without a layer of insulation; in this case, the film can be attached using strips of plastic or wood, which are fixed to the ceiling with screws. The step between the slats should be small, and the attachment points themselves should be located at a distance of no more than 30 cm.
When insulation material is placed on top of a vapor barrier, there is no need to attach the vapor barrier layer separately. You can record everything at once.
Attaching various types of vapor barrier to the ceiling

It’s easier to insulate the ceiling with two people
Sheet vapor and thermal insulation requires a special approach during installation.
First, a special frame of profiles is installed.
It could be wooden blocks or special aluminum slats. The latter are much easier to work with, since they are designed for these purposes.
They have special grooves into which sheets are secured. To eliminate the gaps between the ceiling and the walls, it is necessary to capture a small part of the wall.
There is a type of vapor barrier made from roofing felt; this type of work is called lining. This material is laid on the prepared floor surface. During pasting, heated bitumen or mastic is used, which is applied without missing areas.
If there are joints in the ceiling or corners, then it is necessary to introduce the material with a slight overlap and secure it with nails with large heads on a special rail. The edges of the material are folded under the insulation.
If a painted type of ceiling vapor barrier is used, then most often they use bitumen-kukersol mastic, varnish or hot bitumen. The varnish must be made on the basis of chlorinated rubber or polyvinyl chloride. A layer of mastic is applied using a special sprayer.
The varnish coating is applied twice, and you must wait until the first layer has dried before applying the second.
Features of laying vapor barrier to insulation
When carrying out work, it is very important to consider which side to lay the vapor barrier to the insulation. If you make a mistake at this stage, the thermal insulation will not be effective.
For all film-type materials, one rule applies: the film is placed in such a way that the smooth surface is on the insulation side, and the rough surface is on the inside.
This rule is suitable for protecting walls, ceilings and floors from moisture, but only if the material has a structure consisting of two layers. When working with a vapor barrier with an aluminum side, it is necessary to place the shiny surface inside and the rough surface against the wall.
When using polypropylene material, the rough side should also face the room, and the smooth side should face the insulation. As a rule, high-quality vapor barriers have instructions and installation guidelines.
Installation of vapor barrier on the floor
Vapor barrier materials must be laid only on a prepared base. For this type of work optimal solution will use isospan. You will also need a construction stapler and adhesive tape suitable for the following purposes:
- If the film is two-layer, then its first layer is laid directly on a wooden or concrete floor.
- The material should be laid with an overlap of approximately 5-10 cm on the walls, and secured with a special tape.
- In places where the film is glued together from two canvases, it is necessary to additionally fasten the layers with a stapler. When laying, the result should be a single canvas, without defects. It should completely cover the floor area.
- Any insulation material is placed on top of the vapor barrier: mineral wool, polystyrene foam, expanded polystyrene and others. After the layer of thermal insulation, it is necessary to put a second layer of material to protect against moisture.
- The vapor barrier is placed with a smooth surface against the insulation.
- In the first layer, the rough side faces the base of the floor, and in the second layer, it faces the room.
- After the materials have been correctly laid, the main floor is installed.
When using a film with a foil side, it is laid end-to-end. To fasten the canvases, you need to use a special tape with an aluminum surface.
A layer with a metallic sheen is placed towards the room, then all the heat will be reflected from it and returned to the house.
Sometimes special rubber in a liquid state is used to vapor barrier the floor. The subfloor is prepared in advance; its surface must be dried and cleaned of dirt.
Then the mastic is applied using brushes or a roller. After time, the impregnation dries and forms a dense film that completely matches the texture of the floor.
Types of vapor barrier

The insulation is placed on the smooth side of the vapor barrier
An important step in carrying out thermal insulation work is the correct choice of material.
Not so long ago, the most popular way to protect against moisture was to use glassine or roofing felt.
Today the market is saturated with offers, and technological progress has gone far ahead - you can buy modern combined materials that are reliable and durable:
- The film is an excellent vapor barrier and prevents condensation from forming on the walls, roof and insulation itself.
- Film with a layer of aluminum foil. Metal surface has the ability to reflect heat and has excellent vapor barrier properties. This type of material makes sense to use in wet areas: bathrooms, swimming pools, saunas and baths.
- Film with a membrane - has a limited ability to transmit steam. Depending on its condition, it can change its properties. As the humidity level increases, the film begins to allow steam to pass through; in a dry state, this property is much lower.
- Mastic based on bitumen - allows air to pass through and retains moisture.
Vapor barrier materials can also be produced in sheets and rolls. Depending on this, the installation technology differs.
When using the material in rolls, they should be rolled out in the direction from bottom to top. The fabric is secured using wooden slats or profiles in the horizontal direction.
The hole for ventilation is left in the gap between the vapor barrier layer and the finishing inside; its size must be at least 4 cm. The fastening must be strong.
The vapor barrier in sheets is mounted in a pre-prepared profile frame, and then the material is installed into it from the bottom up.
Features of vapor barrier
Vapor barrier materials are necessary for normal circulation of moisture in the room. A special membrane in the film prevents the insulation from accumulating moisture. Therefore, it is very important to observe several conditions when laying the layer:
- If a membrane with wind and waterproofing properties is used, it must be in close contact with the insulation. If there are gaps, the material will cool to a temperature that will be lower than that of the steam being released. Then membrane film may become covered with a thin layer of ice and cease to be effective.
- It is necessary to provide a gap for steam removal of at least 40-50 mm. But the size may vary depending on climatic conditions. It is especially important to maintain balance for large roofs or those with an obtuse pitch, where air circulation is poorer.
- The amount of steam passing through the system should be kept to a minimum.
Vapor barrier has one important function - it prevents moisture from entering the insulation layer. But that’s not all, when silicate or polystyrene foam materials are used in houses to retain heat, the membrane will serve as a barrier to the entry of individual fibers and volatile substances into the house, which can be harmful to health.
Air does not escape through cracks and gaps in structures, and the house remains at a pleasant temperature.
Recommendations for proper installation of vapor barrier materials
Planning work on installing a vapor barrier begins with identifying the most critical areas where special attention is needed. Laying material that protects against moisture is needed where the surface becomes the boundary between warm and cold air.
Most often such places are basements, ceilings, roofs, attics, attics and walls. Wooden structures require special attention when performing vapor barrier work:
- The layer protecting against moisture must be laid with the smooth side facing the insulating materials, in this case there will be no influx of steam, rot or fungus will not begin to form, and heat will not be lost. This is especially important for wooden buildings.
- If the walls are insulated from the outside, then the vapor barrier is placed outside the room. When installing thermal materials internally, a layer of film protecting from moisture should also be located on this side.
- The most common mistake is a loose fit of the film to the insulation.
- When gluing the seams of vapor barrier sheets, it is necessary to use wide tape of at least 10 cm.
- When work is carried out in places window openings, then they often forget to leave a small supply of film, which is needed in case of deformation or shrinkage. This should be a fold 2-3 cm in size.
- The film must be protected from exposure to sunlight; in just one season, the exposed surface can become unusable.
- To connect the joints of the film to the foil surface, you need to use metallized tape.
On the one hand, vapor barrier work does not require great skills, but there are still a number of nuances that need to be taken into account. The main condition correct installation film - installing it with the correct side to the insulation. As a rule, it is not difficult to determine the reverse and face of a material.
Let's figure out which side to lay the vapor barrier on different surfaces
Without a vapor barrier, the service life of the insulation will be short. Moisture will penetrate the layers of material and slowly destroy it. This property is especially relevant in
Which side should I lay waterproofing to protect the insulation?
 When arranging a floor, the most important component of this activity is the creation of a reliable vapor barrier for the floor structure, in general, and the heat insulator used in it, in particular. This is necessarily dictated by the following: during the operation of the floor structure, steam penetrates into the underground space, and it can do this both from above, through the floor finishing material, and from below, through the interfloor ceiling. Taking into account the temperature difference in the room and the interfloor span, steam eventually turns into droplets of moisture that settle on back side floor covering or thermal insulation material, leading to their destruction and creating conditions for the development of various microorganisms. So, installing a high-quality vapor barrier allows you to prevent this, but only if you correctly decide which side to lay the waterproofing on so that it allows steam to pass through, but does not allow moisture to come into contact with the floor covering.
Types of materials

 For steam protection, polyethylene, aluminum laminated and polypropylene films are mainly used. The first of them is an inexpensive, quite effective and therefore very popular vapor barrier, which has only one drawback - low strength. However, in lately Reinforced perforated and non-perforated film has become available to us, which has quite serious strength indicators. At the same time, the perforated film has micro-holes that increase its vapor permeability. Simply put, it allows a small amount of steam to pass through, and therefore, if such a film is used in rooms with high humidity, then it is usually included in the waterproofing system. Moreover, in this case, it matters which side to lay the waterproofing in order to prevent steam from penetrating to the insulation. In the case of non-perforated films, there is no such problem, because they have a low vapor permeability rate and do not allow even finely dispersed steam to pass through.

The second type of films is laminated with aluminum, i.e. foil. Their main advantage is that in addition to the ability to create a barrier to steam, they can reflect thermal energy. This means that there is no special need to create and, as a result, protect the heat-insulating layer. That is why foil films are used in floor structures of rooms with high humidity and air temperature, including saunas, bathrooms, swimming pools and even kitchens.

Polypropylene film is more durable than polyethylene film. In some cases, such a film is “equipped” with an anti-condensation layer, which reduces the vapor permeability of the material and eliminates the possibility of condensation forming on the inner surface of the film. This film can be placed on either side of the insulation, but if there is no anti-condensation layer, condensation may appear on the side near the insulation.
Correctly laying the film on the insulation
 So which side should the waterproofing be laid to the insulation? If you are using a film, one side of which will be smooth and the other rough, then place the smooth side on the insulation, and the rough side up towards the floor covering. In this case, the steam will not penetrate down to the insulation, but will remain at the top, and if there is effective ventilation of the underground space, it will quickly evaporate. If you use foil films, then lay them with the aluminum side up. It will also not allow steam to pass through and will reflect thermal energy. If you used polypropylene film, then lay it with the laminated side down and the wicker side up.
But there are also exceptions. For example, a material such as Izospan V is very popular today. Which side of the waterproofing is laid against the insulation if it is used? It's the other way around, i.e. We place the rough side on the insulation, and the smooth side upward, towards the floor covering. In this regard, we recommend that, even after reading this material, you always carefully study the instructions of their manufacturers.
In addition, do not forget about the main purpose of the films listed above - to prevent steam from penetrating into the insulation. This means that they must be laid between the finished floor and the insulation. At the same time, we must not forget that steam can penetrate from below, through the subfloor or interfloor ceilings, which means that another, lower layer of vapor barrier, on which the insulation is laid, will be quite relevant. The last option is especially relevant when it comes to the first floors wooden houses, in which the floors are laid on the ground or are located above a damp basement.
Laying film on the subfloor
 Laying a vapor barrier film on a plank subfloor is done as follows. First, we clean the floor from debris and dust, after which we unroll the roll of film so that its strip overlaps the wall to a height of 15-20 cm. We unroll and cut the second strip in exactly the same way and fasten it to the first using mounting tape or tape. Next, we fix the film on the joists using galvanized nails or a stapler. After this, we lay insulation on the film, the layer thickness of which should be at least 50 mm. The thermal insulation material must fit tightly to the waterproofing film. After this, we cover the insulation with a second layer of film, similar to how we laid it on the subfloor. Well, the last step is to lay the finished floor covering, not forgetting to create a small ventilation gap between it and the vapor barrier film.
Additional nuances
Before laying waterproofing film on the subfloor, take care to protect the wood or screed from moisture. To do this, it is quite acceptable to treat the base with coating or plaster waterproofing, for which it is necessary to use the appropriate compounds. It is recommended to apply several layers of waterproofing at once, and each subsequent layer is applied after the previous one has partially dried, which takes an average of 3-4 hours. There is no need to wait for the waterproofing layer to dry completely, because... this may cause the next layer to fail to adhere to the previous one. But it is recommended to lay the vapor barrier film after the last layer has completely dried.

Which side to lay waterproofing, Floor finishing
Which side should the waterproofing be laid to protect the heat-insulating layer of the floor structure from condensation? The answer depends on the type of overlap and
How to properly install waterproofing for floors and more
 It is difficult to underestimate the importance of such a stage in the construction of a house or other structure as vapor barrier. This term means various ways and means designed to exclude or minimize the penetration of moisture in the form of condensation into structural materials. It is important to determine which side to lay the vapor barrier on, and the tips or instructions below will help with this.
Insulation materials are the most vulnerable to moisture. Under the influence of moisture, the structure of most modern insulation materials is damaged, and as a result, their thermal insulation properties decrease or disappear. However, this is far from the only threat posed by condensate penetration. In a humid and closed environment, fungal organisms, that is, mold, which is completely unnecessary there, begin to actively develop. They negatively affect the reliability and durability of load-bearing structures, especially wooden ones.
Vapor barrier material options
The modern building materials market has a wide range of vapor barrier coatings. They are divided according to many characteristics, primarily by vapor permeability, which is needed to select the location for installing the insulation. Also, vapor barrier materials have a fairly wide price range, which should also be taken into account when choosing a material.
The main types of vapor barrier are:
- Traditional vapor barrier film;
- Film with a layer of aluminum foil;
- Membrane film.
Unfortunately, there is no material that is equally acceptable for any area of vapor barrier, be it a roof, walls, one of the floors, or a foundation. Therefore, it is extremely important to take into account the structure of the materials being coated, the purpose of the insulation and the area of coverage, and based on this, choose the right specific material, as the instructions will tell you.

In addition, it is necessary to take into account the characteristics of each type of vapor barrier. If a vapor barrier film made of polyethylene is installed, it would be correct to leave gaps, because in addition to insulation from steam, the film is completely airtight, so condensation will form in a closed structure without air access.
Features of membranes
Membranes, in addition, are divided into pseudo-diffusion, diffusion and super-diffusion. They differ in vapor permeability coefficient, which is 300 g/m2, 300-1000 g/m2 and more than 1000 g/m2, respectively. Based on this characteristic, the suitability of membranes for insulating certain structures is determined. Pseudo-diffusion practically does not allow moisture to pass through, and is most suitable for vapor barrier of the outer layer under the roof. However, an air cushion is needed between the film and the insulation. And such films are completely unsuitable for insulating facades. The pores of the membrane become clogged with external dust, and condensation begins to remain directly on the material.
The remaining types are more versatile due to their larger pore diameter. This makes it difficult to clog them and allows you to avoid leaving air gaps.
Correct placement of material
A key role in achieving good insulation of structures is played by which side to lay the vapor barrier. The answer to this question also depends on the chosen vapor barrier material:
- Vapor barrier polyethylene film is laid with either side facing the insulation, but there are special vapor-condensate films with roughness for better evaporation of condensate. In this case, the film is placed with its smooth side facing the insulation. Such details are usually determined by the attached instructions.
- Laying a vapor barrier from a diffusion membrane, by analogy with a vapor-condensate film, is done with the smooth side facing the insulation.
- Materials containing energy-saving foil should be correctly mounted with the foil side facing the inside of the room, because it reflects heat.
It is important to consider the following features:
- Vapor barrier material, whether it is rolled or sheet, is laid only overlapping and secured with special tape that prevents the passage of air in the gaps.
- Under no circumstances should damage (breaks, cuts) to the insulating material be allowed, even if they were formed during the process or after installation they must be sealed.
DIY vapor barrier
Vapor barrier of a room is a procedure that can be done with your own hands. If you take into account the above rules, correctly determine which side the insulation is laid on, and choose the right material, then even without the help of professional builders, it will be done reliably.
The most indicative would be a do-it-yourself floor vapor barrier. Before installing insulation and vapor barriers, it is strongly recommended to treat underground structures with compounds against wood rot and against insects. This treatment is of particular importance for structures located closest to the ground and foundation. After this, the logs are installed, and the subfloor of the first floor floors is mounted on top of them. This will be the basis on which the floor vapor barrier is laid.
The selected vapor barrier material is laid on top of the subfloor, with an overlap of 15–20 centimeters. It can be secured with nails or a construction stapler, but the most appropriate method would be the previously mentioned adhesive tape. Places that are difficult to reach, abutments to walls and raised areas of floors, require additional treatment with bituminous material, because it is almost impossible to properly lay film in such places. After laying the vapor barrier, the installation of thermal insulation begins. It is important to lay these materials (mineral wool, polystyrene foam and others) close to the joists.

The vapor barrier of the floor, however, does not end there. Moisture can get into the insulation from inside the house from the first floor. Therefore, when insulating, you need to lay another layer of vapor barrier, similar to the bottom layer. Any type of membrane insulation is most suitable for this purpose. This layer is also overlapped. You can confidently lay the main floor on top of it. In this case, you need to leave 1-2 centimeters as a gap.
Conclusion
At making the right choice Which insulation is installed on the insulation, as well as the correct choice of the vapor barrier material itself, will ensure reliable vapor barrier of the floor. And it, in turn, is one of the important components of the overall reliability and durability of buildings.
Laying waterproofing, its features, choice of materials for its implementation
Important features when laying hydro- and vapor barriers must be taken into account when building any structures, otherwise inattention at these stages can lead to disastrous consequences during the operation of the house
During construction country house or a private bath, an important step is the thermal insulation of various surfaces. In addition, the insulation itself needs high-quality and reliable vapor barrier protection.
To prevent the negative impact of external factors and the formation of condensation on the heat insulator, any homeowner must have general idea about how to properly install a vapor barrier to ensure long term operation of the entire building.
Membrane structure and operating principle
The most popular for their performance characteristics are breathable multilayer membranes, which are designed to create reliable vapor barrier protection.
They consist of three layers, each of which performs an important function. The first layer prevents the penetration of steam into the insulation, the second provides the necessary strength of the base, and the third protects against moisture from the outside.
Each individual layer has the necessary perforation for good air exchange. The first layer removes excess moisture, allowing dried air to penetrate. The reinforcing layer retains warm air masses inside thanks to a special weaving of threads. The third layer provides a sufficient level of traction inside the structure.
Some types of membranes have an additional anti-condensation layer based on viscose or cellulose. It retains excess moisture deposited on the paper fibers. To naturally remove moisture from the membrane, a technological gap of 2.5 cm is provided between the vapor barrier and the finishing surfaces.
Features of vapor barrier installation
An important stage in protecting insulating materials is laying a reliable vapor barrier layer. All work is carried out during the repair or reconstruction of a finished building or during the construction of a new building. To properly install a vapor barrier, you need to understand how to connect membrane sheets and which side to fix them to the insulating base.
Preparatory work
At this stage, work is carried out to select the appropriate type of vapor barrier, taking into account the features of the installation process, performance characteristics and material requirements.
Before laying a vapor barrier, careful surface preparation will be required. It is important to consider the type of material used in the construction of floors, walls, ceilings and roofing structures.
- During the construction of a log house, everything structural elements treated with protective antiseptics and fire retardants.
- When carrying out repair and reconstruction work, complete dismantling of the finishing, cleaning and preparation of surfaces is carried out:
Wooden elements are treated with compounds against aging, rotting and burning. Concrete, block and brick surfaces are treated with deep penetration antiseptic compounds.
Proper preparation of surfaces will ensure a long service life of the insulating material and the entire structure.
Technology for laying vapor barrier on the ceiling
If the roof structure and interfloor ceiling are made of wood, then the installation of a membrane for waterproofing is carried out on a prepared base.
Roll or block insulation is installed in the space between the rafters and joists, best option– mineral or basalt wool. Next, you can lay vapor barrier protection on the ceiling surface.
With the thickness of the insulation, equal height log, an additional slatted counter-lattice is installed to maintain natural ventilation.
It is necessary to install a vapor barrier on the ceiling with a slight overlap on the walls around the perimeter, while special attention should be given to the corners. It is better to place the joints on the joists and glue them on both sides with tape on a reinforced base.
Important! When installing a vapor barrier, sagging and deformation of the panels should be avoided.
For thermal insulation flat roof or a concrete ceiling, a waterproofing film is mounted from the inside on a self-adhesive tape, then a lathing made of wood or metal is installed.
The height of the sheathing is determined based on the thickness of the heat-insulating material and the minimum technological gap for ventilation. The installation pitch is 3 cm narrower than the width of the heat insulator, which allows for high-quality styling insulator into the prepared sheathing cells.
Technology for laying vapor barrier on the floor
The installation scheme for vapor barrier protection on the floor is similar to how the material is laid on wall and ceiling surfaces.
The wooden floor is insulated using joists, on which a waterproofing layer is laid. Next, insulation is placed in the space between them - wool on a mineral or basalt basis. After this, vapor barrier material is laid.
The rolled material must be laid with an overlap of 12 cm, with the joints carefully sealed with metallized tape on both sides. A properly laid vapor barrier should completely cover the floor surface with an overlap of up to 10 cm on the walls.
To install a vapor barrier on a concrete base, you will need to install a sheathing, in the cells of which a waterproofing layer and a heat insulator will be laid.
Choosing a side for installing a vapor barrier
Once the material for the vapor barrier has been selected, an important question to consider is which side to attach the vapor barrier to the insulation. Such materials can be fixed as follows:
- Polyethylene films (reinforced and plain) are laid on any side, which does not impair the protective properties of the material.
- Foil films are installed with the reflective side facing the inside of the room to effectively reflect heat.
- Anti-condensation films are mounted with a fabric surface inside the room, treated - to a heat-insulating base.
- Membranes of any type are attached with a smooth surface to the heat insulator, and with a rough surface - inside the room.
- Foam-based insulators are laid similarly to membrane materials.
Important! Before laying the vapor barrier to the insulation, it is recommended to lay out the prepared material on a flat surface to correctly determine the inner and outer sides.
The face or the back of a vapor barrier?
If a breathable membrane is used to create a protective barrier, the main thing is to determine which side to lay the vapor barrier on - face or back.
The vapor barrier cake must be placed so that the protection is directed towards the heat insulator on both sides with the smooth back side, and with the rough front side facing the inside of the room.
The rough surface provides protection from moisture penetration into the insulation, and the smooth surface promotes maximum heat accumulation.
Determining the width of the overlap when installing the membrane
There are special markings along the edge of the insulating membrane to determine the width of the overlap of the sheets, which ranges from 8 to 20 cm.
The vapor barrier strips on the roof should be laid in a horizontal plane from bottom to top, overlapping each other with a width of 15 cm. At the ridge the overlap is 18 cm, at the valley - 25 cm.
On walls, ceilings and floors, the canvases are mounted with an overlap of 10-15 cm.
Is a layer required for ventilation?
At the bottom of the membrane vapor barrier there is a 5-centimeter ventilation gap, which helps prevent the formation of condensation on surfaces and the heat insulator.
Diffusion membranes can be attached to insulation, plywood sheets or OSB. In a membrane with an anti-condensation layer, gaps up to 6 cm wide are located on both sides.
To create a gap for ventilation when insulating the roof structure, a counter-lattice is used. In the process of fastening a ventilated facade, a technological gap is created when installing racks located perpendicular to the vapor barrier.
Elements for fastening vapor barrier
To securely fasten the membrane or film vapor barrier, use wide-headed nails or metal construction staples. Most practical option fasteners - counter rails.
To increase the tightness of the structure, individual vapor barrier elements are additionally glued with double-sided adhesive tape or wide metallized tape.
To ensure a long service life of modern insulation, high-quality vapor barrier protection is required. Otherwise, it will be difficult to obtain the optimal ratio of temperature and humidity indicators in the premises. The main thing in this matter is to choose the right material and know how and which side to lay to the heat insulator.
It's a pity, but any good deed, any excellent material can be ruined. The worst thing is when it happens out of ignorance. This fully applies to the insulation and protection of the thermal insulator. Failure to comply with technology leads to disastrous consequences. The house is cold, energy consumption has not decreased, and there is leaking from the ceiling. When opened, it turns out that the insulation is damp, the rafters have begun to rot. At this moment we begin to remember: “so that this doesn’t happen?”
The following types of insulation are produced and widely used:
- polyurethane foam;
- expanded polystyrene (extruded and foamed);
- organic (natural);
- mineral (basalt).
Due to its high hygroscopicity, the latter type of insulation requires the mandatory installation of a vapor barrier.

There are several types of vapor barrier:
- roll with impregnation;
- liquid (coating);
- adhesive (sheet and roll);
- polyethylene (films);
- reflective (with aluminum coating);
- “breathable” (membranes).
For most materials used for vapor barriers, it does not matter which side they face in one direction or another. This is possible due to the uniformity of the components used, the solidity of the structure, and the simplicity of the design. When laying the last two types, it is necessary to understand which side to attach the vapor barrier to.

Choosing vapor insulation
Before choosing and purchasing a vapor barrier material, you need to figure out which one will provide reliable protection for the insulation in specific conditions.
It is recommended to use rolled materials impregnated with bitumen or coal tar for temporary insulation of structures during the construction process. They are not convenient and difficult to install. Sealing of joints is ensured by gas burners, which is not very convenient and safe indoors.
It is not entirely rational to insulate the ceiling and walls with coating compounds due to the fairly high cost of the material and increased labor intensity. This method is more suitable for isolating concrete floors indoors high humidity(washing, steam rooms). When applied in two layers, they provide complete waterproofing of enclosing structures.

Protecting installed insulation from steam using adhesive materials is not justified due to high labor costs. Such insulators are successfully used to insulate joints of various building materials and communication passages.
When installing polyethylene film as a vapor barrier, the question of which side to lay correctly does not arise.

It has identical opposite surfaces. Some experts recommend using it only for wind protection, temporary protection of insulation from precipitation, and insulation of concrete floors. It should be remembered that polyethylene used in this capacity ensures complete insulation of the enclosed space with tight joints. When there are temperature changes or differences between the internal and external environments, water condensation forms on its surface, which will ultimately end up in the insulation. To prevent this process, good ventilation of the protected volume must be ensured.
- short service life;
- low strength under mechanical stress;
- high degree of deformation at high and low temperatures.
What bad steam has in store for us?
During human activity, air saturated with water in varying concentrations is released into the surrounding atmosphere. Cooking, washing, watering indoor plants, cleaning increases the concentration of steam. It rises up and tries to get out of a room with a high temperature to the outside, where the temperature is lower. Due to temperature changes, it condenses and settles on the objects surrounding it: joists, rafters, insulation.

Even wood treated with protective antiseptics and painted iron are rented out With I, and begin to rot and rust. Mineral heat insulator, when moistened by 5%, retains heat 2 times less.
The main reason for this is either a completely missing vapor barrier, or ignorance of which side to lay the vapor barrier against the insulation.
What does the membrane consist of and how does it work?
“Breathing” membranes are a complex set of materials that perform different functions. One cuts off steam, the second is the power base, the third prevents moisture from entering from the outside. Some films have only two layers (there is no reinforcing layer). Understanding the functioning of the material leads to an understanding of how to properly install a vapor barrier.
Each layer has holes for air passage. The small diameter of the first level cuts off moisture, allowing the dried flow to pass further. The reinforcing layer does not interfere with its passage, due to the rather rare arrangement of the power threads. The larger diameter of the holes in the third layer creates the necessary draft to prevent air stagnation in the membrane.

Some vapor barrier products have a special anti-condensation layer made of viscose and cellulose. It is rough to the touch. It is in it that moisture is retained, settling on thin fibers. Removal of accumulated moisture occurs naturally. To ensure evaporation, a ventilation gap is arranged between the material and finishing room at least 25 mm.
Let's look at how to attach a vapor barrier and how to lay it, using the Nanoizol membrane as an example.
We insulate roofs and walls with external insulation
Installation of vapor barrier on the roof and wall begins before laying the insulation. If you install the vapor insulation incorrectly, you will have to disassemble the entire “pie”.
After treating the frame with an antiseptic, a vapor barrier film is installed on the roof or wall.
It is installed from the inside close to the joists (rafters) or rough sheathing. Fixed with staples or galvanized nails on a wooden base.
A vapor barrier is installed on concrete, block and brick surfaces using connecting tape.

Vapor barrier film must be laid from bottom to top in horizontal stripes on walls and inclined surfaces. At the same time, overlap the lower panel with the upper panel by 10 cm. At the same time, the vapor barrier provides wind protection for the insulation.
Correctly lay the vapor barrier, with the smooth side close to the insulation, the rough side inside the room (against the wall). The tightness of the connection to the enclosing structures, pipelines, and ventilation must be ensured with connecting tape.
After correct installation vapor barrier on the ceiling, a lath of 3x5 cm is installed for installation of the finishing, insulation is laid on the wall. Protect the wall insulator from external influence using windproof film and finishing.
Insulation of interior partitions
During reconstruction or major renovation In a private house, you have to isolate heated rooms from unheated ones. For example, a cold corridor (entry) from living rooms. In this case, which side should the vapor barrier be laid on?

All wood frame materials are treated with septic tanks to protect against insects and rot.
Installation procedure:
- a counter-rail is placed on the enclosing structure, providing a ventilation gap;
- it is necessary to attach a vapor barrier to the laid slatted frame with the smooth side facing the inside of the room;
- frame racks are installed on top of it;
- insulation is laid between the racks;
- a vapor barrier film is installed on the installed racks, with the rough surface facing the room;
- Nanoizol is secured to the frame using staples or nails with a wide head, then counter-battens, followed by installation of front panels or trim.
We protect interfloor ceilings
Correct installation of vapor barrier for frame floors is carried out as follows:
- depending on the material used, the supporting structures are treated with compounds that provide long-term protection during operation;
- on the underside of the ceiling, Nanoizol is secured with staples or tape, with the rough side facing the inside of the room and secured with longitudinal counter-battens;
- Thermal insulation is placed on top of the frame close to the insulator (the height of the racks should be equal to the thickness of the insulation);
- a vapor barrier is laid out on top of it with its smooth side close to the insulation and fastened with longitudinal counter-battens (the overlap of adjacent panels should be at least 20 cm, the panels are connected to each other with connecting tape);
- The floor of the upper floor and the ceiling of the lower floor are installed across the counter slats.
Cutting off the attic and basement
How to make a vapor barrier for an unheated basement and attic?
Correctly installing the vapor barrier of the base is somewhat more difficult than in other cases.
It must be assumed that it is best to carry out work in the following sequence:
- We provide a ventilation gap of at least 5 cm between the ground level and the expected floor level;
- we lay pre-treated logs at a distance equal to the width of the insulation;
- We fix the subfloor from a board (you can use an unedged one) or slats onto the floor joists;
- Nanoizol must be laid with the rough surface down, going around the logs;
- we lay the heat insulator (the insulation should be placed with slight compression to prevent slipping during operation);
- after laying the thermal insulator, we install the vapor barrier with the rough side up;
- we secure the insulation material with a counter batten with a height of at least 25 mm;
- We install the finishing floor.
Vapor barrier, installation of attic insulation is carried out in the same manner as interfloor covering. It is necessary to lay the Nanoizol vapor barrier with a rough surface towards the inside of the room, and a smooth surface towards the insulation. If the attic is not heated, we install waterproofing under the roofing material, protecting the upper part of the insulation with the subfloor of the attic.
Protection from water and steam in baths and saunas
The material coated with thin aluminum foil works well to provide reliable water vapor barrier in damp rooms with elevated temperatures. An example of such insulation is Izobond FS premium class. Aluminum foil ensures that up to 90% of the released energy is returned to the room. This allows you to quickly raise the temperature in steam rooms and maintain it at a high level without additional energy consumption.

Proper vapor barrier involves treating the frame with septic tanks to protect it from insects and rot. After installing the external insulation, the membrane is placed on the insulated ceiling and walls with the foil side facing the inside of the room. It is easier to install a vapor barrier on the ceiling by first cutting the rolled sheet into pieces of the required length, taking into account the required overlap of at least 10 cm on vertical surfaces.
The installation instructions do not provide for overlap of aluminum vapor barrier. Ensuring tightness is done with aluminum self-adhesive tape. When using reinforced double-sided construction tape, at least 10 cm of insulation layers are applied. This ensures that the properties of the tape, which is not intended for use in high temperatures, are preserved.
The acquired knowledge of which side to lay the vapor insulation against the insulation and the correct fastening of the vapor barrier will ensure heat retention in the house and comfortable operating conditions for the insulation for a long time.
Each of us has heard the term “relative humidity,” but not everyone understands what it is. And this is the amount of moisture in the air, determined as a percentage of its maximum possible amount. Temperature here is of decisive importance, since warm air is able to hold more steam, and accordingly, there is more of it in the premises. Trying to escape, the steam creates pressure that affects the structure of the house and condenses on them due to the temperature difference. Water, as you know, is an enemy for most materials; films specially designed for this help reduce their corrosion and extend their service life. If these are not universal membranes that can be placed in any position, during installation it is important not to confuse which side to lay the vapor barrier against the insulation. Why? This is the issue we will look into.
Warm air, carrying with it a considerable amount of steam, always rises, so the first place where you need to organize the protection of materials from its effects is the roof.
In low-rise construction, its frame is always formed from wooden beams, and extremely rarely from rolled metal. The space of the frame is filled with insulating material, which is most often mineral-based wool.

All these materials are of organic origin and therefore subject to corrosion when exposed to moist air. And first of all, due to its low density, the insulation suffers, which loses its thermal efficiency when wet.


Use of mineral wool materials instead of polymer based(the same polystyrene foam), insensitive to moisture, makes the problem somewhat easier, but does not solve it completely (and such a roof breathes much worse). After all, there are still wooden structures who are also vulnerable and need protection. Therefore, the presence of a vapor barrier in the roof pie, which is attached to the side of the room, is mandatory.
Note. Which side to lay it on depends on the type of material, its manufacturer, which gives similar recommendations. A little later we will do a review and give explanations for each type.

Prices for mineral wool
Floors and walls
The next design in which the presence of a vapor barrier is required is beam floors, since in them the insulation also forms the main part of the structure. This is especially true when it comes to basement and attic floors, on different sides of which there may be a temperature difference.

Since steam rises from bottom to top, the vapor barrier is attached to the bottom surface, directly under ceiling lining. If there are living spaces with the same temperature on both sides of the ceiling, sometimes a vapor barrier is not installed, believing that since there is no temperature difference, there will be no condensation. And indeed, there is no condensation. But you can’t escape the fumes!

A vapor barrier need not be installed only if all materials mounted on the ceiling, including the floor covering of the upper room, allow steam to pass through well. For example, wood flooring, parquet. If the floor above is, say, tiled, or laminate on a polyethylene backing, then the steam entering the ceiling will not be able to pass through, but will accumulate in the insulation and on wooden structures.
That is, steam should either not enter at all, or be able to penetrate freely. The same principle is used when finishing external walls from materials with high degree vapor permeability. These include cellular concrete blocks - foam and aerated concrete, as well as construction wood, in need of exterior finishing.

To ensure that steam and condensate can be removed without hindrance, the facades are faced using a frame scheme, with the obligatory arrangement of a ventilated gap. If the decision is made to plaster or paint the outside, the materials used in the process must be vapor-permeable.
When facing such walls with bricks without a ventilation gap, or ceramic tiles with glue, the material for interior decoration you need to use one that is impenetrable to steam, or install a vapor barrier underneath it. All this is relevant – and even primarily for houses frame type, which in their structure resemble the same roof.
As in the case of the roof, the vapor barrier film is installed from the inside of the room, under the finishing. However, no vapor barrier provides 100% protection, and in small quantities, through joints or damage to the film, steam still penetrates into the insulation. He must have the opportunity to go outside, which is why a ventilation gap is installed.

Pay attention! On the outside, the insulation is also protected with a membrane, but not an insulating one, but a permeable one. Its surfaces work differently: on one side, steam can escape unhindered, but on the other, it is sealed and does not allow moisture to pass through from the outside. Therefore, when constructing multilayer structures, it is very important to place the film with the correct side facing the insulation.

Materials for insulation and vapor removal
The expression that walls and ceilings must “breathe” has become something of a cliché, but it is not without meaning. If they are hermetically sealed, a greenhouse effect will occur in the rooms, and condensation will collect on the coldest surfaces, which are usually window glass. The so-called phenomenon of crying windows occurs.
The best option is when steam can freely penetrate through the structures, but not abundantly. The role of vapor barrier membranes is that they allow steam to pass through in doses, in quantities that manage to escape through the ventilation gap without turning into water. In ordinary residential premises it is better to use them.

Polyethylene or regular foil work better in rooms with wet operating conditions - baths, saunas, bathrooms, swimming pools. But in general, these materials are not used for vapor barriers in modern construction. The best protection today there are specialized membranes that protect against steam, which we will discuss further.
Films and their varieties
Vapor barrier membranes are moisture resistant and durable, are not afraid of temperature changes and their critical values, are highly effective, easy to install and last a very long time, and therefore deserve the closest attention. Their choice on the construction market today is extremely wide. Their purpose is different, depending on the installation location. Accordingly, the degree of penetration will also be different, the maximum value of which is 100 mg per square area per day.
Today, the choice of vapor barrier materials looks something like this:
1. Reinforced films based on polypropylene and polyethylene. This is, one might say, a budget option with a low cost. But accordingly, its service life is shorter. Such films may or may not have perforations. Solid ones are insulating and are installed indoors, while perforated ones are installed on top of the insulation outside. That is, they must pass steam through themselves.
When choosing a vapor barrier for a bathhouse, you need to remember that under high-temperature conditions, the service life of polymer films is reduced. Polypropylene has higher mechanical characteristics, especially with the addition of cellulose or viscose.

2. There are also membranes with a foil surface what is theirs hallmark. These are films with a multilayer structure that can be made from the same polypropylene, fiberglass or artificial fabric like lavsan. That is, although the base is polymer, it can also be woven, which provides the material with absolute flexibility and facilitates installation.
Surface metallization, only on the working side. This material works like foil, which is laid with a reflective layer towards the room. This material is only insulating and has no perforation. Excellent for rooms with hot steam, and not only keeps it inside, but also minimizes heat loss.

Most often used in bathhouses, but can also be mounted on the roof. In hot regions, a membrane laid with the metallized side up will reflect UV rays and prevent the roof from heating up too much. So you must choose which side is best to mount this material yourself - depending on what you want to get in the end.

3. Anti-condensation films. They have a special structure and, as a rule, can serve not only as insulation for steam, but also serve as a water barrier. Therefore they are universal. If the under-roof space is not used - that is, it is simply cold attic, such a membrane has the best application.

Roofing films - anti-condensation
The material they are made of is polypropylene combined with viscose. One side has lamination, so it is smooth, while the other side is rough. But it fits into the pie of structures in different ways, which depends on the type of film.
Many inexperienced developers do not understand the difference between waterproofing films and membranes. Let's look at this issue in detail.
Types of membranes that determine their scope of application
We have figured out the installation locations for vapor barrier films and their varieties. Now let's look at what types there are and where they are used. And most importantly, let’s figure out where and which side they need to be laid.
Type "A"– this type includes vapor-permeable membranes designed for steam removal. This is exactly the case that we talked about when it came to a ventilated facade: on the one hand it allows steam to pass through, and on the other it is a waterproofing barrier. If such membranes are installed on the roof, it is not from the inside, but on top of the insulation, under decorative coating. They are also great for insulating floors.
Attention! Type “A” films are laid with the rough side facing the insulation and the smooth side facing out.


Type "B"(some manufacturers designate them "AM"). Films of this type are precisely vapor barriers, that is, they prevent the penetration of steam. They also have different sides in structure (smooth and rough), but here, on the contrary, the smooth side should be adjacent to the insulation. An ideal material for insulated roofing pies. Manufacturers, in order not to confuse the sides during installation, make them multi-colored, and place inscriptions and logos on the outer (front side). It is very important that there is a ventilated gap above the film, without which the membrane practically does not work.

Type "C"- These are two-layer membranes of increased strength. They are used in non-insulated roofs and facades to protect against wind and moisture from the outside.
Type "D"— this type includes high-strength laminated polypropylene membranes in rooms with high humidity and on roofs over insulation. That is, it can also perform the functions of hydro-wind protection.
Note. The last two options are most often double-sided, and it makes no difference which side to mount them to the insulation.
On those membranes where the sides have different textures, the rough surface is called anti-condensation. It has villi that absorb a small amount of moisture and retain it until it evaporates. That is why this side is directed to where the steam is coming from. If the membrane is installed from the side of the room, the smooth side is adjacent to the insulation.
Prices for vapor barrier materials
Vapor barrier material
Ideal roof structure inside and out
Table 1. The process of installing a vapor barrier using the example of a roof
| Steps, photo |
|---|
