Paint for chipboard. Features of selection and application. Protecting chipboard from moisture Painting chipboard
A product made from chipboard, as a rule, is the result of a lot of work, and therefore it will be very disappointing if many days of work are ruined by unsightly painting. In such a seemingly uncomplicated matter as repair or decorative painting surfaces made of chipboard have their own characteristics and pitfalls, so adherence to painting technology, right choice tools and materials will allow you to perform this work at home beautifully and efficiently, and the coating will make it durable and resistant to any damage.
Today the market offers very wide choice very different coloring materials and compositions, while the chance of making a mistake in the choice of paint and the technology for its application only increases. After studying this material, you will learn how to paint chipboard with your own hands, what paint to choose, and also receive a number of important tips directly on the painting process itself. To paint chipboard yourself and avoid turning your house into a paint shop, prepare the necessary tools and materials in advance.
What do you need to paint chipboard yourself?
Primer– you can use acrylic primer
Dye– alkyd or acrylic, aerosol or regular
Brushes and roller if you use regular paint rather than spray paint
Acrylic clear varnish– it will protect the painted wooden surface from damage, and also add depth to the color and shine of the new coating
Respirator and gloves for protection while working
Solvent for degreasing the surface before painting (you can use white spirit, kerosene or special degreasing compounds)
Cloth napkins or just dry clean cotton rags
Masking tape and paper or covering film
Very fine grit sandpaper
Spatula and putty, best car, you will need it if you plan to remove deep scratches or chips.
So, let’s move on directly to working with our product or structure made from chipboard materials.
Step-by-step instructions for painting chipboard
|
Step_1 Preparing the workplace. Before you start working, cover the floor and (preferably) walls of the room with covering film or newspapers. Step_2 If you plan to paint furniture made of chipboard, then before starting work, remove all parts that cannot be painted: unscrew the handles and other fittings, remove the glass, remove the drawers. It is also preferable to paint doors and facade elements after removing them first - this will allow you to apply the paint as efficiently and evenly as possible, avoid unpainted areas at joints, etc. |
 |
Step_3 Removing old paint layers. If you are not painting a new product, but are carrying out repair painting of an old chipboard product, you must, if possible, get rid of the old paint and varnish coating. If the old coating is already peeling off a lot, and in some places has completely peeled off, it is better to remove it completely. To do this, you can use special removers of old paint, or construction hair dryer, or do it by hand - using a grinder or sandpaper. If the old lacquer coating holds up well, then you can simply sand the old surface so that it is smooth. Use fine-grain sandpaper for this.
Step_6 ADDITIONAL STEP. Alignment. If there are deep cracks or chips on the surface, they must be filled with putty. The easiest way to do this is using automotive putty. Upon completion of puttying, sand the treated surfaces, then repeat step 4 - clean the surface with a damp cloth.
Step_7 Priming. Coat the chipboard with one or two layers of primer, this will allow for better adhesion of the paint to the surface and reduce paint consumption during further painting. It is best to use an aerosol acrylic primer. After priming, wait until the primer is completely dry.
|
Step_8 Finally we got to the most creative and interesting moment- COLORING! What paint to paint chipboard at home? Enamels and varnishes are used to paint chipboard. Varnishes are used to give a painted surface a deeper and more beautiful color, and, most importantly, to protect the painted surface from damage and abrasion during use. The range of paints today is quite wide: oil-based, alkyd, acrylic, epoxy... We recommend using them for painting chipboard at home acrylic paints, preferably aerosol, and there are a number of reasons for this: |
 |
1 Acrylic paints today are offered in a very wide range of colors and shades. There are hundreds of them, in addition there are acrylic paints with special effects: metallic, fluorescent, hammer, pearlescent, etc.
2 Easy to use, application does not require special skills, even a beginner can handle it.
3 Aerosol acrylic paints evenly cover the surface and create a perfectly even and smooth coating.
4 Non-toxic, dry when room temperature for 20 -25 minutes, which is very important.
5 They have good adhesion to almost any material, including chipboard.
6 Durable. If the dyeing technology is followed, they will remain on the surface for many years. So we chose paint. A few words directly about the dyeing process:
 |
If you are using aerosol paints, first shake the can thoroughly for 20-30 seconds so that the paint is well mixed. Apply paint from a distance of 20 - 25 cm using wide, even strokes. If possible, lay the chipboard surfaces horizontally, this will help avoid drips. If the surface is located vertically, paint with movements from top to bottom. Apply at least 2 layers of paint (preferably 3 layers), and you must wait until the previous layer has completely dried (20 - 30 minutes) before applying the next layer. Special attention When painting, pay attention to joints, internal corners and other hard-to-reach elements. |
Step_9 Varnishing. After your chipboard product is painted and the paint has dried, we recommend applying 1-2 layers of varnish. As we said above, this will give the surface a more beautiful deep color and protect it from damage and wear during use. If you used acrylic paint for painting, we recommend that you use acrylic varnish, glossy is best, but matte is also possible - depending on what kind of product you are painting and what you like best.
Painting chipboard, as when working with other materials, has its secrets. Below are recommendations that will definitely help you quickly cope with painting, save money and provide better results when painting chipboard at home:
It is recommended to choose varnish, paint, and primer from the same manufacturer, then their compatibility will be one hundred percent.
d Remember to cover surfaces that do not require painting with masking tape and masking film. This will save you from making mistakes and will help keep the surface from getting paint onto areas that don't need coating or are already painted.
d If you paint with regular paint, have brushes of different thicknesses in your arsenal.
A short nap roller will help achieve a smoother finish, while a long nap roller will help achieve texture.
g Play with the color palette to create a unique style. Correctly similar colors will help to increase or, on the contrary, narrow the space where it is necessary.
h Majority modern colors and varnishes are non-toxic, however, thorough ventilation of the room and the use of a protective mask and respirator at home will not hurt.
Transforming furniture edges, floors, walls and other surfaces made of chipboard using painting is a great idea for both complete and partial changes in the interior of a house, cottage, or workspace. As you probably already understood, to paint the traffic police with your own hands, no colossal investments of effort and money are required - anyone can do such a transformation.
Experiment with colors, because it is quite possible that you will even discover the talent of a designer, capable of creating unique and inimitable items, analogues of which cannot be found anywhere else. Updated chipboard furniture after painting can become a reflection of your way of thinking and individual vision of the world. Good luck in creating your next masterpiece with your own hands!
If you found this article useful, please rate it (at the top of the page). Thank you!
Visitors to this page most often choose from the online store:
It is not always possible to replace outdated furniture with new ones, or replace a tatty, worn-out chipboard floor with expensive parquet or laminate. One way to restore an old coating is to paint chipboard. Such a simple task also has its pitfalls, so you need to know how to properly prepare the surface and apply paint and varnish. Compliance with technology will allow you to do the work efficiently and beautifully, and the coating will be resistant to abrasion, scratches and delamination.
Selection of materials and tools for painting chipboard furniture
If you decide to repaint old chipboard furniture yourself, start with the main thing - careful planning. Think over your future image the smallest details. What exactly do you want to see: a mirror-glossy, but monochromatic surface bright colors rainbows, matte patination with several pastel shades, special techniques (decoupage and others) or simple tinting under bog oak, teak or wenge. Do you need to replace fittings or parts? Check the compatibility of the selected tones using the designer’s color wheel.
The next stage is the selection of materials. Depending on the project you will need:
- Tools: flat wide and narrow brushes, foam rubber and velor rollers with short pile, masking tape, screwdrivers, coarse and fine-grained sandpaper, paint tray, universal glue, spatula, hair dryer.
- Construction chemicals: acrylic wood putty, solvent, remover of old paintwork.
- LMB: adhesive primer for wood and chipboard, acrylic or alkyd furniture paint, tinting pastes, tinting impregnation and varnish.
- Auxiliary materials: soft rags, gloves, new fittings.
The primer not only reduces paint consumption (Lakra GF-021), but also levels the surface, strengthens it (Helios Tessarol, Dufatex-Grund, Dyostar), and some contain antiseptic additives (Belinka Base).
To repaint furniture, it’s not enough to go to the store and pick up the first budget paint you come across. You need to choose carefully, because the updated façade should last at least 5-7 years. Therefore, it is better to avoid cheap PF-115 of unknown production with a high lead content - it is easy to get poisoned, but difficult to recover from. It is better to take oil compositions from trusted manufacturers: Rastsvet, Yaroslavl paints, Tex, Dyo, Tikkurila, Dulux. You can purchase time-tested furniture enamels and varnishes from Galamix, Raduga, Novbytkhim.
The same goes for acrylics (on water based) And alkyd enamels, but here the choice is already expanding due to aerosols. The latter are very convenient for application to laminated coatings, as they provide a perfectly smooth coating without drips.
The water-based acrylic paints are also good because they can be diluted and washed off with water until dry, and tinted to any color using pigments.
Another point - calculation required quantity paints. Before purchasing, you need to measure the area of chipboard that needs to be painted and multiply it by the estimated number of layers. On average, consumption is 1 liter per 5-6 square meters. m.

The process of selecting tint and varnish is simple. They also differ in basis. The strength of the coating depends on the content of the polyurethane polymer, so it is better to choose alkyd-urethane or special water-based furniture varnishes - they contain additional additives that provide impact resistance and abrasion resistance (Lakra, Alpina, Pinotex, Dyo, Tikkurila). Tinting mixtures should have good permeability and give a uniform tone without spots or whitish streaks (Belinka, Practic, Helios).
Often, for do-it-yourself tinting, you use drying oil or a simple stain for wooden products.
Preparation of furniture surfaces made of laminated chipboard and chipboard
The façade preparation process includes the following steps:
- Dismantling- unscrew all fittings, pull out or remove all drawers, extensions and other elements;
- Removing an old layer(laminated or painted): sandpaper (sand first with rough, sweeping, wide movements, then level with fine-grained sandpaper), abrasive remover according to the instructions (Pufas, Dufa) or carefully heat with a hair dryer and remove with a spatula or scraper;
- Degreasing and cleaning. You can first brush off the dust with a wide flat brush, then use a rag moistened with water or solvent to clean the surface of the facade from debris and remnants of the old coating;
- Alignment: Fill all cracks and holes with acrylic putty. It is advisable to apply 1 coat of primer before starting to make unevenness appear better. Then, for perfect smoothness, go over again with sanding paper and wipe with a wet cloth;
- Padding: Apply 1-2 coats of primer and let dry.
At the end, be sure to sweep out the garbage from the room where the renovation is being carried out, wipe all surfaces (tables, chairs, floors, window sills, etc.) so that dust and remnants of removed coatings do not accidentally stain the prepared facade.
Technology of applying paint and varnish to furniture
So, you can start painting the furniture. First, you should check the expiration date of the paintwork material. If the enamel (varnish) has thickened or dried out, you need to dilute it with water or a solvent according to the instructions and stir thoroughly.
Apply the first (background) layer of enamel with a roller or brush and leave to dry for 24 hours. Then either paint the surface again, or carefully and tightly stick masking tape in accordance with the design idea or a stencil with a pattern and cover with a second layer. The drying time depends on the manufacturer, but, as a rule, is at least a day.

If the coverage of the selected brand is weak, and the original color shows through the paint, then you can and should apply the coating one more time. Mirror gloss is achieved with an additional layer of acrylic or alkyd universal varnish.
The total drying time should be at least 3-4 days. Only in this case will the furniture coating be of good quality and durable.
Varnishing and tinting impregnation is carried out according to the same scheme. The difference is that this process requires perfect cleanliness of both the surface and the room; any speck of dust can nullify all efforts.
Painting chipboard floors: materials and stages of work
One of the most effective ways to preserve the integrity of a chipboard floor covering and give it high strength characteristics is to paint it yourself with high-quality floor enamel or parquet varnish. Moreover, it is not necessary to limit yourself to just one color. By playing with shades, you can visually expand the space, arrange bright accents, zone the room. And such a simple technique as stencils with patterns will allow you to create a designer floor in a few days.
The required set of tools and materials includes:

The primer used is the same type as for furniture, but the paint should be designed specifically for the floor. Simple acrylic quickly wears out, loses its gloss and attractive appearance.
To repaint the floor covering, you need to choose an enamel with high quality characteristics(impact resistance, resistance to fading, scratches).
Alkyd compositions can only be used if the last layer is varnish. But even in this case, a simple wood varnish or a universal one like NC will not work. This should be parquet varnish with polyurethane additives (Practic, Dyo, Belinka, Marshall), which provide increased surface resistance to abrasion and mechanical stress. Oil paint PF-266 (Lakra, Yarko, Rastsvet, Chief Technologist) and polymer floor enamels (Dufa, Dulux, Tikkurila) have the same properties.
You should prepare a chipboard floor for painting especially carefully, since any defect will appear almost instantly and cannot be corrected.
The work includes the following stages:
- Checking the floor for creaks, defects, scratches, cracks. Creaking is eliminated with additional fasteners, chips and pits are puttied, and the gaps between the sheets are sealed.
- Inspection of fasteners: all hardware is examined for strength, protruding ones must be attached with a hammer, loose ones must be sealed with glue or sealant.
- Degreasing and sanding chipboard: grease stains and dirt are removed with a solvent, then the board is sanded with fine-grained sandpaper, especially at the joints. Finally, wipe thoroughly with a damp cloth.
- Priming: the impregnating primer is applied in 2 layers, then the floor is checked again for defects.
The quality of restoration work depends not only on the qualifications (or lack thereof) of the master, but also on the quality of the materials used. Only good, proven brands guarantee long term coating service and its resistance to any mechanical load.
Paint or varnish is applied in 2-3 layers with a brush, roller or spray gun in accordance with the instructions. Highlighting or applying additional elements made with a separate small brush. Between layers, roughness can be removed with zero-grade sanding paper.
How to coat and treat chipboard from moisture
The low cost of chipboard, high performance characteristics, and versatility of use have made them a very popular material. Most common applications: furniture production and construction. The main enemy of these slabs is water - the chips increase in volume, the slab swells, warps and crumbles.
Even at the very beginning of production, sawdust and shavings, after drying, are impregnated with formaldehyde resins. After pressing, the surface of the boards is laminated, sometimes even varnished.
But protecting the surface does not prevent the penetration of moisture from the ends through which it enters. Accumulating inside, water gradually begins to penetrate the wood fibers, which leads to the destruction of the slab. Consequently, the ends must first be saved from liquid penetration during operation. If they are tightly sealed, the service life of the slabs will be much longer.
The photo shows the effects of water on a chipboard tabletop
Why are the ends the starting point for destruction? Yes, because the production of slabs is necessary standard sizes, as well as preparing pieces of material of different sizes, requires cutting. In this case, the integrity of the wood fibers is compromised.
Thus, chipboard protection from moisture is carried out in three directions:
- impregnation of wood fibers with resins;
- special surface treatment;
- end sealing.
The first step towards moisture resistance
Already at the beginning chipboard production a process is carried out designed to protect them from water penetration - the so-called resinization of chips. Thanks to this operation, two goals are achieved - saturation of the fibers with resins and their gluing. For most of the manufactured boards, formaldehyde resins are used, which by definition are a hydrophobic component of the product.

Green inclusions in chipboard are special water-repellent components
In cases where even greater moisture resistance is required from the boards, another binder is used, that is, the formaldehyde resin is replaced with urea-melamine resin. It glues the chips together much more firmly, thereby being a stronger barrier to moisture. With the additional introduction of molten paraffin or its emulsion into the chip carpet, the moisture resistance of the chipboard further increases.
Surface treatment of plates
The front and back surfaces of the slab, as the largest contact areas, without any protection, can pass through and absorb, accordingly, the largest amount of liquid. It would be a good idea to cover these surfaces with something moisture-proof. Some of the methods of such coating are possible only in factory conditions, some are also possible at home.
One of the main methods of protection is lamination. With it on sanded chipboard with high blood pressure and at high temperatures the melamine film is laid. The essence of this process is not pressing, but the fact that under these conditions the film polymerizes the surface of the slab, becoming one with it.
There is another method that is performed in the factory - laminating. Pressure and heat are also used here, but more gentle. The already hardened film is pressed against the glue-coated slab. If lamination is a chemical process, then laminating is a mechanical process.
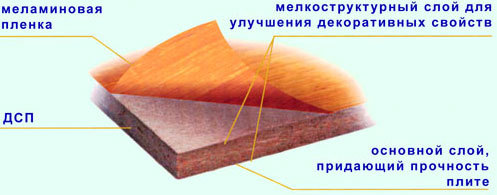
Components of laminated chipboard
At home, non-laminated chipboard is often coated with several layers of paint for protection. Before painting, pre-treat the surface:
- dust is carefully swept away and washed off the surface;
- for the first time, the plate is coated with hot drying oil;
- then this is done with cold drying oil until an outer crust forms;
- the top is painted. With any painting method, you must remember that each subsequent layer of paint is applied to the already dried previous one.
There are several other ways to protect yourself from getting wet. For example, a surface that will not be subject to mechanical stress can be protected as follows: rub it with stearin, then heat it with a hairdryer. Let cool and repeat this a couple more times. Or: one part of bitumen varnish is mixed with five parts of drying oil. Coating is carried out twice.
Processing joints and edges
Water always looks for the lowest place, the depression. And what, if not a recess, are joints on horizontal planes? There are especially many such joints in cabinet furniture, which is made from chipboard. Kitchen furniture in general is like on the front line: there is plenty of water and enough evaporation. The most susceptible to moisture are the sink, cabinet with dryer, countertop, and furniture near and above the stove.
The taps all start to leak at some point. So, the most potentially dangerous place in the sink is where the faucet crashes into the countertop. This is the point of contact between metal and wood. It is possible not only for the faucet to leak, but also for water to condense at the contact point. Therefore, this place is cleaned and dried with a hairdryer. Next, a layer of PVA glue is applied, after which it dries - silicone. You can use construction sealant, this is also a silicone mass; it even seals window frames against leaks.

The edge not only protects the chipboard from moisture, but also reduces emissions of harmful substances
In the dish cabinet, you should check the presence or absence of a tray: if it is not there, the liquid, flowing to the bottom of the cabinet, will ruin it. For all kitchen furniture where it is possible to get wet, you need to make it a rule: degrease this area and then do not skimp on the sealant.
To seal the seams, it is better to use sanitary silicone of a suitable shade: dark mold spots will not appear on the surface.
Non-laminated edges of the tabletop are covered with connecting or end strips. They come in metal or plastic. The protection is not so great, so the end of the tabletop should first be treated with silicone. Another method of protection is to apply furniture varnish or PVA glue to the cut area. Proposed construction market self-adhesive films or adhesive tape cannot be called reliable protection.
Sealing chipboard joints on the floor
The difficulty lies in the fact that the slabs on the floor are constantly subjected to significant physical stress; they “play” relative to each other. For this reason, the putty does not want to stick. There are several folk ways sealing such seams.
The seams are covered with epoxy mixed with sawdust. The sawdust is first finely sifted. The composition sets very quickly, so you should not prepare a large volume of such putty at once. Such protection serves for a long time and reliably. But the price of epoxy is high, and sealing joints is expensive.
You can replace the epoxy with hot wood glue. You need to mix sawdust in it and go through the seams.
The effect is achieved even greater than with epoxy, since the hot glue penetrates deep inside. This method also saves from moisture, and the joint stops “playing”. True, it is advisable not to walk on such a floor for several days, since wood glue takes a long time to dry.
This method is much cheaper. And if the floor is still covered with linoleum on top, then about damage chipboards You can completely forget it.
How to impregnate chipboard from moisture
Chipboard is one of the most affordable building materials, so many are interested in the question: how to impregnate this material from moisture? And, if moisture gets on the floor in the summer low probability, then in winter it is formed in any case. In this article we will give practical advice on how and with what to impregnate chipboard from moisture?
Oil varnish or drying oil
 In Soviet times the best way was oil varnish or drying oil. and now - special impregnating agents. Naturally, this does not mean that you cannot continue to use drying oil as protective agent from moisture. It is allowed to be used, but achieving a high level of protection is almost impossible. Yes and necessary large number mixture, and the working procedure will have to be done several times.
Polyurethane mixture
One of the most popular means for treating chipboard is a polyurethane mixture, which is similar in composition to a primer. Impregnation is based on organic solvents and polymers, which, during processing, penetrate deep into the pores of the material. At the same time, the level of strength of the building material increases significantly.
Nitrocellulose varnish
There is another way to protect chipboard from moisture - nitrocellulose varnish. Its protective effect is similar polyurethane varnish: it forms a kind of protective coating on the surface of the product, preventing the penetration of moisture, while resistance to damage is equivalent to the maximum value. A significant advantage of nitrocellulose varnish over its predecessor is the application of the substance without preliminary preparation of the workplace, but to achieve best results We strongly recommend priming the chipboard.
To significantly protect chipboard products, you need to use a combined protection method. It is best if it not only consists of an impregnation stage with deep penetration of the substance, but also includes the application of additional paints and varnishes.
Tell your friends!
Methods for treating chipboard from moisture
Chipboard is an excellent construction material, but is not very attractive in comparison with wood, and is also particularly susceptible to environmental factors. Products made from chipboard receive certain protection during the manufacturing process. For this, all kinds of impregnations and additives are used. However, under intensive operating conditions, such factory measures are not enough, so it is recommended to further protect the material. How to protect chipboard, as well as treat it with finishing materials, will be discussed below.
Surface treatment of plates
The front and interior of the slab have the largest areas, so if they are not protected, they will absorb the most moisture. At the same time as protection, you can decorate the material. Below are several such techniques.
Lamination
The lamination process involves finishing chipboard with paper-resin films. The lining is carried out at high temperature (150-200 degrees) and high pressure (25-30 MPa). The protective and decorative layer occurs due to the spreading of hot resin over the surface. The resin then polymerizes, forming a hard, uniform coating.

If complied with process, there is a reliable adhesion between the chipboard and the resin. During lamination, a certain surface texture is created - usually glossy or “wood-like”. Laminated surfaces are resistant to mechanical stress, moisture, ultraviolet radiation and high temperatures.
Laminating
During lamination, the chipboard is covered with an adhesive layer, on which hard paper-resin unvarnished films are then placed. The difference between lamination and lamination is that when laminating decorative coating glued to the plate in finished form. For example, wood grain embossing is done in advance. Such films are called “finishing films”.

As in the case of lamination, when processing material using the laminating method, increased pressure and high temperature. However, the parameters in this case are more gentle: temperature - from 20 to 150 degrees, pressure - from 5 to 7 MPa.
The disadvantage of laminating is that the coating is unstable to mechanical stress and moisture. This surface is easily scratched and swollen. Lamination is used mainly in the manufacture of inexpensive furniture, as well as for the production of parts that are not subject to aggressive influences. environment(for example, the back walls of a cabinet).
Paint coating
A non-laminated chipboard sheet can be coated with several layers of paint and varnish material. The sequence of work on painting chipboard is presented below:
- remove dust and dirt from the sheet;
- coat the chipboard sheet with heated drying oil;
- coat the sheet again, but this time with cold drying oil (a thin crust should appear);
- apply the first layer of paint;
- After the first layer has dried, apply the second.

Finishing with paper-laminated polymers
Laminated plastic is a polymer in which there are niches for filler. Fabric, paper, veneer and other materials are used as filler. The basis for the production of paper-laminated filler is paper. It acts as a reinforcing layer, and also gives the layered polymer ductility, strength and visual appeal.
Finishing begins with cutting chipboard sheets of the required size. Using compressed air and brushes, dirt and dust are removed from the sheets. If contamination is not removed before painting, high-quality adhesion will not work.
Pasting facing material is carried out by direct pressing of a paper-laminated polymer, onto which glue and chipboard are previously applied. Pressing can be done hot (urea or PVA based adhesives are used) or cold (PVA dispersion contact adhesives are used). In practice, cold pressing is not used very often, since the process requires large areas and the productivity is relatively low.

The finishing is completed by postforming. The task is to give the plastic bends and other irregular shapes. The process is carried out on special equipment at elevated temperatures.
Pasting with polymer films
The process of applying polymer films is similar to decorative cladding with plastics. The difference lies in the materials used. In this case we are talking about a thermoplastic film applied by pressing to chipboard treated with an adhesive composition.
For chipboard finishing PVC films are used. Polystyrene and acrylic films are occasionally used.
Finishing with polymer films is carried out on the same technological equipment, on which finishing materials such as veneer or paper-laminated polymers are applied. The cladding process can be either hot or cold.
The advantage of cladding using the polymer method is the ability to process profile parts. However, the use of polymer films has limited potential, since the coating does not have high physical and mechanical properties and is also unstable to temperature influences.
Vacuum pressing

Vacuum (or, as it is otherwise called, membrane) pressing is a technological process during which furniture is covered with decorative film. The main advantage of the method is the ability to coat parts of complex shapes.
For example, using membrane pressing, you can veneer handmade furniture with all kinds of recesses, cutouts, miniature parts, etc. The part is placed in vacuum press, where a heated polyvinyl chloride film fits tightly around it, repeating the surface relief.
Veneering
The correct name for the process is veneering. However, the term “veneering” is often used in everyday life. Natural veneer can be used to decorate both chipboard and furniture panels. Veneered furniture is of higher quality than laminated furniture. However, maintaining the safety of veneered furniture is quite difficult, since veneer is not as durable as laminate.

Table top made of chipboard or MDF
For finishing chipboard sheet or MDF you will need plastic (laminated paper, polycarbonate, polystyrene).
Work progress:
- We cut out the necessary parts from the chipboard and connect them with a stapler.
- The joints between the chipboard base parts must be identical. If this is not the case, smooth them out with sandpaper.
- We make facings for the ends.
- We cut the facing part using a grinder.
- We glue the finishing material and secure it with light blows of a rubber hammer.
- We install the end trim level with the bottom edge of the tabletop.
- At the same time, coat the base and apron with glue.
- When installing laminate flooring, we use separators. After installing the sheet, remove the dividers.
- Smooth the surface with a roller.
- Using a router, cut a hole under the sink.
- When the structure is assembled, we sand all the edges.
Protection of joints and edges
Any liquid always seeks and finds the lowest place on the surface. The joints are recesses and are therefore vulnerable to water penetration. There are a considerable number of joints in cabinet furniture, where the main structural material is chipboard.
Because of high humidity and frequent contact with liquids is especially vulnerable kitchen furniture. The sink, countertop, and furniture next to the stove are the most frequently moistened pieces of furniture in the house. An example is the part of the countertop that is in contact with the mixer. Sooner or later, the faucet leaks, which means that unprotected chipboard will inevitably begin to get wet and collapse.
To protect the joints, we first clean these places and dry them with a hairdryer. Then we apply PVA glue to the joints, and when it dries, we treat the protected surface with silicone or, alternatively, construction sealant.

If there is no tray in the cupboard, then sooner or later the liquid draining from the wet dishes will destroy the chipboard. Therefore, the material must be degreased and then treated with a sealant.
We seal the seams with sanitary silicone in the color of the furniture. This will prevent mold from growing on the furniture.
In those places on the edges of the tabletop where there is no lamination, we install end or connecting strips. These elements can be made of metal or plastic. Planks are not perfect protection, so the edges still need to be pre-treated with sealant. Another common method of protecting chipboard is applying PVA glue or furniture varnish to the edges.
Protection of joints on the floor
The main difficulty in protecting joints on the floor is that such slabs are subject to increased mechanical loads and constantly shift slightly under load. Because of this, the putty does not adhere well to the chipboard.

To ensure protection of joints on the floor, the seams are treated epoxy resin mixed with sawdust. Moreover, the sawdust must be very fine - it must be sifted in advance.
Pay attention! The epoxy-sawdust composition sets extremely quickly. Based on this, you should not mix too much putty at once.
A mixture of epoxy and sawdust will reliably protect the joints, but the cost of such a solution is quite high. You can replace epoxy resin with wood glue. You need to add sawdust to the hot glue, and then treat the seams with the resulting composition. If done correctly, the effect will be even better than when treated with epoxy resin, since the glue penetrates deeper.
After processing the seams, the chipboard joints will become more resistant to moisture and, just as importantly, they will stop “playing” with each other. If you decorate the chipboard with linoleum, you no longer have to worry about the safety of the slabs.
After processing the seams, it will take several days for the putty to dry. At this time, you cannot walk on the slabs so as not to disturb the joints.
Coating chipboard with protective and finishing materials in many cases requires certain experience and qualifications, and sometimes the presence of special equipment. If you do not have confidence in your own abilities, it is better to entrust the work to specialists.
Primer for chipboard
Personal website - how to prime chipboard
How to prime chipboard?
Chipboard can be primed with a regular primer. If the chipboard structure is located in a dry room, then any primer will be suitable for priming the chipboard. If the chipboard is exposed to moisture, it must be treated with a moisture-resistant primer, which contains additives that protect the chipboard from destruction by microorganisms. Available on the market wide range, a primer that will protect chipboard from destruction in wet rooms, such as a bathroom, kitchen, or shared bathroom. Primers of this type are represented by the brands “Tex”, “Tikkurila”, “Neomid”, “Eskaro” and others trademarks. It is best to prime the chipboard twice on all sides, for reliability. Primer compositions form a polymer film. This film with additives will protect the chipboard from destruction.
How to putty on chipboard?
After the chipboard surfaces have been primed, they need to be puttied. Since the surface of the chipboard is rough, but you want to make it smooth and beautiful, so that it pleases the eye, you need to putty the chipboard. For puttying chipboard, ordinary dry putty is suitable. final leveling. Putty is applied to chipboard in two stages. The first time the surface of the chipboard is puttied to cover all the irregularities. The second time it is puttied to eliminate minor defects. If necessary, you can putty a third time. You can putty the second time using oil-adhesive putty. Can be puttied with latex putty. When puttying chipboard with latex putty or oil-adhesive putty, the surface will be smoother than putty with regular dry putty. Regular putty is easier to sand with sandpaper. If you putty the chipboard with latex putty or oil-adhesive carelessly, then sanding the putty surface of the chipboard will take more time. Therefore, it is recommended to putty the first layer with ordinary putty, and the second after sanding the first, with latex. If the surface of the chipboard is smooth, then you can putty it with oil-glue and latex putty twice. If you carefully putty the chipboard with oil-adhesive putty or latex putty, you will hardly need to sand the surface. If chipboard is puttied with latex putty, the surface will be less exposed to moisture.
How to paint chipboard?
After priming and puttying, chipboard can be painted with any paint. What paint and varnish materials can be used to coat the surface of chipboard.
Untreated chipboard can be coated with water-based or alkyd-based varnish. But before coating the chipboard with varnish, it is necessary to treat it with a primer that is suitable for varnish. Only in this way does the varnish manufacturer guarantee the reliability of the coating. Thus, before varnishing chipboard, you need to learn about primer compositions. Mostly primers are provided by foreign manufacturers.
Domestic varnish PF (pentophthalic) can be applied without a primer. On the other hand, if the chipboard is not of very good quality, or the chipboard is old, it must be primed before applying varnish. You can make the primer yourself. Dilute with 50% varnish and 50% white spirit. You will get about a liter of liquid for priming chipboard. A liter of such primer is enough to prime 15 square meters or even more. It all depends on humidity, air temperature, atmospheric pressure and the condition of the chipboard. After priming the chipboard, you must allow time for the surface to dry.
After drying, you can apply the first layer of alkyd or water-based varnish, i.e. acrylic, latex. It all depends on the goals you are pursuing. For example, PF varnish (aka Pentophthalic) makes the surface translucent. Acrylic or latex based varnish makes the surface less transparent.
A chipboard surface that is coated with PF will be more transparent than one that is coated with acrylic or latex-based varnish.
The advantages of acrylic and latex-based varnishes are that they are impact-resistant, which cannot be said about Pentophthalic and Alkyd-based varnishes.
Chipboard can be covered decorative plaster, can be covered with decorative putty. Any patterns can be applied, it all depends on the goals. There is a whole set of tools for such purposes. Special rollers, sponges, brushes, spatulas. On the other hand, texture can be created using any available means.
Decorative plaster or decorative putty applied to chipboard can be varnished. So that the decor does not collapse and the color of the decor does not fade.
Chipboard can be painted with regular paint alkyd paint, any color. Can be painted with water-based enamel.
Primers - types and properties
A primer is a mixture that contains a binder. By type of binder primers are divided into: acrylic, epoxy, polyurethane.
Acrylic the primer can be used for all surfaces (screed, concrete, wood, chipboard, fiberboard, etc.). This primer is diluted with water, has no odor and dries in 2-4 hours.
Epoxy And polyurethane Primers are used to ensure good adhesion of the materials being laid to the base and to reduce the porosity of the base.
In the process of installing floors, primers are used to treat all kinds of screeds, concrete and cement floors, painted and unpainted wooden bases, stone coverings and ceramic tiles, as well as for self-leveling mixtures.
It is also necessary to highlight the protective properties of primers, such as preventing the appearance of rust, salt stains, and mold.
A whole range of primers with special properties are produced:
- suitable for heated floors;
- electrically conductive (electrically conductive coatings can be laid on this primer using antistatic adhesives);
- to impart water-repellent properties to the surface.
Description of the properties of Bamard primers
UZIN-PE 260 Has white. It has adhesive properties and does not allow water to pass through. Dries within 2-24 hours. 100-150 Dispersion primer for treating substrates made of chipboard, fiberboard, wood and with firmly adhered glue residues, asphalt and magnesite screeds. Used for interior work. When treating absorbent cement screeds, you can use a mixture diluted with water in a 1:1 ratio.
UZIN-PE 260L Has a black color. Has electrical resistance
Usadba primer for fiberboard, chipboard, plywood for painting, 2.5 kg - products » buy
PRIMER for fiberboard, chipboard, plywood, 2.5 kg
The composition stabilizes the absorbency of porous wood, fiberboard, chipboard, plywood, significantly reducing paint consumption. Provides reliable adhesion of highly absorbent wood surfaces to alkyd, oil enamels, acrylic compounds, and water-based paints. Contains fungicidal and insecticidal additives that prevent the formation of rot and mold on the treated surface. After using the PRIMER, it is enough to apply one coat of paint to obtain an optimal painting result, which allows you to reduce paint consumption by at least 3 times. Increases the service life of the painted layer.
The surface to be treated must be dry (humidity no more than 20%), cleaned with a brush from peelings and dust, including wood. Carefully remove peeling varnish and oil coatings with a spatula. The PRIMER can be applied with a brush or roller, thoroughly saturating the surface. To obtain an optimal result, processing in 1 layer is sufficient. Operate at air temperatures above +5°C.
Water, acrylic latex, tannin inhibitor, functional additives.
Store the composition in a hermetically sealed container from the manufacturer, in a dry room at an air temperature of +5 to +30°C. Shelf life: 3 years.
More posts on the topic
Because The topic is archived.
This question is very common on the Internet. Google returns hundreds of pages. The essence is the same everywhere: One bought chipboard, laid it on the floor and asks how to treat it, while others, talking about hot drying oil, floor paint and ship varnish, discuss the fact that it is not best material chose for the floor and would he pass it.
I HAVE A DIFFERENT THING:
I buy chipboard as table tops for folding transport tables. There are no alternatives to chipboard here. A table is a thing on which liquid is constantly pouring.
Let's think about how you can really protect chipboard from moisture? In addition to moisture, even with careful moving, tables still get scratched. The issue that the corners may simply soon break off and crumble is not discussed.
It would be ideal, of course, to create some kind of varnish surface. although not necessarily. Of course, I will process it from all sides and especially the ends. It would be better if it didn't smell too much. The option with drying oil, which will stink in my warehouse for another six months, is not suitable. 
What chipboard do you want to use? sanded or laminated? 
The difference in price is not great, you can take laminated one. but (from experience using original countertops which were originally on the tables), the laminate is scratched very noticeably, and this part immediately becomes accessible to moisture. and the laminated edges begin to swell and fall off. Therefore, if it is possible to impregnate and/or coat the sanded material with something, then perhaps it will be more useful. 
There is moisture-resistant chipboard, although the choice of colors is poor. Either make from plywood fsf, there is no need to process anything there. 
Sometimes when remodeling furniture the question arises of how to paint chipboard. This material is one of the most common materials for making furniture; it is also used in construction and renovation work. Chipboard (chipboard) has been used in various fields for decades, furniture made from this material is especially common.
Chipboard consists of wood chips glued together with formaldehyde resin. Since wood chips can become unstuck under external influences, they are protected with an outer coating - this can be a layer of varnish, paint, polypropylene film etc. In addition to protection, painting chipboard also creates a decorative effect, since with this method you can create surfaces not only different colors, but also with different textures.
To restore attractive appearance It is enough for chipboard to renew the paint layer, thanks to which products made from this material acquire their own unique style. Also, painting chipboard increases its moisture protection and makes the material resistant to ultraviolet rays. At correct implementation painting work, old furniture and other products made from chipboard not only receive new look, but also extend their service life. Also, coating chipboard with paint reduces its impact on humans (over time, resins tend to evaporate, and paint prevents this process).
An important point is what the chipboard is coated with on top - varnish. There is no veneer, paint, film or coating. Of all the options listed, laminate is the most difficult to paint over. It must be covered with several layers of primer, and no one guarantees the result.
Preparation for painting chipboard
Before you start painting chipboard, you must carefully prepare the surface. The result of staining will depend on the quality of preparation. Usually, to “ennoble” the appearance of chipboard products, they are coated with a layer of varnish or paint, but over time they crack and peel off. Removing varnish or old paint from the surface of furniture often causes difficulties for craftsmen. Of course, this is a long and labor-intensive process, but it is possible to clean surfaces.
To remove a layer of old coating from chipboard, two methods are used:
- Chemical. When the surface is treated with different chemical compounds(with washes). They are selected depending on the composition of the old paint. It is necessary to carefully follow the conditions of use indicated on the remover label to avoid trouble.
- Thermal method. In this case, exposure to hot air or steam is used. A construction hair dryer and spatulas (scrapers) are required. A stream of hot air is directed onto the painted surface, and when the paint softens, it is removed with a scraper. It is important to maintain the correct temperature conditions so as not to damage the chipboard.
Also, the surface of the chipboard must be puttied and sanded. This will save the product from minor defects and scratches, which are especially noticeable under a layer of fresh paint.
 Before applying putty, the surface must be primed with a suitable composition. For Chipboard is better choose elastic putties, for example, acrylic. This will protect the product from cracks on the surface. Apply the putty using a spatula, trying to form an even layer. After the putty has completely dried, the surface is treated with fine-grained sanding paper. The product is sanded with it until all the irregularities disappear. Then the product should be cleaned of dust, and you can begin painting work.
Paints for chipboard
To paint chipboard, the best option would be to use a spray gun or spray paint. This will give a smooth surface without smudges, but it is better to practice first, especially if you have not used a spray gun or aerosol paints before.
 As for the types of paint, you can use alkyd, oil or acrylic paints. With different types of paint, the coloring result will also differ. You can paint with a brush or short-haired roller, and in the latter option the uniformity of coloring will be better. After painting, you can coat the product with varnish, this will increase its resistance to mechanical stress.
Chipboard painting technology
- The surface is cleaned of dust, dirt and degreased.
- Using coarse sandpaper, clean the surface so that scratches remain - this is done for better adhesion of the primer to the surface.
- Apply a primer (you can use alkyd or even automotive primer for bumpers).
- Next, apply an acrylic primer.
- Paint the surface with the chosen paint with a roller or brush in several layers (at least two). In general, the number of layers depends on the desired end result - some people need a translucent coating, while others need a rich, dense color.
- If after applying the first layer unevenness appears, then it is necessary to sand the surface again with fine-grained sandpaper and apply several more layers of paint.
- Before painting, chipboard products must be treated in such a way that the glue in the sawdust stops evaporating harmful substances and the surface does not absorb moisture. This is achieved by impregnation deep penetration. You can also use NC varnish, but impregnations are more harmless.
- Before varnishing chipboard, it must also be treated with deep penetration impregnation.
- To highlight the wood texture, chipboard can be treated with alkyd pigments or English patination (a special composition for patination and texture highlighting).
- To achieve a smooth painted surface, it is necessary to use rollers with short naps, since long naps leave a pattern. By the way, this is how you can achieve the appearance of texture on a painted surface.
- If you need to paint dark-colored chipboard furniture, it is better to cover the surface with two layers of thick primer, otherwise the dark shade will still be visible through a layer of fresh light paint.
Painting chipboard and fiberboard is a responsible procedure that requires compliance with certain rules. For work, certain compositions are used to achieve optimal results. Due to its structure, the material absorbs the applied solution well, so careful preparation is required. The place where the slabs are used is also important, as this involves different levels of exposure.
|
To accept the right decision How to paint chipboard or fibreboard, it is necessary to take into account the characteristics of these materials. Although they are almost identical, each has its own structure.

How to paint chipboard and fibreboard?
The choice of paint is a very important process; the final type of coating depends on this.
Paint for chipboard
The solution is selected taking into account several factors that depend on the type of surface and external parameters. It is recommended to use the following types of compositions:

A good option is spray paint. But aerosols do not allow coloring large area, so they are used for decoration.
Compositions for fiberboard
Not all types that can be used for chipboard are suitable for fiber boards and panels. For example, water-soluble paints do not have good adhesion to such a surface, since fiberboard contains paraffin, which repels water. That is why, when choosing acrylic mixtures, a deep penetration primer is additionally selected.
Note! Moisture-resistant chipboards will also require more labor-intensive preparation when choosing water-based compositions.
In addition to water-based emulsion, materials can be coated with the following types of coloring solutions:
 The use of budget formulations is justified in most cases
 - Oily. This variety is used less and less due to toxicity, pungent odor and long drying time.
- Alkyd. Good option, which is suitable for all types of products made from wood materials.
- Drying oil. It is used as a decorative and moisture-proof impregnation, which is additionally coated with varnish. An alternative could be stain.
For decorative varieties quick-drying colorless varnish is suitable.
Dyeing technology
Techniques for coloring different wood boards at home has some differences, but the preparation process for all types of materials is common:

Attention! An important condition is the minimum humidity of the material being processed; if necessary, it is dried in advance.
Painting of particle boards
Painting of chipboard begins with priming. For these purposes, an acrylic composition is used, with which the product is impregnated in several layers, each time waiting until the previous coating has completely dried.
 When working with acrylic compounds, the primer should be selected similar
 Do-it-yourself paint is applied as follows:
- The mixture can be applied with a roller or spray gun; brushes are used for hard-to-reach places. If the coating has not been primed, then use well-diluted paint.
- The composition is evenly distributed over the surface, movements should be in one direction. The number of layers applied varies from 2 to 5. Spraying is a more complex process and requires experience.
- After the last coating has dried, varnishing can be done for additional protection.
 If the spray gun is not available, then the best tool for coloring smooth surfaces there will be a roller
 Dyeing of wood fiber products
Painting of fiberboard slabs is carried out in almost the same order as previous work, but it is recommended to use a fur roller or a spray gun. This material can be painted without a primer, then the procedure will be as follows:
- For the first layer, the mixture is slightly diluted. The paint is applied quickly, without treating the bald spots that appear due to the gradual absorption of the solution.
- The next layer is laid no earlier than a day later. The mixture should be more viscous.
- At the final stage, the third layer is applied.
 Floors finished with fiberboard are painted in at least 3 layers
 Note! If the treatment is carried out exclusively with varnish, then a suitable shade is selected, and the number of layers varies from three to six.
Features of working with chipboard
Laminated chipboards are common in furniture production. They are quite difficult to paint with your own hands, since the top layer reliably impregnates the base, which eliminates the possibility of its removal. But laying paint directly on a laminated surface is not always a good solution, so such material must be subjected to external grinding in order to create a rough base.
