DIY glass mosaic. Mosaic glass: how to make a colored picture with your own hands How to make a mosaic from stained glass
Are you familiar with a children's toy in the form of a tube with a small window, looking through which we see fancy patterns and multi-colored ornaments? Mosaic is one of the finds of decorative artists that allows you to enliven the most dull interior. It can be successfully used in the design of a garden plot.
The most unexpected objects are suitable for creating mosaic compositions:
- fragments tiles or broken dishes;
- pebbles painted with acrylic paint;
- colored plastic caps for beer, mineral water, juices, etc.;
- colorful bottles;
- glass from old window frames etc.
Mosaic elements do not have to be correct geometric shape. We bring to your attention several techniques with which you can transform your country landscape with your own hands.
Design of vertical surfaces
You can decorate any walls of country buildings with mosaic ornaments or panels:
- garden houses and gazebos;
- summer showers and toilets;
- wooden and stone fences;
- retaining walls, etc.
One of the tasks of landscape design is visual increase space. To make the area seem larger, climbing plants are planted near the walls and tubs with small trees are installed. However, roses, clematis, grapes or other vines grow slowly, and you want to get the result today. Mosaic is an ideal technique that can easily cope with this task. Plant motifs on the walls expand the space, creating the illusion of a continuation of the garden.

It is convenient to use flat crockery shards or broken tiles.
Operating procedure:
- clean the wall of debris and dust;
- Slightly level the area allocated for the picture with putty and sand it;
- draw the outlines of the future panel;
- according to the instructions, prepare a solution for laying tiles or use ready-made glue;
- start work from the middle of the picture, selecting shards according to shape and shade;
- Apply the adhesive solution with a spatula not to the entire contour, but to a small part, moving further as you lay out the mosaic elements.
At the first stage, the wall should dry out within 24 hours. Then the remaining glue is removed, and the seams between the mosaic pieces are treated with a special tile grout, which is also removed after drying. It is convenient to perform these actions with a soft, damp sponge.
Multi-colored paths
To decorate paths, driveways or other country roads, hard materials are mainly used. It can be natural or artificial stone, wood or ceramic tiles. Using pebbles of different sizes and textures, you can “draw” a simple pattern or create a real Persian carpet.

Fashion trend recent years became a building made of colored pebbles. Paint sea or river pebbles with special acrylic paints. The technology is the same as for paving slabs, but there is one feature - the pebbles are laid on an edge. This method provides better grip cement mortar with stone, which means the path will be stronger. The mosaic can consist of stones of the same size, or it can be contrasting - small stones are laid in the spaces between large flat tiles.

Glass mosaic
Glass paintings deserve special attention, because the possibilities of this material are endless. Glass painting is the only activity where you don’t have to worry about a broken mirror - after all, its fragments can also be used.
Creating panels from ready-made sketches is quite simple - you can take patterns from women’s magazines for knitting patterns or cross-stitching as a basis. They are convenient because the finished picture is composed of identical elements a certain color. But you can use pieces of glass of different sizes and shapes, and any illustration or drawing as a sketch. The main thing is to prepare the material and arrange it according to shades. This technology requires some skills - first of all, you need to learn how to cut glass correctly.
Step by step steps:

The technique for laying mosaics is the same as when laying tiles on a wall. You can use special glue or liquid nails.

False mosaic
Another technique surprises with its simplicity and unique effect. This technique is suitable for those who are not patient, but want to get results. Actually, this technique is not a mosaic; rather, it is one of the decoupage techniques, although glass is also present here, and the design consists of small parts. What's the catch? For false mosaics, whole glass is used, and there is no need to paint it.

To work you need a drawing that should look like glass mosaic. This can be any illustration, photo, or painting drawn by yourself, a collage of flowers and leaves, an abstraction made of shiny candy wrappers, etc.
Operating procedure:
- stick a drawing onto the prepared surface;
- Transparent glass glue is applied on top;
- apply thin glass (from old window frames) and press down well;
- if the surface is horizontal, place the load.
When the glue is completely dry, use the sharp end of a hammer to hammer the glass in several places. The result will be chaotic fragments, but the glass will not be completely broken. Use a cotton swab moistened with water to remove glass dust. Then you need to fold a small piece of fine-grained sandpaper in half and carefully walk over the chips. This action will have two results:
- will widen the seams a little;
- smoothes out the sharp edges of the fragments.
The resulting seams are rubbed as usual. If you add a little bronze paint to the grout, you get an antique effect.
Where can it be used? Using this technique, it is better to design horizontal surfaces:
- garden furniture table tops;
- sides of artificial reservoirs;
- borders of high flower beds, etc.
Plywood sheets, decorated using the false mosaic technique, are used for wall cladding, on terraces, and other country buildings.
Decorating small items
Nothing is thrown away on a personal plot - any items can be used for decoration. We have already told you that the same technique is used for glass products, only use special acrylic paints for glass.


Acrylic paint with a metallic effect is applied using a stencil. Transparent acrylic gel can be mixed with small beads and this paste can be applied to the surface of old lampshades or flowerpots.
Creating a mosaic effect with paints is also very simple - use a stencil. And any mosaic technique is successfully used to create flowerpots, candlesticks, and other decorative items that always have a place in the country house.


If there is unnecessary glass in the house (whole or broken) that clutters up the space, do not rush to throw it away.
You can make a beautiful product out of it, or decorate existing items.
This good way put it into action this material , because handmade crafts and gifts are valued much more by people.
In this article we will tell you what can be done with whole or broken glass, how to make a herbarium in it or bake a flower, how to turn its surface into a matte or mirrored one, and other subtleties of craftsmanship.
 Glass is universal material
, used to create various interior items.
Glass is universal material
, used to create various interior items.
Not only dishes and furniture are made from it, but also paintings and panels.
You can give a second life to even a broken object by using shards and fragments.
There are different types of glass, differing depending on application:
- construction;
- porous;
- liquid;
- artistic, finishing, etc.
Such a variety of materials allows a skilled person to create unique kaleidoscopes and make products of bizarre shapes and colors.
Many crafts Even a beginner can create it, the main thing is to have necessary tools, patience and desire.
First you need to determine what exactly you want to make from glass. There's a lot here depends on the author’s imagination and resources available.
All products can be divided into categories:
- household;
- aesthetic.

Here are just a few examples:
- candlestick decoration;
- ornaments on glass, flower compositions;
- small souvenirs made of broken glass;
- thematic installations;
- decoration of household items - dishes, chandeliers, mirrors.
Let's figure out in order what items can be made from old unnecessary glass.
Shelf
Glass shelves are popular because can easily fit into any interior. In addition, they can withstand significant loads, although they seem fragile.
Glass furniture looks good in small rooms - because of its transparency, it seems less noticeable, so it does not visually take up space in the room.

The location must be accessible to adults, but out of reach of children(so that the child cannot hang on it).
To make a shelf you will need:
- glass cutter (it is more convenient to use an oil cutter);
- belt type sander with abrasive sandpaper (grit value should be 120 units);
- respirator, gloves and other protective equipment;
- rulers (you will need to periodically check whether the layers are even).
It is created in the following order:

Aquarium
To make it yourself, you will need:
- Silicate glass premium.
- Glue, which contains silicone. Look carefully at the information on the packaging: it should indicate that it is suitable for aquariums (it does not contain antibacterial substances that harm fish and plants).
- About 8 pieces of small corners, suitable for predetermined dimensions.
When gluing parts, you need to remember certain requirements:
- the seams must be thick, at least 2-3 mm;
- The outer edges must be sanded, and those under the glue must not be touched.
The build process itself looks like this:

Do not rush to immediately “transport” fish and other marine life here. Swipe 3-5 hour hydrotest– fill it with water and check whether the structure does not allow liquid to pass through, whether the seams are leaking, etc.
Now you have an idea of how to make an aquarium yourself at home.
Greenhouse
Glass is often used in the construction of wooden or metal greenhouses. This classic version greenhouse structures, which allows you to maintain the necessary microclimate inside.
If you have a lot of window glass leftovers, you can successfully use them to create a greenhouse.
 Such a structure has walls and a roof made of glass, which provides a number of advantages:
- You can use a greenhouse all year round. The material retains its transparency, structure, appearance and thermal insulation properties.
- Having connected the heating to it, you can grow plants in winter. In summer, transparent glass allows light to pass through, allowing plants to grow.
- Glass withstands abrasive influences and is easy to clean.
- Walls of the structure Can be easily replaced if damaged. Replacement is inexpensive, and used glass is suitable for this.
- Glass does not emit harmful substances or odors even when exposed to heat. This is an environmentally friendly material that is also easy to care for. Glass is resistant to chemicals used for cleaning.
- The reinforced or tempered type (thermal glass) can withstand large hail and other adverse weather conditions.
In addition to all these properties and attractive appearance, lasting for years, this design has disadvantages:
- You need to select a reliable frame and prepare a solid foundation (it can withstand such loads strip foundation), since glass characterized by increased mass. You wouldn’t say so at first glance, but the material weighs a lot: for example, glass is 4 mm thick square shape weighs about 10 kg, and the mass of a 6 mm layer is 1.5 times greater.
- Building a glass greenhouse will not be cheap.
- The glass resists shock and mechanical impacts poorly.
- Glass has high thermal conductivity, so it heats up and cools down quickly. This is especially harmful to plants during daily temperature changes. Therefore, you need to take care of the system for maintaining the desired temperature inside the room.
- A glass room can only be built in the form of a house.

It all starts with preparation:
- Creating a drawing of the future greenhouse, determining its dimensions.
- Choosing a suitable location. It is necessary to take into account the level of lighting, orient the room so that the heat is distributed evenly.
- Taking into account the wind direction in a given area. It is best to protect the structure on the leeward side with some object (shrub or other small obstacle).
- Determination of soil and relief features. You need to choose a dry and level place.
- Calculating the distance of the greenhouse to the nearest source of electricity and water supply. The closer you get, the easier it will be to build a system for heating and watering plants.

Below is shown where should not be placed greenhouse If you do wrong choice, the greenhouse may collapse, or the plants being grown will grow more slowly.

A reasonable solution would be to create a wall-mounted greenhouse. This will save area, reduce the distance to water and electricity and spend less money on construction.
Below is a typical drawing. If desired, it can be changed according to the desired dimensions.

Based on drawing are elected building materials . The foundation must be at least 0.5 meters in height and have a strong frame - metal or wood (bars or profiles measuring 5 by 5 cm, the distance between the posts is up to 0.8 m, based on the size of the glass and the frame itself).
You can use different types of glass. Main, so that they match the dimensions of the frame. For example:
- single (2.5 mm thick) suitable for side walls installed in wooden frame small sizes;
- double (up to 3.5 mm) cannot be used as a top window;
- showcase (6 mm) will become a strong wall, but will need reliable fastening and supports;
- multi-layer will work in almost any part.
Choose glass based on the purpose of the structure.
If there are tropical plants, it is better to use multilayer glazing, which will reduce the cost of internal heating.
Regular glass is also suitable for greens and vegetables.
Double-glazed windows provide the best growth. There are several types:
- single-chamber;
- two-chamber;
- heat-saving;
- energy saving.
Double-glazed windows from old plastic windows are perfect.

Will need to prepare the following building materials:
- support corners;
- wooden beams or metal bases for each side of the frame;
- beams;
- polyurethane foam and hardware;
- glass or double glazing;
- sealant (for fixing and insulating glazing);
- door parts (handle, lock, hinges);
- corners on which wooden parts will be attached.
Cords, pegs, containers, buckets and shovels are needed for marking and preparing the foundation. A hacksaw, chisels, glass cutter, electric planer and construction level will be needed when assembling the greenhouse.
Now that everything is ready, we’ll tell you in detail how to make a greenhouse.
Assembly is carried out in the following order:
- At the selected location, you need to level the soil and remove vegetation. Make markings for the trenches by installing pegs and cords.
- We dig trenches according to the intended markings (depth 0.4 m, width 0.2 m). Let's plan the bottom of the pit, fill it with a 10-centimeter layer of a mixture of crushed stone and sand.
- We assemble the formwork and check the height of the edges. Laying it down welded mesh or steel reinforcement, we attach anchors to the frame.
- We prepare concrete (a mixture of cement and sand 1:3 with the addition of crushed stone and water). Pour in the resulting solution and give it time to harden.

We lay two layers of roofing material directly on the surface of the foundation. They will provide protection wooden frame from moisture. We treat wooden blanks with an antiseptic.
Screw the frame support bars to the anchors, then make holes in the bars on which the glass will be attached.
We fasten the racks and beams.
Make sure the structure is upright. Install the braces and fix all elements with metal corners .
Connect all the remaining elements together. Check everything first for cracks and gaps, then make sure the structure is durable. When it is clear that the greenhouse retains heat, bring all the plants into it.

Colored mosaic
A special mosaic - smalt - is suitable for decorating surfaces. But in its absence, you can use colored broken glass. By the way, smalt is also made from broken glass; you can read about it in detail.
To do this kind of work, you need to prepare:
- drawing, glass base for mosaic (or plexiglass);
- glass cutter, wire cutters and a special breaker for working with glass;
- colored glass from which the mosaic will be made;
- medical syringe, which is useful for applying the material;
- transparent silicone;
- tile grout (black).
Consider making a mosaic in the shape of a butterfly.
So, the finished drawing needs to be transferred from paper to a glass base. Using tools, we cut out wings from colored glass. Then cut it out with a glass cutter.

After they are separated from the base, you need arrange them into a prepared drawing.
The pieces of glass need to be coated with silicone, then glued to the glass base. For this you will need a medical syringe.
When you glue the fragments together, leave gaps between them. They will need to be filled with grout later.
The seams need to be rubbed only after the silicone has grown.
Be sure to wear rubber gloves. The grout itself dilute according to instructions located on the package with the substance. The result will be a mixture as thick as sour cream.
We apply it to the mosaic.

As you can see, it covered the entire surface of the product, and the seams are securely sealed. All that remains is to remove the excess mixture from the glass. Do it you can use a wet sponge.
The procedure for creating any other mosaic is similar; the specifics of the work will vary slightly depending on the design.
Here is an example of another product made using the same technology:

As you can see, the mosaic is a universal technique, with which you can decorate completely different interior items using broken glass.
The main thing is to draw the contours in advance so that the resulting drawing looks organic.
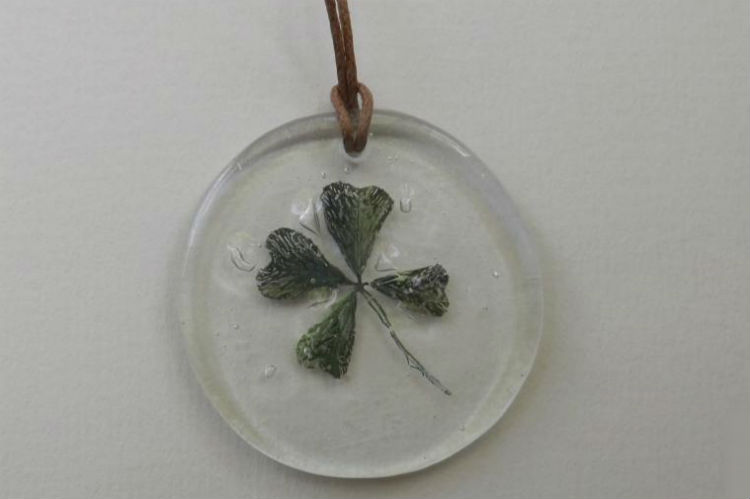
Herbarium and flower in glass
This is a very unusual, rare and beautiful fake. This technique allows you to “immortalize” any flower (or other object) in glass, making it into a decoration (for example, a pendant).
Naturally, in order for the sheets to be visible, you need to use only transparent glass (intended for fusing or regular glass).
The only tools you may need are a special oven, a glass cutter and a machine for grinding the edges of glass.
Needs to be cut and sharpened two circles of equal diameter, the dimensions of which will fit the flower. Plus, you need to leave a little space if you want to make a pendant (a hole will be made in a small area for the cord).

By the way, this is a difficult operation to predict the end result. Difficult to control the process: The grass may burn completely, or a clear silhouette will remain.
To minimize possible damage, it is better to paint the flower in advance: even if the leaves fade, the paint will retain the original shape of the flower and remain inside the glass.
You can approach the matter artistically by coloring the flower with transitions of shades.
You should use only fusing paints - they do not fade at high temperatures. After applying it, you need to let it dry.
We put the painted plant between the pieces of glass and put it in the oven.
Need to pick up correct mode baking. It is selected depending on the glass used. The approximate range is 740-800 degrees.
Please note that between the pieces of glass air bubbles may form. If after baking there are few of them and their sizes are small, they can further decorate the product.
If the plant burns out only partially, it may turn out a little lacy and fibrous.
Photo frame
A more difficult operation will be decorating frames, panels and paintings.
Before making a frame with glass, you will need to prepare:
- fiberboard sheet suitable size (dimensions are selected based on the intended design);
- broken glass (transparent and colored);
- acrylic paints, gouache or ink;
- glue.
A thick layer of acrylic paint is applied to the fiberboard sheet. Upon request, can be coated with one or more shades. This is necessary to prepare the background. When everything is dry, the sheet needs to be inserted into the frame of the future product.
Then, on the future panel or painting, you need to apply the contours of the planned design using a stencil or by hand.
This is why ink or gouache was needed - to circle the outlined lines twice and glue the fragments along them.
Having pasted them in the background area, you need to let the product dry.

Mirror
The easiest way is to decorate mirrors using shards (colored or transparent). This can be done with vases, candlesticks, and trays.
Since the essence of the decoration is gluing pieces of glass, be sure to wear rubber gloves before starting work; they will protect your hands from cuts and allergies to substances contained in the glue.
On the surface of the object you need pre-mark the pattern, along which the fragments will be laid out. Only suitable ceramic glue, layers of which must be applied using a special tool - scrapers.
If transparent pieces of glass were used, they can be painted with acrylic paint designed for working on glass.
After the layer with the fragments has dried a little, the holes between them can be sealed tile putty or mosaic cement. You need to act carefully, but there will still be excess. You can remove them using a damp cloth.
This is what mirror frames made in this style look like.

You can decorate in a similar way:
- frames for photographs, mirrors, paintings;
- flower pots;
- caskets;
- drawers;
- countertops and other items.
- accurately calculate the number of pieces of glass (prepare paint to finish painting the transparent pieces);
- apply clear markings and indicate where and what layer will need to be laid.
Other items and decorations
The list of crafts is not limited to this. Here's how else you can decorate your interior.
Picture made from multi-colored glass cullet
All work can be done at home, having prepared in advance:
- plywood;
- finished drawing;
- a bunch of colorful pieces of broken glass.
Plywood is needed as a base-frame on which the drawing with glued pieces of glass will be held. The picture itself can be drawn in advance, or you can take a suitable template.

The pieces should be glued so that they fit tightly to each other. Better to use more stable glue. Try to ensure that they follow the lines, observing the pre-planned color scheme of the drawing.
Do not touch the glass under any circumstances until the glue has dried, otherwise there is a risk of moving the pieces from their original places.
In addition to pieces of glass, you can use other elements for decoration:
- beads;
- seashells;
- glitter;
- buttons, etc.
Drawing using fusing technique
You can make a multi-colored picture using either mosaic or fusing techniques. It involves baking pieces of glass, pre-folded into a specific pattern. The whole operation carried out in a muffle furnace at high temperature (at least 800 °C).

This technique first appeared in the 90s. in Germany, and it was based on another, more ancient method of glass processing - the “hot enamel” technique.
The main task is to correctly position glass elements, to as a result heat treatment they merged into one. Consequently, the material becomes homogeneous; there are no metal compounds in such a product.
The image completely depends on the artist: you can make it more voluminous, convex, leave some areas flat, increase the thickness and relief of the stained glass.
All scattered parts are laid out on a glass base - the most even and flat surface possible. Thanks to this, the illusion of perspective, volume, and depth of the product is created.
The use of colored pieces allows you to expand the color range. This is precisely why you need a glass base, since working on a metal plate you cannot achieve such an effect.

This product is also quite durable. It practically does not age, the color remains unchanged.
The only drawback in the heat treatment itself is this technique will not allow you to get clear image contours. Colored pieces inevitably float on top of each other, resulting in an effect similar to watercolors.
Using liquid glass
Advanced craftsmen can create crafts using.
You can buy this material at a hardware or hardware store. Or use other varieties liquid glass, for example, stationery silicate glue, which is often used to imitate sea spaces.
But such a substitute will be less durable and hard than liquid glass.
Almost any item can be decorated with this material.
After applying a layer of liquid glass, apply decorations on it - pebbles, shells, beads, sparkles, etc.
If you want to do decorative elements more voluminous, apply two layers of liquid glass.
With liquid glass quite easy to work with. You can use it to decorate the surfaces of various objects or make your own decorations:
- hairpins;
- earrings;
- brooches;
- figurines;
- vases, etc.

You can decorate your interior with liquid glass in a simple way– apply small objects to a layer of glass according to a pre-designed pattern, then allow the product to cool.
Decor elements
What can you do if you only have small broken glass on hand? It can be turn into powder and use as decoration.
To crush it into powder, safety precautions must be followed:
- use gloves and safety glasses;
- Find a container that is deep enough and strong enough.
The resulting broken glass powder is applied to the selected item in areas where glue was previously applied. Once the glue dries, you can cover it with another layer. By analogy, powder can be used to paint pictures and decorate interior items.
In addition to glass, you can additionally decorate objects with the following materials:
- shells (sea or river) and shells;
- beads or beads of a suitable size;
- shell walnuts and other available materials.
The challenge is to choose the right combination of all decorative materials, then the product will look beautiful and organic.

Making black, white and colored paint for glass at home
How can you make glass colored, white, or apply a design on it at home?
Glass surfaces must be treated with special paints that have good adhesion to smooth surfaces. Conventional paints and varnishes are not capable of this, so the coating wears off quickly.
The composition of the paint should not be too liquid, and it should be applied in thin and translucent layers.
Acrylic paints are best suited for liquid glass. They have good adhesion, and on surfaces they look like a matte film. Even when mixed, they retain color purity and are resistant to ultraviolet rays.
You can paint the surface with polyurethane mixtures. This is an elastic substance that instantly hardens on glass. The layers are perfectly transparent.
You can make the compositions yourself.
 Here are a couple of recipes:
- White paint is prepared by mixing four parts silicate glue and one part kaolin (it must be thoroughly ground).
- Black shades are created by mixing one part charcoal with three parts silicate glue and one part printing ink. The resulting mixture must be filtered.
Various colored dyes can be made using special fabric dyes.
The procedure is as follows: dissolve 5 g of gelatin in 200 ml of water, then dilute the necessary dyes in a separate bowl. The required shade is obtained by gradually mixing the contents of two prepared solutions.
Prepare the following tools in advance to paint glass with paint:
- spray;
- end brush with bristles;
- a paint roller or a foam swab.
You need to pre-treat the glass:
- Wipe the glass with soapy water, then rinse first with warm and then with cold water.
- Apply acetone to degrease the glass. Traces of solvent can be removed with a simple dry cloth.
- Those areas that do not need to be painted should be protected. Apply one or two layers of masking tape to these areas.

Instructions for painting glass at home:
- Prepare the mixture and pour it into a small container (this will make it easier to apply paint to the surface).
- Paint glass using a brush, spray gun, foam pad or roller. Follow, so that the layers are distributed evenly over the entire surface.
- When the paint is dry, remove the pieces of masking tape. If some areas are poorly colored, apply an additional layer.
How to make it opaque?
You can achieve a matte glass texture:
- chemical and mechanistic methods;
- using a sandblaster.
Follow the instructions below and you will learn how to make glass opaque.
It is easier and safer to use a mechanical method based on the use of abrasive paste or sand.
You need to take polished glass with a thickness of 4 to 6 mm, place it on a flat surface, placing a thick cloth under it.
Thin spatulas need to be nailed to the sides of the glass so that it does not slide on the table.
Prepare sand (river sand or corundum sand is best: it scratches glass more smoothly), then sift it through a sieve until smooth.
 Then apply sand to a board measuring 20 by 30 cm and moisten it with water. Place glass on top of the board, and any weight on top of the glass so that it presses it tightly to the surface.
Move the board parallel to the side edges of the glass. Do not make circular movements under any circumstances.
Moisten the sand as it dries.
Periodically check whether the matting process is successful by removing sand from the surface and holding the glass up to light. Continue the procedure until you get the expected result.
Create a mirror surface
How to make a mirror? First you need to polish our glass by wetting its surface with water.
Will be required in advance prepare the following items:
- glass;
- containers in which the solution will be prepared and mixed with silver;
- rubber gloves;
- silver (nitrate) and tin (bichloride);
- distilled water, caustic potassium or soda;
- honey, ammonia and formaldehyde;
- alcohol, cotton wool;
- clear varnish;
- glass rod and nitric acid;
- a spray bottle that will be used to apply the mixture to the glass, plus a brush with soft bristles;
- frame or wooden sheet with clips;
- dye.
We put on rubber gloves and carry out all work exclusively in them.
Next, when you manipulate the glass, hold it carefully by the edges, otherwise you risk blur smooth surface . This is important because the material will need to be frequently dragged from place to place, washed and various substances applied to it.

The procedure is as follows:
- We wash the glass with distilled water and crushed chalk. All sides must be clean, incl. ends.
- We treat the surface with a degreasing alkali solution (sodium or potassium, containing about 10%).
- Rinse the glass again with distilled water.
- Wipe clean glass with a cotton swab dipped in a 1% solution of stannous chloride. Then immediately place the mirror in a container filled with distilled water. Let it get wet.
- While the glass is poured, clean and degrease (with the same alkaline solution) the container in which you plan to silver the glass. Please note that the surface temperature of the future mirror in water should be 10 degrees higher than that of the solution induced for silvering.
Will be required prepare two solutions with the contents with which the glass will be coated. Use only distilled water:
- The first solution consists of silver nitrate (1.6 g) and water (30 ml). After mixing them, watch what kind of sediment you get. Drip 25% ammonia into it until it disappears, then add another half cup of water.
- Pour a 40% formaldehyde solution (5g) into the second container with divisions.
- Place the glass horizontally on the surface prepared for silvering.
- Now start covering the glass: pour the resulting solution into the middle, roll it out in an even layer using a glass rod. Or lower the glass into the chemical mixture so that the silver does not fall on the opposite side.
- The solution needs to harden. To “mirror” it needs 3-10 minutes, depending on the initial temperature of the mixture.
- When everything is dry, you need to place the mirror vertically. While the silver layer is not fixed, it may be damaged, so lean the product against the support with the untreated side.
- The mirror needs to dry for 2 hours at temperatures up to 100 degrees.
- Inspect the received product. Silver stains can be wiped off with cotton wool and a solution of nitric acid.
- Rinse the mirror first in water and then in alcohol.
- The silver layer should have cooled by this time. Spray it with clear varnish from a spray bottle.
- When the varnish is dry, paint the darkened surface. Then paint the silvered part with red lead, diluting it in turpentine. The glass part must be wiped with a solution of nitric acid.
- Let everything dry and look at the result. If everything suits you, all that remains is to place the mirror in a frame with clips.

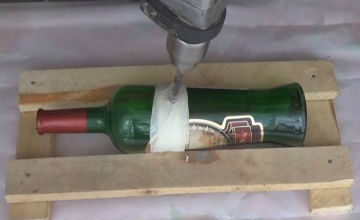
How to make a hole?
A hole in the glass can be drilled using:
- drills with flexible shaft;
- dental burs.
The structure itself amenable machining , but you need to take into account the fragility of glass. Therefore, it is necessary to calculate the force and impact points, as well as the operating procedure.
The processing should not lead to cracks, breaks and chips on the main surface, otherwise the entire product may break.
Before making a hole, you need to prepare the glass for processing. Work surface needs to be cleaned and leveled. Check for defective areas - when mechanical impact they can chip and ruin the workpiece.
First, make markings: mark the lines of future holes so that surface flaws are located inside the circle and do not extend beyond its limits. Additionally You can treat the surface with chemicals, ridding it of oil traces.
 Determine where the work will be done. You need to prepare the fixing equipment.
The method of glass fixation itself is determined based on the chosen technology for creating the hole.
Typically, the workpiece is placed in a vice, and under the areas that will be affected, a damping soft materials.
What if you need to make a small hole?
Miniature holes can be drilled using a drill and drill. A drill is required first:
- heat up;
- immerse in sealing wax and hold until the substance begins to melt;
- moisten the tip in turpentine.
After this you can start working.
The second option is:
- Grind camphor and coarse sandpaper particles.
- Pour the resulting elements into a small container and then dilute them with turpentine. Place this paste on a clean glass surface of the workpiece.
- Prepare a small piece of copper wire. It will need to be clamped in the drill chuck. This type of equipment needs to be guided, so prepare a guide jig (plywood).
- The preparation is completed. You can start drilling.
Large holes in glass are made in a different way. If necessary diameter exceeds 10 cm, household equipment will not help here.
 You can still drill, but you must first make a small through point in the center of the future hole.
Any small-format glass of small diameter (up to 1 cm) can handle this. Extraneous chips will occur, but this is not a big deal: they form in areas that will later be removed.
Having received a small through opening, you need to insert and secure a piece of wire into it.
One end is fastened with a glass cutter. After checking whether the elements are securely fixed and Does the tool move smoothly in a circle?, you can cut a circle.
If you can't drill a hole, you can melt it. You will need to prepare equipment in which liquid tin or lead will be prepared. The glass blank is treated with gasoline, acetone or alcohol.
Having made the markings and formed the area for the future hole, the resulting area is sprinkled with moistened sand.
It should be enough to create a funnel, the bottom of which will be comparable in size to the edges of the hole, then metal is poured into it.
After 1-2 minutes it will cool down, and the sand equipment can be removed along with the mold.
As a result, in a glass blank a hole with smooth edges is formed. The risk is only in the melting process itself: it is impossible to control the diameter that is formed after the interaction of glass and metal.
 The last option is to cut the hole using a soldering iron. You need to start by creating risks using a needle file.
Carefully mark the zones in which the melt will be made with a soldering iron in depth.
Then you need to warm up the tip and start cutting. Proceed slowly and carefully.
Better melt small sections, periodically cooling the glass (this will reduce the risk of deformation in nearby areas).
The result will be exactly the opposite of the above method:
- the boundaries of the intended diameter of the hole will be maintained;
- the edges will turn out uneven.
Video on the topic
Conclusions
As you can see, unnecessary or broken glass is suitable for decorating a room with handmade items. The main thing is desire and imagination.
You can also decorate other glass containers.
If you don’t want to work on crafts, don’t throw away the glass anyway. Take it to or into a special container for collecting glass.
The mosaic patterns are mesmerizing - it’s hard to take your eyes off them. Do you want to learn how to create such masterpieces? It's easier than it seems!
Among the various women's hobbies, there are those that can bring not only pleasure, but also benefit. Mosaic can be placed on a par with sewing and cooking. The association that first comes to mind when hearing the word “mosaic” is multi-colored small figures from sets for children's creativity. Plastic circles and squares that give a unique sensation if you step on them with bare feet. Glass mosaic, made with your own hands from multi-colored pieces of glass, is completely different.
From time immemorial: the history of fashion creativity
It turns out that the current hobby is already about six thousand. Examples of the first mosaic designs were found in excavations of Sumerian temples, which the Sumerians built sometime in the middle of the fourth millennium BC. The ancient Greeks lined the floors of their houses with designs made from river pebbles. The color scheme left much to be desired, but Greek craftsmen had enough shades of gray to create complex ornaments and designs.
Mosaics were most loved and revered in Ancient Rome. Ancient Roman generals even carried mosaic floors for their field tents during campaigns. And it was very difficult, really. literally: The mosaic floor tiles weighed hundreds of kilograms. The first examples of glass mosaics, made of special glass, opaque, multi-colored and durable, appeared in Ancient Rome. This glass, called smalt, is still used today for their work by craftsmen in modern studios and by those who like to make mosaics with their own hands.
What is needed for practical classes
Almost any material is suitable for mosaics. It can be laid out from stones, fragments of porcelain dishes, old ceramic tiles and even eggshells. But still, the brightest, most durable and colorful mosaic is made from glass. Colored glass for mosaics (not to be confused with stained glass, this is a completely different type of glass!) can be found in two types:
- Smalt. It is produced in the same form as two thousand years ago - in the form of a large glass pancake, which must be chopped into pieces before work. It is used in workshops by professional mosaic makers to create highly artistic works.
- Glass modules. These are glass squares of different sizes, or packaged in plastic containers, or pasted on paper or mesh. These are well suited for home crafts.


This type of mosaic glued onto a mesh is used by master finishers in their work. It turns out nice, but a simple alternation of multi-colored glass squares on the walls is so boring! And if you are planning to renovate a bathroom or kitchen, then it’s time to try yourself in the role of an antique craftsman and an interior designer rolled into one. You can involve all household members as helpers. And even four-year-old children will be happy to assemble a drawing from multi-colored glass squares together with their mother.
From preparation to action: techniques for laying mosaic modules
To lay out the mosaic you will need:
- mosaic glass modules;
- glass cutters;
- special white glue for mosaic;
- grout for ceramic tiles;
- pencil or marker.
All these accessories are sold in finishing materials stores. First you need to come up with and draw a sketch directly on the wall, according to which the mosaic will be laid out. Separate the mosaic modules from the base on which they are glued.
Using glue, glue the modules directly to the wall, according to the sketch, face up. If necessary, the modules can be split with pliers. When the drawing is ready, you need to wait about a day for the glue to dry and carefully rub the seams with grout. The mosaic picture is ready! Now your home has acquired a unique flair that will attract the attention of guests. All that remains is to accept compliments and answer endless questions about how to make a glass mosaic yourself.

There is another technique for setting mosaics. It's called "reverse dialing". Glass modules are not glued directly to the wall, but are first glued onto sheets of paper, face down. Lay out the modules on paper in accordance with a special diagram, which indicates how to arrange the modules. One fragment of the drawing is placed on one sheet. The sheets are numbered, top and bottom are indicated, and sent for installation. Fragments of the design on paper sheets are glued to the wall, wait until the glue dries, then soak and remove the paper, rubbing the seams.

It turns out to be one big picture, and if it is mounted correctly, no one will guess that it was made up of small fragments. This method of mosaic typing is used when a design is typed in one place and is intended to be mounted in another. Many mosaic studios work using this technique, sending their work to customers even in other cities. If you master the reverse typing technique well, you can find a mosaic studio and offer your services for typing mosaic fragments at home. This work is not difficult and brings in very real money.
Glass mosaic technique
In addition to decorating walls, you can decorate any piece of furniture with mosaics: flower pots, lamps, mirrors and even garden tables. It makes original gift paintings and souvenirs. And even if you don’t set a goal to make money from this hobby, the ability to give your home comfort and uniqueness is worth a lot. For decorations, you can use not only ready-made modules, but also pieces of glass.
Before making a glass mosaic, you need to prepare materials and tools:
- colored glass;
- transparent silicone;
- glass base;
- tile grout;
- medical alcohol;
- glass cutter;
- wire cutters;
- sketch.

- First, the design is transferred onto colored glass for mosaics. To do this, just place the sketch under the glass and circle it with a marker.
- All elements are cut out with a glass cutter, assisting the process with other devices.
- The same pattern is duplicated on a glass base.
- The colored parts are carefully laid out on the base, creating the desired pattern.
- When you get the desired pattern, the parts can be glued with silicone. It is convenient to use a syringe for this.
- The space around the picture is covered with frosted milk glass or other shades suitable for the background.
- The dried work is treated with grout.
- Clean the surface of excess grout and admire the beauty.


As you can see, there is nothing complicated about this hobby. You can create a mosaic by creating original decor for home and useful gifts for friends and relatives for any holiday. And if you do crafts in advance, you will always have gifts in stock.
Be sure to read about it and see what other women’s hobbies there are in the world!
IN landscape design and interior design, decorative panels and glass mosaic elements are becoming especially popular. They look interesting, exclusive, and resemble stained glass works. I am especially pleased that glass mosaics with your own hands allow you to create masterpieces from available materials and transform any interior. Products made from glass fragments will be appropriate in any design - from decorating flower vases to decorating wall panels. In this article you will find several interesting ideas for the design of such decor.
Materials and tools for work
DIY broken glass mosaic combines with different elements, so the starting materials for work can be varied:
- You can use fragments of tiles, tiles or glass.
- Beads, shells, stones and various decorations are also suitable.
If you are going to professionally or often engage in this type of creativity, it is advisable to purchase special tools that allow you to cut pieces of glass to specified sizes and give them the desired shape. Moreover, there are not so many of these tools:
- There are two types of glass cutters: regular (cuts glass in a straight line) and oil cutter (provides curved cuts due to the rotating head)
- Disc cutters can break glass into tiny pieces, resulting in a chip at an angle of 90 degrees to the surface.
- There are different types of breakers, they allow you to break pieces of different shapes.
Preparatory stage - sketches, preparation of parts and basics
Before you start work, you need to prepare a sketch of the future masterpiece. Initially, it is important to decide on the object of work: will it be a vase, wall decoration, decorative panel or a picture. Based on this, select a drawing. These could be:
- clear geometric lines;
- abstract elements;
- images of animals and plants;
- fantasy style painting.
Important! If you are not very strong in artistic craft, you can use an embroidery pattern or any ready-made image as a basis.

The next step when creating a glass mosaic with your own hands is preparation source material. Mosaics are made from broken, cut or broken glass. The preparation procedure is quite dangerous, so you need to be extremely careful, or purchase ready-made pieces in craft stores.
Important! If you want to get a non-schematic drawing, process the broken pieces of glass with a glass cutter or wire cutters, trying to give them the desired shape.
- To hold the work firmly, also prepare load-bearing slab, for example, a sheet of glass or a table top. It is important that this slab does not warp or hunch.
- Apply even layer glue on a horizontal plate.
Important! Gypsum or cement composition can be used to fill the mosaic. For mosaics large size It is useful to add substances that slow down the thickening of the mass, for example, dextrin or alum.
Technology
The preparatory stage has been completed, now you can move on to the main process. So, how to make a glass mosaic with your own hands:
- Transfer the drawing to the selected surface.
- Take glass desired color and, lubricating it with glue, glue it to the appropriate place.
- Similarly, we fill the entire space of our diagram. At the same time, do not forget to leave gaps between parts. This will add a dimensional look to your piece.
- Let's wait for everything to dry and fill the left gaps with grout diluted to the consistency of sour cream. This procedure is conveniently carried out using a spatula.
- After drying, remove excess with a damp sponge.
- If desired, you can coat the product with varnish after the grout has completely hardened. This will give the mosaic a stained glass effect and ensure a long service life.
Video material
Do-it-yourself broken glass mosaic is a great opportunity to surround yourself with unusual and unique things, as well as add beauty and exclusivity to the interior of any room.
Most likely, you are partial to mosaics. Such is the peculiarity of this type of art. Surely you have admired a certain street panel by an unknown artist more than once. Perhaps your home is not even deprived of factory-made mosaics. Thousands miniature elements, assembled with a caring hand, invariably please the eye, but sometimes bite your pocket. And they hurt your pride - you have so many wandering, but bright, ideas. Why not try it yourself? Take a chance, a mosaic made by yourself is an irreplaceable thing not only for the interior, but also for the soul.
At home, compositions are made from anything, the most incredible objects are used: mosaics from tiles, broken dishes, pebbles, broken bottles, mirrors and even.
Making mosaics is divided into stages:
- tile preparation;
- surface preparation;
- planning and sketching;
- laying mosaics;
- grouting;
Quick navigation through the article
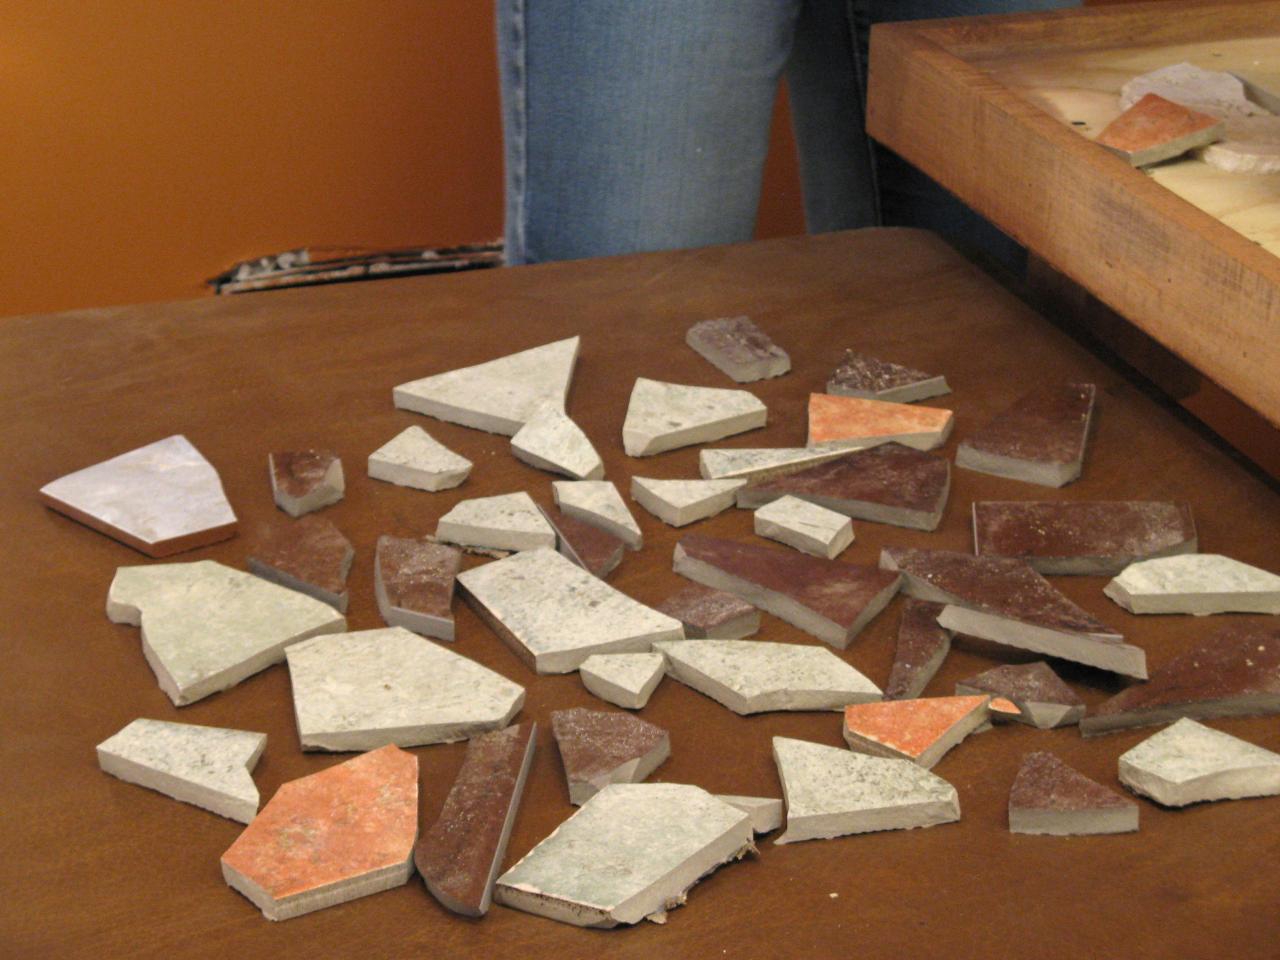
Preparing tiles
You may already have the raw materials, but if you don't, that's okay. Any store will happily sell broken pieces and leftover ceramics for pennies. It’s good if you know a tiler who is constantly faced with the need to throw away waste. Take over his “trash” and you will find yourself with an inexhaustible supply of tiles. Stock up on colorful raw materials, better in small quantities different shades than a lot of plain tiles. It’s even better to keep the future drawing in your head at all times, it makes it easier to navigate.

Broken tile mosaics require small pieces of different sizes. We suggest cutting some of the tiles - compositions often require rectangular pieces. Cut ceramics with a glass cutter or a professional tile cutter. If you plan to create regularly, purchase an inexpensive tool. High cutting precision is of no use here. Simply break the main part of the tile into fragments. It is more convenient to do this with the help of a rag in which you will wrap the fight, and a hammer wrapped in a thick layer of fabric. The latter is necessary so as not to unnecessarily crumble the material.

Fill in the mosaic pieces different sizes, it is not difficult to follow a certain format. For the future: do not throw away leftover tiles, broken dishes, etc. Put it aside for later, failed garbage will one day become part of a masterpiece.

Surface preparation
A suitable base for mosaics is cement-sand screed or plaster, putty and drywall. They provide good adhesion to glue and ceramics. It is important that the surface is clean and smooth. Remove uneven surfaces and seal cracks, if any. After this, treat the coating with a primer; it helps strengthen the base and increases adhesion.
Preparing a sketch

Even a trained eye finds it easier to navigate. An inexperienced artist, when working with a complex drawing, can’t do without it. In order not to get away from the dimensions, contours and proportions, draw a sketch on the base with a pencil. If you have artistic skills, your hands and eyes will suffice. Without such useful baggage (we are talking about skills), use the scale grid method, or even better, transfer the sketch using a projector.
Plan the color scheme and divide the sketch into zones based on tonal ideas. Think about how to make a mosaic according to your design optimally.
Follow certain rules:
- Start from the center, so the composition will turn out better in terms of proportions and compliance with the sketch;
- Do the background last;
- Also leave abstraction for last, first people, animals, plants - anything that has complex geometry.
Mosaic glue
The mixture for laying out the pieces should have high adhesion to the materials you use. It is best to work with white glue; regular gray is not suitable for aesthetic reasons. For typical concrete bases, white cement adhesive (Kreps Reinforced White) is suitable. For installation on a non-standard base (for example wood), it is better to use reactive epoxy-based tile adhesive (Litokol Litoelastic), liquid nails or epoxy grout.

Mosaic laying
If you plan to use tiles of different thicknesses, start with the thickest one. It will serve as a guide for others. It is advisable to spread the glue on both the base and the ceramic, but one of the surfaces requires only a light coating. One that will not increase the thickness of the layer, but will have a positive effect on the strength of the installation.
Apply glue to small areas that you previously highlighted in the sketch. Coat light areas larger area, complex ones will require slowing down. After spreading the glue onto the base with a regular spatula, remove the excess mixture with a notched spatula. If the mosaic pieces are uniform in thickness, the work will be easier. Otherwise, the difference must be compensated by adding glue. But even uniformity does not always save. Pieces that are too different in size require different gluing efforts; a smaller tile with the same layer of mixture will always fall a little deeper, so it needs more glue. The comb is just a guide; each element still has to be brought to the desired plane individually. 
A mosaic of broken tiles on a wall does not have to be in the same plane. Based on your own ideas about beauty. In addition to tiles, use other materials that will diversify the composition and allow it to match the idea. Floor mosaics must be flat; unevenness and roughness will create problems when walking on the tiles.

It is difficult to achieve an even coating using only your hands and eyes. Use a flat sheet of wood, plastic or metal to periodically press down the laid areas to level them. It is better to have sheets of different formats. The principle is simple: the more complex the pattern, the smaller the area covered at a time, the smaller the sheet.
Broken tile mosaic involves laying pieces with gaps. Do not place tiles close to each other. Very precise fitting of the parts will not only complicate the work many times over, but may also cause subsequent damage to the canvas. Seams compensate thermal expansions materials arising due to temperature changes. But you shouldn’t make huge gaps either, use common sense. The final drawing should not be damaged. Do not place pieces of the same size next to each other. Too different formats are also not “class”; there should be differences, but within reasonable limits.
Countertop cladding

If the countertop is made of wood, clean it of paint with acetone or special removers. Then go through the sandpaper twice, first with a coarse abrasive, then with a fine one. These manipulations are necessary to increase adhesion; do not start mosaic without preparation.
How ? A different installation scheme is required here:
- Start from the edges, gradually moving towards the center;
- Compact the canvas as much as possible;
- Remove the glue immediately high density implies large number seams; cleaning at the end will lead to unnecessary waste of time.
Video master class on decorating countertops with mosaics:

Grouting joints
This applies to both floors and walls and countertops. Grouting can be done no earlier than one day after finishing the cladding. The mosaic should dry evenly. If the room temperature is too high, cover the canvas with a damp cloth. Before jointing, remove any remaining adhesive and wipe the mosaic with a damp cloth. To work you will need a rubber spatula.
Transparent grout based on epoxy resin with chameleon effect (). It will adjust to the color of each piece. Cement mixture It is much inferior to epoxy in strength and can literally fall apart.

Apply the fugu rubber grater, driving it tightly into the spaces between the pieces. Remove any residue with a damp foam sponge. Epoxy mixtures must be washed off with copious amounts of water, and plaque must be removed with special detergents(Litonet gel, Sopro ESE 548). 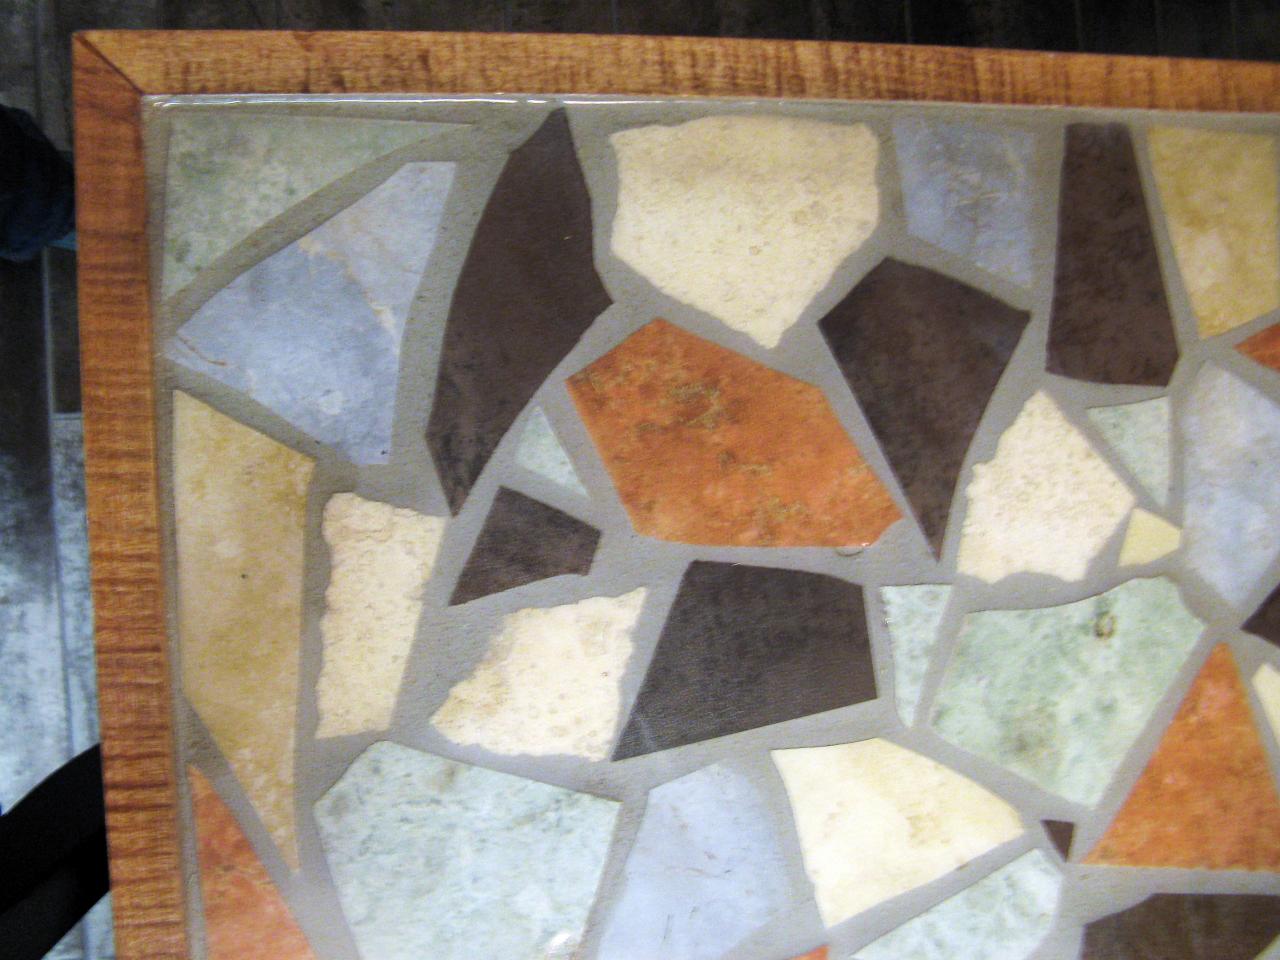

Well, now you know how to make a mosaic at home. We hope that the master class served as a starting point. Remember that mosaic requires regular maintenance. Do not wipe it with substances containing phosphoric acid. Use products with a low percentage of acidity, but even after using them, wipe the mosaic with a cloth and water.
Don't get hung up on tiles, train your imagination and use unusual and interesting objects.
comments powered by HyperComments