Remove plastic window. How to remove a plastic window (double-glazed window) and its sash - instructions. Cases of necessary replacement of the mechanism
The use of groove insulation in the insulation of wooden windows is more efficient and cheaper than any other methods. This method is called Swedish technology, it is the most budgetary, not labor-intensive, and anyone can do the work of repairing and insulating windows.
Your attention is presented step by step photo and video instructions for self-repair wooden windows using Swedish technology.
Photo-instruction for insulation and repair of wooden windows
Step 1. Remove the wooden window from the hinges
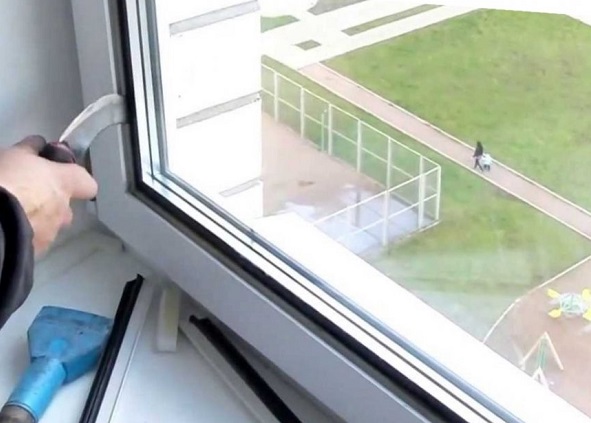
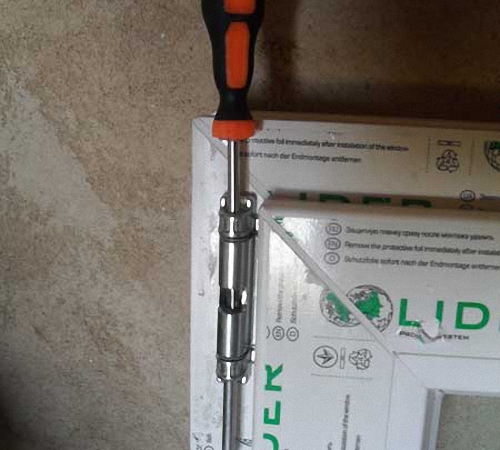
Take the window off its hinges. Close the door to the "closed" state, but only close, and do not close to the very end. If there is a cap on the axial cylinder of the hinges, it must be removed. Next, you will need a screwdriver and a hammer and tap this axial cylinder with them (substituting the tip of the screwdriver under the cap and tapping with a hammer from bottom to top to pull the cylinder out of the loop). First you need to tap the cylinder of the lower hinge, then the upper one. The window must be held at this moment. At the end of the operation, the window can be easily removed.

Step 2. We seal the glass with silicone sealant
If you have a double-glazed window (two glasses - inner and outer), then first you need to separate the two parts of the window. To do this, it is enough to unscrew two screws located in the same vertical plane with the window handle / handles.
In the case of a double-glazed window, only glass with inside double-glazed window. If there is only one glass in the window, then we seal it from the outside. Starting at the top corner of the glass and even layer we pass along the entire perimeter of the glass.

Step 3. Installing the profile interframe seal
We need an inter-frame seal made in Sweden (profile D, it white color, its price is around 17-20 rubles). It is laid along the entire perimeter of the frame and will provide additional noise and heat insulation.

Step 4. Leveling the surfaces of window and balcony door sashes for perfect closing/opening
If the door/window closes with a creak and friction, then it is necessary to cut off those parts that protrude outward. The easiest way to do this electric planer. But you can also use manual tools (with a knife or even coarse-grained sandpaper).

Step 5. Installing a groove seal using Swedish technology
In the sash, the groove is milled first in the upper rebate and up to the middle of the sides. Then, for convenience, the sash is turned over 180 degrees by the side closest to you, not yet milled, and the operation is repeated.

The underwindow sash is milled only on three sides, all other types of sashes are milled on all four sides.
Groove seal installed

Hi all! A friend calls me unexpectedly and asks how to pull a double-glazed window out of plastic window.
I ask him what happened, why he didn't call me.
He says that the matter is urgent: the wife decided to wash the windows, but there are no sashes in them, the developer did not provide, so they need to be removed.
I had to explain over the phone how to do it. Then, however, he suggested simply replacing the window with a casement window.
But if you are in similar situation, I recommend you check out useful information indicated below.
A large window area is occupied by a double-glazed window - about 80% of the window structure and is its most vulnerable part. Sometimes situations arise when you need to remove a double-glazed window from a plastic window.
Quite often, such a need arises when you decide to replace your double-glazed window with a better one, for example, with large quantity cameras or using energy-saving glasses, etc.
Also, the need to replace a double-glazed window arises when a double-glazed window cracks, breaks, or loses its tightness due to illiterate installation.
Perhaps you need to finish the outer slopes after the time has elapsed after installing the window, and there is no access from the street and there are blank windows, then you will also need to remove the double-glazed window from the plastic window. It is worth saying that this process is not quite complicated, but it requires certain knowledge.
If you are confident in your abilities and want to avoid additional material costs for calling a master, our article will help you figure out how a double-glazed window is held in the frame and how it can be removed from it.
How is the double glazing held in the frame?
The double-glazed window is held in the window frame with the help of glazing beads; this method of fastening was also used in old wooden structures.
Beads, as well as window profile, made of PVC, and inserted into the frame in the plane of the glass. You must take into account the position of the glazing beads so as not to damage the window during the process of removing the double-glazed window.
Required Tools
In order to independently remove the double-glazed window from the plastic window, you will need:
- protective gloves to avoid possible cuts;
- screwdriver;
- putty knife;
- sharp knife;
- rubber suction cups.
Instruction
If you need to remove a double-glazed window from the sash of a plastic window, then first you need to remove the sash itself. To do this, pull the retaining rod out of the top hinge and now detach the sash from the window frame.
Lower the sash and gently lean against the wall. Now let's move on to the glazing.
Attention! Be careful and careful not to accidentally leave scratches on the window profile.
- Take a knife or spatula and stick to the vertical seam between window frame and bead.
- Now gently pry the bead and slide it.
- Repeat this action along the entire length of the glazing bead.
- Carefully remove the glazing bead from the frame, moving parallel to the glass.
- Remove the lower horizontal bead in the same way, then the second vertical one, and finally proceed to the upper horizontal one.
- When you remove the top bead, be sure to hold the double-glazed window with your hands.
- After all the glazing beads have been removed, it is necessary to remove the double-glazed window from the frame.
- You can use rubber suction cups.
- If there are none, then you can do it with your hands, be sure to wear gloves for protection.
- Gently pick up the upper edge of the double-glazed window with your finger, and then tip the double-glazed window towards you, move your hands and sides take the glass pane.
Note!
Double-glazed windows big size it is worth extracting only with an assistant. While you are removing the glazing beads, the assistant must secure the double-glazed window from falling.
How to remove glass from a double-glazed window?
A double-glazed window usually consists of two or three glasses. In order to remove the glass from the double-glazed window, it is necessary to carefully cut the top layer of sealant with a knife. Now carefully remove all layers of sealant and get to the aluminum frame of the double-glazed window and remove the glass.
Installation of a double-glazed window
Now let's talk about installing a double-glazed window back to window frame. Before installing a double-glazed window, you must make sure that there is no dirt and dust in the opening on the frame folds.
Unlike dismantling a double-glazed window, when installing it, short horizontal glazing beads are first hammered, and then proceed to the side vertical ones.
To do this, manually insert the bead shank into the bead groove of the frame. Using a rubber mallet, fully insert the glazing bead into the groove, apply medium-strength blows.
Having installed all the glazing beads, you can begin to restore order. Wipe down new glass. If there are small scratches on the frame and glazing bead, clean them with a fine emery cloth.
Removing a double-glazed window from a plastic window, as you can see, is quite simple, without resorting to the help of a specialist.
Note!
It is important to understand that a double-glazed window is the most fragile and vulnerable part of a window, and such actions should be performed only when absolutely necessary and with full confidence in knowing the features of the process.
source: http://okna-prof-donetsk.ru
Modern plastic windows are a rather complex technical design.
A double-glazed window is the most vulnerable part of a plastic window, which often fails.
At first glance, it seems strong and reliable, but it is quite fragile and should be treated with the most careful way.
Glass is protected by all sorts of protective films and coatings, but it can easily break or crack.
To replace a worn or broken double-glazed window, many resort to the help of window repair specialists.
But if you strictly follow all the rules, then it is quite possible to perform this procedure yourself. Basically, the need to replace old double-glazed windows arises when you want to replace them with more advanced ones, with an increased number of sealed chambers or with improved sound and heat insulation properties.
However, it also happens that, through negligence, a double-glazed window breaks, cracks or becomes unusable (tightness is lost). It is not necessary to change all window construction, it is enough to replace a single double-glazed window.
Of course, it is better not to take risks and order the replacement of a double-glazed window of a plastic window by specialists with sufficient experience. They will be able to quickly and efficiently install in short time new double-glazed windows in your windows.
However, the cost of such work, which depends on the complexity of the process, the delivery distance of new double-glazed windows, the urgency of the order, the size, configuration of the double-glazed window itself, and other factors, leaves much to be desired.
Specialists from the company who are engaged in the production and repair of plastic windows, first of all, must make all the necessary measurements of the double-glazed window using a special measuring tool.
Double-glazed windows are made in special workshops, after which they are delivered in finished form by specialized transport to the desired facility.
Then the old one is dismantled and the new double-glazed window is installed in plastic window. In rare cases, you can replace the glass of a plastic window yourself.
Of course, you cannot make a double-glazed window with your own hands, so you should carefully measure all the parameters and dimensions of the window, and then order a double-glazed window from a company that manufactures them.
Useful advice!
As soon as your order is completed and delivered, you need to start the process of replacing the double-glazed window.
Metal-plastic windows can be installed using special mounting plates with a through, through the frame, fastening of the window unit to the walls, but many people who decide to install them on their own are scared by the question of how to remove the double-glazed window without having a special tool.
source: http://estroyka.com
What tools might be needed?
It is possible to install metal-plastic windows with the help of mounting plates, and with a through, through the frame, fastening of the window unit to the walls.
The practice of our craftsmen shows that of all available tools, the ax is the most convenient, due to the length of the handle, because. this greatly simplifies the work. If you come across a window made of soft plastic, feel free to use a spatula with a hard handle.
Professional installers of metal-plastic windows, in addition to a puncher and other tools, in order to remove the glazing bead from a plastic window, must have a special hammer and spatula, as well as suction cups.
But buying these devices for installing just a few windows is quite expensive, unless you want to install large windows. In order to remove the bead, we will use an improvised tool - a knife and a hammer.
The blade of the knife should be thick enough and, if possible, without a sharp tip. You can laugh, but the shape of a table knife is very similar to the shape of a spatula for dismantling plastic glazing beads. You can also use a chisel. The main requirement is not to damage the surface of the metal-plastic window, since you can’t paint over it later.
At work you will need:
- screwdriver
- putty knife
- sharp knife
- rubber suction cups
- protective gloves
source:
http://prorabsovet.com
If it is necessary not only to remove the double-glazed window from the frame, but also to disassemble it, then proceed with dismantling. Usually a double-glazed window consists of two or three glasses. During manufacture, a moisture absorber is poured into a special frame.
Using a sharp knife, it is necessary to cut the top layer of sealant. All actions must be careful not to damage the glass, because it can crack if the knife is pushed deep.
Carefully remove the sealant layer by layer so you can get to the aluminum frame. At this stage, the disassembly is almost complete. If necessary, repeat all the steps with other window sashes.
But, remember, to assemble a double-glazed window, you may need special equipment, therefore, all actions must be deliberate, unhurried, accurate, so as not to damage any part of the disassembled window.
Note!
Note that the network is full of proposals for replacing the ax with wide spatula with hard handle. They say it is safer and it is impossible to damage the double-glazed window. Trust us it's a lie clean water. We want to say that a spatula cannot, by definition, always be suitable for these purposes.
It can be suitable in an exceptional case - if we have a soft window profile in front of us, i.e. from soft plastic. However, as we can see, most windows are made of hard plastic.
source: http://www.all-4-home.ru

Part of the design of any plastic window is a double-glazed window.
There are times when it is necessary to disassemble the window for the purpose of repair, adjustment or preventive maintenance.
If this is the first time you have encountered such a problem, then you will have a question “how to remove a double-glazed window?”.
At first glance, this seems difficult, but if you follow a small instruction and adhere to some rules, it will turn out that this task is so difficult.
To remove the double-glazed window, it is necessary to disassemble the plastic window, dismantle it. To do this, pull out the retaining rod from the upper hinge, then you need to disconnect the window sash from the window opening.
Useful advice!
When doing this, be careful, as the window can be quite heavy. Lower the removed sash to the floor, carefully and securely leaning against the wall.
Engage in the dismantling of window sash fittings. To do this, unscrew the handle, unscrew all the screws. To remove the parts of the locking device, a screwdriver is useful. All removed elements, fasteners and accessories, fold in a separate place so as not to lose a single detail.
Insert the tool into the gap between the glazing bead and the window and carefully remove it. Do the same with the rest of the glazing beads.
source:
http://otdelkavnutri.ru

Blind plastic window
If you have a blind plastic window, then sooner or later there may be a reason to remove the double-glazed window, for example, to paint the ebb or slope from the outside, or to repair these very slopes.
To remove the double-glazed window, we need a hammer (wooden or plastic) and a sharp chisel.
In principle, you can use an iron hammer, but you need to be extra careful because. window glass and an iron hammer are not compatible - there is a risk of ruining the entire window.
Instruction:
- After we have armed ourselves, we need to start removing the glazing bead. A glazing bead is such a long bar along the perimeter of a double-glazed window, this bar holds the double-glazed window.
- We insert the chisel between the frame and the glazing bead and with light blows knock out the glazing bead to the center of the double-glazed window. It is better to start with one of the vertical glazing beads, the chisel must be inserted so that the glazing bead is bent and it can be pulled out.
- The main thing is to pull out one glazing bead, the rest will be easier. they can be picked up at the corners.
- Attention! The top glazing bead should be removed last! After all, the double-glazed window on top, except for it, does not hold on to anything, it can simply fall out on your head.
- After the glazing beads have been removed, we take out the double-glazed window and carefully place it against the wall, after which you can deal with slopes with low tides or whatever you want there.
- Under the double-glazed windows you will see plastic plates on black or gray inserts, when you insert the double-glazed unit back, do not forget to position them as they were at the beginning.
- When you put a double-glazed window into the frame, start hammering in the glazing beads, first the top, then the bottom and then the side ones, it is clear that you should hammer in carefully, this is not a nail and you don’t need much effort here.
We take out the double-glazed window with an ax
How to remove a double-glazed window from a frame - this question torments not a single dozen buyers of plastic windows. Now we will show you how to remove a double-glazed window from a plastic window frame.
Since we will extract it with our own hands, we do not have special tools available, so we will do it with an ax. We begin to dismantle the double-glazed window.
- The first step is to start gently inserting our ax into the opening between plastic frame and bead.
- Then, with a slight movement of the hands, we should gradually press on the handle so that the tip of the ax enters the gap between the frame by about 1-1.5 mm, this will be enough.
- Next, we need to slightly turn the handle of the ax and snap off the glazing bead. When you hear a click, don't panic. You did everything right.
- Now we need to hook the glazing bead in three or four places in order to completely release it from the grooves of engagement with the frame and remove it.
- Let's imagine that we are just standing in front of the window, that is, our eyes are directed to the window opening from the front, then the glazing bead should be inserted into the window frame from the side, moving towards the window.
- It is not difficult to assume that we will extract our glazing bead in the same plane. Thus, we absolutely do not need to pull the glazing bead towards us, standing in front of the plastic window, because. it won't do us any good.
- You need to get it by shifting in the lateral direction, otherwise it will definitely not come out of the window frame.
- Therefore, after our blade is now where it should be, you need to press the ax hard enough and turn its handle to the side.
- Do not forget that the ax should go a little deeper and push the bead 1-1.5 mm away from the frame.
- It is with this method that the bead is most easily separated from the window frame, especially when it comes to the first bead. It is not difficult to guess that it is the first glazing bead that is most difficult to pull out, because. the latches in the frame are quite tight.
- Well, now it's up to the small. After we have removed the first glazing bead, our work will boil more actively.
Note that the topmost glazing bead must be removed strictly in last turn, otherwise you risk that the double-glazed window can easily fall out of the window and break. When removing a double-glazed window, be sure to hold it with one hand, or even better, ask a friend for help.
Note!
We draw your precious attention to the fact that the blade must be used as flat as possible (NOT as sharp as possible), and not rounded, as you see in our picture on the left.
In no case should the blade be sharpened like a knife, otherwise it will scratch the edges of the window frame very strongly, leaving behind ugly notches. Therefore, it is necessary to optimally choose from axes something in between. You can not take something too sharp, and something too blunt.
We take out a double-glazed window with a chisel and a hammer
There are many reasons why people need to remove double glazing. Maybe you want to paint the tide, but your window is deaf, and you don’t live on the ground floor at all. Removing a double-glazed window on your own, despite the apparent complexity, is quite realistic.
To do this, stock up on a sharp chisel and a hammer. It is best to take not an iron hammer, but a wooden or plastic one, because it will work iron tools glass is dangerous. However, this is not such a big problem if you are careful not to accidentally damage the glass.
So, you took a chisel and a hammer:
- Now you need to remove the glazing bead that holds the double-glazed window. It can be seen along the perimeter of the double-glazed window.
- A chisel must be inserted between the frame and the glazing bead.
- Now start lightly hitting the chisel to knock the glazing bead into the center of the pane. You should start with a vertical bead.
- Insert a chisel into its center so that the glazing bead bends so you can pull it out. Then you need to remove all other glazing beads around the perimeter of the window.
- Important! You can insert the chisel already from the edge of the glazing bead, however, the top glazing bead must be removed last, because this way you will control the double-glazed window so that it does not fall on your head.
- When the glazing bead is removed, you need to carefully take the double-glazed window and put it against the wall, and move on to repairing or painting the outer slope, low tide, or whatever you want to do.
- Under the double-glazed window, you will notice colored plastic plates that lie on inserts of black or gray color when you insert a double-glazed window, then you need to remember to put them in place.
When inserting the double-glazed window back, you should start hammering the glazing bead, but in reverse order. You put the top bead first, and then the bottom. - After that, put the side glazing beads (due to greater length they are easier to bend), just need to be hammered in carefully, which is why I was talking about hammers, since when hammering a glazing bead, the hammer is very close to the glass.
- When removing double-glazed windows, do not forget to number all the glazing beads, they will each have to stand in their place, so do not confuse.
- All glazing beads during the manufacture of the window are measured with a ruler according to the location, so if you install the glazing bead in some other place, then it simply will not hold the double-glazed window.
- Even if the glazing beads look the same, for example, from above and below, it can still differ in length by at least a few millimeters. Remember that even a difference of 2 mm will be noticeable at the junction of the glazing beads.
- When the window frame is installed in the opening, it rests with its entire mass on the bearing pads installed under it. In no case should the dowels take over the entire mass of the window, the window itself is very heavy 120-150 kg, and no bolts in the wall can hold it, in short, support in the form of load-bearing blocks is required during installation.
- Blocks should be placed at the corners of the frame and at the location of vertical partitions (mullions).
- When setting the window vertically, use a plumb bob with a sharp tip and axial symmetry. Using a level bar in this case would be a mistake. with its help, accuracy can be measured only conditionally.
- When setting the frame horizontally, for the same reason, a water level from a durable and transparent hose is best suited, the principle of its operation is not difficult to find on the Internet. This level is well suited when you need to install several windows at the same height.
- It is very important to ensure that water does not enter the central chamber through the mounting holes during installation. In fact, in any profile there is the possibility of water drainage, because. it will still seep through the seal.
- But when it comes to the initial installation, water can accumulate in the groove above the center chamber of the frame, and in this chamber is the metal frame.
- Because this water got during installation, and not in a natural way, then it can flow into the attachment points of the impost with the frame, or into the holes of the self-tapping screws. All this is very bad. such water can remain in a sealed double-glazed window for a long time.
- For prevention, you can drill several holes from the bottom end through which moisture can be removed, but there is nothing good in this. additional holes in the frame are not needed, although this is of course better than freezing.
- It is not necessary to tighten the fixing screws too much, if at least one of the screws is pinched, the window may take on a barrel-shaped appearance. Therefore, after fixing the frame, it is necessary to check the window levels again.
- After completion of the installation work, it is necessary to remove the protective film, which is located on PVC profile. This must be done immediately after installing the window.
- Do not think that if there is a protective film on the window, then the window will serve you longer, in fact, it is intended only for installation, so as not to scratch or stain the profile and for long-term use it is not intended - the film quickly loses its properties and literally grows together with the profile, after which it will be impossible to tear it off.
- To get rid of the sealant completely in wooden windows when replacing a double-glazed window, a chisel is needed on the glazing beads, a construction knife is sharp with a wide and not long blade, the skin is larger and the skin is zero.
- At first, with a chisel, you roughly remove the old sealant, then cut off what remains with a knife, then what remains with a large skin, well, there is almost nothing left, zero. To make it easier to work with a rough skin, wrap it in wooden block and then the surface will be flat and wide.
- Do not hold the glazing bead on weight, as it is fragile and can crack, put it on a comfortable surface so that it does not slip.
- When applying a new sealant and inserting a double-glazed window, be sure to degrease the surface of the glazing bead and double-glazed window at the place of application.
Sooner or later, the question arises of the need to dismantle the old double-glazed window. According to experts, this is one of the most time-consuming work, surpassing the process of installing new windows in its complexity. Therefore, you need to know all the features of dismantling and the subtleties, which will be discussed later.
In what cases will it be necessary to dismantle plastic windows?
Plastic windows are so popular, not least because of their durability. Their service life is up to 50 years, so the issue of dismantling and replacing is more important either in the desire to install a new double-glazed window with better heat-shielding and energy-saving characteristics, or in case of mechanical damage to the window frame or glass. The question of how to remove a plastic window is more in what particular stages of work must be performed.

Preparation for dismantling a plastic window
Dismantling a plastic window requires preliminary preparation. It means:
- freeing the premises from household items and equipment,
- furniture insulation protective film to protect it from damage and dust,
- floor and wall insulation.
With any dismantling, no matter how carefully it is carried out, a sufficient amount of construction dust is formed. To hide flooring at the place of work, it makes sense to purchase dense construction polyethylene.
The second important aspect during dismantling is to ensure safety, so it is important to protect and mark the place where the work will be carried out. Outside, a marking tape is stretched to inform bystanders about the possible collapse of stones or other construction debris. It is necessary to exclude the possibility of accidental elements of the window frame falling out into the street in order to avoid dangerous situations.
What tool is required to dismantle the plastic window?
After the preparation has been made, it is necessary to stock up on a tool for the work. In order to remove the double-glazed window of a plastic window, you will need the following:
- shoemaker's or multifunctional knife with a folding blade,
- chisel,
- screwdrivers,
- putty knife,
- a pair of crowbars small size, which are used as levers,
- hacksaw for plastic and metal,
- pliers,
- hammer and chisel.

In the event that there is a puncher and a screwdriver, this will significantly speed up the dismantling process.
Stages of work on the dismantling of a plastic window
It makes sense to divide all the work into several points:
- removal of window sashes,
- cutting structure,
- dismantling of the old window frame,
- drain removal,
- window sill removal
- finishing work.
Since the double-glazed window itself is quite advisable to be reused, the method will be further considered. safe removal glass from window sashes.

Removing window sashes
Each of the stages is important in its own way. For example, without removing the old sash, it will be extremely difficult to install a new window. You need to know how to remove the window sash and what is required for this.
To remove the sash, you need to arm yourself with a chisel or a large flat screwdriver, a hammer and pliers. The work consists of the following stages:
- The window sash is exposed in open position. At the same time, attention is drawn to upper part window, at the junction where the loop passes. That is what needs to be removed.
- Using a small Phillips screwdriver and a hammer, the rotary shaft, which is also called the spindle, is carefully knocked out of the loop.
- After the spindle has been knocked out, the window sash is pulled towards itself and upwards, gradually releasing it from the fasteners.
In cases where established slope makes it difficult to put a screwdriver and knock out the spindle from above, the spindle is pulled out with the help of pliers from below. First, you need to apply a little effort on top of it to grab the protruding part with pliers.

The sash is installed back into the frame in the reverse order, when the lower hinge is put on the spindle, then the upper one is aligned and another spindle is inserted into it, after which the sash is fixed. If he enters with considerable effort, then you should use a hammer. In order not to damage the coating on the surface, you need to use an intermediate gasket, the role of which can be played by a thin piece of plywood, which is already being hit with a hammer. This solution will allow you to evenly distribute the load over the entire surface.
Sawing the window frame construction
Next, you will have to make several cuts in the double-glazed window in order to facilitate the process of removing the panels. This step will take a little time for the reason that all cuts must be made manually, using plastic hacksaws or a simple wood saw. It is not advisable to use a grinder, because in this case the working area will be heavily clogged with small particles and smoky. In addition, simple discs for metal or wood periodically jam in the material, or even crack - which will cause injury.
Two cuts are made along the width of the window frame, three cuts along the height, after which they proceed to the next stage of work.
Dismantling the old window frame
Cuts are necessary to make it easier to dismantle the old window frame in parts using improvised means like a crowbar, or with a puncher with a spatula nozzle.
If the window frame structure was fixed in place with bolts or self-tapping screws, then they are simply unscrewed from the grooves and the frame parts are removed.

The mounting foam at the junction of the frame with the wall is best cut around the entire perimeter with a shoe knife, after which the frame is cut in parts.
In some variations, plastic windows are installed in wooden frames. This cannot be called expedient, and when dismantling the window, such a frame must also be removed.
Removing the tide
It is necessary to dismantle the ebb carefully so as not to damage the remaining elements of the window opening. Force is applied to the ebb itself, tearing it away from the surface of the opening and the applied sealant, which is more often used as mounting foam. In the event that the ebb was additionally fixed with self-tapping screws or bolts, they must first be removed and only after that, with the help of brute force, direct removal should be carried out.
Removing the window sill
The process of removing the old window sill depends on the material from which it is made. As a rule, plastic windows are installed complete with PVC sills and window sills, since they have a number of advantages, such as:
- light weight,
- significant service life up to 20 years,
- have self-extinguishing properties and do not support combustion,
- resistant to impact sun rays,
- ease of cleaning and maintenance.
They need to be dismantled by analogy with the ebb.
In the case of wooden window sills, they must be filed in several places with a hacksaw and then removed by hand or with a crowbar.

If the window sill is made of concrete, then it will have to be broken into pieces using a puncher set to the chipper mode, or manual labor: hammer, chisel or crowbar. If there is a grinder with a circle on concrete, then this will be the most fast way, but in this case, it must be borne in mind that when cutting a concrete surface, a significant amount of construction dust will form. Therefore, after each cut, it is necessary to sweep away the resulting debris with a broom. In addition, when working with a grinder, you need to remember about the means of protection:
- respirator to protect the respiratory tract from airborne dust,
- protective glasses with polycarbonate glass, resistant to mechanical damage and ingress of particles into the lenses,
- construction gloves to protect hands.
It often happens that the concrete window sill has been preserved in excellent condition and the owners do not have a desire to replace it. Dismantling old plastic windows or installing new double-glazed windows does not oblige you to change the window sill, but in this case you need to know that plastic and concrete do not mix well for the following reasons:
- Plastic products have a higher heat capacity, they are much warmer than concrete products, which leads to the formation of condensate.
- The presence of an old window sill forms a gap between it and the installed plastic window. Despite the seal, over time, microcracks will appear in the structure.
To solve this problem, concrete window sills are often tiled. If there is a special desire to give a simple design decoration, then concrete surface decorate with ceramic mosaics, often using mosaics different shades. The use of glass will give the old window sill a beautiful and artistic view, and the glare from the sun's rays will bring additional comfort.

Finishing work
Any construction work characterized by the fact that a significant amount of construction debris is formed, especially if you use a grinder. Small particles of dust can firmly eat into the surface of the furniture, so it is highly desirable to carry out timely cleaning of construction debris after each action. Large particles and pieces of concrete are swept away with a broom, and construction foam requires complete removal shoemaker's knife and chisel.
It is advisable to leave a protective film made of dense construction polyethylene until a new one is installed in place of the old plastic window.
Removing glass from windows
In the event of a situation with glass damage, it is not necessary to change the entire sash. Of course, sellers are not interested in selling one double-glazed window, but the replacement itself is possible. In addition, sometimes the need for replacement arises not in case of damage to the glass, but in the desire to install a new double-glazed window that has the best properties, or having more cameras.
In this case, the stages of work are conditionally divided into the following:
- First, the glazing beads are removed from the window sash, inserting gaskets made of plastic or other improvised material into the slots that appear. It is important to know that the glazing beads are removed in the following sequence: first, the long side ones are removed, then the short bottom one, and finally the top one is removed. Work must be carried out in this sequence in order to prevent the possibility of premature loss of glass.
- The fixing points of the glazing beads must be marked with a marker so that after installing a new double-glazed window they can be returned to the same position.
- Next, the double-glazed window is removed from the glass. It must be remembered that it has a significant weight, so all work is carried out together with an assistant and with gloves.
- A new double-glazed window is installed in place of the old one, and the position is fixed.
- Beads are installed in reverse order, starting from the top, then the bottom is inserted, and after that the side ones. The glazing beads provide good insulation, so no further sealing is required. It should be noted that the glazing beads are driven into their original place, using either a rubber mallet or flat chisel and an ordinary hammer. Applying significant force is not required so as not to damage the glazing bead or glass.

It will take specialists no more than 30 minutes to replace the old double-glazed window with a new one, so this work, with due care, will not become laborious. How to remove a plastic window, the video below will demonstrate clearly.
To repair PVC windows, remove a double-glazed window, it may be necessary to carry out a sash removal procedure. During the removal of the sash, it is possible to damage the double-glazed window, therefore it is recommended to carry out the operation according to the instructions.
Video: How to remove the window sash yourself
Instructions for removing the pvc window sash
1. Open the sash, making sure to window hinges Free access.
2. Remove the spindle from the top hinge. What does that require?
- With the help of a solid object, it is necessary to press on the window hinges;
- The tip of the spindle that comes out of the loop must be pulled out with pliers;
- To remove, lift the sash up.
3. The sash must be carefully placed against the wall so as not to damage the double-glazed window.
4. To install the sash in place, perform all the manipulations in reverse order:
- Put the lower loop on the spindle shaft;
- Aligning the upper loop, insert the shaft into place;
- Check the reliability of the hinges.
Do-it-yourself dismantling of plastic windows
In this article we will talk about the so-called "dismantling with preservation".
That is, we need not only to dismantle plastic windows, but also not to damage the removed windows.
We will not specify why this is necessary, we will take it for granted.
So - the dismantling of the plastic window, with preservation.
First, prepare the adjacent space: remove near standing furniture, carpets and other things that can interfere with us.
What is not removed, it is desirable to cover with a film, from dust.
We remove the shutters.
Option one - adjustable hinges.
First, take off the hinges decorative overlays. Then you need to separate the halves of the upper loop.
To do this, remove the connecting rod by pressing it with a screwdriver
and pulling out the tip with pliers.
Then we open the sash, holding it and, lifting it up, remove it from the bottom hinge.
Option two - unregulated loops.
We knock out the pins from the hinges with anything, only from below, and remove the sash.
Now we need to remove double-glazed windows from the windows. To do this, we need a small spatula, preferably with rounded corners.
We take off the pins. Carefully insert the corner of the spatula into the gap between the glazing bead and the frame, approximately in the middle of the opening, then press the entire front edge of the glazing bead.
Pressing down - up (if side, then left-right), we squeeze out the glazing bead from the mounting groove.
Plastic hinge for windows: rules of operation and care
So we pass along the entire glazing bead until we get a gap sufficient to capture the glazing bead with our fingers.
We remove the glazing bead from the landing groove.
We repeat the procedure with the rest.
When removing the last, upper, hold the glass so that it does not fall on you. Otherwise, you are threatened with a tram and replacement of a double-glazed window.
Carefully remove the double-glazed window from the frame.
Now we remove the slopes.
If they are overhead, decorative, we dismantle them,
if plaster, you have to sweat ....
With a thin chisel (better, of course, a perforator), we begin to carefully chip off pieces of plaster, trying not to damage the frame itself.
In order to facilitate the process, you can make cuts with an impeller (grinder) next to the frame, or drill a series of holes with a drill bit and start from them.
When the entire frame is free of slopes, remove the window sill.
As a rule, window sills are mounted on mounting foam, so it needs to be sharply undermined and then pulled out from under the window.
But, it happens that the window sill is pulled to the frame, through the bead groove, with self-tapping screws.
If so, then unscrew them.
Now we dismantle the ebb, from the side of the street.
We unscrew the screws, remove the caps from the drainage holes and tear off the ebb from the frame.
Mounting plates can simply be cut with metal shears, or you can remove the dowels and use these plates in the future.
There may be anchor bolts inside the frame,
which need to be unscrewed, and the anchors themselves to be pulled out of the wall.
Now we remove the mounting foam, vapor barrier and clean the entire gap between the frame and the opening.
Of course, it is more convenient (and safer!) to dismantle plastic windows with a partner.
In the event that you dismantle plastic windows with your own hands without an assistant, it makes sense to remove the wedges last.
If there were no wedges, leave one attachment point until the foam and vapor barrier are removed.
Then the frame will not fall on you at the most unexpected moment.
Well, in the end - we take out the frame from the opening.
If everything is done thoughtfully and carefully, the window can be kept intact.
I would be grateful if you use the buttons:
 Modern windows are made of polyvinyl chloride (PVC).
They are not at all like classic wooden frames, because the frames are hollow inside, consisting of cells. In the context of a PVC window frame, it looks like a profile belonging to one of three classes: economy, standard, premium.
In the economy class, the partitions between the cells are thin, they freeze through, so they are good in a warm climate. Premium class - expensive at the expense additional options who need few. Hence the conclusion: class-standard windows is the best option. At least that's what the experts think.

The more cameras in the frame profile, the better the window

This is how a metal-plastic window is arranged
The installation of both of them, due to their "plasticity", is traditionally considered the lot of specialists.
In fact, it's the other way around. Both plastic and metal-plastic windows are much easier to install than classic wooden ones. As true consumer goods, they do not require special knowledge. It is enough to learn a number of rules, and the installation of such a window will not be a problem. A medium-sized PVC window, with the dismantling of the old one, is installed by professionals in less than an hour. You will spend three to four hours, because you will constantly check your actions with the instructions below.
window design
To understand what is at stake in the description of the installation process, you need to know the name of each component of the structure.

You must know the names of the elements of the plastic window
The window consists of:
- Frames.
This is the base of the window.
- If the window consists of several parts, the frame is divided into parts by an impost - a vertical component. If the window is in two parts, there is one impost, If out of three - two, etc.
- The opening part of the window is called the sash, the fixed part is called the capercaillie. A double-glazed window is inserted into them - two, three or more glasses, hermetically fastened together.
A foil tape is laid between the glasses, providing tightness. There are double-glazed windows with special properties: with reinforced glass, tinted and energy efficient, which, according to manufacturers, reduces heat loss through windows. There are also double-glazed windows, between the glasses of which an inert gas is pumped. It also reduces heat loss.
- Double-glazed windows are pressed against the frame with a cap - thin plastic bar. The tightness of the connection is ensured by a rubber seal (usually black).
- Locking fittings are installed on the sashes.
This is a specific set of mechanisms that provide opening and locking. They can be different, as they provide different functionality: opening, opening with ventilation, opening + ventilation + micro-ventilation.
- To ensure tightness, rubber seals are installed on all parts - the frame, impost and sashes.
Below on the outer side of the frame (the one that faces the street) there is drainage holes which are closed with special caps.
Through them, the condensate that forms inside due to the temperature difference in the street and in the room is discharged to the street.

drainage holes
Another window has a low tide - a board outside, diverting precipitation and a window sill inside. The side and upper parts from the side of the street and the premises are closed with slopes.
They can also be made of plastic or made using a different technology.
How to measure a plastic window
When ordering windows, you will need six sizes: the height and width of the window, the length and width of the window sill and slope. In order to measure everything correctly, it is necessary to determine whether you have made a window opening with a quarter or without.

Opening with a quarter (quarter) and without
We look at the opening.
If the outer part of the window is narrower, an opening with a quarter. In this case, we measure at the narrowest point: openings rarely have ideal geometry, so you will have to measure at several points. We find the smallest value, add 3 cm to it. We pass the height as it is.
If the opening is even, the calculation is different. We measure the width and height. We subtract 3 cm from the measured width, 5 cm from the height.
This will be the height and width of your window. We remove 3 cm in width, since a gap of at least 1.5 cm is required on both sides for mounting foam. We subtract 5 cm in height, since all the same 1.5 cm are needed from above, and 3.5 cm from below will go to install the window sill.
The length of the window sill and the ebb is taken with a margin - 5-10 cm more than the width of the window opening. During installation, both the ebb and the window sill are “drowned” a little into the adjacent walls, and the excess will go there. The width of the ebbs is standard, so the nearest larger one is selected.
On window sills, the situation is different. Its width is chosen arbitrarily - at the request of the owner. Someone likes wide ones - so that you can put something, someone prefers flush with the wall. So there are no rules here.
Even when ordering, you will need to specify how many and what parts will be in your window: whether or not there is a capercaillie, where it is located, how many sashes, which side they are on, how they should open.
You will need to specify the type of fittings (ventilation, micro-ventilation).
Preparing the opening for installation
If you change windows, do-it-yourself installation of plastic windows begins with the dismantling of the old one. There are usually no problems. Breaking is not building. After dismantling, it is necessary to revise the opening: remove everything that can fall off. If there are any protruding parts, they must be removed - with a hammer, chisel or power tool.
When the plane is leveled, it is necessary to remove the entire construction garbage. Ideally, sweep everything up to the dust, otherwise the foam will not “grab” with the wall during installation.

If there are too large potholes or cavities, it is better to cover them with cement mortar.
The smoother the opening, the it will be easier mounting. With loose wall material, they can be treated with binders: penetrating adhesive primers.
Installation Methods
There are two different methods: with and without unpacking (disassembling) the window. When unpacking, holes are drilled through the frame, through which an anchor is driven into the wall. This method is more difficult, but the mount is more reliable.

Anchor bolts put three pieces on each side
When installed without unpacking, metal plates are attached to the frame from the outside, and then they are attached to the walls.
This, of course, is faster, but the fastening is unreliable: with significant wind loads, the frame will warp or it will sag.
Installation with unpacking
Do-it-yourself installation of plastic windows begins with measurements. Measure the frame and window opening, make sure they are compatible.
Then you can get to work:
1 Remove the window sash:
- Close the window (handle turned down).
- We remove the plastic lining on both hinges. They pry off with a screwdriver.
- There is a pin on the top loop that provides a movable connection. It is in the center and protrudes a little. We press on it until it drowns (you can take a metal plate, rest it on the pin and lightly hit the plate). The pin will pop out from the bottom.
Now you can grab it with side cutters or pliers and, pulling it down, pull it out.
- Holding the sash at the top, open the lock. To do this, put the handle in a horizontal position. Having tilted the upper part slightly towards you, lift the sash, removing it from the lower pin.
- We remove the double-glazed window on the capercaillie. It is held on by pegs.
They need to be removed, then the double-glazed window itself will be removed without problems. Remove the pins like this:
- Something narrow and durable is inserted into the gap between the bead and the frame. If there is no special tool, it is best to use a small spatula.
Disassembly begins with one of the long sides.
- We carefully drive the spatula into the slot with a corner and gradually move the glazing bead away from the frame.
- Without removing the tool, we advance a little along, again pushing the glazing bead to the side.
- So we go through the entire length.
As a result, the glazing bead is already almost separated, we just take it out.
- With the short side, everything is simpler: we hook the freed edge and turn the spatula out of the groove. We take the freed edge with our hand and pull it up.
- Something narrow and durable is inserted into the gap between the bead and the frame. If there is no special tool, it is best to use a small spatula.
Now you can try to remove the double-glazed window. Just be careful, it's heavy. If it doesn't work, remove one more of the glazing beads.
Just make sure that the window is tilted so that the double-glazed window does not fall out. Now, if necessary, you can replace the double-glazed window yourself.
We glue the freed frame along the outer perimeter with a special self-adhesive tape. Its installation is recommended by GOST. With her, the window does not stand out so much.

Where to stick tapes when preparing a plastic window for installation

The layout of the mounting wedges and the distance between the fasteners

You need to check the correct installation constantly.

Installation of waterproofing tape under the ebb of a plastic window
- On the outer part of the window opening, where the ebb will rest on the wall, we apply a layer of foam.
Sometimes, if the height difference is large, a lining profile is installed here. and then an olive is attached to it. We cut the ebb cut to size under the ledge of the frame and there we fasten it to the frame with self-tapping screws.

How to install a low tide and window sill on a plastic window
- The tide also foams along the lower edge.

Foaming low tide from below
- We glue a vapor-permeable heat-insulating strip along the frame contour - it is also recommended by GOST.
- We fill the opening.
When installing plastic windows in the summer, the gap between the frame and the window opening is sprayed with water from a spray bottle. This is necessary for better polymerization of the foam.
- We use a balloon with foam, filling the existing gaps by 2/3 of the volume.
If the gap is large - more than 2-3 cm - foam is applied in several stages. A time interval of 10-15 minutes is required between two layers. When the first layer is partially dry, it is also sprinkled with water and the second is applied. This is repeated until the volume is filled by 2/3.

Foaming of PVC windows can be carried out in several stages
- Without waiting for complete polymerization, we glue the free edge of the heat-insulating tape to the window opening.
Just note that when using the tape, the slopes will need to be made plastic: plaster and mortar do not “stick” to it.
- We collect all the parts of the window. Only Finishing work, but they are not a hindrance.
- Under the window sill in the lower part is also installed vapor barrier tape(GOST recommendations).

Typical mistakes when setting up a window sill and PVC slopes windows and their correct installation
- The slopes are installed or sealed last.
Installation without unpacking
The main details are described above.
Installation begins with the installation of mounting plates. They are of two types: U-shaped and linear. It is important to choose the most reliable thick metal.

We install the plates at the same distance as the anchor: 150-250 mm from the edge and no more than 700 mm between the middle ones.
We simply fasten it with self-tapping screws to the profile.

Attaching the plate to the profile
Only they fix not the frame, but the plates, and not on the anchor, but on the dowel-nails.
How to remove a door or window from its hinges
Drill a hole, bend the plate, insert the dowel, putting the plate in place, twist the dowel. If you take powerful plates, they will hold tightly.
No worse than anchors.
How to remove a wing from a plastic window?
Sometimes when installing a window or repairing a plastic window, it may be necessary to remove the wing from it.
How to remove a plastic window from hinges
To do this without errors, please use our instructions.

Instructions for removing and installing PVC window wing
At the start of the process, a wing needs to be opened in order for these courses to be available. In addition, the upper circuit must be freed from the spindle rotation shaft.
To do this as quickly and efficiently as possible, follow these guidelines:
- Slide the hinges off of some firm before the tip of the rotating shaft comes lightly to the bottom of the upper hinge.
- Lift the shaft shaft with the clamps and pull it out.
- Lift the cover (it can be easily removed from the bottom hinge).
In the frame, the sheet is reversed: place the bottom outline on the spindle, connect the top skirt and the PVC window frame, and insert the spindle.
If the spindle is very tight, use a hammer.
How to remove the wing of a plastic window yourself
A metal-plastic double-glazed window has a very long service life - up to several decades, but nothing can save a window from unforeseen force majeure. What should I do if the glass breaks or cracks? Change all glass? Or will it be enough to change the damaged element?
And how to do it?
Of course, you can call specialists from the installer company, and not bother with the work. But, the process of dismantling and replacing is not particularly difficult. You need a minimum of tools and skills.
So, how to disassemble a plastic window yourself, and what should you know?
Modern window design
To understand how to properly unmount a double-glazed window, you need to have an idea of what parts it consists of.
- Frame.
The basis of the frame is metallic profile, which plays the role of the frame of the entire system. It is to the frame that all fittings and glass are attached.
- Double glazing. In old windows, the design was used according to the principle - one frame + one glass. AT modern system this is exactly a package of two or more glasses with a completely sealed space between them.
It consists of such components: glass, spacers, layers of sealant.
- Accessories.
Other the smallest details that provide functioning: handles, locks, hinges, glazing beads and others.
It is in the assembly that all these components represent a modern window system.
Causes of window damage
If cracks appear in the windows, then there are factors that caused this damage.
- Installation technology is broken.
- The parameters of the window opening are incorrectly measured.
- The window was transported and stored incorrectly.
- Strong pressure when opening and closing the doors.
The first two reasons are related.
The technology for installing new windows provides for the presence of gaps between the slopes and the frame.
How to remove the PVC window sash from the hinges?
If they are not there, then the movements of the walls create pressure on the entire window system, which will gradually cause the glass to crack.
Transportation and storage include correct position with no change in temperature.
If cracks appear, then it is necessary to replace the damaged elements.
Glass measurements
Before disassembling a plastic window, you need to order a new double-glazed window, or glass.
You need their sizes.
It happens that some manufacturers indicate the parameters on the spacers, then you just need to place an order according to these data.
If nothing is indicated on the double-glazed window itself, then using a tape measure, measure the distances between the inner edges of the frame. 10 mm is subtracted from the result obtained - the tolerance for seals.
According to the data taken, an order for new elements is made.
Replacement of glasses and double-glazed windows
Replacing double-glazed windows in plastic windows is easier than changing individual glasses. The space inside is usually completely sealed from air and moisture from outside.
This is done for several reasons - for poor heat conduction, and in order to avoid fogging of the double-glazed window from the inside.
If moisture gets inside during replacement, then, as a result, condensate will settle on the glass.
The work algorithm is carried out as follows.
If the glass on the opening sash is damaged, it must be removed.
To do this, on the top loop at the bottom, you need to pull out one pin, and it can be easily removed. After that, the glass package is removed.
In the case of a blind (not opening) window, you need to remove the entire package.
How to remove a bead from a plastic window? In this process, a chisel is used, if required, you can lightly tap on it, and they are easily removed.
In this case, dismantling begins from the middle part, gradually moving to the ends. Initially, long glazing beads for windows are disconnected: left and right, and then short ones - upper and lower.
How to take out the glass pane?
It is advisable to use special suction cups with handles, which are usually used by repairmen. Or gently with your hands.
If the double-glazed window is very difficult to remove, then the frame may have been skewed during operation. In this case, it will be very difficult to insert a new one, as the proportions of the entire window are violated!
How to replace a glass pane? This procedure is best carried out using special gaskets - "bridges", they will ensure even fixation of the entire system.
When the glass package is installed, it is fixed with glazing beads, according to reverse circuit: bottom, top, and left right.
If the window is standing without violations in the design, then the procedure will take no more than 20-30 minutes.
How to detach glass from a double-glazed window
Replacing glass in a plastic window is done in the following order.
The removed double-glazed window must be laid on a flat horizontal surface, a table or a pair of stools is best.
To do this, you can use a regular clerical knife. This is done in two steps.
- Initially cut through the layer to the distance frame.
- The second cut is carried out directly between the glass and the frame.
Thereafter broken glass easy to pull out.
At the same time, do not forget about safety, remove the elements of the window and dismantle the glass must be carried out with gloves!
Before installing a new glass, you need to wipe the surface of the neighboring one.
The easiest way to do this is with a clean newspaper or melamine sponge.
The new element also needs to be wiped, and if necessary, washed using a detergent.
On the surface where the installation will be carried out, cut off the remnants of the old sealant at a slight angle.
New glass is installed on the double-glazed window with the washed side inward. All edges align exactly with the sides of the rest of the package.
Fastening is provided by double sided tape on the distance frame.
Once the glass is in place and bonded, the seal is made by applying a new layer of silicone sealant.
Under no circumstances should acrylic sealants be used, as they are sensitive to humidity.
A new layer is applied using a special gun, moving evenly from one edge to the other.
After the sealant dries, all ends of the double-glazed window are glued with ordinary tape.
The updated package is mounted back on the frame.
In principle, the answer to the question of how to remove a double-glazed window from a plastic window is simple. You will need a minimum of tools and fixtures, and the process itself, subject to the technology, will take a maximum of 30 minutes.
Plastic windows can last for several years without any problems. But if any damage occurs, then it will be possible to remove the plastic window from the hinges without any problems, without damaging it.
However, before that, you need to carefully inspect the hinges. If they are damaged and / or there is corrosion on them, then it is recommended to remove the window very carefully so as not to break them completely. It is advisable to replace the hinges immediately.
In order to remove the sash from the hinges, you need to remove the plastic caps that protect the hinge structure and at the same time serve decorative element. To get rid of them, you need to pry them with a knife or a screwdriver (you can remove them without tools). They are easy to remove and at the same time they are very difficult to damage, as they are made of high-quality plastic.
It is important to choose the right tools. You will need: screwdriver, knife, tweezers, pliers (most often you only need a screwdriver). The dimensions of the screwdriver should be selected based on the dimensions of the fasteners. You may need some kind of stubborn tool - a long stick, a crowbar. The tool should not be too long and sharp.

Withdrawal process
To remove the sash of a plastic window, you need:
- To begin with, you will have to loosen all the adjusting bolts with a suitable size screwdriver. The bolts do not need to be removed from the structure. If the bolts are rusted or difficult to give in, then thoroughly rinse the structure (you can wipe it with vinegar). However, the design of some upper hinges is completely disassembled.
- Then you need to pull out the stem. This can be done with passages or a screwdriver. Do not be afraid to use force, since the stem and the structure itself are made of durable material and it is problematic to break them. Also, in order for it to come out without problems, it is recommended to thoroughly rinse the structure (you can wipe it with vinegar or alcohol).
- When the rods are removed from both wings, you can proceed to remove the window itself. You need to raise the window (may need to apply additional tools). Do this carefully so as not to damage the plastic or glass.
When the window is removed, then you can proceed to a more detailed repair. To replace the loops, they will have to be completely removed not only on the top, but also on the bottom, and you will also need to make some measurements to find the loops you need in size.
