Features and components of the handle, how to remove it, disassemble and repair it on an interior door. Installing a handle on an interior door How to put a handle on a wooden door
In this material, we will consider with you how to disassemble the knob knob, which have received an unusual distribution on interior doors. And also along the way we learn how these handles are installed. Below you can find not only the instruction in pictures, but also watch the video.
To install the handle-knob, it is necessary to mark on the door and make two main holes, according to the template, which, as a rule, is included with the handle with installation instructions. So, let's start installing the handle, disassembling it along the way.
Given interior door:

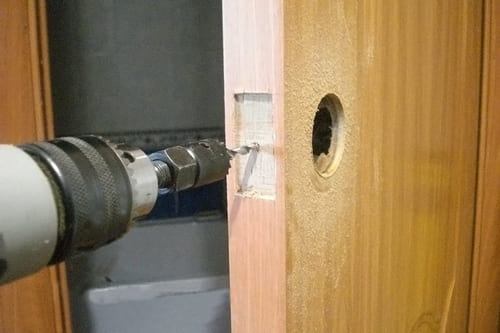
We make a sample hole from the end of the door leaf under the latch. Hole diameter from 23 to 25 mm: It is convenient to make a hole with a so-called spade drill for wood.
With a crown on a tree with a diameter of 50 mm, a through hole is made for the main fastening of the handle. The distance from the end of the leaf to the center of the hole is 60 or 70 mm, depending on the latch that is included in the kit.

You can find a template for installing a knob-knob from some manufacturers in the form of a stencil on the inside of the box or in the attached instructions. It is very convenient to use ready-made kits for installation, which are called “kits for installing interior handles”. It is not scary (and often, on the contrary, it is useful) if the holes are made with a diameter of 1-2 mm larger than recommended. The latch mechanism is two-position: provides for the possibility of installing a knob on the door, with different widths of the first bar of the door. The removal of the center of the handle-knob from the edge of the door leaf in the standard is 60mm:

but by moving the sleeve under the square, you can set the distance to 70 mm:

The standard height of the handle on the door is approximately 950 mm from the floor level. Next, to install the knob-knob, we partially disassemble the inner half of the handle in order to gain access to the holes for the mounting tie-down screws. To do this, we will use a special “key” from the handle kit or any suitable item, for example, a knitting needle. There is a special hole on the handle, through which the door knob should be disassembled. In the presented photo, it is round, but it can be of various shapes. This hole is located at the bottom of the handle:

Through the hole we press the spring-loaded latch, while pulling out the handle of the interior knob.

We take out the handle and completely remove it:


Then you need to pry off the outer decorative flange of the handle with any sharp object. Take a closer look, as a rule, the flange has a corresponding groove for this:

well, the knob-knob is disassembled and we got access to the mounting screws

Further assembly of the handle-knob occurs on the door in the reverse order.
First, install the latch in the door and secure with two screws from the end. It will look like this:

The rectangular front plate of the latch mechanism is mounted flush with the door leaf. To do this, marking under it, with a chisel, the required depth is selected at the end of the door leaf. The same applies to the striker of the knob, which is installed according to the markup, on the door frame. Also, under it, the required depth is sampled with a chisel.

Further, it is already possible to assemble the knob-knob on the door leaf, pulling together the disassembled halves with fixing screws. The square of the handle and bushings for the mounting screws will, during installation, pass through the previously installed latch, through its technological holes


Handles-knobs are universal and are not divided into left / right-handed. The design provides for the installation and adjustment of the knob for any door with a thickness of at least 35mm.
If the shape of the knob-knob has an asymmetrical shape of a ball, etc., then after installing the knob on the door, using the method described above, remove the knob handle, and change the outer and inner handles in places, having achieved their correct location, relative to the location of the door leaf ( left or right side). The latch or lock mechanism, if any, is also brought into the correct location, and if required, we also swap the outer and outer sides.
The handle, assembled and without distortions, installed on the door, should work easily in both directions and independently, under the action of a return spring, return to its original position. If this does not happen, then you need to check the evenness of the installation, as well as tighten or loosen the fixing screws, achieving their equal tightening and soft stroke of the knob.
The market of door handles offers the consumer models for any premises and for every taste. Installing a door handle is not an easy task, many people prefer to entrust it to specialists. But if you have the necessary tools and follow the instructions exactly, you can do this work yourself.
Types of door handles
According to the installation method, the following groups of handles can be distinguished:
- Stationary handles. Their installation is very simple and takes only a few minutes. There are overhead and through.
- Latch handles. Depending on the type of handle, there are push and turn. There are models equipped with a keyhole or latch.
- Lockable handles.
- Mortise handles for sliding doors.
- Handles with magnetic lock.
Required Tools
To work, you will need the following tools:
- pencil, tape measure, square;
- screwdriver and screwdriver;
- a drill, a set of feather drills and a 50 mm crown drill (you can buy a set called the “Latch handle insertion kit”);
- hammer;
- bit;
- awl;
- chisels.
Mounting height calculation
Before proceeding with the installation, you need to determine at what height it is most convenient to place the handle. According to the requirements of GOST, handles must be mounted at a distance of 1 m from the floor. But the average height of each family member is different, and sometimes it is more expedient to mount above or below the specified height, usually 80-120cm.
The most comfortable opening will provide a handle located at the level of a person's belt.
Installation of door handles of various modifications
Below are step-by-step instructions on how to install a door handle of one type or another.
Installation of stationary handles
In order to install a stationary handle, the only tools required are a screwdriver and a drill. Overhead handles are simply attached to the door in the intended place with self-tapping screws. To install through models, it is necessary to drill a hole in the door leaf, insert a threaded stud into it. After that, the handles are screwed onto it from both sides.
Mounting the latch handle
Before installing a rotary or push handle with a latch tongue, you must familiarize yourself with the device of its mechanism. As you can see in the photo, the main details are as follows:

The installation process itself looks like this:


For those models that have 3 additional screws in the kit for attaching the base to the door leaf, it is not necessary to drill a large hole with a crown. It is enough to make a hole for the “square” with a pen drill with a diameter of about 12 mm and holes for the tightening bolts. This design will last longer.
Installing a handle with a lock
A more difficult question is how to put a handle with a lock on the door? In order for the work to be neat, it is better to remove the door from its hinges.
Stages of work:
- We circle the contours of the lock at the end of the door.
- With a drill with a pen drill inside the contour, we drill several holes close to each other, after which we take out the remnants with a chisel, periodically applying the lock. He must fit in there completely.
- We make a recess for the front plate.
- We drill holes for the handles, the diameter must be chosen so that the square rotates freely inside it. The place for drilling must be marked exactly.
- We prepare a hole for the keyhole and make a recess under the base, which can be either a plank or two circles.
- We insert the lock, put a square pin.
- We fasten and fix the base and handles. We make a recess under the reciprocal bar, sink it flush with the box and fasten it.
Installation of handles for sliding doors
Installing a handle on a sliding door will require only a drill with feather and simple drills and a milling cutter with a cylinder cutter. Consider the procedure for installing an oblong handle. It looks like this:


For a round pen, the installation process is much easier. You just need to make a round recess with a pen drill of the desired diameter, and then everything is the same as in the case of an oblong one. If desired, you can additionally install, as well as an end grip, if the handle is equipped with them.
Mounting the handle with magnetic lock
As for the question of how to insert the handle into the door if it is equipped with a magnetic latch, everything here is the same as inserting a handle with a lock. Difficulties arise only when mounting the striker, because it is necessary that the lock snaps into place smoothly.
You need to do the following:
- Close the door and mark the top and bottom of the magnetic latch on the box.
- Attach a striker to the markup and mark the contour of the recess for the magnet.
- Make a recess in the center using a pen drill or a milling cutter.
- We fasten the bar with self-tapping screws and check the operation of the lock. If you need to move the bar a little, we close up the old holes with wooden chopsticks and drill new ones.
A process such as installing a door handle with your own hands requires patience, accuracy and strict adherence to instructions. For more information about the installation process, see the video.
Most people think that installing a doorknob is a very simple task and does not deserve serious attention. But when it comes to installation, these "competent" masters are often lost. So that such a misunderstanding does not happen to you, let's take a look at how to install a modern door handle on an entrance metal and light interior door.
When installing door handles, the main thing is to understand the principle.
With the current range, choosing a doorknob can be quite difficult. The topic of choice with photos and videos is covered in more detail, and now we are talking about installation, so we will go through only the main positions of the direction.
- Overhead handles are considered the simplest, their installation is really extremely simple, you need to choose the right installation location and screw in a few screws. The handles themselves can be wooden, metal or plastic, but the installation technology is the same for everyone;

Even a person without training will be able to install the overhead handle.
- The push-through handle is no more difficult to install than the previous version, only you need a drill instead of a screwdriver. A through hole is drilled here, into which a metal threaded stud is inserted, and handles are screwed onto this stud on both sides of the door leaf;

- Knob handles and rotary models are considered the most complex designs. I am glad that the device, respectively, and the mounting technology for all these handles are similar, so we will focus on these designs.

Installing a rotary type door handle is the most difficult.
Subtleties of self-installation of different models
If you do not go into the design features of some specific models, then installation most of these devices are similar, but before inserting one or another handle, let's figure out the place of its installation.
A few words about the installation site
If we are talking about a private house or apartment, then where the handle should be installed, you have the right to decide for yourself, the main thing is that you and your household should be comfortable. But when choosing a place, experts recommend focusing on 2 things:

- First of all, you need to measure at what height all the other handles in your house are. After all, when one handle falls out of the general ensemble, it is very striking and spoils the interior;
- If you choose a place for installing all the handles in your house, then you need to focus on the arm bent at 90º at the elbow. Naturally, it is worth considering the growth of all family members and choosing something in between.
The installation height of the door handle according to GOST is quite another matter. The documents state that such structures are installed at a height of 1 m, plus or minus 100 mm. This information should be well remembered by office owners and housekeeping workers of administrative buildings. Otherwise, the fire inspector will have another reason to find fault.

Entrance door handle
High-quality door handles from good manufacturers break extremely rarely, this misunderstanding mainly happens with goods from the friendly Chinese people. Fortunately, it is easy to find a replacement in the store, the average price of such a kit fluctuates around 500 rubles.

Finding a suitable handle for a metal door is not difficult.
When buying a new set of handles, it is advisable to remove the old pad completely and take it with you to the market.
Removing an old handle from a metal door is not difficult. In this case, it is not necessary to completely disassemble the entire mechanism, it is enough to unscrew the 2 fixing bolts that are located on the inside.

So, the pens are bought, now it remains to insert them. We have removed the inner lining, respectively, the outer lining also holds practically nothing. If you pull a little harder on the handle, it will come out with a square pivot pin and connecting studs.
When buying a pen, it is better to choose models with an internal armor plate, they are more expensive, but the protection against hacking is an order of magnitude higher.

Further, on the outer part of the new set of handles, screw 2 connecting studs. Separate armor plates can be provided on the keyhole, if they fit the holes in the new set, then change them or not, decide for yourself.

Now we insert a square pivot pin into the core of the handle and mount the outer trim in its place. Keep in mind that the square pivot pin should almost reach the bottom of the hole on both handles. Otherwise, there is a high probability that the handles will break again.

When everything is inserted and screwed, the gasket is installed last inside the structure. Gaskets can be rubber and plastic, and so, try to take rubber ones, such as in the photo below.

The outer lining with a pivot pin and studs is inserted first. Further, the inner lining is combined with it and all this is fixed with a pair of bolts from the inside.

Handle with a latch for an interior door
Often, several types of handles can be installed on a lock embedded in an interior door. This is especially true for light latches, any rotary knobs are generally suitable there. The main thing is that the rotary mechanism works with a square pin.
The technique of inserting a light latch and a major lock into an interior door is shown in detail with photos and videos, and we will only analyze the installation of the handle.
The handle mechanism is screwed to the doors with self-tapping screws, but so that the fixing washer does not spoil the view, it is covered with a decorative overlay, after which the handle is installed.

In round knobs, both the knob itself and the decorative overlay are fixed with the help of an inconspicuous inner tongue. This tongue needs to be drowned down with the help of a special key that comes with the kit. The tongue itself is equipped with a spring and after removing or installing the handle, it returns to its original position.

In rotary handles, the system is slightly different, after installing the handle, you need to fix it with a small screw on the side, and then screw or simply put a decorative overlay on the latches (depending on the model).

The screw fixing the rotary knob can be either a Phillips screwdriver or a hexagon screwdriver. In the latter case, the hexagon must come with the handle.

Conclusion
As you probably noticed, the installation of door handles on entrance and interior doors is, in general, similar. The main thing for you is to understand the principle of the three options shown in the article, and then you will deal with any model.

At first glance it may seem that this work does not require effort and is quite simple to perform, but it is not. In order for the installation of door handles to be successful and correct, installation is carried out in stages in compliance with all instructions.
Classification of door handles
Door handles vary in both appearance and material. Therefore, the installation of door handles begins with their choice. You can put a stationary handle on the interior door, which does not interact with either the latches or the lock. It is fixed with screws or tie-down screws. The door handle with a push mechanism uses a latch latch that cuts into the door. In this case, the latch is removed only under mechanical action, i.e. when you press the handle, and so it is always in the extended position. Installation of fittings with a swivel mechanism is great for the toilet and bathroom, since on the one hand it can be opened and closed with a key, and on the other it has a locking button or latch.
When choosing accessories for a door, you need to decide on the material from which it is made. You can use a door handle made of metal, such as aluminum, brass, steel, etc. The wooden element is made of valuable breeds of wood. To serve for many years, it must be made of solid material. You can also install glass handles made of Bohemian glass or natural stone yourself. For utility rooms, elements made of plastic and other artificial materials are mounted. When making your choice, you need to remember that the fittings must be combined with both the door and the interior of the room.
Installation instructions for door handles

Required:
- roulette;
- square;
- awl;
- chisel or chisel;
- hammer;
- electric drill;
- screwdriver;
- door handle fittings.
Doing the installation of door handles with your own hands, you must follow the instructions for installing them to obtain a high-quality result. First, the height at which the fittings will be installed is noted. When marking it, the average height of family members is taken into account. Basically, the installation of door handles is carried out at a distance of 80-120 cm from the floor. Having decided on the height of the position, a mark is made in this place with a pencil. In this case, the fittings are applied so that the tongue protrudes completely from the door.
All marking should be done using a square. To do this, first draw a line on one side of the door leaf. Then, retreating from its edge by 60 mm, an appropriate mark is made with an awl. After that, with the help of a square, a line is drawn on its end, which is pierced with an awl in the middle, and the same marking is made on its other side. Further, for the installation of door fittings, you will need a drill with a special drill with a crown, which comes in various diameters. First, a hole is drilled on one side of the canvas to a depth equal to half its thickness. For this, a corresponding mark is made on the crown. Then, by analogy, installation is performed on the other side. At the same time, during operation, the drill must be kept strictly at a right angle, in no case deviating it to the sides. The resulting hole will house the door handle mechanism.

For the subsequent installation of the handle with your own hands, the crown changes to a conventional drill, with which a hole is mounted from the end of the door leaf. It is necessary for the tongue protruding from the door. You need to drill a hole for it, evenly moving the drill. After that, a contour is punched with a chisel or chisel, a selection is made and a latch is applied. If everything is done correctly, then it should be located in the same plane with the end of the door leaf and at the same time be completely recessed. At the end, the latch is fixed with screws.
Further, the fittings are applied to the place of its location and the holes for the bolts connecting the handles on both sides are marked with an awl. At this stage of work, you will need a drill that is matched to the size of the hole. After all the marked places are drilled, the design of the fittings for the door is assembled. To do this, one of its parts is first inserted, while falling into the special holes of the latch using guides. Then its second part is substituted and everything is pulled together with bolts.
Final installation step
Required:
- awl;
- bit;
- hammer;
- electric drill.
Having completed the installation of fittings, a metal frame is installed on the door frame.

First, markings are made for the hole for the tongue. In order for everything to work out exactly, it is necessary to apply either a drop of oil, or paint, or toothpaste to its end. Then the tongue is removed into the door, and when it is closed, the handle rises and falls several times. At the same time, a clear trace of the applied product will be imprinted on the box. You can also mark up by inserting a metal ruler into the gap between the closed door leaf and the box, first at the top of the tongue, then from its bottom side, making the appropriate marks with a pencil.
Further, a metal frame is applied to the markings on the door frame and the place of the subsequent selection for the tongue and plate is marked. First, a selection is made under the tongue. To do this, with the help of an awl, a mark is made on the inside, and then a hole is mounted under it with a chisel or chisel.
Before proceeding with the selection of the contour for the frame, you should check the correct installation of the tongue, i.e. it should come out of the latch completely, and the door itself should close well. Then the metal frame is fixed with screws to the box. To properly install door hardware, you must clearly follow all the instructions. And as a result, the handles will be easy to push and the latch is also easy to walk on.
Door hardware repair manual
Required:
- Screwdriver Set;
- screwdriver
During operation, the fittings on the door may loosen or come off. In this case, its repair will depend on the type of handle. If it has a spherical or similar shape, then its fastening is carried out using a through pin. To repair it, you need to turn one of the handles counterclockwise with the door open, fixing in place the other part of it and the decorative lining. When they are separated, the pin should remain in one of them. Next, you need to adjust the pin and, putting back the lining, insert the element with the pin. Then, on the other hand, attach another part of it, and carefully wrap everything with your hands, without using tools.
When repairing a door handle in the form of a bracket, you need to screw in all the screws with either a screwdriver or a screwdriver. In the event that the screws are scrolled, they must be unscrewed. Further, moving the handle on one side so that it covers the old holes, on the other side of it, all the screws are screwed into new places. To avoid their scrolling, you need to screw them in without effort. Fittings of this type are arranged vertically for convenience.
Sold without accessories. You will have to purchase and install the door handle separately. The work is simple. Installation can be done independently, you only need a certain tool.
Products differ in the material of manufacture, design, working mechanism. Accessories are selected according to the style of the room, taking into account ease of use. By type of attachment are:
- Overhead. The fittings are simply screwed with self-tapping screws to the surface of the canvas.
- Mortise. Often come with a lock or latch. Mounting of accessories involves cutting a groove and drilling a through hole in the body.

All mortise models are divided into two types:
- Knobs. The fittings are equipped with a swivel mechanism that moves the latch. Usually the handle itself is made of a spherical or disc shape.

- Push models. The mechanism functions according to a similar principle, only to activate it, the handle must be pressed. Fittings complete with a lock are in demand for interior and exterior doors.

pressure Models are further divided into two types:
- Mechanism with handle and latch complete. Such models are inexpensive, but not durable. They quickly loosen and fail.

- Handle, latch, wrap and the mechanism itself (with a tongue or magnetic) are selected separately depending on preference. Such products are better and more reliable than the first option.

Common material metal alloys or aluminum are used for the production of fittings. Overhead models can be made of wood. For expensive canvases, stone and glass handles are produced. The cheapest option is plastic. Metal elements are chrome plated or nickel plated.
Products differ by type of castle. The simplest locking element is a latch. The lock can be locked with a key on one or both sides. In the first version, a latch replaces the key on the inside of the room.

Required Tools
To install the handle on the interior door with your own hands, you will need the simplest carpentry tool:
- electric drill;
- nozzle crown with a diameter of 50 mm;
- pen drill with a diameter of 20–25 mm;
- pencil;
- screwdriver;
- hammer;
- chisel.
The template for installing door handles, sold with the product, will help facilitate installation. If one was not in the package, it can be printed from the Internet. The template is a 1:1 scale diagram of the movement case. It is applied to the canvas to mark the groove and hole. If it is planned to install a large number of handles, a jig is cut out of wood for drilling.

How to install a door handle?
They determine the height of the installation of handles on interior doors according to their preference, but usually they keep a distance from the floor of 0.9–1 m. The indicator may depend on the height of the people living in the house. To maintain the aesthetics, the handles of all canvases are placed at the same height.
They begin the installation of door handles on interior doors with markings, but first the canvas is lightly tapped. The sound determines the density. Modern doors often go empty inside. The wooden frame is made only along the perimeter and jumpers are installed. If the fittings fall into the void, then it is impossible to fix it.

The handle is being installed on the door removed from the hinges. If the canvas cannot be painlessly dismantled, then it is wedged in the open state. Each model has its own design features. Therefore, before inserting, it is important to read the attached instructions and take measurements. They will help you accurately select the drill nozzles according to the diameter.
Mounting the latch handle
They begin installing the latch handle on interior doors by choosing a full-bodied place and marking. Usually the manufacturer attaches the scheme. In its absence, manual marking is done simultaneously with the sidebar:
- First, a mark is placed from the edge of the canvas at a distance of 60 mm. At the end, a center line is drawn, the center is marked for the future hole.
- To make the front plate of the latch body flush with the wood, a nest 3 mm deep is selected with a chisel at the end of the door leaf.
- For further installation of the knob handle, they take an electric drill with a crown and drill a through hole in the canvas. It is important to be careful to avoid damaging the decorative coating of the canvas.
- A hole is drilled from the end of the sash at the marked center with a pen drill. Its depth and diameter is equal to the size of the latch body. It is impossible to drill deeper, as there is a risk of damage to the panel. The latch is inserted inside, fixed with two self-tapping screws.
- To install the knob, it is first disassembled. There is a technological hole on the side, inside of which there is a latch - a tongue. When pressed with a key, the handle can be easily removed.
- The next element is to remove the decorative trim. The outer half of the handle is inserted into the hole in the door, and on the other hand they put the inner half and both elements are bolted together. Now it remains to put in place the decorative trim and the handle itself.

- Continuation of the installation of the door handle with a latch provides for the fastening of the striker. The sash is completely closed and they try to mark on the boat the place where the tongue of the locking mechanism fits. According to the marking with a chisel, a recess is selected, a decorative pocket is inserted, a steel patch plate is fixed on top with self-tapping screws.
At the end of the work, the operability of the mechanism is checked.
Installing a handle with a lock
Installation of a door handle with a lock is complicated by gouging a large groove in the end of the leaf for the body of the locking mechanism. The work consists of the following:
- The lock is applied to the end surface of the canvas. Draw a pencil around the back of the body. According to the markings, holes are drilled with an electric drill, placing them as tightly as possible. The remaining jumpers are selected with a chisel. It is better to make a hole with a pen drill, and its diameter should be a couple of millimeters larger than the thickness of the body of the locking mechanism.
- A lock is inserted inside the groove. At the end of the sash, a contour of the front plate is drawn with a pencil, a recess is chosen with a chisel under it.
- Having attached a lock to the side surface of the canvas, mark the hole for the handles. Below, they designate and make a hole for the keyhole.
- The lock is installed inside the groove, fixed with screws. A metal square is inserted, decorative overlays are put on. Handles are put on the square. Each lining is fixed to the sash with self-tapping screws or through bolts, which depends on the model.
- With the door leaf closed, the boat is marked for the striker. After sampling the recess with a chisel, the plate is fixed with self-tapping screws.

After installing the lock, check its performance.
Installation of handles for sliding doors
To insert a handle into a sliding-type interior door, you only need a drill, a chisel and a screwdriver. You can simplify the task with a milling cutter. Typically, sliding door handles are oblong in shape. They consist of a plastic insert, on which a decorative overlay snaps into place.
The handle is installed on the compartment door as follows:
- The plastic insert is applied to the side surface of the sash. Outline with a pencil.
- Using a drill and a chisel or a milling cutter, a groove is selected. Its depth corresponds to the thickness of the liner. Usually 12-15 mm is sufficient.

- An insert is inserted inside the groove, fixed with self-tapping screws. The decorative overlay, which acts as a handle, is simply snapped on from above.
- A similar action is performed on the reverse side of the canvas. If the shape of the handle is round, the recess is selected with a pen drill. Hardware may come with a lock. For its tie-in, a groove is selected at the end of the sliding door, and a reciprocal bar is attached to the boat.
Mounting the handle with magnetic lock
To insert a handle into an interior door with a magnetic latch, perform the same steps as when inserting a conventional lock. For smooth snapping, you need to correctly install the reciprocal bar.
With the door closed on the boat, they try to accurately mark the upper and lower edges of the castle. A reciprocal bar is applied to the markup, a groove for the magnet is marked. A hole is made with a drill bit. A magnet is placed inside the groove. A reciprocal bar is screwed on top with self-tapping screws, without deepening it flush. If the plate is sunk into the sample, over time, the weakened magnet will no longer hold the canvas.

Installation of stationary handles
There are two types of stationary handles, but they are all easily attached to the door. Overhead models are simply fixed with screws to the surface of the canvas. For a through option, the door is drilled. A threaded pin is inserted through the hole and the handles are screwed on both sides.
Installation of fittings on the door leaf is within the power of each owner. It is important to initially correctly mark up and understand the mechanism of the product.
