Do-it-yourself parquet boards. Laying parquet with your own hands: rules for preparing the base and work technology. Techniques for making artistic parquet
Parquet is a durable and durable flooring option, which is why it is often preferred. The easiest way is to buy the material in a store, but some craftsmen decide that making parquet with their own hands is not a waste of time, but an opportunity to get an environmentally friendly and high-quality coating.

Indeed, you can make parquet yourself, but how expedient will these actions be? In order to understand this, you will have to understand with examples how this is done.
One Russian family in the early 2000s was able to obtain about 4 pallets of small mahogany and oak bars. And at the same time they became the owners of an apartment that needed major renovation, since it had only bare walls and ceilings. The family decided to do all the finishing work themselves and came to the conclusion that they could make wood material parquet. The idea was crazy, but what do difficulties mean to the hardworking and determined?

Is it possible to make parquet with your own hands?

As a base for the parquet, they made M-300 sand concrete - thus, they were able to eliminate the unevenness of the floor, the differences of which ranged from 3 to 12 cm throughout the apartment. Next on bitumen mastic they laid OSB sheets, secured additionally with dowels. The choice fell on OSB, because this material is very durable and not afraid of moisture. Next, the slabs were covered with a special primer.
Note! To make parquet with their own hands, the family used available tools and the material itself, which miraculously fell into their hands. However, parquet made independently at home can only be made without locking joints, which increase the solidity of the coating. This can be a massive or stacked version of the material. Such parquet can only be fixed to the floor using glue.

Parquet cutting was carried out using stationary circular and cross-cut machines. The resulting slats had to have the same size - in that case it was 10x70x500 mm. The moisture content of the wood should be low - about 9%.
The finished boards were fixed to the base using the usual. At the same time, sometimes it was necessary to individually adjust the planks to each other. After installing the floor, the parquet was sanded and the gaps were puttied acrylic composition woodworking, sanding and varnishing.


Master class. Self-production of parquet floors with heating system. Downloadable file (click the link to open the PDF in a new window).
Laying the manufactured parquet
Laying self-made parquet is done in almost the same way as installing regular store-bought material. Let's look at how this process happens in practice.
Step 1. First, the base is prepared - it must be perfectly flat, since the parquet will be fixed using an adhesive composition. To do this, first, if necessary, it is made cement screed from concrete grade minimum M250. If the old screed is well preserved, then it should be cleared of debris and primed epoxy composition. In this case, plywood is used as a base directly under the parquet. Its sheets are cut into equal-sized squares. The thickness of the plywood should be about 12-18 mm. The squares will have dimensions of 50x50 or 75x75 cm. For convenience, appropriate markings are applied to the plywood sheets.

Advice! If the screed is made from scratch with your own hands, then it is important not to forget to lay the waterproofing material.

Step 3. The next stage is laying the plywood on the base and fixing it. Installation of individual elements is carried out staggered, that is, the seams should not be joined at one point. Between separate sheets There is a gap of about 2-3 mm. The base is coated with adhesive mastic, after which the sheets are laid and screwed for additional fixation to the floor using dowels or screws (depending on the type of base - wood or concrete).


Step 4. The plywood is sanded using a special machine.

Step 5. For convenience, markings are applied to the plywood along which the parquet will be laid. It is applied in accordance with the selected pattern.

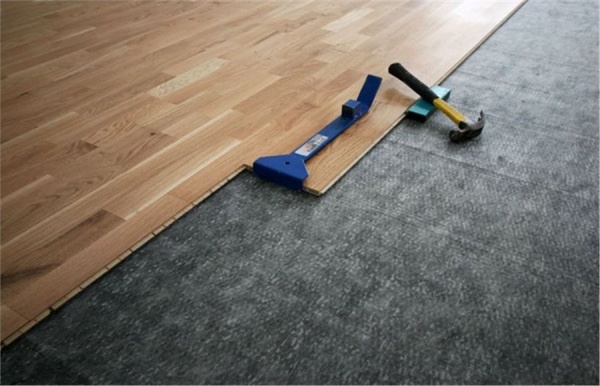
Step 6. Next, the base is coated step by step special glue, which is applied using a notched trowel. It is on this glue that they are placed one at a time. parquet boards. They are pressed tightly to the base, and the gaps between the individual elements should be minimal. While the glue dries, the parquet can be pressed down with a weight.


Step 7 The entire subfloor is covered in the same way. Next, the parquet is sanded.


Step 8 The last stage is varnishing parquet flooring.

Advice! You can close the joint between the parquet floor and other coverings at the exit from the room using a sufficiently wide aluminum threshold.
Video - How to lay parquet?


Making such a floor yourself is extremely simple. To do this, we cut these wooden triangles. The degrees of angles are indicated in the figure. This element is good because it can easily form a beautiful and at the same time beautiful pattern.


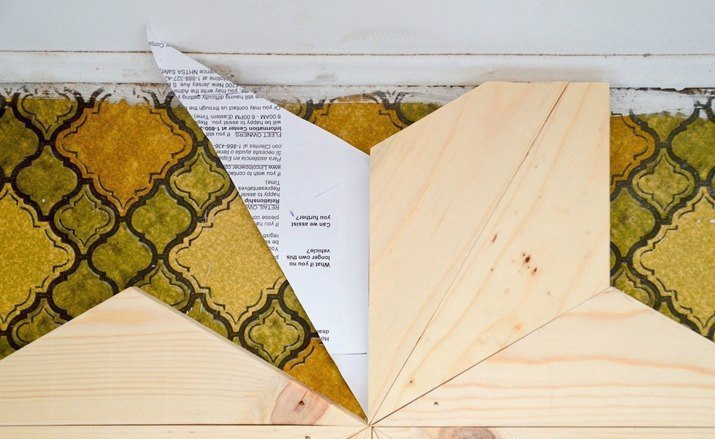
![]()


Working with artistic parquet
Sometimes craftsmen decide to take a completely desperate step and make artistic parquet with their own hands. This is also a type of parquet flooring, but the materials are laid in a special way. In this case, the design is made from several types of wood, and may also have patterns made separately.

Note! Artistic parquet was first used for flooring back in the 16th century. Its production was considered a very complex process, and therefore the labor costs were equal to those required when weaving expensive carpets. Such parquet was used only for decorating halls in castles, palaces, and houses of the nobility.
But even today, artistic parquet has not outlived its usefulness, although it continues to be a very painstaking type. self made, that's why it's very expensive. The work is difficult because it requires attentiveness, a sense of taste, responsibility, the right choice materials - everything, even the most seemingly insignificant properties of the wood used, must be taken into account.

Techniques for making artistic parquet
For making artistic parquet Usually they use types of wood such as oak, ash, maple, walnut, etc. The denser the material is used, the longer the floor will last, it will be easier to repair if necessary, and it will be faster to work with such material. The beauty of the finished drawing will also depend on how the wood was processed. For example, cutting a log can be done in different ways and this will also affect the appearance of the floor.
Prices for Papa Carlo parquet
Papa Carlo parquet

Note! For artistic parquet, cross-cut wood is usually used.
Table. Options for artistic parquet designs.
| Name | Description |
|---|---|
| In this case, several types of planks are used to create a pattern, which, after processing, are attached to the base board. The most popular option for making a drawing. |
| The finished drawing is placed deep into the base. Materials such as metal, amber, and mother-of-pearl can be used for decoration. A less durable version of artistic parquet, but more expensive. |
| In this case, the pattern is created by cutting grooves for the design, which itself is made of dark wood. The method is very ancient and is now practically not used. |


Also, parquet flooring can be laid with a “rosette” (the parts have an oval or round shape, located in the middle of the pattern), a “border” (a part of the floor with a specific motif that divides the space of the room), modules (in this case, the parquet is assembled from individual panels - original geometric compositions are obtained).

Advantages and disadvantages of artistic parquet
It’s not for nothing that artistic parquet is still valued today. It has a number of advantages:
- durability due to use hard rocks wood;
- environmental friendliness;
- excellent thermal insulation performance;
- beauty and originality;
- the ability to create your own pattern.

Disadvantages include high cost, difficulty in manufacturing, low resistance to frequent and strong mechanical stress.
Making artistic parquet at home
The high cost of this parquet and at the same time the desire to still make such floors force home owners to try making this parquet with their own hands.
Step 1. The first step is to draw up a design project, which will mark the dimensions, the place where the pattern was created, as well as the main pattern of the parquet.


Note! Work should be carried out at a temperature of +17-23 degrees, humidity - about 40-60%.
Step 3. Using the templates laid on the floor, the future pattern is milled into the parquet base.

Step 4. Unnecessary elements are removed - gaps appear for the installation of artistic details.

Step 5. The finished gaps are cleaned of any resulting dust, sawdust, or wood chips.

Step 6. According to the sketch from pieces of wood different types details of the pattern are made, which are then glued into the main parquet in previously prepared places. Gluing is done on adhesive composition, intended for parquet. A hammer can be used to force the parts into place.


Step 7 The entire picture is inserted in the same way.

Step 8 Parquet floors with a finished pattern are sanded with a special machine.

Step 9 A primer coat of varnish is applied. It is spread over the surface with a spatula evenly and without leaving empty spaces.

Step 10 Varnish coating After drying, it is sanded using a special machine.

Step 11 The floor is cleaned of dust with a vacuum cleaner - preparation is made for applying the final varnish layer.

Step 12 Finishing layer The varnish is applied with a roller, and hard to reach places and along the walls - with a brush.

Video - Making palace parquet
Brushed parquet boards - what is it?
At home you can make the so-called brushed parquet. This is one of the new technologies for creating artificially aged floors. The material is subjected to special processing, during which it acquires the original appearance. By the way, this processing method can significantly increase the service life of the parquet base.

Aging of wood occurs through treatment with a hard metal brush, which removes the soft fibers of the boards, while the hard ones remain in place. This way, the textures on the wood will be clearly visible, and if you cover them with oil, the natural beauty will become clearly visible.
After the soft wood fibers have been removed, the boards are covered with a patina (special paint), which helps make the structure of the wood more obvious, emphasizes its porosity, or other materials. Also, the boards can be tinted - that is, the wood will change its color by a couple of tones. Usually it becomes somewhat darker than it was. Wood can be coated with varnish, wax or oil.

How to make brushed parquet with your own hands
To make brushed parquet you will need a grinder, a saw, a drill, a hard metal brush attachment for a drill, and a stripping router (it is not cheap, so it is best to rent it). Next comes the brushing process: the wood is cleared of soft fibers using a metal brush. This process gives it texture.

Advice! To reduce dust in the air, you can wet the wood with water before processing. However, before the next stage, the material must dry well.

To get rid of wood fluff formed during the aging process, the board is treated with a polymer brush with a grain size of P80-P120. At the last stage finishing material for the floor is polished.

Polymer brushes - end and radial

You can make parquet with your own hands, but all of the above procedures are quite time-consuming and will take a lot of effort. How advisable is it to tinker with such parquet? It is impossible to give a definite answer. However, in modern world With its constant rush and lack of time, this type of work is performed either by specialists or enthusiasts.
Parquet is one of the most memorable and luxurious flooring materials. It can turn any room into a corner of wealth and comfort. No matter how difficult the process of laying parquet may be, the end result will more than justify all the effort expended.
Parquet is made from different breeds wood. Each has its pros and cons.
- Oak. It has an excellent pattern, is resistant to moisture, has a wide range of colors, but may darken a little over time.
- Maple. As durable as oak, but yellows over time.
- Cherry. Brown with a faint pink tint. It will also darken slightly over time. Easy to process.
- Beech. It has a pleasant yellowish or reddish tint, but is afraid of humidity and temperature fluctuations.
You should choose parquet depending on the room in which it will be used. Should not be used in areas with high humidity, such as in the bathroom, outside, by the pool and so on.
It is not necessary to make the floor from one type of wood, as they can be combined.
The planks come in different sizes; if the room is small, it is better to choose small ones, as they will visually increase the space.
Most often, planks with a width of 5 cm are purchased. Also check which joint of the planks should be smooth and without gaps.
Advice ! When buying piece parquet, pay attention to the condition of the packaging and material, there should be no tears or damage.
Preparation of material and base
A couple of days before the start of work, bring all the materials into the room where the repair will be carried out so that their temperature becomes the same.
The service life of the parquet depends on how well the base for the parquet is made.
Important ! The surface must be absolutely clean, smooth and even. Due to unevenness, the parquet will creak and deform.
Preparing the concrete base
If the room has a concrete floor, you should check it for unevenness. This can be done using a metal ruler. If there is a gap of more than 2 mm between it and the floor, it must be eliminated ( special mixture or a grinder).
After the surface is leveled, cleaned and dried, lay waterproofing film. The sheets are overlapped by 20-30 cm, and they must also cover the wall by at least 10 cm. All joints are taped with adhesive tape. Now the screed is poured (sand-cement mixture with reinforcement) and allowed to dry (screed thickness 4-5 cm). The plywood will be attached directly to the screed.

At this time from the sheets moisture resistant plywood squares are cut (50x50 cm, 75x75 cm). Once the primer has dried, glue is applied and the plywood is laid. The sheets are laid so that the joints between adjacent rows do not form an “intersection”. For better fastening, the plywood is secured with self-tapping screws, so that the head of the screw is recessed by 5 mm.
Important ! There should be free space between the sheets (no more than 4 cm), and there should also be a gap between the walls (3-5 mm).
The surface is ready for laying parquet.
Using plywood for block parquet has many advantages:
- the surface becomes perfectly smooth (if something happens, the plywood can be sanded);
- fastening parquet to plywood will be more durable than to concrete (lay parquet only on concrete screed not recommended, since if the concrete surface is destroyed, the parquet will begin to fall off, and there will also be low heat and sound insulation qualities);
- heat and sound insulation improves;
- walking on parquet laid in this way will be much softer and more pleasant.

Preparing a Wooden Floor
Before you start laying parquet on an old wooden floor, you need to check it. All boards must be intact, without cracks, rot, and well secured. Be sure to check the logs to see if they require repair or replacement. The floor should not creak or collapse. All boards and joists must be impregnated with antiseptics.
After inspection and repair, the floor is carefully sanded, cleaned and the process of laying parquet begins.
Preparation of the base on the joists
Attention ! Before starting all work, logs should be treated with antiseptics.
A layer of waterproofing is laid on the floor. Then logs are installed at a distance of 40 cm from each other (using self-tapping screws). During installation, you need to ensure that all the joists are at the same level.
After installing the logs, sheets of plywood are fastened with self-tapping screws, leaving gaps between them.
If necessary, thermal insulation can be laid between the joists.
Methods for laying parquet
There are several ways to lay parquet:
- floating;
- gluing with parquet glue;
- mechanical fasteners (fixed with nails).
Floating method
Laying parquet using the floating method is the most simple option. Since the planks are secured to each other only with the help of tenons and grooves. They are not attached to the base in any way.
Attention ! Regardless of the installation method, there must be a gap (at least 1 cm) between the parquet and the wall.
Floating parquet can be repaired.
Gluing with parquet glue
To ensure that the technology of laying parquet on plywood is not disrupted, before gluing it is necessary to treat the floor surface with a primer for better adhesion to the parquet. After the primer has dried, they move on to working with the parquet.
The glue is applied to the base only with a notched trowel; the planks are fastened together with or without a tongue-and-groove system.
The disadvantage of this installation method is the impossibility of partial repairs.

Fastening with glue and nails
The most durable option, but the possibility of repair is completely eliminated. The technology for laying parquet is the same as when using parquet glue, but in addition each plank is secured with nails (a special gun is required).
Parquet laying options
Parquet laying options:
- "herringbone";
- deck;
- square, rhombus, rectangle;
- mosaic and so on.
Deck
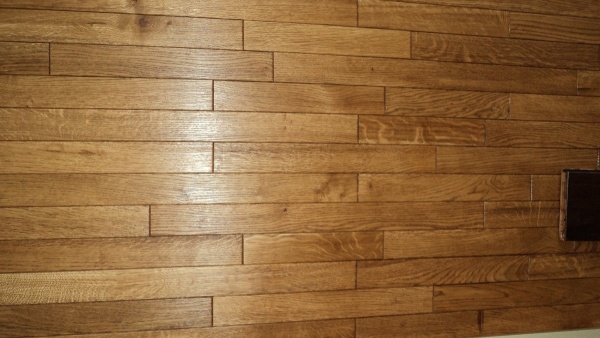
One of the easiest styling methods. All planks are laid parallel to each other. The second row begins with a plank one-half or one-third smaller than the standard one (the required size is sawn off).
You can lay it diagonally across the room, and also use parquet from different types of wood.
Attention ! It is imperative to saw off a tenon or groove from the planks adjacent to the wall.
You need to knock the parquet planks against each other using a hammer with a rubber tip or a wooden plank.
So in a simple way You can lay parquet flooring yourself without hiring specialists.
Square

The planks are joined in the form of a square, and only then laid, the second square is installed perpendicular to the first and so constantly alternates. It should look like a chessboard.
The lighthouse row in a square room begins with the wall opposite the doors, and in a rectangular room along one of the long walls.
The parquet pattern can be absolutely anything, it all depends only on your imagination.
But in order not to get confused with the pattern, you should definitely make a plan for laying the parquet.
Christmas tree

The process of laying herringbone parquet begins with determining the center of the room and drawing a line along which the first lighthouse row will be laid.
A rail is secured to the left of the line so that it cannot move. Laying the planks (three connected together at once) begins to the right of it with the tenon forward (directed towards the master).
Attention ! The planks are laid at an angle of 45 degrees.
If the installation is done with glue, then apply it to an area approximately equal to three planks and install them sequentially (in this case, the planks can be without tenons and grooves).
Approximately every meter, using a second strip, check the evenness and angle of laying.

When laying near walls, you should definitely remember about the gap, especially if you need to saw the planks.
The last stage is sanding, filling and varnishing the parquet.
Before sanding, you should wait at least 5-7 days for the parquet to completely settle and dry.
Sanding is needed to completely level the surface, remove defects, as well as dirt that appeared after installation. The first two times they grind with coarse grain, and then last time small. Then the floor is thoroughly cleaned with a vacuum cleaner.
The putty will close all the cracks and cracks. It covers absolutely the entire floor. After it dries, sand again with fine grit to remove excess putty.
Now the floor is covered with a primer for better adhesion of the varnish to the parquet. Wait for it to dry completely again.
The final stage is varnishing. It will protect the floor from mechanical influences and moisture, and will also give more beautiful view. Glossy varnish will make the floor shiny and the pattern will become even brighter. Matt varnish will give the room more coziness and warmth and make the picture less bright.
Apply from 3 to 9 layers using a roller. After each application, the floor is left to dry for a day or a day and a half.
For self-made For parquet, you will need about 4 pallets of two different types of wood. For example, oak and mahogany. In this case, pallets are a set of wooden blanks certain sizes. Under the parquet you need relatively small bars, preferably 10 mm thick.
Please note: wood in pallets must be well dried - by vacuum or vacuum-convective method. Humidity according to GOST during shipment is no more than 9±3%. Then in conditions normal temperature and room humidity, the dies will not lose their original shape. They will not warp even after getting very wet, but will only swell.
Before we start producing parquet, we buy tools.
- You will need:
- circular saw for making longitudinal cuts;
- crosscut saw.

If these tools are not available, then it is better not to buy them, but to rent them. They are usually rented out construction stores, but it’s a little expensive there. You can also contact specialized companies that rent tools. At one time, we agreed to rent equipment with a company that deals with turnkey repairs - they rented saws to us on very favorable terms. You can try renting everything you need from them.
When all the tools and materials are prepared, you can start working.
Start by marking the future parquet strips (planks).
- Here they are optimal sizes in millimeters:
- thickness – 10 or 13;
- width – 70 or 95;
- length – 490 or 570.
The geometric shape of the planks is an ordinary rectangle. If the thickness of the material is 21 mm or more, and it is varnished on both sides, then first saw the strips. After this you can start making rectangles.
The third step in making parquet with your own hands is cutting ready-made rectangular blanks to thickness. It must be carried out strictly in the middle. You don’t have to do this if you initially found the raw material of the required thickness - 10 or 13 mm.

We lay the parquet we have made
After the dies are ready, we begin laying the parquet floor.
- It can be of several types:
- diagonal – performed in the direction from corner to corner at an angle of 30 to 45°. It is important to outline a plan in advance and then adhere to it carefully.
- classic - straight or herringbone. Block parquet It is better to place it perpendicular to the flow sun rays, i.e. across the room. The herringbone, in turn, can be straight or diagonal.

We chose the “braid” installation method. It's very complex. We advise you to use a simpler installation -.
So, the floor is laid - making parquet with your own hands is completely finished. Now you can buy and install skirting boards. It's best to choose wooden products, V color scheme and quality similar to parquet.
Is it worth trying? independent scraping and sanding parquet? If you do not have special skills, it is better to leave this painstaking work to professional parquet flooring specialists. Our specialists have a full range of tools and many years of experience in bringing parquet floors to perfect condition.
You will need
- - construction level
- - wooden slats
- - twine
- - plaster or alabaster
- - concrete solution or special ready-mix
- - plastering rule
Instructions
Install two guide rails along the edges exactly at the building level. Select the installation height based on required thickness screeds. Stretch several parallel strings between the slats. If the strings are not level, level it by raising or lowering one of the slats. Then install several plaster beacons at small intervals, placing them on plaster or alabaster. The beacons should lightly touch the strings (but do not pull them!), and be parallel to the bars that you installed in. Thus, the room will be divided into small squares.
After that make it thin concrete mortar. To do this, dilute the cement-sand mixture at the rate of 1 part cement to 4 parts thin river sand. Stir and gradually add water until the mixture reaches a semi-liquid state, in which you can easily pour it out, but the water has not yet separated. Fill each square separately; after pouring, remove excess mortar using a plaster rule.
It is possible to level the floor faster and easier if you use ready-made mixtures, so-called self-leveling floors. They are much easier to prepare and level the solution, but somewhat more expensive cement mixture.
A wooden floor, if it creaks or requires a little repair, disassemble it down to the joists and re-coat it. If their strength is beyond doubt, then you can skip this step and simply carefully scrape it off, or sew 8-10 millimeters thick floor plywood onto it.
The production of high-quality parquet flooring directly depends on the condition of the existing base and the choice of installation technology. Compliance with this principle when working with parquet will ensure comfort and coziness in the house.
You will need
- - plywood;
- - leveling mixture;
- - parquet glue;
- - dowel-nails;
- - grinding machine;
- - vacuum cleaner;
- - parquet varnish.
Instructions
Clean the surface of the subfloor from dust and dirt. Eliminate with building mixtures to level out all screeds and irregularities. Use a solution with high peel strength. This is very important, since wood, due to its hygroscopicity, changes its geometric parameters under the influence of temperature and humidity. IN winter period it gives off moisture, as a result of which it narrows. In summer, on the contrary, the parquet plank expands, trying to come off the plywood, which, in turn, transfers stress to the floor screed. The leveling mixture must successfully withstand these conditions.
After leveling the screed, lay the plywood sheets on top of it intended for fastening the parquet strip. Cut the plywood into 0.5 m squares. To accommodate expansion due to changes in temperature and humidity, leave a gap of 0.8–1 cm between the squares.
Using special parquet glue, attach the plywood to the screed, and then nail it in with dowel nails. The latter will ensure uniform gluing by pulling the sheets to the screed. This is also very important, since even minor gaps will cause the parquet floor to creak.
Parquet is one of the main and most popular types of flooring natural wood. Parquet floors have many positive qualities, such as practicality, environmental friendliness, durability.
Wood for parquet flooring
Hardwood is traditionally used to make parquet floors. In turn, this wood can be divided into local (growing in Central Europe) and exotic (Africa, South America, Southeast Asia). Oak parquet is the most common and is distinguished by its durability and beauty. This type of parquet has a pronounced wood structure.
It is ideal for parquet, as it practically does not change the level of humidity and has a high hardness index. Mature oak wood has shades ranging from light brown to yellowish brown. Variegated oak is very elegant. White oak takes on a grayish tint after polishing. Red oak creates a good contrast with light walls and harmonizes perfectly with the furniture.
Over time, the oak darkens a little, which gives the floor a touch of noble antiquity. Beech parquet is smooth, it does not have a clearly defined wood pattern. Beech wood has a lower density and is therefore easy to process; it sands and polishes well. Beech wood is light, with a reddish-yellow or grayish tint.
Parquet made of so-called mahogany - parquet made of merbau (red oak) wood is different beautiful design wood, durability and hardness. In addition to the listed types of wood, alder, ebony, dussia and other types of wood are used to make parquet with your own hands.
Parquet floors
It can be laid on joists laid on separate pillars on a concrete base. The location and fastening of the joists should be done so that the parquet boards laid on them do not sag.
The room under parquet floors must be dry. The logs are laid on concrete or brick pillars up to 250 mm high, standing on the ground at a distance of 400-500 mm from each other. For stability, brick pillars must be made of one and a half to two bricks.
First of all, it is necessary to lay waterproofing on the posts from two or three layers of roofing felt or roofing felt, on them - antiseptic wooden or other gaskets, on the gaskets - logs 40-60 mm thick and 100-120 mm wide. Logs can only be joined on posts.
The surface of the columns should lie on the same level. The logs are first well dried, antiseptic and dried again (they should also lie on the same level). If the soil in the underground is damp, it must be dried, and the columns must be waterproofed at a level of 150 mm of soil, and be sure to perform a second waterproofing along the top of the columns.
See also: