Oval cribs drawing. Do-it-yourself children's bed, features and subtleties of manufacturing. Crib house - a cozy fairy tale
Children grow up quickly, and furniture is quite expensive. In a regular crib, a child can sleep for three, maximum four years. Will have to buy again soon expensive bed, meeting safety and comfort standards. The bed should be as comfortable and functional as possible. In fact, a do-it-yourself bed for a child is made “on time”, you can do it :)
To make a baby crib with your own hands, you do not need any professional skills, and the process will take a maximum of 3-4 days. Drawings and photos for manufacturing are provided on the Internet. From them it is clear: the process of making a crib is simple and exciting. The main thing is to use only quality materials and carefully think through the entire process from start to finish. As a result, both the child and the baby himself will be happy. In this case, instructions are provided for making a crib for a five-year-old child. Of course, he will be able to sleep in it until he is seven years old. But if the baby has a large build, the parameters of the blanks can be changed upward.

On video: review of a crib. Important points constructive solutions, useful tricks.
Advantages of a do-it-yourself crib
Furniture stores have a huge variety of crib models for different ages. You can see cribs made of wood, chipboard, fiberboard and plastic. We provide exclusive models made of artificial and natural rattan, photos of which can be seen in catalogs. But the first factor in choosing a crib for a child should be the material from which the piece of furniture is made.

The crib must be made exclusively from solid wood. It can provide the required strength and durability. We pay attention to the treatment of corners and the safety of all surfaces. If necessary, we clean the shields over the entire surface.
The only drawback of wooden furniture sold in most stores is its sky-high cost. Good model such a crib will cost about 25 thousand rubles, and not everyone considers such costs appropriate, given that the bed will last the child a maximum of 4 years.

A DIY children's bed will cost parents a maximum of 17 thousand. This is taking into account that the highest quality and environmentally friendly materials will be used. Designing and making a crib yourself has such advantages over purchasing finished product in a furniture store:
- you have the opportunity to design a model that will fit perfectly into the interior of the room and will have the necessary parameters, the height of the sides and the size of the drawers;
- confidence in the quality of the piece of furniture. If your child jumps on the bed, you won’t worry that the bottom will accidentally break right under him;
- enjoyment of the process of creating a crib. The baby will even be able to help dad in this important process.
Materials and tools
Before you purchase necessary materials and tools, you should carefully consider the entire process of creating a piece of furniture. Consider whether you are truly ready to complete this process. It is better to do all the work outside the house, as it will be quite difficult to get rid of dust and sawdust. If there is no possibility of privacy in a separate room, you should cover the entire upholstered furniture and remove the carpet from the floor.
You should find detailed drawings of a crib on the Internet or magazines with step by step photos. But if you have experience in carpentry, and have previously encountered the design of furniture, you can do without them. The main thing is to make drawings accurate to the centimeter.

Then we start purchasing materials. We will need:
- furniture panels made of wood;
- aluminum corners;
- self-tapping screws of different calibers;
- wheels for drawers;
- a lattice base for the crib, which can easily be replaced with a sheet of regular plywood of good quality.
The tools you will need are a drill, a jigsaw and a grinder. You should also get a piece of sandpaper to sand corners and cuts.
All materials can be easily purchased at a hardware store. You need to buy another mattress; for a child it is better to choose a good, high-quality orthopedic mattress.

High-quality mattresses are available on the Internet at reasonable prices; their photos and characteristics will allow you to familiarize yourself with the products in detail. Even with this purchase, the cost of the bed will remain more reasonable than when buying a finished product in a store.
To ensure that the dimensions of the mattress and crib match, it is better to first buy a mattress, and only after that proceed to drawings of the crib.
Instructions for making a crib with your own hands
Once you have decided on the sizes and appearance beds for a child, look through photos of popular models on the Internet and find the necessary drawings, you can start making a royal bed for your baby.

Instructions for making a crib are as follows:
- We mark all the parts on wooden boards. It is better to use a regular lead pencil, which, if necessary, can be easily washed off with a sponge. detergent. Don’t forget to immediately mark the sides and the higher headboard: otherwise, it will have to be installed additionally in the future;
- Use a jigsaw to cut out all the details. Here we carefully monitor the straight cut line. We seal the cut edges with paper tape;
- if you decide to draw complex shapes on the side of the crib and its headboard, you can use improvised means as a form. For example - a plate, glass or bottle;
- in accordance with the length of the sides, we cut out aluminum corners and drill 4-5 holes in them for self-tapping screws;
- We screw the corners to the bottom of the sides so that the base of the mattress rests on them. At the same time, they will increase the strength of the structure;
- to connect all parts of the crib, it is better to lay it on its side;
- we process decorative holes (if any) sandpaper, it is better to do the same with sharp corners;
- If the shields are made with high quality, their surface will be smooth and will not require additional processing. But for beauty, the crib can be opened with primer and varnish. Although one impregnation of a pleasant shade will be enough;
- To fasten parts together, it is better to use special ties instead of ordinary self-tapping screws. This is both more reliable and more convenient;
- We assemble the drawers. The best option– two large drawers so that you can put large toys and bedding in them;
- if desired, you can make low legs for the crib, but you should not forget about metal corners for them;
- We lay the mattress on the base and lay down the bed linen. The baby crib is ready with your own hands.
By the way, you can order cutting of materials at a hardware store, having previously provided all the dimensions of the parts.

What kind of bed did you dream of for yourself as a child? Obviously not about those masterpieces of furniture craftsmanship that enthusiasts create today. The only thing that separates you from giving your child the crib of his dreams is your own desire.
Often, it all comes down to the sky-high prices of furniture manufacturers. It is much more rational to buy your child new clothes or a set of books for the future. academic year. Moms and dads, abstract yourself a little from the world of adults and plunge at least for a moment into the world of children.
Go into the nursery and try to look at it through your child's eyes. Every baby perceives the surrounding space as a game and this is how he learns about the world. He will need your help with this.
For example, there is no more effective way to wean a child from sleeping in his parents’ bed than to prepare for him the best place in the world to sleep. Remember how you built houses from scrap materials as a child. Why not an idea for a bed?
The author showed remarkable imagination - and so this project to create a crib in the form of an impromptu house was born. By the standards of US residents, very little money was spent on its production - only $200. IN furniture showroom such an original bed would cost its owner at least three to four times more.

To make a baby crib in the shape of a house you will need:
Materials:
- pine boards, bars and slats;
- glue for woodworking;
- durable oil paint of at least two shades;
- durable furniture varnish;
- furniture screws or wood screws;
- bolts and nuts for assembling the frame;
- nails.
Tools:
- miter saw or any other suitable tool for sawing lumber;
- electric drill;
- sander;
- screwdriver;
- carpenter's hammer;
- fine-grained sandpaper;
- construction tape and square;
- paint brushes and a roller with a paint tray.
Step one: choosing materials
Let's say you have two main tasks. Firstly, since you have decided to make a bed yourself, most likely you are trying to save some money from the family budget. Secondly, given that the furniture is intended to be used by a child, all materials should be as safe as possible.
In order to cope with the first task, choose your base material wisely. Do not rush to buy first-grade lumber in the supermarket. The bed will have to be painted, so no one will have the opportunity to judge the extent of your generosity - the paint will hide all the details.
Of course, the most economical option is to process the wood yourself and make the bed parts. But for this you will need a surface planer. Processing and adjustment of the material on a surface planer can also be ordered in the workshop.
Finally, another affordable option is to buy second-grade materials or use used wood. Supermarkets often offer short pieces of boards for sale, which are perfect for making furniture at home.
But how to choose paint for products that are intended for children? This advice may seem trivial, but pay attention to high-quality compositions famous manufacturers. Regardless of the type of paint, even if it is solvent-based, high-quality paints and varnishes do not pose a danger in their hardened state.
Step two: detailing the bed design
Collect all the photos from the master class and on a piece of paper list all the parts that you will need to make the bed. Dimensions shown in photographs and diagrams are in inches. When converting to centimeters, multiply the value by a factor of 2.5.
Please note that the bed frame is assembled from a back, a front and two side panels, so you will need eight posts rather than four.
The front panel has openings for entry and windows and you will need four additional cross partitions.
One of the side panels is completely covered with boards, while the second is almost open and also serves as a second window facing the sun.
The base of the bed is covered with boards with a small gap. Instead of boards, you can use slats or a solid sheet of plywood, depending on the task at hand.
The back wall, turned towards the wall of the room, remains as it is, and the front wall is also covered with planks. In addition, you will need slats for the roof frame and parts for the roof.
Prepare the staircase elements as well. It will be permanently fixed at the entrance.
Calculate and indicate the exact dimensions of each part of the bed. You will need a lot of them, and it’s easy to get confused in a heap of goodness. A clear plan will help you coordinate your work and act in a coordinated manner.

Step three: making parts and polishing them
Mark the frame and trim parts. Don't forget the stairs. Cut boards, strips and slats to the required length using a miter saw or any available tool.
If you use for sanding belt sander, it's time to start woodworking. After assembly, you can use an orbital sander, but a belt sander will be out of work here.
Pay special attention to the edges along which you cut. When preparing for painting, any surface must be flat and smooth.


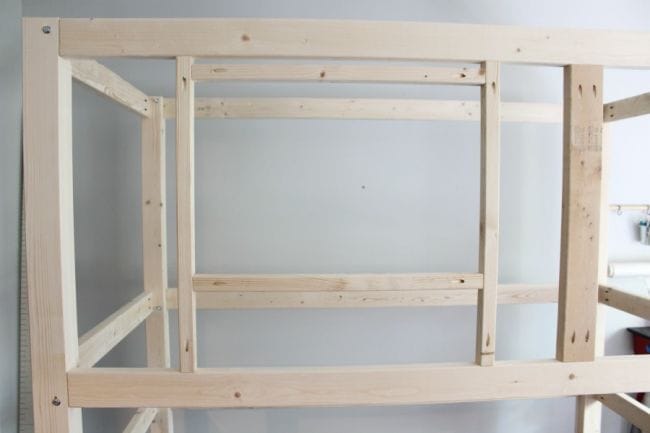
Step four: assembling the crib
Assemble each of the four frame panels using diagonal pocket holes and reliable wood glue. By the way, this time you can’t do without glue. Such a large and heavy structure must be assembled using glue, otherwise it will regularly require repairs.
The panels are ready and you have to connect them to each other. For this, use either furniture screws or bolts with nuts - your choice. Where the side posts meet the front posts, apply glue to the joint surface. Drill holes for screws or bolts, joining both parts together as shown in the photo.
You can also use metal fasteners. Extra Strength Hasn't disturbed any bed yet.
Secure transverse partitions for the entrance and window. Screw the slats from the inside to the longitudinal parts of the bed frame, on which the base sheathing will later lie. Sew up the front and side panels of the bed, as well as the base under the mattress, with boards.
Start building the roof. A special load on the roof structure is not expected, so for the manufacture you most likely used slats or bars of a small cross-section. Cover the front side of the roof with planks, imitating a roof. Install a cross-shaped partition on the window.
Securely fix the ladder at an angle to make it easier for the child to climb to the second tier. Use special metal fittings or bolts and nuts for this.


Step five: painting
The author used white, as the main one. For the roof, he chose a dark gray shade. The crib turned out to be universal and in this color scheme could be used with equal success for both girls and boys.
Choose durable paints and equally reliable varnish. It is better if it is a specialized furniture varnish - nitro varnish or alcohol varnish.
Apply two or three layers of paint and at least two layers of varnish. You may want to apply intercoat sanding during the varnishing process in order to obtain the most durable coating possible.
19.09.2017
Furniture made at the enterprise, although beautiful, is devoid of warmth. And I really want my baby to have a cozy bed, made with love and care. That is why many fathers create children's beds with their own hands. The child will remember furniture made by dad for the rest of his life.
Material options
The material plays a special role in making a crib. Today, store shelves are overflowing with children's furniture made from...
- natural wood;
- Chipboard and MDF;
- metal;
- plastic and synthetic materials.
Furniture made from natural wood is considered the safest from an environmental point of view - this fact has long been scientifically proven. Wood does not have that specific smell that artificial materials have. She is able to create a favorable, warm and cozy atmosphere for the baby, which has a positive effect on his health. It is worth noting that natural wood will always look expensive and solid. Products made from this material will fit perfectly into any interior.

MDF is a board made from pressed wood. high pressure fine wood shavings. From the point of view environmental characteristics close to the performance of natural wood. For children's health furniture made from MDF is considered safe.


IN chipboard production Formaldehyde resins are used, so during operation they can emit substances harmful to health. But for many, the deciding factor is price. Chipboard models have the lowest cost.
Products made of plastic and synthetics can be bright, very beautiful and stylish. But are they good for the child? Young parents often don’t think about the fact that these materials are used in the production toxic substances. Therefore, it is important to remember that during operation, harmful components will be released and harm the baby’s health.
Design elements
The main elements of a children's bed are:
- bottom;
- sidewalls;
- backrests;
- frame strips (frame);
- legs.
Cots also come on wheels. In models of this design, it is convenient to rock a baby to sleep; such cribs are easy to move around the room, if necessary. Some have rocking runners. There are also combined legs: the wheels can be replaced with runners, or you can unscrew them completely. There are also cribs in which the swing is provided by a hinge.
Children's beds can be made in the usual way classic style. However, today they are gaining more and more popularity wooden models, made based on the plots of fairy tales and cartoons. Undoubtedly, both models will look good in a nursery.
However, often beds made in themed decor take up too much space.


It's theirs main drawback, because not everyone can boast of a large living space. Often the crib has to be pushed into a very limited space. Therefore, sometimes, in order to save free space, homemade beds of the required dimensions are made:
- two-tier;
- transformers;
- attics or houses;
- with drawers and shelves.

This piece of children's furniture can be anything you want. The main thing is to comply with the basic requirements: the bed must be:
- safe;
- comfortable;
- beautiful.
Sketches and drawings
If you decide to make a bed with your own hands, then it is advisable to draw a sketch yourself, make a drawing or diagram, which will depict the future “nest” for your child. In such a drawing, all dimensions must be accurately maintained, down to every millimeter. The strength and reliability of the structure will depend on this. 

A drawing or sketch of the future design will greatly facilitate the entire process of manufacturing parts and subsequent assembly. The exceptions are. These are quite complex projects for self-made. As a work plan, it is better to take a sketch made by a professional designer: 

Manufacturing and assembling elements of a crib is a complex process. He demands special attention and great responsibility. Even a minor error in work can lead to dire consequences: the bed can break and injure the child.
Required components
Before starting work, you need to stock up on materials. Buy:
- Edged boards.
- Bars, size cross section which must be no less than 50x50 mm (needed to make the main frames of the structure).
- Slats with a cross-sectional size of 20x20 mm (will be used for filling, for example, making logs).
- Self-tapping screws and bolts.
It is worth going to large stores that have building materials in their assortment. Here it immediately becomes clear that the wood offered comes in different qualities. You need to choose straight boards with the fewest knots. This will greatly simplify and speed up the process of grinding all elements.


Important! Whatever the bed is made (the most ordinary, classic or made for a specific theme), you need to remember the rule - bars and slats must be made of especially strong wood. The quality and further service life of the product depend on this.
Tool
Despite the fact that the child's bed does not have complex design and anyone can collect it, you still need to prepare. Before starting work, prepare:
- roulette;
- drill;
- circular saw;
- Kreg Jig set (a special device for drilling holes at an angle);
- adjustable measuring angle;
- wood glue;
- screws 30, 50, 60 mm;
- varnish on water based;
- stain;
- brush;
- sandpaper;
- wood putty.
Step-by-step photo report
Let's take the following model as an example:

First you need to choose a suitable mattress. All elements of the future design will be manufactured. Then purchase required building material– edged boards, timber, slats, water-based varnish, stain, sandpaper and brush:

Prepare the necessary tools: tape measure, drill, drill bits, circular saw, Kreg Jig set, measuring angle, bolts and screws of various lengths. These things should always be at hand.
Work begins with assembling the racks and sidewalls:

Use a square to make sure all corners are assembled structure straight. Mark the places where the sides will be fixed:

Once the parts are sanded and all the holes are drilled, you can apply a little wood glue to the joints. Without waiting for the glue to dry, remove excess with a napkin.
Fastening of sides with racks:

If necessary, the boards must be fastened from the inside at an angle. To drill pilot holes, use the essential Kreg Jig. This is a convenient and easy to use tool.
Attach the sides of the future bed to the posts:

The crib frame is almost ready:

Now attach the sides of the second tier:

Then prepare the places where the logs will be attached under the mattress:

First fill the unevenness and knots of the frame, then sand it. Next you need to make a ladder to the second tier.

Apply a first coat of water-based varnish. In this case, Lakra “Oak” was chosen. One of its advantages is that it has almost no smell. This is important since there are small children in the house. However, it also has a very unpleasant drawback - it is almost impossible to sand it, and even after drying, a sticky layer remains:

Staircase view:

The staircase in this form is not entirely convenient - it “cuts” the legs, so it will need to be slightly modernized. But more on that a little later.
The top floor is already ready:

It is clear that the sides need to be increased. There is no need to add anything from the wall side. The bed will be close to the wall, which means there is nowhere to fall. On other sides this will definitely need to be done.

Now about the stairs. To avoid the awkwardness and pain of going down it, lightly sand the edges of the rungs with a hand planer or sander. This procedure will give them a neat appearance:

The result of the work:

As a result, you will get a reliable and stable structure. Now we can say with confidence that you can make such a bed yourself, given the abundance of materials and necessary tools with which the shelves are filled construction stores, not difficult at all.
You will find more ideas and tips for making a two-tier structure.
Decoration
Canopy

Bedding
To sew a pillowcase, sheet and duvet cover, it is best to use natural, breathable and at the same time beautiful fabrics. The following are perfect: flannel, calico, satin, poplin.

Mattress cover
To protect your mattress from moisture, you usually use a waterproof mattress protector. Moreover, it is not difficult to do it yourself. For this purpose, a structure is made consisting of oilcloth ( inner part) and knitted, flannel or calico fabric (outer part). To prevent the mattress cover from slipping, an elastic band is sewn around the perimeter of the product.
6503 0 0
DIY children's bed: drawings, photos, manufacturing materials
It is difficult to overestimate the importance of good sleep for a child’s health. That’s why it’s so important to get a comfortable and safe bed. By the way, you don’t have to buy furniture to decorate a child’s bedroom, because you can assemble it yourself. Read on to learn how to do this correctly.
Elements of a baby cot

Before we start making a children's bed, let's decide what distinguishes it from its adult counterparts. Among the distinctive features:
- Dimensions. Mattresses for children's beds are shorter and narrower than their adult counterparts (see table standard sizes sleeping mattresses).
- Number and location of beds. The bed in children's furniture is not made double, more often it is a single design. If you need to accommodate two children, the structure is assembled in two tiers.
- Operational safety. Quality furniture for a children's room does not have sharp corners or traumatic parts.
- Decorative design. Furniture for a children's room should not be boring and visually attractive to the child.

Let's summarize the points listed. A children's bed is made from the same elements as its adult counterparts, that is, it uses a supporting frame around the perimeter, mattress holder slats, a mattress, etc. But all these elements have smaller dimensions and are made of environmentally friendly materials.

Elements in the design of children's furniture are rounded at the corners and painted in bright colors. Important point– to ensure safety, the design of most children's beds uses high sides. The use of such elements is mandatory in cribs for children under 3 years of age.
Deciding on the model

The choice of children's bed design determines:
- Age of children. The dimensions of the bed depend on age - the older the child, the larger the bed.
- Number of children. A single-tier bed is built for one child, and as the number of children increases, the number of tiers increases.
- Gender of the child. The gender of a child affects decorative design furniture.
- Features of the room. In a spacious nursery you can install several single-tier beds, but in a cramped room the structure is built in several tiers.
- Project budget. Material capabilities determine what materials the furniture can be assembled from.
Basic details of wooden beds
The design of a single single-tier children's bed consists of a supporting frame, which is assembled from boards and encircles the product around the perimeter. At the corners of the supporting frame there are vertical supports that serve as legs and as side holders.

At the top of the supports there are horizontal boards - sides. For older children, bumpers are installed on three sides of the bed, and for younger children, on four.
Along the inner perimeter of the frame there are slats that will hold the mattress. At the bottom of the bed there is free space in which there are drawers for storing linen and bedding.

Design bunk bed repeats the design of a single-tier structure with the difference that two beds are supported on the same supports. To make it easy to climb to the second tier, the design uses an extension ladder. To ensure safety, the side of the second tier is located on four sides.
Materials
| Illustrations | Materials and their description |
 |
Solid wood lumber. Boards, timber, furniture panels are solid wood, environmentally friendly safe materials, which I primarily recommend for assembling children's furniture. |
 |
Metal. Children's beds can be assembled from rolled metal, provided that the welds are neat. |
 |
Chipboard (chipboard). Chipboard - not best option in terms of environmental safety. But due to its affordable price, laminated chipboard is still the most popular and in demand material. |
 |
Oriented Strand Board (OSB). From the point of view of environmental safety, OSB is worse than chipboard, since the formaldehyde content in these boards is higher. If OSB is used to make furniture, it must be provided that the surface is covered with several continuous layers of varnish. |
 |
Fiberboard– auxiliary material . Fiberboard (fibreboard) is used as a structural material, which is used to line the bottom of drawers or cover the top of a bed. |
About fasteners

If you are making a bed from lumber or particle boards, for fastening you will need confirmations - universal fasteners in the form of screws with an increased thread pitch. In order to provide greater strength to the confirmations, you can use dowels - wooden choppers that are driven into pre-drilled holes.

You will also need L-shaped corner perforated plates and self-tapping screws to secure them.
Available for sale corner mounts regular and reinforced with scarves on the fold, as shown in the photo. When choosing, we give preference to reinforced plates, as they are stronger and more reliable.
About accessories

A children's bed is a simple structure, where the list special fittings limited to guides for tilting the front wall, a pendulum mechanism for rocking cradles, etc. When assembling it yourself, you can limit yourself to rollers for drawers, as well as hinges and latches for the folding front wall.
Necessary tool

The choice of tool depends on what the furniture will be assembled from. To work with lumber, you need a basic set of carpentry equipment, including a drill, screwdriver, jigsaw, router, 5 mm hex key, and measuring tool. You will also need free space where you can cut out the necessary parts and then assemble them together.
Wooden bed

After we have decided on the choice of materials, fastening hardware and fittings, we will consider how to assemble it with our own hands. wooden furniture for a children's room. As an example, I offer instructions for assembling a typical bunk bed shown in the drawing.

The structure assembled according to the proposed scheme is durable, neat and at the same time budget-friendly in terms of materials. The most important thing is that such a bed is not difficult to make yourself, even if such work is being done for the first time.
| Illustrations | Making a crib with drawers |
 |
Materials and tools. To assemble this bed you need pine or beech boards with a section of 35×100 mm and 25×100 mm. To process wood you will need a miter saw, router, drill, confirm key, and screwdriver. |
 |
Cutting out the details. From a 35×100 board we cut 4 pieces 1900 mm long, 4 pieces 1810 mm long and 4 pieces 800 mm long. On workpieces 1810 mm long we make grooves 35×100 mm as shown in the photo. |
 |
We make legs (supports). As shown in the photo, we attach transverse crossbars into the grooves of the vertical supports, which will be the head and foot of the bed on the upper and lower tier. |
 |
Assembling the bed and installing the ladder. After the end units of the bed are ready, we attach the longitudinal boards and safety barriers. We install slats—mattress holders—in the inner perimeter of the upper and lower beds. We assemble a ladder from a board and a rounded block if round timber no steps can be made from boards. |
 |
Installation of drawer fronts. We assemble the boxes from boards as a rectangular frame, with a bottom attached at the bottom. For convenience and safety of operation, we make the fronts of the drawers without handles with recesses, as shown in the photo. At the bottom of the boxes we attach roll-out rollers. |
Let's take a closer look at the operations you will encounter during assembly.
| Illustrations | Assembly process details |
 |
Screwing in confirmations. To screw in the confirmat, we drill a hole - for this we use a drill with a special cutter. If there is no special drill, drill a hole the length of the confirmation and a diameter of 3 mm. Then we expand the edge of the hole made to 5 mm to a depth of 5 mm and get a recess under the head of the confirmation. We screw the confirmat so that its head is completely recessed into the wood. Subsequently, the mounting hole will be closed with a decorative plug. |
 |
Holes for dowels. To install the dowel, holes of the appropriate diameter are drilled in the parts to be connected, most often 6 or 8 mm. The depth of the hole in each of the connected parts is 15 or 20 mm (depending on the length of the dowel). The dowel is driven into the wood with or without preliminary application of glue. |
 |
Making the base for the mattress. To install an orthopedic mattress, you can purchase ready-made lamellas, like those shown in the photo, or you can cut the same pieces of boards yourself. A barrier is made from a block along the inner perimeter of the bed, onto which prepared lamellas are laid.
|
 |
Installation of swing facades. As an alternative drawers You can install hinged fronts at the bottom of the bed. Installation of facades is carried out using conventional adjustable hinges. |
 |
Decorating the bed. Ready-made furniture can be treated with stain and varnished if it is wooden. In other cases, painting is the preferred option. Alternatively, a bed made of wood or chipboard can be upholstered with fabric pre-pasted with foam rubber. |
Homemade bed-car
| Illustrations | Assembling the car bed |
 |
Support frame. From furniture board a rectangular frame is assembled - a box. Gaps are cut out from one of the ends of the box using a jigsaw to imitate a radiator grille, headlights, etc. |
 |
Imitation windshield . Openings are made on the sides of the body through which the child will enter the structure. At the distance at which the hood is expected to end, we attach a frame assembled from slats. |
 |
Installing the Drawer Lid. The lid of the bedding box, imitating a hood, is attached to a piano hinge at the front of the bed. At the same stage, the wheel rims are attached to the sides. |
 |
Mattress holders. Inside assembled box a plywood sheet is installed on which the mattress is laid. |
 |
Primer and painting. After the bed is assembled, the surface is primed and painted. Considering the complex design of furniture, to work with paint and varnish materials It is preferable to use a brush. The choice of paint is not important, the main thing is that it is completely dry before use. |
Let's sum it up
Now you know how and what to make a children's bed from. If according to the proposed step by step guide If you have any questions, ask them in the comments to the article.
A costly event for parents. To cut costs and furnish children's space furniture, you don’t have to buy it. One of available options- a crib, you can make it even if you have no skills.
Before you start making a crib, you need to make a calculation taking into account its design and prepare the necessary materials. A bed made to individual measurements will not let you down in use.
When taking measurements, accuracy must be observed.
Design calculation and drawing

Selection of materials for assembly
When choosing materials, it is better to give preference natural materials, solid wood and plywood are ideal for this purpose. Usage natural materials will save the child from toxic effects. You should purchase the necessary fittings, fastenings and other materials taking into account the design of the bed.
Use only well-dried wood, without visible damage or knots.
Required materials

The most expensive part of the cost will be on the mattress. There is no need to save money on buying a mattress, from
its quality depends on the health of the child.
Orthopedic mattress guarantees a comfortable sleep and eliminates the problems of incorrect body position during sleep.
Where to start assembling a crib

When assembling, the screws must be tightened so that they do not stick out.
Assembling linen boxes
Once the base is prepared, you can begin making the cabinets. Typically, the crib has 1-2 cabinets with a pull-out mechanism. The base is made from solid wood, and the bottom is made of plywood.
If the child is small, you can make an educational mat for him yourself.
- The cut material is sanded and assembled according to the drawing;
- Equip the cabinets with a retractable mechanism, it is attached with self-tapping screws;
- To make the cabinets easy to open, you need to attach handles.
The back or head of the crib
 Depending on the type of crib, it can be decorated additional elements- back or headboard. Wooden back will save the child from touching the wall while sleeping and protect the wallpaper.
While the headboard will allow you to comfortably place the pillow. Combined models provide for the placement of a backrest and headboard.
Depending on the type of crib, it can be decorated additional elements- back or headboard. Wooden back will save the child from touching the wall while sleeping and protect the wallpaper.
While the headboard will allow you to comfortably place the pillow. Combined models provide for the placement of a backrest and headboard.
- According to the drawing, it is necessary to cut the solid wood according to the shape of the intended backrest. Standard back height: 70-90 cm;
- Before fastening the back or headboard, do not forget to sand everything with sandpaper;
- Instead of self-tapping screws, it is better to use long bolts as fastening materials.
It is better to leave the parts of the headboard, footboard and backrest wooden; in this form the crib can be washed.
Finishing work
The moment the crib is assembled with your own hands, you can begin decorating it. You don't need any special tricks for this. Natural wood is absolutely harmless to the health of the child. So that its surface is well preserved and acquires smooth surface, wooden parts must be coated with non-toxic varnish. If the design includes bright colors for the crib, it can be painted acrylic paint.
You cannot paint the crib in a residential, unventilated area where there are children.
DIY bed making video
Detailed video material will allow you to make a crib from wood and then paint it with acrylic paint. The author of the video explains all the working aspects, from cutting parts to assembly.
Types of children's beds
Choosing a children's bed in favor of a special design poses challenges for parents not an easy task. Different bed models are classified according to functionality and dimensions: 
- cradle cot for newborn children, size 90 x 45 cm;
- standard playpen size 120 x 60 cm;
- cot for preschool children with drawers measuring 140 x 70 cm;
- transformable bed size after transformation 190 x 80 cm;
- bunk bed with drawers and ladder;
- non-standard cribs in the form of a sports facility.
 Cradles and cots in the form of a playpen are designed for children from birth to three years. Using the diagrams presented on the Internet, you can make any model or in accordance with your own design. A crib painted white can be decorated using decoupage techniques and a removable canopy made of harmoniously selected fabric.
Cot for children from 3 years to younger school age will give comfort during sleep and rest. Spacious cabinets with pull-out mechanisms allow you to store  children's things. Thanks to its simple design, it can be made in a few days. The presented model does not require additional decor. Unpainted wood looks natural and natural. Contribute bright colors Bright pillows and soft toys will help.
A transforming bed will help out in situations where you need to save space. Transforming option sleeping place for a child you can buy it in a store or create it yourself according to drawings. Bunk beds also allow you to save space in a children's room.
The top tier of the crib must be equipped with protective railings.
Beds of unusual shapes
 Children are especially delighted with cribs of unusual shapes.
It is a mistake to think that you cannot make an amazing sleeping place yourself. Using the drawings, you can make cribs of a wide variety of shapes. Men who love working with wood can try their hand at making a machine bed.
Children are especially delighted with cribs of unusual shapes.
It is a mistake to think that you cannot make an amazing sleeping place yourself. Using the drawings, you can make cribs of a wide variety of shapes. Men who love working with wood can try their hand at making a machine bed.
 By building a bed in the shape of a sports facility, you can combine play and sleeping space into one. Active children will appreciate a crib with a slide or a fairytale house. After studying the complex design, you can make such a model yourself. To complement the sleeping area, use additional drawers and compartments for storing children's things.
What material is best to make a bed from?
The undoubted leader is natural wood of valuable species.
- The most common and available material- solid pine;
- Using alder will allow you to get a bed of noble colors;
- A beech crib will last for many years, it will not creak, crack or become loose;
- The beautiful structure of ash will give the piece of furniture a natural shine;
- Using solid oak will allow you to get an exquisite crib in which you can raise several generations of children.
A homemade bed with your own hands is a practical solution for arranging a nursery. The design of the presented models is quite simple, so a novice craftsman can make it. Using the instructions, drawings and detailed video material, it is quite possible to make a bed for a child.
