Traditional and unusual ways of attaching shelves to the wall. Corner shelf Wall mounting options
Shelves are quite often used not only to complement and decorate the overall interior of the room, but also for a clearer and more appropriate organization of space. Thanks to their use, the owner of the apartment gets the opportunity to conveniently locate great amount small things that are simply lost in the cabinets.
There are many on the market today various models which are made from different materials. They also differ in design.

You can choose not only products with classic design but also ultra-modern designs.

But more and more people prefer to make such interior details on their own. Asking how to make a shelf with their own hands, they re-read a lot of literature and look through a lot of catalogs.

However, this does not mean that independent production shelves are complex and beyond the power of a person who does not have special skills. No, this is absolutely not true.

Familiarization with the literature in this case is necessary in order to create a product with beautiful design that will fit into the overall interior. Let's consider in more detail what shelves are.
Types of shelves
Any specialist will tell you that before you start creating a product, you need to decide for yourself what kind of design you want to get and whether it will be combined with the interior. And only after that you can start creating the product.

Indeed, for a house decorated in a classically seasoned style, it is completely unacceptable to use trendy and modern shelves. They will look extremely awkward.


The most popular and widely known subspecies of shelves is the classic shelf. This is due to the fact that it is quite simple to install, and appearance, due to its simplicity, it seems refined and sophisticated.
Used with success and open, closed shelves. Closed products are used most often for decoration and installation in rooms decorated in more modern styles. Glass and sometimes plastic are used for their construction.

Open structures can be used both in modernly designed houses and in apartments with a classic design. Over the past few years, this particular type of shelf has gained immense popularity and therefore is gradually replacing the classic options.

AT small spaces quite often you can see corner shelves that have a special way of fastening. They are mounted on adjacent walls that are adjacent to each other. Most often they are used in bathrooms, kitchens and utility rooms.

In addition to the above types of shelves that are mounted on the wall, there are suspended and floor structures. Hanging shelves mounted in an unusual way.

They are installed using cables and vertical racks, and are attached directly to the ceiling. This mount looks quite unusual and original.

Floor structures are most often used in hallways. After all, it is floor shelves for shoes, made by hand, not only look beautiful, but also help you organize the space of a small hallway. It is quite easy to make them though.
How to make a simple shelf
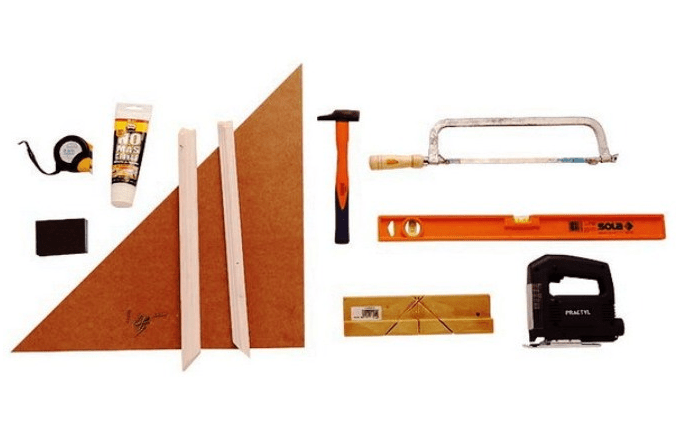
To create the claimed product, you should purchase or prepare some tools and materials in advance. As connecting elements, you can use whatever suits you best. But the most popular are ordinary screws, brackets and dowels.
Note!


For example, take a photo of the shelves with your own hands, which is presented below. It depicts a product with the following parameters: width 250 mm, height 300 mm, length 1100 mm. The manufacturing process for convenience will be divided into stages.
Stages of work
At the first stage, you need to markup. To do this, you should lay the boards on a table or any other flat surface and transfer the measurements from the drawings. The side walls must have a height of exactly 268 mm.

This marking is optimal because the side walls will be located between the two parts.

At the second stage, it is required to cut the boards. To get even and neat cuts, you need to use an electric jigsaw. After cutting, you will get 2 fairly long blanks and 2 shorter ones.

At the third stage, you can start processing the received blanks. The resulting segments should be covered with a special protective varnish or stain, after sanding them.

Note!

In the event that you plan only to paint the shelf, you can get by with a conventional antiseptic primer. So you will increase not only the service life, but also achieve a more even distribution of paint.

At the fourth stage of making a wooden shelf with your own hands, you proceed to its direct assembly. The bottom board should be laid on a flat surface. Step back 8 mm from the ends of the workpiece and draw two lines parallel to the cuts.
They should mark 2 points with a distance of 5 cm from the edge. At the marked points, it is necessary to drill holes for self-tapping screws. With the second workpiece it is necessary to do the same manipulations.

After that, you should install the side blanks on the bottom of the board and secure them. Once you're done attaching the side panels, move on to installing the top panel and securing it.

At the fifth stage, you should fix the brackets on the ends of the side panels, and make several holes for the dowels in the wall. After that, screw in the screws so that they protrude by 5 mm. And now your shelf is ready.

You can make acoustic shelves in the same way, but you need to take into account the dimensions of the equipment itself. Measurements should be taken carefully, because if you make a mistake, the work will have to start over.
Note!


DIY shelves photo


Very often you have to hang shelves on the walls to accommodate all the elements. To rationally plan the interior, it is worth using the corners and, thus, freeing the walls for cabinets and shelving. This requires a corner shelf, which can be made independently from existing materials. The article will discuss the main recommendations on how to make a corner shelf, as well as the main examples of designs.
Place corner shelves in different rooms
You can install a corner shelf in every room, but in most cases it is great for a kitchen or bathroom. Any housewife will quickly place on it a variety of jars with seasonings, cereals and other kitchen utensils, and in the bathroom such a shelf near the mirror will allow you to accommodate all hygiene products and empty the necessary drawers. It should be noted that these premises have enough high level humidity, which means that the tree will need to be additionally treated with antiseptics and applied at least two layers of paint. The best option plastic or glass will become, as they have a greater number of advantages:
- resistant to moisture and temperature changes;
- mold and fungi do not appear on surfaces;
- withstand a lot of weight;
- easy to clean;
- A variety of colors will allow the design to fit into any interior.

Also, corner shelves on the wall are a rational option that is suitable for bedrooms, children's rooms and living rooms. Any other furniture can be placed under the shelf, for example:
- nightstand;
- computer desk;
- armchair.

Regardless of what material was used, the design will look spectacular and presentable. All sorts of little things will be conveniently placed on the corner shelf: books, photographs, dishes, candles, toys and much more.
Note! To add a corner shelf greater effect, you can lead to it LED backlight. With this method, designers give the wall depth.
Necessary materials and tools
Before embarking on planning and manufacturing, it is worth collecting the available materials and calculating: will they be enough? You can make your own corner shelf from the most variety of materials, such as:
- wooden boards;
- plywood;
- glass;
- plastic;
- window profiles;
- iron and others.

The first 4 options are considered the most common and practical. Everyone will cope with them, besides, a special tool is not required, as is the case with glass or iron. The set of tools in each case will be varied, but if we talk about lumber, then it is worth preparing in advance:
- hacksaw;
- jigsaw (manual or electric);
- saw;
- stationery knife;
- drill;
- sandpaper;
- glue and fasteners;
- ruler;
- pencil;
- paints and varnishes (paint or varnish);
- brushes.
Note! For comparison, when making a glass corner shelf, you will need fewer tools: fasteners (self-tapping screws and dowels), level, drill, felt-tip pen and ruler.
Step-by-step instruction

- In the role of the main material, an ordinary board, which remains from the repair, is suitable. The width should be selected individually, based on the items that will be placed on it and the place where it will be installed.
- In addition, for fastening you will need glue with a dispenser and screws (3.0 × 25 mm). As a decor, you can use semicircular slats.
- We apply markings on the board at an angle of 45 ° of the required length and, using a hacksaw, cut it at an angle of 45 °. As a result, we get 4 shelves.
- From the remnants of the board, you need to cut racks of the same size (for example, 5 × 20 cm) in the amount of 6 pieces.
- All elements must be cleaned sandpaper to perfect smoothness.
- Let's start building the structure. To each shelf, except for the top one, it is necessary to fix two racks. The markings are applied in the middle, then the elements are fastened with screws. To strengthen the fasteners, use PVA glue.
- For ease of fastening, the racks of the middle shelf are placed at the edges.
- The remaining parts of the corner shelf are assembled in the same way.
- If desired, and if you have free time, you can decorate the shelves using semicircular slats. So, with their help, you can make low handrails so that small or round accessories do not fall out. On the finishing stage the shelf is painted.
Note! After the first element has been cut out, it is necessary to attach it to the wall and check the correctness of the calculations. To prevent the board from bursting when fastening, a hole for self-tapping screws is drilled a little smaller than the screws.

Corner glass shelf
To make a small and simple design, it does not take much time and special skills, even if we are talking about a glass shelf. So to be precise and make a design correct sizes measurements need to be made. After that, a diagram is drawn on paper indicating all the parameters obtained.
Glass cutting can be done independently, if there is no tool, then go to a special workshop. Here the masters will be able to cut out the necessary shape in a few minutes. Holders can be:
- metal rods;
- aluminum profile;
- wooden frame.

AT ideal it is worth buying special holders, to which self-tapping screws and dowels for fastening will be included. Holders are fixed on the wall and glasses are put on alternately. Using the building level, evenness is checked. As a result, the cost of the shelf will be lower than the cost of a new one from the store.
Note! For convenience, experts recommend creating a template for a future cardboard shelf. This will avoid inaccuracies.
Only with exact observance of the data obtained after measurements, it is possible to produce a high-quality and reliable product, in particular, a corner shelf. It is very important to measure between the walls, as this angle is not always equal to 90°. As a basis, you can take the most different materials that gather dust in a shed or garage.
The problem of space is relevant for small and large apartments. It is very difficult to fit everything you need into the limited square meters.It is almost impossible to imagine a house, office or apartment without comfortable shelves. The element performs an aesthetic, decorative role.
Shelves help free up space and diversify the familiar interior of the room.
Shelves are used in absolutely any room and for completely different purposes. Looks great in bathrooms, kitchens and living rooms.

Consider the features and benefits of building corner shelves on your own.
Previously, the handicraft production of any furniture was considered the lot of the poor. Wealthy people preferred to purchase interior items in stores. But everything there had almost the same design, so thirty years ago the interiors in different houses were almost identical.

Today original furniture own production is a real pride.
In modern stores there are dozens of different models of furniture, but even among such a variety it is difficult to choose one option that can meet all the preferences of the owner of the house. In this case, there are only two options: order furniture directly from the manufacturer, or build it yourself.

Making shelves on the wall with your own hands is not at all difficult, and you can use a wide variety of materials.
The first option may seem ideal. However, not every master will be able to make furniture with high quality, inexpensively and take into account all your wishes. Finding such a specialist is not easy, and it makes no sense to search if you need a simple wall shelf.

This design element is easier to build on your own.
Self-manufacturing shelves has a lot of advantages.

We make a shelf on our own: how to decide on the design and materials?
Any wall shelf can have different shape and design. They can be complex (with additional elements) or simple. Simple shelves can be used in the kitchen.

They are used to store condiments or kitchen utensils, so come up with complex design it makes no sense.
Shelves in a semicircle are very easy to make. This option is ideal if there is no time and desire to do something more complicated. Also, simple shelves can be used in apartments and houses decorated in minimalist directions.

Similar styles are not welcome complex shapes and intricate designs.
Shelves with additional elements can be used in living rooms. They may consist of several sections, or have unusual shape, for example, in the form of the letter "G".

Often, such furniture occupies not only a corner, but also some part of the wall.
You can decorate such furniture and original way cutting, if you have experience in this matter. Shelves placed in the corner also differ in the presence of a back wall. It may be present or replaced by a wall. If there is a desire to preserve the decoration of the walls, then it is still better to build a furniture wall.

It doesn't take much effort.
In this article, we will look at the process of building a classic-shaped corner shelf. This form is very simple and versatile. Its production will not even take two hours.

To get started, you should decide not only on the shape of the product, but also on the material.
Consider the types of materials and their advantages.

To quickly determine the raw materials, be sure to consider comparative characteristic presented in the table.
| Characteristics | materials | |||
| Wood | Plastic | Glass | Metal | |
| Aesthetics | + | + | + | +/- |
| Durability | + | – | + | + |
| Ease of processing | + | + | – | – |
| Price | high | low | high | low |
| Moisture resistance | + | +/- | + | – |
| High temperature resistance | + | – | + | + |
| Strength | + | – | +/- | + |
After analyzing all the characteristics, you can see that it is easier and easier to create a corner shelf from wood.

In this article, we will look at detailed instructions making such furniture.
Tools
To make a shelf out of wood, you need to properly prepare the raw materials and tools. Start by preparing the tools. To build a corner shelf out of wood, you need to find:
- Electric jigsaw;
- Regular ruler 50 cm;
- Hacksaw;
- Glue;
- Drill;
- Building level;
- Sandpaper;
- Shelf fixing.
Tools for making shelves.
materials
In the role of the main raw material for creating a shelf, the most ordinary board, which was lying around on the balcony after repair, is suitable. You can also use leftovers old furniture, or purchase a board in the store. When choosing the main raw material, consider several criteria:
- Design. The board should have a suitable color and a beautiful ornament;
- Quality. It is better not to use rotten and old boards;
- Integrity. Sheet for making furniture should not have scratches and potholes.
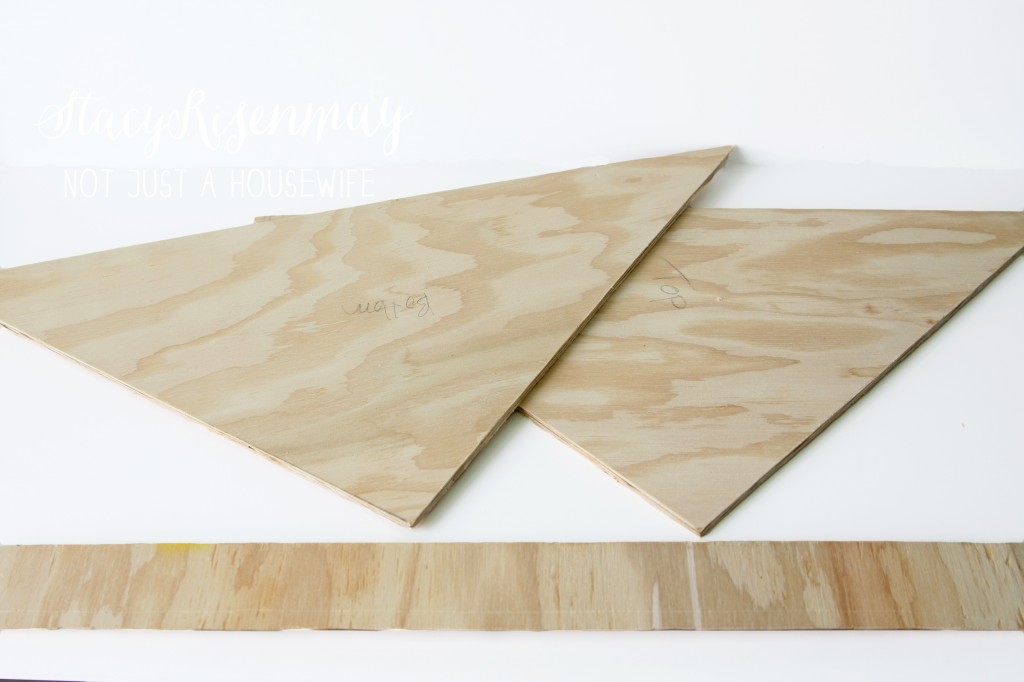
From the prepared board you need to cut blanks.
Cut pieces of plywood diagonally, clean the edges with sandpaper. Four racks can be cut out of the remnants of wood. They must be the same size.
Manufacturing process: step by step instructions
As you can see, the shelf manufacturing process does not require special costs and tools that are hard to find at home. Almost all materials and equipment are available from any owner. In this section, we will take a closer look at how to make a corner shelf

VIDEO: Workshop on making a corner shelf.
Corner shelves in the interior - 50 photo ideas:


Today, even the most modern and fashionable designer does not use the opportunity to use practical and stylish shelves in interior design. They will become not only an integral part of the future decor, but will also serve as an excellent stand for books (mount for bookshelves), for photography and decorative items.
There are two types of shelf mounts available:
- standard method (using hinged brackets, corners, etc.);
- fastening shelves to the wall without visible fasteners.
We will consider the first method in more detail, since with a standard design it is difficult to achieve a combination of the future interior with the target design.

- Mounting preparation
- Detailed mounting instructions with photo
Consider the process of preparing the mount
- First, you need to assess how reliable wall, where our shelf will be directly mounted. If it is a brick wall, then it should be at least 25 cm thick, and if you have a concrete wall, then from 10 cm, which will allow you to place not only decorative elements on the shelves.

1 - fastener;
2 - holes for mounting;
3 - metal rod;
4 - hinged bracket;
5 - shelf.
2. After that, we proceed to determine the thickness of the future shelf.
To do this, you must know exactly what will be located on the shelf so that there are no deflections and deformations. You can check this simply by taking a board of approximately thickness and placing a load on it.
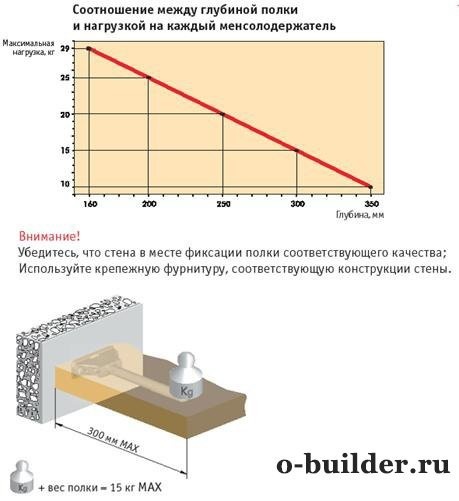
- If the concept of the interior requires a thicker board, then in this case everything should be used according to the recommendations of your designer or chosen style.
- You will need to take into account the features of the fastening, since the thickness of the shelf cannot be less than 3 cm. If there are books, it is better to use a thickness of 4.5 to 6 cm.
- The future shelf will need to be dried and soaked well before processing.
How to install shelves to the wall without visible fasteners
Step 1. We measure the distance between the holes.


Step 3. After that, we apply our fastener to the resulting axis and mark the holes for it, which should be located on a horizontal line.

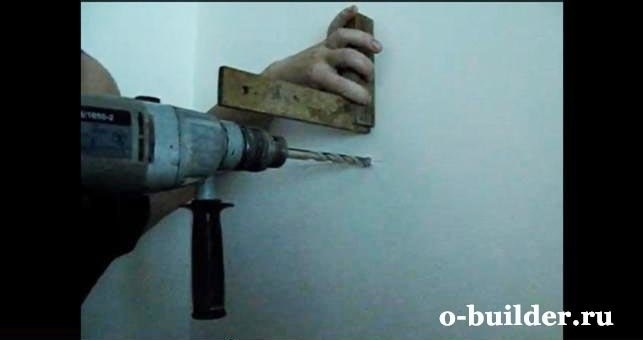
Step 5. After that, we clean all the holes from the remnants of chips and dust and hammer in wooden pegs or plugs for dowels.

Step 6. After that, we take dowels or screws and fasten the fastener to the plugs or pegs.

Step 7. After that, we proceed to the installation of the shelf itself on the fasteners. If the shelf does not sit very tightly, then you can tap on it with your palm or a rubber mallet to secure fixation. It should be noted that you need to knock alternately on the left and right, so you will prevent the shelf from being skewed, and it will sit evenly on the fastener.
The corners in the room almost always remain unoccupied, but meanwhile there is enough space there to accommodate a small shelf, shelving or suspension. From a design point of view, the corner arrangement provides some advantage, because such a wall articulation expands the possibilities of using various configurations of structures and the fasteners used. If you compare ordinary and corner shelves, you can immediately notice how much more diverse and attractive the latter look. Let's try to decorate your house with such a corner shelf.
The most popular materials for making shelves are wood, furniture board, MDF, laminated chipboard, etc. Sometimes shelves are made from improvised means - laminate, plastic or even drywall. We will not change traditions and take furniture plates as raw materials. To work, you will need a jigsaw, a drill, various fasteners, a tape measure and a pencil. First you need to make a sketch of the future shelf for clarity of work processes.

The shelf will be about 70 cm high with three sections. It will fasten through vertical elements with the help of dowel-nails, and among themselves the parts will be connected by confirmations.

The first thing to do is mark all the details on the plate. Usually this is done with a pencil, but if the plate has a dark surface, then the pencil mark will not be noticeable, in which case you can use a knife. It is necessary with his blade, without pressing hard, to draw along the line of the cut, after which a thin, white, noticeable line will appear, along which it will be easy to cut.

To cut out the elements of the shelf, you can use an electric jigsaw. The saw blade must be small tooth and intended for woodworking. The sawing speed regulator on the jigsaw must be set to the minimum value, and the mode selection knob must be set to "0". To facilitate the assembly of the shelf, it is necessary to number the parts on the drawing, and then put down the corresponding values on the structural elements themselves.

After all the details are cut out, you need to drill holes in them for connecting with confirmations. It's much easier to do it consistently. First you need to make holes in the shelf, and then drill through these holes corresponding to them in the supporting element. If there is no special drill for confirmations, then it is necessary to use 3 ordinary drills with different diameters - for the screw part, thickening and head of the euroscrew.


Immediately at this stage, you can make holes for attaching the shelf to the wall. It will be fastened with dowel-nails 6x80 mm through the supporting elements. All holes must be countersunk to ensure that the nail head is flush with the surface.

When all the details are cut out, you can start decorating the edges. First, we clean all the edges of dust and sawdust formed during sawing. Then we apply an edge tape to the ends and, using a heated iron (it is advisable to take an old, unused one), glue it to open surfaces.
This trimming tape is produced standard width at 1.8 mm, and the thickness of the furniture plate is only 1.5 cm, so part of the tape remains redundant and must be removed. We cut off the excess part of the edge with a regular wallpaper knife.


We clean the resulting edge with fine-grained sandpaper. You can close the ends with any other accessible method, for example, use a decorative cord, braid, special paper or cardboard.
Now you need to assemble the shelf. The assembly is carried out in accordance with the numbered scheme. We use a hex wrench to tighten the confirmations.
Trying on assembled structure to the place intended for it and mark the attachment points on the wall. For drilling in concrete or stone walls, we use a drill with a pobedite tip. On the drill tip, you can pre-mark the drilling depth required for the prepared dowel. So that the dust generated during drilling does not scatter, you can stick a paper "pocket" on the wall under the place of work.


After drilling is completed, you need to insert the dowels into the holes and, through the corresponding elements of the shelf, fix it with screw nails, drowning the hats. This can be done with a hammer or a regular Phillips screwdriver.


You can decorate the open caps of the fasteners with the help of special plastic plugs of a suitable color.
Perhaps such a shelf will turn out to be too simple in appearance, but we made it from materials that often gather dust in our pantry or live out their lives in the country. The design can be changed at your discretion, for example, to make the supporting elements longer and then the shelves can be used as bookshelves. Or choose a different shape of the end pieces, in which case the shelf will acquire additional decorative effect. In any case, a hand-made item will serve as an example of the individual skill of the owners of the house.

