New cabinet from old one. What can be done from an old closet. Restoration using staining
Despite the fact that Soviet-era furniture is quite reliable and strong, it is not considered beautiful, much less competing with modern furniture. In addition, by this time it was pretty worn out and required repairs. Even in such conditions, the owners feel sorry to part with her. To buy a new, modern one, you need a lot of money, since furniture has always been not cheap, and it is not cheap now. In this case there is one alternative option leaving old furniture and not buying new is to try to update the furniture with your own hands, giving it an attractive and modern appearance. Cabinet furniture can be remade quite easily, especially since all the materials necessary for this are available. In any case, purchasing materials for remaking furniture will be much cheaper than buying new furniture. One of the easy and accessible techniques is changing the color and replacing the fittings. There won’t be any special problems with the fittings, but changing the appearance is much more complicated. There are several options, but the two most common are painting and gluing special film or wallpaper.

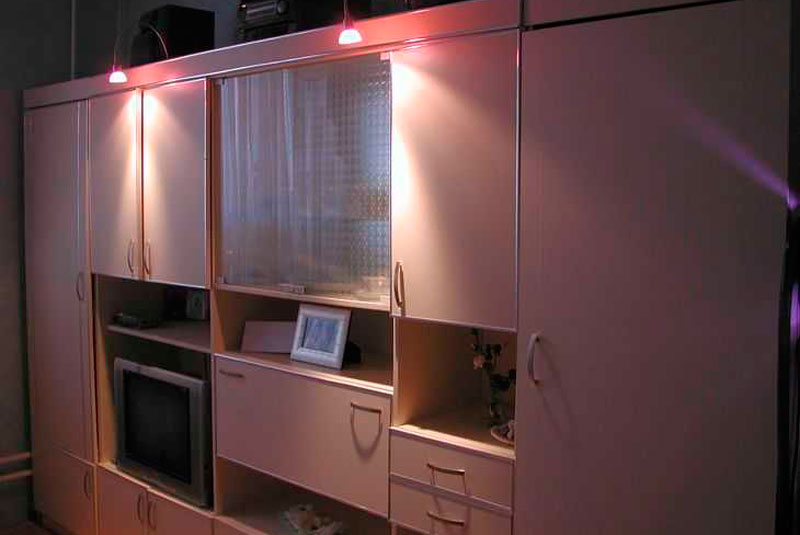
The most affordable and simplest option is to paste old furniture self-adhesive film. On sale you can find film for every taste, both colored and monotonous, in various colors, shades and textures. Many people prefer wood-effect film, but there are other options that meet the spirit of modernity. This approach can really turn an old wall into furniture that will have an attractive and modern appearance. It’s not difficult at all; it’s enough to do your work slowly and carefully, which will allow you to get an interesting result that deserves attention. To verify this, just look at 2 photos. The first photo shows an outdated Soviet wall made of chipboard, and the second photo shows the same wall, but after updating.
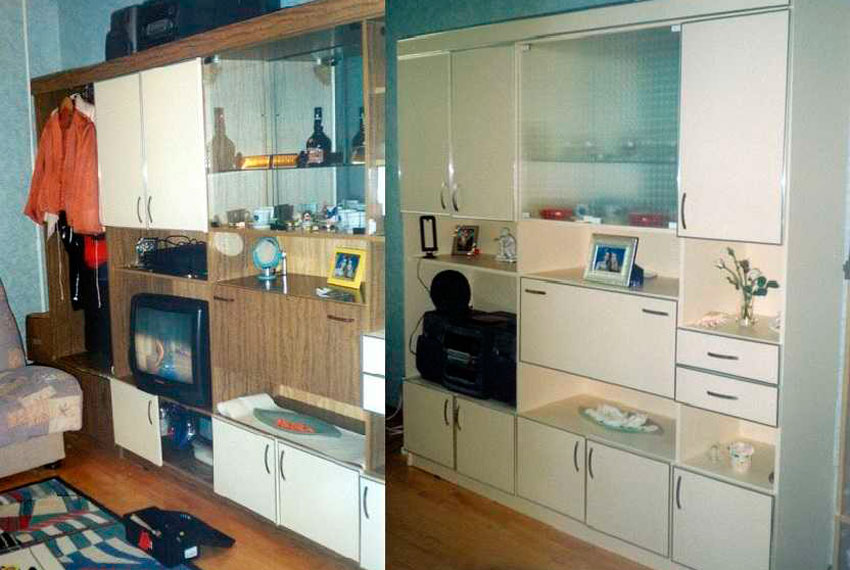
The wall received a new appearance thanks to the use of compacted furniture self-adhesive film, cream color with a matte surface. Where there was an open part of the wall, there were glass doors covered with a translucent matte film. For the edging, a furniture layout was used, chrome-colored, and also self-adhesive.
The work consists of the following stages:
- The old wall is disassembled, everything that is not needed is removed, including the fittings.
- All surfaces are cleaned of dirt and degreased. To do this, use a soft rag and detergent. After this, the product is washed off warm water with vinegar and finally wipe the surfaces with a dry, clean cloth.
- Fragments of the required size are cut out of the film, with a margin of up to 1 cm. After pasting, the excess film is cut off with a stationery knife.
- Before pasting, the surface is irrigated with water from a spray bottle. A wet surface will allow you to accurately position the film, since it can be moved, or even peeled off if it was not possible to glue it properly the first time.
- Before pasting, remove from film protective film, after which it is laid on the surface. Having correctly positioned the piece of film, begin to smooth it with a soft cloth in the direction from the middle to the edges. The main thing is that there are no air bubbles left under the film. In this regard, all work is performed slowly and very carefully.
- When bubbles form, they are pierced with a thin needle and the air is expelled from them. This operation is also carried out using a rag, moving from the edges to the puncture point. After this, this place is thoroughly rubbed with a rag.
- After the film is glued, a thin cotton fabric is taken and placed on top of the film, after which an iron is used average temperature heating The fabric is ironed together with the film.
- Finally, the trim (edging) is glued and the fittings (handles) are installed.
- This technology is applied to every part being glued. Glass is glued in the same way, only from the inside. After complete assembly you will get a completely new furniture wall. In this way, you can breathe a second life into items such as bedside tables, chests of drawers, cabinets and kitchen furniture.
After the wall was successfully pasted over, it was also updated old wardrobe and installed on the right. The result is that the entire wall is filled with updated furniture. Using the same technology you can update the old one kitchen furniture- glue self-adhesive film and replace the handles.
There is a second option for upgrading furniture, which is less expensive and, what’s most interesting, does not require disassembling anything. IN this option Only furniture doors are covered, not with film, but with non-woven wallpaper. For gluing, PVA glue is used. To prevent the edges of the wallpaper from lifting, they are cut into blanks, the size of which is 5 mm smaller than the size of the doors. Judging by the photo below, the result is not bad at all.

The advantage of such a finish is that the finish can be replaced with new wallpaper at any time.
As a rule, a surface covered with wallpaper lasts for five years. A similar technology was used for finishing kitchen set. To make the surface washable, the wallpaper is covered with two layers of PVA glue. The most important thing here is to do everything carefully so that no smudges form, since you will have to work with a brush.
Alternatively, the wallpaper can be opened with varnish, but before that it is better to experiment on unnecessary wallpaper. It is important to determine what the reaction of the wallpaper to the varnish will be. When choosing a varnish, you need to know that acrylic and cellulose provide a transparent surface, while polyurethane will turn yellow after a certain time. Polyurethane varnish It is practically unaffected by solvents and, if it needs to be removed, you will have to resort to mechanical action. Usually a large one is used for this sandpaper or use an electric drill with an attachment.
How to update a chest of drawers
An old chest of drawers can sit in the attic for several years and lose only its appearance. Typically old varnish coating cracks, but otherwise he can be envied modern furniture. It does not dry out and remains as reliable and strong as it was before. In this case, the chest of drawers undergoes a more complex update, using painting and decoration, using polyurethane molding and wallpaper.

Stage No. 1. All fittings are removed from the chest of drawers, after which the old covering is removed. As a rule, the old varnish coating is removed mechanically, using sandpaper (coarse) for this. All sinks, cracks and chips are sealed with putty and wait until it dries. After completely dry, the surface is sanded with fine sandpaper. The result is what is shown in the photo below.

Stage No. 2. Installation of polyurethane moldings. The main task is to choose the right moldings so that they are neither small nor large. Basically, products are selected up to 5 cm wide and very narrow if you look at them in profile.
The purchased moldings are very carefully and accurately cut into pieces of the required length, and the corners are cut at an angle of 45 degrees. At the same time, you need to make sure that the drawing matches. The molding is attached using PVA glue. Alternatively, you can use self-tapping screws for reliability. At the same time, before screwing them in, recesses are made for them. All recesses are filled with putty very carefully, otherwise there may be problems when the putty dries.

Stage No. 3. All surfaces for gluing are treated with a primer. As a primer, it is possible to use PVA glue diluted with water in a ratio of 1:2. After the primer has completely dried, begin painting. As a rule, 2 layers of acrylic paint are applied to water based. The color is coffee with milk, although the color in the photo does not match the one indicated due to poor color rendering.

Stage No. 4. Decoration is carried out on the basis of wallpaper made using silk-screen printing technology. Sections of wallpaper are cut precisely according to the dimensions of the inner part, bordered by the molding. The wallpaper is glued using PVA glue. After complete drying, the entire chest of drawers is coated with water-based varnish in 2 layers.

Stage No. 5. Finally, modern legs in the form of furniture wheels are screwed onto the chest of drawers and handles are installed.

If you carefully study the technology, everything is much simpler than it might seem. Although, all stages require a certain accuracy, otherwise there will be problems with the appearance. You can update your wardrobe in the same style. The result is not a bad set for a room or bedroom. It may not be entirely modern, but it is original and stylish, and most importantly, very cheap.
If old furniture has a varnish coating, it is very difficult to get rid of it. If there are no obvious flaws, it is better to use a primer for complex surfaces and only then start painting. This approach will minimize the effort to update old furniture.
Updating an old bedside table
The photo below shows the process of updating an old polished bedside table. First of all, the polish was removed, after which the surfaces were filled and sanded. After that, it was painted with acrylic paint in two layers. Finally, the paper from the gift bag was pasted onto the door, making it possible to get an original design. After this, the entire bedside table is covered with two layers of semi-gloss acrylic varnish.

All stages are not particularly difficult if you have the slightest skills. All processes correspond to the sequence of actions described during the restoration of the chest of drawers. The result exceeds all expectations.
 This old bedside table subject to update.
 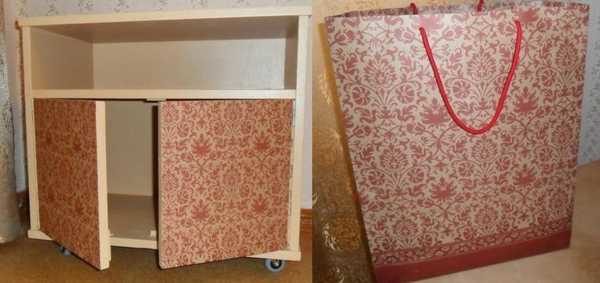 This package will serve excellent decor for doors.
 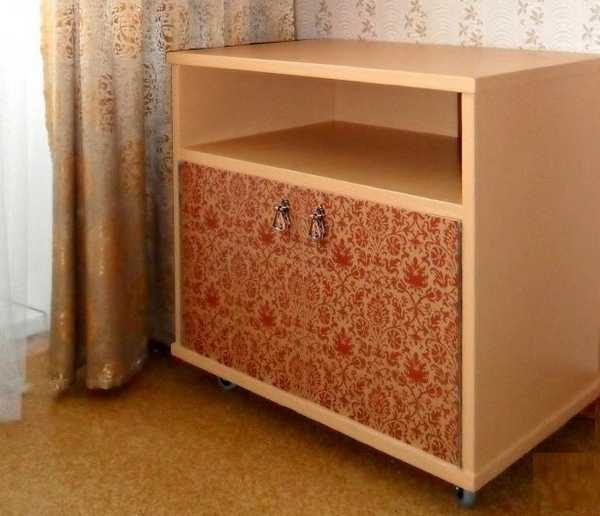 The result of updating an old bedside table.
 Remaking furniture with your own hands is simple and accessible to everyone, if desired. Unfortunately, without desire nothing will happen. Above in the photo, you can see a bedside table that was redone using a very simple method: the bedside table was simply covered with embossed wallpaper and varnished twice.
How to remake a table
By adopting such technology, it is enough to simply transform an ordinary coffee table into the subject modern interior. They simply take it and cover it with wrapping paper. This is thick paper that sticks without problems and does not become limp under the influence of varnish.
First you need to work on the legs and edges of the tabletop. They need to be painted light color so that they fit better with the new style. After this, you can begin further work.
Before pasting, you should cut out a piece of paper slightly larger than the size of the tabletop. PVA glue is used for gluing. The surface is well rolled with a roller to avoid air bubbles. The result should be a perfectly smooth surface.
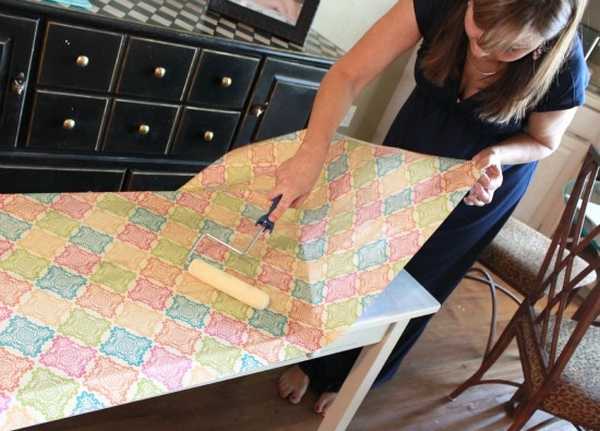
After this, remove excess material by running a fine-grit sandpaper along the edge of the tabletop, pressing the paper against the tabletop. This method allows you to remove excess material very smoothly, which is more like a professional action.

Finally, the surface is covered with two layers of varnish. At the same time, the layers should be thin. Each layer is applied perpendicular to the previous one.

Furniture remodeling: photo ideas
Currently, in stores you can find an endless number of all kinds of cabinets, chests of drawers, racks, hanging shelves, multifunctional drawers for clothes and personal items. But if you decide not to plunge into a long search, but to follow the thread of your imagination, then with the help of the following master classes you will learn how to update an old cabinet with your own hands beyond recognition.
After reading the article, you should not have any questions about how to paint varnished, chipboard or wooden cabinet, what paint to paint and make it suit your own style, and you will also learn some of the intricacies of this work.

- Painting- This is the most reliable and capital method.
- Wallpaper, self-adhesive film and decoupage- when choosing this method, remember that it is not durable!
- Covering with fabric and decorating with carnations - also
Most best method To update any chipboard or wooden cabinet, of course, painting is not as expensive as it seems at first glance and is quite simple to do.


Painting a wooden cabinet made of chipboard
Paint selection
- For processing wood and chipboard you can use alkyd or acrylic,
- spray or regular wood paint,
- for deeper coloring - varnishes, but most often preference is given acrylic paint m.
They are non-toxic and dry when room temperature, which in our case and when painting home furniture is very convenient, stores offer a wide range of them, you can colorful b, i.e. dilute with white paint, achieving desired color. In addition, there is a choice of acrylic paints with a mother-of-pearl effect or, for example, metallic.
Aerosol acrylic paint adheres better to surfaces than regular paint, creating a smooth, evenly colored texture. It is easy to work with both a professional and a beginner.


- Varnishes are used mainly to give furniture an antique look., but well-groomed, noble and rich. In this case, the surface is painted several times after each layer has completely dried.
- Varnishes are also necessary to fix the color and protect the surface from scratches and minor damage.
- You will need varnish even if you decide to paint the chest of drawers in an antique or Provence style.

Selecting Brushes and Rollers
After choosing the paint you should special attention pay attention to brushes and rollers. Why shouldn't you save on painting supplies if you decide to update your chest of drawers yourself?
- At the right technology processing old surface and good painting of the cabinet will be maintain its appearance for several years.
- If you use bad brushes, you will not protect freshly painted furniture from sticking hairs or lint, which is almost impossible to fix unnoticed.

If you have a task to paint a large smooth surface, then for work Both a roller and aerosols will do.

ATTENTION: During work, do not leave the brushes dry, it is better to put them in a jar of water, otherwise they will quickly become unusable
Technologies and painting methods
Don't forget about the other important ones painting tools and materials such as sandpaper or grinder, primer, putty, solvent and varnish. All this is necessary to comply with the correct dyeing technology.

Equipment:
- Sandpaper of different types grain size is needed for preliminary rubbing of the old paint layer and sanding the surface.
- Primer will be needed for sealing small cracks on the surface of wood or chipboard.
- Putty (you can use car putty) and a putty knife will come in handy if there are deep scratches or chips.
- Solvent or white spirit is needed to degrease the surface before painting for better impregnation.
- Varnish performs protective function and gives the furniture shine.

In general, preparing a cabinet for painting consists of: 5 short but very important stages.
- To begin with, carefully remove old paint and use medium-grain sandpaper(or machines) level the working surface.
- All dust must be brushed off, but without using wet rags or sponges etc. Otherwise, the old paint will only be absorbed better, and the new paint will not adhere well.
- After processing with the finest grain degrease with white spirit(acetone) and apply a primer layer for better adhesion to the paint.
- If there are large chips, then first fill them with putty and rub them until smooth. Afterwards we apply one or two layers of primer.

When you know all the stages of preparation, it’s time to move on to the main stage and figure out how to paint a wooden chest of drawers and chipboard.
Master class No. 1. Stencil painting
Everything is mixed in this closet - romanticism, Chinese motifs, and even something from Gzhel. Everyone sees something different in him. Let's learn painting techniques.

Materials and tools
- Prepared cabinet;
- white paint;
- solvent;
- blue spray paint;
- gold paint;
- stencil;
- brushes
Step by step guide
Step 1.
- We remove all fittings, locks, handles, etc. from the cabinet. Using familiar technology, we will prepare a wooden cabinet for painting.
- On work surface(on the floor) spread newspapers or big piece polyethylene so as not to damage other furniture.

Step 2.
- Take white enamel and solvent. In a small plastic jar, dilute paint and solvent according to the instructions on the paint can.
- The paint consumption is also written on the can, it is better to use this information and dilute it immediately required quantity. If you mix too little paint, you may end up with a different color the second time.
- Making the background of the picture - apply the first coat of paint. Leave until completely dry.


Step 3.
- If the color is saturated and you like it, then take the stencil and place it on the cabinet. Carefully glue on the front side and side walls so that there are no bubbles.
- Shake the spray paint well and spray it over the stencil. For an even color, one layer of blue paint will be enough, so we do everything the first time.

Step 4.
While the blue paint dries, painting the fittings, taken from the cabinet, in gold leaf. After the parts have dried, screw them into place.
We remove the stencil from the cabinet and place it in the most visible place in the room - after all, it now deserves special attention!


You can decorate the cabinet with a stencil, for example, with flowers.


Master class No. 2. Updating a chipboard cabinet
This cabinet looked very cheap since it was made from chipboard. But we updated it with a beautiful ornament for a children’s room, now it can fit into even a high-tech or modern interior.

Materials and tools
- Prepared cabinet;
- white paint;
- pencil;
- building level;
- sponge brush;
- masking tape;
- additionally: protective paint (enamel).
Decoration process
Step 1.
- Let's prepare the furniture by cleaning surfaces from roughness, chips, cracks using putty and primer.
- After using special products you need to give Allow surfaces to dry completely.
- Take masking tape and stick it on the front side of the chest of drawers according to your individual idea.
- We make combinations of triangles along the top and bottom edges, diamonds in the middle, and rectangles at the top and bottom. We cut off the strips and make shapes from them, as shown in the photo.

- We make a rhombus by cutting strips of equal length and placing them perpendicular to each other.
- To make rectangles, First, stick the tape evenly, parallel to the cut of the chest of drawers, and use a building level and a pencil to mark equal intervals. Cut through one.
TIP: Watch the placement relative to the fittings (handles, locks) and the gaps between the drawers - it’s better to be symmetrical than even.


Step 2.

Step 5.
The final stage is the application of protective enamel. It will extend the life of the chipboard cabinet and protect against small mechanical influences such as moisture and dust.
And now the stylish wardrobe is ready for active use!

Color options can also be the same as in the photo below.


Master class No. 3. Painting a polished cabinet
Some people can’t believe that you can make such a piece of candy from an old polished cabinet. vintage style, and without loss of functionality. And then we'll tell you how to do it.

Materials and tools.
- Old polished cabinet;
- vintage paint (regular acrylic matte);
- white spirit or acetone;
- brushes;
- sandpaper or sanding machine;
- gold handles for drawers.

Painting process
Step 1.
Despite the fact that we are creating a vintage effect, there is no real need for the dresser to look shabby. Therefore, we carefully prepare it for painting.
- To do this, we remove all the old fittings and sand the entire surface of the chest of drawers. First we use coarse sandpaper, then fine-grained sandpaper.
- It is not necessary to putty and prime, except for serious chips on the surface. Degrease the surface with white spirit or acetone and let it dry.
TIP: Since the paint will be applied in several layers, it is very important that it is well absorbed into the wood.

Step 2.
- Cover with the first layer of paint. Very thin, you don’t have to try too hard and leave unpainted areas.
- Sand the first layer with fine-grained sandpaper. We clean off dust, but do not use wet rags, sponges, etc. in the process. Wash only with a dry cotton lint-free cloth.
- Next, apply a second layer of paint, also rubbing it in. Let it dry and rub it in a little again.
- We repeat this until the color becomes even, but a little rough. For this we used matte paint with a vintage effect. After a few days, it will be completely absorbed and dry and begin to turn yellow (pay attention to the instructions on the can so that you don’t have to repaint everything again later). To avoid this, you can try this coloring method on a small and inconspicuous area. Proceed with full coloring when you are satisfied with the result.

If you bought new handles, check if they match your color and screw them into place. Golden brass carved handles with patterns match the white aged chest of drawers.
Check the chest of drawers to see if it meets your requirements - it is still comfortable, beautiful, and, paradoxically, modern. Vintage is in fashion now!


Wallpaper or film
When using film or any other paper covering to update your cabinet, you should remember that we use the cabinet every day. And usually such a coating does not last long, but it is very simple to implement.


Fabric covering
This is the most painstaking way to update a cabinet, when fabric is stretched over the entire plane. The method is quite outdated. But maybe someone will like it.


Spot painting for polished cafe
Spot painting is perfect for a polished cabinet. In this case, there is no need to remove the varnish and sand the surface. The technique is simple:
- Drawing using a marker
- The marker is painted with paint using dots. Details - here.


Closet Update Ideas


Remaking old furniture will warm the master’s soul and delight his family. Recently, a couple I knew asked a woodworker to reupholster some simple Soviet chairs. He painted the wood either with special paint or varnish in a rich emerald shade. I chose avant-garde upholstery - green with silver apples...
What a miracle it happened! It was rubbish, natural decay, and now it’s new stylish furniture, both antique and unique. No one else has one like this. And what savings!
I offer you ideas for repurposing old furniture that can lead to an interesting transformation. Why not paint your dining table with acrylic paints? Moreover, the table is already 20 years old, and you have artistic talent.
Furniture remodeling
Inspiring Examples
- Super idea for protect the sofa from stains and disguise those that have already appeared on the upholstery. The pockets on this blanket are simply designed for storing useful household items!

- It was a real misfortune: this sofa was clearly destined for a landfill.

We painted it, sewed new pillows, and here he is, a handsome man!
- What a bedspread! If you know how to crochet, then not crocheting such a wonderful blanket for the sofa is a crime. The sofa is white like an angel's robe, lush, like a fresh bun, and updated! Nothing was reupholstered or painted, but the sofa was transformed.

- A sofa bench can become a full-fledged sofa if you choose a blanket. By experimenting with fabrics, you can achieve unexpectedly pleasant results!

- To make simple cheap furniture look chic in the interior, you need to follow fairly simple principles: the right combination of colors and harmony of style...

- Here's how old table Can fit into a new interior!

- An unremarkable, miserable table!

But fate smiled on him, now it’s nice to look at...
- A nonentity that should have been gotten rid of long ago!

A decent and practical table, its shape hints at reliable design and capacity...
- This is what the furniture looked like before the remodel. I want to forget this sad look...

There is no comparison! Brilliant, bravo, incomparable!
- Why not cover a battered sofa with something unusual? Looks amazing.

- Ethnic motives, richness of patterns, brightness, beauty that makes your eyes run wild. An interesting idea is to use carpets instead of bedspreads and capes.

- Such a piece of furniture is unlikely to impress anyone.

The remodeled bookcase is 100 times better!
- Unattractive, boring table.

It turned out great! Very gentle.
- This poor thing needs to be given a chance at a second life...

Great result! Is this really the same chair?
- Horror, horror. He looks terrible...

And now - the royal chair!
- The table played completely differently!

- I want a bedspread like this... It's a lazy remake, yes. One new bedspread will change both the furniture and the room!

- I really like this option! You can add fur to any piece of furniture you sit on.

- I want to throw this chair away. Cry over it, feel sorry for it again and throw it away.

After renovation it commands respect!
- It turned out to be a nice chair!

- Great idea - related with my own hands cover for an old chair.

- Here's how new upholstery can transform a sofa!


- Acrylic paints and furniture are made for each other!


- And one last idea... Well, how can you not admire the magic and start creating!

Seems, DIY refurbishment of old furniture- not such a difficult task. Perhaps I’ll go study, I’ll have enough inspiration... And you
It happens that old furniture becomes unusable. You can use it, but the appearance does not evoke positive emotions. To extend the service life of the product, it is necessary to restore it. Before you restore an old cabinet, you need to decide on a set of tools, as well as the equipment that will be used.
The components that will be used during the restoration of the product depend on the chosen work method. If you don’t have specific decorating skills, don’t despair – we recommend paying attention to the following types of work:
- painting the cabinet;
- use of craquelure varnish;
- Decoupage technique.


Painting

Craquelure
Even a teenager can carry out these methods of repairing a product. Restoring a cabinet with your own hands requires having an idea or choosing the style of the future masterpiece. To do this, you should turn to the existing interior: if it is made in a vintage style, the craquelure varnishing technique will do. If the interior is made in classic style– choose painting followed by applying an image. When the design of a room requires elements of romance - good decision will become decoupage.
Restoring a chipboard cabinet begins with repairing visible defects. To move on to decorating the facades and ends, you should carefully inspect the hinges of the product and check the integrity of the fittings. Open the cabinet and inspect the drawer mechanisms and check the interior for chips and holes. All noticed defects must be eliminated. This can be easily done with a hammer and nails, as well as by replacing faulty mechanisms with new analogues.
A universal list of tools for restoring an old cabinet with your own hands looks like this:
- sandpaper or sanding machine - to make the surface smooth and smooth surface;
- a screwdriver or screwdrivers along the diameter of all bolts - for possible adjustment of the product and removal of fittings before cleaning;
- spatula - for covering holes and chips;
- paint roller and narrow brush - in order to renew the coating;
- wood glue or PVA;
- set of screws for replacement.
Directly for the decoupage technique you will need napkins with a pattern or ornament, acrylic varnish, and a special thin synthetic brush with fan-shaped bristles. Also, restoration of an old cabinet requires the presence of a primer, wood putty, paint for painting, and masking tape. To use craquelure you will need a varnish of the same name.
It is necessary to immediately decide on the idea of restoration, because without an idea it will not be possible to make a beautiful product. Consult with your household and find out about their wishes.

Tools and materials for decoupage
Stages of restoration using painting
Before studying the master class on dyeing items for storing clothes, it is recommended to carry out preparatory work on wood. These include cleaning and sanding the old coating. It is important to achieve a smooth surface so that when painting the brush applies the composition evenly.
For small areas, use sandpaper to sand down large area– apply grinding machine. The final stage of preparation always involves using the finest grain sandpaper.
As soon as work with defects is completed, decorators advise moving on to primer. This stage is no less important than the painting itself. It is necessary to restore an old cabinet with your own hands with high quality, so the soil will great solution: it will hide all the cracks and fill the pores. In addition, the coating treated with primer will absorb less of the coloring composition.
After waiting for the product to dry completely, we restore the cabinet using paint:
- unscrew all the fittings that will prevent the brush from penetrating into narrow places;
- those elements that cannot be removed are sealed with masking tape to preserve their original appearance;
- for painting wood it is better to use special acrylic compositions– they fit better on a plane and create protective layer films. Pour the paint into the roller container and get to work;
- First we process all the internal elements: shelves, compartments, mezzanines. After this, we proceed to painting the facades, as shown in the photo;
- After the first layer has dried, apply a second, and if necessary, a third layer of paint. This is necessary to achieve color brightness and complete coverage of all gaps;
- The dried cabinet must be opened with varnish in several stages.
Restoration experts advise you to use your imagination and make the cabinet not in a single color, but add several colors to the facades. The simplest option is geometric shapes. To do this, use masking tape to cover some part of the facade and paint the remaining area a different color. For originality, you can decorate the cabinet in a contrasting design.

Removing old coating

Sanding parts

Chips are repaired with putty

Surface primer

Painting parts


Using craquelure
Coating technique wooden products A special varnish consisting of 2 components will allow you to transform an out-of-fashion cabinet. With its help, it is possible to create an old wardrobe that grandmothers used. To complete the work you will need PVA glue, craquelure, acrylic paint and varnish, and a wide brush.
The technique also does not require specialized talent; all manipulations are similar to conventional coloring. The algorithm of actions looks like this:
- preparation - the old product is sanded, if necessary, putty is used to seal large holes. The final stage of preparation will be a primer in several layers;
- coloring - for work you will need compositions of 2 colors: dark and light. They do not have to be in harmony - the dark version is used to decorate cracks, and the light version is used for the main coloring. Apply with a brush dark color, evenly distributing it over the surface of the product;
- craquelure - once the paint layer has dried, you can apply craquelure. This must be done quickly and preferably in several layers - the thicker the varnish, the more visible the cracks will be. Dry the product until your fingers stick slightly;
- second color - master class on craquelure on at this stage suggests applying a light color and waiting for it to dry gradually. As soon as the coating dries, a characteristic mesh will become visible;
- applying varnish - a completely dried restored cabinet is coated with acrylic varnish to consolidate the effect.
When choosing craquelure, it is worth considering that if there is an image on the cabinet, you should not touch it. For this, a two-phase composition is used, the work with which is characterized by application in 2 stages.
This technique is suitable for restoring cabinet facades, but similar manipulations can be performed inside the product. This beautiful antique wardrobe will appeal to all lovers of vintage interiors.


Decoupage
Modern art stores will surprise any novice craftsman or amateur with an abundance of assortment of napkins and paper for decoupage. Napkins have a small format and are often used to decorate small items. In the case of a cabinet, they can be considered as elements for the design of drawers or mezzanines. Decoupage paper is available in large sizes, therefore it will be optimal for this type of work.
Before restoring the cabinet, select a theme for the product. It could be floral motifs, historical ornaments, images of people, heroes or just vintage pictures. Decoupage consists of several stages:
- The surface prepared for repair is sanded and primed in several layers. After this, apply light acrylic paint to give a background;
- at this stage, paper materials are applied to the surface of the cabinet, mentally coming up with the plot and location of each detail;
- Transferring a picture to a surface is considered one of the most difficult tasks. You can use the "file method" to do this. Prepare a regular office file, remove the top 2 layers from the napkin and place it face down on the file. Next, take a spray bottle of water and gradually wet the entire napkin. As soon as it gets wet, gently use your fingers to try to push out all the bubbles. If this is not done, wrinkles will be visible on the product. As soon as the napkin has become even and smooth, we apply it along with the file to the surface of the cabinet. Carefully delete the file and move on to the next step;
- using a thin synthetic brush and special glue, treat the surface of a napkin or paper in 1 layer;
- As soon as the napkin sticks and dries, you need to treat the surface with acrylic varnish. The photo shows options for decoupage of old cabinets.
Restored furniture gives the room fresh look– it looks original, non-standard. Such products will delight all guests, positioning the owner as a budding master of decor.

Elements that do not require restoration are covered with masking tape

Painting furniture elements

Glue the napkin

Applying clear varnish
Video
Photo


Do you want to create a unique interior without extra costs?
Old furniture will help you with this, photos of the conversion of which you can find here. There are many ways to transform old, familiar objects.
The choice of method depends on the purpose of using the furniture and the type of coating, as well as its condition at the time of repair.


You can find a step-by-step photo master class on making furniture with your own hands from old interior items on our website. The process of updating furniture includes two main stages:
- repair;
- decoration.
Let's take a closer look at what you should focus on.
Table repair
Tables are classified according to their functionality into desks, dining tables, kitchen tables and coffee tables. Depending on their purpose, their structure and, consequently, the restoration process also differ. As a rule, dining tables consist of 4 legs, a bow and a table top. They can be solid or folding. When remodeling such furniture, it is worth paying special attention to the condition of all elements, as well as their fastening. The legs must be identical, without damage. If necessary, they can be replaced.
The tabletop, in turn, is the main part of the table. Its surface should be smooth, without grooves, cracks and corrosion. If necessary, wood putty can be used to achieve the desired effect. With its help, you can easily and quickly eliminate all surface imperfections. If necessary, it can also be used to repair legs. The same scheme is used when repairing coffee tables.


Kitchen tables have their own characteristics. Before starting repairs, it is necessary to conduct a full inspection of this subject interior The strength of the countertop plays an important role. It must withstand heavy loads and physical impact. In this regard, the base on which it is installed must also be strong.

An example of using wood putty, which will help correct all the unevenness of an old countertop
Pay attention! Kitchen tables are not only a place to work, but are also used to store kitchen utensils. To do this, they have built-in drawers, shelves and doors. They deserve special attention.
If the table is equipped with shelves, then you should pay attention to their fasteners. If necessary, you can purchase special caps made of wood or plastic from a furniture store; a thin, durable metal corner can also be used as a fastening for shelves. Pay attention to the condition of the canopies that secure the door. It is best to replace them with new ones, since with frequent use this part is subject to the greatest wear.

Freshness natural wood add special polishing agents that can be found in any hardware or furniture store
If the table is equipped with drawers, check how firmly their walls and bottom are connected. To make them easier to use, you can replace the fittings with which the drawers are pulled out. You can buy it at a furniture store. You can also buy it there various types comfortable handles.
Advice! When replacing awnings, choose ones that are designed for furniture. They will ensure more convenient and reliable operation of the doors.
During repairs desk It is worth paying attention to all of the above. After watching a detailed master class on remaking old furniture with your own hands, you can repeat it yourself.

Repair of cabinets and bedside tables
Every home has furniture that is designed for storage. Typically this is different types and size of cabinets and cabinets. They can be different in height, depth, and capacity. Moreover, each of them can become a real decoration for your apartment. To do this, see how to restore old furniture with your own hands below.

A rather extravagant and extraordinary element of the interior is a bedside table made from an old suitcase.
First of all, you should inspect all the shelf fastenings and, if necessary, replace them with new ones. You can also replace the drawer fastenings with more functional and modern ones.
Depending on the size, door fastening methods may vary. Canopies are used for cabinets and small cabinets. They wear out quickly, so when carrying out repairs, it is best to replace them with new ones.
If you are remodeling a large wardrobe and it has moving doors, then over time its fittings may wear out. In a furniture store you can find special fastening rollers for sliding doors closet
How impressive restored old furniture looks in this case, see below in the photo.


Chair repair
It’s hard to imagine any home without chairs. Today it is such a commonplace item that few people pay attention to it. This can happen in two cases - either when the chair is properly designed as an interior item, or when it breaks. We will look at how to get from the second option to the first.

An option for restoring old armchairs with covers in a vintage style
The chair consists of three main elements:
- legs;
- seats;
- backrests
All of them can fail sooner or later. If the breakage is caused by the legs, then they must be firmly secured, as otherwise the use of the chair becomes dangerous. If the seat is broken, it can be replaced by cutting out a corresponding piece from plywood or fiberboard. The same can be done with the back. You can also make the stool soft if desired. To do this, you need to attach it to the seat and backrest. soft upholstery based on foam rubber.
Advice! If you decide to install or replace the upholstery on a chair, it is best to use fabric stitched to the foam. You can find one in a textile store, and you should attach it using a construction stapler.

Old furniture: photos of design options using painting
As you know, any piece of furniture should be not only functional, but also attractive. Therefore, when old furniture is updated, a photo of which you can see below, it is necessary to divide the work into several stages. The first stage is surface preparation.


It is necessary to clean the furniture from traces old paint, varnish, and also from dirt. After this, it is necessary to fill the cracks, if any, and then apply a primer. Next you can apply the base. To do this, you need to choose paint of the appropriate color.

New life for an old bed frame natural wood– painted in soft turquoise
Advice! It is best to use water-based acrylic paint. It does not contain toxic substances, does not emit a strong odor and dries quickly. At the same time, the surface becomes glossy attractive appearance. But if you are good with an aerosol can, then this will do.


Decoration
Restoration of old furniture, photos of which are presented below, includes decor. You can use various techniques and combine them. The most common is decoupage. To do this you will need the following:
- the required image printed on paper;
- PVA glue;
- glue brush;
- varnish, preferably water-based acrylic;
- brush for applying varnish.

Decoupage is a fascinating activity, and furniture made using this technique looks very delicate and unusual.
Advice! It is best to use large colored napkins with appropriate motifs as images.
Lubricate the surface with glue, carefully apply and smooth the picture. Let everything dry a little, then open it with varnish. It is worth noting that there is no doubt about the effectiveness of using this method when restoring old furniture with your own hands.


Another equally interesting decoration method is applying patterns using lace. For this you will need:
- lace;
- paint of the appropriate color;
- scotch.
Take a piece of lace and apply it to the place you plan to decorate. Secure the ends with tape. It is advisable to cover the remaining area with paper or film. Apply paint with a brush or use aerosol cans. Let the product dry. Remove the tape, paper and lace.
Advice! If you want to decorate large area, then it is best to use a piece of guipure of the appropriate size.
Both of the above methods are quite effective. Instead of lace and guipure, you can use paper templates. As a rule, often when decoupage and restoration of old furniture, wallpaper left over after renovation is used.
Upholstery of upholstered furniture
Over time, the upholstery of sofas and armchairs not only loses its attractive appearance, but can also sag significantly and become not as soft as before. But if you don’t want to throw away your favorite piece of furniture or don’t have the funds to buy a new one, you can reupholster it at home.


Renovated shabby chic dining room

Detailed master class How to remake furniture with your own hands, and photo examples are presented on our website. You will need to purchase the appropriate fabric from which the new upholstery will be made. It could be:
- barrack;
- velours;
- leatherette;
- crepe;
- Alcantara;
- leather, etc.
The choice of upholstery material depends on your financial capabilities. You can purchase it either in a textile store or in a specialized furniture store. You will also need a construction stapler and staples for it.
From old upholstery best to get rid of it. It can be secured with glue. In this case, you will need a utility knife or (if staples are attached) you will have to use a flathead screwdriver. After removing the old trim, begin installing the new one.
A small master class on replacing the upholstery of an old pouf
Cut the required piece of upholstery, place it so that the edges overlap where the old one ends, and attach it with a stapler. You can carry out such manipulations both with the soft part and with the back and sides.
If upholstered furniture has lost its volume and softness, they can be returned by replacing foam rubber. It must be secured with special small nails. If you are afraid that such manipulations are beyond your power, then you can stick foam rubber on top of the old upholstery and cover it with new one. But it is worth considering that the furniture should not lose its functionality.

Adding new volume to the seat of an old chair
You can add any volume to your product. To do this, you need to choose foam rubber of the appropriate thickness. If there is a folding mechanism, then after reupholstering it should function as before.
Advice! If you need to replace the upholstery and restore its volume, it is advisable to use fabric stitched to the foam rubber. You can purchase it at a specialized store or sew both materials yourself.

Decorating upholstery of upholstered furniture
If you change both layers of upholstery, you can apply different types of decoration options that will give your furniture a more aesthetic appearance. There are lots of ways to do this. We will look at the two most common:
- The fabric used for covering can be sewn using patterned seams. This will create a special decorative effect.
- Buy buttons or textile clips and use them to tighten the fabric and foam, connecting them together.
Updating upholstered furniture with a cover
More economical and in a simple way To hide stains is to sew covers. To do this, you can choose any fabric you like. It is important that it is durable. Most often used for this purpose:

- barrack;
- velours;
- velvet;
- jeans;
- calico;
- and others.
Having taken measurements of the size of the sofa, you can sew a cover that will cover the back, seat and, if necessary, the side of your sofa.

A small master class on sewing a replacement cover for a pouf
When making a case, you can use various techniques decor. Possible in certain place place embroidery. If desired, you can sew on an applique. To do this, fragments of the design are cut out from pieces of fabric and sewn to the base, forming a single picture.
You can also use patchwork, which is popular today - the art of making products from scraps. In this case, you can use pieces of old unnecessary things to make a cover.
Renewing the existing building using plywood
Scuffs, stains and even torn upholstery can be hidden using a special lining. To make it you will need:
- plywood;
- small metal corners;
- the smallest furniture screws.
You can cut the plywood yourself or seek help from specialists where you will purchase it. You will need 5 pieces according to the size of your animal. The cover should cover its outer, inner, back, front and top parts. After taking measurements, simply make 5 corresponding rectangles and fasten them from the inside of the structure using corners and self-tapping screws.

Next, you just need to put the structure on the frame. It can not only serve as decor, but also be quite functional. You can use the overlay as a mini table. If necessary, apply paint or decorate it in any way convenient for you.
Advice! After making the plywood trim, sand it on both sides with sandpaper.
