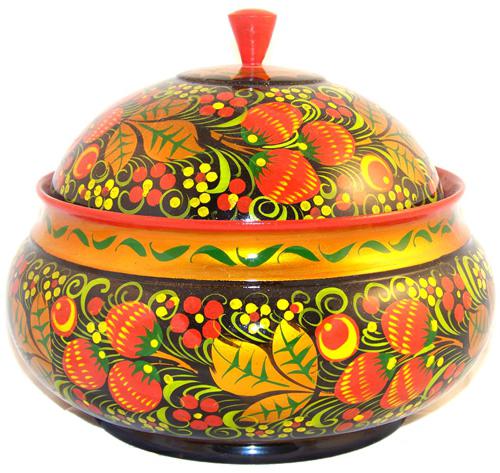
How to make a wooden ladle. Carved wooden ladles. Material for a ladle in a bath
Even the smallest details are important in a bathhouse. Often in a steam room you need ladles for water. Their size and shape usually depend on the size of the steam room and personal preferences, but there are general recommendations according to their choice.
Material for a ladle in a bath
When choosing any accessories and items for the bath, you need to proceed from several criteria. You need to take into account safety, practicality, durability, and aesthetic components. Well, there’s no escape from the material side either: in many cases, the decisive factor in the choice is the price.
Wooden buckets
Wood is the most traditional of all possible materials for bath accessories. Typically, linden, aspen, cedar or oak wood is used for bath ladles. In order to extend their service life, wooden ladles are coated with a layer of wax or impregnated linseed oil. But even in this option, they have a short service life: they darken or crack, and may simply lose their aesthetic appearance.
Wooden bath ladles also come in several types:

Metal
Metal sauna ladles are more practical, but in order not to get burned, the handle of such an accessory must be made of wood or heat-resistant plastic. The materials used for production are copper, brass or stainless steel.
A brass or copper sauna ladle is not a cheap pleasure, but it also has a significant service life. The stainless steel ladle is the cheapest in this group, but by no means the worst: performance characteristics His is no worse, and perhaps even better. Brass and copper ladle will oxidize and darken over time. Periodically they need to be rubbed to restore a decent appearance. Not everyone will like this procedure: sit and sand the surface with a soft cloth. No problems with stainless steel. They are like a Christmas tree: in winter and summer they are the same color. In the sense that they do not change at all.
From a safety point of view, bath ladles and metal scoops are not the best best choice: They may become hot and burn. In the Russian steam room with her not very high temperatures You will get a full-fledged burn if the ladle lies near the stove, but in saunas they heat up even from the air. In dry air vents, temperatures of 90-100° C are not the limit. And you can easily get burned with metal at this temperature. SO it’s better not to take metal buckets into saunas.

There are also hybrid buckets: a metal container is inserted inside a wooden bucket. This bucket is convenient, durable and practical. It is difficult for them to get burned; it will not allow water to pass through, even if the wood dries out. The cost is, however, decent.

A metal container is inserted inside a wooden ladle
Plastic
Most budget option- ladle made of heat-resistant plastic. Relevant modern materials You can safely dip it into boiling water. The only issue is the issue of aesthetics, which is compensated by the low price and a decent margin of safety.
Each of these options has its own advantages and disadvantages, but any of them is suitable for use in a bathhouse, but there should be no glass accessories in the steam room (and even in the bathhouse).
What kind of ladles are needed in a bathhouse?
If your stove has a remote water tank, or there is a tap in the mounted/built-in tank, then you can collect water in a basin or bucket. If a tap is not provided, you will need to draw water from above, through a special hole in the tank lid. You will need a fairly large ladle with a long vertical handle. They are also called scoops because they scoop up water.
The length of the handle depends on the configuration and size of the tank: the greater the depth, the longer the handle must be in order to be able to get water from the bottom. It is convenient to have several of these scoops: if more than two people usually steam, then one scoop is clearly not enough.

You also need a special ladle for watering the heater in the bathhouse. These buckets have a long horizontal handle. Even a small portion of water falling on hot stones causes the release of heated steam. If your hand is in the “affected zone,” you can get a noticeable burn, which is very difficult to treat. Some models of buckets have holes. Such scoops help to distribute water evenly over the surface of the stones if an open heater is used. How convenient it is to use them is a moot point.

You also need a ladle for pouring in the bathhouse. It is inconvenient to do this using a container with a long handle. The volume of the ladle for pouring is at least 0.4-0.5 liters. It is also convenient to have several of them - according to the number of steamers. This is much more convenient than waiting for your turn... If children will be steaming in the bathhouse, you can purchase several pieces of a smaller volume so that the children can comfortably enjoy the procedure.

An expensive ladle is hardly necessary in a bathhouse, but for those for whom the aesthetic component is very important, we can advise you to select a bucket and a ladle at the same time. If you purchased both a bucket and composite buckets - cooperage ones, it would be logical to order buckets of the same type.
For those who have both wood and metal in their bathhouse design, it is worth thinking about metal ladles with wooden handles- they will “fit” perfectly into this design option. If resources are limited, you can choose very good plastic accessories that will look good in the bathhouse, but when adding water to the heater with such a ladle, you need to be careful not to touch very hot elements with it. For a heater, it is better to use a metal or wooden ladle.
How to make a ladle with your own hands: video tutorials
For those who like to do everything with their own hands, there was a video on how to make a carved ladle. A special cutter with different attachments is used here, but if desired, everything can be done hand tools. It will undoubtedly take more time, but it’s hardly worth buying equipment just for a couple of buckets.
The work of Russian woodcarvers traditionally includes a stylized image of a horse's head. Scoop ends, scraper buckets, pouring buckets, scoop buckets, as well as many other items for various purposes folk craftsmen decorated it with the image of a handsome horse.
The horse ladle was conceived by the author as a purely decorative product. Therefore, there is no special protection for the wood of the ladle from moisture, only tinting with stain is applied.
The ladle is cut from two aspen blanks - a block of wood Ø150 mm (for the bowl) and a piece of board 200x150x20 mm (for the handle). With this cutting, there will be no end cuts, and therefore no cracks on the walls of the bowl; in addition, the process of applying a carved pattern is simplified. The height of the bowl walls is 55 mm, the base of the bowl has Ø90 mm.
All work is done by hand with chisels and a knife, but the bowl itself can be turned using lathe. When making a bowl and handle, it is better to maintain the given dimensions and proportions; they turned out to be the most successful both in compositional terms and in technological terms.
Do not forget that during production, even decorative item its shape should correspond to a real drinking ladle. A medium-sized hand should tightly cover the “neck-handle” of this ladle for ease of use of the drinking vessel.
The ladle is decorated with a triangular notched carving with the following elements: a snake made of pegs, a radiance in a circle, fragments of a radiance and a honeycomb. A large set of thread elements is not desirable.
Marking the carving elements on the walls of the bowl should begin with the radiance in the circle. It is necessary to select the diameter of the aurora in the ornamental ribbon so that the circles (limiting the rays of the aurora) touch each other at one point or, in extreme cases, leave a gap of no more than 1 mm between them.
The snake is marked using center lines radiances in the circle. Along the middle line of the snake, a dihedral notch is made.
The drawing of the future thread on the neck-handle begins with marking the snake element along the perimeter of the part. In this case it should
retreat from the edge of the workpiece by at least 3 mm. This will prevent you from chipping when carving. Having finished marking the snake, enter circles for the aurora. Their number may be more than four, depending on the taste of the carver.
On the edge of the neck-handle (the “mane” plane) a pattern of several touching snakes or touching diamond-shaped honeycombs is marked. Then they “apply” a bridle made from a honeycomb element.
The carving is done before gluing the parts. You can mark the entire pattern, and then carry out the carving, or, having marked and cut out the element, move on to the next one.
After all the carving is done, the parts of the bucket are tinted with stain, allowed to dry, and the relief of the carving is “revealed” with sanding paper.
Having glued the bowl and handle, the finished ladle is placed in the place prepared for it.
How to make a wooden ladle for a bath with your own hands in the form of a small barrel, we will consider in detail in the presented article.
The figure shows the design of the bucket in section:
1.
Tablet.
2.
Pen.
3.
Donyshko.
4.
Metal hoop.
PLATE

It is made from a wooden plank measuring 10 x 21 (mm), the side edges of which are ground at an angle of 12° with an inclination towards the center. We cut all planks to a working size of 80 (mm). From below we mill a groove 4 (mm) deep and 8 (mm) wide. Round off the sharp corners of the end faces.
Reference:
The number of planks can be any, in the example under consideration – 15 pieces.
Let's calculate the angle of inclination of the side faces: 360 / 15 / 2 = 12°
It is advisable to choose such a number of planks that the angle is an integer. This angle is easy to set on processing equipment.
PEN

We will make it from a planed wooden board 15 x 75 x 380 (mm). The handle can be of any shape, the main thing is ease of use. Round off sharp corners. At the end of the handle we will drill a through hole into which we will insert a rope loop.
DONYSHKO

We cut it with a jigsaw from a planed board 10 x 90 (mm). The end of the bottom is ground around the circumference to size 6 (mm) to a radius to the center of 76 (mm).
Assembly order, or how to make a wooden ladle for a bathhouse with your own hands:
1.
In the board to which we will attach the handle, we will drill two mounting holes Ø 4 (mm) at 4.2 x 25 (mm).
2.
Let's assemble all the planks around the bottom so that the bottom fits into the grooves of the planks.
3.
Let's squeeze assembled structure twine.
4.
We will make hoops from steel packaging tape (cold-rolled low-carbon, soft) M-T-Sh-0.40X20.
5.
In the hoops we will drill three through holes Ø 1.6 (mm) for construction nails P 1.6×25.
6.
We nail the hoop from below at a distance of 5 (mm) from the lower end of the bucket.
7.
We will nail the hoop on top at a distance of 10 (mm) from the upper end of the bucket.
Tuesa and Buckets, what's so surprising about them? And how they were made. Tues, otherwise called Burak. This small vessel made of birch bark, striking in its simplicity and wisdom of design, was invented a long time ago. But to this day craftsmen from the Russian North, the Urals and Siberia continue to make it. Peasants know well that salt stored in a container will never disappoint, and pickled mushrooms and cucumbers are not only stored for a long time, but also acquire a pleasant aroma, so that it is sometimes difficult for the uninitiated to believe that some spices have not been added to the pickling.

But still, another advantage of the tuesk is most valued - water, milk or kvass remain cold in it for a long time, and hot water, on the contrary, it does not get cold for a long time. That is why from time immemorial he was a frequent companion of the reaper, plowman, hunter, and fisherman. The peasant had to notice more than once that even on the hottest days, when the sun mercilessly scorches, the birch sap coming out of the trunk is always cold. This means that birch bark reliably protects the birch trunk from overheating. This property of birch bark is explained by its structure. It consists of many thin layers that do not allow moisture and air to pass through, and the top layer is covered with a white coating that reflects sun rays. And the inner layers of birch bark have a wide variety of colors - from golden yellow to pinkish brown.


Birch bark is given a unique decorative appearance by narrow brownish lines, the so-called lentils. These are kind of windows through which the trunk breathes in the summer. In winter, these windows are tightly closed and filled with a special substance. Birch bark has high strength and almost does not rot. It is known that the Northern Russian log house was knitted without a single nail. In the same way, without nails, glue and other foreign fasteners, birch bark tuft works.

The device of the container resembles a thermos. It has outer and inner walls, between which there is a small air insulating layer. On inside The walls have a white chalky surface that helps reflect heat rays.

The inner wall should be without a single crack: after all, it retains liquid. U outer wall The task is different - to be beautiful and elegant. No wonder they call it a shirt. Some shirts were decorated with bright and rich painting.

Others were made with lace cut-out patterns or embossing, while others were woven from narrow strips of birch bark. For the inside of the tree, you need a chip - this is birch bark, removed entirely from the trunk. You can only remove chips from a cut birch tree. We warn you that you cannot cut down trees in the forest without permission! Every year, planned felling is carried out at forestry enterprises, and forest workers will allow birch bark to be removed from fallen trees. It is best to remove birch bark in spring and early summer, at which time it easily peels off from the trunk. Find a straight trunk with smooth bark in the clearing, cut it into separate ridges, removing areas with knots. From a long ridge you can remove several chips one by one, from short ones - one or two. In our figure, the length of the ridge is equal to the length of the pole.
Removing the chip and the sequence of making the tues:
1 - peeling of birch bark;
2 - skolone and ridge;
3 - tues shirt;
4 - shirt worn on the ankle;
5 - making willow hoops;
6 - wrapping the edges of the sioloten and inserting the bottom.
Anyone who made whistles from a willow or linden branch in the spring knows well that it is enough to lightly tap the bark with the handle of a knife - and it can easily be removed with a “stocking”. A chip is removed in approximately the same way, using the most simple tools- wooden hammer and wire. Bend the handle at one end of the thick wire, and hammer the working end on an anvil and round it. The wire should not have sharp edges or burrs - they can scratch the birch bark.
Insert the wire approximately to the middle of the ridge under the layer of birch bark and carefully move it in a circle around the trunk. Do the same operation from the other end. As soon as the birch bark has completely peeled off from the trunk, knock the trunk out of the chippings with light blows of a hammer. All tree trunks have a so-called taper - a barely noticeable taper from the butt to the top.
You must take this into account and always remove the chip towards the top, otherwise you risk tearing it.
Skolotni can be prepared for future use and can be stored as long as you like. To prevent the chips from becoming deformed and taking up too much space, smaller chips need to be inserted sequentially into the largest chip.
Birch bark for shirts is much easier to prepare. Make cuts along the trunk with a knife and, lifting the edges with your hands, peel off the birch bark layer. Plast birch bark can also be prepared for future use. Straighten the pieces of birch bark and place them on wooden shield. Cover the top of the stack of birch bark with another shield, on which place the load. Once dry, the birch bark will remain flat and easy to work with.
The proportions and sizes of future tueski will depend on the prepared skolotny. Having chosen a suitable pin, make a shirt pattern from thick paper using it. Make the height of the shirt so that its top and bottom edges are approximately 3-5 cm away from the edges of the strip. Then wrap the paper around the strip so that one edge overlaps the other. This supply is necessary for making the castle. Taking into account the diameter of the collar on the shirt pattern, draw and cut out the elements of the lock. Close the lock and place the pattern on the pin. If the pattern fits snugly to the pin, and the top and bottom edges are not skewed, the shirt pattern is made correctly. Place the pattern on a piece of plastered birch bark and trace with a pencil or an awl with a rounded end. Place the birch bark on the board and use a cutter and a metal ruler to make slits along the outlined contours. The shirt is ready, but if desired, you can make it elegant. In the picture in the header you see teams with different shirt designs. One piece is decorated with the natural pattern of birch bark. The shirts of other tues are decorated with embossing, cut-out patterns, and painting, and one tues has a shirt woven from narrow strips of birch bark. This shirt is woven directly on a plait. The painting is applied to the finished shirt, and embossing and carving is done on the shirt before putting it on the shirt.
Having put the finished shirt on the knee, steam its protruding edges in boiling water. Then bend two hoops from a willow rod and fasten their ends with threads. The hoops should fit snugly to the joint. Now wrap the steamed edges of the pin around the willow hoops, placing them on the shirt. The hoops give the edges of the walls a rounded shape and make the structure rigid.
Cut the bottom out of spruce or cedar wood. The diameter of the bottom should be several millimeters larger than the diameter of the inner walls of the container. Before inserting the bottom, steam the edges of the walls again. After this, the bottom will be easily inserted, and when the walls are dry, the bottom will be firmly fixed in the frame.
Cut the lid from a spruce or cedar board with a small margin. Then, carefully cutting off the edges with a knife, fit it to the tuesk. Make sure that the edges of the lid fit snugly against the walls of the container. The lid should fit into the container with some effort. Select the shape of the handle, taking into account the purpose of the container. If the container is intended for storing some products, and not for carrying them, the handle can be made in the form of a poke. Cut the poke with a knife or turn it on a lathe, insert it into the hole drilled in the lid and drive a wedge on the bottom side to secure it.
If the container is intended for carrying food over long distances, it is necessary to make a handle-bow. A simple bow is made like this. Drill two holes in the lid at an angle to each other. Then steam a willow twig lightly trimmed on one side in boiling water. Having bent the rod in an arc, insert its ends into the holes. After drying, the rod will become rigid and firmly fixed in the lid. For reliability, the ends of the handle can be wedged.
But the most reliable and beautiful is the handle-bow with a lock - it is this one that is shown in the drawing. Regardless of the size of the tool, such a handle has fairly constant proportions and dimensions. Most often it is done on the hand of an adult. G. FEDOTOV Drawings by the author
Plane a handle blank from willow wood (1a). Hollow out two rectangular holes in cover 2. When marking the holes, make sure that the wood grain on the lid runs across the line where the holes are located. In the drawing this line is shown in red.
Steam the handle-bar blank in boiling water, carefully bend it into an arc (16) and insert the ends into the holes of the lid. Drill two holes in the ends of the handle protruding from below and use a chisel to shape them into a wedge. Cut a wedge 3 from spruce and hammer it into the holes of the bow. The wedge will firmly connect the lid to the handle. But it also has another purpose - being located across the fibers of the lid, it will prevent it from warping, especially if liquids are poured into the lid.
To test the container, pour water into it and close the lid tightly. Taking the handle by the handle, shake it vigorously, swing it, and turn it upside down. If the lid fits accurately, the container will come out of this test with honor - not a single drop of water will spill out of it.
As you may have guessed, the lid and the container are firmly connected to each other due to friction and air pressure. This connection is so strong that the unit can withstand weights much greater than the weight of the water poured into it. For the same reason, it is quite difficult to open the lid without spilling the contents of the container. Only those who know its “secret” can quickly and effortlessly open it. And the secret is very simple. Instead of pulling the handle up, you need to carefully tilt it, and as soon as the slightest gap appears between the lid of the container and the wall, the lid can be easily removed.
In conclusion, one more type of tues should be mentioned. These containers are intended only for storing bulk products or for picking berries. Liquids cannot be stored or transferred in them. Such tues are made from plastic birch bark, which is usually held together with sponge. The top edge of the tues is tied with the same material. The handle and lid are made in the same way as for tueski made from chipped stones.

1. To prevent the wooden product from cracking and crumbling into pieces, it was boiled for 1-2 hours in a solution of ash alkali. After this, they dried it, and, if necessary, continued processing of thinner parts (small “finishes” were cut out).
Ash alkali is an ancient recipe of our ancestors, used both for washing woven products and for processing wooden products. The lye is made simply - firewood is burned (I read that birch is best) to the state of white ash (ash). Ashes (ash) are filled with water, into which, during soaking, all alkaline groups of substances pass. After this, the sediment can be used to fertilize the soil (it is not dangerous for plants, since it does not contain “soap”), and the water can be used for washing or for treating wood products.
2. In a strong decoction of crushed oak bark our ancestors either boiled (I don’t remember the exact time - it seems like a couple of hours) or soaked (here I remember the time - a day) products not only made of wood, but also all kinds of wicker products - from bast, flax, hemp, reed (I don’t remember the whole list). Tannins strengthened the product so much that, for example, ropes and ropes increased their strength by an order of magnitude.
3. any turpentine is obtained from resin - pine resin. It is an excellent solvent. They throw wax into it (not paraffin, but natural wax) and after dissolution, they cover the product like varnish.
There is another method of such folk varnish - rosin dissolved in turpentine.
The whole secret is to find the optimal ratio of ingredients. This can only be done experimentally, since each area has its own specific conditions (pine species, climate, soil, etc.).
As an employee of the museum where we purchased the product told us, it was not a matter of coating, but of impregnation. And the product does not look varnished. It partially has the property of “suede” or “leather”, since the substances have formed a tight connection. This technology has been developed over the years. And some say: To master it, you need to either look for such masters (there are quite a few of them), or discover some secrets on a whim.
BAT PRODUCTS

LUKOSHKO-NABIRUKHA

URINE
for storing yarn and spindles


BREAD BOX


CHOTTED AND CARVED


SKOPCAR BRATINA ENDOVA


In Rus', wooden utensils of various shapes, sizes and purposes have long been cut: ladles, skopkari, valleys and others. Today, several types of traditional Russian ladles are known: Moscow, Kozmodemyansk, Tver, Yaroslavl-Kostroma, Vologda, Severodvinsk, etc.

Rice. 1. Russian festive dishes. XVII-XIX centuries: 1 – burl boat-shaped Moscow ladle; 2 – large Kozmodemyansky ladle; 3 – Kozmodemyansk scoop ladles; 4 – Tver ladle “groom”; 5 – ladle of the Yaroslavl-Kostroma type; 6 – Vologda dump bucket; 7 – Severodvinsk skopkar; 8 – Tver valley; 9 – Severodvinsk valley.
Moscow ladles, made from burl with a beautiful texture pattern, are characterized by bowls of a clear, even refined boat-shaped shape with a flat bottom, a pointed spout and a short horizontal handle. Due to the density and strength of the material, the walls of such vessels were often as thick as a nut shell. Burl dishes were often made in a silver frame. There are known ladles from the 18th century, reaching a diameter of 60 cm.

Kozmodemyansk ladles were made from linden. Their shape is boat-shaped and very close to the shape of Moscow ladles, but they are much deeper and larger in volume. Some of them reached a capacity of two or three, and sometimes four buckets. The handle is flat and horizontal with a structural addition of a purely local nature - a slotted loop at the bottom.

Kozmodemyansk is also characterized by small scoop ladles, which were used for scooping drinks from large bucket ladles. They are predominantly boat-shaped, with a rounded, slightly flattened bottom. The almost vertically placed handle, running from the bottom, multi-tiered in the form of an architectural structure, is decorated with through carvings, ending with the image of a horse, or less often a bird.


Tver ladles are noticeably different from Moscow and Kozmodemyansk. Their originality lies in the fact that they are hollowed out from a tree root. Mainly retaining the shape of a rook, they are more elongated in width than in length, which is why they appear flattened. The bow of the bucket, as usual with navicular vessels, is raised upward and ends with two or three horse heads, for which Tver buckets received the name “grooms”. The handle of the ladle is straight, faceted, the upper edge is usually decorated with ornamental carvings.


The ladles of the Yaroslavl-Kostroma group have a deep rounded, sometimes flattened boat-shaped bowl, the edges of which are slightly bent inward. In earlier ladles the bowl is raised on a low tray. Their handles are carved in the form of a figured loop, the nose is in the form of a cock's head with a sharp beak and beard.

Vologda ladles are designed for scooping drinks from large ladles. They are characterized by a boat-shaped shape and a round spherical bottom; they were usually hung on a large ladle. The hook-shaped handles were decorated with an incised design in the form of ducks.


In the Russian North, skopkari ladles were carved from tree roots. Skopkar is a boat-shaped vessel, similar to a ladle, but with two handles, one of which is necessarily in the form of the head of a bird or a horse. By for household purposes skopkari are divided into large, medium and small. Large and medium ones are for serving drinks on the table, small ones are for individual use, like small glasses.

Severodvinsk skopkari were also cut from the root. They have a clear boat-shaped shape, handles processed in the shape of the head and tail of a waterfowl, and in their entire appearance they resemble a waterfowl.
Along with ladles and skopkars, endovs or “yandovs” were also decorations of the festive table.

Endova - a low bowl with a sock for draining. Large valleys could hold up to a bucket of liquid. Their Tver and Severodvinsk variants are known. The best Tver valleys are carved from burl. They are a bowl on an oval or cubic shaped tray with a drain-toe in the form of a gutter and a handle. The endova of the Severodvinsk type has the shape of a round bowl on a low base, with slightly bent edges, with a semi-open toe in the form of a groove, sometimes figuredly carved. The handle is very rare. The initial processing of the described objects was carried out with an ax; the depth of the vessel was hollowed out (chosen) with an adze, then leveled with a scraper. The final external processing was carried out with a chisel and knife. Samples of Russian wooden utensils demonstrate high skill, developed by more than one generation of folk craftsmen.
It is difficult to say when the production of wooden carved utensils began on the territory of Russia. The earliest discovery of a ladle dates back to the 2nd millennium BC. e. Archaeological excavations on the territory Kievan Rus and Novgorod the Great indicate that the production of wooden utensils was developed already in the 10th – 12th centuries. In the 16th – 17th centuries. Wooden utensils were made by serf landowners and monastery peasants or archers. The production of wooden utensils and spoons became widespread in the 17th century, when demand for them increased both in the city and in the countryside. In the 19th century with the development of industry and the emergence of metal, porcelain, earthenware and glassware The need for wooden utensils is sharply reduced. Its production continues mainly in the fishing areas of the Volga region.
Currently, scoop ladles and table ladles are one of the favorite types of wood art products. Arkhangelsk craftsmen, while preserving the traditional basis of the North Russian ladle, prefer not to varnish the velvety wood surface, slightly tinted in silver or light brown tones. The masters of the Khotkovo craft near Moscow created their own image of a modern ladle, a ladle-bowl, a ladle-vase, decorating festive table(Fig. 2). They are characterized by powerful plasticity of forms, an unusual surface, sparkling with internal light, and a pleasant tone. A bucket-sail with a highly raised, spread sail-handle, on which, as a rule, a bush of the famous Kudrinsky ornament has become traditional for the fishery.
Old Russian dishes were distinguished by their diversity, despite the fact that they were most often created from wood. Its attractiveness for modern people is that it is beautiful, unusual, and making dishes was a real creative process, a true art in which the imagination of Russian craftsmen was manifested.
Features of ancient dishes
As already mentioned, in Rus' all utensils were carved from wood, both for food and for drinking. That is why very few examples of real folk art have reached us. Old Russian dishes are distinguished by their variety - these include bowls, ladles, jugs, and carved spoons. These attributes were created in different centers of the Russian principality, and each master was distinguished by his own unique handwriting. Painting and carving are the most common decorations of ancient dishes. Today, these products can only be found in museums and in private collections of lovers of antiques.
What material was used
Not all types of wood were suitable for making dishes. The most commonly used trees were birch, aspen, conifers trees. Soft linden was used to create spoons and ladles. Moreover, in the documentation it appears Old Russian dishes, the name of which attracts attention with its unusualness. For example, a spoon of straightness, a ladle of root - such names do not tell us anything, modern people, accustomed to glass and porcelain for table settings. In fact, the straightness is the wood of the trunk, and the root vessel is a vessel made from a powerful rhizome. Peasants, as a rule, used any tree to create dishes - ruins, bark, and flexible roots that are easy to weave. And the most expensive dishes were considered to be made from burl - a growth on a tree.
Ladle
This ancient Russian utensils have come down to us in a modified form, because modern models They are not created from wood. Metal buckets in modern Russia often used in villages when equipping bathhouses. IN Ancient Rus' The ladle was considered the most common type of festive drinking utensils - honey, kvass, and beer were served in them. An ensemble of large and small ladles served as a real table decoration.

This ancient Russian wine glassware was always elegant and interesting, for example, in the shape of a boat or a sailing bird. On the Northern Dvina they created this dish with two handles that resembled the head and tail of a duck. The bright paintings that decorated these simple peasant attributes of everyday life also played an important role. In the Tver province, local craftsmen created vessels decorated with carvings and a geometric rosette in the center, which is an ancient symbol of the sun. And in 1558, during the reign of Ivan the Terrible, by his order, a ladle was created, decorated with three large sapphires. Today this work of art is kept in one of the museums in Germany, where it ended up during the Great Patriotic War.
Buckets of different regions
Moscow craftsmen created ladles from burl, which made it possible to preserve beautiful drawing textures. These items had a boat shape, a flat bottom, a pointed nose and a short horizontal handle. The vessels had dense and durable walls, and a silver frame was used as an additional decoration. Kozmodemyansk ladles were made from linden and were similar in shape to Moscow ones, but were deeper and larger in volume. The ladles made by Tver craftsmen were hollowed out from tree roots, most often in the shape of an elongated boat. And in the northern regions, skopkari ladles were created - vessels in the form of a boat with two handles, one of which was necessarily made in the form of the head of a bird or horse.
Breadbox and salt lick
This ancient Russian utensils were also a mandatory attribute on any table, because bread and salt were important components of the diet. A bread box was used to store flour products, and it was made from bast - a layer of a tree trunk that is located between the bark and the core. Such dishes reliably protect bread from mold and moisture.
There was salt in Rus' expensive pleasure, therefore, they approached the creation of dishes for its storage very carefully. The saltbox was made in two main forms - in the form of a chair with a raised seat-lid, or in the form of a floating bird. Old Russian dishes looked very beautiful and unusual - the pictures show how much attention was paid to the elements of painting and carving.
Bro, bowls and eyelid

If the names “ladle” and “salt cellar” (although we more often call it “salt cellar”) are familiar to everyone, then with the word “brother” everything is much more complicated. Most likely, the name of this dish comes from the word “bratchina”, which meant a festive feast. As a rule, it was made in the form of a ball, which was intercepted at the top by a crown neck with bent edges. Old Russian of this type was very different. For example, a bratina made in the 18th century, decorated with paintings in the form of scales with an inscription, has survived to this day. By the way, the inscriptions also played big role when decorating ancient dishes. They could tell a lot: about the place and date of creation of the attribute, about its owner, and so on.
In the old days, bowls were also used, which were wide dishes with low edges. They served fried and baked dishes, and in the monasteries they even baked loaves. The eyelid was an oblong-shaped dish, which was covered on top with a lid and additionally equipped with handles. It was used for various purposes: for baking pies, storing kvass, and preparing meat dishes. Subsequently, this dish turned into the frying pan we know.
Endowa and cups

If everything is clear with cups, then endova is an ancient Russian dish, the names of which were different: bowl, and yandova, and bratina. This dish is a round vessel made of copper or bast, which was used for drinking beer, honey, and mash. Such vessels were stylized in the form of figures of a duck, goose, rooster, and rook, and each region had its own designs. The Karelians still have such utensils - they create valleys from linden, oak, maple or birch wood.
Tver craftsmen created the best valleys from burl. The dishes were made in the form of a bowl on a special tray (oval or square) and were complemented with a spout. The vessels were processed with an ax and then leveled with a scraper.
Stavetes and spoons

Old Russian wooden utensils are unusual and very colorful, and their names are sometimes very unexpected. For example, for food, a stave was used, which was created by turning on a special machine. This dish consisted of two deep bowls - one served as a lid, but it could also be used as a plate. Well, what holiday table can do without spoons? Probably, many people have this element of utensils - a beautiful and thick wooden spoon, richly decorated with paintings. In stavtsy in Rus', fruits and vegetables were also served. But there were also dishes for a specific type of fruit - lemongrass, vegetable garden, borage.
Large number of species wooden spoons was in Novgorod the Great. Products that had a sort of raised handle looked especially beautiful. Most often, braiding was used as an ornament, which was performed using the technique contour thread. And in the northern regions, chadar spoons were created with inlay with bones or fangs. In addition, in each region spoons had their own unique shape. For example, in the Gorky region they created ladle spoons, salad spoons, fishing spoons, and thin spoons, which were distinguished by a rounded and faceted handle. The Kirov spoon was distinguished by an egg-shaped scoop and a flat handle.
Drinking vessels
In Ancient Rus', all utensils used for drinking were called drinking or drinking vessels. Moreover, the name of almost each of them is interesting and original from the point of view of origin. Perhaps the simplest and most understandable vessel is a jug - drinks were stored and served in it. A type of jug was the kumgan, borrowed from its eastern neighbors, distinguished by its narrow neck, long spout and handle. Water was most often stored in kumgans, so they were large in volume. Tin pots are also a type of jug. They were stored and served in it different drinks. But with glass products in Rus' things were very interesting. Thus, already in the 12th century the word “glass” was known, but they were brought from other countries.

Both glass utensils and ancient Russian wooden utensils look very interesting. Pictures from chronicles and ancient records show that most of these attributes were simple, laconic, and differed only in patterns and ornaments. Cookware named after appearance or the material that was used to create it.
