Working with a hand router on wood. All about chamfers and chamfers How to make a figured end chamfer on a board
An easy-to-manufacture device for chamfering wooden blocks and narrow boards, as well as for planing and other types of processing of round or faceted wooden blanks.
When planing wooden blocks and narrow boards, it is almost always necessary to remove small chamfers from the ribs in order to blunt them to one degree or another. However, to do this you have to hold the plane obliquely, at about a 45-degree angle, which is not always convenient, especially when working with electric planes.
You can get out of this situation if you make a special device in the form of a long longitudinal angle into which the processed block would be placed and thus the edge from which you need to chamfer would be on top.
In addition, such a device could also be used for planing faceted and round wooden blanks (for example, handles for garden tools: shovels, forks, rakes, etc.), which are very inconvenient to plan on a flat surface.
I thought about making such a device just when I was planing blanks for shovel handles (see my article “”), since with such a device my work would have gone much easier and faster.
As a result, I decided to make this device, for which I needed the following accessories:
Materials and fasteners:
Two wooden planks 2 cm thick, 4 cm wide, and 6 cm wide, and 2 m long.
Wooden plank 2 cm thick, 5 cm wide, and 50 cm long.
Wood screws 4x50 mm.
Tools:
Drawing and measuring tools (pencil, tape measure and square).
Awl.
Jigsaw with saw blade figured cutting.
Electric drill-screwdriver.
Metal drill with a diameter of 4 mm.
Spherical cutter for wood.
Screwdriver bit RN2, for driving screws.
Sandpaper.

Operating procedure
First, we mark a 6 cm wide plank and drill along its entire length, with 5 or 6 holes for screws on one side.

On the opposite side of the plank, we countersink these holes for the screw heads using a spherical wood cutter.

Then we insert screws into these holes and screw our plank to the end of another 4 cm wide plank.

As a result, we get something like this wooden corner 2 m long.

After that, using a jigsaw, we cut out such a blank from a short strip.

It will serve as a stopper for planed workpieces, and at the same time, as a support for our device.
We also mark this blank and drill three holes in it for screws.

And then, using screws, we screw this workpiece to the end of our corner device.

From the remaining piece of the plank we cut out two more blanks like this with a jigsaw.

We will screw them to the back of our device, where they will serve as additional supports.
At the very back of the device, we drill two holes for screws on each side.

We also countersink the upper parts of these holes with a spherical wood cutter in order to recess the screw heads.

Now we screw our blanks with screws.

All elements of the device and especially the ends are processed sandpaper.
And now our device is ready!
This is what the back looks like.

And so the front part.


Now it will be possible to process bars using this device.
For example, I put a blank block for a shovel handle into this device - rear view.

And this is the front view.

But the block is not square, but rectangular in cross-section. Now it will be quite easy to chamfer from such bars.

But I put a purchased handle for a shovel, round in cross-section, into the device.

Such round workpieces will now also be very convenient to process in this device. Moreover, it will be possible not only to plan them, but also to carry out other types of processing, for example, drilling holes in them or sawing them.
Well, that’s probably all! Goodbye to everyone and have easy-to-use devices!
When processing wood, you cannot do without a plane. Not everyone can use a hand plane professionally. But there are electric planers that anyone can master. This tool allows you to achieve excellent results after just a short training.
A plane in the hands of a professional carpenter can literally work wonders. But it takes years to master this instrument to such an extent. For the home handyman For those who would like to learn planing faster, we can recommend purchasing an electric planer. It’s not difficult to master; besides, when using such a plane you don’t have to put in a lot of effort: the electric motor “saves” it.
You can cleanly process the edges of boards or narrow parts with an electric planer without having any experience in handling this tool, that is, the first time.
Processing large surfaces will require some skill.
It is important here to prevent the formation of unsightly grooves between individual passes of the plane, which happens if the tool is not positioned and guided accurately. Therefore, it is better to first try it on cheap timber. So, lay out the rough boards after sawing on a plane, glue them together, connecting them to each other with insert tenons, and then try to plane the resulting board until it has a smooth surface.
The electric planer can be driven over a fixed workpiece or installed on a workbench and the workpiece passed through it.
In this chapter we will tell you how to use an electric planer correctly.
Installation
For both manual and electric planers, the cutting depth can be adjusted (usually in the range of one to three millimeters). Moreover, for a plane of any type, the rule is true: the smaller the set cutting depth, the less the risk that the work will be unsuccessful. It happens, for example, that at the end of a pass the plane is involuntarily pressed harder, which causes the edge of the workpiece to be rounded. But this is easier to avoid if the rotating knives only barely rise above the sole of the tool. And in general, the thinner the layer of wood that the electric planer knives remove, the more invisible the traces from its passes.
Increase gradually
When processing unplaned wood, first set the plane to a relatively large cutting depth, and then, before each new pass, gradually reduce it.
As experience accumulates, dexterity comes, the ability to properly handle the plane and, in particular, the ability to retract it at the end of the pass, preventing the trailing edge of the part from rounding. Now you can try to remove the maximum layer of wood when selecting a rebate, in order to process the edge not in ten passes, but in just four or five. How accurately the cutting depth is set, which is determined by the position of the front of the plane's base plate in relation to its rear, can be easily checked using a ruler.

The position of the front of the plane sole can be adjusted so that the rotating blades remove more or less wood.
Planing direction

It is better to plan in the direction of the wood grain with both a hand and electric planer.
One of the basic rules for working with a hand plane is to guide the tool only in the direction of the wood grain. And although the knives of an electric planer rotating at high speed affect the material differently than a cutter hand plane, however, here too the results will be much better if you adhere to the specified, repeatedly proven rule. But there are no rules without exceptions. For example, the surfaces of boards assembled from several boards or bars of different thicknesses, that is, with noticeable protrusions, should be treated differently. In such cases, a flat surface can be obtained faster if the electric planer is held at an angle to the direction of the wood grain.

The surfaces of parts assembled from different elements, smooth it by moving the electric plane at an angle to the adhesive seams.
Edges
When processing or, as experts say, planing the edge of a board with a plane, it is very important, firstly, to guide the tool exactly at a right angle to the surface of the part and, secondly, when approaching its rear edge, do not press the plane too hard.
Only those who confidently wield the tool and feel it well can manage to cleanly process the edge without resorting to improvised means. Therefore, it is better for a beginner to use an angle stop in combination with a fixed electric plane, which will allow you to more accurately guide the part and avoid beveling its cut edge. The installed corner stop forms a right angle with the sole of the plane, and if the part always fits tightly against the stop, then the sole of the plane is always perpendicular to it.
Proper care
So that the emphasis provides correct position parts, it must be well secured. When using the stop for a long time, it is necessary to periodically check whether deviations from its original installation have appeared and, if necessary, tighten the fastening screws. You should also check it from time to time work surface stop, as resin deposits may form on it. Periodically, you should wash both the surface of the stop and the sole of the plane with white spirit, thereby ensuring good sliding of the workpiece.

The board, placed on its edge, should fit snugly against the corner stop. This ensures that the plane will cut the edge of the part exactly at right angles to the main surface.
Chamfering
Sharp edges of boards or slabs may splinter. Therefore, they are “blunted”, that is, they are chamfered. Parts that will later be varnished should also be subjected to similar processing, which will avoid hard transitions from one varnished surface to another.

The triangular recess in the sole, which all electric planers have, makes it easier to form a chamfer (bevel) on the edge of the part.
All electric planers have a triangular notch on the sole, which makes it easier to form a chamfer. But you can also use a miter gauge, setting it at an angle of 45 degrees to the surface of the workbench. When gouging chamfers, the stop must fit tightly to the workpiece. After completing the work, do not forget to return the stop to its previous position, that is, set it at an angle of 90 degrees.

If you need to plan the entire edge of a part with a bevel, then the miter gauge is set at an angle of 45 degrees.
Gouging the rebate on the edge
For a conventional hand plane, selecting a rebate - a rectangular groove along the edge of a part - is an impossible task (here you need a special planing tool - a selector or a rebate). But even a beginner can successfully cope with this operation if he has an electric planer, an angular stop and a cutting depth limiter at his disposal.
Selecting a fold of the required width
The angle stop is installed at a given distance from the part. In this way, it limits the planing width and at the same time ensures a right angle between the plane and the edge of the workpiece. On right side The plane is equipped with a cutting depth limiter. Now, with a planer whose blade extension should be maximum (the knives should first be tightly fitted to the right outer edge of the sole and partially covered with a small folding plate), pass after pass is made - until the depth limiter hits the spring next to the fold.
At the end of a pass, you should not put pressure on the plane from above: when the front part of the sole slips over the edge of the part, the cutting depth limiter does not always work and the plane knives may cut too deeply into the wood.
When planing a rebate at the end of a board, you should not move the plane too quickly to the edge, otherwise there may be chips. However, it is worth noting that the risk of chipping when processing the ends of parts electric plane significantly less than when processing manually.

The selection of a fold of the required width and depth is ensured by an angular stop and a cutting depth limiter.
Imitation of rough finish
Electric planer knives, as a rule, have two cutting edges, and if the knives become dull on one side, they are simply turned over. Of course, knives with straight cutting edges are most often used. But such knives can be replaced with rustic ones - with wavy cutting edges (replacing knives that are fastened with screws on the knife shaft is a simple procedure).

The wavy cutting edges of rustication knives leave parallel grooves on the surface of the wood.
The photo below shows what the surface of wood looks like, processed with rustication knives. Note that it acquires this appearance as a result of at least two passes with a plane. On the first pass, the knives cut parallel grooves. During the second pass, the plane is moved with slight shifts, first in one direction, then in the other, so that random grooves remain, and the surface of the wood appears to have been hand-processed with an ax or chisel. If some areas are too smooth or orderly, then make a third pass with the plane, achieving a highly textured surface - one that would be considered rough-hewn in the usual sense.

By repeated planing, the desired texture is obtained: the bridges between the grooves are cut off and the surface appears randomly processed.
Cycling
The cycle removes all irregularities remaining after processing the surface of the wood with a plane. After processing with an electric planer, the surface is not absolutely flat and smooth: even after the most careful work, more or less noticeable marks remain that need to be removed. First, the surface is treated with a scraper, then with fine sandpaper.
The tsikli blade should be sharp and straight. It is carried along the wood at a slight angle in the direction of the grain. The tsikli blade cuts off tiny tubercles (bridges between the plane's passes) and protruding fibers. The cycle evenly removes chips in the form of small and thin “curls”.
Sharpening cycles
After long-term use The cycle blade becomes dull. This manifests itself as follows: the scraper still cuts off the unprocessed and uneven surface the wood has thin shavings, but instead of old irregularities, new ones appear. This means the cycle needs to be sharpened.
After sanding, the surface of the wood is treated with fine-grained sandpaper (180 grit). The result will be better if the surface is first moistened with water, then dried and sanded again with fresh sandpaper. Water makes the wood fibers swell, and the cut ones straighten and therefore cut better.

The cycle removes the bridges between the plane marks and all the irregularities that still remain on the surface of the wood.
this section...
CHAMMER REMOVAL.
Beveling is the process of bevelling a corner along the edge of a board. Any ELECTRIC PLANE can do this, but many models are equipped with special V-grooves on the front sole. Their walls serve as a support for, so the work requires less effort and you can focus on the main task - strictly maintaining the angle. If you have to remove a very wide chamfer, use the largest groove and set the depth to maximum, a narrow chamfer is planed with the smallest groove, and set the depth to “0”.
TEST No. 4.
Chamfer several times using all available grooves. The work is carried out without auxiliary means. The ergonomics of the ELECTRIC PLANE are assessed, as well as how difficult it is to maintain the transverse angle. Of course, attention is also paid to the little things that help or hinder the work.
ELECTRIC PLANE BOSCH GH0 15-82.
This small and, most importantly, lightweight ELECTRIC PLANE seems to be created for such work. There are three grooves on the sole different sizes, the angle is easy to hold. The ELECTRIC TOOL did not cause any serious complaints, except that the smallest groove is not visible (there are pillars), and the ejection of chips is one-sided.
 ELECTRIC PLANE METABO No 0882.
There is only one groove on the sole (albeit a large one) and it is located in the center. It is large and heavy, and maintaining an angle of 45° turned out to be difficult. During chamfering, the angle seemed to be correct, but it ended up being shallower. The results were improved only after several “grinding” attempts.
 ELECTRIC PLANE SPARKY P 382.
Externally, the ELECTRIC TOOL is quite unusual, but how does this affect the work?
The coverage point is located at the bottom and is shifted back, and the center of gravity is shifted up and forward. It turns out that during planing, the ELECTRIC PLANER is pushed from behind. This action requires less effort than using the standard grip of a conventional ELECTRIC PLANE of the same weight, which is especially noticeable when working vertical position or at an angle. The second “plus” is that it is easier to press on the rear bed at the end of the passage. It should be noted that there is such a drawback in the layout as poor visibility of the area in front of the ELECTRIC PLANE: the hand grasping the additional handle is in the way.
You shouldn’t be surprised at the high rating; this one has good makings for chamfering. All the grooves are quite large, and the weight of the POWER TOOL is felt weakly, thanks to the unusual layout! The separate additional handle is convenient. The only inconvenience is that the POWER TOOL does not lie flat on the edge, but with a longitudinal distortion, and as you move you have to press the sole against the workpiece.
 ELECTRIC PLANER MAKITA KR0810.
Even with a very decent weight, the ELECTRIC TOOL turned out to be convenient for chamfering. The angle is maintained without problems, and the sole fits tightly onto the edge at the very beginning of the passage. In this type of planing, the ELECTRIC PLANE even has its own signature: whether the chamfer is removed or not, you cannot immediately determine, the sound practically does not change. The work can be determined only by the flying dust.
Now let's talk about the performance and mobility of our "competitors".
Transforming rough boards into a product you can be proud of starts with getting a straight edge.
In a perfect world, all the lumber you purchase for your projects would have arrow-straight edges. Unfortunately, such perfect factory edges are the exception rather than the rule. We'll tell you how to get perfectly straight edges on imperfect workpieces.
Straight edges start in the shop
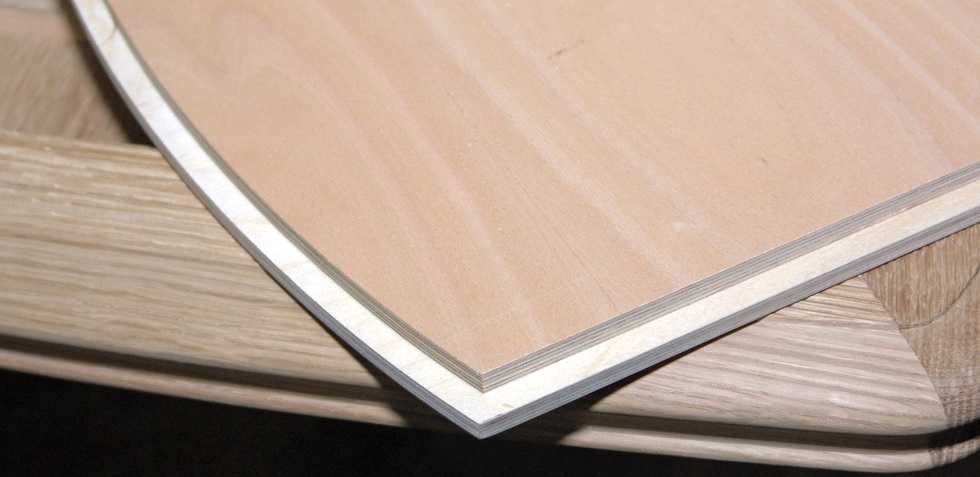
When buying lumber, select the most best boards, paying special attention texture pattern and how it will look on finished product. You can purchase unplaned material, either having two planed faces or planed on both faces and on both edges. The latter option, being more expensive, often solves the problem of obtaining a straight edge. However, even such boards can warp. Warped boards, despite the difficulty of working with them, can also be good material. Flat board with curved edges (photo on the right) easy to process to straight edges by following the decision flow chart.
Do not process more material than required
After purchasing the boards, let them sit in the workshop for several days so that they adapt to the new temperature conditions and humidity levels. Then cut them into pieces with an allowance along the length. The longer the board, the more material you will lose trying to make it straight. Leave a small margin (5-10 cm) at the ends of the blanks, which will later go to waste.
To plan or not depends on your machines
After the boards have acclimatized in the workshop, you can choose one of two options. Either straighten one face first on a planer and thicknesser the other to make them flat, and then proceed to straighten the edges, or straighten the edges and leave the faces untreated. We recommend the first option, since some methods of preparing the material work better when the face of the boards is cleanly planed.
However, the choice may be dictated by the capabilities of the available machines. For example, you cannot process a 200 mm wide board on a planer with a maximum planing width of 150 mm. And by sharpening both sides of the board in a thickness planer, you will not make them flat, but only parallel to each other. In this case, make one of the edges of the board straight by first sawing it straight sawing machine to the required width, level one face using a planer, and then planer the board to the desired thickness in a planer. If the required workpiece width longer knives of your planer-jointer, then simply saw it lengthwise into two or three plots, sharpen them and process planer, align the edges. After the plots become straight and rectangular in cross-section, connect them again into a shield, gluing them with edges.
The edges of the boards can give a clue
To determine your next step, look along the edges of the board. If the board has one more or less straight edge, then making it perfectly straight will not be difficult. A slight longitudinal bend along the edge will require a little more work, but you can also handle it quickly. Even in case of strong longitudinal bending boards can be made straight in two stages. Next, we'll show you how to straighten the edges of boards with varying degrees of warping, from barely noticeable to severe.
Planer and jointer: the main machine for straightening edges
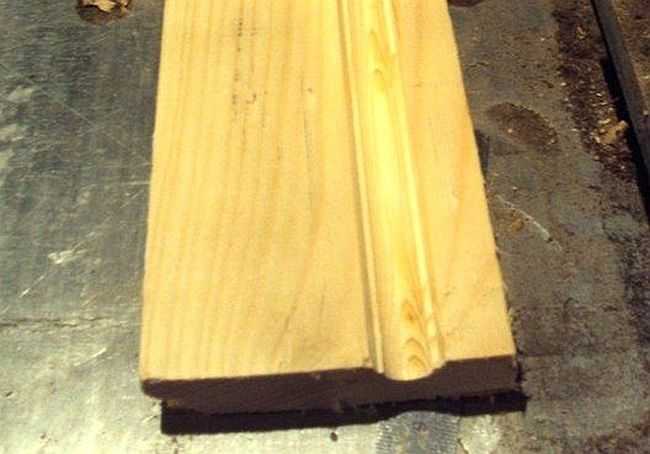
If you work with unplaned lumber, you really need a good planer. This the best remedy for a straight, clean edge that is exactly at right angles to the face (photo below), as well as for cleaning and leveling the surface of the board. Although models with a planing width of 150mm work well, consider purchasing a machine with a planing width of up to 200mm. In addition to allowing you to process wider boards, this machine also features longer front and rear tables to provide better support for long workpieces.

You're lucky: there's no warping
If the selected board falls into this category, you can consider that the deal is in the bag. Regardless of the length of the board, you can quickly get a straight edge using a planer jointer. If you don't have one, use a circular saw to file down the rough edges of the board.
A straight edge on this type of board can also be achieved using a router. If the board faces are not planed, use a guide board that has a smooth face and a straight edge, attaching it to the top of the workpiece, as shown in photo below. Use a guide cutter with a top bearing. Install the guide board with a slight indentation from the edge of the workpiece - this distance corresponds to the volume of material that will be removed during processing. If necessary, make two passes.

When using this method Press the straightest edge of the board against the rip fence to avoid kickback. Having filed the opposite rough edge of the board (photo on the left), move the longitudinal fence, turn the board over so that its new edge faces the fence, then file the second rough edge (photo on the right).
If the boards are planed, fix the guide (this may be flat board either a homemade or purchased tire) on the workpiece so that when moving along it, the router removes a layer no more than 1.5 mm thick in one pass (photo below) Make as many passes as necessary to obtain a straight edge.

With the router sole on the guide board, guide the cutter bearing along its edge. Remove no more than 1.5 mm of material in one pass. Use a cutter with an upward or downward helix, or a straight cutter whose blades are longer than the thickness of the workpiece.

Grind a small chamfer on the edge of the face facing the cutter - this will prevent the workpiece from getting stuck when it is fed.
A straight edge can be made on a router table, but it requires a little more advanced setup. First, clamp a straight or spiral cutter into the collet of a router fixed to the table and set the cutter overhang to be slightly larger than the thickness of the workpiece. Adjust the front of the rip fence so that no more than 1.5 mm of material is removed in one pass. Place the back of the rip fence flush with the cutter blades. If the rip fence does not have separate front and rear sections, use a clamp or double-sided tape to attach a piece of laminate plastic to the back half of the fence, the thickness of which is appropriate for the layer of material being removed. (photo on the right).
Typical case: slight bend
Most boards in this category warp when they swell or shrink, adapting to the humidity of the environment. Plan the future straight edge in such a way as to obtain an effective textured pattern on the front surfaces of the product. Boards belonging to this category are processed differently depending on their length.
Boards less than 0.3 m long are processed quickly
For short boards, use the most simple options: planer, circular saw or band saw. Planers are usually faster, even if it takes multiple passes to get a straight edge. The same technique is used when sawing on machines: the board is sawn longitudinally, while its concave edge moves along the parallel stop. The edges obtained in this way, being straight, have sawing marks that can be quickly removed in one pass on the planer. A router table will produce the same quality as a planer, but it will take more time to set up.
Choose the right tools for straight edges
The tools and techniques used to straighten edges vary depending on the degree of curve and length of the board. Use this decision tree to select the best tools and techniques for use in each situation. Additional options are described in the article.

Boards 0.3-0/9 m long: many possibilities

With boards of this length (the thickness and width of the board can be any) you have a choice of the largest number options. On a planer, such boards can be processed in two ways. The first is a conventional planing of a concave edge, removing a small amount of material each pass until the edge is straight. The second option involves preliminary planing in several passes, first one edge of the board and then the other, as shown in picture above. This is repeated until the bend disappears almost completely, after which the entire edge of the board is planed. A band saw and circular saw will also do the job, but with one major addition.
To ensure that the concave edge of the board contacts the rip fence when cutting boards longer than 30 cm, add a long pad as shown in photo below left. The length of the overlay is equal to twice the length of the workpiece, increased by 300 mm. Center the pad relative to the saw blade and secure it to the longitudinal stop of the machine using clamps or double-sided fabric-based tape.

The auxiliary stop ensures the linear movement of the workpiece, thanks to which the sawn edge will be straight.

When making an auxiliary longitudinal stop for a milling table, make a cutout in its middle so that the cutter rotates freely.
To process boards of this length for milling table, use a combination of an extended rip fence, as with a saw, and a pre-planing method, as with a planer (photo above right). Use a sharp straight or helical bit (up or down helix). You can also work with a router with a guide in manual mode. This will require more passes, but less space, so this solution is suitable for a workshop where there is a shortage of free space.

Clamps can hold the workpiece by its faces or ends. When making cuts, press the slide against the saw table.
A straight edge can be easily achieved on a circular saw using the carriage or slide shown in (photo on the right). Paying attention to the texture pattern, position the board so that one of its edges extends beyond the edge of the slide. Secure the board to the slide using clamps or screws. Raise the saw blade to the height required to cut the workpiece placed on the skid. You will find a plan for making the sled on p. 7.
Boards longer than 0.9 m: no need to sweat!
With these boards you have four options: a planer, a router with a guide, a circular saw or a sled for circular saw. If you have a planer with a planing width of 150 mm, use the pre-planing method; if you have a machine with a planing width of 200 mm, which has longer tables, good results will give any of the methods.
Another way to get a straight edge is by using circular saw. You can cut along the guide, or beat a straight line with a chalk cord, and then saw the board along this line, as shown in photo below left. Some models of circular saws have a laser pointer that makes it easier to follow the marking line.

Rigid foam used for insulation makes an excellent backing for sawing. Set the cutting depth so that the saw blade barely penetrates the foam.

Press the concave edge against the guide and measure the maximum amount of deflection to find the line along which the cut will be made.
To saw along a guide, first find the point corresponding to the maximum amount of deflection by pressing the board against the guide, as shown in photo top right. Make a mark on one of the edges of the board, setting aside a distance from the curved edge equal to the measured deflection. Measure the distance from the saw blade to the edge of the saw foot (under the motor) and attach the guide to the workpiece, setting it at this distance from the mark you made. Make the cut by moving the saw blade along the guide. To make a durable guide that also prevents chipping and quickly installs along the cutting line, refer to the plans on the next page.

By removing the sag along the entire length of this board (left), you will lose a lot of material as waste and the resulting blanks will be narrow. By dividing this board into two parts (right), you can get wider pieces.
Worst case: significant bending
Before processing such a board, first determine how best to dispose of it. By removing the sag from a 3m long board, you will waste a lot of wood, as demonstrated by photo below. If you really need a long board, try to choose a board with less curvature. If you absolutely need to get long workpieces from heavily curved boards, you have three options: cut them lengthwise with a circular saw, use a sled for a circular saw, or use a band saw with an extended fence - provided that the length of the workpieces does not exceed 0.9 m. Processing on band saw more long boards will only create additional complications.

Make an anti-splinter guide for sawing and milling
You can make two guides (1.2 and 2.4 m long) to use with workpieces different lengths. Designed to work with a specific circular saw and router, these guides can be made from a single sheet of 13mm thick plywood. (We recommend using plywood that has both sides sanded.) Here's how to do it.

- Using a chalk cord, mark a line along the entire sheet of plywood at a distance of 280 mm from the edge. Cut the sheet along this line with a circular saw.
- Make the remaining cuts along the guide, using the factory edge of the cut strip as this. From the remaining part of the sheet, cut two strips 51mm wide, two strips 203mm wide and one strip 280mm wide.
- Saw the plywood strips to the length indicated on picture above, and then assemble the guides. Carefully remove any exposed adhesive.
- When the glue has dried, secure the guides to the workbench, leaving an overhang necessary for further trimming. Using a circular saw with the blade you normally use, make a cut along the wide edge of the fence, running the saw along the fence as shown below. Do the same from the other edge of the guide, but using a router. In the future, when milling along the guide, use a cutter of the same diameter as for the initial trim.

Subject to availability milling machine It really simplifies the work of inserting hinges, forming complex holes, recesses, wood carving, etc. But this does not mean at all that it is necessary to have professional and expensive equipment: it is enough to have a simple manual device.
The only thing you need is to be able to basicly handle wood and use power tools. In addition, you need to have a desire, otherwise without this there will never be a result. Those who have no desire to work simply buy furniture or hire craftsmen to, for example, install new door and cut the locks. Any work, especially with power tools, requires certain knowledge, and especially safety precautions.

The milling device is designed for processing both wood and metal. With its help, it is possible to form recesses or holes of any configuration. This greatly simplifies tasks such as inserting hinges and inserting locks. Doing this with a chisel and an electric drill is not so easy, and it takes a lot of time.
There are stationary milling devices and portable (manual). Hand-held electric cutters are considered universal devices, with the help of which, in the presence of attachments, it is possible to perform operations for various purposes, it is enough just to change the position of the part in relation to the device or vice versa.
Stationary devices are used in factories or factories where mass production of wood or metal products is established. Under such conditions, the cutting attachment is stationary, and the workpiece moves along the desired path. When using hand tools on the contrary, the part is fixed motionless and only then it is processed, although there are parts that require fixing a hand tool. This is provided for in the design, therefore, it is considered more universal. This is especially true when you need to process large number parts, but using a stationary machine is not possible.
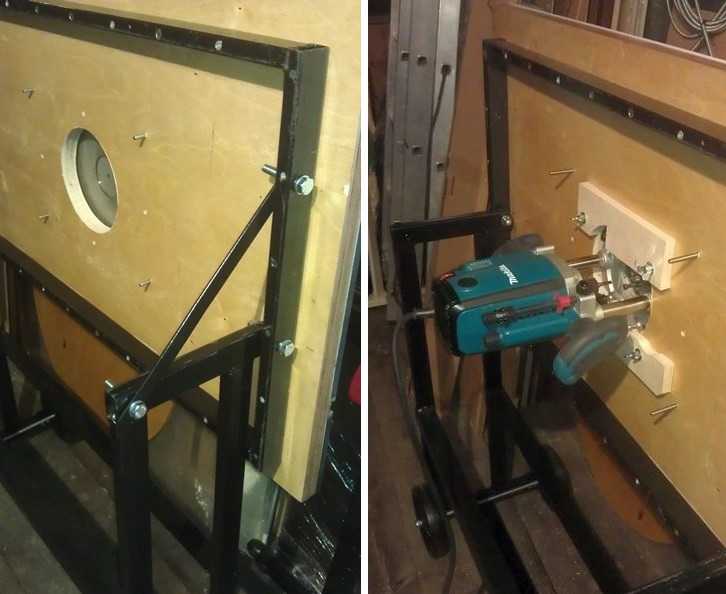 A homemade milling machine is a horizontal platform with a hole in the center, to which a hand-held device is attached from below.
 There are many types of milling machines, but for use at home or for starting your own business, universal models are more suitable. As a rule, they are equipped with a set of cutters and various devices to perform various types of operations. The only thing is that if you have a manual milling cutter, simple operations can take much longer than when using a stationary machine.
Using a manual milling device it is possible to:
- Make grooves or notches free form(curly, rectangular, combined).
- Drill through and non-through holes.
- Process ends and edges of any configuration.
- Cut out complex shaped parts.
- Apply drawings or patterns to the surface of parts.
- Copy parts if necessary.
 Copying parts is one of the functions of any electric milling machine.
 The presence of such functions makes it possible to simplify the production of the same type of furniture or the production of identical parts not related to furniture production. This is one of the main advantages of this tool. As a rule, to produce similar parts it is necessary to install copying machines, which are designed to perform only one operation, which is not always profitable, especially in small businesses.
Getting started and caring for the tool
To understand how it works this device, you should familiarize yourself with its main parts and their purpose.
Composition and purpose of main components
A manual milling device consists of a metal body and a motor, which is located in the same body. A shaft protrudes from the housing, onto which various collets are placed, serving as adapters. They allow you to install cutters of various sizes. The cutter is inserted directly into the collet, which is secured with a special bolt or button, which is provided on some models.
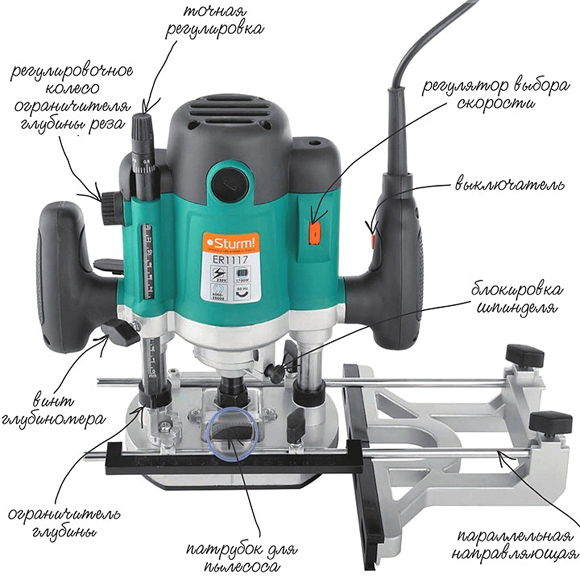 Basic elements of manual milling device and their purpose.
 The design of the milling device includes a metal platform, which has a rigid connection to the body. It is attached to the body by means of two rods. On the outside, the plate has a smooth coating that ensures smooth movement during operation.
The manual milling device has some characteristics that can be adjusted:
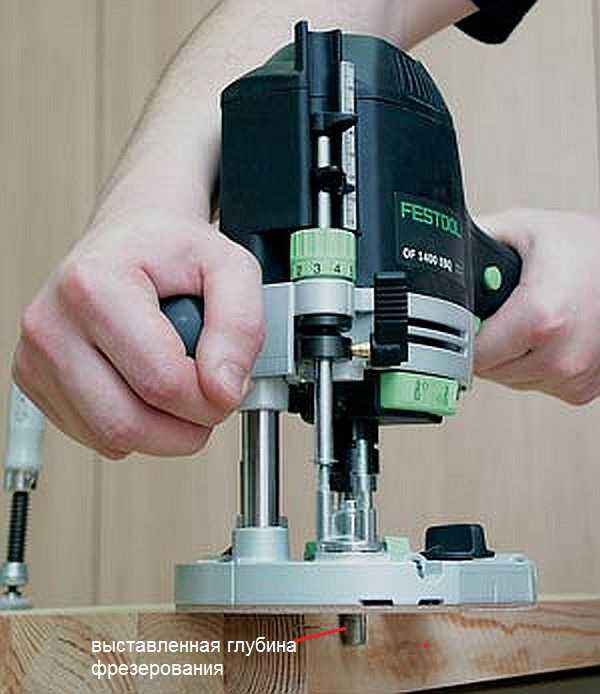
- Due to the handle and scale for adjusting the milling depth. Adjustment is carried out in 1/10 mm increments.
- By adjusting the rotation speed of the cutter.
At the initial stages, when mastering the tool, it is better to try to work at low or medium speeds. Although you should always remember that the higher the speed, the better the work. Especially if this concerns critical, visible areas that cannot be masked.
In addition to these levers, there is also a button to turn the product on and off, as well as a lock button. These elements are considered basic, ensuring high-quality and safe performance of work. There is also a parallel stop here, which contributes to ease of use. It can be rigidly fixed or with the ability to adjust the shift of the working area away from the center.
Caring for a hand-held milling device

Usually, a factory product falls into the hands of a person tested and lubricated, so no additional measures should be taken. Only during its operation you need to monitor its cleanliness and serviceability. At the same time, it should be regularly cleaned of dust and the lubricant should be changed, if so written in the passport. Lubrication is especially necessary for moving parts. As an option, you can use aerosol lubricants, but you can also get by with regular ones, such as Litol. The use of thick lubricants is not recommended, as chips and dust stick to them. If aerosol lubricants are used, then this factor can be eliminated.
The sole, the smooth part of the body, also requires lubrication. Regular lubrication will ensure smooth movement.
Despite this, the purchased item should definitely be checked for quality of assembly and presence of lubricant.
Unfortunately, not all manufacturers, especially domestic ones, care about build quality. There are cases when, after the very first hours of operation, screws or screws are unscrewed from a product because they were not tightened properly.
Rotation speed adjustment
The operation of any tool is associated with certain conditions, primarily related to the nature of the material being processed. It can be plywood, composite material or regular wood. Depending on this, the rotation speed on the electrical appliance is set. As a rule, the technical data sheet always indicates the operating parameters of the device, depending on the technical characteristics and characteristics of the surfaces being processed, as well as the cutters used.
 Indicators of processing speeds when using various cutters.
 Fixing the cutter
The first thing the work begins with is installing and securing the cutter. At the same time, you should adhere to the basic rule - all work is performed with the cord plug removed from the socket.
The cutter is installed according to certain marks, and if they are missing, then to a depth of no less than * the length of the cutter itself. How to install a cutter on a specific model can be found in the instructions, which are in mandatory must be present in the technical documents for the device. The fact is that each model can have its own design features and it is not possible to talk about this in the article.
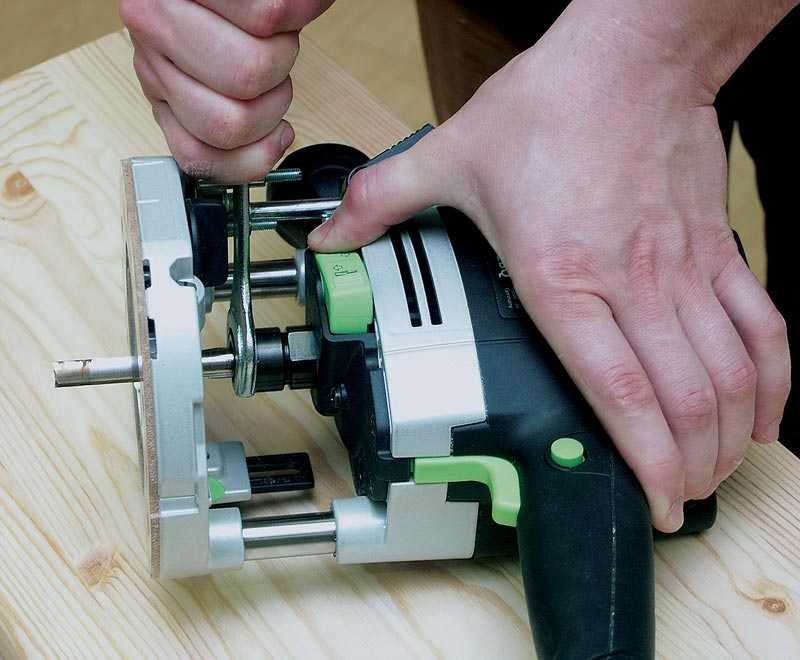 Installing the cutter on the device before starting work.
 There are both simple and more “advanced” models, as they say. Some models have a shaft rotation lock button, which makes installing the cutter easier. Some, especially expensive models, equipped with ratchets. So it won’t be possible to specifically describe the process of installing the cutter, and it doesn’t make sense, since everyone who is familiar with the operation of such devices will figure it out in a moment.
Milling depth adjustment
Each model has its own maximum milling depth. At the same time, it is not always the maximum depth that is required, but a certain depth that is set before work. Even if maximum depth is required, in order not to overload the device, the milling process is divided into several stages, changing the milling depth in steps. For adjustment, special stops are provided - limiters. Structurally, they are made in the form of a disk located under the bar, on which stops of various lengths are fixed. The number of such legs can be from three to seven, and this does not mean that the more there are, the better. It is better if it is possible to adjust each of the legs, even if their number is minimal. To secure this stop in the optimal position, you should use a lock in the form of a flag.
The process for adjusting the milling depth is as follows:

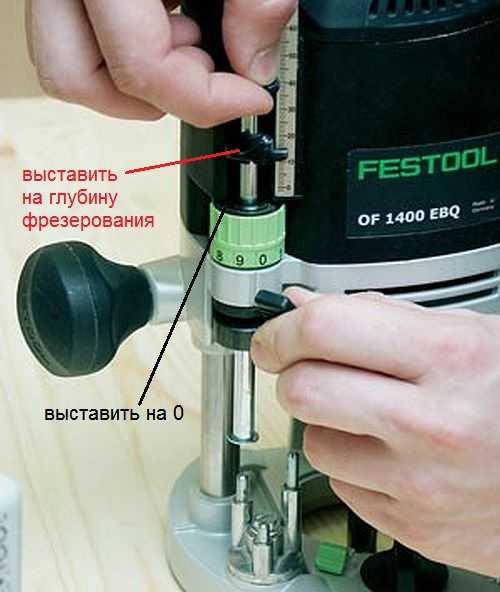 Thus, the workpiece is milled to a given depth.
 On high-quality, expensive models there is a wheel for precise adjustment of the milling depth.
 Using this wheel, you can more accurately set the depth without disturbing the previous setting.
 This wheel (green in the photo above) allows you to adjust the depth within small limits.
Milling cutters for hand milling tools

The cutter is cutting tool, which may have an intricately shaped cutting edge. As a rule, all cutters are designed for rotational movements and therefore have a cylindrical shape. The shank of the cutter, which is clamped in the collet, has the same shape. Some cutters are equipped with a thrust roller, so that the distance between the cutting surface and the material being processed remains constant.
Cutters are made only from quality metals and their alloys. If you need to process soft wood, then HSS cutters will do, and if you need to process solid wood, then it is better to use cutters made of harder HM alloys.
Each cutter has its own technical specifications, which provide it with high-quality and long-term work. The main indicator is maximum speed its rotation, which should never be overestimated, otherwise its breakdown is inevitable. If the cutter is dull, you should not try to sharpen it yourself. Sharpening of cutters is carried out using special, expensive equipment. After all, you need not only to sharpen the cutter, but also to maintain its shape, which is no less important. Therefore, if for some reason the cutter becomes dull, it will be cheaper to buy a new one.
The most popular cutters
There are cutters that are used in work more often than others. For example:

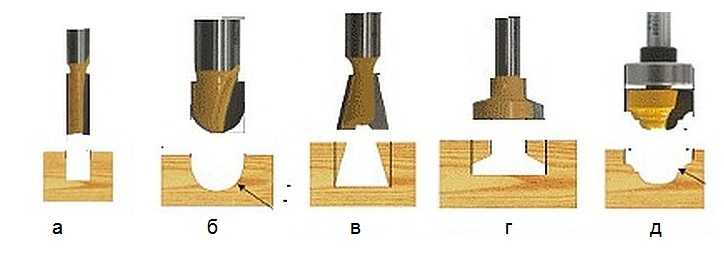 Groove molds are designed to create recesses in any location on the workpiece.
 There are cutters that are simple, monolithic, made from a single piece of metal, and there are typesetters. Set cutters consist of a shank, which serves as the basis for a set of cutting elements. By selecting cutting planes and installing them on the shank, using washers of various thicknesses, you can form an arbitrary relief on the surface of the workpiece.
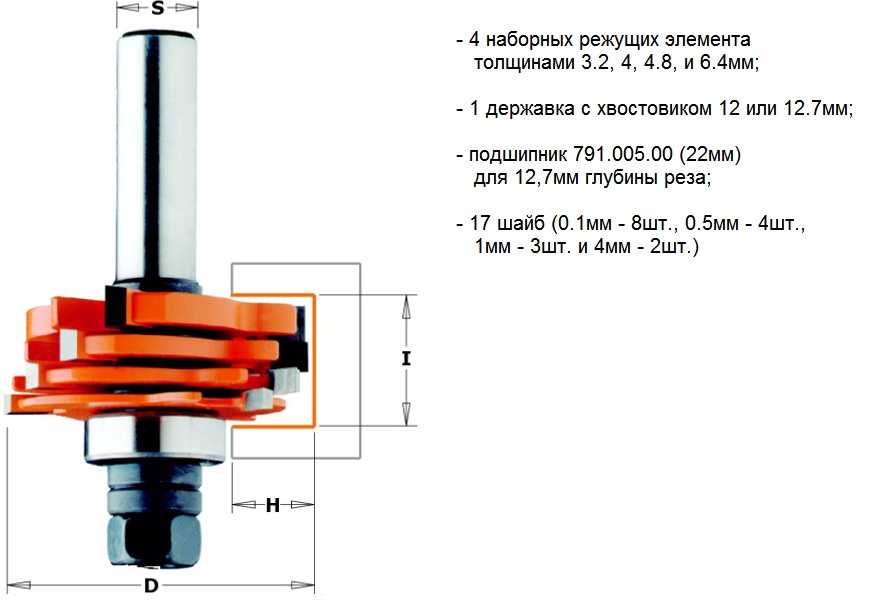 A set-up cutter is a set of cutting surfaces and washers, which allows you to assemble the cutter of the desired shape.
 In fact, there are a lot of cutters and this is only a small fraction of what is produced. All cutters differ in the diameter of the shank, the diameter of the cutting surfaces, their height, the location of the knives, etc. As for manual milling equipment, it is enough to have a set of five of the most popular cutters. If necessary, you can purchase them at any time.
Rules for working with hand milling tools
Working with power tools requires special rules, especially when there are rapidly rotating elements. In addition, as a result of work, chips are formed that fly in all directions. Despite the fact that most models are equipped with a protective shield, this does not fully protect against the flow of chips. Therefore, it is better to work with such a tool wearing safety glasses.
 The photo shows a model where a vacuum cleaner is connected to remove chips.
 General requirements
If you meet the basic requirements safe work with electric manual router, then the end result will please you with the quality of work and a safe outcome. These are the conditions:

The requirements are not very complex and quite feasible, but to ignore them means putting yourself in danger. And one more thing, no less important, is the ability to hold a milling tool in your hands and feel how it works. If serious vibrations are felt, then you need to stop and analyze the reasons. It is possible that the cutter is dull or there is a knot. Sometimes it is necessary to correctly set the rotation speed of the cutter. Here you can experiment: either add speed or reduce it.
Edge processing: using templates
Edge processing wooden board It’s better to do it on a surface planer. If this is not possible, then you can use a hand router, although this will take some time. These works are carried out both without a template and with a template. If there are no skills or very few of them, then it is better to use a template. Straight edges are used for processing edges. edge cutters, both with one bearing at the end of the cutting part, and with a bearing at the beginning (see photo).
 Edge cutters.
 You can use an already processed board or other flat object as a template. Moreover, the length of the template must be greater than the length of the workpiece, both at the beginning and at the end of the workpiece being processed. This will avoid unevenness at the beginning of the edge and at the end. The most important thing here is that the template or object acting as a template has a smooth and even surface. In addition, its thickness should not be greater than the gap located between the bearing and the cutting part.
The width of the part is less than the length of the cutting part
Moreover, the longer the cutting part, the more difficult it is to work with the tool, since more effort is required. In this regard, it is better to start working with cutters that have average length cutting part. The operating principle for edge processing is as follows:
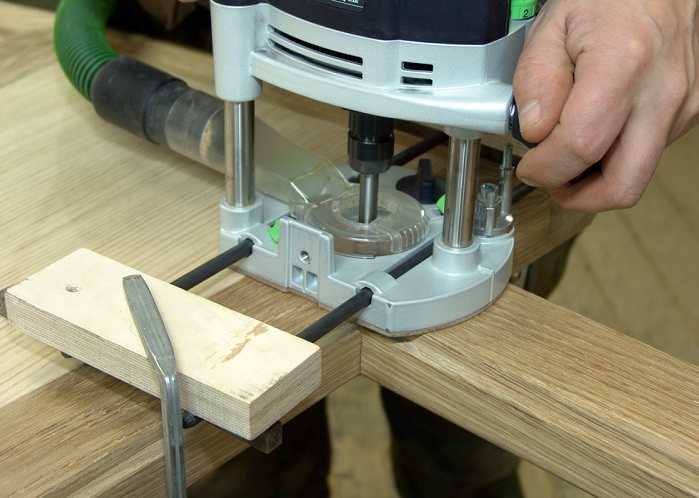
- The template is attached so that it is at the desired height and has a flat horizontal surface.
- The template is firmly mounted to a table or other surface.
- The cutter with the roller is installed so that the roller moves along the template, and the cutter (cutting part) moves along the workpiece. To do this, perform all the necessary manipulations with the template, workpiece and tool.
- The cutter is installed in working position and clamps down.
- After this, the tool turns on and moves along the template. In this case, you should decide on the speed of movement, which is determined by the depth of processing.
- The milling unit can be either pushed or pulled, depending on what is convenient for you.
After the first pass, you should stop and evaluate the quality of the work. If necessary, another pass can be made by adjusting the position of the tool. If the quality is satisfactory, then the clamps are removed, freeing the workpiece.
Using this approach, it is possible to remove a quarter along the edge or in some of its parts. This is done by setting the cutting edge so that it extends to the required depth into the part.
 Quarter shot on a furniture façade.
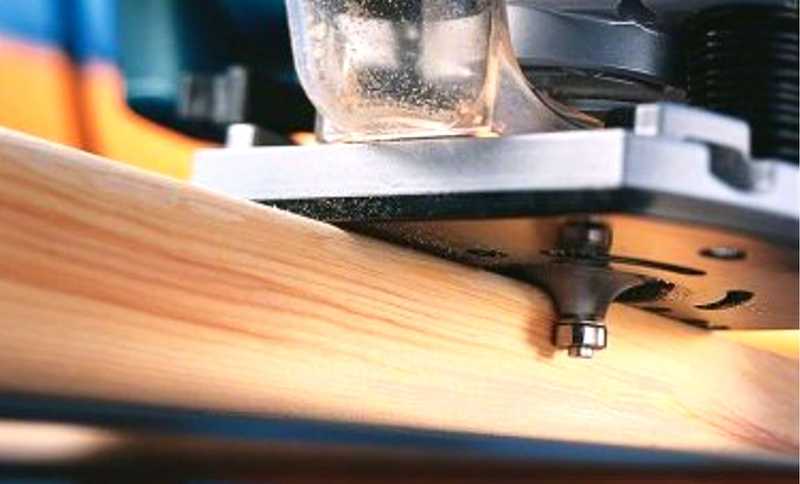
 If you replace the cutter with a shaped one and move the guide, as well as use a stop, you can actually apply a longitudinal pattern to the part (pictured below).
 Applying a longitudinal figured pattern to the workpiece.
 If you use a similar milling technique (with a template), you can easily master the technique of working with wood in general. After some time, you can abandon the templates, since installing them takes a lot of useful time.
 How to make a straight edge without a template: you can’t do this without experience.
 The width of the part is greater than the length of the cutting part
Quite often, the thickness of the workpiece is greater than the length of the cutting part of the cutter. In this case proceed as follows:
- After the first pass, the template is removed and another pass is made. In this case, the template will be the already processed part. To do this, the bearing is guided along the machined surface. If the cutting part was again missing, then another pass will have to be made.
- For final processing, you should take a cutter with a bearing at the end, and the workpiece should be turned upside down, after which it is secured with clamps. As a result, the bearing will move along the machined surface. This approach makes it possible to process thick parts.
 The bearing is guided along the machined surface, and cutting edge processes the remaining part of the workpiece.
 In order to master the work of a hand milling tool, you will need a lot of rough blanks, which you don’t mind throwing away later. No one succeeded the first time. To achieve anything, you need to train hard.
Achieving Various Shaped Edges
If a figured edge is required, which is most likely necessary, then first pay attention to the condition of this edge. If it is uneven, then you will have to level it and only then begin to form a curved edge by selecting the appropriate cutter.
 Rounded edge.
 It is necessary to prepare the surface so that the cutter does not copy the curvature along which the roller will move. In this case, a sequence of actions is needed, otherwise a positive result will not work.
If you need to process a frankly curved surface, then you can’t do without a template. It can be cut from plywood, about 10 mm thick, by first applying a pattern and cutting out the template with a jigsaw. The edge of the template must be brought to perfection using a hand router.
