Do-it-yourself children's house made of wood in the country: photo. Playhouse for children: how to build in the country, in the yard, in the apartment Children's houses for children and play tents: materials for making
In the city, every yard is equipped with a children's playground, but what to do with a child at the dacha? Children love to play in various huts, tents and doll houses. Girls immerse themselves in games with their favorite dolls, and boys are delighted with a hut or tree house. Building a playhouse for your child with your own hands will not be difficult. This is a fascinating process, limited only by imagination.
Common types
Cardboard house
You can call it budget option. The main thing is availability cardboard box suitable size, tape and sharp scissors. The rest is a matter of technique and imagination.
The simplest version of a children's house in the country. You can build one yourself from several wooden poles or pieces of plastic pipes. The frame is secured with tape or rope and covered with a sheet or blanket.
You can get by with a rope stretched between trees and a blanket. If desired and if you have the tools, the design can be complicated.

The design is not much more complicated than a tent. Several long sticks or pieces of plastic pipe are placed in the form of a “wigwam”. The top of the structure is secured with tape or rope. Roof and walls - blanket, bedspread or sheet.
You can make a more rigid structure from wood. To do this, you will need timber of suitable thickness, nails or screws. The frame can be covered with clapboard or plywood.

In hot weather, the child will feel more comfortable in the playhouse-gazebo. The children's gazebo differs from its “adult” counterparts only in size. You don't need a lot of material for production.
Any girl will be happy to play with dolls in a children's gazebo. For a boy, you can build a sandbox with a canopy.

Children's playhouse on the ground
The child will be in seventh heaven if his parents give him a full-fledged “adult home” with real windows and doors. Building such a house is no more difficult than building a children's gazebo. A little more material will be required.

Game tree house
Who didn't dream of a tree house as a child? If at the dacha there are a couple of strong and tall trees, your dream can come true.

How to make a children's house from boards?
Before you get started, there are a few things you need to consider:
- installation location: you need a flat area of suitable size;
- general dimensions of the house: height and internal area;
- door and window sizes;
- number of windows: the building should have enough light;
- roof shape: pitched at an angle or gable to small child couldn’t climb on it;
- interior design.
Required tools and materials:
- wooden beam for the frame and base (minimum 40x40 mm);
- nails or screws;
- metal corners and hinges;
- edged board 10-20 mm thick or wooden “lining”;
- light roofing material (ondulin, bitumen shingles or corrugated sheet);
- screwdrivers or screwdriver;
- jigsaw or wood saw;
- hammer;
- square, tape measure, level;
- sandpaper.
Preparing for work
 To begin with, it won’t hurt to make a drawing or diagram. You can do this yourself or find a suitable one on the Internet. Usually they build a playhouse with an area of 160x160 cm and a height of about 140 cm. It all depends on the available material and the age of the child.
You also need to decide on the location where the gaming house will be located. The area must be level. If necessary, it needs to be leveled.
Before starting assembly or during the process, all wooden parts of the structure must be sanded sandpaper. This will protect the child from splinters while playing.
Making the base
A thick wooden beam is cut to size and knocked together to form a frame. The structure is covered with a board that will serve as the floor. The surface of the boards is sanded with sandpaper.
The future home should not be damp. To do this with reverse side the base is covered with roofing felt, polyethylene or other material suitable for waterproofing.
The base is laid on a pre-prepared surface or supports, which are located at the corners of the building.
Frame for walls and roof

It is convenient to start assembling the frame by installing the beams at the corners of the base. Next, the parts are attached along the upper perimeter. For connections, use special metal corners or long self-tapping screws.
The next step is the installation of beams under the doors and windows. They are fastened with nails or self-tapping screws.
To give the frame greater strength, additional spacers are installed: horizontal - at half the height of the frame, vertical - in the center of the walls and under the windows.
All connections are made at right angles. For accuracy, use a square.
After assembling the frame, you can begin to work on the roof sheathing. To do this, knock down two beams for the back and front of the roof (gables). You should get two identical elements in the form of two sides of a triangle. The parts are attached to the upper beams of the walls and connected at the tops with a lintel (ridge).
Wall cladding
Lining is ideal for wall cladding. There is no need to adjust the joints, and it looks beautiful. You can also use it to make casings for windows and doorways.
Instead of lining, you can use the remains of a moisture-resistant laminate. An option with a thin board is possible; the walls can be sheathed with it end-to-end or overlapping.
Roof
Sheets of plywood are usually stuffed onto the roof sheathing.
They impart rigidity to the surface and prevent the soft roofing material from bending inward. Instead of plywood, you can use a thin board.
Ondulin or roofing felt should be nailed so that the nails go into the sheathing beams, and not into the plywood.
Interior arrangement
Every home needs somewhere to put toys. Of course, there is no need to make furniture, but a couple of shelves on the walls and a small folding table with a bench will be useful in a large farm.
Doors and windows
If you wish, you can install a door or just make do with a curtain. For safety reasons, it is better to avoid glass in windows.
Exterior design
The house is almost ready. All that remains is to attach the pipe to the roof, paint it bright colors and decorate the inside according to the child’s taste.
Made from plywood
Not bad children's playhouse at the dacha you can build it from plywood. The tools and consumables you will need are the same as for a house made of boards. You also need a couple of plywood sheets and several wooden beams of suitable length and thickness.
There are two options for further action:
- Assemble a play house based on a frame.
- Simplify the design by eliminating the frame and connecting plywood parts using corners and self-tapping screws.
Option one
- A base of the required size is made from four beams with a plywood floor. For reliability, the floor can be made of two layers of plywood.
- A frame is erected from wooden beams. If the size of the plywood pieces allows, from the beams under doorway and windows can be discarded.
- Based on the size of the frame, plywood sheets are cut. Windows and doorways are cut using an electric jigsaw.
- The edges of the parts are sanded and secured to the frame with self-tapping screws.
- The roof is assembled using the same principle as the walls.
- From the pieces of plywood left over from the windows and doorway, you can make a door and shutters.
Option two
- Assemble the base.
- Mark and cut out solid parts from plywood: walls with windows and doorway, door, shutters and roof details.
- Using corners and self-tapping screws, all parts are connected together and secured to the base.
- The door and shutters are attached to hinges.
Interior decoration
Everything again depends on imagination and the availability of materials. You can simply paint the walls different colors. Perhaps there are remnants of wallpaper lying around in the closet, cladding panels and others finishing materials, nothing prevents you from putting them to use.
A wooden house covered with clapboard can be coated with varnish or decorative impregnation that does not contain toxic substances.
Baba Yaga's dwelling - a structure on legs
This does not mean a fairy-tale hut on chicken legs, but a house on supports. This design is convenient for equipping an orphanage additional elements. A structure raised above the ground can be equipped with a ladder and a slide. It is convenient to install a sandbox or swing under the house.
Although, on the other hand, if you give free rein to your imagination and try hard, you can build a fairytale hut on chicken legs.
From the point of view of psychologists, every person and especially children need their own territory. It’s not for nothing that they have a craving for building huts, huts, bases and other buildings from any suitable or not so suitable materials. If you have your own yard or your child spends a lot of time at the dacha, build him a children’s house. The easiest way is by frame technology. Examples of the construction of wooden playhouses for summer cottages in photo reports.
Playhouse for a summer cottage with a sandbox below
We bring the brought timber 100*100 mm until smooth. You can use a plane, or you can use a drill with sandpaper attached. First with large grains, then with small ones. Afterwards we treat it against rotting protective composition, we paint. While the pillars are drying, we drill holes (our diameter is 23 cm, depth 60 cm). We fill them with crushed stone at the bottom near a shovel. We put up the pillars, set them vertically, fill them with crushed stone, compact them, and concrete them.
We cut the exposed pillars all to the same level. We fix the same 100*100 mm beam on top. It is also carefully processed so that there are no splinters. We connect it into half a tree: at the ends we cut out recesses half the thickness of the timber. For a 100*100 mm beam, cutouts are 50 mm deep and 100-100 mm in area: so that the same sawn edge of the other beam lies flat.

We fix the top beam. Three have been collected, the fourth is still lying around.
We fasten it securely: 2 long nails (200 mm) on top, corners on the sides with self-tapping screws.

We attach an additional beam along the long side. Under it in the middle - above the stand - we cut a notch, also half the thickness of the beam - 50 mm. No more preventing wood from splitting. We cut down the timber at the ends in the same way as those that go along the perimeter: into half a tree. It fits into the prepared gash.

A children's house must have a solid margin of safety. Therefore, we play it safe in every connection. To give the structure stability under lateral loads, we will install jibs. We cut them from 50*50 mm timber, sawing the ends at 45°.

We put it at a standstill, squeezing well.

After installing the jib, we lay the board. This will be the floor of the house.

Without an assistant - no way
We cut the flooring from the boards. It is more convenient to work with a jigsaw, but you can also use a hacksaw.

On the finished flooring we assemble the frame of a children's playhouse. We use timber 50*50 mm. We position the beams strictly vertically, first fasten them with nails - two on both sides, then reinforce them with corners on self-tapping screws (also on both sides).

We increase the rigidity of the structure by installing jibs. Then we nail the second floor trim. We simply nail these beams between the pillars. They must be sawed off with great precision so that the building does not warp. We strengthen the joints with corners, then install the jibs.

We do not nail the jib in the place where the entrance will be.


They covered it with boards left over from the packaging of the equipment. You can use it from pallets, buy an inch board (12-13 mm thick), cover it with clapboard or imitation timber, logs, or siding.

When the sheathing is almost finished, we begin to assemble the rafter system. It's easier, of course, to do pitched roof— make one wall higher and no problems. But the gable one looks better, although it is more difficult to execute.
For rafter system We put two boards on an edge, connect them at the top, sawing off the corners. The ascent depends on the desire and amount of snow. If there is a lot of snow, raise your skate higher. If not, maybe about a meter or less. We knock it down with nails, then we strengthen the connection with overhead plates.

When building houses, they place either a metal plate or a piece of board here. We decided to use a board.


By finished sample mark the other rafters. Cut it out, knock it into two rafter legs at an angle (all should be the same as a carbon copy). Having installed it on the top of the house, we check the verticality. Then we nail it with two nails on both sides and place the corners.

Now the sheathing boards are laid on the rafters. Roofing material there will be ondulin. We place the board 11*100 mm in increments of 30 cm.

Based on the thickness of the board (11 mm), we use self-tapping screws 25 mm long to fasten the ondulin (so that they fit well into the board. We put rubber gaskets under the caps to prevent leakage.


Railings made of treated, sanded boards. Screwed onto powerful 90 mm self-tapping screws. Two for the bottom beam - one for the sheathing board.

Railings are installed on the “veranda” of the house

At the top, the railings are connected by a 30*30 mm beam. Then a board will be nailed to it - a handrail.


Railings ready for painting
It was decided to put a sandbox downstairs. It is not difficult to assemble: eight boards on the walls, connected at the corners using bars, with a side board nailed on top. Then the sandbox is painted.


Even a “non-builder” can build such a children’s house with his own hands. Especially complex work No, you can get by with a basic tool.
Several options from the same series are pictured below. Two are houses with a slide, and one one-story option, more suitable for girls.


One-story “open” option
How to make a children's house from OSB and plywood (frame technology)
It was decided to make a house using frame technology - the base is made of boards, the cladding is made of OSB. Dimensions in plan - 3 * 2 m, wall height 1.5 m, ridge 2.2 m. 50 * 100 mm boards were purchased for the frame, inch board (100 * 12 mm) for the subfloor, 9 mm OSB for the floor and outer cladding , for internal – polished FSF plywood 6 mm, foam insulation 100 mm thick.
Preparatory work - assembling panels for the children's house - was carried out in the garage: it was still cold. Later, as it gets warmer, the house will move to the dacha, to a place of permanent residence.
The first stage is the manufacture of the floor frame. We knock down a rectangle with sides 3 * 2 m, nail the transverse boards (floor joists) in increments of 50 cm.

The floor will be insulated with foam plastic. Children love to sit on the floor, so we insulate them well - with 100 mm foam plastic. We stuff thin strips underneath it from the bottom so that it doesn’t fall through. Insert foam. The gaps can be filled with polyurethane foam.

It's good that the building is small. We put it on its side and hem it underneath with an inch board. This will be the subfloor. After turning it over, we sew up OSB.

Later, when the house was taken out to the country, a mistake was discovered OSB installation. They nailed him close. In the humid air, the material swelled and the sheets withered in some places. Therefore, when installing sheet material, leave a gap of 8-10 mm.
Next, we assemble the wall frame. We install the racks in 1-meter increments, and double them under windows and doors. Since the top will be filled with OSB on one side and plywood on the other, the structure will be rigid. We don’t install jib beams. They are needed if the children's house will be upholstered with clapboard or other slatted material.

Assembling the wall frame

The work was moved to the dacha. Three old logs were used as the foundation. They are hewn and the tops are leveled. The logs are leveled, a board is nailed onto them, on which the platform will be installed. The width of the house is 2 meters, and the logs are 3 meters long. We will decorate the remaining part as a terrace or porch.

The platform was installed. It is attached to the logs with large pins that connect the log and the platform. We began to lay out the frame of the walls. They must be placed exactly vertically. To secure it, temporary cuts were used - they were nailed down with boards on the sides.


Fixed externally (connecting brackets are visible in this photo)
Along the way, having aligned and checked whether the wall is level, we nail it to the platform with long nails. The length of the nail is such that it at least reaches the middle of the frame board.


Then the fittings begin: you need to correctly saw out the corners for the rafters so that they lie evenly on the boards. First, we cut roughly, gradually ensuring that there are no gaps.

Trying to “create” a rafter leg


When the shape of the cuts is clear, we transfer it to other boards using a sharp pencil. We cut everything evenly (with a jigsaw, if you have one or hand saw). Then we nail all the boards to the frame. We fill transverse boards between the rafters - the ondulin will rest on them. It turns out to be such a house.


After the construction of the rafter system, only the sheathing remains - inside and outside. We fill the outside with OSB. We cut it so that the joints fall on the racks. We nail it, you can use wood screws. For whom is it more convenient?


The insulation of the house inside is mineral (basalt wool)
Everything is nailed on top with plywood. That's all. The job is done - paint it and you can put it into operation)))
Using the same technology you can build a tree house. It will be necessary to secure the platform, but everything else is very similar.
Drawings and diagrams
Each homemade children's house differs in size. Based on how many “inhabitants” are planned in it. If the child plays alone, then 1.5 * 1.5 m is more than enough. If there are two children, they are already needed large sizes. At least 2*2 m. Decide for yourself on height too. But it’s better not to do less than 1.5 m.


House made of boards and plywood with a slide roof


It is perhaps difficult to meet a child who would not dream of his own small house. It can be anything - a textile tent, a wooden hut, a plastic house, and even a hut or wigwam. And it doesn’t matter where such structures are installed - on a summer cottage, or in an ordinary apartment - it is important that this is a personal place for the baby to play and spend free time. Such space is very necessary for children, any child psychologist will tell you this, especially if the house does not have a separate children’s room. This article will talk about how to make a children's house with your own hands.
It is important to satisfy the need for a personal “corner”, because only this will lead to the full development of the growing personality. Here the child should feel like a master, he himself arranges the furniture or brings toys, cleans the inside, makes it clean and beautiful. This helps teach responsibility and also makes the baby feel safe. In addition, it is also a great place for educational games.
Children's house photo

That is, as experts assure, any child needs a secluded place where he could feel confident, protected, could play, or engage in creativity, or simply relax from everything and everyone. Of course, today manufacturers of children's toys offer the most various options children's playhouses or tents. But it’s so nice to make a house yourself, especially since you can involve the future owner of this property in this work.
All that remains is to create a project for a children's house and select the materials from which the idea will be realized.
Variety of children's playhouses
Wooden children's houses
- Today the choice of materials is very large. Of course, wood comes first. This is a natural product, environmentally friendly and easily accessible. To work with wood it is enough simple tools- hammer, saw, screws and nails.
- Of course, if you want to build a real masterpiece, you will need a more serious set of equipment, but in principle there is nothing complicated here and you can always do it yourself. This category also includes products such as MDF, fiberboard, plywood, lining and other wood-based materials. They can be combined with each other or used independently. It all depends on where the structure is planned to be installed and how it will be used.
House made of cardboard or cardboard box
- It is easy and simple to build a house from cardboard or a cardboard box; even children can do it. The basis can be packaging from household appliances, for example, from a refrigerator, washing machine, TV, etc. It is advisable to take thick and dense cardboard, then its strength will be higher. All structural elements- doors, windows and others are easily cut out with an ordinary stationery knife and scissors. To perform this procedure more accurately, it is advisable to first draw the boundaries.

- The roof is made from glued pieces of cardboard or one large one, depending on the design of the house. You can glue the parts together with PVA glue or tape (it is especially important to strengthen the joints in this way so that the product does not quickly become unusable). After the structure is assembled, it should be brightly and beautifully decorated. This is easy to do armed with regular gouache and a brush. If there are pieces of wallpaper left in the house, then you can beautifully cover the walls and roof with this material.
- It is recommended to entrust the decoration of the interior and exterior to the child so that he feels like a master here. True, such a structure will not differ in durability. Therefore, it is best to keep such a house in indoors(in an apartment or house), and if used outdoors, then only in dry, windless weather. This rule also applies to the next category of materials - textiles.
Children's house made of fabric
- You can build children's houses of various shapes from fabric. Most simple view is a hut or tent. To create them, just come up with a base (frame) and cover it with a piece of fabric, an old bedspread or sheet. This building It can be both stationary and collapsible, it all depends on the imagination of the master.
- Ideal for frame plastic pipes(PVC), which are used for plumbing, or thin blocks of wood. It is quite easy to purchase these products at hardware store, their price is low. In cases of creation wooden frame, all parts should be sanded and painted. This procedure will prevent splinters and scratches from appearing in the child.

- It won’t take much effort to make a hut; just tie 3-5 guides together at the tops (from one end), and use the free end to place the structure on a solid support, straightening the guides in different directions. Then attach the fabric to them to form walls. Since there is no floor in the design, it is necessary to lay a thick carpet so that children do not catch a cold while playing on the cold floor. In the summer, such a children's house can be taken out into the garden. This is a fairly mobile design that the child can move at his own discretion.
- Another option to simply build a hut is to use a gymnastic hoop as a basis or build a wire frame. Such a product should be secured to the ceiling, or, if possible outside, to a tree branch. Here it is important to cut the material correctly; with the right approach, it is easy to make windows and doors from separate pieces of fabric. If you can’t build a frame, then you can take an ordinary table as a basis and cover it with fabric, like a cover, leave space for the entrance, that is, make a folding canopy and the playhouse is ready. Children will be happy to spend time in such a place, especially if the table is large and there is room to turn around.
Children's house made of plasterboard
- Another material that is successfully used in the construction of structures of varying complexity is plasterboard. Such a house can become a decoration for any apartment; the main thing is to create a project so that it fits well into the interior. They are used as a frame aluminum profiles, so wooden blocks. Screw plasterboard sheets should be approached to the base using self-tapping screws and a screwdriver; it is important to ensure that the sharp ends of the hardware do not protrude inside the structure, otherwise the child may accidentally injure himself.

- If the house has a second floor and a staircase, then the floors need to be made as strong as possible, and the steps are best made from boards, since drywall breaks easily under the weight. A children's house made of plasterboard will already look like a whole room; real furniture can be placed here and even light can be installed. But it’s better not to use such a design on the street. Especially if the drywall is not moisture resistant and is not additionally treated with anything. Otherwise, all the beauty will disappear literally in one season and the next one will have to build a new one. cozy house, and this is a waste of effort, time and money.
- These materials are the most common for building children's playhouses, but this does not mean that this is the only possible options. Some craftsmen manage to create structures from any available means, for example, from plastic bottles or build a house out of sandbags. In general, if there is a desire, there will be opportunities.
DIY wooden children's house
Since wooden structures are the most durable, long-lasting and safe, it is worth considering the stages of construction in more detail. wooden houses, and learn about the necessary set of materials and tools.
Choosing a place to build a children's house
- So, first of all, you should decide on the location for the future building. This is especially important if you are planning a permanent house that will be located on one site for a long time. Every child's dream is to have a tree house, but if it is not possible to completely secure this option, then it is better to avoid such construction. Children cannot sit still, they need to move, and outdoor games at high altitudes can lead to injuries, which is why it is recommended to stay in a hut built on the ground. Moreover, this particular option can easily be supplemented with a wide variety of designs, including a sandbox, swings and even a slide.

- On personal plot the location of the future house should be indicated. It is best if it is a calm place where there is light shade from the midday sun. It is also important to keep in mind that additional territory must be allocated around for games. Such a place should not be occupied by garden beds or other household needs, but should be completely given over to children for play. This must be taken into account, first of all, not for the children themselves, but for the peace of mind of the parents, because noisy games can lead to the fact that precious plantings are simply destroyed.
Preparing the foundation and floor
- The dimensions of the building are chosen arbitrarily; for a small children's house, a length and width of 140-160 cm, and a height of about 1-1.5 meters are sufficient. The first thing you have to do is prepare the foundation. The base can be a platform covered with crushed stone, or well-compacted sand or even ordinary earth.
- There are several options for laying floor boards. You can remove the top layer of turf, fill the resulting area with crushed stone, level and lay the support beams on the prepared site. Another option assumes that only the corners of the building will be on special support blocks, for example, made of cellular concrete. Such supports are laid on prepared sand cushions. That is, having marked the corners of the future building, a 30-50 cm depression is dug in each of them. All the earth is pulled out of the holes, and sand is poured into the free space, which is carefully compacted. To mark the corners as accurately as possible, you can pre-knit the main frame of the floor.

- Blocks are placed on the prepared sand layers at the same level. Horizontalness should be measured using a level and a floor frame timber. Next, it is important to take care of the waterproofing layer, this will help the house to stand for more than one season intact and intact. Roofing felt or roofing felt, as well as more expensive materials, including various mastics, are used as an insulator. In addition, you can use an option in which there is free space under the floor to ventilate the boards.
- The next step is to install the frame. Planks of the required length are laid on foundation blocks, or on support beams (if the option with a compacted platform was chosen), and connected into a rectangular box using corners and self-tapping screws. Metal corners will make the structure durable, but still, for greater reliability, additional cross beams. If you are planning a large house, then there will be 3-5 such spacers; if the building is of a modest size, then one more board in the middle is enough.

- Next, the floor is laid on the frame prepared in this way. You can use separate boards for the floor, wooden boards or chipboard sheets, MDF or HDF. The main thing is that they can easily withstand the weight of not only a child, but also an adult. Recommended use floorboard with parameters: length 6 m, width 13.5 cm and thickness 28 mm. As a rule, 4 boards are enough to install the floor.
- Another rule when building any structures made of wood is to protect the surface of the wood from moisture, as well as from damage by insects. And the children's house will not be an exception here. It is advisable to impregnate the boards on both sides with a special composition, which contains both moisture-repellent components and antiseptics.
Installation of walls and roof
- Once the floor is sorted out, you can start creating the walls. To mount this element, you should create a frame of beams, which will later be covered with clapboard or panels. The main thing is not to forget about doors and windows. First of all, timber is installed in each corner of the future children's house. For these purposes, you can choose products with a cross-section of 60x40 mm, a length of 3 m is sufficient. Each element is cut into three parts, 1 m high, or into two parts 1.5 m each. Next, beams are installed under the windows and doors.

- To secure the main beam, you should attach it with nails to the floor, but in such a way that in the future these nails can be easily pulled out. This is due to the fact that most strong mount structural parts can only be made using special mounting angles, which are installed a little later. Between the rafters (approximately half the height) it is necessary to install additional spacers, which will also serve as a fastening system. Don’t forget that the beams are connected on top by a frame, which will be the basis for the roof. When the base for the walls is ready, the nails are pulled out one by one and metal corners are mounted in their place. It is important to secure all corners and joint elements with corner fasteners, only then will the house really be strong.
- The bars, which are installed horizontally, mark the windows and doors. It is necessary to calculate their height in advance. The calculation is based on the width of the cladding boards; parameters should be set so that when cladding you do not have to cut the board to its width or cover the floor of the window. That is, we calculate how many full boards will fit into the remaining opening from above and below and at such a height and fix the horizontal spacers.
- The last thing you need to do to complete the frame is to install the beams for the roof. To do this, we knock two bars together at an angle (in the form of an incomplete triangle, the base of which will be one of the walls), and we strengthen the free ends on the upper bars of the walls. There can be from 2 to 4 such triangles. IN mandatory one at a time is installed on opposite walls of the house, opposite each other, and one or two can be installed between them, it all depends on the size of the structure. Also, these bars must be secured with corners.

Drawing of a children's house

Covering a children's playhouse and its design
- Now you should start covering the building. To create walls, you can use lining, boards or boards. The option with lining involves faster cladding, since the elements do not have to be adjusted, and they are quite easily connected to each other. The roof is closing edged boards and roofing felt, tiles or ondulin can be laid on top, here everything depends on the capabilities of the builders.
- Since we have a children’s house in front of us, it is advisable to decorate it in bright colors. This can be done together with children. In addition, windows can additionally be decorated carved frames, which are commercially available, or make them yourself. It is recommended to install benches and a table inside the building, but, of course, this is far from the only option for decorating the interior. A porch is often built in front of the house, which was either originally included in the plan, or can easily be completed separately.
- It is important that the house for children is completely safe. This concerns its stability and reliability of connecting elements to each other. Also, to prevent children from getting hurt or scratched while playing, all boards must be jointed and well protected with a layer of paint, varnish or stain. Metal corners, screws and nails must be properly sealed so that they do not protrude or stick out.
Today choose an option for construction gaming house It won’t be difficult for children, because there are a lot of photos and videos on this topic on the Internet. Approximate cost building costs 5,000-15,000 rubles, this cost includes the purchase of boards, hardware, paints and other materials. But often, many parents can build a playhouse for their child with their own hands completely free of charge, using only available materials.
Children's playhouse video
You should not deny your child such pleasure as small house. This will help the child develop fully and feel happier. If it is not possible to arrange a place to play outside, then this can always be done right in the apartment. Don't forget to please your children, and they will definitely please you with their successes.
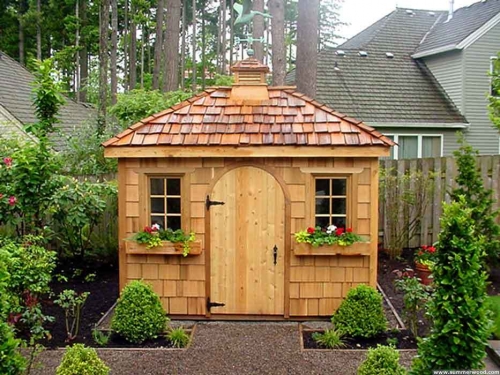
The owners in Golitsyno made this small and budget-friendly, but very solid house with their own hands for their little daughter. The structure was erected not by professional builders, but by amateurs, but it turned out to be stylish and very durable: this mini-house has stood like new for two years now.
Maximum use was made for construction budget materials- the total cost of the building, including decor, was about 35-40 thousand rubles. All wooden elements the house was pre-impregnated.
As the foundation of this house, a base made of 10x10 cm timber was used, and plywood 18 mm thick was chosen for the floor. At the same time, the foundation was raised above the ground on foam blocks, since in the spring summer cottage plot sometimes it floods. Note that the foam blocks do not just stand on the ground, but are dug into it and additionally cemented.

The frame of the walls was made of 5x10 cm and 5x5 cm timber. The outside of the house was sheathed with 18 mm thick plywood. The basis of the roof was also a 5x5 cm beam, it was sheathed with 1.5x10 cm boards. For the roof, the creators of the mini-house chose ondulin (aka Euro slate), since this material is one of the most budget-friendly, and it also turned out to be very simple and quick to install. The windows and door for the building were purchased at a regular hardware store.
