DIY hip roof. Do-it-yourself hip roof - installation of a rafter system Do-it-yourself hip roof made of metal
A hipped roof is a hipped roof covering. It consists of identical triangular slopes, necessarily isosceles, connecting in the center. Maintaining symmetry is the main thing in constructing such a roof.
In its outline, this type of roof is similar to a tent, hence the name. Since the hip roof has a similar geometry to a tetrahedral pyramid, such a roof is often called pyramidal(pyramid roof).
Most often, a hip roof is erected over buildings square shape. Sometimes, when constructing a hip roof, a larger number of slopes are used, the main thing is that in appearance it resembles a pyramid or a polygon with equal sides.
This is one of the varieties hipped roofs. In terms of design and construction features, it is very similar to a hip roof: it also has no pediments, and the eaves overhang runs at the same level along the entire perimeter of the building.


According to historians, the appearance of a roof in the form of a tent goes back centuries, even huts primitive people resembled the shape of tents. Excavations carried out in Mesopotamia, where one of the most ancient developed states once existed, show that even the ancient Sumerians erected buildings with roofs in the form of tents, especially often such roofs were used on religious buildings: temples, temples, chapels. Hip roofs can also be found on ancient towers and castles, where the structures strongly resemble a steep slope.
Currently, such roofs are often used in the construction of cottages, gazebos and other low-rise buildings.
Design
The design features of this type of roof include the arrangement of the rafter system; it is designed in two ways:
Hanging rafter system is as follows: rafter beams rest directly on the walls, creating horizontal pressure; this system requires a system of special ties. Used if the roof spans have large sizes, and the installation of supports is not provided for in the project.

Layered method more popular, but for its implementation it is necessary to have a load-bearing wall indoors. The main load falls on it, but there is practically no pressure on the walls when constructing a roof in this way.


A hip-shaped roof has a number of advantages that are worth talking about:
- for buildings with a hipped roof, pediments are not provided, which greatly reduces the consumption of materials and work for the construction of pediments and hemming of eaves;
- a roof of this type has excellent aerodynamic properties, it is not afraid of strong winds, and the design features will prevent precipitation from entering attic space;
- the surface of such a roof warms up sun rays from several sides at once, in sunny days a room under an uninsulated roof will be warmer;
- The slopes of such a roof are located at a certain angle, which helps drain rainwater and melting snow from the roof.
But, like every design, this roof also has a number of disadvantages:
- a hip roof is quite complicated to design and construct, but after construction is completed, its rich appearance and ease of use often hide this drawback;
- the design of this roof is replete with a large number of connections, beams and rafters, it is necessary to strictly monitor the reliability of all components and connections in order to avoid loss of rigidity and plane shape during the construction of the roof;
- cost of construction - to install such a roof, as a rule, it is necessary to hire professionals in their field, which always increases the cost of the construction process;
- an attic or attic, built under a tent-shaped roof, is significantly smaller in size than a room under a gable roof;
- large waste when using most roofing coatings (especially).
Popularity
The use of hipped roofs has become quite widespread in our time; they are used not only in private construction, but also in the construction of all kinds of modern buildings. They are also used to decorate buildings intended for entertainment centers or expensive restaurants. Such a roof gives any building extravagance and exoticism.
More complex buildings are designed based on a hip roof. Currently, gable elements, dormer windows and elements of other types of roofs are added to a tent-based structure in unlimited quantities. Parts of hip roofs are cut in, complicating the structure and giving it a more beautiful and elegant look.


In ancient times, our ancestors built their homes in the form of tents. Used for this natural materials: wood, stone, animal skins, etc. The modern tent house is a more fundamental structure. It has several varieties and is endowed with certain technical properties.
Ready-made house project with a hip roof
They can be of two types:
- Full-fledged, built in the form of a tent;
- Incomplete, when they are erected as an ordinary building, the roof structure of which is hipped.
The houses will differ in construction technologies and materials used in the work process.
Characteristics of full-fledged tent houses
Such buildings have. Quite often they can be found on summer cottages. Construction is economical, and the assembly of the structure itself is quite simple.
So, a tent house is based on a frame. The projects are quite varied. You can create them yourself or seek help from a professional architect.
Projects for tent houses are drawn up in a similar way to planning a roof structure of this type.
Only the load-bearing walls of the house, which will be used as slopes, are not taken into account.
 Option for a house project with a hip roof
 Their shape can be with one or two slopes, with four, or multi-slope.
That is, in fact, a tent house is a roof that is immediately installed on a prepared base.
The most interesting are the projects of houses with multi-slope walls. The number of such slopes can be any.
But it’s worth considering that the functionality of such a house may decrease, since it will be quite large number limited space due to the construction of additional supporting frame elements.
The most functional and practical are houses with one, two and four slopes. Distributing space in them is much easier.
Note. It is worth considering that the height of such a house can be any. But it is necessary to make it in such a way that the ceilings inside the house reach at least 2.4-2.5 m. In this case, the walls will be inclined.
Although you can make them even and reduce them a little accordingly usable area Houses.
 Hip roof design diagram
 There are several ways to operate a building. Firstly, you can only use a tent house in the summer. In this case, a large amount of money is not spent on its construction. Secondly, you can live in it all year round, which requires high-quality insulation and insulation work. Especially if houses with a hip roof are built from the usual building materials.
How to build a tent house
First, you need to select building designs, which are divided into foundation plans and structural walls. Secondly, you need to initially decide on the choice of building materials. The cost of the future home will depend on them.
So, as soon as there is an exact certainty with all this, you can begin work, which is divided into several stages:

All these stages have their own characteristics.
Selection and construction of the foundation
To build a high-quality tent house, you need to choose the right foundation for it. The following foundations are very popular:
Foundation designs are drawn up in advance, after the selection of building materials. For example, if metal is preferred for the construction of the frame, then it is better to make a monolithic or pile foundation for such a house. They are considered the most durable.
The first type is characterized by production using concrete mortar and fittings. And the second is made using metal piles, which are also concreted in the ground at a certain depth.

Strip and tile foundations are constructed in most cases under wooden frame tent house, since the material itself does not have much mass.
- Determine the composition of the soil on the site;
- Establish the groundwater level;
- Define technical specifications terrain.
The last requirement is characterized by studying the terrain: are there any unevenness, slopes and other defects on the site. On such planes, only a pile or pile-tape foundation is preferred.
Construction of a frame for a building
As mentioned above, a full-fledged tent house is based on a frame. It is constructed from two materials: metal and wood.
 Detailed project of a two-story house
 Note. You can give preference to special profiles. But this is the case if the structure is light, and its period of operation is limited to the warm season.
First you need to draw up design plans. They will allow you to correctly calculate the amount necessary materials for the construction of the frame.
The elements are as follows:
- Bearing (support);
- Additional (supporting);
- Auxiliary (partitions between small cells).
In its principle, the design resembles the frame of a hip roof. All elements are connected with special fasteners, and a bedding made of sheets of roofing material is first constructed on the foundation.
Important. There should be pins and hooks on the surface of the base that serve to secure the frame to it.
It is to them that they are welded or screwed load-bearing beams frame.
External and internal finishing of the frame
Firstly, the tent house must be properly lined. Secondly, do not forget about insulation and insulation work. When they are carried out, modern sheet materials such as polystyrene foam, polyurethane foam and polystyrene foam are used.
In rare cases, preference is given to mineral wool.
Important. This material is least often used in insulating tent-type houses. This is due to the fact that over time it loses its properties and is able to absorb moisture.
Projects for cladding tent houses are quite varied. Today there are a lot of tools and materials to give appearance uniqueness of the structure.
Initially, sheets of OSB or thick plywood are mounted on the surface of the frame. Insulating or insulating material is already attached to them.
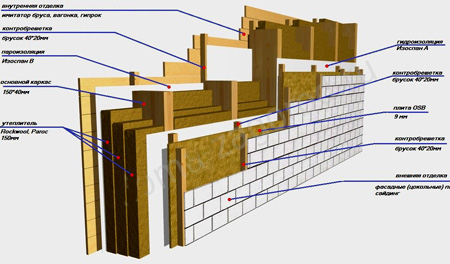 Cladding scheme frame house with hip roof
 A low sheathing is created on top of it, on which sheets of plywood or OSB are again mounted, prepared using primers. This will give you the opportunity to choose any finishing materials for cladding a building.
The following are very popular now:
- Wood;
- Decorative cladding panels;
- Plaster;
- Plastic lining;
- Natural and artificial stone.
The latter material has a large mass and it is not recommended to install it without surface reinforcement. It is best to use stone to finish the lower part of houses.
The inside of a home may look different. For example, you can leave the walls of the building inclined or build profile frame, which will align them. It is fixed to the slope of the structure and to the floor surface. You can already install OSB, plasterboard, and plywood on top.
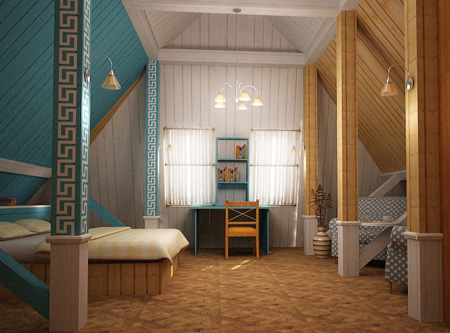 Example of a frame house interior
 The surface of these materials is treated with a primer and finished with any modern materials. You can also pre-insulate and insulate the house using similar means from the outside.
The tent house is quite simple design. It must be airtight, since there is no roof in such a structure.
Hip roofs are used both for low-rise residential buildings and for various outbuildings. Most often, they are built over buildings that have equilateral load-bearing walls and a square foundation plan. You can find such architectural elements above round structures, in this case the number of slopes is more than four.

The main difference between a hip roof is the complete absence of a ridge. This is very important detail rafter systems, it takes on the forces of the rafter legs. The function of this element is assigned to the central support, at the top of which the rafters converge. In this regard, great attention should be paid to its strength. There are options for rafter systems without a central support; the upper heels of the rafter legs rest against each other. Such options are most often used on small-sized buildings. All slopes of the tent system have the shape of equilateral triangles.

A hip roof has many design options, but all must have the following elements.


Types of rafter systems, advantages and disadvantages of a hip roof
Table. The main types of hip rafter system.

Advantages of a hip rafter system


The disadvantages include the difficulty in manufacturing the rafter system. A hip roof has a large number of different units and elements, each of which can have an impact negative impact on sustainability indicators. Another drawback is the difficulty in converting attic spaces into residential ones; such options for rafter systems are extremely rarely used for attics. Sometimes increased consumption is considered a disadvantage roofing materials, but this depends not so much on the features of the rafter system, but on the professionalism of the roofers.

Prices for timber
General tips for constructing hip roof rafter systems
Specific decisions are made by the master, taking into account the size and design features of the hip roof. But for all cases there are general recommendations, the implementation of which guarantees the stability of the structure.

Additional supports for sloped rafters

Top of the tent system
A very complex node from a technological point of view and the most critical from an architectural point of view. Has two solutions: rafter legs rest on one support installed in the center of the building, or against each other. The first option provides maximum structural stability, but its installation requires a rigid support. The best option- in the middle of the building there is load-bearing wall. An acceptable option is that during the construction of the ceiling, reinforced beams or beams are provided. When calculating the parameters, the maximum possible roof loads must be taken into account and a safety factor must be applied.
The use of connections only in the upper heels of slanted rafters without vertical support is used only on small structures. At the same time, a set of special construction measures is used to increase the rigidity of the structure.


Narozhniki
They can be fixed using special lower stops, directly to the rafters or in a mixed way. Modern technologies They allow you to fix the spigots without cutting, which not only strengthens the rafter system, but also significantly simplifies the work.

Structural solutions for a hip roof, especially without a central support, significantly increase the thrust loads on the mauerlat. This situation requires its strengthening; all nodes must be built according to accurate calculations and with unconditional compliance building codes.
And finally general recommendation– unless you have a serious practical experience construction of ordinary pitched rafter systems, then it is absolutely not worth taking on a hip roof. This is one of the most complex rafter systems; all its elements are so interconnected and interdependent that a violation of the stability of one becomes the reason for the complete destruction of the roof. Tent truss structure does not have completely identical elements; everyone must be approached individually.

Prices for construction boards
Construction boards
Calculation of a tent structure
First, let's look at the algorithm for calculating the basic values of the system. We take into account that the roof has four slopes, each of which represents equilateral triangle. The angle of inclination of the slopes is selected depending on the coverage area and climate zone object location. Taking into account the climatic zone in the tables of building codes and regulations, the minimum is selected permissible angle slope of the slopes.

The length of the central rafter depends on the angle of inclination and is determined by the well-known formula of a right triangle. First you need to find the length of the diagonal; this is done by calculation or ordinary measurement. The second method is simpler; use a tape measure to find this value.
We have the angle of inclination of the slopes, find the tangent on the Internet, multiply it by the length of half the leg and the result will be the height of the vertical support of the hip roof. Next, you should calculate the length of the sloped rafters. It is calculated using several formulas, the simplest of which is the Pythagorean theorem: c 2 =a 2 +b 2, Where:
c – rafter length;
a – half of the side of the structure;
b – height of the vertical support.
Hence, the length of the rafters is equal to square root the sum of squares of the indicated quantities. That's all, if it's difficult to do it yourself, then there are a large number of online calculators on the Internet. After entering the data, not only the dimensions of the system elements are displayed, but their number is also calculated.
Construction of your house on personal plot or in the countryside makes us wonder about the shape of the roof. The hip roof (or hip roof in other words) is becoming increasingly popular. Its tent-like design has both advantages and disadvantages. In order to install such a roof, it is not necessary to call professionals. You can assemble the frame with your own hands. To do this, you need to be able to make calculations and have at least some idea of the design. The roof is attached in the same way as on other structures. To be sure, you can call a friend or neighbor.
1-Corner rafter. 2-Short rafters.3-Riding beam.
4-Central intermediate rafters. 5-Intermediate rafters.
The main advantage of the roof is aerodynamics, which resists strong winds. Air currents go down the slopes without causing harm, without even entering the attic. Main disadvantage such - this is a complex frame, its installation and the fact that attic rooms small. The area is equal to the area of the ceiling, but the useful volume is very small. Hip roof design (in classic version) is a pyramid with a square (4 triangular slopes) or rectangular (2 triangular, 2 trapezoidal slopes) base. Both triangular slopes (hips) and trapezoidal ones either rest on the walls of the house or extend beyond them.
About inversion roofing.
Roof construction: basic rules

Subject to the following rules:
- During construction ridge system and the rafters use the same type of wood.
- Intermediate boards have a steeper angle of inclination, and therefore their size must be at least 50x150 mm.
- The short members are attached to the rafter components located at the corners, rather than to the ridge board.
- The design uses intermediate (central) rafters, which must be secured to the ridge board.
- They must rest against the upper end of the harness and the ridge board. In order to do the installation yourself, you need to imagine the house and make a drawing.
- ridge (central part of the structure), which is the load-bearing axis;
- the power components of the rafter system are slanted rafters, one end of which protrudes beyond the building, and the other is fixed to the ridge;
- the central rafters are fixed at the ends of the ridge and extend to all the walls;
- intermediate rafters extend from the ridge and run along the slopes;
Hip roof: start of work
The installation of the hip roof should be done before installing the ceiling.

At the very beginning of work around the perimeter of the house (on top of the walls), we lay timber (wooden or metal beam) to distribute weight over the entire surface.
At the very beginning of work, we lay a beam (wooden or metal beam) around the perimeter of the house (on top of the walls) to distribute the weight over the entire surface. It's called Mauerlat. We attach it to the wall of the house with special studs. Then we proceed as follows:
- first we mark the axis (from the end of the house along the top frame);
- we calculate 1/2 the thickness of the ridge beam and mark the installation location of the first element of the rafter system;
- after this, the measuring rod (one end) is applied to the marked line and the place of the intermediate rafter is marked;
- in order to calculate the overhang of the rafters, we place one end of the beam on and the other on external corner walls;
- the location of other elements of the central rafters is calculated by moving the slats along the side wall and marking the dislocation of each rafter;
- at the other three corners the actions are repeated.
Calculation of roof elements
To calculate, you will need a measuring rod. It is made of simple plywood and is 5 cm wide. There is also a special table of relationships between and their length. Based on the data given in the table, the leg length of each rafter is the product of the coefficient (intermediate or angular) of its projection.
To increase the accuracy and reliability of calculations, be sure to make calculations using this table.

To increase the accuracy and reliability of calculations, be sure to perform calculations using this table.
Calculation example
Using a batten we measure the projection (horizontal) of the intermediate rafter. Using this table, we find the angle of inclination that suits our case and multiply the data.
The calculation of the overhang length of the rafters is carried out in the same way. We multiply the projection (horizontal) by a coefficient. You can also calculate these data using the Pythagorean theorem for a right triangle: a2+b2=c2. In this case, a and b are horizontal and vertical projections.
Corner (sloping) elements. On one side, all rafters have an oblique cut, which is needed for attachment to the ridge beam. The ridge itself has a double bevel cut (for reliable fixation parts in the corners of the house). The rafter (corner) calculation is carried out as follows:
- measure the full from the corner;
- its projection is the product of the squares of the lengths of the projections of the rafters (central).
We multiply this number by a coefficient (according to the table) and find out the length of the corner rafter.
Then we begin to calculate the area of the triangular slopes (hips). It is calculated using the Pythagorean theorem. To make calculations easier, we present the slope in the form of two right triangles. After this, we calculate the area of the trapezoid of the side surface of the roof using the formula. At the very end. The data of all areas is summed up, and the minimum area (or footage) of the roof is displayed.
Frame: DIY installation

Strengthening the roof directly depends on the dimensions of the building. An additional truss (beam between adjacent sides) is installed.
First, we install the verticals for the ridge beam (for a pyramidal roof, one post in the middle is enough). Then we begin the installation of diagonal rafters (equal in length). After this, they begin to install sloped, and then ordinary (in increments of 60 cm) rafters, which are attached using a notch to the ridge and the mauerlat. The cutting can be done either with your own hands or with a power tool. Next, we attach the splices to the diagonal guides to connect the Mauerlat and mowing beams (at an angle of 90 degrees relative to the ridge).
Remember! Ordinary beams should not touch the mounting points of the Mauerlat.
Strengthening the roof directly depends on the dimensions of the building. An additional truss (beam between adjacent sides) is installed. A stand or truss truss is mounted on it. If the building area is very large, then double beams are used for the diagonals.
Tools and materials
You will need the following tools and materials:
- saw or chainsaw;
- grinder or jigsaw;
- hammer, nails, dowels;
- plane or jointer;
- axe;
- drill, electric drill;
- beams and boards (preferably from the same type of wood);
- roofing material;
- special steel brackets. You can make them yourself from a rod (8-10 mm), bending the ends and sharpening them.
In this way, you can build hip roofs in the form of a regular pyramid, elongated to one side, or a truncated pyramid.
Hip roofs have all the advantages roofing structures with four sloped planes. They resist all attacks well environment, and very economical. However, rafter systems of hip roofs are equipped using special requirements and construction techniques. Beginner builders who want to build such a roof themselves need to know them.
Features of hip roof rafter systems
Hip roofs are also called “envelope roofing,” which reflects their configuration in the drawings. To construct a hipped frame, technologies for arranging roofs with four pitched surfaces are used, but in compliance with certain specific specifics. Such roofs completely lack ridge top beams and gables. Functionally ridge beam replaced by a central pillar (support), in the upper part of which all the main supporting parts of the rafter system converge.
Geometrically, the hip roof consists of 4 or more isosceles triangular planes. The lower parts of these planes rest on the walls through the bars/logs of the mauerlat. The tops either rest against the central pillar (support) or against each other.
Types of structures for hip roof rafter systems - diagrams
As with conventional roofs with one/two pitched planes, 2 types of rafters are used for the construction of a hipped frame:
- layered - which use 2 reliable supports in the upper and lower parts. The use of such rafters is possible if the constructed house building has an internal wall on which a central support beam is installed. Instead of a wall, in any building a support column can be installed, which rests with its lower part on the attic/basement floor slabs made of reinforced concrete;
- hanging - using only support in the lower part. Such rafters are installed when the building does not have an internal supporting wall, and placing the support column in the center is impossible.
Important: the choice of the type of rafters - layered or hanging - is determined by the subsequent installation technology of other elements of the rafter system.
Layered technology for installing rafters in hip roof rafter systems is used more often. A hanging structure is more difficult to arrange and is inconvenient to repair, since some of its parts are interdependent, and when replacing damaged parts, undamaged elements must be dismantled.
Hip roof rafters: shortened and diagonal

Corner parts of house construction and upper part Hip-type roofs are connected by slanted/diagonal rafters - a mandatory part of roofs with four pitched planes. They are the longest and most loaded parts of such a rafter structure. Then shortened rafters, called sprigs, rest on them. These elements form the triangular surfaces of the slopes of such a roof - hips. When the length of the diagonal rafter exceeds 4.5 m, it is made of 2 boards sewn together with a 1 m piece of the same wooden building material as the rafters themselves. The board from which the rafter frame of the insulated roof will be built must have sufficient width, taking into account the future ventilation gap of 3 cm. It is formed by the upper pitched surface of the rafter system and heat-insulating elements. When commercially available building materials do not provide the required ventilation gap, then a timber counter-lattice structure is attached to the outer parts of the rafters.
Additional support parts for bevel parts
To increase the strength of the hip roof frame and prevent sagging of very long slanted rafters, additional supporting parts are placed under them. The type and number of such additional supports directly depends on the length of the span covered by the diagonal rafter:
- for a length of 7.5 m and less, the rigidity of the diagonal type rafters will be provided by a strut placed at the top of the span;
- with a length of 7.5-9 m, a strut is placed, and an additional support is placed at the bottom of the rafters;
- for lengths greater than 9 m, a third support is placed in the central part of the rafter. According to the standards, it can only be rested on reinforced concrete slabs ceilings
The struts are placed at an angle with an arbitrary value in the range of 45-53 degrees.
Important: the trusses (and trusses) of the rack are placed only in a vertical position.
Fastening the upper part of the rafters
Rafter systems Hip roofs do not use ridges or ridge purlins. More often, central rafters or diagonal rafters are supported by notches on a supporting central pillar. This single supporting element of such a tent, located at the top of the structure, has 3 installation methods:

With this type of fastening, the thrust load is transferred to the mauerlat bars. Therefore, all hips are equipped with a tie bar.
Features of installation of spigots
The lower attachment point for the shortened rafters (called sprigs) is formed similarly to the attachment points for the central hip rafters. Top mount to diagonal elements is carried out in several ways:
- by cutting into a block, which is used to create a slanted rafter.
- by leaning on an additional block fixed along the very bottom edge of the diagonal.
- by nailing 8.2 cm with nails, when there are no additional strength requirements for shortened rafters.
 Methods for attaching flanges to the slanted rafters of a hip roof
 And the most successful is considered to be fastening through a support beam, which is attached flush with the underside of the slope. With this fastening, the strength of the diagonal rafters does not suffer, and the installation of the frames will be faster. In addition, during this installation option there is no need to maintain a spacing for shortened rafters when marking and securing them. And when fastening with the help of notches, the tops of the spigots cannot converge at one point.
The installation pitch for standard and shortened rafters for a thermally insulated roof must coincide with the width of the thermal insulator. When the tops of the rafters are attached with notches/nails, it is possible to change the pitch between the rafters in order to move the tops of adjacent pitched planes relative to each other.
Stages of construction of a hip roof
At the initial stage of construction of the hip roof rafter system, the base is prepared - the Mauerlat. For these purposes, Mauerlat parts are mounted and floor beams are placed.
 Step by step construction hip roof rafter system
 The last elements then form roof overhangs directed towards the beams. Beams that function as extensions and ceilings are placed from the center - they start by installing the central one, and then the rest of the beams are placed from it with a set step.
For concrete walls, an armored belt is formed on top, to which the Mauerlat itself is attached. At the next stage, the load-bearing support of the rafter structure, central rafters and corner rafters are installed:
A stand made of timber with a cross-section of at least 15 cm is installed in the center of the ceiling, with the obligatory check of its correct installation using a plumb line;
The central rafters are placed, at the top to the rack and at the bottom to the mauerlat beam - they are attached with metal corners;
Cords are stretched from the stand assembly to the corners of the base, and then the slopes are installed along them. After the installation of the diagonal rafters is completed, the installation of the support posts begins.
Upon completion of the installation and fastening of the support posts, the extensions are made and installed.
These elements fill the space located between the central rafters and the diagonal ones, which provides a rigid base for the pitched planes of the hip roof. The frames are placed parallel to the central rafters.
The top of the outriggers is attached to the slanted rafters, and the lower part is secured to the outriggers/beams. As you move to the corners of the rafter structure, the length of the extensions decreases.
Supports are placed under the flaps.
When the rafter systems of hip roofs are mounted in place, the lathing structure is placed on them, thermal insulation work is carried out and roofing.
