Garden shower for a summer residence with your own hands drawings. Summer shower: we build it for the dacha with our own hands, using photos and drawings. How to organize a drainage system in a shower at the dacha with your own hands
In the summer, even when relaxing and not working, at the dacha you need the opportunity to wash yourself. The easiest way to organize this is on the street, not in the house. You can make it portable - a mobile shower. This is a great option for the first time. But I want something more thorough. For this purpose, they build a summer shower in the country. Although it is stationary, it is lightweight.
Portable summer
Let's start with the simplest models, which do not even require a booth or large capacity. There are mobile showers that work on the principle of a foot pump. The source of water is any container that you place next to you - a bucket, basin, tank - whatever you have. You lower the end of the hose into it, connected to a foot pump, which most often looks like a mat.
Summer foot shower - stomp
A hose with a watering can is connected to the output of this “pump”. To get a flow of water, tread on the mat, alternately pressing the pump pads. We trampled and the water began to flow.
What's great about this option is that you can carry it with you. It’s warm outside—you wash on the lawn. It got colder - we went into the house, put a trough, and washed ourselves there. This shower can also be taken on a hike - it fits in a standard package. Another plus is that you regulate the water temperature yourself: if you pour it warmer, you wash in it warm. If you want to freshen up, grab a bucket of cooler water. A good shower option for summer use.
Summer stationary shower in the country
When installing a stationary shower, the first question that arises is: where to drain the water. If there is already a drain hole for, you can lay a pipeline there. But this solution is not the best if you use bacteria or drugs to process waste in the pit. In this case, a certain humidity is required, and with a shower it will be clearly higher than normal.
It is better to make a separate drainage hole for the shower. If the soil has normal drainage ability, it is enough to dig a hole nearby about 60*60*60 cm, fill it with expanded clay, or maybe with broken bricks. This should be enough for average water consumption. If your family belongs to the category of “waterfowl” or the water drains poorly, make the hole larger.

On sandy soils, you may encounter another problem: the sand may crumble. Then the walls can be strengthened with a net by driving pegs into the sides. Another option is to cover the walls with boards (as in the photo). But this is if the board is leftover.
Base
No matter what kind of summer shower it is, it usually weighs a little. That’s why the basis for it is not too serious: there is no point in burying money. Most often, small foundation blocks are used, which are leveled. The shower in the country is raised above ground level by 20 cm or so. This is enough to prevent the treated wood (if it is used as a frame) from rotting.

If you are going to weld the frame from metal, you can generally place it on a level paving slabs or a stove. If desired, you can cast the columns yourself: install the formwork, lay the reinforcement and fill it with concrete.
Frame
The size of the shower is chosen arbitrarily: there are no standards here. In addition, the shower stall is often only one part. In another they set up, for example, a locker room or a room for a water heater (electric or wood - depending on the conditions). Some people plan to use the other half for storage or storage of equipment. So a country shower is not always just a cabin “for washing.”
If it is planned lightweight design, in which they will only wash themselves, and the simplest option is with a curtain instead of a door, you can take the minimum dimensions: a square with a side length of about 90 cm (drawing below), the height of the racks excluding the tank is 2.2 m or higher (if the family tall).

But this width is far from comfortable: it’s too cramped even for people of average build. It is more comfortable with a width of at least 100 cm, and better - 120 cm. This frame is assembled from metal or wooden blocks.
Made of metal
The metal frame for the shower is made from a corner with a thickness of at least 4-5 mm. The width of the shelf is selected depending on the planned load. The frame is usually loaded by water tanks and cladding. If you plan to put a plastic square container of 100 liters on top, and cover the walls with film, impregnated fabric or something equally lightweight, you can take the cross-section to a minimum. If you are planning, for example, two 200 liter barrels, and cover the shower stall at the dacha on both sides with clapboard, the load will be completely different. And here large sections are required.

Another metal frame for country shower can be made from profiled pipe. The wall thickness for the racks is 3 mm; 2 mm is also suitable for strapping. It has a rectangular or square section, which makes it much easier to attach the sheathing and sheathing. To attach something to a corner, you often have to first screw the bars to it, and attach the rest of the strapping to the beam. The harness can be attached directly to the profiled pipe using bolts or screws with pre-drilled holes.
It is best to weld the metal frame. If there is no apparatus, you can make a collapsible frame with bolted connections. Craftsmen do it this way: they cut pipes to the required length, take thick mounting angles and assemble the frame with bolts.

In case you are planning to learn how to weld metal, the choice welding machine — .
Made of wood
Wooden frame for an outdoor shower they are assembled from timber. For bottom trim As a rule, pine beams 100*100 mm or 150*100 mm are used. Racks can be installed with a smaller cross-section. Again it depends on the load. If there is a large tank on the roof, make racks from weave. If they only hold a roof (water is heated in titanium nearby) or a very small tank, then 50*50 is enough.

The bars can be attached in different ways. If correct, you need to cut out the tenon and groove. If it's quick, you can join directly, reinforcing the connections with corners.
Having placed the racks, they immediately make the top trim. It definitely fits 50*50 mm or 50*40 mm. They also make intermediate strapping. There may be one, two, or even three. If you are going to cover the shower with clapboard, imitation timber, it is better to fasten the crossbars more often: it will be possible to fit the not quite even lumber more tightly. The quality of wood materials sold on the market is, to put it mildly, low. We have to correct the jambs of geometry using force.
The construction of a timber frame is shown in the video
Sheathing
You can cover the frame with any material:

You can use any other fence that comes to your mind and will perform its functions. For example, on one summer cottage the shower paneling was woven. By type.

Shower tank
As a tank for a summer shower, use any suitable container that is on the farm. Most often it is a barrel - metal or plastic. If there is nothing suitable, you can buy a container. They are available in a wide range: plastic, metal - ferrous metal and stainless steel.
Not everyone likes plastic ones, as they heat up the water worse. For the southern regions this is not a big deal - there is already enough heat, but for Middle zone-may be critical. Although in this region, most of the summer, water even in black metal barrels requires heating. On the other hand, plastic containers are inexpensive, lightweight, and have a square, flat shape, which means they fit well on the shower frame and there is no need to come up with a mounting method.
IN metal barrel the water will heat up faster, especially if it is painted black. But if it is made of ordinary metal, by the end of the season there will be a lot of rust. So much that it will be noticeable on the body. This is the main disadvantage of such tanks. Much better - stainless steel. If finances allow, allow yourself one.
Summer shower tray
There are two options for installing a country shower: when the septic tank (drainage pit) is located directly under the shower stall. Then you can simply make a pouring floor: lay boards with a gap of 3-5 mm. A simple option that works great on sandy and sandy loam soils. In this case, the water leaves very quickly, without stagnating anywhere, so this device does not cause any inconvenience.
But this option is only suitable if you plan to use the shower exclusively in warm weather. But in spring and autumn it will be cold, as it will blow from below.
If a normal drain is required or the drains need to be moved to the side (the drainage hole is away from the building), you need to make a tray in the shower. The simplest case is to buy ready-made. Then, when constructing and choosing the size of the frame, you will have to focus on the size of the pallet: under it you need bars to which it is attached. They also connect it in a standard way: install a siphon with a flexible hose, like in a bathroom.

If the pallet is plastic, just bars around the perimeter will not be enough: support is required under it, otherwise it “walks” too much. This base is usually made of bricks. You can bind them with a solution. Just be sure to leave room for the drain hose.
In some cases, they try to make a more solid drain: without using a ready-made pan. In this case, a concrete slab is poured. To do this, dig a pit of the required size, about 30-40 cm deep. A layer of gravel 15-20 cm thick is laid on the bottom. Already at this stage, a foundation is installed - a drain pipe and a drain grate. They are putting up formwork. It can be permanent - made of brick. The crushed stone is compacted and everything is filled with concrete (). Wait a week (at a temperature of +17°C and above) until the base gains strength. Afterwards, you can continue work: install the frame and continue construction.

Filling the tank and heating the water
There are usually no problems filling the shower tank with water. Sometimes they carry water in buckets - if you want to wash, you will carry it. It’s not very convenient, of course, but it happens... If there is a water supply at the dacha, fill it with a hose and install a supply pipe with a valve. You need to add water - open the tap, the tank is filled - turn it off.
How to auto-fill a tank
The most advanced ones do automatic filling. Then the water supply is opened/closed by a float system similar to the one in the tank. Only in case of breakdown should provision be made for draining excess water. And, preferably, when leaving the dacha, turn off the supply tap. Otherwise, you can turn your and your neighbor’s dacha into a swamp.

An approximate diagram of the implementation of auto-filling the tank is shown in the figure above. Please note: the water intake into the shower occurs close to the surface: this is where the most warm water. Only this pipe is placed at the opposite end from the cold water inlet, otherwise the water will still be cold.
Two pipes go into the sewer: one overflow ( mustard color). With its help, the tank will not overfill if the float mechanism breaks down. Second drain into the sewer for complete drainage ( brown). It is useful when preserving the system - draining it for the winter, which is why a tap is installed on it.
Organization of heating
The simplest option is to use solar energy. Yes, it heats water through the walls of the tank. But the water thickness is too large for it to warm up quickly. That's why people invent various settings for solar water heating.

As mentioned above, the warmest water in the tank is at the top. And the traditional feed comes from below. That is, we take the most cold water. To ensure that the warmest water flows into the watering can, a hose is attached to it, and it is attached to a piece of foam plastic, which I let float. So water is taken from above.
To speed up the heating of the water, they make a “coil” (in the photo above it is the right picture). At the bottom of the water tank and above, two pipes are welded into one of its walls. They are connected to a black rubber hose, which is folded into rings in the sun. If there is no air in the hose, the water movement will be quite active.
If the sun is not enough for you, but you can supply electricity to the shower, you can use heating elements (wet). They need to have a thermostat so you can set the required temperature. Usually used in storage water heaters, so you can find it.

When you pull the power line to the shower, do not forget to install a circuit breaker with an RCD. This is the minimum that will ensure your safety.
Construction of a shower at the dacha: photo report
It was decided to use the fence at the far end of the site as one of the walls of the shower. It was decided to have a shower with a locker room - it’s much more convenient.
The soil is sandy, the water drains very quickly, so only one tire was buried for drainage. Rainfall tests have shown that no more is required. Much more water was poured than I had in the barrel, but there were no puddles.


Then we welded the frame. A rectangular pipe 60*30 mm was used. This is a bit much for this design, but we used what we had: the remains from the construction of the fence.

Having welded the floor frame and thereby marking its level, we formed a drain. They filled in the missing height with bricks (battle, remains). Everything was filled with concrete, forming a drain into the tire.

We leveled the floor in the second half and left it to set. We started processing wood. Purchased aspen board. It was first treated with sandpaper attached to a grinder. Afterwards it was impregnated with a protective composition.


While the impregnation dries, we continue to weld the metal frame for the shower. The middle piping was welded from the same profile pipes. Then it was used as a scaffold for working at heights. Already dried boards were placed on the piping pipes. The top trim was welded from this pedestal.

The frame is almost ready. All that remains is to weld the frame for the barrel at the top.

The metal used is old, so it is covered in rust. It was cleaned with a grinder. Then the shower frame was painted three times with anti-rust paint. She is chosen blue, since it was planned to cover the shower with blue polycarbonate.

The polycarbonate was mounted with self-tapping screws. No special or regular washers were used during installation. This is a violation of technology, which can lead to it cracking in sunny weather. This material has a large thermal expansion, which is enhanced, since in this case it is fixed to a metal frame.

The barrel in the barn has been washed. The pipes are welded to it. One is for filling water, the second is for connecting a watering can. After this, the barrel is painted black.

Summer is a great time for a country holiday. It can be overshadowed by the lack of a shower, since a person, regardless of whether he is working or resting, needs to perform water procedures.
If the dacha is used only in the summer, then the easiest way to organize a shower is on the site. You can make a mobile shower, or build a solid outbuilding.

Portable summer shower
You can find it in stores foot shower. There is no need to build or carry out anything to operate it. As a rule, you only need a small container of water to use it.

An existing hose is lowered into the container and connected to the pump. It resembles a small rug. The water comes out through a hose with a watering can, and for it to flow, a person just needs to mark time in one place.

This device is simply irreplaceable, as it is suitable not only for the garden, but also for picnics, and you can take it with you on hikes.

With its help, water procedures can be carried out not only on the street, but also in the house when it is very cool outside.
To do this, you just need to put a basin and wash yourself. Another advantage of a mobile shower is self-adjustment water temperature. Such a shower at the dacha simply cannot be replaced.

Stationary shower
Many summer residents are interested in how to make a stationary shower. This option is quite expensive compared to the first. However, it will serve you for many years.

Before you start construction, you need to think about where the water will drain from it. It’s good when there is an antiseptic on the site. You can drain the shower into it.

If it is missing, then you need to make a hole and fill the bottom with expanded clay. A family needs a pit measuring 60x60x60 cm.

If the soil is dominated by sand, the walls of the recess will have to be strengthened so that they do not crumble. Suitable for this metal mesh or boards that are no longer needed.
Shower base
As a rule, a shower building weighs little. Therefore, there is no point in making a foundation for it; it can be replaced with blocks. They are aligned to the same level so that the structure stands level.
This is much cheaper than a foundation, and takes much less time for construction, since the foundation must dry, and the building can be immediately erected on the blocks.

The blocks should be placed 20 cm from the ground, this is necessary so that the wood does not rot.

If you are going to make a structure from metal, then the blocks do not need to be leveled at a level of 20 cm. Such a frame can be installed on ordinary paving slabs.

Construction
There are two types of construction. The first is when the building is divided into several parts. In one part there is a shower, in another there is a dressing room or technical room where the boiler is installed.

Pay attention!

The second type is a simple shower with a curtain, where only water procedures will be performed. Therefore, the dimensions of the shower are calculated based on what kind of construction is planned.
Types of frame
Metal. The frame can be made of profiled pipe, 3 mm in size. For the work you will need a welding machine.

It is best to weld the pipe joints, this will make the structure stronger. If the device is missing, then the joints can be fastened with special bolts.

Tree. For construction you will need timber. Usually a beam measuring 50x50 mm is used. Before starting construction, you need to make a drawing of the shower in the country.

Shower trim
After the frame has been erected, the shower needs to be covered with material. There are no specific standards for the material. Everyone chooses according to their own pocket.
Let's highlight the most popular materials:
- oilcloth;
- textile;
- wood;
- slate;
- polycarbonate
Water container
Absolutely any container can be used as a tank. Basically, these are metal or plastic barrels. They can be purchased at any construction and country stores.
Pay attention!


When choosing, consider your region of residence. For southern cities, any container is suitable, but for northern regions only a metal one, as it heats up faster.

Shower tray
It is best to purchase a ready-made pallet, since it will have a drain that will directly drain into the pit. The pallet is made of plastic or metal. Metal will last much longer, so it is advisable to choose it.

Making a summer shower in the country is not so difficult. The main thing is to approach the design thoroughly and calculate in advance the amount of material required.

For clarity, you can look at a photo of a summer shower at the dacha with your own hands. It will make your stay comfortable and enjoyable.

Photo of a shower in the country with your own hands

Pay attention!


Summer shower- one of the significant buildings on suburban area. How to equip a shower in your country house with your own hands, building a reliable and durable structure with a minimum of financial investments? Guided by the advice of the master, you can easily cope with the task.
In hot months, the presence of a summer shower is one of the conditions for a comfortable stay in a suburban area. A shower gives you the opportunity to freshen up after working day, relieving accumulated fatigue and recharging with vigor for new things.

Summer shower with a simple layout in a summer cottage
There is nothing difficult about building a shower in the country with your own hands. You just need to sketch out a drawing and decide on the dimensions of the future structure, prepare necessary materials and set aside some free time.
Outdoor shower design
There are many options for arranging a summer shower. It might work out simple design made of a wooden frame with a small tank on the roof and a curtain to protect from the wind and prying eyes. Or a full-fledged cabin with strong walls and a roof that can withstand a heavy barrel filled with water.

Summer shower design options
But in any case, the summer shower should be comfortable and spacious. When thinking over the dimensions of the future shower stall, keep in mind that it is necessary to provide a place protected from splashes of water for storing bath accessories and hanging clothes. This will require from 40 to 60 cm of room area.
Based on the experience of craftsmen who have already built a shower at the dacha with their own hands, for a comfortable shower water procedures a sufficient room measuring 160x100 cm or 190x140 cm and a height of 2.5-5 meters.
Tip: A small drawing or simple drawing will help you correctly calculate the required volume of building materials, preventing unnecessary expenses.
Choosing a location on the site
The design of a summer shower assumes that the water will be heated from solar heat. Therefore, it is better to select a well-lit area for installing a shower stall, where sun rays will actively warm up the water tank throughout the daylight hours.

The best place to build a shower would be a sunny place.
When choosing a location, it is worth considering the convenience of water supply, ensuring, if possible, automatic filling of the tank.
It would also be reasonable to worry about water drainage in advance by placing the structure on a natural hill, or making a small embankment so that after washing it flows into a septic tank or septic tank.
Preparing the base
When constructing a lightweight frame structure It is not at all necessary to lay the foundation, but when building a stationary summer shower, this stage of work cannot be skipped.
To carry out the work you will need:
- Roulette and level;
- Pegs and cord;
- Bayonet shovel;
- Garden drill;
- Pieces of roofing felt;
- Metal mesh;
- Crushed stone and sand;
- Cement mortar.

Preparing the base for a summer shower
The dimensions of the foundation depend on the building materials from which the building will be constructed. To build a shower from cinder block or brick for a slab foundation, you will need to dig a pit about 15 cm deep.
The work is carried out in several stages. Having decided on the location of the summer shower, prepare the site:
- Using a tape measure, pegs and string, mark out the area of the required size.
- In the designated area, a layer of turf 15 cm deep is removed.
- Level the base of the pit.
- The bottom of the pit is lined with a “cushion” of sand and filled with mortar, creating a flat surface.
Tip: If you plan to use a wooden or metal frame as the shower floor, before pouring the base you need to prepare a place for the racks by installing sticks of the required diameter vertically wrapped with roofing felt.
Laying the foundation
When screeding a floor, it is better to use a level and guides, because only a horizontal surface can become reliable basis for the entire structure. At this stage of construction, it is also worth taking care of arranging a drain, making a gutter reinforced with a metal mesh in parallel with the concrete screed.

Foundation for the construction of a capital summer shower
Using columnar or pile foundation under a frame summer shower, there is no need to dig a pit. It is enough just to make holes about 1 meter deep at the site where the support pillars are installed using a garden drill.
It is necessary to insert metal posts into them, the height of which is 1.2 m and D = 90 mm, so that the posts rise 20 cm above the ground surface. Columns made of hollow pipes are filled cement mortar, diluted with crushed stone and sand in a ratio of 1: 5: 3 and wait until it acquires the necessary strength.
Important: To extend the service life of metal poles, the ends buried in the ground must be pre-treated with used machine oil.
Drain arrangement
It is better to place a septic tank for a summer shower not under the shower stall, but at a short distance from it. This will prevent it from being flooded with large volumes of water, thereby preventing the destruction of the foundation and soil.
To equip it, dig a hole about 2 meters deep, decorating the walls with brick or cinder block masonry. Some craftsmen use for this purpose car tires, laying them on top of each other in the form of a well. TO ready septic tank a gutter is placed to drain the water and covered with a shield made of wooden boards.

Option for arranging a drain for a summer shower
It is better to decorate the walls of the gutter for water drainage with waterproof material: roofing felt, hydroglass insulation or ordinary PVC film. It is placed on a slope so that the flow is directed towards the drainage tank.
A metal or enamel tray is installed in the shower stall itself, which can be purchased at any specialized store without much hassle. Water will flow from it directly into the gutter.
Advice: You can partially solve the issue of soil drainage by planting moisture-loving perennials near the shower stall, such as bathhouse, buzulnik, hazel grouse, iris, and loosestrife.
Construction of the frame
An outdoor shower made of beams or boards is one of the most popular options for a structure needed in the household. For the construction of the structure, it is better to use coniferous species, the main advantage of which is:
- High density;
- Moisture resistance;
- High level of resinity;
- Ability to withstand heavy loads.

Shower frame made of beams
To construct the frame, 100x100 mm beams are used. First, assemble the lower frame, fixing it by bolting to the support pillars or screw piles. When installing, it is better to use long bolts with complete alignment of the axes.
Having installed the wooden supports vertically, perform the top trim. To give the structure additional stability, the side frames are secured with spacers.
Planed wood is ideal for cladding coniferous species. She has a presentable appearance and fits harmoniously into the surrounding landscape.
Important: To extend the life of wood, it is advisable to treat it with an antiseptic and moisture-repellent composition, or simply coat it with 1-2 layers of varnish for exterior use.

Construction of the walls of a wooden summer shower
Special seals will help ensure a tight fit of the door. The door to the booth also needs to be painted or sealed.
For interior decoration For cabins, you can use plastic panels, oilcloth or linoleum. Photos with interesting design options can be seen on the Internet.
Installation of the barrel
When choosing a barrel of the required volume, they are usually guided by the formula that up to 40 liters of water is enough for one person. To set up a summer shower for a family of three or four people, it is enough to install a barrel with a volume of 200 liters. If you choose between a plastic and metal container, then it is worth noting that plastic is lighter in weight, but metal (painted in dark color) heats up faster.

Various water supply schemes with natural heating
A little trick: To ensure faster heating of water, the outer surface of the roof under the barrel can be lined with reflective material such as galvanizing or foil.
The container is placed on the roof and secured with straps. All that remains is to choose the required diagram water supply to the cabin:
- cut two holes for filling with water and connecting a faucet with a diffuser, fill the container and enjoy water treatments.
- pedal circuit is similar to the first one, but water is supplied using a pedal and not a valve as in the first case.
The second option is more complex, but at the same time very economical because water enters the shower in doses and at the right time, which is very convenient. Both options with natural water heating. It is also possible to connect electric water heating. The presence of an electric heating element in a barrel entails the abandonment of a barrel made of simple plastic (it is better to use metal) and the inclusion of another container in the circuit for supplying cold water.

Scheme of arrangement of a tank for a summer shower
Cold water will save a lot of energy because washing only with heated water is not very practical and convenient, because there is no way to adjust the water supply temperature. You will also need a mixer or some kind of circuit with two taps and the need for an electricity supply. Although electricity is desirable anyway, it is necessary to illuminate the shower.
Construction of a shower in the country: video
Naturally heated shower: video
Summer shower at the dacha: photo


Summer time gives us warm sun, greenery, flowers and a wonderful opportunity to take a shower fresh air. After a cramped city apartment, this procedure brings a pleasant feeling of renewal and unity with nature.
Despite the simplicity of the outdoor shower design, there are many interesting options its implementation. We will get acquainted with the most interesting and profitable ones for construction on a summer cottage in this article.
Options for a summer shower for a summer residence
It's no secret that you can build a summer shower for your dacha from different materials. For the frame, you can take profile metal or wooden beams. Cellular polycarbonate, corrugated sheeting, tarpaulin, polyethylene film, siding, blockhouse.
In addition to using a frame structure, the walls of the shower stall can be made of blocks or bricks. The washing compartment can be single or interconnected with the toilet. This solution reduces the cost of construction and allows rational use of the site area (photo No. 1).

Photo No. 1 “Two in one” - a popular way to combine a shower with a toilet
The simplest and most inexpensive outdoor shower is a frame made of wooden blocks covered with planed boards (photo No. 2-3).

Photo No. 2-3 Summer shower with a cabin made of timber and boards

Photo No. 4 An example of the simplest prefabricated structure made of timber and boards, which can be covered with an awning
The main thing you need to pay attention to in this case is the strength of the frame on which the container will stand. The frame posts must be protected from rotting and reinforced with corner braces. The concrete floor can be replaced with a standard shower tray, directing the soapy water from it into a common septic tank.
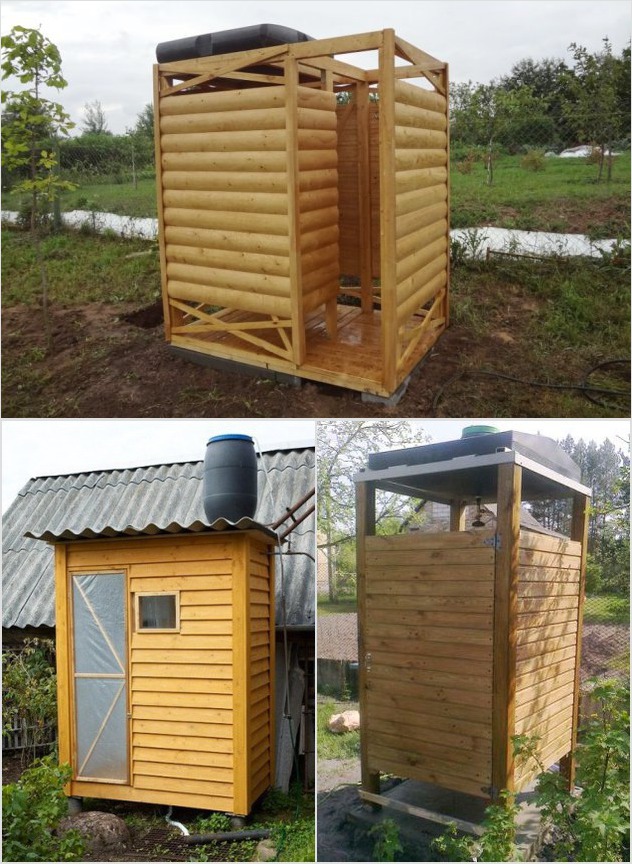
Photo No. 5-6-7 Options for interesting, but at the same time uncomplicated wooden showers
If you have an angle grinder and welding skills, you can make a summer shower with your own hands from a metal profile and cover its walls with tarpaulin. If there is no welding machine, then the frame is assembled using threaded connections and the corners are reinforced with steel gusset plates (photos No. 8-9).
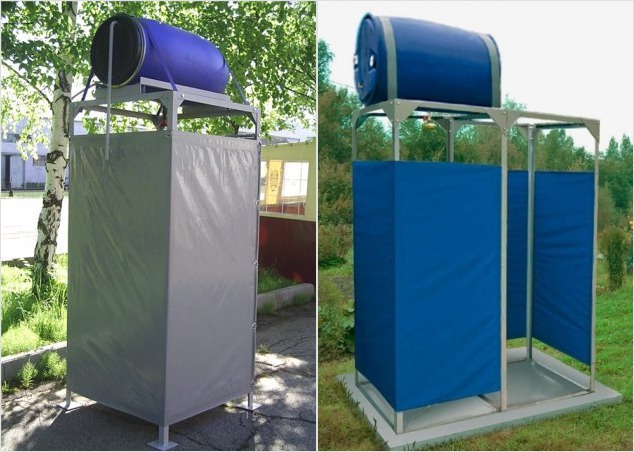
Photo No. 8-9 Summer shower made of metal profiles covered with tarpaulin fabric
This shower option is more convenient than a single cabin, since it has two isolated compartments: for undressing and washing.
Photo No. 10 shows a garden shower popular among summer residents. It also uses metal load-bearing frame, but the filling of the sidewalls is made of a film screen put on rings and a cord.

Photo No. 10 Shower stall with a metal frame and a screen made of polyethylene film
The metal base of the cabin can be easily combined with corrugated sheeting. This makes it simple and reliable design, well protected from the wind (photo No. 11).

Photo No. 11 Shower stall covered with corrugated sheets

Photo No. 12 Garden shower stall with dressing room (220x100) made of corrugated sheets and pipes
In factory conditions, cabins for summer showers are most often made using two materials: profile pipe and sheet polycarbonate. If you want to save money, the same structure can be assembled by yourself. The result is aesthetically pleasing, durable and practical (photo No. 13-14).

Photo No. 13-14 Great shower for a summer residence - profile pipe and cellular polycarbonate
The dimensions of this design are designed for installation of a flat plastic tank with a "watering can".
The shape of the shower does not have to be rectangular and closed on three sides. Photo No. 15 shows interesting solution based on a wooden beam wall and metal pipe, along which the screen moves. You can’t put a heavy tank on such a shower. It is designed to supply heated water from a home water supply.

Photo No. 15 Original “corner” outdoor shower
There is no need for a frame for a summer shower if you attach it to the wall of the house. To do this, you need to line it with waterproof material and bring the mixer with a hose to the surface. By filling the floor with large pebbles and making simple drainage, you will get what you dreamed of: cozy corner for water procedures, filled with air and light (photo No. 16). If you don’t like the open option of a wall shower, then install walls light as in photo No. 17.
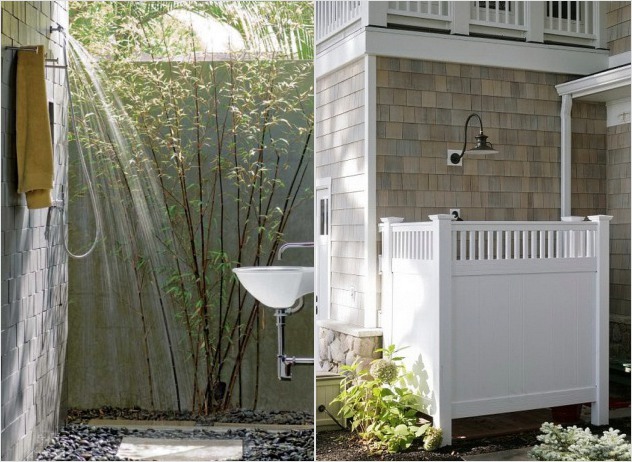
Photo No. 16-17 In summer, you can take a shower not only in the stall, but also near the wall of the building, and the fence of the wall shower will protect you from prying eyes
Climbing plants can be successfully used to fill the walls of an outdoor shower. All that is needed for such a solution is a lattice screen made of mesh, on which ivy, hops or grapes will weave a living carpet.
When considering the materials from which you can build a shower structure, do not forget about natural stone. The option shown in photo No. 18 will perfectly complement the landscape design.

Photo No. 18 A wall made of wild stone, curled up like a “snail” - best place for placing a summer shower
In this case, the fencing was laid dry, without using mortar. It is not needed here, because a flat stone was used in the work. It holds securely in the solid wall due to its weight. The considered option does not involve installing a container, since its appearance will spoil the beauty of the stone lace. Water is supplied to the shower head from an external water supply.
If there is an old tree on your site, do not rush to cut it down for firewood. Its trunk can be used as an original installation for a summer shower. Surround it with a concrete wall of a curvilinear outline, and your creativity will delight your neighbors and friends (photo No. 19).
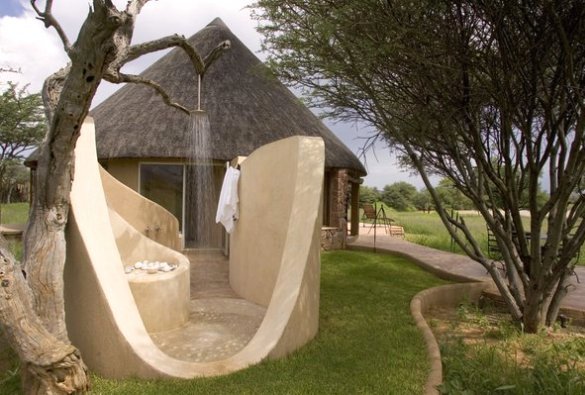
Photo No. 19 An old tree on the site is not a hindrance, but the basis of an original shower structure
Continuing the review of summer shower options, we note that it can be built not only from purchased ones, but also from inexpensive scrap materials.
In photo No. 20 you see such a design. Its frame is made of wooden blocks. The fencing was made from willow wickerwork, which grows next to the dacha plots.

Photo No. 20 Simple, inexpensive and beautiful - wooden frame covered with willow vine
When planning to build a brick utility block at your dacha, do not forget to include a shower compartment in it (photo No. 21-22).

Photo No. 21-22 Compact outbuildings “shower-shed” made from blocks
On the strong stone walls of such a structure, you can easily install it of any volume and shape.
Estimated cost of ready-made options
Factory-produced shower cabins are available in several versions. Some have a metal frame equipped with a screen made of synthetic fabric. Others are sheathed with cellular polycarbonate or made entirely from modular plastic panels. The buyer is offered two planning solutions: a summer shower with and without a changing room.
The average price of an outdoor shower with a moisture-resistant awning and a plastic 200-liter tank (heated) is 15,000 rubles. For a frame-tent structure, complete with a changing room and washbasin, you will have to pay at least 18,000 rubles.
Single cabin from cellular polycarbonate on a galvanized frame with a heated 200-liter tank can be purchased at a price of 20,000 rubles. This design can be supplemented with a locker room by paying an additional 5,000 rubles for it.
A summer shower cabin made of plastic on a metal frame, equipped with a heated tank, will cost no less than 24,000 rubles.
Please note that prices can vary greatly in the regions of the Russian Federation, so you can find out the most up-to-date information from local manufacturers.
How to build a summer shower with your own hands?
The choice of material in this case depends on the set of tools you have at your disposal. If the farm does not have a welding machine and a grinder, then the frame is made of planed bars. You can sheathe it with boards, plastic lining or simply attach film waterproof material to the racks.
An outdoor shower made of polycarbonate on a metal profile is more durable than a wooden one and is not much more difficult to assemble. For this work, you need to prepare a steel corner 50x50mm or a profile pipe with a cross-section of 40x20mm (wall thickness 2 mm). The quantity of the purchased profile is calculated based on the dimensions of the shower: height 2.1 meters, length and width - 1 meter.
The dimensions of the cabin may differ from those indicated, since its length and width depend on the dimensions of the purchased tank. The length of the posts should be 10 cm greater than the height of the frame (for concreting).

It is more convenient to assemble the sidewalls on a flat asphalt or concrete platform using welder's magnets to fix the profiles.
The sequence of operations looks like this:
- We lay two racks and two crossbars on the site in pairs and weld them overlapping.
- Having installed the side frames vertically, we weld two transverse profiles to them, check the corners and fix the joints with a working seam.
- Bay concrete screed We place a ready-made frame under the shower stall so that the legs of the racks are immersed in the concrete. We check the verticality of the installation (if necessary, adjust the depth of embedding of the racks in the screed).

After this, all that remains is to weld the door frame and attach the hinges to it. The work is completed by cutting the cellular polycarbonate and fixing it with self-tapping screws to the shower frame. Can be used to collect water steel pallet or at the concreting stage, make a channel for drainage by installing a drain and a sewer pipe into it.
