DIY brick path: step-by-step instructions, mortar recipes. Do-it-yourself garden paths on a brick plot Brick paths in the garden
Walking barefoot on asphalt is less pleasant than walking on seashells, polished cobblestones or sun-warmed logs. The road surface, without which a metropolis is unthinkable, is inappropriate in a country estate. Almost every day, the owners walk around its territory without shoes, and the kids generally crawl on all fours.
When gardening, it is important to pay attention not only quality care for fruit plants, but also remember about the general arrangement and appearance garden Garden paths, made with your own hands, not only create ease of movement around the household, but are also a special part general design. In this article we will talk about arranging paths with our own hands.
Garden paths - how to combine beauty and convenience
Country house, private house, a cottage requires not only arrangement of the interior and exterior, but also embellishment of the area around it. Often owners want to combine practicality and aesthetics in one project. You can realize your idea by laying garden paths.
What you need to know and consider during construction
Any design begins with a concept, a thorough study of the area and a plan. The first step is to determine the directions, length, width of future paths, imagine their shape, decoration. Next we need to analyze bearing capacity soil in order to choose the right type of building material and only then plan.

You need to draw up a drawing on paper, there will be an opportunity to correct, redo, supplement. There are several important factors to pay attention to:
- Components must be resistant to aggressiveness environment — high humidity, fungi, corrosion.
- It is good to tolerate temperature fluctuations of different seasons.
- Provide for a possible increase in loads (car, loaded wheelbarrow).
- The optimal angle of inclination of the canvas to avoid the accumulation of water from precipitation.
Advice from landscape designer- in compact areas it is better to lay not straight garden paths, but with wavy bends and turns. This visually expands the space and deepens niches for plants.
Each owner decides what to build a path from independently, based on financial capabilities, needs and fantasies. Every coating needs a base. The ideal option would be a compacted earthen embankment or crushed stone cushion.

The most popular materials for DIY garden paths:
- Natural stone. It looks noble, aesthetically pleasing even with unsmoothed corners.
- Artificial substitute. The grace of nature, faceted by man.
- Clinker bricks will add bright colors to the garden.
- Gravel or large polished pebbles will provide originality.
- Wood is an affordable, simple, but short-lived look. Looks impressive separately and in a composition.
- Decking is garden plastic parquet. New material, resistant to ultraviolet radiation, water, mold, rot.
The decorativeness of the structure largely depends on the methods of laying the blanks. The canvas can be solid, smooth, or consist of separately located elements of different geometric shape. By laying out a path of large “leaves”, “butterflies”, “flowers”, it is easy to enjoy the comfort and pleasant walk.

Types of garden paths
Everyone who has a dacha, albeit small, but their own personal plot, will think more than once about ways to decorate and transform it. There is not always enough finance to realize ideas and fantasies. Many will ask: “What should we do then?” The answer is quite simple: if you want to improve your garden paths, but you don’t have the money for a landscape designer or expensive components, then you should pay attention to available and more affordable materials.
Useful for arranging garden paths with your own hands various types stones, boards, wood cuts, river pebbles and even lids from plastic bottles. Now a little about each of the options.
Paths made of natural stone
They fit into any site design. They look natural and correct installation can last forever.
Such paths look very impressive. If there are stones left after the nearest construction, you can use them. Or those left over after installation will do alpine slide. They have uneven shapes, which makes them ideal option for a picturesque path.
 Path made of natural stone
 First you need to calculate the number of pebbles. One of the methods is rough placement of stones. This way you can estimate whether the amount of material you have is enough.

Sprinkle the area for the path with sand and compact it well. It turned out to be a kind of “pillow” for the pebbles. They need to be processed, adjusted to shape, and made more uniform. For good joining and grinding, you can use a grinder or other not too powerful species tool. Having prepared the stones, they are placed in a mosaic composition.
Since all the stones are different in size, they are adjusted to each other using a rubber hammer. At least one side of the stone must be flat for the path to turn out as it should.

When the mosaic is ready, you need to start sealing the seams between the stones. Otherwise, they will begin to overgrow. Although some may prefer another option, the most natural one: a cement-sand mortar is used for grouting joints.

Concrete paths
They are very similar to stone ones. First make a bed, the depth of which is approximately 10 cm. Then pour sand on the bottom and compact it. Fill the top with a mixture of concrete and sand, install the formwork around the edges. Before the solution hardens, pour pebbles into it. Lay out your intended pattern from it. A drainage system must be installed next to such a path.
Sometimes a concrete path is made using a ready-made mold. It's easy to buy at hardware store. And then just pour the concrete mixture into the mold in the place you need, level it with a trowel, remove the excess and remove the mold. It is very light and quick way Moreover, you can lay out this form in at least several rows.
 How to do concrete paths do it yourself using ready-made forms
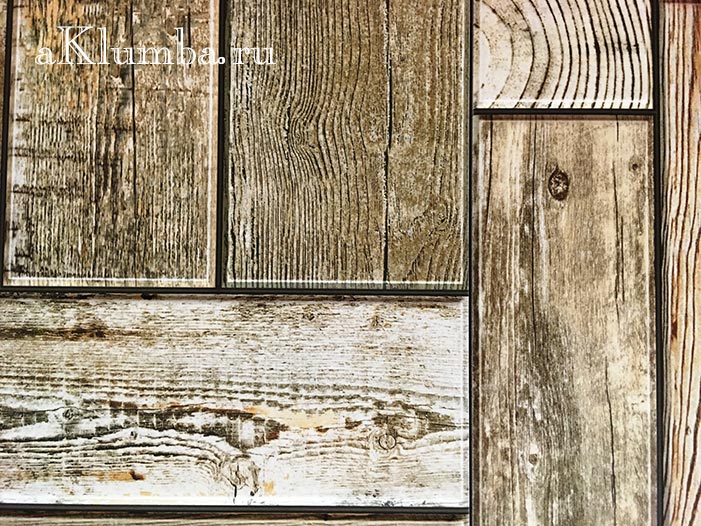
Wooden paths
Wooden paths will last a long time, but at the beginning they require maintenance. They can be laid out from sawn boards or timber, using what remains from the construction of the house.
 Wooden paths
 Prepare boards and blocks; the latter can be replaced with steel corners or pipes. Treat them with protective impregnations or bitumen mastic. After soaking, nail the boards to the blocks. Mount the path on top using hemp of various sizes. Paint them one or more colors.
But in domestic climatic conditions The most modern impregnations will not protect the boards from deformation, rotting and corrosion, so imitation wood is often used as a material for paths - tiles with a corresponding pattern.
It will be possible to select such perfect samples that no one will detect the difference at a distance. It is felt only after tactile contact. The tiles reliably depict the natural texture of pine, beech, oak and other species in cross-section - as a result, the ersatz is indistinguishable from the original.
DIY gravel garden paths
Gravel is a simple material that has good flowability, allows moisture to pass through, and is relatively cheap. You can make paths of any width and length from it, perhaps even giving them different shapes. This path looks neat and fits harmoniously into any landscape. Making it yourself will not be difficult.
 DIY gravel garden paths
 The order of execution of the gravel path
- First you will need to mark the path around the area. Marking is carried out with pre-prepared wooden pegs. You can stretch a string between the pegs if you find it difficult to determine the direction by eye.
- Next, according to the markings, prepare the bed. To do this, dig a trench in the ground. The depth of the trench can be about 14 - 17 cm.
- Prepare the gravel. It is advisable, if possible, to view it and remove unwanted impurities ( broken glass, sharp large stones, etc.). Handling gravel should be done with thick gloves.
- Backfill gravel to the depth of the trench. You can level it with a rake or your hands (also use gloves).
- Next, the laid gravel is compacted.
- At the end, a curb stone can be laid along the edge of the path. This will give an even more impressive and finished look. The stone is secured with a cement foundation. It can be laid either flush with the canvas or slightly above it.
This algorithm is also suitable for constructing a sand garden path. Accordingly, gravel is replaced with sand, and then all work is carried out according to the same scheme.
DIY brick garden paths
This is a very fragile type of material. Before laying it is necessary to check for strength. First, mark the path using string and pegs.
Remove the soil (25 cm), place drainage underneath. In this case, it will be simple, but the main thing is that water does not penetrate. It is necessary to pour crushed stone on top of the drainage system. The boards are laid sideways along the edges. Then the brick is laid. You can come up with a wide variety of brick designs.
 Clinker brick path
 A garden path lined with brick chips looks great. It is also permissible to sprinkle it on a concrete path. Beautiful mosaics are made from broken bricks. If the bricks different colors, beautiful patterns are laid out from them. You can leave space between them to fill it with small stones, pebbles or soil, so that later there will be a green island there.
 Homemade path made of brick and stone
 Sandstone path
They are made dry or using cement pouring. This method is similar to laying a stone path, but the first one is more natural and original.

Dig a trench, removing part of the soil. Pour sand in there and compact it. The middle part should be higher than the edges. It is necessary to walk a little on the slope. This is a dehumidification system. Next comes the processing of the stones.
Sandstone can come in a variety of sizes and shapes. Try on each stone before cutting.
Level the stones, making the gaps as small as possible. The processed stones are laid out as you like. For a classic path you need a bucket of sand and the same amount of mixture with cement. Under each pebble you must first put the first one, then the second one. Moreover, the cement should protrude slightly. You need to press the stone tightly. The completed path must be washed so as not to spoil the aesthetics with cement residues. The seams are filled with soil or sand.
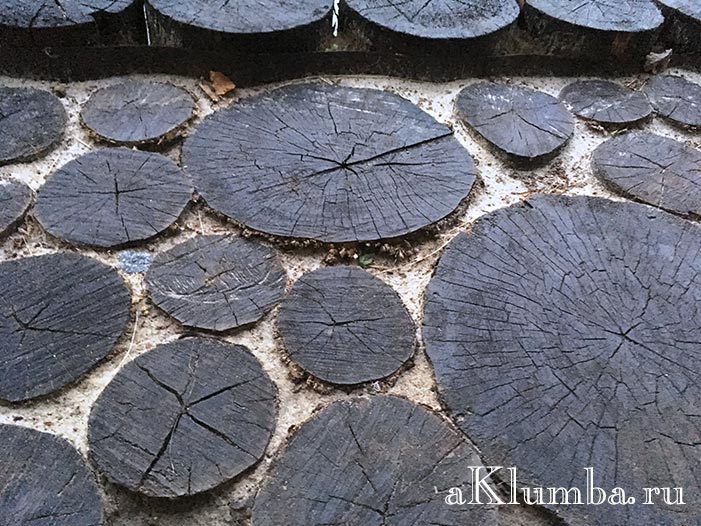
Path made from wood cuts
Such a path will look very beautiful and attractive.
 Path made from wood cuts
 The cuts must be taken of different sizes, laying them so that there is no free space between them. Before laying, round timber must be treated with an antiseptic composition.
 Saw cuts for garden paths
Another option is to use round timber as borders and add a layer of gravel between them.
While staying at the dacha, you want to move away from city life, because all around, if not a forest, then a garden, some lucky ones even have a lake or river. In a word, no matter what the surrounding landscape is, it encourages you to get closer to nature.
An interesting idea is a path stylized as a forest one. It consists of fragments of ordinary tree stumps. Round plates different sizes laid along the edge of the pond and concreted.
The side of the artificial pond is made from them. It is pleasant to sit on such stumps to sunbathe; touching your feet with them also gives rise to positive sensations.

Plastic garden paths
Such country paths are sold as ready-made modules. Their installation does not require surface preparation or treatment. They are very easy and quick to install, very economical, and characterized by durability and long service life. They can be laid out on any site, in the form of any composition. They are environmentally friendly and aesthetically pleasing.
River pebble paths
Working with these pebbles will be difficult, time-consuming and will not end quickly. They are placed in a pre-limited space in wet sand and compacted to the required depth. The process takes several days.
 River pebble paths
 It happens that the design of country houses is based on imitation of the styles of past times - the ancient era, British classicism, etc. Then you should choose slabs that are ornamented in accordance with the general concept of the site and the residential building. They may have impressions of Mediterranean pebbles, ancient bricks, etc.

Paths made from plastic bottle caps
The most original and interesting way— line the path or part of it with plastic bottle caps. Due to the fact that the lids have a variety of colors, you can create patterns and mosaics, even creating entire paintings.
The only disadvantage of this improvised material is its collection, because you will need a lot of lids.
Reinforced garden path concrete tiles
Stages of work:

 Do-it-yourself ready-made garden path made of reinforced concrete tiles
  From lined ceramic tiles mosaic type
  Paving stones, stone path
 The slabs are laid on a layer of sand, with seeds sown in between lawn grass. Mowing is carried out with a conventional electric lawn mower. The photo was taken 3 years after installation.
 These are just the basic materials from which you can make country paths with your own hands. Human imagination is limitless, so by the next summer season they will probably come up with something else. Paths for dachas are made with your own hands from any, sometimes unexpected, material. For example, from glass bottles. You can create combinations from different types material in one composition.


Remember that such paths carry not just convenience and benefit, but also beauty, pleasure for the eyes, and harmony. Imagine, invent, create.

Independently choosing materials for garden paths and the driveway to your dacha can sometimes be difficult. Then you just need to set aside time for a scrupulous study of catalogs or the means to consult with specialists. The result will justify all these costs.
Video master classes


Landscape design, in addition to beauty, should also bring practicality to the site. Paths in the garden are rather the most practical solution that can be. Convenient access to plants, the ability to move freely around the garden and admire the surrounding beauty. They can be laid out from different material, but the brick paths add to the atmosphere garden plot special charm.
The most important thing is that such a track has a low cost, and the effect is amazing. Oddly enough, but laying brick paths is quite a popular phenomenon in many European countries.
Like this, this process is not complicated and everything can be done with your own hands.
Which brick to choose for paths
Most likely you will have to lay out a path in your dacha from existing old bricks. Usually, paving is made of red brick (it is the color that gives that very antique atmosphere). You can also use clinker or sand-lime brick. Perhaps there are construction residues lying somewhere on your summer cottage - broken bricks make chic paths.

Necessary tools for laying a path
To work you need a small list of tools and materials:
- Shovel.
- Garden wheelbarrow.
- Level.
- Construction thread.
- Rubber hammer.
- Tamping.
- Cement.
- Sand.
Planning the future garden path and preparing for work
Let's decide what you expect from the future track, what functions it should perform. You need to decide on the width of the future coverage. If walks outside the garden are not planned, then a width of up to 1 m will be quite normal, but if the area allows you to walk around the territory not alone, then you can expand it to 1.5 m, or even more.
Don't forget about the slopes - the water should not stagnate and form puddles, but you shouldn't make the slopes too large. The water should leave gradually, and not run in a stream. It is advisable to organize the collection of water in advance, otherwise it may collect at the curbs and wash them away, which can lead to destruction.
As for the location of the path, you should not lay the path too close to growing trees, otherwise their roots may destroy the covering. Also, there is no need to make sharp turns - they should be smooth.
To mark the future path you need to use metal or wooden pegs, as well as thread. Using a thread, adjust the required height of the brick path. If the landscape of the site has already been formed, then most likely it will be necessary to remove the soil. If the soil has not yet been brought to the site and no plants have been planted, then it is enough to clear the working area of weeds.
Preparing the base
Although the paths are not designed for heavy loads, it is still worth treating them responsibly. The base should consist of the following layers, starting from the bottom:
- gravel layer (acts as drainage);
- sand or sand-cement layer.
Geotextiles allow liquid to pass through from top to bottom, but block any weeds that may try to get out. The ratio of the sand-cement layer is 5 or 4 to 1, respectively. Each layer is carefully compacted. It’s best to use, but if it’s possible, then it’ll do just fine.

How to lay a brick garden path
Brick paving slabs are not so popular for nothing. She has large number styling options. And yes, this is a classic! To start laying, you need to decide on a pattern.
It is also advisable to start by installing curbs. Bricks placed at the end or can serve as borders. If installing borders at the initial stage causes difficulties (you are afraid of not guessing with the size or other options), then you can install them after laying the bricks or install borders only on one side.
The garnet layer is leveled using a level or wooden flat board, and then laying is done on it. You should not place the bricks too close to each other - let there be a small distance between them (about 3 mm).

Final stage
After the brick paths have been laid, you need to carry out finishing work. It is necessary to level the bricks where required, fill everything with sand or light grout and rub all the seams between the bricks. This will secure the bricks into the lock, give strength to the paths and prevent destruction.
When structuring a plot - no matter whether it is a garden-type garden or a decorative cottage-type one, the owner is faced with the problem of structuring the space and facilitating access to the plants in the garden for caring for them. The construction of wide, comfortable and beautiful paths is relevant. In other words, the path should also decorate the site.
Anyone can lay a brick path with their own hands, and by following the guide on our website you will do it quickly and beautifully from an aesthetic point of view.
We plan the location of the path and the work plan
When planning a garden brick path, you need to consider that:
- a loaded wheelbarrow should easily pass along it (sufficient width and smooth turns are needed).
- the path should provide access to all areas of the site even in rain and slush.
- the path should run from the trunks big trees at a distance of no closer than 3 meters: the roots will easily lift the covering.
- the path must be brought into compliance with, at a minimum, adjusting the automatic watering nozzles so that water does not fall on the path. Irrigation water, saturating the track material, erodes and destroys it.
- it is necessary to adjust the slope of the soil or make drainage grooves.
Required materials
A brick garden path will withstand the load only if you choose the right type of brick. Silicate and ordinary ceramic solid bricks are completely unstable. Due to water and constant freeze-thaw cycles, the brick cracks and begins to crumble after just a few years.
Therefore, you need to purchase waterproof brick or clay paving slabs. They are more expensive, but more decorative and will last longer.
You will also need:
- sand
- cement
- curbstone or boards
- fittings for securing limiters
- mallet
- tamper (usual manual, or in the form of a drum filled with water)
- shovel
- mop
- scoop
Marking and preparing the base for the path
 We mark the area of the path with pegs and cord
 The easiest way to mark a garden path is using pegs and string.
If you need an easy to dismantle raised walkway, then after marking the soil is leveled, cleared of weeds, along the border of the path on one side, boards or curb blocks are installed and secured with reinforcement driven into the ground. The area of the path is covered with a membrane that does not allow plants to break through it, and is covered with a layer of sand.
The required width of the path is achieved with one row of bricks, after which a limiting element is tightly placed on the other side of the path and also secured with reinforcement. Once the width of the path is determined, it is paved within the boundaries. Such a path lasts for several years, then the boards and bricks become unusable and need to be replaced. However, this is easy, just like removing a path without harming the soil.
If you need a stationary track, according to the markings, dig a trench-bed 10-15 cm deep, compact the bottom and pour gravel in a layer of 5-6 cm, then a layer of sand 5-6 cm (or a layer of granite chips), moisten and compact. The thickness of the pillow depends on the area. If it is important that the finished path is above the soil level, guide limiter boards are installed.
The board is impregnated with an antiseptic. After two years, the path will finally “sit down”, and the board can be removed and the voids filled with stone chips or pebbles.
Laying out borders
 It is appropriate to use ordinary brick as a border
 After compacting the sand, take out part of it along the guides to lay the side strips of brick or curb stone. An ordinary brick is placed on its edge, and with gentle sharp blows of a mallet it is driven into the sand to level it at the required height. Having laid out the strips of borders, they begin to pave the path field.
If you need the most durable track, then the base is dried and covered with a dry mixture of sand and cement, or poured cement mortar. Then they put curbs on it and pave the field.
Paving process

- The bricks are laid on a sand cushion, pressing and leveling.
- It is checked with a board, laid on bricks and tapped with a mallet, then the brick sits “even”.
- If some brick sag, they take it out, add sand under it and level it again.
Many have been created decorative ways styling (dressing patterns), for example:
- Spoon dressing
- "Herringbone"90°
- "Network"
- Pattern alternating vertical and horizontal rows of bricks
- Double braided
- Herringbone 45°
Final stage
Seams between adjacent bricks are rarely secured with mortar. If you need to cement them, then pour a dry mixture of sand and cement onto the surface of the path, rub it into the cracks with a mop, and then water it with water. Although usually limited to filling the seams with sand and watering.
Brick is traditionally considered building material, used in the construction of building walls, the construction of fences and fences. However, its capabilities are much wider. One popular application is paving paths. For those who are not afraid to try their hand at new types of work, it will be useful to learn how to make a garden path out of brick. Moreover, there is nothing super complicated in independent execution there is no such operation.
Preparation of tools and materials
In order for the work to proceed smoothly, and the result to please you for many years, it is important to have a set on hand the necessary tool. As for materials, they usually take old bricks or those that were left after construction on the site.

Brick Pavement Design
What tools are needed for paving?
To complete the work you will need the following set of tools:
- shovels (scoop and bayonet);
- tamping;
- hammer;
- hacksaw;
- rubber mallet;
- building level;
- rule;
- roulette;
- thin cord;
- metal or wooden stakes.

Laying scheme
To make work easier, the manual rammer can be replaced with an electric or gasoline one. And to cut bricks to the required size, use an angle grinder (grinder).
Materials required for work
The work will require the following list of materials:
- brick;
- sand;
- cement;
- gravel;
- geotextiles.

Old brick paving option
In most cases, leftover stones from construction are used to pave garden paths. Old brick, obtained from dismantling buildings erected in the first half of the 20th century or even earlier, is also good at working. By the way, it is not necessary to use whole stones. Paths at the dacha made of broken bricks will look good. Elements of different sizes will add a special charm finished product. And if these are old stones that differ in color, then this will make your paths unlike any others.
Sequence of actions during construction
You need to start by planning your future path. If heavy traffic of people is not expected, then a width of 80–100 cm will be sufficient. You must definitely pay attention to the proximity of large trees. The distance to them should be at least 60–70 cm. Otherwise, the powerful roots of a growing tree can destroy the path. It is best to plan future walking routes before fertile soil is brought to the site. This will reduce the volumes earthworks.

Planning a garden path
Preparing the base for installation
To make work easier, the outline of the future path is marked using stakes and a stretched cord. It is advisable to repeat its shape as accurately as possible. After this, a layer of earth is removed with a shovel within the area limited by the cords. The thickness of the layer to be removed depends on how the bricks will be laid - flat or rubbed - and the thickness of the gravel-sand substrate.
Then a layer of gravel is poured into the prepared bed. It will serve as drainage. After laying and leveling, the gravel is compacted. The next layer is a geotextile fabric. This material will allow water to seep down without problems, and for germinating weeds it will become an insurmountable obstacle.
The next step is installing the curb. It will fix the stones and prevent them from spreading to the side under the influence of mechanical influences and natural precipitation. The functions of a border can be performed by the same brick installed on an edge, or by a traditional curb stone. Temporary sides can be wooden boards secured with stakes. Instead, you can fill them later concrete curb.

Laying a brick underlay
Next, clean sand or a cement-sand mixture is poured over the geotextile. A ratio of 1:5 will be sufficient. The resulting layer is leveled using the rule. This tool will not only make the surface smooth, but also compact it a little.
Laying the final coating
Laying is done using a rubber (rubberized) mallet. Each brick is carefully tapped to the base. During the laying process, continuous control of the plane is carried out. It is important to remember about a slight slope to one of the edges to allow rain and melt water to drain. Adjacent bricks should have a small gap of 1–3 millimeters.
For final fixation of individual elements, the path is covered with a cement-sand mixture and swept with a brush. The mixture gets into the cracks, fills them and fixes the bricks. To be sure, this operation can be repeated several times.

Laying nuances
To prevent water flowing from the surface of the path from forming puddles, a drainage channel is dug along the lower edge. Through it, water will be drained in advance specific place.
As you can see, there is nothing complicated in this work. But it’s not for nothing that they say that a professional can handle any job better. Therefore, it is better to entrust the pedestrian recreation area at your dacha to specialists.
Publication date: 05/16/2015
How to make a garden path with your own hands?
If daily walking summer cottage turns into an obstacle because the owner of the site is drowning in mud up to his ankles, then it’s time to start building a brick path. Garden paths are an integral part of the landscape today country house. Such a path will not only make the passage from the gate to the house strong and clean, but also add style to the landscape of the house. Moreover, you can build a brick path with your own hands without much difficulty, and the dacha will look well-groomed and respectable. And for this it is not at all necessary to have “golden hands”; it is enough just to follow the step-by-step instructions.
To build a quality walkway you will need three things: boundaries, bricks and foundations.
In order to build a brick path in your dacha with your own hands, you will need the following tools:
- hacksaw;
- shovel;
- manual rammer;
- 1.2 m level;
- hammer;
- drill;
- mechanical brush.
Necessary materials for laying the path

First of all, you need to choose a brick that can withstand harsh weather conditions.
You need to measure the brick you like and calculate the amount needed for the path.
A graded base (a combination of rock dust and crushed stone) will be needed to create a porous, strong base. You will also need stone dust to create a porous, smooth base between the bricks and the graded base.
You cannot do without composite lumber, which is used as temporary guides along the edges of the path. Combined materials are easier to bend than standard ones. You can choose the latter, but do it yourself, using combined materials make it easier. Pegs will be needed to secure the guides, and screws will be needed to screw them in place. To make a sand screed, you will need lumber. To give the path a finished and neat look, you can use a border.
Return to contents
Overview of garden path construction

Each brick path needs a border to hold the material in place. When building a path, guides are used to help hold the bricks.
To build a quality walkway you will need three things: boundaries, bricks and foundations. Material that is suitable for harsh conditions weather conditions, not only will it last for more than one season, but it will also not crack after daily walking. If “old-fashioned standard” bricks (their length is twice the width) are used in construction, in order to create a durable surface and prevent weeds from appearing, such material is recommended to be laid at maximum density.
Each brick path needs a border to hold the material in place. When building a path, guides are used to help hold the bricks in place while the path is being laid. But then you still need to make a permanent restriction, which is formed from bricks turned on their sides. In this case, the bricks must be buried deeper in the ground to provide the necessary support.
Regardless of the quality of the material, garden paths will be durable only if there is a good foundation. The path at the dacha is laid at a distance of at least 60 cm from those trees that have large root systems. Another big threat is water - if it is not absorbed properly, it will seep to the surface, and when frosts and warm temperatures come, this will lead to the brick sticking out over the entire surface. In order to prevent this, it is necessary to redirect the drains; for this, a small slope is made on one side of the path.
Under the bricks there is a layer of graded base (a mixture of crushed stone and dust), and sand must be poured on top to ensure proper drainage. All layers must be compacted properly in order to have a solid base; this is not difficult to do with your own hands.
Return to contents
Construction of a garden path at the dacha
First you need to determine how wide the path will be, and then add 5 cm to this. Then you need to highlight its location in width using a rope, a hose and paint. The top layer of soil is removed with a shovel between the markings, and you need to dig to the depth until the color of the soil changes. The soil that has been dug up must be laid on a tarpaulin so that everything around is clean, because then you will also need to clean everything up with your own hands.
Now that the path has been dug, 5 cm of the graduated base is poured out, and its surface needs to be sprinkled with water. Take a hand tamper and compact the base layer evenly, then add another couple of centimeters of base, and the process is repeated again until the compacted layer reaches a height of 7.5 cm.

Near the edges of the graduated guide base, narrow trenches are dug along the edges with a shovel. Installed on each side wooden board 2.5 by 10 cm, then ties are installed on top of them, and the boards are then hammered in.
Now you need to start working on the screed; it can also be used as a spacer when installing the guides. This is done as follows: a wooden board 5 by 10 cm is cut with a hacksaw so that it is 15 cm longer than the width of the path. Then they dig holes at the ends, the width of which should be 8 cm.
Near the edges of the graduated guide base, narrow trenches are dug along the edges with a shovel. A wooden board 2.5 by 10 cm is installed on each side, then ties are installed on top of them, and the boards are then hammered in. And then the brick garden path will look neat. In order for the guides to stay in place, it is recommended to drive wooden stakes to a depth of 15 cm, and they need to be installed every 90 cm. The pegs are attached to the boards with screws, then the boards are cut to the same level as the guides.
In order for the path to be smooth, you need to cut small piece made of wood for every 30 cm of path width. Then place a level between the guides so that the wood is located at the top of the guides. Then, using a hammer, the guides are pressed to the ground until the level is level. Now sand is poured between the guides and compacted, and a screed is installed between the guides so that the surface of the sand is even. If necessary, sand is added and everything is compacted again.

During installation, levelness should be regularly checked using a level.
Shallow trenches (about 6 cm) are dug on both sides of the guides, the bricks are laid on edge in these trenches and leveled at the same level with the top of the guides (the blunt part of a hammer is used for this). Then, using a level, the bricks are checked for evenness. The material is laid along the edges until the entire path is laid out.
The recesses on the sides widen so that the screed is installed between the bricks on both sides. The actual laying of bricks begins between the edging: the brick is held above the sand, pressed against the edge of the edging and placed flush with the beginning of the path. Then the bricks are pressed with a hammer so that they are flush with the edge of the edging. During installation, the evenness is regularly checked using a level. Bricks should not be dragged along sand, otherwise the joints will be filled with sand, which will lead to leaks.
A layer of stone dust or sand is poured on top of the brick, then the sand or stone dust is swept between the joints using a large broom. The path needs to be watered with water from a hose, and then, when the sand becomes wet, place it in the joints until they are tightly filled. It must be remembered that garden paths should not only be beautiful in appearance, but also durable.
The sand sets in about one week, and after this time the seams are filled with sand again. When it will still pass one week, then you can unscrew the pegs and guides. Thus, it becomes clear that homesteads built with your own hands are not something very complicated. You can also decorate garden paths with colored bricks, which will look very original, and here everything is limited only by your imagination. AND step by step instructions will help with this. you can not only build, but also decorate.
