How to set up a digital camera. Nikon, Canon and other cameras. What settings to use when shooting
Today, there is a camera in almost every home. Many have a camera on their phone, and someone buys for themselves digital camera to take professional pictures.
Digital cameras are not the best simple technique. Therefore, when buying a digital camera, you should know how to properly set up the camera so that it helps you capture the shots you like in the best quality.
Camera setting includes white balance
To make your photos beautiful, you need to balance the white. Usually this is achieved by the automatic tuning mode.
Before you set the camera to white balance, you should know that white balance systems are characterized by correction of the natural color deviation in the bright area.
With this camera setting, your pictures may look unnatural. For example, if you photograph a sunset or dawn, with such parameters you will not get the real colors of these beautiful natural phenomena.
It should be borne in mind that when taking pictures on the street, you need to set the camera to Daylight mode ( daylight) or Sunny mode (sunshine).
These camera settings allow you to take photos even best quality than with Auto mode, which is designed for shooting in poor lighting, cloudy weather.
If you have not figured out how to set the camera to white balance, keep in mind that modern cameras have options for white balance settings.
You can adjust the white balance for shadows using Shady mode, or take pictures with Cloudy mode on an overcast day.
By using these two photo modes, your photos will have pleasing hues that reflect real colors photographed objects.
But don't overdo it. If you set the camera incorrectly, the photos will be unnatural. To set the camera correctly, it is best to try different white balance modes to choose for yourself. best option.
Another custom setting Customs Manual allows you to set the white balance parameters manually.
By adjusting the white balance, you can give your pictures different effects, in particular, neutrality, warmth, coldness. You can also set up a neutral calibration target.
2. How to set up the camera correctly: set the sharpness
The level of sharpness of your shots is very important when processing your photos. Adjust the sharpness level.
Some people think that this value should be set to the maximum for sharp images, but usually with such sharpness, the edges of the photo look unnatural.
Also, you can not set the camera to the minimum sharpness, because then the small moments in the picture will be blurry. Try to experiment with sharpness to achieve the golden mean, gradually increasing the sharpness.
Proper camera setup involves setting autofocus
Autofocus can be adjusted automatically. If you want to change this setting, set the focus point so that a nearby subject is closer to the center of the frame.
If the subject is off-center and multiple subjects are placed around the subject, the camera's auto setting may not set the focus point correctly.
The AF point is best adjusted manually. Then you yourself choose where the active point will be.
Select AF, Single point AF modes will help you correctly set up autofocus at a single point.
If the desired subject is not on the AF point, focus and recompose techniques can help.
Selecting the most sensitive center AF point and moving the camera to the subject will solve the problem.
Lightly pressing the shutter button allows the camera to focus the lens correctly.
How to set up your camera the right way: flash sync
The flash usually appears at the beginning of the exposure, which is useful when shooting a stationary subject or at a fast shutter speed.
Long exposures or moving subjects require different camera settings to take beautiful pictures without giving the impression that the subject is blurred and forward according to the exposed, sharp version.
To know how to set up the camera correctly and avoid such occurrences, open the camera menu or the flash menu, then enable second-curtain flash sync in Rear Sync mode. Synchronization will allow the flash to appear at the end of the exposure.
In the photo, your subject will be sharp, and all other active objects behind it will be a little blurry, and can emphasize the speed of movement.
How to set up your camera properly to reduce long exposure noise
Thanks to the Noise Reduction function, you can compare the main image with the so-called "black frame" and "subtract" its noise to create a beautiful photo.
"Black frame" and main image use same time exposure, but in the first case, the shutter does not open, preventing light from reaching the sensor.
You need to set up your camera to record non-random noise, which is caused by changes in pixel sensitivity at slow shutter speeds.
This feature is usually annoying for photographers, because with long exposures, using the noise reduction mode takes much longer to record a photo.
The camera's built-in noise reduction system is the best option for this setting.
How to set up the camera correctly: long exposure
To create an image with good sharpness when shooting manually with a full-frame camera, you need to use a shutter speed that is one second divided by focal length lens. So with a 100mm lens, the shutter speed will be at least 1/100 s.
Also, this camera setup mode is suitable for DX cameras, taking into account the zoom factor.
If you find it difficult to adjust this setting, we remind you that modern cameras have a standard shutter speed scale in fractions of a second and built-in image stabilization systems.
Such systems make it possible to take photos with a lower shutter speed when shooting manually. Also, shutter speed can be reduced using exposure compensation (1/125 to 1/16.).
We hope our tips will tell you how to set up the camera correctly. We bring to your attention a few more tips on setting up the camera in pictures, with which you can easily figure out the issue of setting the optimal parameters.


The camera is a fairly complex device that requires certain knowledge of operation. For those who have used any camera before, it will be much easier to master the new technique. But people who hold the device in their hands for the first time may encounter a number of difficulties. The following details how to use your Canon DSLR from the moment you turn it on for the first time until connecting the optional accessories.
Device assembly
Any SLR camera is in its original packaging. disassembled. To be precise, the carcass, lens and battery are separate. First of all, you should remove the protective cover from the lens and the camera itself. After that, the lens is put on the device. To do this, you need to find a white dot on the lens and align it with the white dot on the carcass. After that, the lens rotates clockwise until it clicks.
Second phase - battery installation. It's easy enough to do this too. The battery compartment is located at the bottom of the camera and opens with a special latch. You need to pull it down, and the compartment cover will open. The battery is placed in the camera with the contact side. In general, it is impossible to confuse here, since it simply will not fit on the other side.

The memory card slot is most often hidden under the battery cover, but on some models it may be located with right side. The memory card is inserted with the side also contacts forward.

Most often, the camera in the box will be discharged, or the battery will have a small percentage of charge. Before using it, it is best to fully charge it so that it does not sit down during the first setup. Charging in most cases is not carried out by connecting the entire device to the network, but using a separate battery charger. The battery should be removed and inserted into the charger. During the process, the red lamp will be on, which will turn green after charging is completed. In rare models, the function of charging via USB cable is available. Modern batteries do not require charging and planting them completely. They have no memory effect, as it was in older types of batteries, so the battery is not afraid of partial charging and discharging.

Advice! To charge your Canon camera, you should use original charging device. This is the only way to extend the life of the battery and not spoil it ahead of time.
First power on
After the battery is charged and the lens is on, it's time to turn on the camera. Before you start using it, you will need an initial setup, during which the date, time zone, language and other system parameters are set. Basically, the initial setup Canon camera does not require special knowledge or additional instructions. The device gives information on the display, and the user just needs to act according to the proposed actions.
After the first switching on is completed, the camera will in most cases ask format memory card. If the card is new, then such a need will appear for sure. You can do this in three ways:
- using a laptop or computer;
- upon direct request of the camera;
- through settings.
It makes no sense to consider the first option in detail, since it is not the best. The fact is that any technique formats the media for itself, and sometimes it happens that a memory card formatted in a laptop is not readable by the camera. For this reason, it is best to do this with the help of the technique in which the card will be used.
In the event that the card is new and the camera does not understand how to work with it, it will simply write on the display that the media needs to be formatted and offer to do it right now. In this case, the user just needs to agree.

If the card has been used before or just needs to be cleaned, then formatting can be done using special option in settings. To do this, on the device itself, press the "Menu" button, then select the item with the drawn key. In this menu item, you can change all system settings, for example, reset the date, including formatting the memory card.
Advice! The device will offer two types of formatting: quick and normal. The first option is suitable for new cards, the second for previously used or those that gave errors.
Any camera, regardless of class, has different shooting modes. Some of them are automatic, and the second half will require you to adjust one or another parameter for specific shooting conditions.
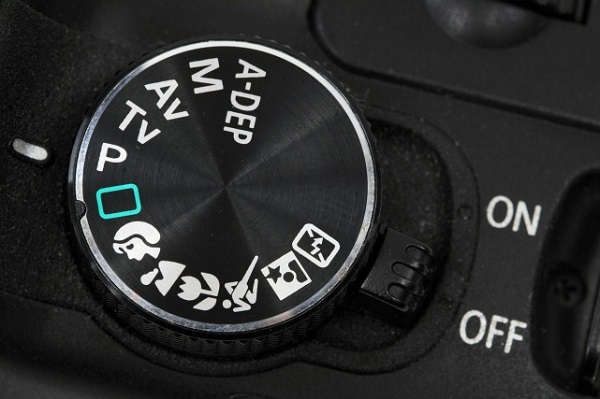
All Canon camera modes can be seen on mode scroll wheel- it is located on top. The choice of modes is carried out by its rotation. A white short line indicates which mode is selected, respectively, to select another, you need to scroll the wheel to desired option. The number of modes may vary depending on the model. At the same time, they can decrease or increase only due to automatic programs shooting. Semi-automatic modes are unchanged - there are always four of them.
To automatic modes include macro (flower on a wheel), sports mode (running man), portrait (person's face), automatic (green empty rectangle), and others. In these modes, the user only needs to point the camera at the object and, after focusing, which is also carried out automatically, press the shutter button.
Semi-automatic modes are marked with the letters M, Av, Tv, P. When working with them, the photographer will need some knowledge and understanding of working with aperture and shutter speed. However, the pictures here will turn out to be more interesting.
P mode
P mode or program does not differ globally from automatic, but allows the user to adjust the aperture within limited limits. You can also adjust the white balance here.
Most experienced photographers find Program mode completely useless. The manufacturer notes that it will help novice users move from automatic to manual settings.
Av Mode
Av - aperture priority. In this case, the user sets the aperture size himself in order to experiment with the amount of light transmitted and the final image. Based on the size of the aperture, the camera itself chooses the exposure time and takes a picture. With this mode, you can affect depth of field.
Using this mode, you can adjust the sharpness and blur the background. To make objects in the photo clearer, you need to set a smaller aperture value, if you need to blur the background and focus on the main objects, then a large value is selected for shutter speed.
It should be understood that the aperture setting depends on the lens that is connected to the camera. That is why, when changing optics, you need to choose not only the lens, but also set new shooting parameters for it. Another nuance is that on different cameras the same lens may require new settings.
TV mode
Tv - shutter priority. In this mode, the user selects the time that the aperture will let light through, respectively, the aperture size itself is selected automatically. Using this function is indispensable when shooting sports events or moving objects. Also, different exposure times can give interesting effects, for example, a photo with wiring. The mode will appeal to those who like to photograph any movement, regardless of whether it is a person, an animal or a natural phenomenon.
M mode
M- manual mode . With it, the user gets access to the simultaneous adjustment of aperture and shutter speed. Suitable for those who know exactly what they are doing and what they want to achieve. The mode is especially good at night, when the camera, due to darkness, does not understand what aperture and shutter speed it should set. The user can choose the parameters that he needs. In this mode, most often professionals work. Novice users simply will not figure out how this or that parameter affects the photo.
System settings
Canon cameras have a wide range of settings. This may relate directly to the shooting process, as well as camera settings, for example, the format in which the picture will be saved, its size, etc. In the system settings, you can set a timer, synchronize the flash, or format the memory card.
Photo quality and size
To set specific photo settings, you must press the "menu" button and select the item with the drawn camera. This is where all the settings related to the photo are available.
Depending on the model, the item where you can select the quality of the photo will be called differently. Most often the name speaks for itself: "quality". On a Canon camera, the options are labeled L, M, S1, S2, S3, RAW, and RAW+L. All letter variants (L,M,S) are preserved in JPEG format and among themselves imply degradation from L to S3. Not only the quality of the photo changes, but also its size, as well as how much it takes on the memory card. Obviously, it is best to choose option L in this case.
RAW and RAW+L formats- this is the maximum quality of the photo and its size. Pictures are saved in RAW and take up a lot of space. Photos in this format resemble an electronic negative, which carries information about the photo, but not the image itself. Pictures in this format require mandatory processing on a PC.
The advantage of the format is that it allows you to get more flexible options for processing an image in a professional editor on a computer. Minus - they take up a lot of space and do not open without special program.
Image focus
Focusing the image in the camera may be manual or automatic. In the first case, the user does everything on their own with the power of the rotary rings on the lens. In the second case, automation works. To switch from one subject to another, press the switch on the AF-MF lens. AF mode, in turn, is divided into two more options.
- AF-S - frame-by-frame focusing. Its meaning is that the camera focuses on the selected object when you lightly press the shutter button. It is best suited for shooting still subjects. To focus on a new subject, release the button and aim the camera again at the subject.
- AF-C - continuous focus. Its meaning is that when you press the button, the camera continues to follow the object, even if it moves. Obviously, it is more convenient to use this type of autofocus when shooting sports events.
An important point - focus point selection. Modern cameras offer from 9 to 50 points. In this case, there is a main object on which focus is carried out, the remaining points are focused on other objects. When the photographer looks into the viewfinder, he sees several points, the active one is highlighted in red. To do active point focusing that is aligned with the subject, you need to use the small wheel on the camera or the navigation buttons. At first glance, it may seem that it is much easier to move the camera and thus align the points. But there is a caveat: when you change the position of the camera, the exposure changes, that is, the whole idea can be spoiled. Using the navigation keys, the user can take multiple shots of the same object, but focus on a different point each time.
Working with exposure
The shutter speed of a camera is a parameter that is measured in seconds, or rather fractions of a second. The physical meaning of exposure is that this is the time during which light passes through the aperture and hits the matrix. Obviously, the more time the light hits the matrix, the brighter the picture will be. This is important when shooting in low light conditions, but there is back side medals. A large amount of light can make the picture overexposed and blur the frame. To get the blurring effect, you should set the shutter speed to a longer one, if sharpness is required, then the minimum time is set. You can adjust the shutter speed in manual mode or shutter priority.

What is white balance
White balance is the correctness of the display of colors in the picture. As you know, the color spectrum can have colder or warmer values.
An example is a photograph of a person. With a normal white balance, the skin of the face will be natural. If the spectrum rolls down to heat, then the skin will turn yellow, if to the cold part, then the whole photo will give off blue.
Obviously, depending on the lighting, the spectrum may change, and the photo will have unnatural colors. Sun rays or an incandescent lamp has warm tones, but a fluorescent lamp makes the image "cold". And it is precisely in such situations that white light balance adjustment is required.
All Canon cameras have dedicated WB button, which opens the balance settings menu white color. Here there is an option to select already preset modes, which are indicated by schematic drawings. For example, the sun means optimal settings for shooting outdoors daytime. Similarly, auto-tuning is selected for other situations.

However, the camera makes it possible not only to use the preset options, but also make adjustments yourself. This process is similar to using color filters and is not suitable for amateurs. To do this, press the "menu" button, select the item with the drawn camera and find the line "WB shift" there. Next, the display opens the correction screen, which is divided into four parts by two straight lines. Each of them is marked with letters:
- A - amber,
- M - purple,
- G - green color.
Moving the cursor (displayed as a black square on the screen) enhances one of these colors or a combination of them.
How to put the date on the photo
Sometimes there are situations when you want the date and time of the picture to be displayed on the photo. In modern SLR cameras, this function no longer exists, since in general the date spoils the photo, and if necessary, it can be placed on the photo when printing pictures. The print program extracts the date and time from the photo information and places it in a corner. In simpler devices, such as compact cameras, this function is available. You can set the date in photo settings menu. You should find the item "Display date and time on the photo." In this case, the user will be able to pre-configure the date and time format.
Photo with timer
Taking a selfie with a DSLR is hard enough. For this, manufacturers have provided a timer that is set for a few seconds and takes a picture after this time has elapsed. To use the function, the camera must first be securely mounted, ideally on a tripod, select the exposure, check that everything is in the frame, and then select the timer and response time using a special button on the body. Button marked with a clock icon. Due to the fact that the device emits a beep after every second, you can know exactly how long the shutter will open and have time to take your place.

Using flash
Camera flashes are of two types - built-in and external. The first is built directly into the body of the camera and opens when necessary. In automatic mode, the process is controlled by the camera itself; in manual mode, you can turn on the flash using a special button (lightning bolt), which is usually located next to the flash itself.
How flash works
The main thing to know about flash operation is its power.. Obviously, it cannot shine with the same power, since the level of illumination can be different. For this reason, the flash works in three stages:
- determination of the level of illumination;
- frame exposure;
- snapshot.
In other words, the flash fires very quickly three times in a row. In this case, the picture is taken on the third flash, and about 10% of people have a high sensitivity to light and notice the first two flashes. Thus, in the photo, such people are obtained with closed or half-closed eyes. The process of detection and exposure is called TTL. Professional photographers know that TTL can be turned off, and then the power has to be adjusted manually. This is rather complicated, but more convenient, and in this case, you can choose the optimal flash output.

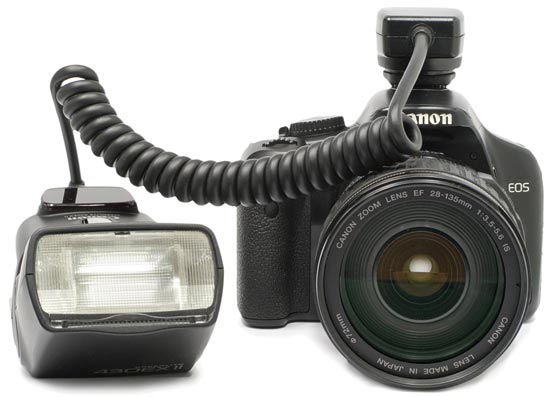
External Flash Features
The external flash has several advantages before built-in.
- It is more powerful and can be directed at an angle or from above, which makes lighting and shadows more natural.
- Another advantage is the range. A standard flash can illuminate an object within 4-5 meters in front of you.
- An external flash provides more flexible lighting settings.
Advice! When setting up the flash, you must set the shutter speed. Considering that at the moment of the picture there will be more light on the object, a slow shutter speed is not needed, except when this is done to obtain an unusual effect. According to experienced photographers, the optimal flash exposure time is 1/200-1/250.
There are two options for external flash - wireless and wired. The second option is connected directly to the camera through a special connector for connection. It looks like a metal socket on the top of the camera. Often it is closed with a plastic plug. You can connect the flash using a special cable that will allow you to slightly move the flash away from the camera. Canon's cable length is 60 cm. The wireless option is the most convenient, as cords do not interfere with the photographer. In this case, a special transmitter is inserted into the flash slot, which sends a signal to the flash that it needs to fire. This transmitter has all the power control buttons.
What is synchronization
Nowadays, flash sync has lost its relevance, as the whole process is automatic. The task of the user is simple make an external flash dependent on the main one. Before connecting an external flash to a Canon camera, the user needs to set its standard flash as the “main” one in the camera settings. To do this, hold the “zoom” button for a few seconds, then use the scroll wheel to select the inscription “master” and confirm the selection by pressing the center button. On the flash, you need to select “slave” in the same way. Now she obeys the main one and reacts to her impulses.
Connecting a microphone
For professional video recording of a holiday, you will definitely need an external microphone. Most modern SLR cameras have a whole set of necessary connectors. There is an audio-video output, a microphone jack, mini-HDM and others. Accordingly, you can connect a microphone to a Canon camera through connector labeled "mic". All settings in the camera come down only to choosing in which version you want to record the sound - mono or stereo. This item is located in the settings menu in the video section.

How to check camera mileage
The mileage of cameras is the number of shutter releases, which in turn makes it clear the degree of deterioration of the device.
For budget devices, the normal parameter is 15 thousand frames, after which you can expect a breakdown at any time, although this does not mean that it will happen in 100% of cases. For models of the expensive and middle segment, this parameter reaches 150 and even 200 thousand.
For a long time, it was possible to find out the mileage of a Canon camera only through carcass dissection. It is obvious that the method is not the easiest and most dangerous, because it is easy to disassemble, but not very good to do as it was. Currently, there are more simple ways look at the mileage, namely, use computer programs.
Information about the mileage can be seen either sewn into a photo, or directly in the carcass of the device. It should be noted at the outset that Canon prefers not to include such information in photographs. There are a limited number of models that store data in the camera. Thus, only checking the device itself will help. the best options are currently EOSMSG and EOSInfo programs. The programs are distributed free of charge and you only need to install them on your PC to use them. After that, the Canon camera is connected with via USB cable. In some cases, the laptop may not see the camera, then you will need to install drivers or a special program that, in addition to connecting, provides control of the Canon camera from a computer. After connecting the camera to the PC and launching the program, in the window that opens, you need to find the ShutterCount (ShutCount) item, which shows the number of shutter releases.
Some cameras do not have the ability to test this setting at home. In this case best solution will be contacting a service center to have diagnostics show the status of the device. This is worth doing if you plan to purchase a camera from your hands, and there is no information about its previous operation. Service center will be able to answer how well the camera is preserved, and how much longer it can last.
The main malfunctions and their prevention in Canon cameras
SLR cameras are fragile devices that can fail for a variety of reasons. To avoid damage, you need to carefully treat the camera and optics, use protective case, clean the surfaces of the lens, and also, when storing the optics and the body separately, close the joints with a special cover.
- Moisture ingress. Moisture is a very dangerous substance for the camera. The device does not have to be exposed to rain or get wet in order to deteriorate. Prolonged exposure to damp environments can lead to oxidation. internal details and breakdown. If there are concerns that something like this has happened, then you should put the device in a warm and dry place, and then take it to the workshop.
- Mechanical damage. Shocks and drops do not contribute to the normal operation of the SLR camera. The most fragile elements in it are the mirror, which can easily break, as well as the lens, in which the focusing system can fail. If the camera is unable to focus, the lens has been damaged as a result of the impact. In this case, it is best to carry the entire device for repair.
- Entry of dust particles. Frequent malfunctions Canon cameras are caused by sand and dust getting inside the camera. This can lead to complete breakdown, but much more often to extraneous noise during lens operation (focusing) or blocking. In this case, only cleaning the camera will help, and contacting a professional service center will be the best solution.
- non-compliance thermal regime . Any camera has a range of operating temperatures. If they are not observed, the device may well fail due to the combustion of one or another mechanism. It is impossible to solve such a problem on your own.
- The device gives errors. Busy may appear when using a low speed memory card if external flash did not have time to charge from the carcass. In general, this inscription can be translated as “busy”: the camera hints that some process has not yet been completed, and you need to wait a bit. If the camera does not see the memory card or refuses to save data to it, then you should format it or see if the card is blocked.
Extending the life of your camera is very easy. First of all, it is necessary buy a cover which will protect the device from bumps and drops.
Advice! Do not transport the camera and lens assembled. It is best to disassemble the camera at the time of transportation.
If the camera is not used for a long time, then it is better to remove the battery and periodically discharge and charge it. The camera should be stored in a warm and dry place and avoid being exposed to dust or sand. To clean the device, you need to use only special kits that allow you to carefully remove dust and debris from the lens and other components of the equipment.

The SLR camera is a serious device that requires the same approach. You can't just buy a camera and start shooting. To understand how to use it, understand the functions and settings, extend the service life, you do not need to rush to expensive courses. To begin with, it will be enough to get acquainted with the instructions, which describe in detail what and how you can do with the camera.
At different models photographic equipment differ in customization options. In budget devices, the choice of shooting modes is minimal. Camera settings semi-professional and professional level wider, which allows you to conduct high-quality shooting in any lighting conditions.
How a digital camera works
The term photography is commonly understood as the fixation of a visible picture of reality through light. The main elements for image acquisition are the lens through which light enters the camera, the opening/closing shutter in front of the light-sensitive receiver, and the light receiver itself.
As the last element in film devices, a film was used; in digital technology, a matrix is \u200b\u200bused.
The model range of cameras according to the principle of image formation is usually divided into mirrorless devices, which, because of their simplicity and affordability, are popularly called "soap dishes", and "reflex cameras" (reflex cameras). The main difference between these devices is that the latest special mirrors, due to which the photographer on the camera screen sees the image being shot without delay, which is not available when using a "soap box".
To the main parameters that a photographer has to manipulate to shoot in various conditions, relate:
- exposure,
- IPIG,
- focusing,
- matrix light sensitivity (ISO),
- white balance.
All these parameters are closely interrelated, and for high-quality shooting it is important to set them correctly. Professional and novice photographers have to shoot in different environments: shoot moving or static objects, the lighting can be different depending on weather conditions or time of day. Therefore, it is important to know the capabilities of the camera and the features of its settings for working in various conditions, for example, for shooting indoors.
Digital photography setup tools
The main problems that a novice user of advanced photographic equipment has to solve are learning and using setup tools:
- for subject shooting;
- for shooting landscapes, nature, birds and animals;
- making photo reports from sports or cultural events;
- for shooting in the studio and other photographic works.
It is important to know the concept of "exposure" - it determines the amount and time of exposure to the light flux on the matrix. The tools for adjusting exposure are shutter speed and aperture. And the first step in finding the answer to the question of how to set up the camera is to understand the manipulation of these parameters.
Excerpt
The shutter speed determines the time that the light with the shutter open affects the matrix. During this time, the image is recorded on the matrix by the light passing through the lens and the open shutter. The curtain opens when the start button is pressed. Shutter speed varies depending on shooting conditions short or long. The parameter is indicated in numerical format: 1/500 second, 1/8000 second, for example.

Canon EOS 600D shutter speed setting
For capturing dynamic moments such as athletes in motion or birds in flight, short exposure. Set up equipment for long exposure recommended when shooting under poor lighting conditions.
In semi-professional and professional models from manufacturers such as Sony, Canon, Nikon, Samsung, in addition to various automatic scene shooting modes, there is a manual shutter speed setting mode.
Shutter speed is closely related not only to lighting conditions, but also to another adjustable parameter - aperture, which determines amount of light. Aperture is a mechanical part of the lens in the form of petals that change in size with a hole in the center. By adjusting the size of these petals, an increase or decrease in the opening for the light flux is achieved, which in turn determines the amount of light that contacts the matrix. Aperture is also indicated by the symbol "f" with a number: f5.6, f16, for example. The higher numerical value diaphragm, the smaller the hole formed for the light flux.

Proper exposure means optimal choice shutter speed and aperture values certain conditions. For studio shooting, these will be one setting, and for shooting outdoors, they will be different.
The size of the aperture opening is closely related to the depth of field (DOF), which, in turn, is related to focusing.
Focusing and DOF
A common technique in photography, when the object being photographed is chosen as the center of maximum sharpening (focus). Focusing the depth of field on the subject is called focusing.
Cameras and cameras on the phone are usually equipped with auto focus. Professional-level equipment, in addition to automatic mode, is equipped with the ability to adjust the depth of field and focus manually. The technical solution may be different: a mechanical or electronic focusing method is used. Control is carried out both by pressing a certain button, and by rotating the focusing ring of the lens.

ISO matrices
The exposure setting of the frame is also affected by such a parameter as the ISO matrix. For film cameras, the parameter was expressed film sensitivity, which is marked with a 100, 200 or 400 marking on the box. In digital cameras, ISO can be adjusted for each individual frame. This parameter relevant for customization reflex camera because this technique is used in different modes shooting. So, for photographing landscapes, it is optimal to set the value to 1600, in portrait works 3200, and for story photo reports, the value can reach 6400. In semi-professional equipment, values from 100 to 1600 are most often used.

white balance
Any lighting conditions have their own temperature, and this fact explains such a concept as warm and cold shades of light. In order for the photo to be as close to reality as possible in terms of displaying colors, it is important to track and adjust the “white balance” parameter. Otherwise, with the same settings in different situations may result in spoiled images with a predominance of red or blue tints.
We recommend adjusting the white balance before shooting white sheet paper, which should also be displayed on the viewing screen of the camera. If necessary, the temperature in the setting can be increased or decreased to achieve the desired result.
In conclusion, we note that manual settings professional apparatus are carried out through the PASM modes.
 This article will focus on the settings that will need to be done before shooting video on the camera. As an example, will be used SLR camera firms Canon. Material shot with these settings will be most suitable for further processing in a video editor.
So the first thing we need to do is move the camera to manual shooting mode so you can set values like white balance, ISO, shutter speed and aperture. That is, you need to disable all automatic settings.
For example, switch the video shutter speed from auto to manual and white balance to the most appropriate light from automatic. I also advise you to turn on the manual focus mode. Since autofocus on cameras is quite slow and noisy. Next you need change image style. Because, by default, it is set to a very contrasting picture with digital sharpness. Which in the future will not allow you to draw out the details in the shadows and the sharpness will look much worse than the one that you can add in post-processing.
So we go into the image styles and select one of the custom ones (for example, the first one) Press the button "info" and get into its settings. Here at paragraph “Picture Style” choose "Neutral" (Neutral).
Further sliders sharpness and contrast (sharpness and contrast) move completely minus to the left (for all 4 divisions). BUT saturation shifted down by two divisions. These are the most optimal settings at which remains the largest number details in the image. Now you need adjust the frame rate for video recording. So, if you want to get a picture similar to a movie, then choose 24 fps. Because exactly this number of frames per second is used when shooting movies on film. If choose 25 (for PAL (European TV Format)) or 30 (for NTSC (US format)), then the picture will be television, as in the news.
More about endurance. Ideally, its value should be set equal to 1/47-1/50 for 24 and 25 fps or 1/60 for 30 fps. At these values, the movement in the frame does not become too sharp and there is no flicker. artificial sources Sveta. That is, they put it up once and you can not touch it anymore Exposure can be adjusted using the values ISO and aperture. I note that sometimes you need to open the aperture completely in bright sunlight to get a blurry background (small depth of field), while you have to reduce the shutter speed.
Greetings, dear reader! I'm in touch with you, Timur Mustaev. So, you have purchased a photographic equipment. But what to do with her next? Of course, you first need to set up! The instruction, as well as this article, will greatly help you with this. The article will answer in detail the question: how to set up a SLR camera.
Preparing and using the camera
I'm sure you can't wait to start filming! Wait, first prepare the equipment for work. The interface and features of the camera device from top manufacturers may differ. For example, Canon from Nikon.
Important! Read your camera manual very carefully.
But at their core, they have similar features and are configured in the same way, so my advice is universal, no matter which camera you use. I present the steps of the setup process to help you. Here's what to check:
- Battery
- Memory card
- Image format and quality
- vibrations
- Focusing
- Metering area
- Shooting modes and options
- Picture Control or Picture Style
Battery
Your camera must have a charger, most likely already included with your camera. It's not a battery, it's an accumulator. Before you start taking pictures, you need to properly charge it.
In this case, usually a brand new battery for normal operation will have to be fully charged and discharged more than once. Carefully consider the recommendations for its use in the instructions for the camera.
It happens that if the battery is constantly recharged without full energy consumption, it may gradually start to work worse, that is, it will last for less time.
Proper charging will help to avoid this. Also, it will not be superfluous to purchase an additional battery if you plan to shoot a lot without the possibility of recharging.
Flash drive
A flash drive, or a memory card, is not sold together with the camera, it is bought separately, but you absolutely cannot do without it. This is where your photos will be stored. Much depends on: both the speed of shooting, and the speed of access to files. Therefore, it is not worth saving on it, take a high class - not lower than 10.
Before you rush to try out the hardware, make sure that the flash drive is in place. Format it in advance by going to the camera menu.

Formatting will increase the free space for recording photos, as well as ensure optimal performance. Do this procedure periodically: we shot a series of frames, filled out the map, then transferred the data to the computer, and cleaned the flash drive.
Important! In your camera's settings, set the settings so that the camera does not take pictures when a memory card is not inserted. At Nikon, this feature is called Shutter Release Lock without a Memory Card.
Image format and quality
Any camera has the ability to save pictures different size and format, which determines their weight. As a rule, this is JPEG, small, medium and large, but there are semi- and professional models where you can shoot in RAW - the highest quality, or as it is also called digital negative.
There is also a TIFF format, but it is mainly present on semi-professional and professional cameras.
Beginners most often start with an average quality. Once you master Lightroom or Photoshop, image editors, you will understand the benefits of RAW. Despite the fact that such a format takes up a lot of space on the map, it will contain all the information on any frame, and in such a photo you can subsequently modify almost all elements, within reason.

vibrations
Did you know that our actual stability in place leaves much to be desired? If you didn't know, you'll soon find out - as soon as you start taking photos. Often or even constantly in the camera, you should turn on the additional noise reduction (stabilization) setting, which will save the frame from vibrations. Vibrations naturally come from external conditions (wind, for example), from hand trembling, awkward movement and can make the image fuzzy, blurry.
It is also necessary to enable a button that reduces vibrations on the lens itself, if any (VR - on Nikon, IS - on Canon). If you do not have such a button, do not worry, not all lenses have it.

Focus
In order for the optics to correctly recognize what exactly needs to be focused on, which object to make clear, it is necessary to vary the focus. In most cases, manual mode will not be useful to you, so switch the focus button to auto. You can switch both on the lens itself and in the camera settings.
Also, in the menu itself, you can also select the focus mode: single-point or multi-point.
I always shoot with the first option, because in the second, the camera already determines the points on which to focus. I don't know about you, but I prefer to manage this process myself. Moreover, in the frame space, the focus area can be shifted in any direction, depending on the location of the main subject (with single-point focusing).
Metering area
Of the three common exposure metering options, I most often use matrix (multizone) and center. Matrix does a great job in many shooting situations: it measures the lighting conditions in several areas of the frame at once, which determines the exact exposure. The central one is more suitable when you need to evaluate the exposure in the central part of the photographed space.
For more information about exposure metering modes, see the article -

Modes, shooting options
An important task is to choose the parameters. After all, they define the whole picture! Of course, a lot depends on the composition and atmosphere, but the exposure and its components “create” the photo, they can both improve it and completely destroy it. I will not write much about this, since you will find comprehensive information about it in my articles. Let me just say what you need to be able to exhibit:
Very effective method make the image more expressive and adjust to the shooting conditions. In addition, less time will then be spent on post-processing.

It will be very useful for you to watch a video course that will guide you on the right path and answer many of your photography questions in more detail. It is called " Digital SLR for beginners 2.0” and is a well-chosen material, especially useful for a beginner.
It will also be useful to familiarize yourself with the video course dedicated to the powerful assistant of almost every photographer, Lightroom " Lightroom wizard. Secrets of high-speed photo processing". This course will teach you how to properly work with a photo and make small adjustments to photos. With this program, you will understand why many photographers use the RAW format.
I hope the article was useful and understandable. More practice - and everything will work out! See you on my blog! Share with friends and subscribe to blog updates.
All the best to you, Timur Mustaev.
