DIY flying saucer made of foil. Assemble it yourself: what you can make your own aircraft from. How to make a model airplane that will fly quickly
Good day everyone! How are you feeling, girls and boys? In the last article we did it, and in this article we will make the plane of your dreams))). True, it will be made of paper, but it will be such that it will fly quickly and far and no one will be able to catch it.
And then you can organize a competition and let all the paper airplanes race, what do you think of this idea? Probably just great, because spring is coming soon, and then summer, when there will be much more fun and entertainment than now.
Everyone knows this toy, even kids, who also love it and willingly sit with great interest and fold A4 sheets to get a wonderful craft and at the same time a flying machine above the ground.
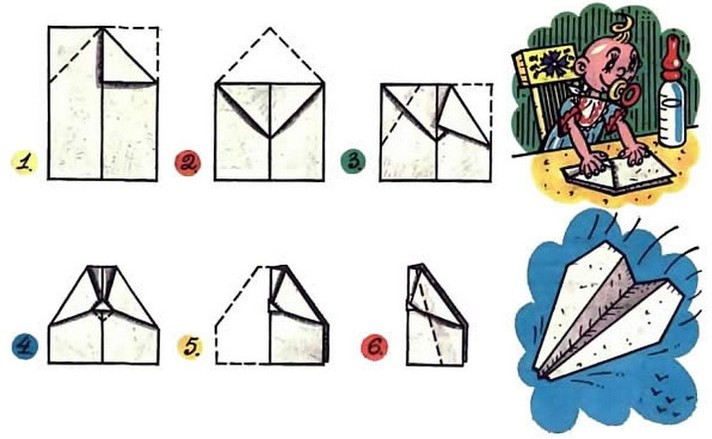
The simplest method is familiar to all of us from childhood; absolutely everyone, both mothers and fathers, remembers it. Take a look at this picture.
First of all, we’ll make an airplane that flies far, the main thing is that it flies straight and beautifully. Just what you need to make it fun and you can watch him))).
We will need:
- A4 sheet - 1 pc.
Stages of work:
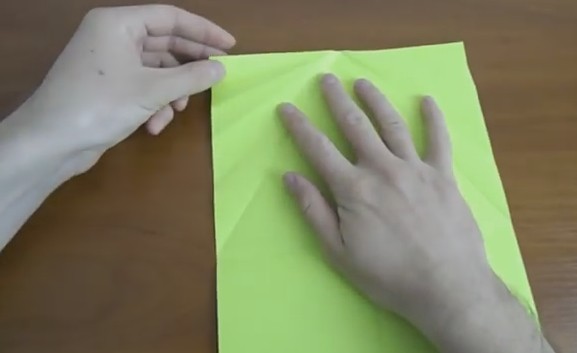
1. Take a sheet, our toy will be made from it. Decide on a color, you can take a traditional one white sheet, or you can take green or blue for example.
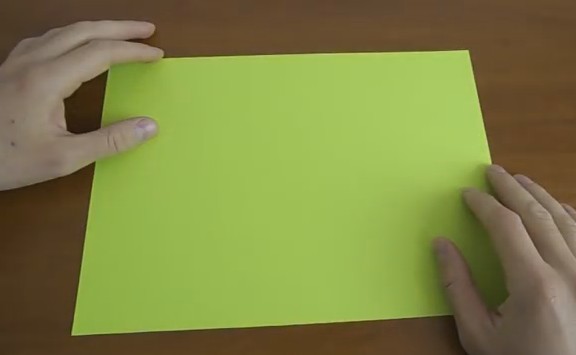
2. Place the paper horizontally in front of you and fold it in half. We will do it using the origami technique.

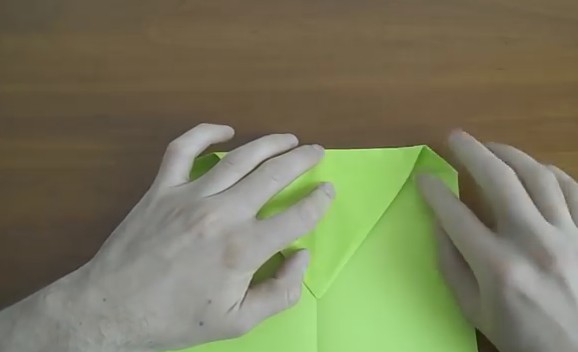
3. Then open and turn vertically. Start bending towards the straight line you've marked.

4. This way you get a triangle at the top.
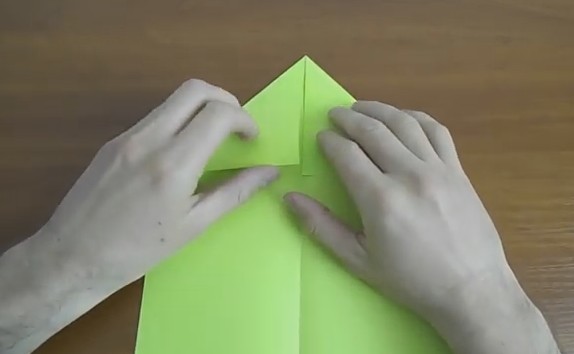
5. Now fold the resulting line back to the outer one. Do this on both sides.

6. Repeat the steps again.

7. This is what should happen.

8. Then open all folded parts.

9. Fold the paper on both sides where you have two marked lines towards the center strip.

10. At the intersections, fold the sheet of paper forward.

11. Press the line with your fingers.
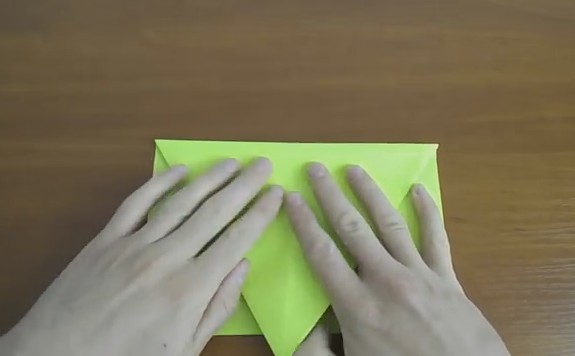
12. Open and return the sheet to its original position.
13. Then bend along the first top line.

14. Fold to the center horizontal line.

15. Place the resulting corner exactly on the line.
16. Then turn the sheet over to the other side and fold it along a horizontal line.

17. Turn the sheet over again to the other side and make the triangle look up.

18. Fold the top parts of the center line, as you begin to do this, the product will begin to come together.

19. Therefore, you have to push the paper with your own hands very carefully.
20. These actions need to be done on both sides.


21. Fold it in half.

22. Fold the wings of the airplane.

23. Afterwards, make bends of 1-1.5 cm on the wings themselves.
24. Open the airplane and straighten your wings. This is such a handsome guy, and he’s ready to fly. Look, just don't fly too far))).

Paper airplane using origami technique in 5 minutes
For the smallest fidgets, there are, of course, simpler instructions, such souvenirs turn out just as good and they fly very well too, depending on how you launch, you may not even be able to catch up; they will fly wow 100 meters, you’ll be exhausted looking for them later).
The most important thing is that you need to make the two sides the same in a mirror image so that they turn out even and then everything will definitely work out.
On one of the forums I spotted a craft called Piranha, and does it look like it’s true? The author also chose red as the color. See how cleverly you can roll up such a miracle. No special skills are required. The most primitive option with a simple model.

It turned out to be a cool thing, my boys really liked it).

By the way, you can get a little creative and give dad a little surprise.

In general, make a craft with your child so that there is something to do with your beloved family, because such work brings you very close together.

Step-by-step instructions for a flying toy for beginners
The interesting thing is that almost any plane can fly a sufficient number of meters above the ground, it can be 10,000 or even more than 1,000,000, the most important condition is, depending on what height it will be launched from and whether there will be wind outside and how it will pick it up.
If you want your airplane to never fall over, then use this scheme. This toy will show you a uniform and very fast flight. You yourself will be very amazed.

If you like this type of air transport with large wings, then fold this type of airplane.

You can build it with a blunt nose, there will be no collisions.

Well, if you don’t understand diagrams and instructions at all, then watch this step by step video from YouTube channel:
How to make a paper airplane that will fly very far, up to 10,000 meters?
There are actually quite a few large number various paper models this air transport. Leading on at the moment became Hawk, Owl, Falcon and Albatross.
And that’s not all, I propose to build a powerful and beautiful airplane called Thunderstorm.
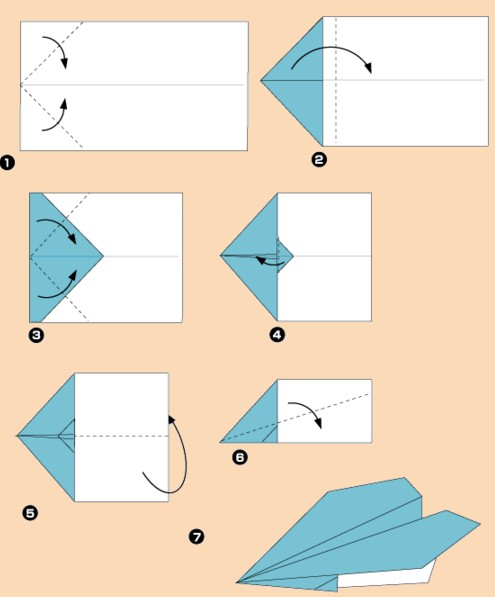
Stages of work:
1. Be sure to bend the sheet of paper symmetrically, straighten the resulting line very well with your hands, then turn it back.

2. Make a triangle at the top, as we did in the first example.

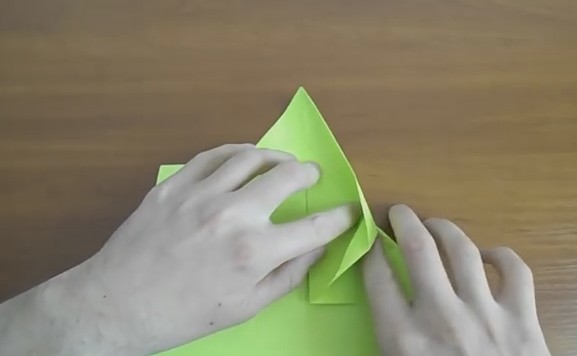
3. On both sides, bend the leaf again towards the center, you will get a sharp triangle.

4. Then bend the sheet where the bend point has formed.


6. Next, fold the triangle forward again.

7. Turn the resulting masterpiece over and bend it again.

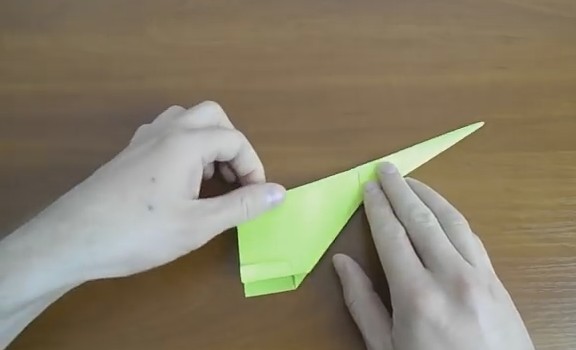
8. Bend the plane in half. Bend the upper part of the wings slightly, as shown in the photo.

9. And then bend it so that you get real ones, like an airplane.

10. Voila, and this is what happened, it looks cool and cool, but it flies, well, it’s definitely fast and far).

DIY paper airplane model for children with folding patterns
Do you want to make a bunch of wonderful and beautiful airplanes with sharp or blunt noses together with your kids?
First of all, learn how to do these things yourself, and then teach them not to do so. difficult task your little helpers. Start with the simplest model.
If you don't understand this diagram, move on to the next one and choose.

Making a planner from A4 sheet is easy and simple
If you want another look that can be done in a matter of minutes, and you don’t have to fold and bend much, a completely different technique is used. It turns out cool and original. In general, a cool option for a child who will happily launch it in the air.
We will need:
- sheet of paper
Cooking method:
1. Fold the A4 sheet in half and draw a line with your hands. Take scissors or a utility knife and cut along it.

2. You will get two small leaves, fold one sheet in half again and draw a blank with a pencil, which you can request from me completely free of charge, and then print it on your printer.

3. Cut according to the template and don't forget to make gaps on the wings and tail as shown in the picture I sent you.


5. Take your time, iron the lines carefully and evenly.

6. There is no need to rush, otherwise it will turn out to be a blunder.

7. Place a piece of plasticine into the nose of the air transport and close it.

8. Where you made the cuts on the tail, bend and straighten the paper.

9. Do the same with the wings.

10. To give it the flying ability, you need to smooth out the wings using a pencil and curl them a little.

11. It should look something like this. To check the elevator, lower the plane vertically, it should take off like the wind, but do not overdo it.

If your airplane tilts to one side, then adjust it, because you can lower or raise the adjusters.
Volumetric cardboard craft
We will need:
- cardboard - 2 sheets
- PVA glue
- ruler
- pencil
- scissors
- matchbox
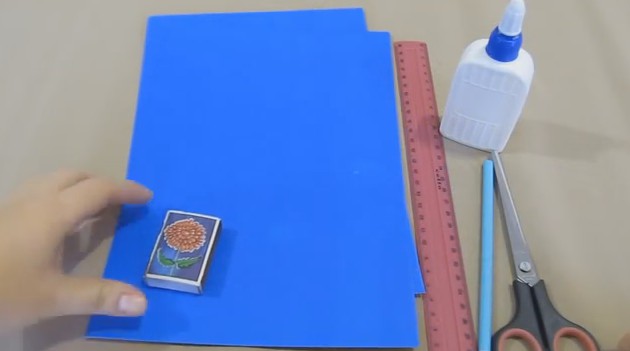
Stages of work:
1. Mark two strips on the cardboard with a pencil; their width should be equal to a matchbox.

2. Then use scissors to cut them out. Use these strips to make airplane wings. On another sheet, mark two 1.5 cm wide strips and also cut them to the length of the cardboard.

Move one such thin strip, and cut the second into two parts of 8 cm, remove the rest, it will not be needed. Here's what happens:

3. Now start assembling. Take a matchbox, bend a long thin strip in half and attach it, glue it to the box.

4. Using two identical strips that are wide, like boxes, make wings.

The corners can be rounded; cut them with scissors.
5. Make a tail from one short narrow strip and also round it, glue it inside. And glue the second one on top, make a triangle out of it.

6. Then you can cut out the propeller and glue it.

7. The craft is ready, enjoy your work!

Video on how to roll a Fighter without glue

Of course, such a craft will be difficult to do if you are doing it for the first time, so I suggest starting by watching a video that will definitely teach you how to create such a beauty.
Well, how did it work out for you? Is it really easy and simple and without glue, and not as difficult as it seems at first glance?
And if you have problems with the Internet, then you can always use the scheme, especially if you suddenly forget something, this is also an option.


P.S. By the way, craftsmen even make such airplanes from one match, see for yourself:
Well, that's all for me. I wish you creative success and good luck! Create for your health, play and have fun! All the best and joyful. Bye everyone!
Do you like to make various crafts with your child, are you constantly looking for something new and interesting to interest your child and involve him in working together? Then you will certainly like this article, because in it we will give several examples of how to make a flying saucer with your own hands. Your little son will not only receive great pleasure from the process itself, but will then happily play with his new toy in space travelers. In addition, with the help of such a craft you can tell him about the structure of galaxies, stars and planets, as well as fascinating space travel. The main advantage of such a craft is that it can be made from the most simple materials, and the baby will be able to come up with the shape, texture and color of the spaceship himself.
DIY flying saucer from scrap materials
In order for you to get an original flying saucer with your own hands, made with great interest and enthusiasm, you will need to take care of preparing everyone in advance necessary materials. There will be no problems during the work, because even a three-year-old child can handle it, and parents will only have to do all the gluing work.
Materials for work
To make a real spaceship, you will need the following tools and materials:
- Unnecessary disk.
- Two foam hemispheres.
- Colored paper with self-adhesive strip.
- Decorative carnations.
- Several bamboo sticks or toothpicks.
- A couple of plastic flat stars.
- Acrylic paint.
- Several fairly large beads.
- Sequins.
- Chenille wire intended for crafts in a silver or golden hue.
- Glue.

Operating procedure
If you follow this working technology, you will get the perfect flying saucer made of paper with your own hands:
- Take a sheet of self-adhesive paper of the desired shade and trace the disc. Cut out a circle along the resulting outline and glue it to the top side of the disk.
- Paint one of the foam hemispheres acrylic paint, leave to dry.
Important! Let the baby choose the color on his own, because thanks to this, independence and imagination will develop in him.
- Decorate the second hemisphere with decorative carnations and shiny sequins. To do this, you need to string sequins onto nails one by one and stick them into the hemisphere.
Important! You can start decorating either from the edge or from the center, but it is better, of course, from the base, so that it is more convenient to form straight parallel rows. If your sequins different shades, then you can even make some kind of pattern out of them, such as waves, circles or stripes.
- After the top is decorated, you can begin to form the antenna. You need to stick two pieces of fluffy wire directly into the foam.
- Assembling the ship's hull. It is necessary to glue the hemispheres on both sides of the disk. In this case, a hemisphere with sequins should be attached to the shiny side, and a painted hemisphere should be attached to the side covered with paper.
- Making legs for a ship. You need to string the beads onto the edges of the toothpicks so that they go into them as deeply as possible, but do not stick out on the opposite side.
Important! If the hole in the bead turns out to be too wide, you can seal it with plasticine, glue or chewing gum to prevent the beads from sliding on the toothpick.
- Insert the finished legs as supports into the painted lower part of the ship so that they are at the same distance from each other, otherwise the craft will not stand level.
- Glue plastic stars to the shiny side. You can additionally cut out decorations in the form of alien figures from paper.
Our plate is ready!
Even a child can figure out how to make a flying saucer out of paper according to the presented diagram. If you take your time and carefully study each point, the craft is guaranteed to turn out beautiful and quite durable.
DIY flying saucer made from natural materials
If you like to create compositions and all kinds of crafts from natural materials, in particular vegetables, branches and cones, then it will not be difficult for you to make a ship for aliens yourself, guided by this technique. Below we will describe in detail how to make a flying saucer with your own hands from materials found in any modern kitchen.
Materials for work
You will need to implement this idea:
- For oblong-shaped vegetables, it is better if it is squash, because it is most suitable for this purpose and does not have to be cut.
- Colored push pins.
- Small plastic bottle.
- Colored paper or cardboard.
- Foil.
- Scissors.
- Transparent tape.

Master class
Having prepared all the materials according to the list, feel free to get to work:
- Wrap the squash in foil - do it carefully so that there are no empty or loose areas left. Use tape to secure the edges of the foil.
- Make portholes on the sides of the vegetable by attaching pushpins - you need to place them around the entire circle.
- Cut off the neck of the bottle, leaving a little of the side walls so that the cutting of our spaceship. The bottle can be inserted directly into the vegetable pulp or glued with tape.
- Cut out decorative elements in the form of stripes and stars from colored paper and glue them to the walls of the ship.
- You can also make space travelers out of cardboard.
Making a paper airplane that will fly is very simple. It is important to follow the instructions provided on how to make the plane and make the bends carefully.
Any person in childhood loved making such paper airplanes and then launching them, and the higher the point from which the plane was launched, the more interesting the activity was.
Assembling an airplane is not only a fascinating process, but also develops a child’s fingers.

Instructions for creating an airplane
It’s worth starting with the fact that the product can be made from almost any paper.


Start with simple designs, and then smoothly move on to more complex ones:
- Position the paper so that the short part is facing you.
- Mark exactly the middle on this side.
- Fold the paper so that the top corners are aligned with the center.
- Bend top part exactly in the middle.
- Bend back the small part of the triangle so that you can later fold the corner of the airplane back to the middle, and secure the resulting structure with a small triangle.
- At the end of all stages, it is necessary to bend the resulting material in half and bend the wings back.
- The plane is ready.

To better understand how to make such an origami product, check out step by step photos homemade aircraft.
Making a modern airplane model
When you can easily make simple airplanes, you can move on to more complex models.

One of these is the “Glider”, which flies very high and far, while it can maneuver well in the air:
- Fold the sheet in half.
- As in the first option, you need to fold the corners of the plane towards the middle.
- Visualize a line in the middle of the product, then make a bend in this place. You will get a very sharp nose of the plane.
- The wings of the spout must be folded so that they look back a few millimeters.
- Roll the product in the center so that reverse side became internal.

The last step is to bend the wings, which can be made narrow, or vice versa – wide. Through experimentation you will learn how to make an airplane more maneuverable with your own hands.

Military airplane
The following type of aircraft model is more complex than the first two, but you should not have any problems building it:
- The first point is repeated from the first model.
- Fold in the middle. Fold the corner that is at the top. Repeat on the other side.
- As a result, you should see a detail that resembles a cross. Fold the side pieces together towards the center piece on both sides.
- You should see the horns, fold them in half, and wrap the remaining paper inside.
- The bottom corners should be bent in the opposite direction from you.
- Fold the product in half and the plane is ready for battle.

How to make a flying airplane out of paper?
When you get tired of making airplanes, and this will happen quite soon, but your child will not leave you asking to make him a new airplane, then show him a couple of lessons on creating a simple model on his own.


It will also be possible to add a separate propeller to such an airplane, which will give some realism to your product:
- Fold a piece of paper diagonally twice
- Fold the resulting sheet along visual lines, which is divided by diagonals into two even parts
- Both corners must be folded in opposite directions
- On both sides, fold the edges one more time so that the new part is lightly flush with the previous one.
- The edges should be folded over the received parts
- Fold one more time toward the center, and then tuck the corners into inner side
- Both lower corners must be bent into the resulting holes.
- For the propeller, you need to cut a square sheet of paper diagonally, leaving the whole core
- Fold the propeller, all the time securing it with a thread and a needle
- The last step is to secure the propeller to the tail of the plane.

How to make a model airplane that will fly quickly?
We bend the sheet in half and open it back. Now we bend the sheet across and fold the two edges to the bottom side, and then bend only half of what was bent before.

We unfold the sides that are on the sides and bend each part to the inside. Small area We bend the wings and bend them away from the underside. In the middle, where the fold line is located, carefully compact it with your fingers or using a ruler.

We bend the resulting bends so that they are parallel to our wings and the plane is ready.

Try to create your own version based on the instructions given. original idea airplanes and methods for making paper airplanes.


Any, even the most primitive folded paper airplane, will fly perfectly if everything is done correctly and the bends are carefully made.


If your child wants something new, you can always show him how to make a plane with a folded tail and flaps. Airplanes gifted with such parts fly high and very far.

These examples of creating aircraft are far from the only ones; on the Internet you can find a fairly large number of diagrams and descriptions, as well as tips that will help you do it every time. new look plane and make the child happy.

What you can make an airplane out of at home is up to you to decide. Try experimenting with various materials that lend themselves to such bends and you will notice that each aircraft made from a different material will have completely different flying skills.

Maintain symmetry, as an error of just a couple of centimeters can tilt your plane to the side, so that it will not fly or will fly, but only downward in a spiral.


The presented master class on making airplanes will help you and your child get a lot of pleasant memories and emotions. Create a whole squadron and go outside - let them all into the sky.

DIY airplane photos


There is probably no boy who would not like to fly. You can fly in any way, for example, on a homemade radio-controlled model aircraft or on a paraglider.
But, you can start with a simple free-flying aircraft model.
You can make such a simple aircraft model from ceiling tiles. You can paste paper printouts with a view of the airplane onto the model parts, or you can paint the airplane model yourself.
How to make a flying model airplane with your own hands
(clickable)
To make it, you will need ceiling tiles (take ones without an embossed pattern) or cardboard.
The easiest way to start making a flying model of an airplane is from the wing. He has simple form and it is easy to cut. Cutting is done using a regular stationery knife. You can pre-glue the printed templates onto ceiling tiles and then cut out the details of a flying airplane model right through the paper.

The fuselage is also cut from the ceiling. The wing consoles are glued at an angle of 7-10 degrees, then the aircraft model will self-stabilize in flight.
The front pads on the fuselage are needed to make the nose heavier; you may need to add weight to the nose of the aircraft model for smooth flight.
See how to properly set up your model airplane flight.
How to launch a model airplane
After the aircraft model is assembled, the question usually asked is how to properly configure the flight of the aircraft model.

Look at the picture above - if a homemade airplane model takes off after being thrown, then you need to add weight to the nose of the airplane model. This can be plasticine or a lead weight taken at a car wheel balancing station.
If the aircraft model dives, then vice versa, reduce the load or add it to the tail homemade model airplane.
A properly configured homemade aircraft model flies smoothly.
It is best to launch a free-flying model aircraft from an elevated position, for example from a balcony. multi-storey building. Good for starting and steep slope, the main thing is that the wind on the slope is uphill.
Watch a video of making a free-flying model from ceiling tiles.
Also interesting articles:
Do-it-yourself aircraft model - making a radio-controlled model airplane
How to make a radio-controlled yacht with your own hands - we make a yacht with radio control.
Nowadays, airplane travel is no longer unusual. People fly them every day. However, this is not exactly what you want. To satisfy the desire to fly, it is best to design an ultra-light aircraft.
What are the requirements for ultralight aircraft?
When this field of activity was just beginning to develop, many people made many mistakes in the design or neglected some important requirements, without which the flight would have been impossible. For this reason, many have never been able to launch their own device. However, several decades ago, the Ministry of Aviation released a collection of certain requirements for ultra-light aircraft. There are quite a few of them, but among them there are several of the most important.
- Devices assembled with your own hands must be simple to operate, easy to control during landing and take-off. In addition, the use of any management methods other than traditional ones is strictly prohibited.
- If a microlight aircraft's engine fails for any reason, it must be designed to glide and land smoothly.
- The maximum permissible takeoff run of an aircraft before takeoff is no more than 250 meters. The minimum speed during acceleration must be at least 1.5 m/s.
- The forces applied to the control stick should be in the range from 15 to 150 kgf, depending on the complexity of the maneuver being performed.
- Clamps for steering planes must withstand a load of at least 18 units.
Design
Besides general requirements requirements for ultralight aircraft, there are also certain conditions regarding the design of these devices.
The main requirement for this type of device is as follows. When constructing the apparatus, it is unacceptable to use steel, cables, hardware components and other materials of unknown origin. This is due to the fact that the unit itself belongs to a group of devices increased risk for human life. Another very important condition is that if you assemble an aircraft with your own hands using wood, then it must be without any visible flaws, knots, wormholes, etc. In addition, in those compartments where moisture may accumulate for any reason, drainage holes must be equipped.

Assembly nuances
It is highly not recommended to use bent pipes or rods. This is especially true for those units where forces may arise to compress or stretch the material. IN mandatory When assembling an aircraft with your own hands, you need to ensure that all threaded connections are locked, and the movable type hinge joints must be equipped with a mechanical stop. The use of growers or is prohibited. All cables used during assembly must be free of knots and damage to the cores. In addition, they must undergo mandatory treatment with anti-corrosion compounds.

High wing
The simplest version of the aircraft to manufacture is the high-wing one. This model is a monoplane with a pulling motor propeller. It is worth noting that the diagram of this device already quite old, but reliable and time-tested. Among the shortcomings of these aircraft, there is only one minus - when emergency situation It is quite difficult to leave the cockpit due to the monowing. However, the design of these units is very simple, which is the most important feature when assembling an aircraft with your own hands.
- The wing is constructed of wood using a two-spar design.
- Frame material - welded steel. Riveted aluminum options can also be used.
- As cladding, you can use completely linen materials, or combined types.
- The cabin must be closed type. It should be closed with a car-type door.
- The usual pyramidal type of device is used as a chassis.

High wing braced model
The model of the single-engine high-wing aircraft "Leningradets" is one of the varieties of homemade aircraft, the design of which is also very simple. If you assemble an aircraft with your own hands, you need to know the following details. The wing can be made of pine plywood. The fuselage is welded from ordinary steel pipe, and the usual linen version is used as lining. Parts from rural equipment were chosen as wheels for the chassis. This is done so that you can start from an unprepared surface. The engine of the aircraft is based on the design of a motorcycle engine model MT8, which has 32 horsepower. The take-off weight of the device is 260 kg.
This aircraft demonstrates its best qualities in the field of control and ease of maneuvering.
DIY drone
(BPA) are also quite common nowadays. Here it is worth saying that the assembly of this unit, especially if it is assembled using the latest technology, will be quite expensive.

As the main material, you can choose one that has characteristics similar to foam plastic, but will not be deformed by the use of glue, and its strength indicators will be higher. You can also use fairly lightweight, but very rigid polyethylene foam. It is worth adding that to assemble this device you will have to master the skills of working with a soldering iron yourself.
