How to make beautiful DIY storage boxes. Do-it-yourself box for small things: materials and tools
Almost every item, from the smallest accessory to a pair of shoes, is packed in cardboard box. As a result, in every home there is a whole warehouse of small and large, round and square, flat and voluminous empty packaging boxes. They do not look very presentable and obviously do not add coziness to the apartment. Therefore, most often you want to get rid of them immediately.
But don't be in a hurry to do it. Check out some ideas first that are sure to help you put your empty boxes to good use. Indeed, in our small-sized dwellings there is very little space for storing a variety of things. And in this case, closing compact boxes will be simply irreplaceable. They are practical, they can be stacked on top of each other, saving space. Their main advantage is simplicity and ease of use.
What can be stored in cardboard boxes.

Turns out there are a lot of useful things. For example:
– Charging device and connecting wires from your gadgets. You don't have to waste time looking for charging from your phone or tablet, now each of them will have certain place.
- Kids toys. Small parts from constructors or puzzles are constantly lost. It is much more convenient to store them in one capacious box.
- Cosmetics and jewelry. Fashionistas have certainly adopted this idea for a long time.
- Attributes for your favorite pastime. Creative people can store pencils, brushes and paints in separate boxes. Needleworkers - yarn, knitting needles, needles and scissors. In general, anyone who has a craving for any hobby will be able to keep in order the accessories he needs.
- Shoes. The very first thing that comes to mind. Sandals and light shoes will survive the winter in such a package, and boots will be perfectly preserved in the summer.
– Stationery and magazines. Small boxes make a nice organizer for storing glossy publications, as well as pencils and pens. They will always be at hand.
- Towels and baby clothes. You can also use boxes for diapers and other baby items. But then it is desirable to make a fabric cover, which can be changed periodically.

Now you will always know where to look for charging.

Stand for careful storage of earrings and other jewelry.

Organizer for the needlewoman.

Convenient stand for pens and pencils.

A great replacement for the bulky locker in the nursery.

Designer box for storing old letters.

It is convenient to put every little thing in tins from under cookies and candies.

Shoe boxes are great for storing shoes.
How to decorate cardboard boxes.

Wallpaper is a great choice for decor.
This is not to say that empty packaging looks attractive and pleasing to the eye. However, by applying a few simple tricks, spending quite a bit of time and inspiration, you can give it a stylish, elegant look.
To create a new design of an old box, suitable simple materials that any hostess has:
– Remaining wallpaper or wrapping paper. To decorate the box, use any wallpaper, including vinyl, textile or non-woven wallpaper. You can take ordinary PVA glue or wallpaper adhesive solutions.
- Textile. A worn dress or a stretched sweater will come in handy to create original decor. A small box for storing jewelry can be decorated with buttons. This will give her a graceful and stylish look.
- Rough canvas or burlap. Of course, they are unlikely to be found in every home. But if the design of the room is made in an ecological or Provencal style, boxes decorated with fabrics from natural fiber.

There was a use for the old geographical atlas.

Grace and style.

Hat boxes do not need decoration.

Jute is an excellent ecological element.

You can write on the boxes. It is very comfortable.
Before getting started, use some simple advice:
– Before you start decorating, organize workplace. The table should be spacious enough and well lit. It is better if it is located next to a window, a source natural light.
- Prepare immediately necessary tools: glue, scissors, thread, stapler and everything else you may need in your work.
- Free the table from unnecessary items that interfere with you. Nothing should distract you from creativity.
Think carefully about the design you are about to implement. Try on scraps of fabric or scraps of paper. Make sure they are enough to bring your creative vision to life.

A beautiful metamorphosis.

This can be done without professional skills.

Black and white fantasy.

Stylishly decorated boxes will decorate any interior.
In fact, there are a great many ideas for decorating and decorating your apartment. You can choose from one of our options or come up with your own. In any case, you will get great pleasure from the process of turning an ordinary cardboard box into an original design item.
The doors to the cave opened, and Ali Baba found himself among all sorts of things: jeans, T-shirts, paper towels, flash drives, CDs, chocolates, tea bags and ping-pong balls ... For a very long time he tried to find a bag of gold coins, but, alas. This would be the end of the story.
Thank God, order reigned in the cave, and all kinds of places for storage were provided: chests and bags, boxes and bundles, dishes and jugs. Today we will sort out our treasures, go through the "epicenter of the trash" - wardrobes and bathroom cabinets, desks and kitchen shelves (you can add your "hot spots" to this list).
We will not reinvent the wheel, we will just figure out where all things can be neatly placed. In boxes? Or to banks? Both will do. But! It should look organic and fit into the design of the room. So, let's begin.
Boxes and boxes

To get a beautiful container out of a cardboard box, it is enough to paste over it with paper, fabric, leather, film - and a lot of things. Choose any material and create a brand new storage box.
You can make several of these containers, matching in color, and thus not only put things (for example, shoes) in boxes, but also make a nice accent in the interior from this set. Can be pasted over with the same material of the box different size and even attach handles and corners, then it will be “suitcases” with things. And also - generally paste over several small boxes, put them in one - for storing small items: jewelry or stationery, or just make partitions in the box and store underwear.

Let's take a closer look at manufacturing. pencil holders. It would seem that it’s easier - pasted over a glass, here’s a pencil box for you. But then this cup overflows and again on the table (and in other places) there are pencils. Especially for young artists.
So today we will make a special pencil box for artists. There will be not one glass in it, but several. For its manufacture, bushings from toilet paper, a cardboard box at the height of the sleeve, colored paper and pieces of felt or drape.

Manufacturing technology
1. Prepare a cardboard box, toilet paper sleeves (enough pieces to fill the entire box), scissors, glue and pasting materials.
2. Paste the box with paper, decorate with pieces of felt (cut out circles, flowers, stripes at your discretion). Glue a bottom of cardboard circles to each sleeve to make cups.
3. Place pencils, pens, brushes, felt-tip pens in cups. Place the cups in the box. This is how the pencil case turned out (and at the same time both the brush and the felt-tip pen).
Now your artist has desk- full order!
Such convenient banks
We go to the kitchen and see how many small glass jars with screw lids have accumulated. Of course, we left them for spices, but there are a lot of spices, there is simply nowhere to place so many jars. And there is no point in placing them! We'll hang them up! Beautiful and comfortable.
Manufacturing technology of shelves with jars for spices
1. Pick up the same banks. Drill holes in covers.
2. Attach the covers to the shelf with self-tapping screws at an equal distance from each other.
3. Everything! Hang the shelf in place and screw the jars to the lids.

There is also cans? You can also build an interesting shelf. For bathroom. We decorate jars using decoupage technique.
Manufacturing technology of shelves with jars for towels

1. Cut out the fragments of the pattern you like.
2. Cover the jar with a primer, dry it, stick a picture.
3. Paste the edges of the can with tape.
4. Varnish. Dry.
5. Prepare in this way (p. 1-4) all banks. Attach to the shelf (colored plywood) with self-tapping screws at an equal distance.
6. Hang a shelf.

We sew organizers ourselves
Well, for those who know how to sew, there are several options for storing things: handbags-pockets with clasps, an organizer with pockets, fabric pouches for the bathroom and even... an iron case.

Today we will sew a fabric organizer. Cardboard boxes, of course, are convenient, but they wear out quickly. Yes, and not everywhere you can leave them, for example, in the bathroom they can get wet, and in the nursery - get dirty. But fabric organizer boxes can be washed and dried.
Manufacturing technology

1. Cut a rectangle (the length is equal to the perimeter of the bottom of the box, the width is equal to the height of the box) and sew in the form of a pipe. Sew on the bottom.
2. Repeat step 1 with another fabric (lining).
3. Insert the lining into the box and into sides sew in mesh (for strength and stability).
4. Process the top (piping or inlay).
5. Sew pockets. The organizer is ready.

And what an indispensable thing in a nursery! After all, the children's room is a dressing room, and a bedroom, and a living room, and even an office, so it is difficult for a child to keep order in such an endless variety of things. Help him out by making a few storage spaces: fabric boxes, organizers, pencil cases, and item cases. To make everything easy to open and easy to clean.

Then your "ali-baba" (with his fellow robbers) will lay out their treasures in their places.
In every house there is at least one empty box left after shopping. In most cases, they are simply thrown away. However, few people think that they can be used to make an original and unusual box for storing things and various small things.


Stores offer wide selection decorative boxes various sizes, colors and styles. However, the prices for such accessories are not always affordable. With a little effort and imagination, everyone can make an original box with their own hands. The purposes of their use in the apartment are many. Boxes in the interior can become original decorative element, and also serve as a place to store various things. The table shows the most popular ideas for using decorative boxes.


Storage box decor
|
Where to apply |
What to store |
material |
|
|
Bedroom or living room |
small |
Bijouterie; Jewelry; Accessories; |
Different types of trees; Porcelain or stone; |
|
Underwear; Hosiery; Cosmetics; Hair accessories; Photo albums; Sets and accessories for needlework; Chargers for gadgets; |
Carton boxes; |
||
|
Bed sheets; Towels |
Thick cardboard; Plastic; |
||
|
small |
toys for fine motor skills: beads, mosaic, etc.; any children's "treasures"; |
Thick cardboard; |
|
|
Accessories for creativity; Constructors; Children's tableware; |
Plastic; Paper tubes; |
||
|
Large children's toys; |
|||
|
small |
any seasonings |
||
|
Unused utensils; Towels |
Paper tubes; |
||
|
Any, but better with a water-repellent effect; |
|||
|
Hallway |
small |
Headphones; Lost little things; Spare laces; |
Plastic; |
|
Shoe care products; |
Thick cardboard; |
||
|
Bags or backpacks; |
|||
|
small |
Moisture resistant materials; |
||
|
Hair accessories; Personal hygiene products; Cleaning products; Iron, hair dryer, hair curlers; |
Moisture resistant materials; |
||
|
Towels Laundry items; |
Moisture resistant materials; |
Also boxes big size made of dense material can be used as pouffes in the interior of the living room or hallway, on which you can not only sit, but also use to store things.

DIY storage box ideas

DIY cardboard box decor

Original decoration of cardboard boxes
How to make a box or a box of newspapers with your own hands.
This material is the most economical, and finished goods are original and look decent in the interior. The master can independently choose the shape, size and color of the finished decorative box. To make this accessory with your own hands you will need:
- Newspaper tubes - you can make them by tightly winding a newspaper strip diagonally onto a thin knitting needle. The edges are fastened with glue;
- Base (box or any salad bowl, according to the shape of which the product will be created) and cardboard bottom;
- acrylic paint;
- Scissors;
- PVA glue;
- Decor elements.

DIY storage box decoration

Storage box decor
Making boxes from old magazines or newspapers with your own hands must start from the ground. The easiest way is to use a cardboard base, on which newspaper tubes are glued around the perimeter at an equal distance (about 2-5 cm). Before weaving, newspaper tubes must be dyed in the desired color. Weaving consists in bringing the working tube back and forth of the vertical tubes alternately. When one of them ends, it must be “growth” using a new tube and PVA glue.
Decorating the finished box can be done with any materials you like.

DIY storage box ideas

Original decoration of cardboard boxes

DIY cardboard box decor
What to use to decorate a decorative box
If you can’t weave a box with your own hands, you can use old shoe boxes, for example, and decorate it beautifully. What can be used for this:
- Wallpaper or wrapping paper - simply paste over a cardboard box using Double-sided tape or PVA glue;
- Fabric - any old thing can become a material for decorating boxes (for example, old jeans or a T-shirt);
- Paper napkin with beautiful drawings- make decoration using decoupage technique;

DIY storage box decoration

Storage box decor
Decorating the box with fabric
In addition to the basic storage box and a piece of cloth, you need:
- Scissors;
- Threads and needle;
- PVA glue;
- Double-sided tape or silicone glue;
- Decorative elements (buttons, beads, lace, etc.).

DIY storage box ideas

DIY cardboard box decor

Original decoration of cardboard boxes
The fabric must be cut in the form of a cross of five rectangles. These rectangles are the sides of the cardboard box. Leave a margin of 1-1.5 cm on each side. Place the box in the middle of the pattern and glue the base double sided tape. After - glue each side alternately so that the edges of the fabric overlap slightly and wrap deep. The inside can also be glued using a light fabric, or the bag can be sewn to fit the size of the box. On the edges you can make a double-sided Velcro. So the inner bag can be removed and washed in case of contamination.

DIY storage box decoration

Storage box decor
Decoupage box decoration
This type of decor is the most financially costly, since it requires a lot of tools necessary for work:
- decoupage glue;
- iron;
- acrylic lacquer;
- baking paper;
- synthetic brush;
- acrylic primer;
- paper napkin with a pattern;

DIY storage box ideas

DIY cardboard box decor

Original decoration of cardboard boxes
The preparatory stage includes the primer of the box in two layers, each of which must dry, and then clean them sandpaper with fine grain smooth surface. The next step is painting. acrylic paint. Then follow these steps step by step:
- Lubricate the entire surface of the box with acrylic glue and allow to dry;
- Lay the napkin evenly on the surface of the cardboard box, smooth out all the bumps;
- Iron the surface with a hot iron on medium temperature regime through parchment;
- Cut off the excess edges of the napkin;
- Cover with a thin layer of varnish.

DIY storage box decoration

Storage box decor
This process must be repeated for each side of the box. After the varnish has dried, iron each side through the paper. If desired, you can additionally paint the resulting storage accessory with acrylic paints.
Creating an author's decorative box for storing things with your own hands is within the power of everyone. This article describes the basic decor options, which can be continued indefinitely. And each new thing will become a unique interior decoration.
Video: DIY shoebox decor
50 photos of DIY storage box decor ideas:


The eternal problem of all housewives: lack of space to store the necessary things. But maybe the problem is not in small cabinets, but in their incorrect filling? Competent organization storage - that is not an easy science. One of the most milestones in its comprehension is systematization and division. The manufacture of the proposed products will help to put things in order huge number stacks, make it easier to find what you need and save precious space.
We make boxes with our own hands for storing things of a simple design
Consider several options for assembling storage boxes with your own hands: simple and quick to perform, and also a little more difficult to manufacture, but more decorative in terms of appearance option. The article will describe two options for creating boxes in detail, as well as illustrations (photos) of the stages of work of four different examples.
To make the first one, we need the following:
1. Cardboard box of the right size.
2. Glue (either "Crystal" transparent, or "PVA").
3. A piece of fabric.
4. Large paper clips.
5. The tape is narrow, or ribbons.
 steps for making a box for underwear (1-4)
  fig.5-8
For the manufacture of the second option, we need materials from the first list, except for the last item, and in addition to them the following:
1. or magazines.
2. Primer.
3. Paint.
5. Needle and thread.
 steps for making a storage box (1-4)
  rice. (5-12)
  rice. (13-20)
  rice. (21-22)
To make simple do-it-yourself storage boxes, you should adhere to the following work order:
1. Cut off the top cover pieces of the workpiece, if any. Or glue them to the inner surface of the side walls if you want to strengthen the structure.
2. Make a cross mark on the cut. Its center should correspond to the dimensions of the bottom of the workpiece, the side elements - to the dimensions of the four walls. Step back from the marking contour by 1.5-2 cm and point another one. It is on it that the fabric for decoration will be cut.
3. Cut out the lined cut segment, smooth it and unfold it on a flat plane. Evenly cover the bottom of the cardboard blank with adhesive and lower it into the center of the prepared fabric coating. Press down and let the glue dry completely.
4. Cover one of the sides of the workpiece with adhesive and attach the corresponding part of the pattern to it. The lateral allowances made earlier must be bent inward, under the glued canvas. We bend the top allowance inside the workpiece and fix the top of the canvas with paper clips (so that the fabric, when wet, does not move down), remove them after complete drying. By the same principle, we act with all the other sidewalls.
5. The corners of the workpiece with the joints of the canvases are masked with tape or tape, which is also glued. The inner space of the product can be left empty, but it is better to close it with a cloth. This is done in exactly the same way as when decorating the outer part, only with a slight difference in allowances. The top allowances are bent under the canvas. The side allowances at one corner are glued like this: the allowance from one canvas is glued to the adjacent wall, and from the other, it is folded under tightly.
 newspaper tube box
  making from newspaper tubes (1-4)
  making from newspaper tubes (5-8)
  felt box
In order for everything in a house or apartment to be always in in perfect order, each little thing had its rightful place, a good housewife needs storage containers.
In this article, the website news portal offers you several options for making do-it-yourself storage boxes from improvised materials that can be found in every home.
You can put into ready-made boxes bedding, towels, children's clothes, photographs, toys, handicrafts, etc. Boxes can also be a place to store dirty clothes waiting to be washed.
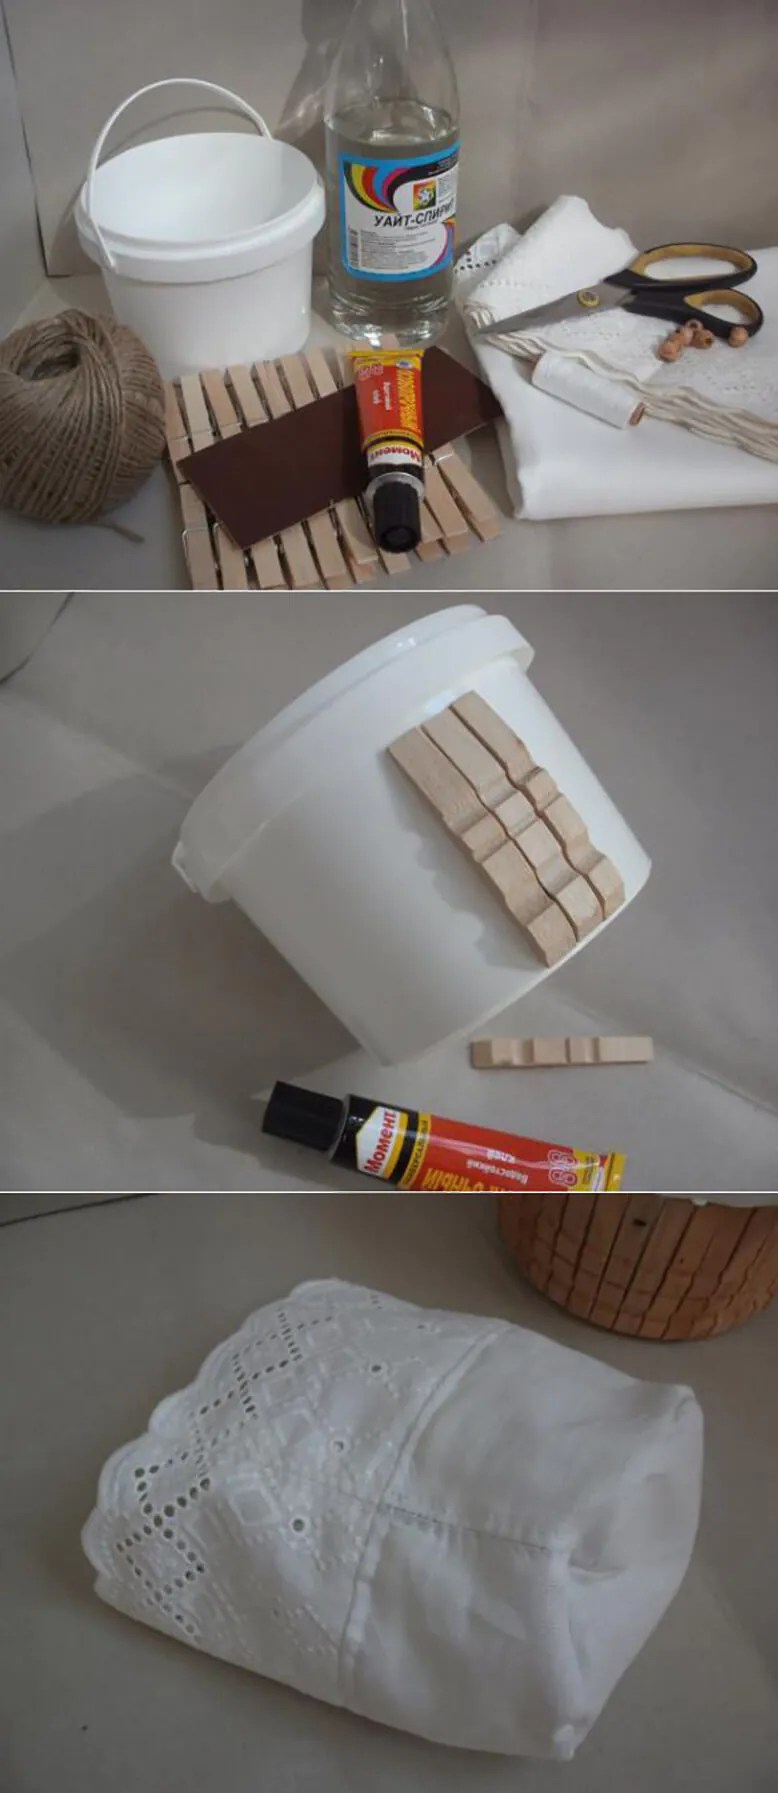
DIY storage basket
To make such cute baskets for storing small things, you will need a plastic bucket (suitable for sour cream or mayonnaise), wooden clothespins, glue, tourniquet and a small piece of beautiful openwork fabric.
Wooden clothespins must be disassembled and the halves glued to a plastic bucket so that the basket still seems to be wooden.
Then make a bag out of the fabric that will match the volume of the plastic bucket you have chosen and put it inside. Wrap the handle of the bucket with a tourniquet.
You can also wrap the bucket with cloth or knitwear if no wooden clothespins are available.
You will need a capacious cardboard box, a decorative rope harness and glue.
trim upper part boxes. Lubricate the box with glue, and then carefully wrap it with a rope bundle from the bottom up. The rope harness will give the box strength and practicality. Place a cloth bag inside the box.
DIY storage container
If there is a man in the house, then this option for making storage containers would be appropriate. The entire container is made of metal mesh, wheels are attached to the bottom, which will allow you to easily move the object in any direction.
DIY storage box
If the house has unnecessary tight knitwear (for example, a sweater or scarf), then any cardboard box can be transformed and made useful and beautiful.
DIY storage box made from newspaper tubes
This option for making a storage box is laborious and requires a large number time, but the result will pleasantly surprise you, because it will look like it is made from rattan.
DIY storage box
This option is suitable for lovers of everything unusual and extraordinary. Here is such a stylish storage case small things you can get out of the most ordinary shoe box.
Storage Ideas
And a few more options for making boxes and other containers for storing things.