How to decorate a three-liter jar piggy bank with your own hands. Do-it-yourself piggy bank from a tin can with locks. How to make a piggy bank with your own hands from a tin can
How and from what you can make a piggy bank for money with your own hands - these questions are of interest to creative individuals. After all, they can decorate their apartment using only improvised means and their multifaceted imagination.
Let's start with the fact that a person who considers himself financially literate is simply obliged to have a piggy bank in his house. Or maybe two
Why do you need to make a piggy bank for money with your own hands? Because, putting aside your wonderful money in a piggy bank, you most likely collect it for something specific. For your "American" dream! And if you are building your future - dreams, desires, goals, then you need to make a piggy bank for money on your own.
In this article, we will show you examples of shoe box piggy banks.
This article is also about how to make a big piggy bank! We have big dreams and desires! Accordingly, if you make a piggy bank for money, then you need to make it big.
Piggy bank decor with newspaper and pictures

In time, such a piggy bank is made for about 1 hour.
In order to do it, you will need:
- box,
- newspaper,
- PVA glue,
- stationery knife,
- Pictures.
Making a piggy bank:
1. We find a box, a newspaper, PVA glue and pictures.
Not only modern prints can be used as pictures. Well suited to bookcases in the form of banknotes, inserts, brochures etc. You can also take real banknotes! Not the point. The main thing is that a home-made piggy bank for money should be pasted over with money. And money will go into your piggy bank.
2. Paste the box with newspaper (walls and lid), then paste the banknotes. The box for the piggy bank inside can also be pasted over, or you can leave it as it is.
The most important thing remains! Where to throw money? This will require a utility knife.
3. At this stage, you should be extremely careful and attentive. With a knife, you need to cut a rectangular line a little less than 1 cm thick and about 10 cm long. Then you can safely throw both small change and banknotes into such a piggy bank.
If you need to make a piggy bank with your own hands only for small things, then we make the appropriate rectangle.
The piggy bank is pasted over, there is a hole for money in the piggy bank. What is missing?
It lacks a frightening inscription on the piggy bank so that you from there did not steal money.
4. We make an inscription like “Do not steal from yourself”, “Do not touch me”, “Your duty is my enemy”, etc.
5. And, of course, you need to throw money there right away! At least 5 cents!

Decorate the box with paper and ribbons
In addition to newspapers and pictures, there are 100,500 ways to decorate a piggy bank. You can use buttons, rhinestones, ribbons, fabric.
 To decorate this box, we need:
- colored paper (plain and velvet),
- glue,
- scissors,
- hole puncher,
- ribbon (string),
- Pictures.
Making a piggy bank:
1. Take the lid and glue it with velvet paper.
At will, we glue pictures, make applications from them. We glued a flower from plain paper. You can make the same out of fabric.
We decorate the lid and the box completely.
2. Since this is not just a gift box, but a piggy bank, then the lid should not open.
To do this, we make holes (hole punch) along the rim of the box and the lid at the same level. We insert a ribbon or lace into these holes and tie it.
The edges of the tape must be treated with fire so that they do not fray.

Cardboard chest
This chest can be used for various purposes. It can be both a piggy bank and a box, as well as an ordinary element of decor. For the chest we need:
- box,
- scissors,
- cardboard,
- glue,
- acrylic paint,
- paint brush,
- napkins.
The size of the chest directly depends on the size of the box. Therefore, do not foolishly take huge boxes!
So, do:
1. From the box we make the shape of a chest using glue, scissors and cardboard. We make additional walls from cardboard so that the chest has the desired look.
2. We make a hole for money in the lid. This can be done in advance so as not to wrinkle the craft.
3. Additional walls can be pasted over with paper, fabric, wallpaper - to your taste.
5. We cover the box with acrylic paint. In the photo, the piggy bank is covered with black paint. You can also use gold, red colors.
6. Outside, the box can be decorated with completely different techniques. This can be plastic modeling, stained glass painting, carving on cardboard, etc.
The main thing is to cover with acrylic paint. Then the piggy bank will look rich.
7. After the chest has dried, cover with gold paint in special places.
If you cover it with gold over black, the box will look like it is expensive. So it makes sense to do so.
8. Dry the piggy bank and take a picture 🙂

Why is she in the house
Homemade things are generally very good for gifts.
In the 21st century, it's hard to surprise anyone with gifts. After all, all goods are available in stores, online stores, from intermediary friends, etc. Therefore, fashion is returning to DIY crafts.
A piggy bank is such a thing that will never interfere in the house. We very often shake out a trifle from the pockets of a jacket or bag, throwing it on such.
No matter how ridiculous it may seem, but if this little thing is thrown into the piggy bank for an ode, then you can collect a small amount to go to the cinema, bathhouse or Eva.
Some collect so many small things in their pockets that at the end of the year they have enough for such people on underwear from Victoria Secret.
How to behave with her
 There are several rules for keeping a piggy bank, described in the books of Stephen Covey, Bodo Schaefer and other financial experts.
We will describe them briefly especially for YOU:
1. Constantly unload the change into the box.
2. Every day replenish the piggy bank, regardless of the amount.
3. NEVER take money from there before the due time. This time, day, year you choose initially independently. And no matter what happens, you can’t pull from the piggy bank.
You yourself must understand that it will be possible to collect money only if these rules are strictly followed.
Many in childhood had a piggy bank in the form of some animal, more often a pig. It was customary to throw coins of various denominations into it and dream that by filling the fragile calf, wealth would be used to fulfill the most cherished desire. The abundance in stores of materials for all kinds of crafts makes it possible to make such a necessary thing in the household as a do-it-yourself piggy bank.
Cardboard paper chest
The product can also be used not for its intended purpose - to serve as an interior decoration, but to play the role of a jewelry box.
- an unnecessary box of a suitable size;
- scissors;
- glue;
- cardboard;
- acrylic-based paints - blue and gold;
- brush;
- napkins;
- fasteners for connecting the cover to the base;
- paper base or fabric.
Manufacturing steps:
The basis of the bottom and walls of the future chest will be a box, but the lid must be made independently from cardboard, having made a hole for the money.
Attach fasteners to fix the lid on the box and paste over the chest with paper, cloth or wallpaper.
Decorate with napkins and glue, and do not smooth them, but specifically create bumps and roughness. When dry, paint blue.
Cut out stripes from the remaining cardboard, paint with gold paint and decorate the chest as shown in the photo, attaching it with glue.
It is not forbidden to make a lock and attach handles.
Now it’s clear how to make a piggy bank out of paper. The decor is used by anyone and is limited by the flight of the master's imagination.
It is better to paste over the wedding box with a white cloth, mask the joints with an openwork white ribbon and glue a thin ribbon of the same color as the color of the celebration over the entire surface.
Ribbon flowers are used as decoration.


Piggy bank from a jar
A do-it-yourself piggy bank from a jar does not require special skills and abilities. There is a glass quarter in every home, as well as a metal cap for rolling up, so that there is no temptation to stick your hand into the neck and take out the treasured bill.
For manufacturing you will need:
- the bank itself
- metal cover;
- thick paper or cardboard;
- scotch;
- napkins;
- dye;
- scourging;
- stapler;
- glue.
Manufacturing steps:
How to make a piggy bank with your own hands? Roll up the jar with a seamer and make a slot in the lid for coins and banknotes.
Make a frame out of cardboard, securing it with a stapler and tape if necessary.
Crumple the napkins and stick on the container in several layers.
Wait for the design to dry and cover with paint.
Decorate the lid with a twine, gluing it to the glue.
Don't forget to leave a free slot.
Everything, easily and simply managed to make a beautiful stylish thing.


If desired, decorate with marine-themed accessories - shells, pebbles, glass elements, acorn caps, foliage, twigs, etc.
It is not forbidden to simply paste over with newspapers or hand-tied napkins.


Piggy bank for storing money from a plastic bottle
How to make a piggy bank from a water tank? It's simple.
You will need:
- bottle and 4 caps;
- spray paint of any color. When planning to make a pig, use pink;
- toy eyes;
- scissors;
- glue;
- cardboard.
Manufacturing steps:
Shorten the bottle so that the pig is not long, but well-fed.
Cut out the middle part of the container, and put the two halves on top of each other.
Color the future piggy bank, wait until it dries and attach the eyes.
From the remaining plastic or cardboard, cut out the ears and glue them, not forgetting to color them too.
Do the same with the tail, after twisting it, sharply drawing the edge of the scissors.
On the twisting “nose” cover, draw two stripes with a marker - these are the nostrils.
Make a hole in the back for money.
Paint four bottle caps with paint and glue to the body like legs.
Everything, the piggy bank is ready! It is easy to make a larger pig out of a five-liter bottle, and the legs are made not from lids, but from the top of one and a half liter containers.


For those who know how to knit, it is easy to make a case for a bottle or jar in the form of any animal and decorate it accordingly.
There are no prohibitions on the use of plastic containers from under any medicine and vitamins.
Paint with plain paint and apply superhero decor or apply the logo of your favorite series, cartoon character.
Some use their own photographs, the decoupage technique described above, etc.
Knowing how to make a birdhouse for birds, it is easy to build a piggy bank-house by pasting it with paper, painting it with paints and decorating it with flowers.


Another simple and unpretentious option can really be implemented instead of with a child. Take any soft toy, rip it along the seam on the back. Remove the filler without affecting the paws and head, and insert some kind of rigid frame inside, for example, a toilet paper sleeve.


Gently sew up, leaving a slot for money and use it for its intended purpose, collecting the baby for a new bike and other desires.
Everything is in the hands of the master, and there are a lot of ideas for such an original craft!
A very detailed master class on making a piggy bank from a jar using decoupage technique.
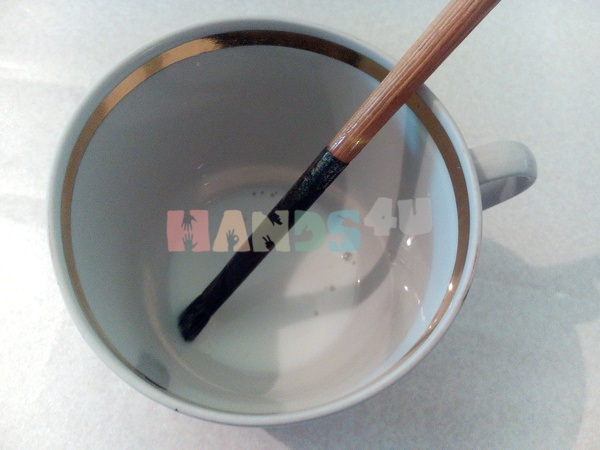
If iron money operates in the country's economy, a piggy bank is an irreplaceable thing! Of course, you can put paper bills into it, but it's not so interesting. You can buy a piggy bank in the store, but it is much more interesting to make it yourself using decoupage technique. To work, you need a glass jar with a lid. If not with a screw, you can roll up the usual one. Also take white acrylic paint, a sponge, PVA glue, a file, a spray bottle with water and a napkin with any pattern.
We make a piggy bank from a jar with our own hands like this
1. From the jar, you need to wash off traces of glue, remove the label, degrease the surface with alcohol. Make a hole in the lid for coins. It is better with the help of a “grinder”, but an ordinary kitchen knife will do.


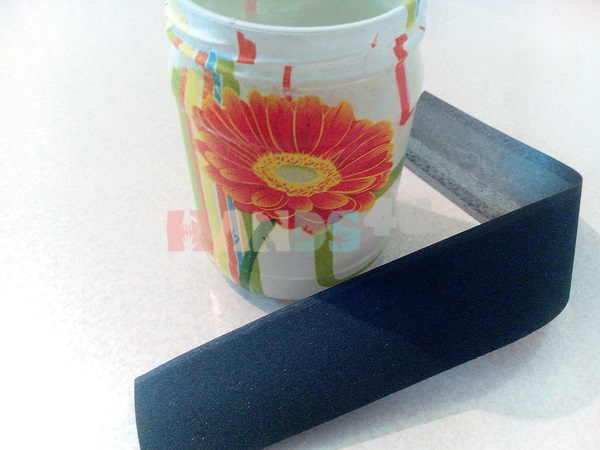
2. We dip the sponge into acrylic paint and apply it on the surface of the jar and lid with “bang” movements. It is important to paint over the entire surface evenly, just make sure that the paint layer is as thin as possible, otherwise it will not dry well. If necessary, you can repeat the procedure 2 times. The main thing is to wait for the paint to dry completely each time! It is optimal to paint the jar and lid in the evening.


3. We pull out the motif you like from the napkin. It is better not to use scissors, but to carefully pull out the drawing, because. the torn edge is less noticeable on the finished product. For torn drawings, we separate the top color layer. Napkins are two-layer or three-layer. We are only interested in the one on which the drawing is applied. Be careful not to tear it.


4. We put the picture on the file “face” down. Irrigate abundantly with water from a spray bottle. Dilute the PVA glue half with water and grease the pattern with the resulting mixture. At this stage, the napkin will increase significantly in size, keep this in mind when gluing the picture.


5. We apply the file with a napkin to the surface of the can and gently press it with our fingers along the perimeter. We separate the file. The pattern should remain on the surface of the jar.

6. With a dry brush, smooth the pattern from the center to the edges. It is important to remove all wrinkles and air bubbles, but do not tear the napkin. If creases or air bubbles still remain on the surface, you can get rid of them in the next step.

7. Let the jar dry completely. You can dry it with a hairdryer, you can leave it by the battery, you can turn on the oven for a short time, then turn it off and leave the jar there until it cools completely. The main thing is that the napkin is completely dry. If any defects remain after drying, remove them with “zero” sandpaper.
8. We cover the jar and the lid with acrylic varnish. You can apply 2 layers, but apply the second only after the first has completely dried. It is important.

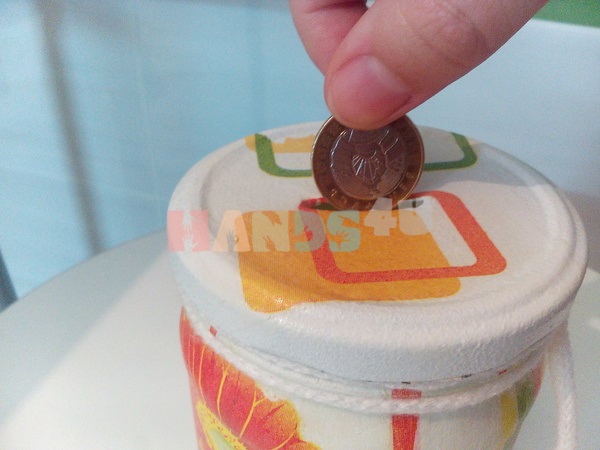
We decorate our jar with a lace. So that the coins do not ring too much and do not damage the jar, you can put a piece of soft cloth or cardboard on the bottom.


The piggy bank is ready! You can collect coins!


Who said that money boxes can only be made of ceramic, wood or metal? Paper is great for this! So, we make a piggy bank out of paper with our own hands in 10 minutes!
Copy and print the piggy bank diagram below. You can come up with any drawing. Or make such a piggy bank using decoupage technique. Then such a piggy bank can be presented as a gift. Just do not forget first, before giving a piggy bank, put a coin in there so that the future owner always has money :)

The small diagram on the left shows how to bend our workpiece.

Other Master classes from the rubric
When does the formidable king of beasts become kind, soft and gentle? Of course, when he is in love! Even his powerful mane fluttered like a fiery heart. The most romantic holiday is approaching, when you can give a heart to everyone who is dear to you. Such a romantic lion can become both a heartfelt gift and a good toy. It is rare when creative people limit themselves to one type of needlework: as a rule, we want to try more and more new types of handicraft. And every beader should know how to make paper: imagine what a sensation you will make if you use handmade paper as a substrate for your jewelry! Such paper can also be used as a postcard: its texture is unique, and there is no way in the world that will allow you to make 2 identical sheets.Few people do not have a piggy bank at home. Someone uses it for its intended purpose and collects small things there, for someone the piggy bank serves as an element of decor. But few people know that the history of this item originates in ancient China, where donations were collected for it. The first prototypes of the modern pig for collecting small things were in the form of an ordinary cup with a lock. On such a piggy bank it was necessarily indicated what the collected funds would go to. Then piggy banks appeared in Russia and in Europe. The piggy bank symbolizes well-being and prosperity among all peoples. So, among the Germans, the wish for wealth sounds like “pig happiness”. Let's try to make such a “pig happiness” with our own hands. There are many ways, following which you can get a very original piggy bank from a jar with your own hands, as well as from a plastic bottle, a cardboard box. Do not count all the options. Let's dwell on the most interesting in our opinion.
Piggy bank from a plastic bottle
You will need:
- plastic bottle;
- spray paint;
- toy eyes;
- scissors and glue.
Operating procedure:
- Cut off the middle part of the plastic bottle.
- Put the lower part on the upper, for better adhesion they can be glued together.
- Paint the craft with spray paint in several layers. The color can be whatever you like.
- When dry, you can glue the eyes. They can be borrowed from some unnecessary toy. Cut out ears from the remaining middle part of the bottle or from cardboard, paint them light pink and glue them on.
- The bottle cap can be painted black with a marker, and you will get quite a nice snout.
- Make a small hole in the top so that you can push change and paper bills through it. This can be done with a knife.
- Pig legs can be made from plastic or bottle caps.
Your piggy bank is ready! You can feed her, and we wish you "pig happiness"
Important! The first piggy bank appeared in medieval England, it was there that the first copies of pigs were released. Well, the Japanese, as always, distinguished themselves and released a kamikaze piggy bank. Its goal is not only to raise money, but also to teach young people to be responsible and punctual. If you do not throw a coin at a certain time, then it will crumble.
Bank piggy bank in the style of Superman or Batman
If your son is a fan of superheroes, you can make a Superman-style piggy bank with him or any other hero that can be easily made from a can. How to make such a superhero piggy bank with your own hands from a jar? Very simple:
- Find a pretty jar with a metal lid.
- Spray paint it several coats in a color suitable for your superhero and let it dry well.
- Cut out an emblem from colored paper or you can simply print the one you need on a color printer.
- Glue the pattern onto the jar.
- Make a hole in the hole of the desired size with a knife.
Making a piggy bank from a glass jar
Take an ordinary glass jar of a suitable size and screw the lid on it. On this cover, make a slot for money. In principle, the do-it-yourself piggy bank from a glass jar is already ready. It remains to decorate it.
For greater originality, we will make a square-shaped piggy bank. For this we need cardboard:
- Cut out two strips of cardboard. One stripe is the width of the can. The second is 1 height + can diagonal + 1 height.
- These two strips must be combined with each other in the place where the bottom of the can will be, and fastened together with a stapler. This is the first blank for the frame.
- We make the second preparation. To do this, put the first blank on the cardboard and circle it, adding 1 cm to the allowances from the sides. It does not need to be made so long, leave 3 cm on each side. Cut out the second piece.
- In the center of the second blank, draw a circle equal to the diameter of the lid and cut it out.
- Now you need to put both blanks on the jar. We put the jar in the center of the first blank and raise the edges, and put the second blank on top of the lid and fasten them together with a stapler.
- For strength, you can fasten the entire structure with tape.
- We dilute PVA glue in water in a ratio of 1 to 1. Cut paper towels into strips. Dip the strips in glue and lay them in waves on the base. Thus, we decorate the jar from all sides, preferably in several layers.
Important! Before applying a new layer, the old one must dry completely.
- Each layer must be painted with acrylic paints. You can choose the color according to your taste.
Important! Paint the first layer with a darker color without gaps. The next layers are painted with lighter tones.
- Now take the “Titan” or “Moment” glue, coat the neck with it and the places where the workpiece ends. Lay a wrapping rope, woolen thread or burlap on the glue in a circle. Using the same glue and rope, decorate the lid.
Important! On the side, you can decorate the piggy bank with bows or buttons or other decorative elements.
Other ways to create piggy banks with your own hands:
- Do you still have empty coffee cans? Do not throw them away, because you can use them to make a piggy bank. How to decorate such a piggy bank? Find on the Internet a beautiful ornament, drawings of flowers or another picture you like and print the picture on a color printer. Cut out the pattern based on the size of the jar and paste over it.
Important! From above, you can decorate the piggy bank additionally with rhinestones, beads, buttons, bows or flowers.
- You can make a box of cardboard and colored threads. Just make a sketch of the box, cut it out of cardboard and fasten all the parts with colored threads. You can download the finished blank from the Internet, print and use as a stencil. Make a hole in the lid for coins.
- Cut the plastic bottle to your desired height and sew a drawstring cover that can be loosened or pulled back on. Put it on top of the bottle. You can put anything inside: money or just small items.
