How to restore a chair with your own hands? Detailed instructions for restoring a chair with wooden armrests Necessary materials and tools
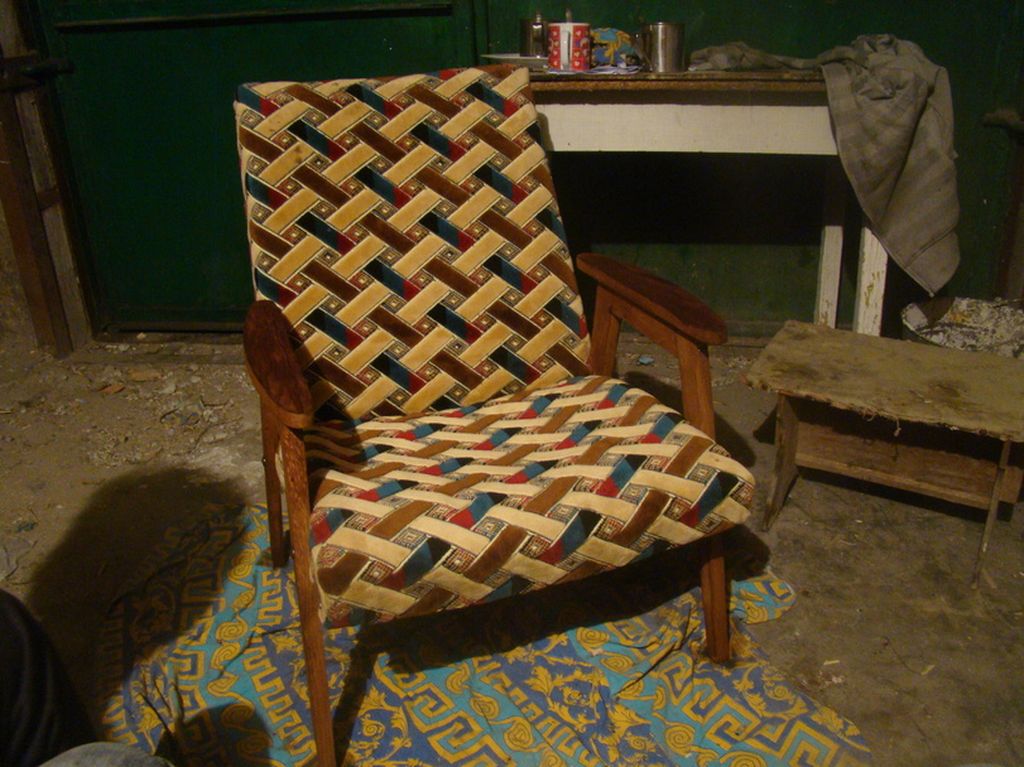
An IKEA shelving unit or grandma's old lamp can be transformed beyond recognition with simple tools at home. The Village begins a story about how to make interior items with your own hands. In the first issue - banner Soviet chair 60s, made by Alexander Kuptsov.
These chairs began to be produced according to GOST in the 1960s. Our two came out around 1968, I think. In the nineties, we already tried to reupholster the chairs using the materials we could find, but over time, the foam inside turned into rusty mastic and began to spill out onto the floor and smudge. For this reason, such chairs are usually thrown into the trash. And we decided to save them, take them apart and see what’s inside.
At the core - wooden frame made of pine and birch, rubberized slings on which foam rubber is laid, backrest on furniture nails made of thin plywood, armrests-legs made of 15 mm plywood, coated with stain and then varnish.
Before buying foam rubber, we thoroughly studied its properties and parameters. We settled on highly elastic HR as the most durable. The most difficult thing was to choose the fabric for the chair, because it is very characteristic, the era can be clearly read from it, not every textile can cope with such a task. We went through about a dozen different options, textures, drawings and chose this one. It seems that the fabric for the chair was just perfect.
Materials
For one chair you will need a piece of fabric 2 by 1.5 meters, 100 mm foam rubber for the seat and 60-80 mm for the back, as well as three meters of 40-50 mm textile sling. Tools: furniture stapler, screwdriver set, pliers, 2.5 cm nails, hammer, scissors.
Instructions
Disassembling the chair
Pulling out the nails
Making a frame from slings
Secure with a stapler
Let's disassemble the chair. We separate the backdrop, unscrew the armrests and legs, and unscrew the crossbars.
Separate the back and seat. They are connected by furniture brackets.
In order not to make a mistake later, be sure to take photos of the disassembled components and places where the fabric is attached. This is important.
Let's get to the worst part - pull out the nails and remove the fabric along with the foam rubber and the old belts.
Frame cleared of foam residues wash with soap and brush and dry.
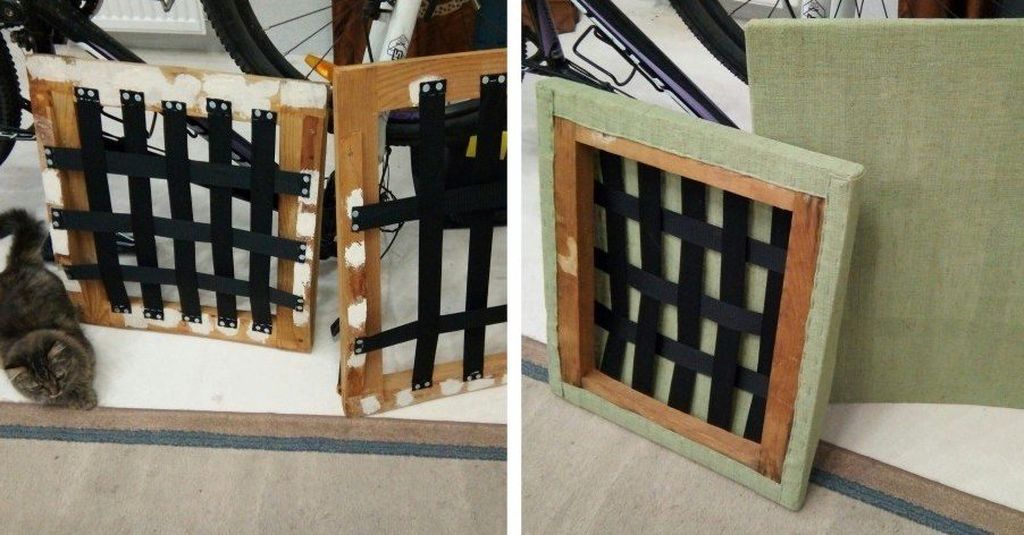
Let's get started installation of a frame made of slings. Measure the pieces a little larger to tuck them. Don't forget to seal the cuts with a lighter. Tension the sling properly so that it does not play.
Over the slings put the fabric, secure with a stapler.
Cutting out the foam rubber. Remember that the foam does not cover the entire frame of the seat and back.
Let's start with the fabric. If the fabric has a pattern, be careful so that the drawing does not move. The backs (front and back) are cut from the first meter, the seat from the second.
When fitting the parts, press down the foam. Secure with a stapler from the center on four sides, tucking the fabric. Do not press with full force, otherwise you will overtighten the chair and it will be uncomfortable to sit. If you apply little pressure, the fabric will wrinkle and wrinkle when used.
In the article I will consider the conditions, and possible options restoration and alteration of the Soviet armchair. I’ll tell you about the features that need to be taken into account when restoring old furniture. I will describe the requirements for the necessary materials and tools. I will consider the types of alteration of an old chair and provide original ideas to update furniture.
Main features of restoring an old chair
The process of restoring damaged furniture is not a partial restoration of parts or replacement of upholstery, it is giving a new look to an old chair, an opportunity to refresh it. Alteration is carried out when the legs are wobbly, the upholstery is worn out, springs are sticking out, or the structure is loose.
The peculiarity of the restoration process is that it is quite difficult to do it yourself, so this matter is entrusted to professionals.
You can partially remake and restore upholstered furniture yourself:
- dismantle the upholstery;
- make a constriction;
- legs are repaired or replaced.
It’s worth trying to restore furniture with your own hands if you have enough experience in furniture repair or if you don’t have enough money for quality materials.
The only downside to restoration is the lack of professionalism in restoration work.
Advantages of restoration at home:
- cost savings;
- the value of the interior item increases;
- the interior is refreshed.
Required materials and tools
First you need to select a set of tools and materials.
You can use a standard set of tools, and a set of brushes and paints for a painter. Unavailable tools are purchased according to the recommendations of the master, so as not to damage the parts during work. Pure wood furniture is sensitive to floors and can dry out.

Required materials and tools:
- chisel, spatula;
- hammer, screwdriver;
- stationery knife, wood glue;
- set of brushes, roller;
- acrylic paints, water-repellent varnish;
- sanding machine, foam rubber;
- stapler, sandpaper, new springs;
- screwdriver, awl, large needles with silk threads.
Main types of modifications and materials
Restoration upholstered furniture, like recovery antique chest of drawers is divided into types that can be combined.
Padding
This method does not affect the restoration of the frame. This is where the upholstery fabric is reupholstered. It is either attached to an old covering, which is not recommended by craftsmen, but it makes the chair look voluminous. Or they change the coating along with the filler.
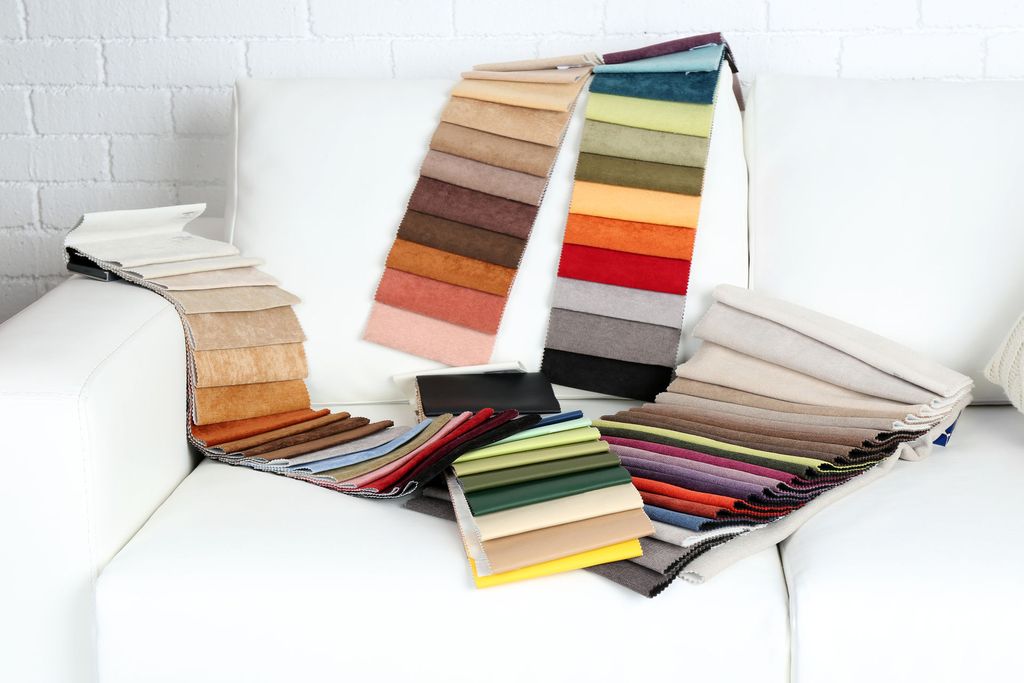
High-quality and durable fabrics:
- velor, corduroy;
- eco-leather, jacquard;
- flock, tapestry;
- microfiber, chenille.
A thick crinoline is suitable for the inner lining of the filling. The density and elasticity of the material will not allow foam rubber and springs to dig into the upper upholstery.
The constriction is done like this:
- analyze chairs, even if there are wooden handles or back;

- unscrew the bolts, which fasten the legs to the frame;
- remove the armrests, disassemble the bottom;
- remove the upholstery from the seat, armrests, backrest;
- the old upholstery is applied to the new fabric, the parts are cut out according to exact parameters;

- foam rubber is cut according to the parameters of the bottom with an addition of 2-3 cm;
- springs are attached to the bottom, then the filler, and the structure is secured with internal upholstery;

- armrests lined with foam rubber and inner fabric, the back is restored like its bottom;
- the details of the cross are attached to the frame, covered with outer fabric.

Re-upholstery is done for the soft version. Furniture with wooden parts is subject to complete repair.
Upholstery
Restoration method for a chair with a rigid base. In appearance, the furniture has clear geometric lines, upholstered in thick fabric with thick foam inside.
To restore you need:
- remove the top covering fabric;
- remove the filler and its fastenings;
- new parts are cut out from old parts;
- the structure is checked for looseness, the damaged frame is replaced or restored;
- on new basis fasten the filler with a stapler, then the upper upholstery.
This method restoration is suitable for chairs with a solid wooden base.

Repair
General view of the restoration work. Combines the process of upholstery, reupholstery and complete replacement basics. The structure is checked for damage, the legs are replaced, and metal mount for strength.
Restore the surface using paints, varnishes, additional tools. This method of restoration is quite complicated; the chair is given to craftsmen to work on.
What components may be needed?
During restoration office chairs or models with mobile wheels need rollers or crosses. To avoid damaging the surface of the laminate or parquet, purchase sets of rollers with mechanical locking.


A master can update the chair more efficiently, but it is possible to restore it yourself. It is necessary to choose high-quality upholstery material. Restoring appearance furniture for the interior of the room. Then there will be no need to purchase new furniture.
Perhaps everyone still has old furniture in their home or country house today - it’s a shame to throw it away, and it looks shabby in a modern interior. But this problem is very easy to solve, just use your imagination. This review contains great and easy to implement ideas that will help you become a real furniture wizard.
1. Sofa in the hallway

A small homemade mattress or soft furniture pad and a pair sofa cushions will allow us to turn old cabinet into a comfortable and functional sofa with storage space for shoes, which will fit perfectly into the interior of the hallway.
2. Refreshed sofa

Upholstering the cushions of an old sofa and painting its elements will allow you to breathe life into an old shabby piece of furniture and turn it into stylish detail living room.
3. Table

Transform desk Soviet era white paint, a few decorative moldings and new fittings. First of all, you need to disassemble the table, clean its parts from varnish coating or paint, stick to pull-out cabinets moldings, after which all elements should be carefully painted in white and screw on the handles.
4. Bright cabinet

Minor alteration and neat painting old wooden bedside table not only will they refresh it appearance, but will also turn it into a spectacular interior detail.
5. Kitchenette

An eye-catching TV stand can be turned into a children's kitchen, which the growing housewife will surely like and will fit perfectly into the interior of the playroom.
6. Buffet

Do not rush to get rid of a bulky and, at first glance, completely inappropriate buffet. New color and slate stickers on the doors will turn it into a stylish and modern item furniture that fits perfectly into the interior modern kitchen.
7. Bright chairs

Careful painting and new bright upholstery will transform old shabby chairs that you didn’t even want to look at before beyond recognition.
8. Pencil case for toys

A boring narrow pencil case is an excellent basis for creating a bright, spacious rack for children's toys. To transform it you will need white paint and bright color, as well as wide decorative molding.
9. Bookshelf

Amazing transformation of a completely useless vintage radio into a bright one bookshelf, which was realized using a roll of colorful self-adhesive paper.
10. Banquette

An old cabinet, painted in a light shade that refreshes its appearance, complemented by a soft quilted seat, will become a stylish and functional detail in a modern hallway.
11. Sideboard in a new way

White paint and replacement of wooden sashes with bright curtains allowed us to breathe life into an old sideboard that we previously wanted to throw in the trash.
12. Elegant sofa

White paint and new upholstery allowed to breathe new life into an interesting but outdated sofa.
13. Shelving

Old wooden doors Can be used to create creative shelving for books and decorative items.
14. Fireplace

Fantastic transformation of a Soviet locker into decorative fireplace, which will become a unique detail in a city apartment or the living room of a country house.
15. Decoupage cabinet

White paint and simple pictures using the decoupage technique will help to transform an old, nondescript cabinet. The updated cabinet will fit perfectly into the interior of a modern kitchen and will become its unique detail.
Video bonus:
16. Table

Legs painted and new glass table top allowed us to turn the stand into an antique one sewing machine in a very original table.
17. Patchwork style chairs

New upholstery in the now popular patchwork style and painting of some elements made it possible not only to update the old chairs, but also to turn them into ultra-fashionable interior items.
18. Decorated chest of drawers

A little effort, imagination and bright colors will allow you to turn your grandmother's vintage chest of drawers into a bright piece of furniture, which will become a spectacular interior detail and something to wow all your guests.
Video bonus:
Summer is such a time that your hands are itching to redo something, repaint it, screw it on. And if you also like this process, and if you are in love with this business, then in general there is no price for such a pastime!
I haven’t done any master classes for a long time, all because I personally didn’t redo anything for myself this year. And at the dacha everything is ahead. There is a Soviet table waiting for me, a pre-war table, a TV stand... a sofa, armchairs... oooh... there will be enough work for a hundred years to come :). And today I’m talking about a cool transformation of an old Soviet chair from my designer colleague and friend Elena Andrianova.
The desire to update the interior sometimes comes suddenly. For some people, this comes to life by going to a showroom for new furniture, and for others, by going to a paint and varnish store. It’s just that sometimes we think that the old chair has already served its purpose and its place is, at best, in the attic of the dacha, and at worst, in the trash heap. Everyone is tired of it and does not fit into your DREAM HOME.
Interior designer Elena Andrianova from Stavropol proves that even in the most modern interior you can fit in a “good old” chair - you just need to give it a NEW LIFE!
Let's meet and greet a cool remake of a Soviet chair from designer Elena Andrianova.
 Elena Andrianova
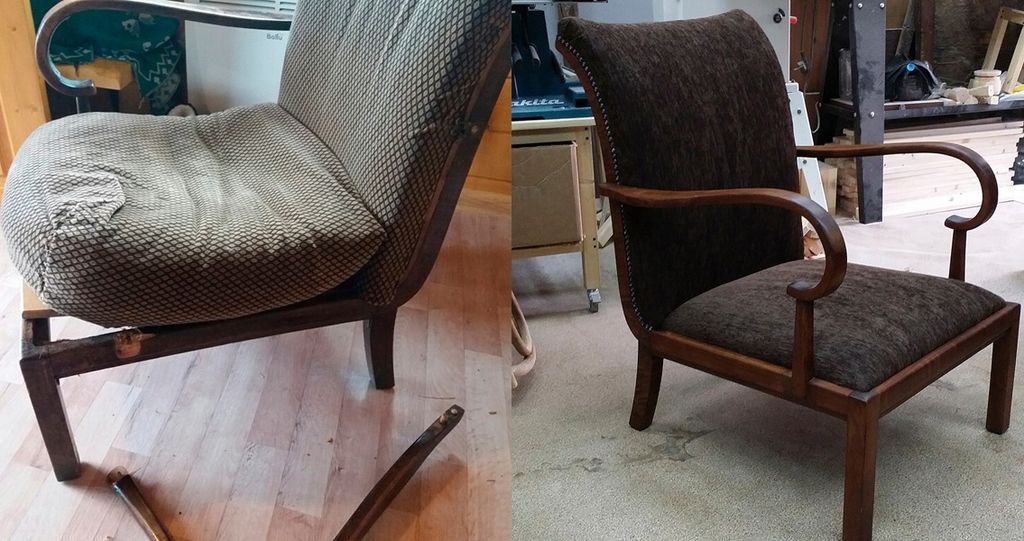
 “Making and remodeling furniture has been my hobby since childhood. First for the dolls, now for myself. I got this pair of chairs from my grandmother. They were part of a large Yugoslav set from the mid-70s of the last century, but were in very good condition. Their shape captured my heart and I decided to carefully restore them rather than completely remodel them. I returned the chairs to their beautiful dark walnut color, changed the fabric and now they decorate the living room of my house.”
The original frame of the chairs was made of beech, tinted “dark walnut” and covered with semi-gloss transparent varnish, which was lost over time on the armrests and slightly in other places.
Pillows in non-removable covers, slightly squashed. The chair was in good condition, all connections were strong, nothing was loose, did not dangle, did not creak. Therefore, I decided not to disassemble it, but to restore it as an assembly.

 I sanded only in those places where it was necessary, due to the loss or damage of the old varnish layer. All sanding was done by hand. sandpaper varying degrees graininess. After sanding, I carefully removed all the dust from the chair with a damp cloth and let it dry.


The varnish I used was Unika Super alkyd (Tikkurila), semi-gloss, tinted in color 3443. This varnish adhered very well to old varnish, without preliminary sanding and priming. I applied 4 to 7 layers of new varnish to the sanded areas to achieve desired color. On well-preserved areas of the old coating of the chair frame, I applied 2 layers of varnish. I used the polish exactly according to the instructions.


To make the pillow a little thicker, I used 2 cm foam rubber, fixing it with silicone glue on old pillow in several places. Due to ergonomics, the thickness of the pillows cannot be increased very much. Then she tightly covered it with a padding polyester cover on lining fabric.
“Furniture from the 60s-70s is at the peak of popularity today. Why? It's probably simple. How can they not like it? natural wood, light shapes, laconic design, ergonomics and practicality? This furniture is so compact and comfortable, you can’t help but fall in love with it! Elena Andrianova”


I needed a smooth sliding surface of the pillows, because... I wanted to make the decorative cover removable and it should be easy to take off and put on.
And to make it easier to pull a tight synthetic padding cover onto a foam pillow, you need to have a layer of cellophane between these two materials clinging to each other (I took a regular bag and cut the bottom).


After the synthetic padding cover is put on, the cellophane layer is removed (just pull the bag out by the handles).
The result is “tight” pillows. Decorative covers are made from upholstery fabric Genova matting from Panorama Decor - jacquard with woven fabric made from two threads of different colors. Color genova-12. Dense fabric with a high abrasion coefficient.
This is the kind of work that was done that brought life back to a beautiful piece of furniture!


And chairs), which became unusable over time. “It’s a shame to throw it away, and there’s not always enough money to buy a new one,” many people are immediately upset about this, without even suspecting that old furniture can be restored, restored. As an example, in this article we will reupholster an old chair with our own hands.
Let's move from words to action. In order to restore an old chair, we will need the following tools:
- Hammer, pliers, screwdriver (flat),
- Manual stapler, staples from 4 to 6 mm, scissors,
- Wide sling (textile),
- Foam rubber, batting, synthetic winterizer,
- Fabric (1.5 – 2 m),
- PVA glue, gauze.
Disassembling the chair
Before you start working, you need to disassemble the old chair and see what's inside.
As a rule, it is a wooden frame, foam rubber on the back and seat. It is held in place by rubber or textile slings.
Also included in the components are legs and armrests (polished or fabric-look). The back wall of the chair is secured with plywood. That's probably all.
After parsing:
- We determine what needs to be replaced. We carefully knock out all tenon parts with a rubber hammer so as not to damage the edges and preserve the polish.
- Using a scalpel or a knife with a thin tip, we clean the grooves so that there are no glue residues inside.
- We coat the tenon parts with PVA glue, and then wrap the bandage directly onto the tenon.
- We carefully hammer everything into place and wait a day for it to dry completely.
Do-it-yourself chair reupholstery
Let's take a step-by-step look at the process of reupholstering a chair
Replacing foam rubber
The next stage of do-it-yourself chair restoration will be replacing the foam rubber. List of brands used in furniture production:

- EL – has a medium degree of hardness,
- HS – soft type,
- HL – super hard,
- HR – low degree of rigidity, most often used in the manufacture of upholstered furniture.
In our case, HR is the best option.
It is best to cut foam rubber with a knife with a long blade sharpened on an abrasive stone. We cut in several stages.

Replacing passes (belts)
After we have decided on the foam rubber, we check the passes. They can be made of rubber or thick canvas fabric.

They are fixed on wooden frame with the help of nails, in rare cases they are broken through with staples.
We remove the old belts, measure their length and, with a little tension, replace them with new ones. The edges of the belt must be folded (folded at least in two). In this position they will last a long time and will not stretch under heavy weight.

The straps are tight, now you need to secure the foam. We coat the passes with foam glue and carefully adjust the seat first, and then the back.
After we have the frame ready, we proceed to choosing the fabric.
Chair upholstery with fabric
Today textile industry offers a wide range of fabrics for chair repair and upholstery.
Fabric for upholstery:

You need to remember one simple truth: if the fabric has a pattern or abstraction, you need to make sure that the image does not move during the pattern.
We cut out the front and back parts of the backrest from the first meter of fabric, and the seat from the remainder.
Having made the cut, we need to check whether we have maintained the dimensions correctly by covering the seat with a cut piece of fabric. Having set the angles correctly as shown in the figure, we begin to “shoot” our cover to the frame of the chair.
We fix the rest of the fabric with staples, and make sure to pull it towards ourselves.

The corners can be sewn by machine or, if not essential, by hand, using a fine seam.
At the moment of fixing the cover to the frame, we punch the staples at intervals of 3-4 cm. If these are nails with a wide head, then the distance should be slightly less.

Once we have changed the seat upholstery, we do the same with the backrest.
You should always remember that restoring a chair with your own hands always requires consistency in work, as well as attention.
When removing each of the parts, you need to remember where and how it stood. Some craftsmen use a camera for such purposes.
Restoration of frame parts
The concept of “restoration” includes not only reupholstery, but also restoration of the wooden parts of the chair. After time has passed decorative details(armrests, turned elements, curly legs chairs) become unusable, that is, they become dull, the varnish surface wears off, and small cracks appear on the furniture frame.
What can be done in this case?
To solve this problem we will need:
- Sandpaper,
- Scraper,
- Blade from a stationery knife.
- Varnish, stain.
Every part needs to be sanded. You need to start with coarse grains, gradually moving to smaller ones.
Sanding should only be done in the direction of the grain. If you make movements against the grain, the varnish will definitely show transverse lines.

Many master restorers use drill with special sanding drums. They happen different widths and lengths, very convenient for grinding in hard-to-reach places.
- After the parts have been sanded, carefully remove the dust with a damp cloth or foam sponge.
- Apply nitro varnish with a soft brush until completely dry.
- After the varnish has dried, you can run your hand over the surface and feel how the pile rises. Using the finest sandpaper, we carefully “knock down” the raised fibers, that is, we make the surface smooth.
- Then you can apply a stain (alcohol, water or white spirit based) and only then cover it with any commercially available varnish.
Video: DIY restoration of an old chair
That's all the wisdom - how to easily and efficiently restore a chair at home.
Good luck to all masters!
