Attaching a tray in an outdoor shower. How to install a shower tray - options from different materials. Video: installation of an acrylic pallet
Photo: at the request of Yandex and Google
When renovating a bathroom, we, first of all, replace the finishing materials of walls, floors and ceilings, as well as update plumbing. If your room is not spacious enough to install a large bathroom in it, then you can significantly “save” space with the help of a shower. This article will discuss how to make a pallet design yourself.
Varieties of shower trays by materials
Pallet- this is the basis for our shower cabin, which means it must be made of really durable materials. They can be classified like this:
- from cast iron. Such pallets are one of the strongest and most durable. Among the minuses - a very large weight, long warm-up and high price.

- of steel. Very light, inexpensive and quite durable. However, such pallets have very fragile enamel and low sound insulation.

- from ceramics. These pallets are very attractive and easy to operate. But they usually don't have legs and are very fragile.

- from artificial stone. You will definitely be attracted by the surface texture of such a pallet, however, low thermal conductivity, high price and heavy weight can push you away from the purchase.

- from acrylic. Practical, light, beautiful, well absorb noise. There is only one drawback of such pallets: they are prone to damage and deformation.

- from wood. Suitable for cottage or country house. Environmentally friendly material, however, will last no more than three to four years.

- from plastic. A very budget and short-lived option that we would not recommend for an apartment or house: rather, for a summer shower.
How to make a shower tray with your own hands: step by step instructions
For convenience, we propose to divide the whole process into several stages. The first, important, is the preparation of all the materials necessary for work. So, you will need:
- Ladder, in other words, a drain system.
- Several concrete blocks or bricks (your choice).
- Some sand and cement. It is also desirable to have plasticizers.
- Roofing material or a couple of sheets of plastic film, a little water-repellent mastic.
- Among the finishing materials - mosaic tiles or tiles (at your discretion).
- Tile grout and good glue.


Now about tools:
- A small bucket in which we will knead the solution.
- Mixer.
- Trowel (construction trowel).
- Laser or water level.
- Perforator, drill, several screwdrivers of different sizes.
- Spatulas and roller.


Stage 1. Run a screed under the shower tray. First, the surface should be thoroughly cleaned of the remnants of old tiles, dust and dirt. Now primed in two layers. As for the primer, it is better that it is moisture resistant. After the soil has dried, the shower tray is waterproofed. To do this, it must be smeared with special mastic (especially carefully handle the corners). Then a plastic film is laid on the floor (preferably a couple of layers). As soon as the mastic dries, you can pour the cement screed. As for the thickness of the screed, it should be about five to eight centimeters.
Advice! When you lay the film, try not to exclude air gaps. If there are any, there will be no effect from waterproofing. 
Stage 2. Install a shower drain and drain pipes, make a neck for water to drain. Before installing a drain ladder, you need to bring a sewer pipe to the place of water flow (the ladder is connected to it). Pay attention to the installation height: the slope must be at least three degrees. Fix it well with a cement-sand mortar. This stage is very important, because if you loosely fasten the drain and its structure moves during subsequent work, in the future the pallet will leak inside. As a result, the entire system will have to be disassembled. 


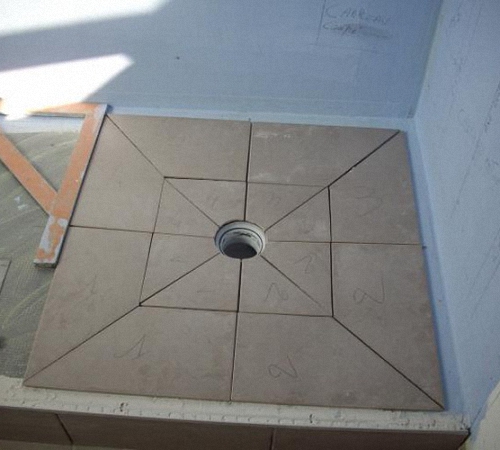
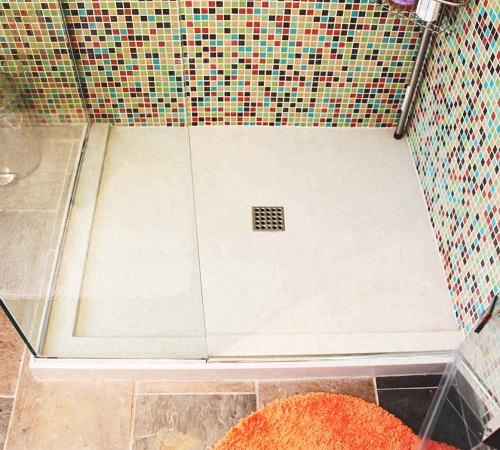
Stage 3. Lay out the sides of the shower tray with bricks. After the waterproofing together with the drain are installed, we can form the shower tray directly. The sides around the perimeter of the pallet are made of brick. First, the shape of the future pallet is drawn up (about what forms of pallets are shown in the photo above). Marking is done on the floor with a simple marker. According to the marking, we lay out our brick side using a cement-sand mortar.
Advice! The proportion of the solution should be the same as for the screed: one to two. As for the height of the side, it should be close to the level of the lattice of our ladder - plus twelve to fifteen centimeters. So water will not flow onto the bathroom floor.
Stage 4. Filling of the basis for shower cabins. Again, we use cement, in which it is worth adding a little special hydro-repellent agent, for example, liquid glass. First you need to fill the layer up to the ladder (horizontal). Once it dries, install some special beacons (stucco beacon rails). Thanks to this, you will form the correct inclined plane.
Advice! Before pouring the base, make sure that the overlap is solid. After all, the concrete base of the shower tray is quite thick and, accordingly, weighs a lot. 
Stage 5. Pallet waterproofing. It would be useful to make another layer of waterproofing. Now on the completed design of our pallet. We coat the base with mastic, as well as the outer and inner sides. It is best to apply two coats. Now we can safely call the isolation reliable.
Stage 6. Shower tray cladding, decoration. After the water-repellent mastic dries, cover the pallet with cement plaster. Special attention is paid to the processing of the seams of the shower tray. Please note that the selected plaster must have increased resistance to moisture. It is also mandatory to use a plaster mesh with a small cell. So the layer of plaster will lie more firmly.
As soon as the surface dries, we begin to prime it with a moisture-resistant primer (several times). Once the primer is dry, you can start working on the decor. Congratulations, your DIY shower tray is ready!

Do you know how to make a shower tray? Share with our users in the comments below the article!
If you do not have the time or desire to make a shower tray with your own hands, then welcome to our catalog: you will find dozens of stylish and high-quality options from trusted sellers.
You may also be interested in:
The process of installing a shower cabin provides for the mandatory fixation of the pallet, without which it is impossible to fix the cabin, as well as equip it with doors.
Do not install the shower cabin without first fixing the palletTrying to avoid this procedure, some prefer to purchase pre-assembled units, not taking into account important nuances, for example, how to transport a bulky device, and whether it will pass through the entrance and interior doors of an apartment or house.
Installing a shower tray on site is also preferred by those who doubt that the device will fit into the overall design concept and are considering possible options for using non-standard materials.
To this end, you can seek help from specialists, or independently learn how to install a shower tray, and thereby save part of the family budget.
How to choose a pallet
What are pallets
Most often shower enclosures with pallets, limited area. The shower room can be equipped with many functions - hydromassage. The equipment is in demand due to the wide price range in which the cabins are presented.
A large amount of money will have to be paid for a pallet made of marble, however, in the absence of skills in working with the material, even at the installation phase of the device, it may crack. From the point of view of the design component, ceramics wins favorably compared to other samples, but it is considered the most fragile and unreliable. At the same time, the price of such models is kept at a fairly high level.

When choosing a pallet for self-assembly, craftsmen are advised to pay attention to devices made of acrylic or steel. It is these products that can be found today in the construction market in 85% of cases.

While you may find that the acrylic tray sags a little under the weight when using an acrylic tray, this deficiency can be easily removed with adjustable legs, building brackets, and other special fasteners.

If this nuance is not eliminated in time, the product may crack. Therefore, when purchasing this model, immediately discuss with the seller the issue of selecting the appropriate additional equipment stand.
Choose a manufacturer
Even if the pallet is marked with a well-known foreign brand, specify where the structures are assembled, in most cases foreign parts are assembled by Chinese craftsmen. Therefore, do not chase after a foreign device, practice shows that in recent years, domestic manufacturers, wanting to gain competitive advantages, produce plumbing at the proper level.
Of course, we are still far from Italian and German brands, but with economy class models, the Russian manufacturer can compete with success, and the cost of the latter pleasantly pleases the wallet.
Installation of an acrylic shower tray
Preparatory stage
The pallet is installed in the place allotted for it after all repairs in the bathroom have already been completed. We are talking not only about finishing the walls with ceramic tiles, no problems should arise, first of all, with sewerage and electrical wiring. After all, almost all shower fixtures are connected to all available communication systems.
Ideally, the electrical wiring hidden in the wall should contain the smallest number of "twists". For water supply and its removal, it is better to use pipes made of plastic, which has established itself as the most reliable, plastic and high-quality material.
Before starting work, carefully read the step-by-step instructions for the device, and also determine the proper number of parts.
Features of the installation stage
The following tools will help you make a shower tray:
- FUM tape;
- silicone-based sealant, which can be replaced with an adhesive if it is included with the main product;
- mixer and siphon.
If you plan to place the pallet on the legs, they are fixed with locking bolts. Instead of legs, ordinary bricks or supports made of plastic can be used, which are poured with a cement mixture at a height slightly higher than the height of the drain. If this nuance is not taken into account, the flow regime may be violated.
 Precise fixation of the pallet is important
 Next, glue the base base of the device to the wall structure of the room. If there is no special tool in the kit, Moment glue is suitable, connecting objects in contact with moisture.
Apply a sealant to the seam between the pan and sealant, this will help prevent liquid from penetrating into the joints formed.

Attach the faucet to the drain hole in accordance with the scheme stated in the instructions. To protect the device from leakage, seal the screwed parts using a FUM tape, turn on a small pressure of water and check the device for leaks by carefully examining each section of the unit with your finger.
Self-manufacturing of the base
How to prepare the sewer and lay out the barrier?
It is not necessary to buy a pallet in a store; if desired, you can equip it with your own hands. Having learned how to install plumbing, the rest of the repair in the rooms and attic will seem like a mere trifle to you.
The procedure begins with waterproofing a homemade shower at a height of about 30 cm. Prepare for work sealant, fiber rubber or other products presented in a wide range in the hardware store. Well, if the sewer pipe is located in the center of the future pallet, this simplifies the creation of a drain.
Make sure that the parts adjacent to the sewer are well glued, make sure that there are no cracks or crevices that provoke fluid leakage. The nozzle at the outlet should rise 12-15 cm above the base of the floor covering. To prevent the part from becoming clogged with debris and dirt, tightly close the nozzle.

To put a shower tray, lay out a barrier along its edge - a border corresponding to the walls of the planned shower cabin. The height of the “fence” must exceed the level of the nozzle by at least 5 cm.
Smooth out sharp corners from the brick with cement mortar. The mixture can be kneaded by adding cement and sand in a 1: 1 ratio to a basin or bucket. Stir the resulting mass with a trowel, additionally pour in liquid glass, which will provide the solution with water-repellent characteristics.
Filling the bottom
It's time to move on to pouring the floor, which includes three stages of execution. First, use a cement mixture marked “self-leveling” on the package, the mass layer should reach 5–8 cm. Wait for the material to dry and apply waterproofing, it can be “Fiberpool”, “Decoprof”, for better effect, apply the product in 2 layers.

When this material hardens, mix the adhesive designed to adhere the tiles to the surfaces with the cement mixture. Apply the mass in concentric circles, maintaining the technology of increasing the height starting from the drain hole. This work is jewelry and does not tolerate haste. It is necessary to ensure a uniform radius of curvature; a sharp drop under the finish cannot be hidden.
Now grout the cement coating, your goal is to achieve a smooth plane and the same level of height.
Floor finish
If you decide to mount the shower tray at an angle, the floor finish is better, which will hide all visible imperfections. Glass mosaic, which is produced specifically for bathrooms, has a number of properties that distinguish it from other types of mosaics, for example, it has anti-slip characteristics and does not lose color saturation and shades over time. Of course, working with small elements is harder than with tiles, but the end result will please you.

After the repair work is completed and the shower cabin is installed, wait a few days and enjoy your own creation already inside the structure.
Conclusion
When getting started, remember that incorrect installation of the shower tray can lead to the gradual destruction of the base, which means that everything will have to be redone.
When installing a structure that rises above the floor surface, professionals advise to build a comfortable step that will protect you and your household from falls and injuries.
Previously, shower trays were sold without support, without legs, but today such cabins are out of fashion. Modern designs are so simple that everyone can do all the operations with their own hands. Installing a shower tray has become a really easy task.
We recommend that you research the issue before buying. This is mostly impossible without a visit to the store, but reading articles like this one will give you a clear idea of how to install a shower tray yourself.
Pallet structures
Shower cabins today are equipped with four types of pallets:
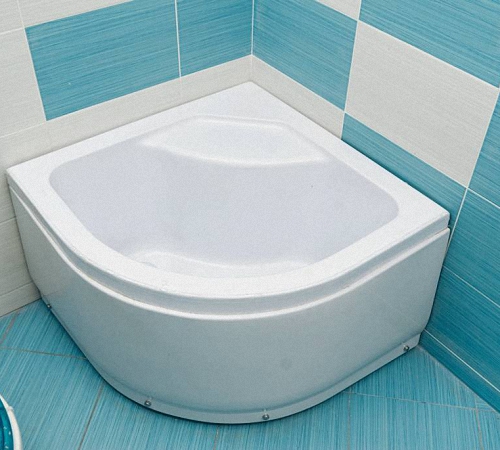
- Deep ones are so called for the reason that some of them are only slightly inferior to the bath in terms of the height of their sides. A powerful frame supports their bottom from below, relying on six height-adjustable legs.
- Small pallets are more often called low. They are completely flat with a few exceptions. In the modern version, they are placed on 5 legs, but you can still get a completely bare "shell", for which a foundation is required.
- Pallets made of artificial stone and ceramics stand in a completely separate line. In all previous cases, there is free space under the bottom for mounting a siphon, and in this case we have a plate with a drain hole in the center.
- Cast iron is much less common than steel, and often confused, but has won recognition for its durability at an affordable price. They are both deep and shallow, but complete cabins are sold extremely rarely. Cast iron pallets have to be purchased separately.
It is clear that thin-walled pallets do not suffer durability. This is explained by the fact that they constantly suffer mechanical deformations: from temperature changes, from the feet of bathers and from other reasons. Thin-walled pallets are made of plastic with fiberglass reinforcement, ABS and steel. Each of these materials is deformable and has its drawbacks:
- The steel is painted and the coating peels off easily. A metal pallet must have a properly equipped frame. For example, in the form of a solid brick foundation.
- Acrylic pallets have failed to circumvent the same shortcomings. But over time, it not only bends, but also begins to break. About which there are plenty of videos on YouTube.
In addition to these features, it should be noted that steel rusts. As soon as the protective coating of enamel peels off, the metal will immediately begin to oxidize. This is all the worse because the process can go completely unnoticed by the owner. So one day a through hole will appear on the steel. Acrylic is not afraid of moisture, sunlight, mold, but over time, like any plastic, it loses strength. When buying, the consumer participates in the lottery: lucky or not (high-quality polymer or the first one).
As for the cabin with a pallet made of artificial stone or ceramic, this is the most profitable option. Both materials have proven themselves throughout human history. An additional plus is that the slabs are completely flat, they fit well on any suitable pedestal foundation. And IDO cabs compare favorably with the fact that instead of legs they ride on rollers. Due to which the structure can be moved around the room within certain limits (if there are flexible connections and a siphon). But you don’t need to put it on bricks - no matter how it falls.

Cast iron is good because it does not rust. The walls of the pallet are noticeably thicker (by an order of magnitude), so the pallet is very durable. Among all varieties, cast iron is the most durable.
Foundation structures
At first glance, it seems that the cabins do not need a foundation. It is enough to adjust the legs to start using the product. But actually it is not. The pallet height factor comes into play. The drain hole must necessarily be above the sewer outlet. So that the drain safely leaves the pallet.
Frame, foundation in most cases are not needed. But it should be noted that most of the products are specially designed so that over time, replacement is required. Of course, we want to avoid this for as long as possible. The design shows 100% exactly what can go wrong.
Needed or not?
As a rule, the need to build a foundation is determined instantly. To do this, it is enough to measure the level of the sewer pipe. The drain hole of the pan should be slightly higher. The bigger the difference, the better the stock. Usually a slope of 3 centimeters per meter of distance (pipe path) is considered sufficient, but in practice there may be other ratios, and the water will still leave well.
Below the pallet, there is usually a place for placing a siphon, so no design solutions are provided in the foundation for the drain. I would like to draw the attention of readers that in high (deep) pallets, the drain is not too high. Because most of the vertical goes to the formation of walls. No wonder this tray is called deep: you can wash, wash children in it. There is often a seat in the corner.

A deep pallet in 90% of cases has a strong frame made of a metal profile. At first glance, this is good, but in practice it turns out that the foot pushes the pallet between the guides. And since over time the plastic becomes brittle, this is just enough for a crack to appear. That is why sometimes deep pallets are placed on the foundation. As for the small ones, this is prescribed for them from birth: a thin flat bottom breaks perfectly, as many owners were convinced of. The effect does not appear at the very beginning, but is greatly aggravated over time.
brick foundation
Many do not think long about solving the problem of building a foundation. The traditional brick helps to solve the problem. For a ceramic tray, this is a great solution, but you need to leave room for a siphon. Properly executed foundation greatly extends the life of the pallet. Much depends on how tightly the bottom is attached to the pedestal. Ideally, any deformations are excluded.
The problem is this. Previously, many put a flat pallet without a foundation, or in such a way that only the perimeter rested on the bricks. As a result, the statistics of broken pallets replenished at an incredible rate. Manufacturers quickly noticed this and corrected the matter by adding a fifth leg in the center: this is such a plastic tubercle where a threaded rod is embedded. It's almost impossible to remove it. You yourself understand that a flat foundation is no longer suitable here, you need to leave a gap under this “fifth leg”.

Bricks are quite versatile. So, for example, on the bend of the perimeter, they are laid out like a fan outward with bonded faces. The free space is filled with mortar. This scheme is often used for an acrylic pallet. It is important to leave room for leak control here. It will be in vain to think that concrete will stop moisture on the way to the neighbors. Need special measures for waterproofing the floor. And in any case, dryness needs to be controlled somehow.
An example of a brick foundation for a ceramic pallet
The ceramic tray looks fragile, but can last for decades. Here is a base case for this case. We proceed from the fact that the frame for this type of pallet is made only along the perimeter, which gives very wide prospects in terms of control.
- It is necessary to lay out the bricks to the desired height along two walls and one sidewall.
- The front part is used to access the siphon and control leaks. You can close it with a decorative panel.
In case of big worries, place the pallet on two rows of bricks, in one of which there is a hole for control access and dismantling (if necessary). It is not necessary to mount tightly, because no one does. Instead, on three sides, a sanitary corner is laid between the tile and the pallet, mounted on silicone sealant. If you want to hang the curtain from the sides, leave small protrusions along the width of the brick row. Place the board there and bring the threshold to the desired height.
This is necessary in cases where the corner is homemade and curtained. Then there is a certain reserve for the mobile matter, so that it does not crawl out, and the water does not flow onto the floor. There are some other options as well.
A metal tube frame is often placed under a purchased ceramic pallet. It covers only the perimeter. For this type of construction, this is quite a suitable solution, if the weight of the entire cabin does not press from above. So, for example, Leroy Merlin reports that the mass of a pallet is only 3 kg. The frame is good if the cabin weighs a little. For obvious reasons, the threshold in this case is much more difficult to organize.
Foundation for acrylic pallet
It was written above that the acrylic pallet has legs. So the instructions for building the foundation are as simple as possible: this is a flat stand where the cabin supports rest. Installation of the shower tray consists in attaching it to the sewerage system and adjusting the height of the legs. It is not difficult to do this correctly, having a building level in hand, so we see no need to describe the process itself.
Few acrylic pallets today come without legs, but if this is the case, then you need to do the following:
- There is a slight depression around the perimeter as the center of the pallet is slightly higher.
- For metal (not acrylic), an extruded polystyrene plate is sometimes placed in the middle to provide thermal insulation for the area.
- Fastening is carried out on adhesive-sealant, so that if necessary, the pallet can be replaced.
The problem is that most flat pallets are placed on legs. In this case, their bottom is defenseless before the feet of users. Alternatively, you can fix the removable formwork and pour concrete, where, after a certain period, mount the pallet. The complexity of the operation lies in connecting the siphon, and the minus is the inability to control leaks or change the sewer.
stone pallets
The easiest way to correctly install this particular type of pallets. No frame is required, but a foundation is needed in all cases. The stone pallet is very low. It would be a mistake to fix the slab too tightly, because someday it will be the turn of the repair, and tearing off the slab will be almost impossible. That's right - just grab around the perimeter with glue-sealant.
The biggest problem in this case is with the siphon. Obviously, you need to equip it directly on the surface of the foundation (floor), or attach a flexible one, which, as it is fine-tuned, will hide in a niche prepared in advance. In the latter case, the foundation becomes a real work of art, because it would be nice to find the ability to control leaks. No single instruction can be given here.
Cast iron pallet
This type of pallet does not require installation. Just placed on the floor. He doesn't need a frame, he doesn't need a podium. Own height is quite enough to ensure reliable drainage into the sewer.
The bathroom is the place where everyone starts and ends their day. Therefore, it is important that you feel as comfortable as possible there. But not all people have enough time and energy to take a bath, and do-it-yourself installation of a shower tray becomes relevant. This is better than calling a brigade - both cheaper and more reliable, since real craftsmen are now worth their weight in gold.
TYPES OF SHOWER TRAYS
Recently, showers and corners are gaining immense popularity. And even if there is a bath, many still seek to install an additional shower.
This makes it possible to functionally use the space in the room, receiving not only the usual flow of water for washing, but also massage, aromatherapy, musical accompaniment, etc. The modern plumbing market presents a wide selection of shower trays of various shapes and sizes. But how to choose the right shower tray this article will help you.
The most durable, durable and expensive are pallets made of marble and cast iron. Everyone else follows them.
But the most popular, affordable and durable are pallets made of plastic or acrylic. They can sag under weight, so during installation, you need to take this nuance into account and install the pallet on a frame or adjustable legs.

Ceramic structures are particularly beautiful, but they are not resistant to mechanical damage. When choosing, you need to pay special attention to the pallet. If it is not durable, it will not last long, regardless of whether you install it yourself or hire specialists. Each of the materials has a number of advantages and disadvantages, and it is difficult to say which one will be better.
The most popular plumbing in recent years is acrylic. Sturdy, beautiful and affordable .
If there are only legs in the base of your chosen pallet, then you yourself will have to prepare the basis for the future shower stall. This will require a metal pipe of the desired size and a rubber gasket. Thus, with the help of almost improvised means, you can create a durable mount for a shower stall. Shower trays are classified according to shape, material, depth and dimensions.
PALLET INSTALLATION FEATURES
If you undertook the installation of a shower tray yourself, then you should familiarize yourself with some of the nuances and features of the installation work. If the pallet is installed on "native" legs, special attention should be paid to uneven floors and the legs should be twisted in accordance with these defects.
Also a very important part of the work is the installation of the drain, as this is the key to the long-term operation of the pallet without repair work.

There are several ways to install a pallet:
- On a metal frame
- On a plastic base
- On the bricks
- On a flat surface
- On legs
The guarantee of the quality of the work performed directly depends on the preparatory stage - you should carefully prepare the place for installation. If the pallet is immediately placed on the floor, then special attention should be paid to the evenness of the floor. In addition, it is important to make sure the strength of the product itself. Plastic and acrylic pallets can deform under weight, so they need to be reinforced with polystyrene foam, polyurethane foam, bricks or concrete.

The work can be done in any of the options.
The second important point- this is a competent installation of pipes and electrical wiring, if light or radio is intended in the shower stall. The pipeline is mounted with PVC pipes and connected with fittings.
The wiring must be moisture resistant and must be hidden to protect it from excess moisture. The cable is recommended to be pulled directly from the shield. This is an important condition for fire safety. A lot of controversy arises about a flat and slightly sloping installation towards the drain. Both installations have the right to exist, have a number of advantages and disadvantages.
When installing with a slope, additional reinforcement is required so that there is no “surprise” during washing, and the drain should be properly sealed. With a level installation, most of the weight is on the center of the structure, so it is important to pay attention to strengthening it.
INSTALLING THE SHOWER TRAY WITH YOUR HANDS ON THE BRICK

Bricks should be additionally fixed with mortar, fixing them evenly, using a level
Do-it-yourself installation of a shower tray on bricks is the easiest and most reliable installation method. To ensure the strength of the structure, the bricks should be additionally fixed with mortar, fixing them evenly, using a level.
Neglecting this advice is fraught with the appearance of cracks and dents in the bottom, due to excessive weight. And only then you need to attach the pallet to the solution, leveling it with the help of a level and a mallet.
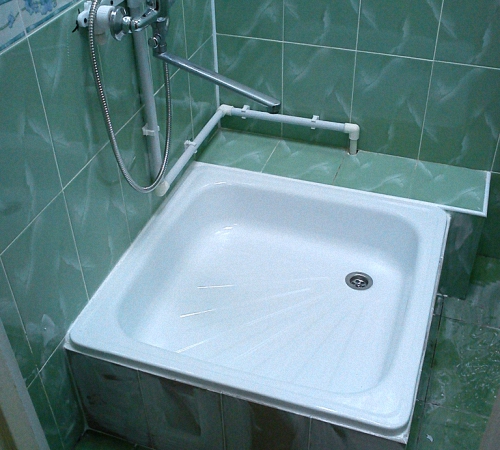
Pallets made of various materials can be installed on bricks. Steel or acrylic pallets are sometimes placed without doors and side panels, using only a protective curtain.
This is a budget option, perfect for a summer house or a country house, where you do not visit very often. Because installing a shower without doors at home is not very comfortable.
The steel pallet is very strong, so when installing it on bricks, only the pore material on the sides is enough. The middle can be left hanging.
To install the pallet without deepening the floor, a minimum of tools is required:
- pliers
- Drain keys
- Screwdriver
- wooden hammer
To fix the pallet on the bricks, a metal frame or supporting elements are used. Mounting foam or silicone sealants are used as a sealant. But remember that with high humidity, silicone tends to darken, which can spoil the appearance.

In order for the end result to be a smooth structure, be sure to use the building level at all stages of installing the pallet.
If it is not there, then you can use a simple method from improvised means. Take an ordinary plate and place it on the edge of the tray. Then gradually start pouring water into it. The edge from where the water will flow faster is sloping. Level the pan and repeat the procedure until the water from the plate begins to flow evenly.
It was already mentioned above that pallets come in various sizes:
- Semicircular 80x80cm, 90x90cm, etc.
- Rectangular pallets - 70x85 cm, 70x100 cm, 70x120 cm, 80x100 cm, 80x120 cm.
- Square pallets - 70x70 cm, 80x80 cm, 90x90 cm, etc.
- Pentagonal - 90x90cm, 100x100 cm, 120x120, etc.
Which one to install - the choice is yours, which depends on your desires and the dimensions of the bathroom.
If you decide to make a recess in the floor, before starting installation, you need to remove the tile (if any) with a puncher at the place where the shower tray is planned. Bricks should be laid along the side wall of the shower and reinforced with concrete mortar.
To be sure, you can additionally lay a few bricks in the middle so that the bottom does not deform under weight. Do not forget about the place for the drain pipe.
The brick should be laid out according to the level in such a way that there is a slight slope towards the drain. And if you decide to install the pallet evenly, accordingly, the support (bricks) should be placed evenly.
After that, you need to proceed to the stage of installing a siphon for the pallet. A PVC tube, 5 cm in diameter, is perfect for this. If the location of communications requires it, then a square, adapter or corrugated pipe of the appropriate size is installed. These fittings can be purchased at any plumbing store.
Use sealant for a secure fit. After that, it is very important to check the quality of work with water. If everything is fine and the connections do not leak, you can proceed to the next step.
After installing the shower tray on the bricks, fix it with mounting foam. All sides are laid with ceramic tiles or plastic lining. It is recommended to install a corner (plinth) between the wall and the pallet and seal it with silicone or acrylic.
Calculate the curing time of the sealant at 2 mm per day. After drying, the process of installing the pallet can be considered complete.
From the sides, you can hang bathroom curtains, install tempered glass curtains, or mount side panels. It already depends on your desire and possibilities.

For long-term operation of the shower cabin, it is necessary to properly install the shower tray. The technology for performing work must be accompanied by a competent installation of all structural details. In this article, we will describe the features of installing a shower tray in accordance with the rules and recommendations of experts.
Types of pallets
The shower room is a great addition to the bathroom, which saves space in the room. The installation method of the shower tray must be installed in a safe manner. Installation options depend on the type of pallets and the technology of fastening to a certain material. However, it is important to remember that not all pallets can be installed independently, and in some cases, you need to seek help from specialists.

Shower trays are distinguished by the type of material from which they are made. So, the following types of structures are distinguished:
- cast iron products;
- pallets made of marble and ceramics;
- steel products;
- acrylic trays.
Marble products are considered the most durable and reliable, however, their cost is quite high, so not everyone can afford such an acquisition. Ceramic pallets are also expensive and have excellent decorative properties, but are too sensitive to various damages.
An affordable option is to install a shower tray made of acrylic materials. To mount the structure, it is necessary to build a special frame that would support the pallet, because such products tend to sag under weight. Special fixing legs are added to the kit, as well as reinforcing parts, which ensure the strength and reliability of the future installation. For example, cast iron pallets are the cheapest among other types of products. The peculiarity of such pallets is durability and reliability, which is indicated by the material used.
Pallet Installation Aspects
The cost of a shower cabin depends on the variety of functionality of the product. For example, a shower room with hydromassage, telephone, lighting and other effects will have a high cost. At the same time, it is important to take into account the payment to workers for the installation of the entire structure. With your own hands, it is easiest to install acrylic or steel products.
During the do-it-yourself installation process, it is important to remember to level the surface under the shower for the vertical position of the legs. The assembly technology of the structure can be seen in the instructions for the product. They indicate the features of installing a product made of plastic or metal, and also describe tips for connecting the sewer system to the shower. Pallets can be installed on plastic support elements, which can be replaced with bricks.
It's important to know! To insulate the shower tray, as well as to seal all voids, it is necessary to use mounting foam in the work. However, this method can complicate the dismantling or repair work. To check the correct installation of shower trays, you need to stand in it with extreme caution, after which you will determine the stability and reliability of the structure.
Do-it-yourself installation of an acrylic pallet: features of work
The main disadvantage of acrylic products is the lack of support under the central part of the pallet. Thus, the surface may be damaged by careless movement. This will cause the installation to break down and damage the human body as a result of the fragment.
Therefore, when installing an acrylic pallet, it is important to follow the sequence.
Preparatory work
During renovation work in the bathroom, special attention is paid to connecting the sewer system and water supply. The shower cabin must be connected to several systems, which are the supply and removal of water, as well as the wiring of electricity. At the same time, the last part must have a high resistance to moisture and water.
To install a shower tray for showers, you need to purchase high-quality pipes and other products in order to avoid leakage in the future. After installing all communication systems for the bathroom, it is important to carefully check everything, especially the water supply and the operation of the sewer. All pipe openings are closed with temporary plugs at the time of installation work.

Installation process
During installation, it is important to align all pallets strictly vertically. This is due to the need for proper flow into the sewer, only if the product is perfectly level in a horizontal position. This will prevent the formation of puddles in the shower. To install the pallet, it is important to make a flat base of tiles or ceramics.
To properly mount the pallet, you need to fix the central part of the product, while the horizontal structure should not be disturbed. To simplify the work, draw a contour around the entire perimeter of the pallet to establish the exact position of the product. After that, you can start connecting sewer pipes and other elements.
Strengthening the shower tray
For the strength of the installation of shower trays, it is necessary to measure the distance between the product and the floor. At the beginning, it is important to leave space for the sewer so that the sewers can be cleaned or replaced later. Bricks or steel pipes can become additional parts of the support, depending on the design parameters.
Rubber is laid on top of pipes or bricks, after which the supports must be firmly pushed under the base of the acrylic pallet. After that, you can connect the communication systems.
Detailed instructions for installing shower trays
Before proceeding with the installation work, you need to prepare the necessary tools. For installation you will need the following materials:
- FUM tape;
- sealant or special glue;
- twin to the sewer network;
- if there is no siphon in the kit, then you need to buy it at any plumbing store.
1. The pallet with legs must be leveled in a horizontal position. To do this, the legs are separately unscrewed and fixed in special locking screws. If you purchased a booth without supports, then you need to fill the floor with cement mortar. The level of the base must correspond to the position of the floor in the bathroom. After that, they proceed to the installation work and do the finishing, using ceramic tiles or other products.
2. It is important to fix the pallet from the side of the wall using adhesives. Joints and fastening points must be additionally sealed with sealant. All work must be carried out carefully to avoid further leakage of water between the wall and the structure. A double is attached to the sewer system, in the presence of other types of connection, a tee is installed.
3. All parts and joints of the pallet must be carefully sealed to avoid water leakage and destruction of the pallet.
4. It is important to install the pallet above the level of the sewer pipes. This is necessary for further access to communication items for their repair or dismantling in case of breakage or damage.
5. In conclusion, it is necessary to check all attachment points. Also check the supply and drainage of water. If there is a leak in some areas, then it is important to tighten all connections more carefully. If necessary, carry out additional insulation.
Features of installing other types of pallets
The pallet for a cheap cabin can be installed in many ways, for example, on a brick base, on plastic supports or a metal frame. The technology of work depends on the characteristics of the product and the materials from which it is made.
For a ceramic pallet, you do not need to install supports or other racks, because the structure is mounted directly on a flat floor. In this case, there will be no mounting clearance, therefore it is important to lay all communication systems with high quality and professionalism. To carry out repairs or to replace sewer parts, you will need to dismantle the pan. Answering the question: how to install a shower tray without ceramic legs, you need to attach the product with glue or cement mixture for tiles. Lastly, install the drain hole.
For the installation of steel or cast iron products, it is necessary to use more reliable support elements, which are bricks. Initially, the boundaries of the pallet installation are set on the floor. After that, a cement mortar is prepared and masonry is made of bricks. The height of the masonry must correspond to the parameters of the pallet and have the same shape. The pallet must not come into contact with the floor in order to be able to install the communication system.
Three days later, after the cement mortar has dried, a pallet must be installed. A layer of cement must be applied over the masonry, after which the product must be applied and leveled in a horizontal position. A hose must be attached to the drain system. Tiles, decorative panels, mosaics and other finishes are used as facing materials. This is necessary to give completeness to the installed structure.
Unlike installing a low shower tray, for other products you need to use a metal or plastic frame, which makes the DIY installation process easy. The process of performing work consists in aligning the legs, installing the pallet and fixing the drain hole.
At the end of the installation, it is necessary to check the stability of the structure. If the pallet staggers or fastens, then additional support elements must be made as a brick laying or attaching steel pipes.

The process of making a pallet with your own hands
It is quite possible to install a pallet with your own hands without buying such products in plumbing stores. The main thing is to follow the rules and detailed instructions for performing work. The shape of the base for the shower cabin can be different, you can also use different materials for finishing, creating your own design design. The work process has the following sequence:
1. First, we designate the place of drainage and installation of the drain system. We cover the surface of the base under the shower tray with a waterproofing layer, and the height of the wall covering should be 30 cm.
2. A barrier of bricks is installed along the perimeter of the structure, the height of which should be more than 5 cm above the position of the drain hole. Next, the screed is poured, which should be 6 cm below the drain point.
3. After the screed and brickwork have hardened, the barrier is covered with a layer of insulation. The pouring of adhesives or cement mortar is carried out with a slight slope towards the drain system. The technology for applying the mixture starts from the edge and moves towards the center. It is important that there are no steep angles of inclination, as this creates significant and sloppy transitions.
4. At the end of the work, the surface is finished with different materials, for example, ceramic tiles, mosaics and other products at the discretion of the owners.

Features of installing shower tray bumpers
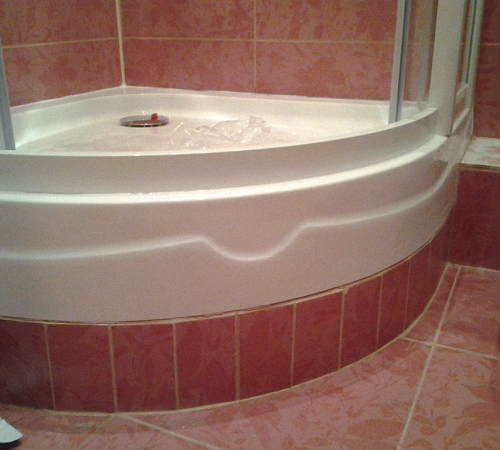
After determining the installation features of the shower tray, the video of which is presented at the end of the article, you can proceed with the construction of the sides. If the pallet has a large height, then it is necessary to build one or more steps for the shower cabin. Masonry can be made of bricks with the installation of formwork, however, the type of material used does not matter, because the surface will be tiled.
After laying the steps and removing the formwork, it is important to cover the surface of the sides with a primer and a layer of waterproofing. After that, the processed and correctly erected structure can be covered with finishing materials. It is important that the shade and type of finish match the look of the shower enclosure and the style of the bathroom. It is important to tile the walls behind the pallet if they are not treated with waterproof materials. As a tile adhesive, you need to choose waterproof products without the addition of silicone, as it darkens over time and spoils the appearance of the shower cabin.

To equip a shower cabin in an apartment, it is better to seek help from specialists. This will allow you to properly distribute the load on the base, as well as lay all communication systems. It is easier to install such a structure in a private house or in a country house, where there is no danger of flooding the lower floors of the house. In the process of performing work, it is important to fasten all parts and elements firmly and securely in order to extend the life of the shower tray.
