How to make a corner shelf with your own hands? Mounts for shelves on the wall - the best options and installation technology How to hang a corner shelf correctly
The corners in the room almost always remain unoccupied, and yet there is enough space there to place a small shelf, rack or hanging. From a design point of view, the angular arrangement provides some advantage, because such articulation of the walls expands the possibilities of using various structural configurations and the fasteners used. If you compare regular and corner shelves, you can immediately notice how much more diverse and attractive the latter look. Let's try to decorate our home with such a corner shelf.
The most popular materials for making shelves are wood, furniture board, MDF, laminated chipboard, etc. Sometimes shelves are made from improvised materials - laminate, plastic or even drywall. Let's not change traditions and use furniture board as a raw material. To work you will need a jigsaw, a drill, various fasteners, a tape measure and a pencil. First you need to make a sketch of the future shelf for clarity of work processes.

The shelf will be about 70 cm high with three sections. It will be attached through vertical elements using dowel-nails, and the parts will be connected to each other with confirmations.

The first thing you need to do is mark all the parts on the plate. This is usually done with a pencil, but if the slab has a dark surface, then the pencil mark will not be noticeable; in this case, you can use a knife. You need to use the blade, without pressing too hard, to draw it along the cut line, after which a thin, white, noticeable line will appear, along which it will be easy to cut.

You can use a jigsaw to cut out shelf elements. The saw blade must be small tooth and intended for woodworking. The sawing speed regulator on the jigsaw should be set to the minimum value, and the mode selection knob should be set to “0”. To facilitate the assembly of the shelf, it is necessary to number the parts in the drawing, and then put the corresponding values on the structural elements themselves.

After all the parts are cut, you need to drill holes in them for connecting with confirmations. It's much easier to do this consistently. First you need to make holes in the shelf, and then drill through these holes corresponding to them in the supporting element. If there is no special drill for confirmations, then you need to use 3 ordinary drills with different diameters - for the screw part, the thickening and the head of the Euroscrew.


Immediately at this stage you can make holes for attaching the shelf to the wall. It will be fastened with 6x80 mm dowel nails through the supporting elements. All holes must be countersunk, this is necessary so that the nail head is flush with the surface.

When all the parts have been cut, you can start decorating the edges. First, we clean all edges from dust and sawdust formed during sawing. Then we apply edging tape to the ends and, using a heated iron (preferably using an old, unused one), glue it to the open surfaces.
This type of trimming tape is produced standard width 1.8 mm, and the thickness of the furniture board is only 1.5 cm, so part of the tape remains unnecessary and must be removed. We cut off the excess part of the edge using a regular wallpaper knife.


We clean the resulting edge sandpaper with fine grain. You can close the ends with any other accessible method, for example, use decorative cord, braid, special paper or cardboard.
Now you need to assemble the shelf. We assemble in accordance with the numbered diagram. To tighten the confirmations, we use a hex wrench.
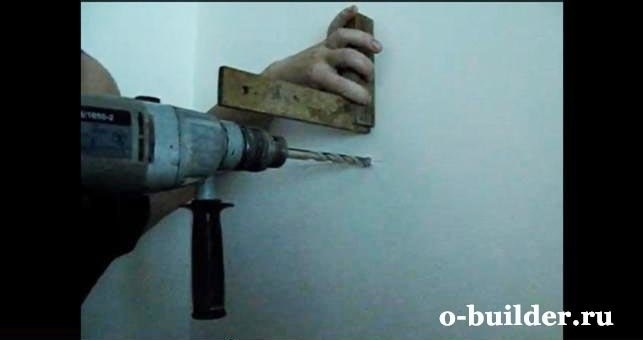
Trying it on assembled structure to the place intended for it and mark the mounting points on the wall. For drilling in concrete or stone walls, we use a drill with a Pobedit tip. On the tip of the drill, you can mark in advance the drilling depth required for the prepared dowel. To prevent dust generated during drilling from flying around, you can glue a paper “pocket” to the wall under the work area.


After completing the drilling work, you need to insert the dowels into the holes and secure it through the corresponding elements of the shelf with screw nails, recessing the caps. This can be done with a hammer or a regular Phillips screwdriver.


You can decorate the open heads of fasteners using special plastic plugs of a suitable color.
Perhaps such a shelf will turn out to be too simple in appearance, but we made it from materials that often gather dust in our pantry or live out their days in the country. The design can be changed at your discretion, for example, the supporting elements can be made longer and then the shelves can be used as book shelves. Or choose a different outline of the end parts, in which case the shelf will acquire additional decorativeness. In any case, a hand-made item will serve as an example of the individual skill of the owners of the house.

Home improvement is not always a matter of several weeks, and quite often, additional elements such as shelves, racks and other decorations are hung on the wall after everything is finished renovation work in the house. Therefore, almost everyone faces the question of how to hang a shelf on the wall without damaging the finish.
Everyone, even those who have never encountered such a task, knows that attaching a shelf to a wall can only be done with the help of fasteners. In stores and along with shelves you can find dozens of types of fasteners, which may differ in both appearance and design. But they can be divided into two main types, with hidden fastening and external.

In addition, the shelf mounting itself can also serve a decorative role, creating the desired design effect.
The shelves themselves are also very diverse both in their appearance and in the material from which they are made, and they also do not have a clear classification; they can be single-tiered or multi-tiered and intended for any room. The type and material of the shelf depends only on your needs or tastes. If you wish, you can even make a homemade shelf.

Where are shelves most often used?
The main place where you simply cannot do without a shelf is the bathroom. This is where shelves are a must-have attribute, as they allow you to conveniently store bathroom accessories. In most cases, even several shelves are used, but fixing a shelf in the bathroom is the most difficult, since the wall covering here is ceramic tiles, which must be handled very carefully.

You can’t do without a shelf in the kitchen, since it greatly increases practicality and you can place all the accessories that the housewife always needs at hand on it.
Today, even the most modern and fashionable designer does not take advantage of the opportunity to use practical and stylish shelves when decorating the interior. They will not only become an integral part of the future decor, but will also serve as an excellent stand for books (mount for bookshelves), for photos and decorative items.
There are two types of shelf mounting available:
- standard method (using hinged brackets, corners, etc.);
- fastening shelves to the wall without visible fasteners.
We will look at the first method in more detail, since with the standard design it is difficult to achieve a combination of the future interior with the target design.

- Preparation for fastening
- Detailed mounting instructions with photos
Let's consider the process of preparing the fastening
- The first thing you need to do is assess how secure wall, where our shelf will be mounted directly. If it is a brick wall, then it should be at least 25 cm thick, and if you have a concrete wall, then from 10 cm, which will allow you to place not only decorative elements on the shelves.

1 – fastening element;
2 – holes for installation;
3 – metal rod;
4 – hinged bracket;
5 – shelf.
2. After this, we move on to determining the thickness of the future shelf.
To do this, you must know exactly what will be placed on the shelf so that there is no deflection or deformation. You can check this by simply taking a board of approximate thickness and placing a weight on it.

- If the interior concept requires thicker boards, then in this case everything should be used according to the recommendations of your designer or the chosen style.
- You will need to take into account the mounting features, since the thickness of the shelf cannot be less than 3 cm. If books are placed, it is better to use a thickness of 4.5 to 6 cm.
- The future shelf will need to be thoroughly dried and soaked before processing.
How to install shelves to a wall without visible fasteners
Step 1. Measure the distance between the holes.
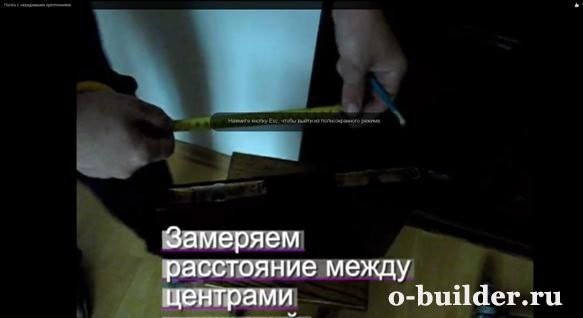

Step 3. After this, we apply our fastening element to the resulting axis and mark holes for it, which should be located on a horizontal line.
Step 5. After this, we clean all the holes from any remaining shavings and dust and drive wooden pegs or plugs under the dowels.

Step 6. After this, take dowels or screws and screw the fastening element to the plugs or pegs.

Step 7. After this, we proceed to installing the shelf itself on the fasteners. If the shelf does not fit very tightly, you can tap it with your palm or a rubber hammer to reliable fixation. It should be noted that you need to knock alternately on the left and right, this way you will prevent the shelf from skewing and it will sit evenly on the fastening element.
Shelves are often used not only to complement and decorate the overall interior of the room, but also for a clearer and more expedient organization of space. Thanks to their use, the apartment owner has the opportunity to conveniently arrange huge amount small things that simply get lost in closets.
Today there are a lot of products on the market various models which are made from different materials. They also differ in design.

You can choose not only products with classic designs, but also ultra-modern designs.

But more and more often people prefer to make such interior details themselves. Wondering how to make a shelf with their own hands, they re-read a lot of literature and look through many catalogs.

However, this does not mean that self-production The shelves are complex and it is beyond the capabilities of a person who does not have special skills. No, that's not true at all.

Familiarization with the literature in this case is necessary in order to create a product with beautiful design, which will fit into the overall interior. Let's take a closer look at what kind of shelves there are.
Types of shelves
Any specialist will tell you that before you start creating a product, you need to decide for yourself what kind of design you want to get and whether it will be combined with the interior. And only after that you can start creating the product.

After all, for a house decorated in a classically styled style, it is completely unacceptable to use trendy and modern shelves. They will look extremely ridiculous.


The most popular and widely known subtype of shelves is the classic shelf. This is due to the fact that it is quite easy to install, and the appearance, thanks to its simplicity, seems refined and sophisticated.
Both open and closed shelves are used successfully. Closed products are most often used for decoration and installation in rooms decorated in more modern styles. Glass and sometimes plastic are used to construct them.

Open structures can be used both in modernly decorated houses and in apartments with a classic design. Over the past few years, this particular type of shelf has gained enormous popularity and is therefore gradually replacing the classic options.

IN small spaces Quite often you can see corner shelves that have a special method of fastening. They are mounted on adjacent walls that are adjacent to each other. They are most often used in bathrooms, kitchens and utility rooms.

In addition to the above types of shelves that are mounted on the wall, there are suspended and floor-mounted structures. Hanging shelves are mounted in an unconventional way.

They are installed using cables and vertical posts, and attached directly to the ceiling. This mount looks quite unusual and original.

Floor structures are most often used in hallways. After all, it is floor shelves for shoes, made by yourself, not only look beautiful, but also help you organize the space of a small hallway. At the same time, making them is quite simple.
How to make a simple shelf?
To create the claimed product, you should purchase or prepare some tools and materials in advance. As connecting elements, you can use whatever suits you best. But the most popular are ordinary screws, brackets and dowels.
Pay attention!


For example, let's take a photo of the shelves with our own hands, which is presented below. It shows a product with the following parameters: width 250 mm, height 300 mm, length 1100 mm. For convenience, the manufacturing process will be divided into stages.
Stages of work
At the first stage, you need to complete the markup. To do this, you should lay the boards on a table or any other flat surface and transfer the measurements from the drawings. The side walls must be exactly 268 mm high.

This marking is optimal because the side walls will be located between the two parts.

The second stage requires cutting the boards. To get smooth and neat cuts, you need to use a jigsaw. After cutting, you will end up with 2 fairly long pieces and 2 shorter ones.

At the third stage, you can begin processing the resulting workpieces. The resulting sections should be coated with a special protective varnish or stain, having previously sanded them.

Pay attention!

If you only plan to paint the shelf, you can get by with treating it with a regular antiseptic primer. This way you will not only increase the service life, but also achieve a more uniform distribution of paint.

At the fourth stage of making a wooden shelf with your own hands, you begin to directly assemble it. The bottom board should be laid on a flat surface. Step back 8 mm from the ends of the workpiece and draw two lines parallel to the cuts.
2 points should be marked on them with a distance of 5 cm from the edge. At the marked points it is necessary to drill holes for self-tapping screws. The same manipulations must be done with the second workpiece.

After this, you should install the side blanks on the lower section of the board and secure them. Once you are done with attaching the side panels, proceed to install the top panel and secure it.

At the fifth stage, you should attach the brackets to the ends of the side panels, and make several holes in the wall for the dowels. After this, screw in the screws so that they protrude by 5 mm. And now your shelf is ready.

You can make acoustic shelves in the same way, but you need to take into account the size of the equipment itself. Measurements should be taken carefully, because if you make a mistake, the work will have to start again.
Pay attention!


DIY photo of shelves


There is nothing better than shelves for organizing space in rooms, as well as for decorating the interior. Comfortable, functional, original form, they help to conveniently arrange a lot of things and give the rooms a more comfortable look. Making shelves on the wall with your own hands is not at all difficult, and you can use the most various materials– wood, fiberboard, glass, pieces of tin, plywood.


| Types of Wall Shelves | Description |
|---|---|
| Classic | This type of shelves is the most common due to its simplicity, aesthetic appearance and ease of installation. They represent a huge flight of fancy: from simple square to creative asymmetrical shapes |
| Corner | This type of wall shelves differs in the method of fastening - it is carried out on adjacent adjacent walls. Most often they are mounted in utility rooms and bathrooms |
| Hanging | This original way creating a shelf involves attaching a simple structure to the ceiling using cables or vertical posts |
| Floor-standing | This wall shelf is a floor support design. This type of product is especially relevant in hallways, as well as large rooms, where you don’t have to think about wasting space. |
| Open and closed shelves on the wall | Wall shelves can be designed, for example, with or without glass |

Wood is the most comfortable material for work. Wooden shelves are simple, complex shape, open and closed, vertical, horizontal and angular. Taking as a basis basic version, you can assemble a shelf from several modules and give it the most incredible look. In order for the product to serve for a long time, you should choose the right wood: the boards must be perfectly flat, completely dry, without cracks, voids or traces of mold.

During the assembly process you will need:
- hacksaw;
- drill;
- building level;
- pencil and ruler;
- boards 16 mm thick;
- stain;
- wood varnish;
- sander;
- screws, brackets, dowels.
The example used is a simple rectangular shelf 250mm wide, 300mm high and 1100mm long.

Step 1. Marking
The boards are laid flat on the table and the measurements are transferred from the drawing. The height of the side walls should be 268 mm, since they will be located between the top and bottom: wall height + board thickness x 2 = 300 mm.
Step 2. Cutting the boards

If the markings exactly match the diagram, you can start cutting. It is best to use a jigsaw for this, then the cuts will be perfectly smooth and neat. You should end up with 2 long pieces and 2 short ones.
Step 3. Processing of blanks

Before starting assembly, each workpiece must be sanded, stained and varnished. If you plan to simply paint a shelf, the blanks are processed - this increases their service life and makes the paint apply more evenly.
Step 4. Assembling the product

The bottom board is laid flat on a flat surface. From the ends of the workpiece, retreat 8 mm and draw 2 straight lines parallel to the cuts. Now on these lines you need to mark two points at a distance of 5 cm from the edge, and drill holes there for the screws. The same is done with the top blank. When all the holes are ready, install the side blanks on the bottom board and tighten the screws. Place a second board on top and also fix the side walls with self-tapping screws.

Brackets are fixed at the ends of the side walls, holes are drilled in the wall for dowels, screws are inserted and screwed in so that they protrude by about 5 mm. The dowels must be positioned strictly horizontally, so before drilling, mark a line using a level. Now all that remains is to attach the brackets to the fasteners and hang the shelf. If desired, the back wall of the product can be filled with a piece of plywood, and glass can be inserted in front.


To make such a simple shelf more original, you can replace one side wall with a stump of a thick branch. To do this, choose an even branch with a diameter of about 7-8 cm with smooth, clean bark, saw off a piece 28 cm long, and cut off all the side shoots. The chock is treated with a primer, dried and varnished. There is no need to remove the bark. After the varnish has dried, the workpiece is inserted between the upper and lower boards and screwed tightly with self-tapping screws.

Based on this drawing, you can make various variations of wall shelves. For example, reduce the length to 400 mm and make 3-4 blocks at once. Then install them on top of each other in a checkerboard pattern and secure them together using metal plates. Or simply mount them on the wall separately, placing them at a short distance from each other.

To save space, shelves are often made corner, and they can be mounted both in the inner and outer corners.


The blanks are made according to the scheme described above, only the upper and lower boards consist of two elements, with the ends cut at an angle. The process of making such a shelf is quite simple:
- the halves of the top board are coated at the ends with glue and clamped with clamps;
- repeat the same actions with the bottom board;
- when the glue dries, all workpieces are covered with stain or primed;
- Attachment lines are marked on the upper and lower workpieces and holes are drilled;
- insert the side walls and secure them with self-tapping screws.

| Wall shelf materials | Advantages and Disadvantages |
|---|---|
| Wood: plywood, chipboard, MDF and others | This material is relatively easy to work with, it looks beautiful, natural and impressive, its service life is quite long, especially if pre-processed |
| Plastic | This material is the most versatile; it can imitate both wood and stone, while eliminating their shortcomings |
| Metal | Such wall shelves will be very strong, reliable and durable, but classic interior They will fit in with difficulty. In addition, corrosion can also be a problem, so metal products Requires special processing and conditions |
| Glass | Transparent wall shelves will create an atmosphere of lightness and comfort in your home. Of course, do it yourself glass structure it will be quite difficult, but if you still decide to do all the work yourself, then you will have to work with the glass for quite a long time and very carefully, especially if various cutouts are planned in the shelf design |
Original shelves for books
Shelves of non-standard shape are increasingly in demand, so if you wish, you can try to assemble something original. Used for example bookshelf in the form of a simplified labyrinth.
To make it you will need:
- edged board 20 mm thick;
- wood glue;
- clamps;
- roulette;
- hacksaw;
- miter box;
- grinding machine;
- stain;
- furniture screws, self-tapping screws;
- decorative shelf holders.
If you have everything you need, you can start making the shelf.
Step 1. Marking
On the prepared boards, mark the cut lines with a pencil under a ruler. Measurements should be taken very carefully, since all horizontal parts have different lengths.
Step 2. Trimming the blanks
The ends of each workpiece are cut at an angle of 45 or 90 degrees. The diagram shows the first option, so you will need a miter box for sawing. It is very important to correctly install the miter box on the board so that the cuts are symmetrical. If the ends are cut off incorrectly, you will not be able to fold the shelf.
Step 3. Assembling the structure
The ends of the parts are smeared with glue, pressed tightly and additionally secured with slotted furniture screws. Ordinary self-tapping screws are not suitable here. Each joint will require at least 2 screws. Both parts of the shelf are applied to the wall, leveled and the attachment points are marked with a pencil. After this, holes are drilled for the dowels, brackets are screwed to the shelf with self-tapping screws and the structure is hung on the wall. Instead of brackets, decorative pelican shelf holders are often used.


Hanging shelf with straps
If you need a decorative shelf for small items, the following option is perfect - a board suspended on straps.


To make a shelf you will need:
- 2 edged boards 300x750 mm, thickness 30 mm;
- 4 leather belts, 75 cm long;
- 4 long screws with plastic dowels;
- 4 short screws;
- building level;
- ruler;
- sharp knife;
- drill.
Step 1: Preparing the belts
The belt cuts must be perfectly even, so if necessary they are trimmed with a knife. Fold each belt in half, press the ends to the table, step back 2 cm from the edge and drill a neat through hole with a drill. The same is done with the remaining three.
Step 2. Attaching the straps to the wall
Using a level, determine two points on the wall at a distance of 60 cm. Drill holes and insert plastic dowels. The belt folded in half is applied to one of the holes and secured with a long screw - you get a large loop on the wall. Another such loop is attached nearby.
Step 3. Installing the shelf
A sanded board is inserted into the loops and aligned horizontally. To prevent the shelf from moving, the parts of the belts adjacent to the wall near the board itself are screwed with short self-tapping screws. Now another shelf is hung under this shelf, exactly repeating the steps described above. The result is a light and neat two-tier shelf. If desired, you can add another 1-2 tiers.
To make the shelves described above, you can use not only wood, but also plywood, as well as laminated chipboard sheets. The last option is used most often, since laminated chipboard is light in weight, high strength, practicality and durability. When assembling shelves from this material, all sections must be covered with a melamine edge to match the color of the sheet.


Making a glass shelf

Glass shelves fit harmoniously into any interior, and the installation process does not take much time. To work you will need:
- tempered glass;
- hammer;
- electric drill;
- building level;
- aluminum profile;
- dowels;
- adhesive tape;
- ruler;
- pencil.
Not everyone knows how to cut glass correctly, and therefore it is better to order the cutting of blanks in a workshop. There they will also grind and polish the edges so that when installing the shelf you will not cut yourself on sharp edges. You can do everything else yourself.

Step 1. Marking for fasteners

The section of the wall where the shelf will hang should be as large as possible. Using a building level, draw a horizontal line on the wall with a pencil. The locations of the fasteners are marked on the line and holes are drilled.

Step 2. Installing profiles


An aluminum profile is applied to the wall surface and the alignment of the fastening marks is checked. Then insert dowels into the holes, attach the profile with one screw and level it horizontally. After this, tighten the remaining screws.


Instead of a drill, insert a bracket screw

Screw in the bracket screw

Leave the bracket screw protruding from the wall


Checking the position

Arranging the shelves
Step 3. Attaching the shelf
The rear edge of the glass shelf is covered with adhesive tape. You can use separate spacers made of tape, placing them where the glass will touch the screw heads. The shelf is inserted into the profile, the edges of the profile are covered with protective caps. If two shelves touch on the sides, their edges are fastened with metal fittings.
If there is free time and the desire to experiment, you can create very unusual shelves on the wall from scrap materials. For example, a corner shelf made of plastic pipes. To make it you will need pieces sewer pipes and corner cuts. The shelf is attached to the wall with screws and dowels.


Old suitcases and briefcases also make great wall shelves. To do this, they are cut to half their height, covered with plywood at the back and secured to the wall with screws or on brackets.

Drawers from unnecessary bedside tables are quite suitable for making shelves. To give them an elegant look, the boxes should be thoroughly sanded, primed and painted. bright colors. Then they are leaned against the surface with the back wall, the attachment points are marked and holes are drilled for them. Even one such shelf looks very original, and a composition of 2-3 drawers will become a real decoration.


Video - DIY wall shelves
Interesting wooden shelf. Master class

You will need:
- Rope;
- Board at least 2 cm thick;
- 2 corners (mounts) for shelves;
- Steel washers;
- Lighter;
- Drill;
- Saw.


