How to make a roof drain with your own hands. Installing a drainage system with your own hands - installing roof drains How to make roof drains with your own hands
Making a drain in your private home is not that difficult. After all, this is just an assembly of trays under the roof of a house and vertical pipes to drain water. True, there are some important points and rules that must be taken into account when carrying out installation drainage system. And the most important point, if there is a need to save, it is to carry out an accurate calculation of the required materials.
Calculation of required materials
Let's start with the fact that in any hardware store Today you can purchase a ready-made drainage system made of metal sheets or plastic. The metal structure is usually galvanically painted, which guarantees long term operation under open air in rather difficult conditions.
So, what drainage elements will be needed.
- Trays or gutters with a standard length of 3 m.
- Pipes for vertical drainage of rain or melt water. Their length: 3 or 4 meters.
- Knee.
- Funnels.
- Brackets for fastening trays.
- Clamps for fastening pipes.
- In addition, silicone sealant is used to seal the joints of roof drainage elements.

Tools for installing a drainage structure will require:
- A hacksaw (cutting metal or plastic with other tools, especially electric ones, is not recommended).
- Roulette.
- Screwdriver.
- Plumb.
How to correctly determine the number of trays needed. Let's look at this using the example of the simplest roof - a gable roof. Gutters are installed under the eaves, so you need to measure the length of one of them. We divide the size by the length of the tray, that is, by three meters. We get a number that is rounded, usually up. Please note that the trays themselves are installed at an angle of 2-5% and are inserted with their edges into each other to ensure the tightness of the tray structure. This results in an overlap connection. The overlap indicator itself is within 5-10 cm. And this must be taken into account when calculating the number of gutters. Now the resulting number is multiplied by two, because there are two stingrays in the house.
You can calculate the correct pipes for vertical water drainage in exactly the same way. But there is one here small nuance, which needs to be taken into account. Everything will depend on the area of the slope, and, accordingly, on the volume of water that will collect on the slope. It is the volume of passing water that will affect the permeability of the pipe, so the larger the volume, the larger the diameter of the installed pipe. By the way, this also applies to trays. That's why:
- If the area of the slope does not exceed 50 m², then a pipe with a diameter of 75 mm and trays with a width of 100 mm can be installed in the drain.
- Accordingly, the area is 50-100 m², the pipe is 87, the tray is 125.
- Above 100 m²: pipe - 100-120, tray - 190.

If the eaves of the house are long enough, then you can install several outlet risers. In principle, there is no such calculation in the rules, but in order to relieve the roof from precipitation, sometimes you have to approach this problem in exactly this way.
Now, as for the standard number of risers. They are usually installed in the corners of the building. And since gable roof If there are four corners, then there will be four risers. Accordingly, there will be four funnels. But the number of pipes used, for example, 3 m long, will need to be calculated. Why measure the height from the ground to the cornice, multiply this by four (four risers) and divide by 3 m.
Attention! The vertical drain riser should not reach the surface of the blind area by 25 cm. Almost four risers equal one meter. It will need to be subtracted from the resulting total length of the risers.

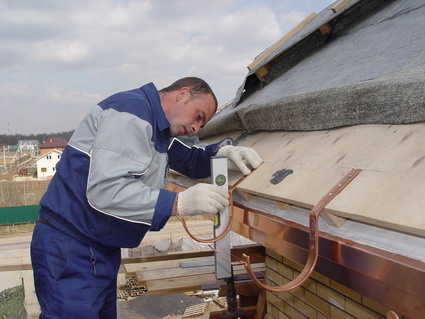
Now required quantity brackets for trays. It couldn't be simpler here; brackets are installed every half meter. The number of clamps is at each junction of two pipes. But with the knees it’s a little more difficult. Look at the photo above, it shows how to install the knees with different designs roofs. From here the exact calculation will be carried out.
Installation of roof drainage trays
So, the entire installation is done from top to bottom (see video). This is a strict rule that guarantees the quality of the final result. It is first necessary to determine the angle of inclination of the tray structure. What is 2% incline? This is a difference of one edge of the line relative to the other by 2 mm, taking into account one meter of the length of this line. So, in a drainage system, the edge of the line at the funnel will be the bottom. And if two risers are located at the edges of the roof, then the middle of the length of the cornice will be the most high point in the tray installation line.

Therefore, we select the middle of the cornice and mark on it the point where the first bracket will be mounted. It must be installed so that the top edge of the tray placed on it does not reach the edge roofing material by an amount of 2.5-3.0 cm. This will ensure the drainage of water without splashing or overflowing.
Now a self-tapping screw is screwed into this point, to which a fishing line or strong thread. Its free end will be mixed to the edge of the roof, where it will be installed drain pipe gutter We know the length of the thread equal to half the length of the cornice. For example, it will be equal to 10 m. That is, the line difference should be: 10x2 = 20 mm. This means that the thread of the pipe should be lower than that of the screw. The brackets will have to be installed along this line. Trays are also laid on them.
Attention! Often one outer tray does not fit in length. It is usually trimmed, for which only a hacksaw is used. The cut edge must be processed with a file to prevent burrs.
Installation of roof drainage pipes
The simplest option is if the pipe from the tray is installed vertically without bends. Simply the edge of the tray is inserted into the funnel (see photo below), which itself is installed in a bell-shaped way into the pipe. The most important thing in this process is the verticality of the structure, so a plumb line is required for alignment.

But such an opportunity does not always occur. Something will definitely get in the way, so elbows are added to the riser design. As already shown in the photo, there may be several of them.
The installation of drain pipes itself is a simple process (see video). To secure them, special clamps are used, which come with the drainage system. Manufacturers today offer many of their shapes and designs. There are clamps that are attached directly to the wall of the house, and there are options with extensions in case the riser is located a little further from the surface of the wall. But in any case, this is a reliable mount.
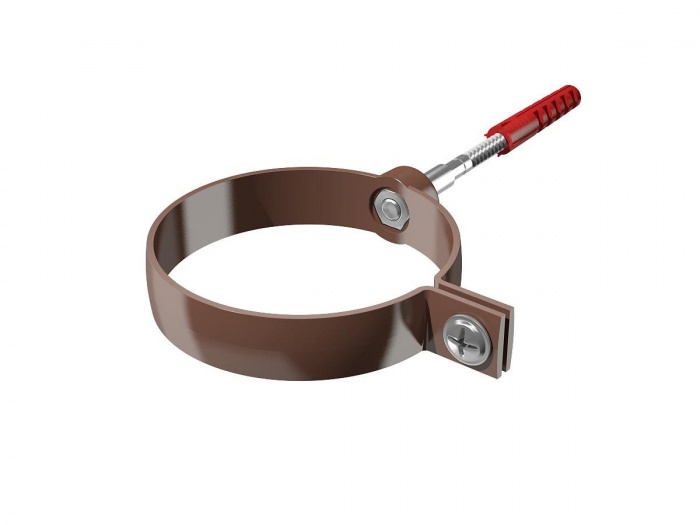
As mentioned above, the installation location of the clamps is next to the connecting joint of two pipes (see video). You can also install a third element in the middle of each pipe. Typically, this option is used only if four-meter pipes made of metal are selected.
Attention! If storm drainage was installed on the site where the house was built, then the lower edges of the drainpipes must be led into water inlets.

As you can see, making a gutter for the roof of your own house with your own hands is not so difficult. It is clear that not all points can be taken into account when performing installation, especially if the work is being done for the first time. Therefore, we suggest watching a video in which everything is laid out on the shelves.
You can eliminate the problem of wet walls and a wet foundation if you install roof gutters with your own hands.
Why is it needed?
 In the absence of a properly organized drain, precipitation from the roof flows onto the ground near the house, which leads to the destruction of the tiles around the house and the facade of the building to become wet. You can avoid such problems if you install it efficiently. organized system gutter A correctly calculated and correctly installed drain preserves the integrity of the foundation and walls of the building and significantly extends the life of other structural elements.
A high-quality drainage system combines the following qualities:
- reliability;
- durability;
- attractive appearance.
 Having studied in detail all the pros and cons of using all types of drainage, everyone will make the right decision for themselves.
- Gutter made of galvanized steel. Among the advantages, it is worth noting the low cost. The disadvantage is the fragility of the material. This type of watercourse is very easy to damage, for example when cleaning ice with a crowbar.
- Drains from polymer materials– modern systems that are resistant to negative external factors perfectly complement roofs covered with metal tiles, creating a single ensemble. Harmonious ensemble. Among the shortcomings it is worth noting high level noise when a large volume of sediment passes through gutters.
- Gutters made of zinc-titanium, coated with polymer paints. Amazing resistance to any external influences, strength and durability make such gutters attractive to consumers. The only thing that stops it is the fairly high cost.
 What is included in the package of the drainage system
- Gutter
- Drainpipes.
- Plugs.
- Couplings.
- Funnels.
- Knee.
- Brackets
- Clamps with pins.
DIY options
Adhering to a clear algorithm of work, a gutter installed independently will be in no way inferior in quality to a gutter made by professional specialists.
The first thing you need to do is make a small drawing.
Depending on the number of roof slopes, there are different schemes drainage installation.

Next, fix the first hook for the gutter at the beginning of the roof overhang. Once the desired slope of the gutter is determined (usually this parameter is no more than 2 cm per meter), the outermost hook for the cornice is fixed. By pulling a rope between them, they mark the places where all other hooks are fixed (steps of no more than 6 cm).

Plugs with rubber gaskets are attached to the edges of the gutter. All joints are thoroughly coated silicone sealant.


All other elements of the gutter are mounted on pre-fixed hooks.

A drain hole is cut at the bottom point of the gutter, into which a drain funnel will later be mounted.

The gutters are connected into a single structure using locking joints.

A drain funnel is installed.

Vertical drainpipes are attached to the wall, the lower elbow of which should not reach 30 cm to the ground.

Design and calculation rules
 When designing an external drainage system, it is important to adhere to certain conditions:
- gutters are mounted on roofs whose slope angle is no more than 15C;
- The average height of the sides is 12cm.
The calculation is carried out using the following formula: one funnel per 0.75 sq.m. roofing and 1 cm2 pipes for drainage.
How to correctly calculate the number of gutters and pipes
 When calculating the external drainage scheme, it is important to examine the entire façade of the building for protruding parts and other architectural features.
The calculation of the gutter height is determined depending on the angle of the roof slope.
The calculation is carried out based on the following indicators: height from the ground to the eaves * 0.2 - height of the pipe bend + height of the funnel. The resulting value is divided by the length drainpipe(on average 3-4 meters).
DIY installation features
 Installing a gutter with your own hands is a complex process that requires strict adherence to certain rules. The first thing you need to do is calculate the throughput.
The layout of all elements of the future drain depends on this indicator. It is also necessary to clearly know the area of the roof and the house, and the method of fastening all the drainage elements.
All parts must be of the same type and size, which ensures high-quality performance and durability of the installed system.

- When connecting several drainpipes together, it is better to treat the joints with silicone sealant. It provides excellent sealing of joints during sudden temperature changes.
- It is recommended to carry out all work on the installation of drains at an air temperature of at least -5C.
- Upon completion of installation of the drainage system, an inspection must be carried out. To do this, just pour several buckets of water into the pipes.
- Every year, before the start of winter, pipes and trays must be cleaned of fallen leaves, branches and dirt.
Important to know: Do not clean pipes with metal brushes. Their use violates the integrity of the top protective layer. Cleaning is best done with a soft broom or high-pressure water jet.
- It is necessary to ensure that the central axis of the gutter exactly coincides with the edge of the cornice. Otherwise, sediment may overflow.
Conclusion
Installing a roof drainage system with your own hands is a labor-intensive undertaking. But professional advice and strict adherence to the work algorithm will help you do everything efficiently and quickly.
For instructions on how to install gutters with your own hands, watch the following video:
One of the serious problems in the house that owners often encounter is drainage. If you already have one, it may make sense to improve it. Well, if he is absent, there is enough work to be done. First of all, you need to decide whether to study information on how to make a roof drain with your own hands or whether it is better to turn to specialists. To order, it is only important to find qualified workers, prepare an estimate and pay for the work.
If you want to save money and have a desire to do the work yourself, we recommend that you carefully study the technology of the entire process, which will be indicated below. Snow, rain and other precipitation threaten not only the roof itself, but also the foundation, collecting around the house. In addition, you are unlikely to like it when dirt collects near your own home. And it’s not even worth talking about water dripping from the ceiling. All this can and should be avoided.
Today you can buy professionally made and well-thought-out kits, selecting any elements for them - from small parts fasteners to complex joints and corners.
If you plan to create gutters yourself, you will have to think carefully about what they will be made of and how functional they will be.
How to make a roof drain with your own hands: making a drainage system
Most often, special polymers are used to make gutters that can withstand high and low temperatures, as well as their sharp changes. They are produced by companies specializing in the development of plastic products for external design and construction of buildings. System kits are quite expensive, and they are usually installed on the roofs of beautiful mansions and less often in simple houses private sector, despite the fact that they can profitably transform any building.
Recently, drainage systems have been made of galvanized metal. Typically, such elements are purchased in specialized stores or ordered from tinsmiths. Metal gutters are more affordable and therefore used more often.Despite the low cost compared to other systems and not so attractive appearance, galvanized systems have their own positive traits, in which they are significantly superior to similar sets made from metal alloys or plastic. Their main disadvantage is the divergence of connecting seams as a result of temperature changes. However, a lot here depends on the skill of the tinsmith who makes them.
Steel gutters may have a layer of highly resistant polymer paint. It improves them decorative characteristics and provides additional protection against corrosion.
Also, drainage systems are made from a metal alloy - zinc-titanium, which are also coated with polymer paints. The content of pure zinc can reach up to 98-99% - they provide corrosion resistance. Titanium in the alloy is a guarantee of the strength of the product, and a small inclusion of copper and aluminum gives the material high ductility, making it easy to process.
Such drainage systems look just as attractive as plastic ones, but are highly reliable because they better withstand the influence of the external environment. Their disadvantages, if the coating is of poor quality, include peeling polymer coating. For this reason, if you give them preference, it is better to buy kits from a manufacturer that has an impeccable reputation in the market.
All of the materials listed above are well suited for gutters - they are convenient to process, install, and they are distinguished by their aesthetic appearance, harmoniously merging with the exterior of the building and becoming an integral functional detail of the entire structure, as well as an important addition to its overall design.
Elements of the drainage system
If gutters are bought in a store, you don’t have to think about what and how to make one of the system components - the manufacturer has long thought through all the intricacies of the roof structure. Having taken measurements and specified all the parameters of your home, you can easily buy all the parts.
Despite the wide range of drainage systems, they all have approximately the same structure and include similar design details:- The gutter is the main part of the drain that collects flowing water from the roof slopes. As a rule, gutters are created up to 4 m long.
- Hook-brackets on which the gutter is subsequently laid. Typically, plastic brackets are used for systems made from polymers.
- Funnels that are installed along the edges of gutters.
- Gutter edge cap for left and right sides.
- A central funnel, which is secured using seals, grooves and glue.
- Coupling (connecting part) for the gutter. It can also be installed with glue or secured with a groove connection using sealing gaskets.
- External and internal connecting angle (90 degrees).
- Drain pipe with coupling.
- A screw clamp that tightens the connection of two drainpipes.
- Transition coupling - used if there is a need to connect pipes of different diameters.
- A tee connecting two drainpipes.
- Bends for connecting drainpipes. As a rule, they have an angle of 60-70 degrees - different manufacturers may use their own standards. It is clear that one system must contain elements with the same values corner.
- Hook-bracket made of metal.
- The final outlet with an angle of 45 degrees is for directing wastewater into the storm drain inlet. This detail is also called a mark.
In addition to the presented elements for certain drainage systems, in addition to brackets, the kit includes a curtain rod, which acts as an additional holder for the brackets or often performs their function itself.
Before you go to the store, you need to draw up a drawing of the edge of the roof with protrusions and turns, carefully measuring all the corners. A drawing with detailed drainage parameters must be provided to a specialist, who must select all the necessary components for a complete set.
How to make a roof drain with your own hands: step-by-step instructions.
- If you plan to use a galvanized metal system, then you can make the gutters yourself, since metal sheets are much cheaper than ready-made elements. You can make a square or semicircular gutter from metal, but the semicircular shape is considered traditional.
Galvanized metal can be easily shaped using a pipe required diameter, making bends at the edges so that they stick well to the brackets.
If you can make a gutter for the drain, then making brackets will also not be difficult. Their semicircle should have a large radius, since the gutter should be easily fixed and fit in the bracket. It will not be difficult to make a box-shaped gutter from galvanized metal. Its shape is derived from a bar of the required size. One of the sides is made larger and bent to the side so that the water flows down to the right place. After which its edges are bent in a special way.
- If you need to make a drain on a straight section of the roof, the gutter can also be made from plastic sewer pipes. These gutters will cost you practically nothing, since one pipe produces two gutters.
- The pipe at the end and at the beginning is fixed on two boards with self-tapping screws, in the upper part opposite the lower fixation points, one more self-tapping screw is not completely screwed in. A thin rope is stretched over their parts, along which a straight line is marked. Using this marking, the pipe should be cut from start to finish using a grinder.
- Next, the pipe must be turned over and the whole process repeated. So it turns out that there are two halves that will act as gutters. During assembly, individual parts can be screwed together from the inside using self-tapping screws. Using sewer pipes, from the same system take and corner parts, sawing them lengthwise.
Video: creating gutters from PVC sewer pipe
Of course, self-made parts are not as attractive as professionally manufactured ones, but they do the job well and allow you to save money.If necessary, you can select other components for the system, since nowadays there are many suitable materials, which can act as blanks. The only parts you will have to order or buy are the funnels. Doing them yourself without experience will be quite problematic.
DIY drainage system installation
Installation of the drain can be carried out in different ways (it all depends on the period of installation and the chosen fasteners). Optimal installation is on rafter-pitched roof or extreme crossbar and fastening roofing.
Our photo clearly shows the method of fastening the brackets, which are covered with a cornice strip. In this case, it acts as a shield for the soffit, protecting it from moisture.
In other cases cornice strip is made from boards, and if the brackets are not secured before laying the roofing material, then they will have to be attached directly to it.
In some cases, gutter mounts are installed on the bottom of the roof slope, but this cannot be called the correct option.
No matter how the brackets are secured, their location must be calculated so that water flowing from the roof falls into this channel and in no case spills beyond it. This parameter directly depends on the protrusions of the roof edge. If he goes to long distance, sometimes it makes sense to use a fastening option that is installed on the roof itself.
Video: calculation and installation of a drainage system
So, having purchased or made your own roof drain, you can begin installing it.First of all, you need to take care of installing the gutter brackets. Install them at a distance of 5-6 cm from each other, with a slight slope towards the drain. They must be fixed so that the roof overhang is 1/3 of the size of the semicircle on the gutter, and 2/3 of the gutters will “catch” water from the roof.
If the brackets are installed on a wooden cornice, then in order to clearly see the fastening line and the slope, the following actions are carried out:
- First, install the bracket itself, which would support the high edge of the gutter, taking into account all the recommendations and rules.
- Next comes the installation of the last bracket in the row. It is fixed with a slope of 4-5 mm per 1 linear meter. Inaccurately calculated and incorrect installed system will not work efficiently and will develop leaks over time.
- Then, between the two brackets, you need to install a thin string, along which you mark the installation baseline. Next, the locations of other brackets are marked along it.
- Next, the brackets are fixed in the marked places. This will ensure that the required slope of the gutter is maintained.
- The gutter is laid and assembled, and a cap is installed on its raised edge.
- The gutter is fixed by placing a groove on the protrusion of the bracket.
- If a ready-made drainage system is installed, then the individual parts of the gutter are fastened together with connecting parts that provide precise sealing and mating. If the system is made by hand, then the gutters are laid overlapping, and then twisted using self-tapping screws. In this case, it is useful to make a thin sealing gasket, for example, from a rubber strip.
- As soon as the drainage channel is laid and you install funnels in it, elbows and waste pipes are mounted to them, which are tightened with clamps at the joints. Drainpipes are attached to the wall with clamps. The use of bends will allow them to be positioned along the wall so that the posts of the clamps do not stick out too much.
- If there is a structure around the house to collect and drain melt or rainwater storm sewer, then in some cases the pipe from the roof is connected to it or the edge of the pipe is placed with a mark directly above the opening of the drain or storm inlet.
Attention! It is advisable to install a protective mesh on the gutters to collect fallen leaves or large debris at the bottom. Typically in large systems it is provided in the form of a strip attached to the edges of the gutter.
For a do-it-yourself drainage system, you can buy mesh by the meter and lay it into a roll, which is secured with plastic clamps.
Video: what a mesh should be like to protect against large debris
Regardless of which drainage system you choose for your home, it requires regular preventative cleaning and periodic monitoring. Even if a mesh is installed on the gutter, it sometimes needs to be washed, since, in addition to large fragments of debris, large number dirt and dust, and the soaked fallen leaves themselves are not always blown away by the wind. If the drain system is clogged, all the accumulated water along with dirt may end up on the walls of the house.Taking on self-production drainage or installation finished system, you need to correctly calculate all the slopes and parameters, complete the drawing and evaluate your strength in completing the work. If you are not sure that you will make a drain of the required quality, we recommend that you contact a specialist.
If you are building a house or reconstructing an old building, you need to pay close attention to the roof drainage system. From its presence and correct design The integrity of your walls and foundation will depend in the future. Moisture that is not collected at low tides will penetrate under the foundation and destroy it. Literally in ten years the first cracks will appear, which will subsequently cause the destruction of the building. Drainage structures are designed to prevent these negative manifestations. Let's figure out how to make a drain with your own hands.
Materials
There are two main materials in fashion today that are used in the manufacture of drainpipes - metal and plastic. System from metal elements costs a little more. Gradually, dents and various scratches appear on the surface, which can further contribute to the appearance of corrosion. Therefore, in order not to waste money on periodic processing anti-corrosion compounds or replacing system elements, make your choice in favor of galvanized material. It can last for quite a long time.
Plastic is considered more durable material and does not require additional protective treatment. Its advantage is diversity color shades, allowing you to select drainage systems to match the tone of the main facade and roofing. But at low temperatures this material becomes quite brittle, cracks and loses its tightness.
Elements of the drainage system

There are six main elements:
- pipes,
- rotating elements,
- funnels,
- gutters,
- plugs,
- mounting hardware.
Calculating the number and length of each element is quite easy. The first thing is the footage of the gutter channel. To do this, the footage of the entire perimeter where it is planned to install the drainage system is measured. Next, the number of funnels is determined. One is installed per ten meters of gutters. Experts advise that if the length of the plot is more than ten meters, install several drainage points. The number of pipes is determined by the number of funnels. The length of one is equal to the distance from the funnel to the surface of the earth. Rotary elements are determined based on design features roofs.
Installation work

The main rule is to maintain tightness. When installing gutters, it is necessary to maintain a slight slope of two to three degrees so that the water does not stagnate and drains immediately. First of all, the mounting brackets are mounted:
- for each straight section from the edge of the roof to the funnel, two extreme brackets are mounted, taking into account the slope angle you have chosen,
- a cord is stretched between them, along which intermediate fasteners will be installed,
- Installation of intermediate brackets is in progress. The cord will allow you to do the work smoothly, while maintaining the slope in the desired direction. The spacing between holders depends on the material of the system:
- made of metal – 1000 mm,
- made of plastic – 600 mm.

Pay attention! When assembling gutters, in order to maintain tightness, work should be carried out in the direction of the water flow. When installing pipes, you need to start work from the funnel and move towards the ground!

Maintain a slope for water drainage. It should be 2–5 mm per meter of gutter length.
The gutters must be connected with an overlap; a sealing compound can be used at the joining areas.
It is best to install brackets more often, for every meter of gutter. This will give the system additional strength.

Pipe clamps are installed at your discretion, based on the height of the wall.
See detailed video instructions below:
Buy or make your own?
If funds allow, you can purchase all the elements of the drainage system. And if funds do not allow, let’s consider how to make a pipe or gutter. To do this, you need to purchase a galvanized sheet 7-8 mm thick. Then you can get started:
- we bend the edge necessary for the seam connection;
- we roll the tin into a pipe or make a gutter;
- For a funnel, three components are made - a glass, a rim and a cone. In this case, it is necessary to ensure that the diameters are maintained so that subsequently there are no leaks at the joints. All elements are fastened using a folded seam;
- the drain is made in the form of pipes.

Pay attention! If the drainpipe consists of several pieces, then one side of each should be slightly narrower in diameter. This will allow the sections to be tightly connected into one whole.
Tools for work
To install the system, you will need scaffolding (a tower, several ladders), a hammer drill, a level, sealant and all the necessary elements of the system in quantities determined in advance. By installing gutters, the pipes can be directed into water tanks for watering the garden or taken to areas where the water will not pose a threat to the foundation.
Photo


Properly arranged drainage of water from the roof of a house will ensure reliable and timely protection of the foundation, wall structures and roof from the negative effects of precipitation.
A practical drainage system is made of durable and reliable materials, is easy to install and maintain, and gives the building façade an attractive and aesthetic appearance.
Features of the roof drainage system
The roof water drainage system is an important functional part of any building, which ensures its reliable operation and protection throughout its entire lifespan.
Such a system is intended for the following purposes:
- protecting the finished structure from moisture;
- collecting any liquid - melt, rain;
- decorative design of the facade.
Drainage systems for private households are divided into two types:
- Internal. Intended for installation on flat roof. In this case, the roofing material is laid at a slope towards the funnel to collect and transfer water to the drain. The pipe is installed in interior walls buildings or in technical channels.
- External. Used for pitched roofs (with one and two slopes). The main elements - drainage pipes, funnels and gutters - are mounted along the edge of the roof, and liquid is drained from the outside of the building.
Structural elements of the external drainage system
External drains are used in most private houses equipped pitched roofs, therefore, this particular version of the system will be considered in more detail.
The drainage system includes the following elements:
- Gutters for collecting water from the roof surface when it's raining or snow melts, as well as its further removal through pipes into drainage system. Drainage gutters differ in configuration, dimensions and material used for their manufacture.
- Connectors for gutters. Considering the standard length of gutters is 250 cm, in order to organize a system of drains from the roof, it is necessary to correctly connect all structural elements. For these purposes, connectors equipped with rubber-based sealing gaskets are used. They provide reliable sealing of the joints between elements and compensate for the expansion of materials during heating or cooling.
- Angle-type transition elements are used to organize the bypass of the wastewater system along internal corners buildings. Corner connectors help increase the hydrodynamic performance of the finished structure.
- Fastening elements – metal brackets designed for reliable fixation gutters to roofing structure. They are represented by special hooks of different lengths and configurations.
- A funnel for redirecting water from the roof through gutters into pipes. An important structural element of any drainage system, it is mounted between the gutter and the drainpipe.
- Protective caps that prevent water from overflowing over the edges of installed gutters.
- Drainpipes are designed to drain liquid into a storage tank or drainage system. The pipes are installed to the funnel and fixed to the facade of the building.
- Pipe and waste elbows are provided for drainage waste water at a safe distance from the foundation and blind area of the building. The pipe elbow allows you to adjust the rotation of the pipe, and the waste elbow ensures that water is discharged into sewer system.
- Fasteners for fixing pipes. Such elements are used to securely fasten pipes to the facade of a building.
- Mesh caps to protect the structure of the gutters from dirt and clogging with foreign objects.
Technical characteristics of gutters and pipes
Gutters and pipes - main structural elements drainage system installed on the roof. To organize water drainage from the roof, it is necessary to select the correct structural elements, taking into account their sizes, configurations and materials.
Gutter configuration
This parameter determines the geometry of the finished system, on which the effective one depends.
Gutters come in the following forms:
- semicircular;
- square;
- rectangular;
- trapezoidal;
- semi-elliptical.
The most reliable and affordable are semicircular elements, which are widely in demand for private households, are easy to maintain, and can provide big flow water. The special design of semicircular gutters, reinforced with stiffening ribs, provides increased resistance to extreme loads and deformations.
Square and rectangular shape They are not suitable for all types of roofs, and they also require additional protection from deformation by additional installation of snow guards.
Drainpipes are selected taking into account the shape of the gutters: square pipes for box-shaped gutters, round - for semi-circular and semi-elliptical gutters.
Diameters of pipes and gutters
No less important parameter is the diameter of gutters and pipes, which is determined by the area of the roof - than larger area, the larger the diameter.
Gutters come in diameters from 9 to 15 cm, pipes - from 7.5 to 12 cm. When choosing elements, it is recommended to follow the following recommendations:
- For small roofs with a slope area in the range of 11–72 sq. m. gutters with a diameter of up to 10 cm, pipes - 7.5 cm are suitable.
- For medium-sized roofs with a slope area from 110 to 205 sq. m. you should choose gutters with a diameter of 10–13 cm, pipes – from 9 to 11 cm.
- For roofs large size, the slope area of which is from 210 sq. m., gutters with a diameter of up to 15 cm and pipes with a diameter of up to 12 cm are provided.
Material of manufacture
The reliability and durability of the roof drainage system depends on the quality of the material used to make the gutters.
Gutter systems with basic elements can be made of plastic or metal. For metal structures products made of steel, copper, polymer and aluminum are used.
- Steel. The products are characterized by low cost, light weight and ease of installation. To increase performance characteristics steel products are coated with special polymer components that can withstand temperature changes, exposure to ultraviolet radiation, mechanical damage and deformation. The connection of individual structural elements is carried out using fasteners equipped with seals, brackets and locks. The disadvantages of the material include fragility upon impact and susceptibility to rust in places where the surface is damaged.
- Aluminum. Roof drain equipped aluminum elements, is distinguished by practicality, durability, ease of installation and low weight. This design has an attractive appearance and is resistant to ultraviolet radiation and fading. The disadvantages of the material include high cost and susceptibility to electrochemical corrosion. To connect products, special rivets, an adhesive mixture or silicone for aluminum are used.
- Copper. Products made from pure copper are the most durable and reliable. The connection of individual elements is carried out by hot soldering or folding. Copper elements are intended for installation on seam type roofs. During operation, copper undergoes oxidation, as a result of which it acquires a characteristic green tint. If a copper roof water drain comes into contact with aluminum or steel elements, this may cause electrochemical corrosion. In this case, it is recommended to install copper drains on roofs made of the same material.
- Polymer. The most popular and affordable option drains for private houses and cottages. To increase the resistance of products to ultraviolet radiation and temperature changes, the surface is coated with acrylic or titanium impregnation. The elements are connected using couplings with sealing rubber bands, snaps or adhesive mixture. Gutters made of polymer materials are resistant to corrosion, mechanical stress and damage.
How to install a roof drainage system yourself?
Installing a drainage system with your own hands requires technical training and compliance with safety rules when carrying out work at height.
Before starting work, it is recommended to take some measurements, namely, calculate the perimeter of the external walls and the number of fixing brackets. In addition, you should prepare simple diagram placement of brackets, gutters, funnels and pipes with drainage elbows.
To arrange a simple drainage of rainwater from gable roof, calculations of the required number of components are carried out in the following ratio - every 10 meters of the gutter are equipped with 1 funnel, to which 1 pipe is fixed. Next, the required number of funnels and pipes is calculated.
The number of fixing brackets is determined by the total length of the gutters and the minimum distance at which they are installed. Calculating clamps for drainage pipes is simple - 3 clamps for each pipe.
Assembling and fixing the system structure is carried out in the following order:
- The locations for fixing the brackets are marked. To provide them with the necessary slope, two points are marked - the start and end points - and connected to each other. Points for attaching the bracket are marked on the line. Next, the elements are fixed to the roof surface.
- The gutter structure is assembled. All main elements are connected to each other into a single sealed structure, and funnels are installed.
- The assembled gutter is mounted in the place provided for it with fixation on brackets.
- After the gutters are securely fixed, the funnel is connected to the elbow to install the drainpipe. It is important to maintain a minimum technological gap of 3–4 cm between the pipe and external wall Houses. For vertical pipe installation, you can use a building level or plumb line. Clamps are installed in appropriate places and the pipe is fixed.
- An elbow is attached to the bottom of the pipe to drain water.
- All unused sections of the gutter are closed with protective plugs.
- To route the system around the entire perimeter of the roof, corner-type gutters are installed at the corners.
Closed drainage of rainwater from the roof provides for effective drainage of liquid beyond the foundation and basement: into the storm sewer system, drainage or sewer well and a storage tank.
