How to drill a vertical hole in a beam. Deep holes with a drill. Like a drill press
In the process of drilling recesses, a situation often arises in which it is not easy to obtain perfectly straight corners. How to drill a perpendicular hole of a certain depth? To do this, you should use these tips experienced craftsmen. They offer several options for getting out of this situation.
There is practically no carpentry work that does not involve the use of a drill and fasteners. During the drilling process it is worth knowing about important principles this activity:
- you only need to drill a hole at a given point;
- the hole has a set size;
- at the time of drilling, the tool should be positioned at a right angle.

If all of the above requirements are clearly met, we can speak of success in the work:
- use of special drills;
- clear fastening of the material will help to secure the work and make it significantly easier;
- uniform pressure on the drill.
So, for these purposes you can use wooden block square shape, press the drill and drill bit firmly against its base and perform the desired action.
Another method also involves using homemade device, only it looks like the letter “T” with internal corner at 90 degrees.

Drilling methods: partial holes in products in pairs (a); using an attachment plate (b); c - holes in the corner; g - in planes located at an angle; d - on a cylindrical surface; e - in hollow parts.
The drill is placed at one of these points and placed on the mark, after which drilling is performed. Taking into account the length of the drilling device, the depth of the groove is determined.
To get an accurate hole at a right angle, you can use a guide. Its strictly fixed position will allow you to avoid mistakes and deviations from the given angle. Certain varieties of such tools help to make grooves not only vertically, but also while maintaining other angles.
The nozzle has a depth-limiting device, adjustable with a stopper and a spring. The purchase of such a tool will protect against damage to workpieces and furniture.
Using a Conductor
You can drill a deep hole in a perpendicular sample using a special device - a jig. Moreover, such activities are carried out not only on a flat base, but also on the rounded parts of the workpieces, at corner points.
Components of the conductor:
- A core that allows you to make markings for a drill.
- Plastic stencil.
- There are 6 guide bushings, the diameters of which correspond to 4 mm, 5 mm, 6 mm, 8 mm, 10 mm, 12 mm.
Return to contents
Features of the position of the jig for drilling in different areas of workpieces

- For rounded parts, a recess without corners is used, located on the bottom of the device.
- At corner points and on cylinders it is worth using the V-shaped element included in the kit.
- To fix the middle end line of the part, you need to install 2 nails in the corresponding grooves at the corner points of this device. The jig is rotated so that the fasteners connect to the edge of the element. The central part of the sleeve, intended for drilling a hole, is placed in the middle of the end part of the part.
A core is taken to mark the center point of the groove.
- Place the named element in the middle of the hole and fix the stencil on it.
- Place the bushing on this post with the flared part up, its diameter corresponds to 4 mm, and insert it into the template. Such a part must be centered and pressed against the material using a clamp.
- Remove the core along with the bushing from the template, which should not move.
- The guide sleeve is placed in a stencil of a certain cross-section.
- Using a drill, a hole of a certain depth is made.
Return to contents
Making a homemade device

Devices for drilling wood: a - use of a stop for drilling holes in round workpieces; b - use of a stop for drilling holes in a vertical plane; c - template for drilling the end and plane of the workpiece: 1 - workpiece; 2 - template; 3 - holes in the template; 4 - clamp with which the template is attached.
In practice, drilling a groove at a right angle can be very difficult. Often, many craftsmen use special devices for this. However, these options are often designed for specific types of drilling equipment. Some are suitable for hand drills with seats for additional handles, and others for battery handles.
Meet and universal options, however they are expensive. People who make furniture cannot do without this device. For a person who makes something on rare occasions, the cost will be quite high.
You can make such an assistant yourself, from the remains of chipboard. The initial blank of such a device looks like bars stuffed on the base of this material.
Here later you need to help the drill find the right point and inclination angle. A small part of the material is installed end-to-end on the main panel.
Before assembling the device, it is worth making a mark for 3 holes with different sections.

Take 3 screws, the diameters of which correspond to 5 mm, 6.3 mm and 7 mm. According to these dimensions, grooves are drilled at 3.5 mm, 4 mm and 4.5 mm.
Next, the device is assembled. Holes are drilled for the first holding component, which is immediately secured. Afterwards, a groove is made for another holder. At the time of drilling, a chipboard block is placed between these two parts to create more accurate results for the second element. The device, made independently, must be strong and should not move in all directions.
Such a device will allow you to make grooves only as a drilling device to create right angle at the end of the panel. To center the drill and drill a hole on a flat base, a additional device. To do this, 3 holes with a diameter of 3.5 mm, 4 mm and 4.5 mm are drilled in a chipboard block. Next, marks are fixed on the prepared panels, the drill must pass through the object, and a groove is outlined.
As soon as the markings are made correctly, you need to lower the device onto the panel and place the drill, maintaining a right angle. Now you can drill.
The grooves in the end part are made in the same way. The drill passes through the assistant, the hole is marked, the structure is firmly connected to the side of the manufactured object, after which the drill can be used.
When making any devices, it is sometimes necessary to drill a wooden or metal rod or other part from the end. For example, in order to cut a thread in a shaft, join shafts together, or machine a recess for a key, etc.
This seemingly simple task is actually quite complex. Since it is very important to ensure perfect alignment of the part itself and the hole.
A simple template that can be made from hard rocks wood (oak, beech, dry birch). Let's take a small block from one end and use a drilling machine to drill a hole with a diameter of future detail to the middle of the thickness of the bar.
Then we will continue drilling, but with a drill whose diameter is equal to the diameter of the drill with which we will subsequently drill the part. If the hole in the part is needed not in the center, we drill the working hole for drilling in the template also in the center, but with an offset.
If you have to make a recess in a part for a key, then do not try to drill into a half-drill. The template material is probably softer than the material of the part and the drill will simply “go” into the template. Just take a thinner drill. It is necessary to drill so that the drill with its cutting part does not touch the template.
For reliability, the part is clamped in a vice (if possible). The drill should be removed from the hole as often as possible to remove chips and cool it. When drilling metal, especially tough metal (duralumin, copper, stainless steel), the drill should be cooled in machine oil and not allowed to overheat in order to avoid its “holidaying”.
Drilling curved parts.
This problem presents a rather interesting case. When registering a dacha or garden plot, at home in rustic style, it is becoming fashionable to use all kinds of wooden elements not only in the design, but also in the interior. For example, street lights hung on thick branches or branches. When constructing such a lantern, the task arises of dragging electrical wire so that it is not visible. Because if it is visible, it will significantly reduce the aesthetic perception of the product.
Therefore, the wire is sometimes placed in a groove cut into an invisible part of the product and then puttied. This method is simple, but it is also not the best.
In order to drill a channel in a thick crooked branch, you can use the fact that the wood in the core of the tree is much softer than the surrounding wood. Those. the branch can be considered as a kind of wooden “cable-channel” filled with more soft material. So we have to remove it and drill it out.
Ordinary drills, even very long ones, cannot always help us here. You'll have to make a flexible drill bit yourself.

If you have a strong spring from a flexible shaft, then you are very lucky. You can securely fasten an ordinary perk in it (only the shortest one) using soldering, and with this tool you can slowly and without manic effort drill a branch. This technique only works when the branch is thick enough and the hole is required to be 15-20 mm in diameter.
If you have to drill a fairly thin branch, you will have to make the drill yourself. To do this, take a piece of flexible but elastic steel wire and flatten its tip on an anvil, so that you get a small spatula. Mentally divide it along the axis of the future drill into 2 halves. And using a needle file we sharpen each half in the opposite direction. We leave a small guide point in the center. Those. We repeat the shape of a regular drill - perks.
Before we start drilling, we use a regular drill to make a recess in the branch to be drilled, so that our drill will immediately receive some kind of direction and “support” in the form of stronger walls. Clutching the opposite end of our improvised homemade drill into the drill chuck, and having installed the drill itself in the clamps, turn on the slowest speed. Holding the “drill” with one hand (with a strong glove), we begin to drill the branch from the thinner end. The force of pressing the branch on the drill should be minimal and pulsating. After a while you will get the hang of it and the process will go faster. You should experiment with sharpening angles to get the best results.
The drill seems to rub more soft wood core and moves deeper into the branch. If you have to drill a very long branch, then, of course, this should be done from different sides. This way both holes will meet in the middle and the drill won't need to be too long.
You can pull a wire through a barrel drilled in this way and from the outside it will not give itself away at all. Having mastered this technique, you will be able to make absolutely amazing souvenirs from crooked and gnarled branches. For example, hanging hooks for lanterns or table lamps, souvenir trees strewn with miniature light bulbs or LEDs, etc.
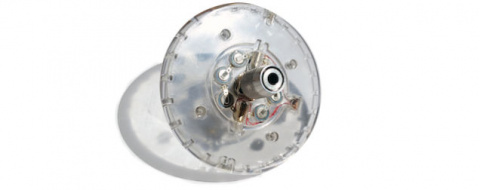
Drilling a hole straight at a 90 degree angle is not an easy task. It may take a lot of effort to keep the drill level and vertical. BullseyeBore suggests doing this using several laser concentric rings.
The BullseyeBore drill uses a simple red laser to project three rings onto the surface where you intend to drill. To keep the drill as level as possible during the process, watch the three rings. The inner two will remain in the same position no matter how the drill is tilted, but the outer one can move. By aligning the position of the largest ring relative to the two smaller ones, you will ensure that the drill is strictly vertical position, and the hole will turn out just perfect.

In addition, concentric rings can provide information about the depth of the hole. The distance between the large and middle circles will precisely indicate the drilling depth. If at the beginning there is a picture like this:

In the middle of the process the circles will come closer together:

And in the end they will simply merge:

The attachment looks like a small transparent disk with a connector for easy installation on any drill. Lasers, optics and batteries are already built inside. The disc is smooth, lightweight and impact resistant.
Manufacturers are now developing a model where all the filling will be implanted into the drill chuck.
You can find out more about the project.
Drilling is one of the most frequently performed operations by home craftsmen. And any master has encountered problems when drilling, especially if the work is delicate. And delicate work most often occurs: the drill is missing half a millimeter - the furniture door is skewed or a simple towel hook in the bathroom is askew, and it is impossible to re-drill: the tiles have just been laid. Grace and “oakiness” are incompatible, so you need to know how to drill correctly with a drill.
Safety
In terms of electrical safety, commercially available power tools belong to class II: double working insulation, use without additional grounding is permissible, i.e. Such a drill can be plugged into a regular, non-European socket through an adapter. At “iron bazaars” you can find class I (“industrial”) tools with a grounding terminal on a metal case. It is dangerous to use it in everyday life, and its chuck is most often used for a drill with a conical shank (Morse taper), unsuitable for rotary impact drilling. Therefore, do not buy such a drill, even if it is powerful and inexpensive.
Class I is indicated on the nameplate of the drill, and if there is no designation, the body is partially or completely plastic, and the cord with a Euro plug is a class II tool. Class III - a power tool with an operating voltage of up to 42 V (low voltage) can be recognized by the class designation on the nameplate and by a special plug with flat crosswise contacts. It is suitable for home use, but inconvenient: you need a powerful step-down transformer.
For protection against foreign objects and moisture, power tools and equipment are marked with the letters IP (Ingress Protection) with two numbers after them: the first - from foreign objects, the second - from moisture. If the protection for any position is zero, the letter X is placed instead of the corresponding number. Thus, an IP32 drill can be used outdoors in good weather; IPХ2 - only inside, IP34 - outside in fog and drizzling rain, and IP68 can work during the Samum in the Sahara and under water.

Important: the first digit 2 means that the device is finger-resistant; for example, household socket has a degree of protection IP22. But this in no way means that if you grab a drill chuck with the same degree of protection with your hand while working, it will stop on its own. The IP standard is not foolproof.
Cartridge
The regular three-jaw chuck is accurate and good at rotary drilling. When using a rotary impact drill, it quickly becomes loose, and the chuck itself loses accuracy and may completely fail: the threaded race of the cam mechanism bursts. For work on hard, brittle materials, the three-jaw chuck is suitable for occasional use or with a diamond working body in rotation-only mode.

In a quick-release chuck (you can recognize it by its corrugated plastic collar), the drill is clamped by a collet. Such a chuck holds the drill better during impact-rotary drilling, but is less accurate for fine work of little use. Powerful drills are equipped with a two-sleeve collet chuck– clamping and loosening are carried out by different rings.

The SDS cartridge (Steck-Dreh-Sitzt, German “inserted-turned-sits” or Special Direct System, special direct system, English) was invented by Bosh. SDS is ideal for construction work: the system of shaped grooves, see figure, absolutely securely fixes the working element according to the principle of a Chinese puzzle; replacing the drill is done with just two light movements.
Unfortunately, SDS is not suitable for metalworking and carpentry: the centering accuracy of the drill is insufficient. An adapter from a three-jaw chuck to an SDS makes no sense: it will become loose from vibration, just like a regular drill. Therefore, the SDS drill is incompatible with the conventional working tool fit.
Note: There are three types of SDS fit: SDS+, SDS Top and SDS Max. SDS Top is rarely used, as an intermediate and generally unsuccessful option; SDS+ is designed for one-handed tools weighing up to 5 kg; SDS Max – for heavy two-handed.
Power and speed
Buying a rotary impact drill for general works, no need to save on power. Power reserve is needed to create the necessary torque at low speeds. The external characteristics of a series-excited commutator motor used in drills are close to ideal, but the low-power motor overheats at low speeds due to high current. It is also advisable to purchase, if not included, a front slip handle.
The maximum speed of the drill is also important. Diamond tool literally “eaten up” before our eyes at a rotation speed of less than 1600-1700 rpm; its normal operating speed is from 2500 rpm. Carbide tools require at least 1500 rpm. If you come across a drill at 600-1200 rpm, this is a special tool for work general purpose unsuitable
For precision work on metal, a simple, rotation-only, low-power drill - 120-200 W - is best suited. A stand that turns the drill into a tabletop will be very useful. drilling machine. And if you also fork out for turntable to the bed, then it will be possible to mill small parts with a dental bur.
Mains or battery?
Cordless drill home handyman needed in two cases:
- If you work on the side, this is your more or less regular extra income.
- If you have a non-electrified cottage or garage.
In any case, an expensive professional drill with lithium battery and its charging time of 10-20 minutes is unlikely to pay for itself. This is an option for professionals who work full shifts day after day. A regular alkaline battery, charged in 4-8 hours, will suit you. In extreme cases, you can “pump it up” to a hole or two in half an hour.

Section summary
All of the above can be reduced to the following recommendations:
- Regular construction work, including metal structures - you need a hammer drill and impact drill at 350 W and above.
- Occasional household work – rotary impact drill from 250 W.
- For precision drilling - an additional precision drill for rotary drilling at 120-150 W; preferably with a frame.
Drills
The following types of drill bits are most commonly used:
- Spiral - are made of tool steel, coated with carbide, with a carbide insert and solid carbide. Used for all types of work on any materials.
- Spade bits can be used to drill wood, MDF and plastic. Allows you to drill holes large diameter. They are made either in one piece or in the form of a set of a shank with a groove and several inserts of different diameters. This set is cheaper than a set of solid nibs, but less accurate.
- Crowns (crowns) are used for excavating holes in hard fragile materials– stone, concrete and drilling wide holes in chipboard and fiberboard. Available with or without a centering twist drill. The latter are cheaper, but are only suitable for stone and require strong working skills.
- A circular drill (centre drill, ballerina drill) is used to drill large-diameter holes in thin, durable but fragile materials with a decorative front surface, such as tiles or polished decorative stone. The drilling diameter of the circular drill can be changed smoothly. Rotary impact drilling with a circular drill is unacceptable.
- Diamond drills are thin-walled tubes made of a special alloy coated with diamond. They can be used to drill glass, polished decorative stone, and glazed ceramic tiles. Roads require careful handling and precise adherence to drilling technology.
Drill sharpening 
Drill sharpening
Self-sharpening of drills is acceptable for twist and feather drills. The first ones are sharpened with a diamond file - they are made of tool steel. Cheap sets can be made from regular carbon steel; their feathers can be straightened with a regular file.
Spiral drills are sharpened with an emery wheel (carbide - diamond) using a device - a wedge with an angle of 180 degrees minus half the sharpening angle. So, with a sharpening angle of 120 degrees, the wedge angle is needed at 30 degrees. In the hypotenuse (oblique side) of the wedge, a longitudinal hollow is made or blind hole, in which the drill is smoothly rotated when sharpening. The best sharpening is achieved using a fine (“velvet”) hand grinder. emery wheel, see fig. below.

For different materials need different angles drill sharpening A. Metal is most often drilled with drills with a sharpening angle of 116 degrees, concrete and stone - 90 degrees, wood - 60-90 degrees. Precise angles and methods for sharpening drills different types for different materials can be found in material processing reference guides.
About hard alloys
Carbide alloys for drills are made based on boron, tungsten or zirconium compounds. The cheapest are boron-based, but such a drill will take concrete with great difficulty and will wear out quickly. Such drills are marked “by stone”. Drill with them decorative materials You can’t - the edges of the hole will chip. Tungsten and zirconium compounds differ primarily in their durability: zirconium compounds last longer. They cost more accordingly.
What and how to drill
Whenever drilling, the hole locations must be marked. For metal this is done with a center punch, and for glass, ceramics and stone - either with a special diamond center punch, or with half a pobedite roller from an old glass cutter, clamped into a homemade holder. Mark (more precisely, scratch with rotation) hole marks in fragile hard materials need to be done manually. Now let's move directly to drilling technology.
Steel, brass, bronze, massive duralumin
Drilling of metal of normal viscosity is carried out at medium drill speeds, 400-1000 rpm depending on the hole diameter: 400 revolutions - with a maximum drill diameter of 13 mm for a conventional drill; 1000 – with a diameter of 3 mm. For smaller diameters, the speed is again reduced to the same 400 rpm for 1 mm.
RPM means maximum, at idling. During the drilling process, the regulator itself will reduce them according to the tool feed, i.e. according to how hard you lean on it. Selecting the feed when manual drilling by weight requires a certain skill: if the feed is too low, crumbs will form, the hole will end up with uneven walls. And from the same crumbs the drill will overheat and quickly become dull.
If the feed is excessive, so-called drain chips will form - thick, curling in a spiral. The result is the same. To develop the feeding skill faster, you need to drill even small holes with both hands, with a cap handle. The chips should be thin and fragile. For steels 42 and 44 (regular structural steels), chips with a bluish tarnish color are acceptable.
Bronze and some types of duralumin require special attention: they do not produce flush chips at all, and duralumin sharply loses strength when heated above 160 degrees. It is permissible to monitor bronze by its tarnish: its appearance is undesirable. The duralumin needs to be cooled with liquid machine oil: if it boils, you need to press it lightly.

You can set the idle speed by clicking the regulator. If the drill is at 2800 rpm, and the regulator gives 14 clicks from edge to edge, then 1 click is 200 rpm. The adjusting characteristic of the regulator is not always linear, so you need to carefully monitor the drilling process and then make the necessary correction: know at what clicks of this particular tool you need to drill a given material.
Note: When drilling steel and brass, lubrication is not needed, it will only prevent the formation of correct chips.
Sheet metal
For the same materials, but sheet materials, so that drilling does not lead to bending of the sheet, two methods can be recommended:
- When drilling from the bed, give more revolutions, up to 1500-2000, and quickly “pierce” the sheet, which should lie on a wooden pad. To prevent the sheet from turning and injuring you, it must be secured with nails driven into the cushion at its edges, or pressed to the table with a clamp; better - two.
- When drilling by weight, as soon as you feel increased resistance to feed (this means that the drill is about to come out), you need to drill the hole on the other side, pressing the “pimples” inside with a center punch.
But radical way to get a wide hole in a thin sheet of metal with a regular drill - first drill a hole with a diameter equal to the thickness of the sheet, then in one or three steps expand it to the diameter of the required hole minus double the thickness of the metal, and drill cleanly. Each subsequent hole should be wider than the previous one by twice the thickness of the metal. The maximum permissible diameter is 5-6 metal thicknesses. That is, in a 2 mm sheet you can drill a hole with a diameter of 13 mm, and it will be round, and not like a triangle with heavily smoothed corners.
Aluminum is a soft metal, very viscous and fusible: its melting point is only 660 degrees. Because of this, when drilling, it may melt on cutting edge, blurring of the hole, swelling of its edges and biting of the drill. Therefore, when drilling aluminum, the speed should be one and a half times less than for other metals, cool the drill with liquid machine oil, emulsion or water, and feed the tool little by little, without interference.
The drill bit for aluminum must be sharp, factory sharpened or sharpened on a special machine. Hand-sharpened drills are not suitable for aluminum.
Stainless steel
Stainless steel is drilled in the same way as structural steel, but with a solid carbide drill bit sharpened for metal. Such drills are very fragile, so the tool must be fed easily and without the slightest distortion. It is best to drill with low power precision drill in the bed.
Wood, MDF and plastic
Industrial wood is drilled with a twist drill or a feather drill, sharpened to look like wood. Dense woods (oak, beech, walnut) can be drilled with a core bit and a centering drill. Drill revolutions are 400-600 for a twist drill and 200-500 for feathers and crowns.

Drilling plastic windows, MDF, plastic tiles and polished wood are produced either with a special wood drill (with shaped sharpening and a centering threaded cone) or with solid feather drills. In the latter case, a centering hole of 3-5 mm is drilled in advance; it can be drilled with a regular drill. Turnovers are the same as for industrial wood; The feed is easy, without pressure.
Concrete and reinforced concrete
Drilling of concrete is carried out using special drills for concrete with a super-hard solder or liner, using a rotary impact method at medium or 2/3 of the maximum speed of the drill. Best option– SDS drill. If reinforced concrete is drilled, then the drill hitting the reinforcement most often leads to its damage: the hard tip gets chipped. Therefore, before drilling reinforced concrete, it is highly advisable to determine the location of the reinforcement using a reinforcement detector; This device works on the principle of a metal detector.
Drilling holes in the walls for socket boxes is done with a stone crown (for brick walls) or concrete, with the same precautions in the case of reinforced concrete. If the hole is drilled with a crown without a centering drill, then it is applied tightly, without distortion, to the wall, pressed, and with sharp, quick pressure, turn on the drill.
There is a special tool and technology for through-hole drilling of walls, but this is the subject of a separate description.

Ceramics and stone
How to drill tiles is, without exaggeration, a whole science. The material is decorative; chipping of the edges of the hole is unacceptable. They drill into already laid tiles, so cracking is also unacceptable. By smooth surface the drill can easily slip off, which is again unacceptable. Drilling - only by rotation.
Drilling ceramic tiles is done as follows:
- A hole with a diameter larger than the thickness of the centering drill web is punched manually with a diamond or carbide center punch; its diameter is 2.5-3 mm. When drilling a large diameter hole, the diameter of the centering drill should be equal to the diameter of the centering rod of the compass drill.
- A centering hole is drilled using a concrete drill. When drilling holes for dowels up to 6 mm, you can immediately drill clean.
- Using a concrete finishing drill, the hole is finally drilled.
Porcelain tiles are drilled in the same way as ceramic tiles. Drill speed is maximum, except for drilling with a circular drill; serving – light, minimal. It is advisable to provide continuous cooling working area water. You cannot cool the tiles with oil - when heated, it can ruin the decorative surface.
Drilling ceramics with a circular drill requires special care and steady hands: misalignment is unacceptable, and the drill is not balanced. Even experienced workers need to drill with a cetrobur with both hands, placing the front handle on the drill. The revolutions are higher, but not more than 900, because with large ones, an unbalanced drill will break the hole and chip off its edges.
Video: how to drill tiles
Solid stone and glass
Glass, granite and other brecciated (grainy) hard stone with quartz inclusions should be drilled with a diamond drill bit. This is a job for an ace and virtuoso of drilling. A low-power precision drill is set to maximum speed, tried on, aligned horizontally and vertically by eye, immediately turned on “full” and slowly, smoothly inserted the drill into the material. Pressure and distortion are unacceptable.
If the piece being processed can be laid on a table, then glass and stone can be drilled from the bed using the ancient Egyptian method: with a copper tube and quartz (not sea shell) sand:
- A roller 1-1.5 cm high is made from plasticine or putty around the drilling site.
- Fine powder is poured into the formed hole. quartz sand and moisten it to a liquid paste.
- A flat, thin-walled copper tube is inserted into the drill chuck.
- The drill is set to MINIMUM speed.
- Drill with a series of short, light pecks with the lightest pressure. The sand eats into the copper, and the tips of its grains, which have greatest strength, chew the material.
Note: You won’t get the exact diameter, but you will get a matte spot around the hole.
Video: examples of glass drilling at home
Holes in pipes
If a piece of pipe can be laid in the center or clamped in a vice, then it is better to drill with a precision drill from the bed. If you have to drill by weight, then after punching the mark must be expanded to a diameter exceeding the thickness of the drill bridge. For metal, this can be done with a carbide drill, rotating it with your fingers with light pressure; on PVC - with the tip of a penknife.
Then the tip of the main drill is inserted into the hole with the drill turned off, the tool is leveled and tried on, as when drilling tiles, lightly pressed and turn on the drill, gradually increasing the speed. If the hole diameter is more than 1/5 of the pipe diameter, then first drill a centering hole 2-4 mm in diameter. In general, with some skill, drilling holes in pipes is not a difficult job. You just need to be careful: when drilling while hanging, the drill, if it splashes, can damage the wall or furniture.
Square holes
Is it possible to drill square holes? Yes, you can, if you use a drill in the form of a so-called Renault triangle - the simplest figure, as mathematicians say, of constant width. Renault drills come complete with a fixing frame; it is attached to the drill with a rod and clamp. The corners of the hole will be rounded, but the unnoticed area of the hole will be only 2%.

However, you can only drill square holes with a drill in wood, plywood and not very durable plastic: for such drilling you need high power, and enormous lateral forces occur on the tool. Square holes in metal are drilled on special machines, but ceramics and stone cannot be drilled this way at all: lateral forces will tear the part into pieces.
Bottom line
Somehow piercing a clumsy hole with a drill is a simple matter. But drilling a smooth, round and neat hole is a job for a real master, knowledgeable, intelligent and with skillful hands.
