Install windows 7 from the installation disk. Step-by-step instructions for reinstalling the operating system
In order to start working on a computer, first of all, you need to install the operating system. Without it, your PC is just a collection of devices that won't even "understand" how to interact with each other and with the user. Let's figure out how to properly install Windows 7 from a CD to a computer or laptop.
Although the installation procedure operating system far from being such a complicated process as it seems to some beginners, it is still a complex procedure that consists of several stages:
- BIOS or UEFI setup;
- Formatting the system partition;
- Direct OS installation.
In addition, depending on the specific situation and hardware settings, some additional subtasks may be added during OS installation. Next, we will walk through the process step by step. Windows installations 7 from CD. The algorithm of actions described below is suitable for installing the OS both on standard hard drives of the HDD format and on SSDs, as well as on media with GPT markup.
Stage 1: BIOS or UEFI setup
First of all, you need to configure the system software that is embedded on the motherboard to boot the PC from a disk inserted into the drive. Such software are various versions of the BIOS or its later counterpart - UEFI.
Let's immediately consider how to configure the BIOS. At various versions this system software, the algorithm of actions may differ, so we will give a general scheme.
- In order to open the BIOS, you need to immediately, as soon as the signal sounds after turning on the computer, hold down a certain key or group of keys. The specific option depends on the BIOS version itself. In most cases this Del, F2 or F10, but there may be other variations. As a rule, you can see the name of the desired key to switch to the system software interface at the bottom of the window immediately after turning on the computer. On laptops, in addition, there may be a special button for quick access right on the case.
- After pressing the desired key, the BIOS interface will open. Now you need to go to the section where the order of devices from which the system is loaded is determined. For example, in BIOS manufactured by AMI, this section is called Boot.

For an analogue from the Phoenix-Award, you need to go to the section "Advanced BIOS Features".

You can navigate through sections using the keys. "Left", "Right", "Up", « Way down", which are indicated on the keyboard in the form of arrows, as well as keys Enter.
- In the window that opens, you need to perform manipulations in order to assign the CD / DVD drive as the first device from which the system will boot. At different versions BIOS is different.
For AMI, this is done by pressing the arrows on the keyboard and setting the name CDROM to the first place in the list opposite the parameter "1st Boot Device".

For Phoenix-Award systems, this is done by selecting the parameter "First Boot Device" values CDROM from the drop down list.

Other versions of the BIOS may have different variations of actions, but the essence remains the same: you need to specify the CD drive as the first in the list of devices to boot the system.
- After the desired parameters are set, return to the main BIOS menu. To close this system software, but keep all the changes made, use the key F10. If necessary, confirm the exit by pressing the items Save and "Exit" in the dialog boxes.

Thus, the BIOS will be configured to boot the system from CD ROM. If you have UEFI enabled, then you do not need to make additional settings when installing the system from a CD / DVD drive and you can skip the first step.
Stage 2: Selecting a partition for installation
At the previous stage, preparatory work, and then we will proceed directly to the manipulation of the installation disk.
- Insert the Windows 7 installation disc into the drive and restart your computer. It will start from the CD/DVD drive. The localization selection window will open. In the corresponding fields from the drop-down lists, select the language you need, keyboard layout, and format monetary units and time, if the default options are not satisfying to you. After specifying the desired settings, click "Further".
- A window opens in which you should indicate what you need to do: install the system or restore it. Click on a highly visible button "Install".
- Now a window will open with a license agreement that concerns the edition of Windows 7 to be installed. Read it carefully and, if you agree with all the points, check the box next to the inscription "I accept the terms...". To continue installation, click "Further".
- Then a window will open where you will be prompted to select one of two options: "Update" or "Full installation". Since we are considering the installation itself, then click on the second option.
- Now a window opens for selecting the disk partition where the OS files will be installed directly. Select the partition that you need for these purposes, but it is important to make sure that there is no data on it. Therefore, you cannot select the HDD volume that stores user information (documents, photos, videos, etc.). Determine which partition corresponds to the familiar drive letter you see in "Explorer", you can look at its volume. In case when HDD where the system will be installed, has never been used before, it is better to choose for installation "Section 1" unless, of course, you have a compelling reason not to.
If you are sure that the section is absolutely empty and does not contain any hidden objects, then just select it and press "Further". Then immediately go to Stage 4.

If you know that data is stored in the partition, or you are not sure that there are no hidden objects, then in this case you need to perform the formatting procedure. If you have not done this before, it can be done directly through the interface of the Windows installation tool.


Stage 3: Format the partition
Formatting a partition involves erasing all the data that is on it, and reshaping the volume structure under the option necessary for installing Windows. Therefore, if there are some important user data in the selected HDD volume, they must first be transferred to another partition hard drive or other media to prevent loss of information. It is especially important to format if you are going to reinstall the OS. This is due to the fact that if you put a new Windows on top of the old system, then the residual files of the old OS may adversely affect the correct operation of the computer after reinstallation.

Stage 4: System installation


Stage 5: Post-Installation Configuration
After the installation of Windows 7 is completed, it is necessary to take a few more steps to configure the system so that you can go directly to using it.
- Immediately after installation, a window will open where you will need to enter a computer name and create the first user profile. In field "Enter username" enter an arbitrary name of the profile (account). In field "Enter computer name" enter also an arbitrary name of the PC. But unlike the account name, in the second case, the introduction of characters of the Cyrillic alphabet is not allowed. Therefore, use only numbers and Latin. After completing the instructions, press "Further".
- In the next window, you can enter the password for the previously created account. It is not necessary to do this, but if you are concerned about the security of the system, then it is better to use this opportunity. In the first two fields, enter the same arbitrary password with which you will log into the system in the future. In field "Enter hint" you can enter any word or expression that will help you remember the code if you suddenly forget it. Then press "Further". The same button should also be pressed if you decide not to protect your account. Only then should all fields be left blank.
- The next step is to enter the Microsoft license key. It should be in the box with the installation disc. Enter this code in the field, make sure that opposite the parameter "Automatically activate..." there was a mark, and press "Further".
- A window opens where you should select the parameters to be set from three options:
- "Use recommended...";
- "Install the most important...";
- "Delay Decision".
- If the installer detects a network card driver located on the PC hard drive, it will offer to configure network connection. Select the connection option that you prefer, make the necessary settings and click "Further".

- After that, the installation window will be closed and the familiar Windows 7 interface will open. This completes the installation procedure for this OS. But for comfortable work, you still have to install the necessary drivers and programs.


Installing Windows 7 is not very difficult. The installer interface is quite simple and intuitive, so even a beginner should be able to cope with the task. But if you use the instructions in this article during installation, it will help you avoid different kind difficulties and problems that may still arise when performing this important procedure.
Hello site administrator remontcompa.ru, I have a question for you - how to install Windows 7 on new computer, that is, on a blank hard disk without partitions? Surely there are some rules and if you do not follow them, there will definitely be problems that you want to avoid. George.
Installing Windows 7
Hello friends! Installing Windows 7 on your desktop computer or a laptop from a disk, as well as from a flash drive, should not be accompanied by any difficulties after reading our article. We have prepared for you detailed description each step and attached many illustrations. After going through all the installation steps with us, the next time you install Windows 7 without help.
- Firstly, the official distribution of Windows 7 64-bit can be downloaded from the official .
- Secondly, if you have UEFI BIOS and you want to install Windows 7 on a GPT disk, but don't know how to do it, read our article.
- Thirdly, if you bought new laptop with Windows 8.1 and want to install Windows 7 instead, then all manipulations with the UEFI BIOS and the process of further system installation.
- Fourth, if you have problems installing Windows 7, refer to our article -.
- Fifth, if you do not have a drive, you can use our instructions and.
- Sixth, if you are installing Windows 7 from a flash drive, then you should know that Windows 7 does not support USB 3.0 (ports are usually painted in blue), if your usb flash drive 3.0, plug it into a USB 2.0 port.
So, the last preparations before installing the operating system. What needs to be done first?
If you are installing Windows 7 on a hard drive with existing partitions, then you need to copy all your data from the partition on which you will install Windows 7. During the installation process, this partition will be formatted and information will be deleted from it.
If you are installing Windows 7 on a blank hard drive, then you do not need to do anything, just read the article below.
In general, there is nothing complicated in all this, at the very beginning of the boot we press on the keyboard, in most cases these are the F2 or Delete keys, we entered the BIOS, here we need the "Boot Sequence" or "Boo t" section. There are basically two types of BIOS, this Ami BIOS window, we will consider its settings in our article, if the window differs in interface, then you have - Award BIOS, how to work in it is written in our article " BIOS download from disk".
As we can see, the hard disk is set as the first boot device - HDD: PM-MAXTOR STM3, select the first item 1st Boot Device with arrows and press Enter.

In this menu, we will set the first boot device (First Boot Device) CD-ROM, select it using the arrows on the keyboard, then Enter.

So the first drive, and the second turned out to be a hard drive, what you need.

Save the settings (press F10) and reboot.
If you correctly set the BIOS to boot from the drive and you have an installation disk with Windows 7 in it, then the next time you boot the computer, we will be prompted to boot from the installation on the monitor. Windows disk 7 - Press any key to boot from CD or DVD. We press any key on the keyboard, keep in mind if you do not have time to press it within a few seconds, the system will go into reboot and start all over again.

The process of installing the operating system begins, we are patiently waiting

Here you need to select the system language.

Install

We accept the terms of the agreement

Choose full installation

In this window, we see the space of my hard disk with a capacity of 500 GB ( Disk 0) divided into two sections (Section 1 and Section 2). The hard drive has an already installed Windows 7 operating system, I personally do not need it and I want to reinstall it. Before installing, I will delete all existing partitions on the hard drive and create them again. In general, there is a rule, if you want to avoid errors when installing Windows 7, it is better to delete all existing partitions before installing and create them again or install the operating system directly into unallocated space.
Select with left mouse Disk 0 Partition 2 and click on the button Delete.


Select with left mouse Disk 0 Partition 1 and click on the button Delete .


Old sections are deleted, we create new ones.
Select with left mouse Unallocated disk space 0 and click Create.

In this window, you need to select the volume of our future disk (C :), Windows 7 will be installed on it. Let's choose a size of 200 GB, I think this will be enough. We press Apply.

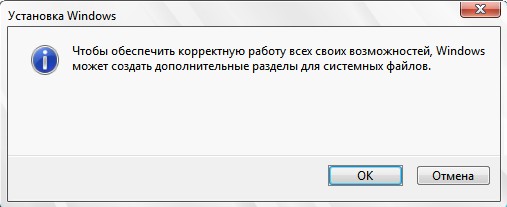
For the correct Windows work 7 you need to create a hidden partition of 100 MB with download files.
Therefore, on the sentence "To ensure the correct operation of all its features, Windows may create additional partitions for system files" click OK.
On Disk 0 we have a hidden partition Section 1: Reserved by the system(volume 100 megabytes) with Win 7 download files.
Also appeared the second Section 2, it will system drive(C:), its volume is 196.1 GB.
Convert the unallocated space to a partition. Select it with the left mouse and click Create, this will be our disk (D:).

Apply
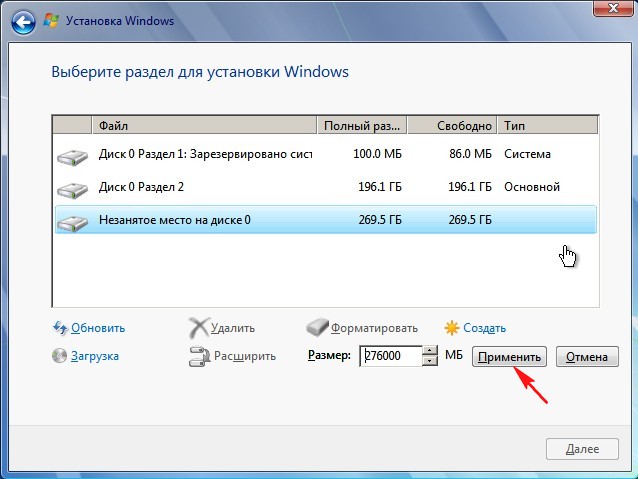
We will install Windows 7 on Disk 0 Partition 2: (the future C: drive), select it with the left mouse and click the Next button.
In this article, we will look at how to install the Windows 7 operating system from a disk. The instruction was prepared as clearly as possible and accessible even for beginners.
The entire installation process of the "seven" will consist of the following steps:
BIOS setup to boot the computer from a boot disk;
Recommendations for partitioning a hard drive;
Definition of the system partition;
Windows 7 installation and initial setup.
Step 1: Configuring the BIOS to Boot Your Computer from a Boot Disk
If you do not know how to boot from a disk, then by clicking on the link, you will learn how to do it:
Step 2. Installation start
After exiting the BIOS, having previously saved the settings made, the computer will reboot and if any operating system has already been installed on it, then after a while the message “Press any key to boot from CD or DVD” will appear on the screen (Press any key to boot from CD/DVD) which you should do.

Be careful, as you will only have five seconds to enter the system installation. If the current operating system starts loading, then the opportunity to start the installation was missed and you should restart the computer again for the next attempt.
If you are installing the system on a new computer or a blank hard drive, then you will not see the previous window, Windows installation 7 will start automatically.
So, if the computer started to boot from the installation disk, then the system installation start window will appear on the screen, in which you can see the process of downloading the initially necessary files.

If this window did not appear, but the loading of the old operating system began (if it was installed) or messages appeared stating that boot disk not found (in the case of installation on a new computer or hard drive), this means that your computer could not boot from the disk and you should return to the previous step to configure the BIOS.
After downloading the main files, you should see a window for setting the language settings, date and time format, as well as the keyboard layout, in which the default settings for Russia will be set.


The system restore point may be useful to you in the future, in case of problems with installed system, for example, due to damage, deletion or unauthorized modification of its system files. As a rule, this leads to unstable operation of Windows 7 or refusal to boot at all. In this case, you can restore the original system files from the installation disk using the above item.
In general, the “System Restore” section in Windows 7 is a powerful enough tool for fixing various kinds of problems that arise during its operation, and we will definitely devote a separate publication to it, and within the framework of this article, click the “Install” button to proceed directly to installation.
After a few minutes, a window with a license agreement will appear in front of you, the terms of which must be accepted by checking the box in the appropriate item and clicking the "Next" button.

In the next window, you have to choose the type of installation:

As you can see, here we can choose two options: update and full installation. You can use the "Update" item if you want to upgrade your old operating system to Windows 7, while retaining all installed programs and settings. True, for this, the installation of the "seven" must be launched directly from your already installed OS. It should also be remembered that this is only possible from Windows Vista, and the update is not applicable to older operating systems, including Windows XP. In general, this type of installation is not the best solution. The fact is that not only the settings of the previous system will migrate to the new Windows, but also all its problems, brakes and glitches. And in general, the stable operation of the system before installed programs in this case are not guaranteed. Therefore, the preferred type is full installation, which should be selected.
At the next stage of the installation, we have to select a partition on the hard drive for installing Windows 7. Here, I would like to make a small digression and give some useful advice for partitioning a hard drive into system partitions:
Do not allocate all hard disk space for one single partition. This can give you a lot of trouble in the future.
Modern hard drives have sufficiently large capacities for storing data and therefore it is advisable to divide them into several thematic sections.
It is recommended to allocate a separate section for installing the operating system and the necessary software and not fill it with your personal data.
You should choose the size of the system partition with a margin, given that for the correct operation of Windows, 15% of the space of this partition must remain free.
Don't create too many sections. This will complicate navigation and reduce the efficiency of distributing large files and folders.
Step 4Define the system partition
Now, let's get back to the installation. From this point on, the installation process can go two ways:
Option 1: You have a new computer and the hard drive has never been partitioned. In this case, you will see a window with the following content:

To partition a hard disk into partitions, select the item: "Disk settings". In the appeared additional options select "Create" and enter the required partition size in the window next to it. It should be remembered that you must specify the size in megabytes. Calculate it based on the fact that 1 gigabyte = 1024 megabytes. As a rule, for Windows 7 and related software, 60 - 100 GB is enough, but you can do more if necessary.

After specifying the required size of the future system partition, click the "Apply" button. Next, to use all its capabilities, ask Windows to create an additional partition for it. Don't worry, it will only take up 100 MB of free disk space and will be invisible to you.

By clicking "OK", we will return to the partition selection screen for installing Windows.

As you can see, there have been changes here. Now we have a partition reserved by the system for its own needs, a newly created partition and the remaining unallocated area. From the unallocated disk space, in the same window, you can create additional partitions in the same way that we used above, or you can postpone this action for later and finally partition your drive already in Windows.
Having made the necessary decision, select the part of the disk on which we plan to install the operating system and click "Next".
Option 2 - If your computer already has an operating system installed. Then your hard disk is already divided into logical areas, and you will see a window listing all found partitions on it, for example:

Attention! All further manipulations with the partitions found can lead to the loss of your data, so be very careful in your actions.
If the current partitioning of the hard disk does not suit you, then you can delete the existing partitions in whole or in part by selecting the appropriate part of the disk, and then the "Delete" option. The unallocated disk space formed after this, you have the right to split at your discretion in the above way, considered in option 1.
If you are completely satisfied with the current disk layout, then you need to decide which of the existing partitions you will install Windows 7 on and whether you want to save the information available there. In this case, before moving on, let's first familiarize ourselves with possible options installation, after which you can already make an informed decision without pointing your finger at the sky.
You have selected a section for which this moment your old operating system is installed, and you plan to keep the data stored on it. In this case, after clicking the "Next" button, before starting the installation, you will see a window with a warning that the previous copy of Windows with all its files and folders will be moved to the "Windows.old" folder. The rest of the information will be untouched. By clicking "OK" in the warning window, you will start the installation process.

This setup has one major drawback. As a rule, after a long operation of the operating system, the partition on which it was installed becomes very littered and contains a lot of junk files. Adding to all this also a new operating system with an accompanying software, you will encounter at least irrational use of hard disk space, defragmentation of files, and even its possible overflow, which will undoubtedly lead to a decrease in system speed.
If you have chosen a hard disk segment that does not contain Windows as a future system partition, and you want to save all stored information on it, then the installation will begin immediately after clicking the "Next" button.
If you plan to install Windows 7 on a blank partition (the preferred option of all) and you either already saved the information on it elsewhere, or you don’t need it, then you should format it before starting the installation. To do this, select "Format". The installer will warn you that this partition may contain important data for you and it will be destroyed.

After clicking the "OK" button, the selected part of the disk will be completely cleared of the information stored there, and to start the installation, all that remains is to select the "Next" item.
Step 5Install and set up Windows 7 for the first time
So, after selecting the system partition, the system installation process will begin directly, during which files will be copied and unpacked, components and updates will be installed.

During installation, your computer will automatically restart several times, and the entire procedure may take from 10 to 30 minutes, depending on its capacity.


Finally, after the installation is completed and the next reboot of the computer, you will see the first window of the initial windows settings, in which you have to enter the username (the name of your account in the system) and the computer (the name under which it will be visible to other users on the network).

On the next screen, you will be able to create a password for your account or defer this action by leaving the fields blank and clicking the "Next" button.

The next step is to be able to select options for automatic windows updates, designed to regularly check via the Internet for all kinds of system security fixes, critical updates and service packs on the official technical support website. Inclusion automatic update is desirable, but optional at this stage, since you can perform more flexible configuration of this parameter after installation from the control panel.

After selecting security options, the Windows Initial Setup program prompts you to check the date and time settings. If everything is correct, click "Next".

If network card drivers were installed during the installation, you will see a network settings window in which you will need to select the location of your computer.

After you make your selection, a window will appear to connect to the network and apply settings.

On this, the initial setup of the system can be considered complete. After the final application of the settings, a welcome window will appear in front of you, then the system will prepare the desktop, the appearance of which will mark the completion of the installation of Windows 7.


Immediately after the installation of Windows is completed, you should install all the necessary drivers for the connected devices.
Remember! After installing Windows 7, you need to enter the BIOS again and return the boot from the hard drive.
![]()
In contact with
Instruction
Purchase a licensed version of the operating system. When choosing, rely on specifications your his personal computer. If you are the owner of a PC of the latest generation, then purchase Windows 7 or Vista. For those with an older computer, Windows XP is recommended.
Copy all important files from your computer to removable media so you don't lose any information.
Insert the operating system disc into the PC drive. Restart your computer. While the BIOS is loading, press the key to open its menu. For different personal computers, you need to press different keys, for example, F2 or DELETE.
In the window that appears, select the Media Boot Priority tab. Install CD/DVD-ROM first and Hard disc second. Save your settings and reboot your system.
The DVD menu will open. disk with the operating system. Select the installation mode: automatic or semi-automatic. The root files will be automatically copied to your personal computer.
After all files have been copied, an automatic reboot will be performed. A list of virtual partitions will appear. Select where the operating system will be installed. Press the "F" key to format the partition. You can also remove one of the sections or add an additional one.
Format the system in NTFS format, as it is more adapted to modern computers and operating systems.
During installation, provide an account name. If necessary, set a password.
After installing Windows, update all drivers on your personal computer.
Related videos
note
Installation may take 40 to 60 minutes.
Use only licensed Windows versions. This is a guarantee of quality and technical support.
Most often, CD / DVD drives of a computer are used to install a new operating system - it is most convenient for manufacturers to distribute OS distributions on such media. The installation procedure, as a rule, takes from half an hour to one hour, it is not particularly difficult, but it requires a little preliminary BIOS setup.
Instruction
Change the BIOS polling order so that the DVD drive is higher in the queue than your computer's hard drive. To do this, initiate a reboot and wait for the prompt to press the Delete key (or f1, f2, f10, Esc, etc.) to enter the BIOS settings (Press DEL to enter Setup) in the lower left part of the screen. By clicking the desired button, find the section in which the desired setting is placed in your BIOS version - this can be the Boot or Advanced section, and the setting itself can be called Boot Device Select, Boot Sequence or Boot Drive Order. In any case, you need to put the line CD / DVD-ROM Drive in the first place in the list.
Insert the DVD with the operating system distribution kit into the reader, and then exit the BIOS settings panel by answering yes to the question about the need to save the changes made. The computer will start a new reboot cycle and depending on the BIOS version, the screen may ask you to confirm to boot from the DVD - press any button and the OS installation preparation process will begin.
Select the partition where you want to install the new operating system - this question will be asked to you by the installer. After you make your choice, you will have the option to format this partition or keep the existing one. file system. If the selected partition is in NTFS format, not re-formatting will save installation time. When the preparation of the hard drive for OS installation is completed, the installer will restart the computer and begin the installation procedure.
You will also need device drivers installed in the computer (chipset, sound card, video card, webcam, etc.)
Burning the Windows XP installation disc
To burn a Windows installation disk, we need a disk image, a disk burning program from an image, a CD writer, and the actual CD itself.
Download Windows XP SP3 Professional disk image
Any disc burning program that supports burning from an iso image will do, such as Nero or DeepBurner, which can be downloaded for free.
So, downloaded the disk image, installed the DeepBurner program. Now consider the process of burning a disc.
Insert a blank CD-R disc into the drive and start DeepBurner. After launching DeepBurner, it prompts you to select the type of project to be created.
Choose Burning an ISO image and click Next.
I don’t know about you, but my project window opened in a compressed form. Therefore, you need to stretch it by grabbing the lower right corner with the mouse or expand it to full screen so that it looks like in the figure below.

In the project window, click the button with three dots (Browse) and select the file of the downloaded iso-image of the Windows XP installation disk. In our case, this is the file ZverCDlego_9.2.3.iso.
Now you need to select the recording speed and press the button Burn ISO. In order for the disc to record better, the speed should be selected slightly less than the maximum. Now it remains to wait for the disc to be written. After the Windows XP SP3 installation disc has been burned, the drive tray will pop out by itself. The disk is ready!
Windows XP(internal version - Windows NT 5.1) is an operating system (OS) of the Windows NT family of Microsoft Corporation. It was released on October 25, 2001 and is an evolution of Windows 2000 Professional. The name XP comes from the English. eXperience(an experience).
Unlike the previous Windows systems 2000, which came in both server and client versions, Windows XP is a client-only system.
According to web analytics from September 2003 to July 2011, Windows XP was the most used operating system to access the Internet in the world. As of February 2013, Windows XP was in second place after Windows 7 with a share of 19.1%. The maximum of this value was 76.1% and was reached in January 2007.
How to install Windows XP from a disk through the BIOS
Now it's time to consider the process itself installing Windows XP on a computer from a disk.
First of all, you need to configure boot from the drive in the BIOS. To do this, go to the BIOS menu. How to do this may differ depending on the motherboard model. In most cases, this menu can be accessed by pressing the button. Del(on some models of motherboards, you need to press the F2) after turning on the computer (during the startup splash screen). It is better to press this key several times to be sure.
The BIOS menu differs depending on the manufacturer and version. There are two main types of BIOS: AMI and AWARD.
Below are screenshots of the AWARD BIOS. Need to go to the menu Advanced BIOS Features.

Here in the menu item First boot device press Enter and select CD-ROM

After that, press the Esc key to exit to the previous menus, where select the item Save and Exit Setup. Everything, now the DVD drive will be the first device to boot the computer. You can go to the process installing Windows XP from a disc.
Now let's look at how to install boot from disk in AMI BIOS
Choose a tab Boot, and in it we go to the menu Boot Device Priority

We put the first boot device (1st Boot Device) CD-ROM or DVD-ROM (your drive model)

In some BIOS versions, the first device is selected after pressing the Enter key on the desired item and selecting the device, in others, devices are moved up and down using the F5 and F6 keys or + and -
After that, you need to exit to the main menu with the Esc key and go to the tab exit. Select an item Exit and Save Changes to save changes and exit.
Now let's look at the process itself. install windows xp from disc to computer.
Insert the installation disk into the drive and restart the computer. The disc menu shown below will appear.

Choose an item Installing Microsoft Windows XP SP3 in manual mode and press Enter.
It should be warned that installing Windows XP SP3 on a computer takes about 40 minutes. So be patient.
On the first screen, press the Enter key to continue the installation.

In the next step, read the license agreement and press F8
Now select the disk partition where you want to install Windows XP. If the hard drive is new and not yet formatted, you need to create a partition by pressing the C key.
Select a partition and press Enter. If the partition already existed, you need to confirm the installation to this partition by pressing the key FROM.

The next step in the installation program is to format the drive. Choose an item Format Partition as NTFS (Quick) and press Enter.

Press to confirm formatting. F
After formatting, the process of copying the necessary files to the hard drive will begin.

After the files are copied, the computer will restart.
When you boot your computer, it will start again from the boot CD. In the disk menu, select the item
A window for selecting driver packages for unpacking and installation will open. These are built-in drivers for many devices included in this build. If you are installing Windows XP from a Microsoft distribution, this window will not appear.

Select the required driver packages by ticking the boxes and click OK. If you are not sure which drivers are needed and which are not, select all. If you have driver disks for all devices ( motherboard, video card, etc.), then uncheck all the boxes to speed up the OS installation process. In this case, you will need to install the drivers manually from the discs after Windows Setup is complete. Read more here: How to install Windows drivers xp.
After pressing the OK button, the unpacking of the driver packages will begin, and when it is finished, the Windows installation will continue.
The next language and region selection window will appear. If the distribution kit of the Russian version of Windows XP, then nothing needs to be changed here.


In the next window, enter the product key and click the button Further.
A window will appear asking you to enter the computer name and administrator password. You can change nothing in this window. Then the administrator password will not be set.
In the time and date settings window, set correct date and time, as well as the time zone.

In the OS network settings window, select Regular Options and click Further.

In the workgroup window, write the name of the workgroup or domain in which the computer participates. If you don't have a home or office network, you can leave everything as it is and click Further.

After that, Windows installation will continue, after which the computer will automatically restart.
We go into BIOS and set the first boot from the hard disk, as described at the beginning of the article. Exit BIOS and save changes.
Now before how to completely install windows xp on a computer the last minutes left.
When you boot, the system will prompt you to automatically adjust the screen resolution. We press OK.
In the Windows XP Welcome window, click Further.

A window will appear asking you to select the Windows update mode.

Choose Postpone this action to disable automatic system updates and press the button Further.
The next window will prompt you to set up an Internet connection. Click Skip.
We refuse the offer to register by selecting the item No, some other time and press Further.

In the final window, click Ready.
That's all! Now you know how to install windows xp from installation disc on your computer.

It remains to install drivers and programs, but this is already beyond the scope of this article.
