How to make a windmill for a garden. How to make a beautiful decorative windmill with your own hands. With instructions and photos. Types of decorative mills
The landscaping of a personal plot includes not only flower beds, vegetable gardens, greenhouses and paths, but also many other elements, including those that perform an exclusively decorative function. An example of such an object is a small copy of a windmill for a garden. Many of its varieties today can be purchased in stores or from individual craftsmen. But often the price of such decorative objects is too high, and if you know how to work with wood, then it makes sense to try to make a windmill with your own hands for the garden. And this article will help you.


main function similar structure, of course, decorative - the mill on the site pleases the eye and creates an atmosphere of comfort. Also, with its help, gardens and flower beds are decorated in the old Russian or European style (depending on the appearance of the object itself). A good addition to the mill will be benches, miniature carts, wattle fences, fences or a small pond.
In addition, it can bring you practical benefits. With the help of a small mill, some gardeners “hide” not so attractive communication elements - taps, hatches, containers, etc. As a result, everything that the eye can catch on in a poor sense of the word is hidden, harmony between trees, flowers, stones and decorative objects do not disturb anything. In addition, the gardener has the opportunity to combine a flower bed and a mill into one structure - you just need to supplement the base with boxes of earth.

And if you increase the structure in size, then it can be turned into a gazebo or children's house. Or, if functionality is more important, make a barn out of the mill and a place to store garden tools.


Garden mill-gazebo

Garden mill device
Most of these decorative objects consist of the following parts:
- platform;
- base;
- frame;
- roof;
- rotation mechanism;
- blades.
Platform- this is the place where the garden mill will be installed. The design can, of course, be simply put on the ground in a garden or in a flower bed, but then it will not last long - dampness will do its job and render the decor object unusable. Therefore, it is desirable to build a platform of concrete or stone. The last option will be prettier.


Base- the lower part of the mill itself, usually wider for better stability. The most stringent requirements must be imposed on the quality of the base treatment - this part of the structure is most in contact with moist soil and plants.
frame- the main part of the decorative object, the walls of the mill. It is assembled from boards, plywood, slats, lining, small logs and many other materials. In addition, the frame has a decorative function and is often decorated with windows, doors, balconies and other small elements.

Important! When choosing a place for a mill, pay attention to the surroundings - appearance buildings should be in harmony with everything around.
Roof - the top of the building. Usually assembled from slats, planks or lining. In some cases, plastic is used, especially for rounded roofs, which are difficult to make from wood. By its color, this part of the mill should stand out from the frame.
Inside the roof is rotation mechanism– axle on two ball bearings. In most cases, it passes through the entire structure; this location option is reliable and stable. The mechanism can be supplemented by connecting the roof of the mill to the frame on a vertical axis and adding a sail - then the structure will not only turn the blades, but also turn in the direction of the wind.
![]()

Blades, also known as wings - the second most important decorative element of the mill. It is assembled from plywood, planks and thin bars. The main condition is that all blades must have the same mass and be balanced, then the mill will last a long time and without problems. Examples of various design options windmill wings are shown in the pictures below.


![]()
Table. Types of decorative mills for the garden.
| View | Description |
|---|---|
| Enough simple design. The walls are rectangular, straight or inclined. Usually such a mill ends gable roof, but there are other designs. A great option for those gardeners who do not have much experience with wood. |
| More complex structure. It requires a sufficiently high accuracy in sawing parts of the right size and giving them bevels. Often the walls of such a hexagonal mill taper towards the top. It ends with a dome or a polygonal roof. Compared to the previous version, other things being equal, it is more attractive. |
| The decorative windmill has the simplest design due to the absence of sheathing and a complex roof. In addition to decoration, it helps to determine the direction and strength of the wind on the site. In addition to wood, a windmill can be made from steel profiles, if it is easier and more convenient for you to work with them. |


There are many ways to ensure that the tree on the site quickly withered. However, the most common of them are those that involve the use of chem. preparations intended for the destruction of plants. Read more in.

Decorative plywood garden windmill - instructions for creating
Here is a step by step tutorial on how to make a hexagonal plywood ornamental garden windmill. With the proper skills and tools for woodworking, assembly will not take you much time and effort.
Important! All details of decorative mills need careful and multilayer treatment with antiseptics, protective compounds and varnishes. Only in this way they will not lose their attractive appearance over time and will be able to decorate a plot or yard for many years. good example protective coating for the mill - ship or yacht varnish.

Start working with the middle part of the structure, called the frame in the picture above. It is a truncated hexagonal pyramid with a straight base. All parts are assembled from thick plywood.
Step 1. Prepare drawings and part templates. Given the complexity of the design, the dimensional accuracy of each element becomes very important.
Step 2 With a pencil, mark on the sheets of plywood the individual elements of the frame - trapezoids elongated in height. Then cut them out with an electric jigsaw. Do not forget to cut the side ends at an angle of 45 ° to connect with the rest of the elements.


Step 3 Place the finished plywood pieces together so that the cuts form grooves facing down. Refer to the image below. Connect the parts together with adhesive tape.

Step 4 Turn the resulting structure over and apply glue to the grooves formed by the cuts. Act quickly, but at the same time carefully.

Step 5 Fold all the frame parts into a hexagon so that the glued ends fit snugly together. Use tape again so that the design holds its shape for a while.

Step 6 Wait until the applied adhesive dries, lay the walls on their side and remove any excess. Remove the tape from the structure.

Step 7 Cut out the hexagonal lid internal dimensions the upper narrow part of the frame. On one of the sides, do not completely screw in the screw - it will play the role of a kind of mounting handle. Glue the edge of the upper narrow part of the frame with glue, turn it over with this side down and, using a screw, mount the hexagonal cover. Put some weight on top of it. Wait until the glue dries, remove its remnants.


The truncated pyramid that makes up the walls of the mill is ready. Now start building the base. It is a straight hexagonal prism. To connect to the base of the structure, a central vertical beam, which is fixed with a screw on the top cover of the prism and passes through the corresponding hole in the bottom.
Step 1. Cut out two hexagonal lids to fit the base of the truncated pyramid you made earlier. In the center of one of the parts, make a mark for the screw, in the other - a square hole along the cross section of the beam.

Step 2 Install both covers on one of the faces, cut out the vertical walls of the prism. Connect the first three of them with the lids with glue, use tape and clamps to maintain the shape. Everything is shown in the image below.

Step 3 Repeat the previous operation with the three remaining faces of the prism.
Step 4 Insert the bar into the hole in the bottom cover. Move it until it touches the top hexagon. There, screw the screw on the mark and fix the timber.

The beam must be screwed to the upper hexagon with a screw
Step 5 Treat the lower walls of the truncated pyramid and the top of the prism with glue, connect them to each other. Use tape again to maintain shape.

Step 6 Once the glue dries, remove the adhesive tapes and process the resulting design. grinder or sandpaper.

The next part of the mill to be made is the base, which consists of three parts:
- the lower part is a large straight hexagonal prism with fastening for a vertical bar;
- middle - truncated hexagonal pyramid;
- the upper one is a small straight hexagonal prism with grooves for a decorative viewing platform.
As for the walls of the mill, we present the manufacture in the form of a step-by-step instruction.
Step 1. Prepare fasteners for the beam, which was mentioned above. It is a board fixed on the lower hexagonal prism and a hollow box under the beam section.

Step 2 Saw out six parts for the lower prism from plywood, make cuts in them at the side ends, as shown in the instructions for the mill walls. Attach with glue and tape together. Then attach the plank and lumber box from the previous step. Make sure that they are located exactly according to the drawing.

Finished lower base prism with fasteners for timber
Step 3 Now proceed to the truncated base pyramid. Saw out the trapezoid-shaped parts from plywood, use a jigsaw to make cuts on the side ends at an angle of 45 °. Then connect the elements of the pyramid from the outside with adhesive tape, gluing the grooves and assemble the hexagonal structure. After drying, get rid of the glue residue.

Step 4 Run a small upper base prism. At the corners, saw through small grooves for attaching an observation platform that will decorate your windmill.

Step 5 Connect all three parts of the base to each other with glue. From above, attach a load to them, which can be a bucket of water. Cargo needed for better grip glue.

Important! Do not overdo it with the mass of the load, the base design may not withstand excessive loads.
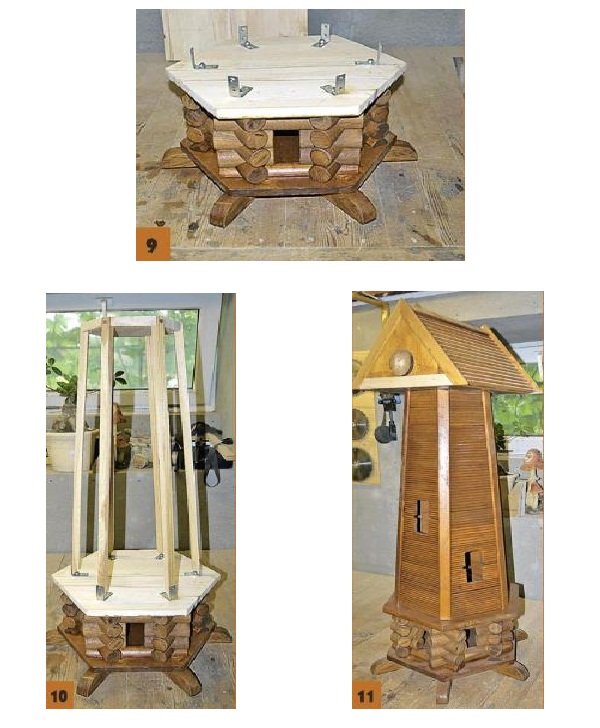
After completing the bottom of the windmill, proceed to the observation deck. The latter consists of supports made of small bars, a track of rails and railings. The platform is screwed to the lower part of the mill wall and is installed with props in the grooves of the base.
Step 1. Saw out the base bars. Then make marks or small holes on them for fastening the viewing platform to the walls of the mill with screws.


Step 2 Prepare a template on which the floor slats of the observation deck will be laid. It should be a hexagon with pencil marks. It makes sense to glue it with double-sided tape so that the floor slats do not move from the slightest movement or contact with the supports during installation.

Step 3 Lay five rows of timber, as shown in the photo below, to form the floor of the observation deck. Between themselves, they are connected with a small amount of glue. From above, with its help, fasten the supports to each of the corners of the hexagon. Use clamps for clamping.

Step 4 Wait for the glue to dry and carefully separate the floor and observation deck supports from the template.

Step 5 Attach vertical bars to the outer edges of the supports - these will be the railing posts. Fastening is made on screws.

Step 6 Carefully glue the slats to the racks that will make up the walls of the railing. Use clamps or plastic clips to form.


Step 7 Turn the mill frame over and place it on the floor or workplace bar up. Also turn the viewing platform over and fix it to the lower hexagonal cover of the truncated pyramid with screws. Then glue the grooves in the upper part of the base and attach the mill frame to it along with the viewing platform.

The creation of a decorative windmill for the garden is nearing completion. The next stage is the dome and the inner part of the “wings” rotation mechanism. The roof of the mill is made of a plastic hemisphere, to the bottom of which a plywood ring is attached. It, in turn, is connected to screws with a circle, which is mounted on the top cover of the frame of the structure.
Step 1. Process the dome, saw out a ring and a circle from plywood of the desired size.

Dome, as well as a circle and a ring, cut out of plywood
Step 2 Make holes or marks for them in the same places in the circle and ring - this will be needed for subsequent assembly. Mount the circle on the top cover of the mill frame.

Step 3 Make fasteners for the bearings of the mill wing rotation mechanism. They represent wooden bars with holes of the appropriate diameter. Their device and creation are shown in more detail in the images below.

Important! For many garden ornamental windmill assembly jobs, your indispensable assistant there will be a stand for vertical mounting of a drill, which thus turns into a drilling machine.


Step 4 Connect the lower halves of the bearing brackets by inserting horizontal bars between them and from the ends, as shown below.

Step 5 Install bearings in the holes of the fasteners, mount the entire structure with screws, add a small support at the front to give some tilt.

Step 6 Now you need to connect the bearings to the axle from of stainless steel. To do this, use nuts with washers, wrapped on all sides of both fastening bars.

Step 7 Install the bars with bearings and axle on the wheel previously mounted on the mill frame.

Step 8 Determine the point where you want to make a hole in the plastic dome for the axle.

Step 9 Drill a hole in the dome for the axle. Then glue a plywood ring to the underside. Use tape as a clamp (crosswise).

Step 10 Carefully mount the dome onto the plywood circle by threading the axle through the hole. Use screws as fasteners, driving them into the marks or small holes made in step 2.


After that, it is necessary to make the outer part of the mill mechanism - the blades and their attachment to the axis.
Step 1. Saw out a block for fastening the mill to the axis. Details of its manufacture are shown below.


Step 2 From relatively thin sheets of plywood, cut out four blades according to a pre-made template.


Step 3 Prepare four long bars. With their help, the blades of the mill will be mounted on the central block and the axis.

Step 4 From one of the ends in each of the bars, drill a hole for the stud.

Step 5 Glue the bars to the blades. Be especially careful and respect the dimensions.

Step 6 Prepare the studs with clamps, put them on one side on the glue to the bars with blades.


Step 7 Insert the clamps into the corresponding holes of the central block, then insert the blades with studs from the ends. Fasten everything precisely and carefully.

Step 8 Install the center block and blades on the mill axle. Check if the mechanism works. If everything is ok - decorative building ready! It remains only to paint it, varnish it and put it in the garden or in the flower bed.

Advice! If you think that the design of the decorative windmill described above is too complicated, then it makes sense to try to create a more simplified version - with four walls and a frame made of ordinary boards or lining.

Video - Decorative windmill
Do-it-yourself log mill - instructions
By its design, it is a reduced copy of real log cabins. Shovel cuttings can be used as "logs" - cheap and available at any hardware or gardening store. List necessary tools the same as in the instructions for the previous mill, only an annular nozzle for a drill is added to them, which is necessary for cutting out rounded grooves for a log house.
Step 1. Prepare the cuttings, remove the packaging from them, if any. Fold the two cuttings together and secure with clamps with screws. The parts of the blanks extending beyond one of them should be slightly more length walls of the future mill. Mark places for cutting cups (the so-called grooves in the log house). This instruction shows the creation of a mill with hexagonal walls, because the connection of the individual elements of the log house is not at right angles. Therefore, the cups in the cuttings should be "oblique", at an angle of 60 °. To do this, prepare a wedge, as in the image below.

1 - Shank and hole saw for wood. The diameter of the latter should be equal to that of the former; 2 - Fixing two cuttings together; 3 - Wedge
Step 2 Lay the two cuttings joined together and clamped on the inclined surface of the wedge and fix. With a hole saw connected to an electric drill, cut through both blanks of the cup for the frame in one operation, as shown in the image below. Then turn the cuttings with clamps 180° and make two more grooves, but from the other end of the cuttings. After that, use a jigsaw to cut off what is located behind the edge of the clamp. The logs for the base of the log mill are ready.

4 - Installation of cuttings on a wedge for sawing cups; 5 - Finished result, two logs with oblique grooves located at an angle of 60 °
Step 3 Move the clamp up the cuttings, again mark the points for drilling the cups and repeat the previous operations until the desired number of logs is ready.
Step 4 Carefully cut six of these logs lengthwise into two halves - one with cups, the other without. The first will go to the top of the base of the mill, the second to the bottom.
Step 5 In this case, the logs are connected to each other by studs inserted into the base, therefore, in the middle of the cups, drill a hole of the desired diameter in each of them. Alternative way connections - carpentry glue.
Step 6 Prepare a hexagonal base. Assemble it from two glued trapezoidal boards or cut it out of a single piece of plywood. Insert studs at the corners of the future log house.
Step 7 Put the first three elements of the log house on the studs - halves of logs without cups, prepared in step 5.

6 - Cutting holes for studs in logs; 7 - The beginning of the formation of the frame; 8 - Finished "log" walls of the mill base
Step 8 Sequentially put the logs on the studs, forming a log house, as in the image below. Inside, you can cut holes for decorative doors or windows.
Step 9 Treat the hexagonal base and the walls of the log house with stain or varnish to give a more attractive appearance and protection from damage. From above, fasten another hexagon on the studs, made in the same way as the product from step 6. On it, in turn, fix the metal corners.
Important! For durability, equip the base of the mill with legs or supports made of wood that is resistant to external influences. It can be oak or larch.
Step 10 Attach long and thin bars to the corners, which will play the role of a frame for the walls of the mill. At the top, they are attached to a slightly smaller hexagonal board or plywood plate to form a slight slope.
Step 11 Sheathe the frame of the mill with small slats, which are then treated with varnish or stain. At the same time, to improve the appearance, cut holes in the walls for decorative windows and doors. Then make a rectangular base for the roof, assemble its frame from the same bars and sheathe the ends with slats, and the roof with glazing beads. Close the fastening points here and on the walls of the mill with decorative strips.
9 - Processed base with corners for fixing the wall frame; 10 - Installation of frame bars and the upper hexagonal plate; 11 - Finished walls and roof of the mill, sheathed with slats and decorative strips
Step 12 Prepare holes for the axle in the ends of the roof. It can be made from metal or wood. At the outer end of the axle, fix an octagonal bar, on which, with an equal interval, make four holes - for fastening the blades.
Step 13 Saw out three bars that will play the role of the "frame" of the blades - two side, located at an angle, and one central. At the end of the latter, make a rounded stud for mounting the blade on the axle. Then nail the "frame" bars onto the slats and cut them into the desired shape, as in the image below.

12 - Axle with an octagon necessary for fixing the blades. The ends are closed with cuttings; 13 - Blade preparation. Three bars are its frame, but the slats have yet to be cut out to achieve the desired shape.
Step 14 Process the blades and fix on the axis. If necessary, balance them so that the mass is approximately the same and the mill is not subjected to unnecessary loads. Install it in the right place in the garden, preferably on a support of stones - this way the structure will last longer.

With a proper attitude and some skill in working with wood, you will get an excellent mill without any problems, which will decorate your garden, yard or flower beds for many years.
47837 5Have we answered your question?
Despite the fact that the era of agriculture ended many years ago, many are still interested in the question of how to make a mill for a summer residence with their own hands without much effort. Today we will cover this topic in as much detail as possible.
First of all, it is worth talking in general about what is needed in the country windmill today? After all, most likely no one will decide to use it in order to grind prepared millet into flour on a daily basis.

In addition, today the cultivation of millet is already more occupation for professional farmers, because their production is mainly responsible for exclusively modern technology.
Note. More more ideas can be found on the website https://dachadesign.ru/

However, a do-it-yourself decorative mill, which will be installed in the future in the country, has not bothered anyone yet.
Why do we need a windmill today?
Before you decide to choose a place where a windmill created by yourself will be installed in the future, you should definitely keep in mind that the structure may have a different purpose.

First, a homemade windmill can hide some of the least pretty places in your home, like a manhole.

Secondly, most of the mills, which, in principle, can be made without problems on their own, are quite simply made of lightweight materials, which makes it possible to significantly reduce their size.

For this reason, this type of structure is in most cases used as protective caps necessary for various types engineering objects.

Thirdly, many hosts country houses decide to turn the blueprints of the windmill into real life to the playhouse for their children. True, this requires a slightly enlarged design, but there is definitely nothing possible.
The main thing you should pay attention to is that it is as stable as possible and with an open entrance.

Of course, having decided to nevertheless make a mill for the garden, it will be possible to subsequently find for it a huge number of the most various applications as a component of modern landscape design.

Choosing and preparing a site for a new mill
The construction of a windmill is a rather crucial moment. It is important to pay attention to a number of important factors in order to achieve a really beautiful design.

Ideally, this should be an open space, since the blades will actively and non-stop rotate, and besides, it is much easier to assemble a massive structure in an open area, because absolutely nothing will interfere.
After completing the issue with the choice of location, it is necessary to remove all stumps and bushes that may interfere. By the way, if the grass is tall enough, then it is even desirable to cut it. The ground before starting the installation of the structure must be carefully leveled.

Create a plan
The easiest way to understand from the photo of the mill in the country is how exactly the structure should be built.

You need to do the following:
- Draw a sketch of the future layout;
- Using the drawing, calculate what size each of the parts for the future mill will be;
- Choose the best material for yourself, which will later be used to create all structural elements.
It is believed that one of the most financially advantageous materials is pine, since everyone can afford it, and at the same time it is endowed with fairly good performance.
Note!


After completing all the questions with the drawing and, accordingly, the plan, then you can proceed to the process of direct assembly. In order for the mill to look really beautiful, you can decorate it. This will give the object a finished look.

It is important to note that if wooden elements were not well processed, it is advisable to use paint for decoration.

Of course, anyone can make a mill on their own. The most important thing is to think over the first stage in detail and draw the correct markup, as well as choose the ideal place in your opinion in the future.

In addition, you need to decide in advance what qualities you want to endow your structure with.
DIY mill photo


Note!


Having a country house, you always want to do garden plot with him interesting, striking unusualness and beauty.
If you would like to make your household plot original and unique - building a decorative windmill is a great idea.
One way to diversify the landscape is to install various architectural miniature buildings on it.
We propose to build a decorative building according to drawings that are accessible for reading by people, even those who are very far from building from materials that are always stored in abundance in country houses and at cottages. Will help with this detailed instructions by assembly.
Materials and tools

A do-it-yourself garden decorative mill, the drawings of which you see on the right, is assembled from the following materials:
- nails 80 mm, self-tapping screws 4x20 mm;
- plywood 38x38 cm - 1 pc., 30x30 - 1 pc., 35x35 - 1 pc. for the roof, 18x15 - for the door;
- pieces of bars: 50x50 mm, 60 cm long - 4 pieces, 33 cm long - 4 pieces; 30x30 mm length 28 cm on the roof; 15x40 mm, length 85 cm - 2 pcs. for blades;
- metal corners - 8 pcs.;
- wooden corners: from 3 cm in size and above, 60 cm long - 4 pcs. for the frame, 25 cm -1 pc. for the roof ridge; 2 cm in size for finishing window and door openings with a total length of about 2 m - depends on the width and number of elements;
- wooden planks 10x30 mm, 35 cm long - 4 pcs., 15 cm - 2 pcs. for one window, 18 cm - 2 pcs. for the door, 29 cm - 10 pcs. for the roof;
- metal 35 cm or more pin;
- paint or varnish.

Fasteners are best taken galvanized, they do not rust in the open air under the influence of precipitation.
The following tools will help you assemble the structure with your own hands:
- a hammer;
- crosshead screwdriver;
- plane;
- saw.
Back to index
Assembling the main frame

- We cut a 50x50 timber into segments 60 cm long. The mill must be pyramidal in shape, for this, at both end ends of each workpiece, we make bevels at an angle of 10 ° so that a parallelogram is obtained from each bar.
- On a sheet of plywood measuring 38x38, retreating from the edge by 4 cm on each side, we nail each beam vertically with large nails (at least 2 pieces). For the foundation, on the underside of the sheet along the perimeter, stepping back 2 cm, we fasten bars 33 cm long.
- We measure the square obtained from the racks at the top and, according to its size, cut out the second sheet of the base of the frame from plywood 30x30 cm, nail it.
- We determine the dimensions and location of the door, window / windows (see drawings). For windows, we make a structure of 4 planks 10x30: to two long ones (equal to the distance between the posts) we fasten two vertical 15 cm, the distance between which is equal to the width of the window. Stepping back from the edge of the mill frame bar 1 cm, so that the future wall cladding is nailed to the vertical planks and is even, we attach window construction corners. We also make out the doorway using 18-centimeter segments. If the door is to be opened, the thickness of the vertical strips must be selected according to the size of the hinge base. Accordingly, the indent from the edge of the edge will be equal to their size.
- We sheathe the frame: this can be done with slats or clapboard, horizontally or vertically, it all depends on preferences and the material available. Saw off the edges of the skin protruding beyond the edge, nail a wooden corner.
Back to index
Assembling the roof structure

Drawing of the base of the roof: A - a roof of planks; B - a roof made of thick plywood.
- We cut off the ends of the bars at an angle of 60 ° so that they form a trapezoid. We fold and fasten the segments in two pieces with cut planes between each other, we nail the resulting triangles to plywood. At the top of the triangle, in the middle and at the bottom, on the sides, with corners flush with the roof racks, we fasten 10x30 mm strips for attaching the skin. from the front and back side in the middle, in the same way, we create a jumper for attaching the axis of the blades.
- We fasten the structure to the top plywood of the mill base.
- We sheathe the roof with planks so that the slopes protrude beyond the frame by 1.5-2 cm to the side and 3-4 cm down. It is easier to close the pediments with plywood, marking the points of exit of the axis of attachment of the blades on them. The roof ridge is closed with a corner
- The constructed mill is painted or varnished in 3 layers.
Back to index
Blade manufacturing
For the device of the inclined position of the blades at the bars of 1.5x4 cm, it is necessary to grind off one edge at a time as follows:
- the thickness of the end of the bar should be on one side - 1.5 cm, and on the other - 0.5 cm;
- before reaching the middle of 3 cm, the turning angle descends to 0 °;
- on one bar, different edges of the same face are processed on both sides, that is, if you look at the wide plane of the bar, then the lower edge is grinded to the left, and the top edge to the right.

The plane of the blades can be made in various shapes from any materials that are at hand: plywood, lining, plastic sheets, slats, etc. Our drawings suggest making them from ordinary pieces of wood with a thickness of no more than 10 mm. The width of the largest of them is 15 cm, the smallest - 5 cm.
To cut them at a bevel, draw the shape of the blade on a large sheet of paper, mark the necessary segments on it. Cut them out and, using as a stencil, cut the boards. Be sure to process the cuts sandpaper providing smooth, burr-free edges.
Nail all parts to the bars, cover each blade with at least 3 layers of varnish or paint.
Connect them at an angle of 90 ° and fasten them together with self-tapping screws, stepping back from the center in each direction by 1-2 cm. Drill a hole in the center for the axis of attachment to the roof.
Drill holes for the pin in the gable and the back of the roof, insert it as shown in the diagram, fasten and put on the blades. Axle outputs will be covered with a decorative overlay.
A small garden mill is ready.
Reading time ≈ 7 minutes
This article will help you bring a touch of originality to landscape design your his suburban area. Here you will learn how to make a decorative windmill with your own hands. Step-by-step instruction will allow you to calculate your time and finances, and soon there will be a windmill in your garden!
frame
1. Let's start by building the frame of the mill. To do this, you will need 6 identical boards, which will need to be shaped into an elongated trapezoid, as shown in the figure. It is important that the side edges of the boards are cut at a 45 degree angle. Thus, a cone-shaped ditch is formed at the junction, which will later be filled with glue.

2. Next, with the help of construction tape (adhesive tape), it is necessary to connect all six elements together: fastening should occur from the side where the boards are connected tightly to one another, without forming a moat. Please note that the adhesive tape must have a good layer of strong glue in order to adhere firmly to the tree.

3. To make the decorative mill with your own hands not only beautiful, but also withstand the influence of bad weather, by turning the boards connected with adhesive tape to the other side, fill all five seams with construction glue using a gun, for example.

4. Then fasten the first and last board constructions first with glue inside, then with adhesive tape outside. The hexagonal frame blank is ready.

5. After connecting all the seams, the remaining glue will come out, so when the glue dries, it will need to be removed with a construction knife. You also need to remove the adhesive tape.

6. Cut out a hexagonal cover for the top cover of the mill, suitable in size, which will need to be installed on the adhesive from the inside.


In order not to get confused in the details, in addition to the instructions and step by step photos to the project, your attention is provided with a photo of a finished decorative windmill, made by yourself.

Lower part of the structure
8. For the manufacture of the lower part of the structure, you will need to cut two more hexagons of the appropriate size.

9. Next, you will need to cut a small square 7x7 cm in one of them (lower), to which a bar will later be attached, which will serve as the basis of the entire structure. In the second (upper) simply drill a hole in the center through which a bar will be attached with a screw.
10. Now, in order for the lower part of the structure to resemble a kind of box, you need to make walls for it. To do this, cut out 6 pieces of the same shape, sides which should be the same as that of the frame - cut at an angle. Use photographic materials for precise cutting.
11. Using glue, screws and a drill, attach the walls to their bases (to two hexagonal blanks), and glue tape temporarily at the junctions of each of the six wall elements; use a vise if necessary.

12. Insert a bar with sides of the same size into the lower blank with a 7x7 hole, and resting it on the upper blank, fasten it using a screw.

13. Tape the frame to the bottom on each of the six sides. Now we have a design that resembles a lantern on a leg.

14. Use grinder to give a smooth design.

Base
15. Now, the bottom. It consists of three levels. Its lower part, consisting of 6 boards forming a hexagon (it must be made according to the same principle as the walls of the previous design) should have a capacity for the already installed bar of the previous design. For this you need to do square box and attach it exactly in the middle of the board with screws. The board with the box should be attached to a pre-prepared hexagon. Follow the photo so that the DIY garden mill is made correctly.


16. The middle part is also a hexagonal cut pyramid, the sides of which are connected in the same way as in the manufacture of the frame of the mill - glue and adhesive tape.

17. The top part is a little more complicated, so follow the instructions in the pictures when making it.

18. Connect all parts with building glue, placing a bucket of water on top of the board, which plays the role of a press.

Viewpoint
19. Now the hard work begins. Prepare the base on which you will temporarily attach the "observation deck" using Double-sided tape. You need to cut out 30 blocks that form 5 hexagons. Every six bars should be shorter than the previous ones, as they should form a "web". You will also need to craft 6 bars complex shape with holes that are glued to each of the 6 corner joints of the "spider web". When the glue dries, carefully remove the unfinished structure from the temporary base.


20. Now you need to cut 6 more simple shaped bars and attach them with screws to the outer sides of the complex shaped bars.

21. Using glue, on each side, attach a "railing" consisting of three boards to these bars.


22. Turning the structure over, install it on upper part base and fix with screws, connecting inner sides bars of complex shape with a base.

top of the mill
23. The top of the mill is made of polystyrene and consists of a hemisphere, as well as a base plate and a wooden ring.


24. Make 4 holes on the ring and base plate for the screws.
Internal mechanism
25. Now you need to make a design for the blades of the mill.
As you may have noticed, a decorative windmill for a summer residence is not an easy project, but it is worth the effort and time spent.
So, you need to make two flat wooden squares with holes inside, as shown in the photo, and drill holes in the right places.


Now, for the two parts, you need to make a base from three pieces of boards (two holes need to be drilled on the extreme ones) and fasten them with glue, placing them in a vise.

And then place on a solid base.

Note that it should also have 4 screw holes.
The last step in making the base for the internal structure of the mill is to install a support cut at an angle so that the structure resembles a hill.
26. Now you can install the top parts of the squares with a hole using screws. But don't fasten them too tight.


28. In the hemisphere, you need to make a hole through which the rod could rotate freely. But in order to choose the right place for it, take a support panel, attach a wooden ring to it and install a “gun” inside against the wall (to the ring). Having placed the hemisphere at the same height as the height of the support panel and the ring, on the side where the rod is higher, mark the point of contact between the rod and the hemisphere and make a hole in it.

29. Now you need to glue a ring to the hemisphere, for strength, rewind the resulting “helmet” with adhesive tape, for a while.

30. It's time to install the support panel (using a screw, attach it in the center to the top cover of the frame), the “gun” in the middle and the “helmet”, after removing the adhesive tape from it when the glue dries, so that the rod comes out through the one prepared for it hole in the hemisphere.

31. Screw the support panel to the ring from below - the holes for this are already prepared.
