Wireless LAN setup. Do-it-yourself local network: General rules for building a home network and its main components
How to connect two computers to each other using a network cable with RJ-45 connectors? In a particular case, this question may sound like this: how to configure local network between a laptop and a desktop computer?
The reasons for connecting computers into a network can be very different - the need to access files and folders of another computer from one PC, the desire to combine a laptop and an old stationary computer, or simply for online games. Let's consider situations for different operating systems. In this case, we will need to have installed on both computers network cards(the vast majority of devices have them by default), as well as network cable with RJ-45 connectors at the ends.
How to set up a local network between two Windows XP computers using an RJ-45 network cable
Make sure that you are logged into Windows with administrator rights, that the computers have network cards, and that they are connected to each other by cable. If everything is OK, move on to setting up the network card.
- Opening Start > Control Panel > Network connections.
- We find Local network connection And right click mouse open Properties.
- Select from the list Internet Protocol TCP/IP and open again Properties.
- In the window that opens, select the item Use the following IP address and enter the local address of our computer 192.168.1.1 (the last number can be anything from 0 to 255). Subnet mask 255.255.255.0.
We follow the same procedure on the second computer, specifying the IP address, for example, 192.168.1.2. Then you need to make sure that the devices are in the same working group.
- My computer and choose Properties
- In the window that opens System Properties select a tab Computer name And Change. .
You can check if a connection is established between two PCs using the ping command. Opening command line: Start > Execute > cmd and click OK. Enter the command ping 192.168.1.2(here we indicate the IP of the second computer). If the packets are transmitted successfully, the network is configured.
Setting up a local network between two Windows 7 PCs
When working with Windows 7 on two computers, you must immediately specify the same workgroup, as is the case with XP.
- On the desktop, right-click on the shortcut My computer and choose Properties(key combination Win+Break or Win+Pause).
- In the window that opens System Properties select a tab Computer name And Change. Computers must have the same workgroup, for example WORKGROUP, but different names online.
- Save the changes and reboot the computers.
After this, the operating system itself must make all the add-ons and recognize the network; if this does not happen, you will have to perform a few more steps. Opening Start > Control Panel > Network and Internet > Network Sharing Center > Changing adapter settings and in the settings of the required connection, set the computer’s IP address similarly to the previous instructions for Win XP.
Setting up a network between computers running Windows 7 and Windows XP
Above, we looked at setting up a network between computers with the same operating systems, but what if, for example, you need to connect a laptop with Windows 7 to a desktop PC with Windows XP? First, we perform the actions that are already familiar to us: we set the same workgroups and indicate the computer names (necessarily in Latin characters and without spaces).
To open access to files and folders on one PC for another, you need to use the desired folder (or logical drive) right-click and select Sharing. In the section Specific users we open access.
To log in from Win XP to Win 7 you will need to accept account user "seven". If your account does not have a password, you will have to set one.
You may also need to do the following: Network and Sharing Center go to advanced sharing options, where you need to set the “correct” settings.
Microsoft Corporation, starting with Windows Vista, has greatly changed the security policy of its systems regarding the local network. The operating system seemed new, somehow too complicated, and therefore many could not figure out how to open access to files on the computer. Today we will look at how this is done using Windows 8.1 as an example, but Vista and 7 have a similar system, and the difference is not fundamental. The local network can also be used to later create , which will unite all multimedia devices of a house or apartment, or to share files with your phone or tablet.
In my opinion, this is very convenient when, without additional movements, you can play a movie from a computer, laptop or even phone to big screen TV or listen to your favorite music from your phone, on the speaker system without connecting additional wires, although this already requires . But let's move on to setting up the local network.
Video instructions are available at link.
Step by step instructions
- For the normal functioning of a local network, all computers on this network must be in the same workgroup, for home network Let's take MSHOME. To install it, we need to go through next path: open “Control Panel” - “System and Security” - “System” (you can also right-click on the “Computer” shortcut on the desktop and select “Properties” or the key combination “ “). In the window that opens, select “Advanced system settings” in the left column.

- In the window that opens, go to the “Computer name” tab and click the “Change” button. A dialog box opens in which we need to record a new workgroup. Enter MSHOME (all in capitals) and click OK. We also close the system parameters by pressing the OK button and restart the computer.

- Next, it is advisable to configure a permanent IP for both computers. To do this, go to “Control Panel” - “Network and Internet” - “Network and Sharing Center” - on the left side of the “Change adapter settings” window - select the network card, right-click and click “Properties”.

- Before completing this step, read the notes under the screenshot. Select “Internet Protocol Version 4” and click “Properties”, fill in as shown in the picture.

P.S. If your local network is organized through a router with a DHCP server enabled, the IP address, Default Gateway and DNS Server can be left in automatic mode. This action must be done if you have two computers connected directly or if DHCP is disabled on the router.
P.P.S. The IP address value must be different on computers within the same local network. That is, at of this computer we indicate IP 192.168.0.7, and the next one already has 192.168.0.8.
- At this point, we begin to work with folders that we will share on the network. I will tell you using the example of one folder, but you can open access to the entire local drive using a similar scenario.
First, we need to share the folder. It should be taken into account that if the network is not limited to two computers (for example, some providers (Beeline) provide Internet to apartments based on one large local network), it makes sense not to give the right to change the contents of the folder; If you are confident in the computers on the local network, feel free to give “Full access”. So, open the properties of the folder we need, to do this, right-click on the folder and select “Properties”, open the “Access” tab and click the “Advanced settings...” button.
- In the window that opens, check the “Share this folder” checkbox, click the “Permissions” button and give the necessary rights to the folder; Since this is an example, I'm giving full access to the folder, but you can use it at your discretion. Here's what I got:

- Click OK to accept the changes, also click OK in the “Advanced sharing settings” window, then in the folder properties go to the “Security” section and click the “Change” button.

- Click the “Add” button, in the window that opens, write “All” (without quotes) and click OK.

- Select our new group in the window and give it full access at the bottom of the window.

- Click OK, in the folder properties it is also OK and to be safe, restart the computer again.
Next, we need to configure the visibility of the computer within the local network. To do this, go to “Control Panel” - “Network and Internet” - “Network and Sharing Center” - on the left side of the window, select “Change additional sharing settings” and profiles of sharing settings will open in front of us. Here your task is that in all profiles you must enable “network discovery”, and “file and printer sharing”, and “sharing so that network users can read and write files in shared folders”, as well as “Disable password protected sharing.” Click save changes.


Visit our partner store OGO.ru, there you will find a lot of electronics from computer components to refrigerators and washing machines at delicious prices.
That's all. I hope you found this article helpful, click one of the buttons below to tell your friends about it. Also subscribe to site updates by entering your e-mail in the field on the right or subscribing to the group on VKontakte.
Thank you for your attention!
Despite the growing popularity of Windows 8 and Windows 10 optimized for mobile devices, the good old “xp” still enjoys the trust of users. Accordingly, the question “how to create a local network connection on Windows XP” is still relevant for lovers of simple and understandable “classics”. Therefore, here we will look at how to set up a local network between windows xp and windows xp when connecting computers via cable.
How to connect a local network on windows xp?
To set up a local network on Windows XP, you first need to connect the computers using a network cable.

connecting a network cable to a PC network card
A direct local network connection in Windows XP is created in the settings of each network computer.
The cornerstone of most self-created local networks is the incorrect connection of computers via twisted pair cable. Check that the cable is not “crushed” by the sofa or broken interior door, otherwise , or , may occur.
How to set up a network connection in windows xp?
To create a local network connection:
1. On your Windows XP, go to the “Network Neighborhood” section;

2. On the left side of the menu, from the list of possible tasks, select the “Display network connections” sub-item.
 This will allow you to identify the networks that are involved in at the moment or simply disabled.
3. Select the local network connection shortcut here, right-click on it and select the “Properties” menu item.

4. In the “General” tab at the end of the list there is a column “Internet Protocol TCP/IP” - double-click on this line to go to the menu for adjusting the IP address parameters.
Enter here following parameters:
If the local network connection shortcut is inactive, right-click on it and enable the network connection.
This completes the setup of the windows xp windows xp local network on the first computer.
5. On the second and subsequent computers (when creating a network connection via a switch), the network card is configured in the same way.

Please note that the IP address of each network computer must be unique. So, if you installed 192.168.1.1 on the first PC, then on the second you can enter, for example, 192.168.1.2.
Network settings are correct windows connections xp can be checked using the Ping utility launched on the command line, as we described in the article: “”

This parameter regulated through the “Control Panel” in the “System” tab. Next, go to the “Computer name” column and set the desired value. Each computer must have a serial name: for example, comp 1, comp 2, comp 3, etc. Do not forget to title the name of the entire functioning working group - this will be required for the smooth exchange of information between functional units.
Hello. Recently responding to a comment on a blog, I promised to write an article about that how to set up a local network via Wi-Fi router . And since I have TP-Link TL-WR841N installed, I will write instructions using this router as an example. Although in setting up a local network between computers, the router will practically not be configured, so even if you have a different Wi-Fi router, this article will be useful to you.
Local network is a useful thing. You can exchange files, you can play games, especially since setting up a network through a router is not very difficult. If you have two or more computers accessing the Internet through one router, then there is already a network between them. And it doesn’t matter how they connect, both via a network cable, Wi-Fi, or one via cable and the other via wireless network. Let's get started with the setup process. I will write in order what we have and what needs to be configured. Let's go.
Setting up a local network via a Wi-Fi router
What we have:
- Wi-Fi router is connected to the Internet. Distributes IP and DNS automatically.
- Computer No. 1. operating room Windows system 7. Connected to the router via a network cable, the Internet is working.
- Computer No. 2. Windows 7 operating system. Connects to the router wirelessly Wi-Fi networks, the Internet is working.
Target:
Set up a local network between two (you may have more) computers. Share access to a specific folder or local drive. Get the ability to share files.
We work:
Before starting to set up the network on the computers, I decided to ping from one computer to another to see if there was a connection between them. Read more about ping. If you want to do this too, then you need to go to the router settings from one computer and see what IP address the router assigned to another computer on the network. I recently wrote an article about that, you can read it.
Well, I’ll quickly write how to do it. We type 192.168.1.1 (192.168.0.1) in the browser and go to the router settings. Go to the “DHCP” and “DHCP Clients List” tab, we see there the devices that are connected to the router. We look at the IP address that is assigned to the second computer with which we want to set up a local network.
Now we ping to it. Click “Start” and write in the search bar cmd, in the search results, run the utility “ cmd.exe“.

A window will appear in which we write the command ping “IP address of another computer” and press “Enter”. Let's look at the result, if you see that packets are being exchanged, then everything is fine, there is a network between the computers.

I think I’ll do another ping from a laptop that is connected via Wi-Fi, and I see that packets are not being transferred. And if the ping does not pass, then the network will not work. And then it started, for a long time I changed different settings until it dawned on me that it was installed on the laptop and computer ESET Smart Security, yeah! He completely checks the network.
If during the setup or work process problems arise with the network connection, then the first thing you need to do is check and disable antiviruses and firewalls. I also advise you to disable Windows Firewall.
I open the antivirus, go to the “Settings” tab, “Network”, select “Change the computer’s network security mode” and celebrate “Allow sharing”. Click “Ok”, repeat the ping, everything works. Half the job is done, let's continue.
Setting up a local network
Now you need to check on each computer which workgroup they are connected to and give them a name. If the name has already been set, then it is better to change it by writing the word in English letters.
Right click on “My computer” and select “Properties”. Further “Advanced settings” and go to the tab “Computer name”. Click the “Edit” button. Enter a new name and, if necessary, a group.
You need all the computers you want to connect to the network to work in the same group.
I had a registered group “WORKGROUP”, and I left it.
After making the settings, click “Ok” and restart the computer.

Let me remind you that we perform all actions on both computers.
We continue the setup, go to “Start”, "Control Panel", “Network and Sharing Center”.
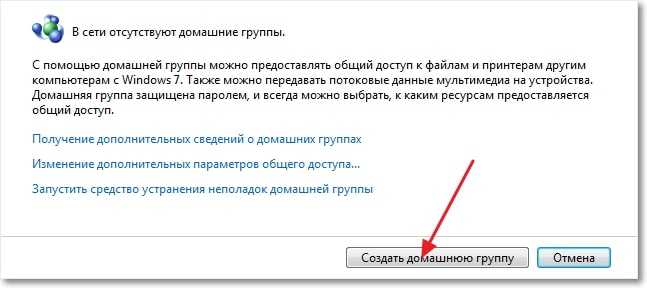
Let's look at what network your network belongs to, what you need is “Home network”, if you have for example “Community Network”, then click on it and select “Home network”.
Now click on the right “Ready to Create”.

Click.
Select the items you want to share and click “Next”.

A window with a password will appear, just click “Finish”. In the window that appears, click .

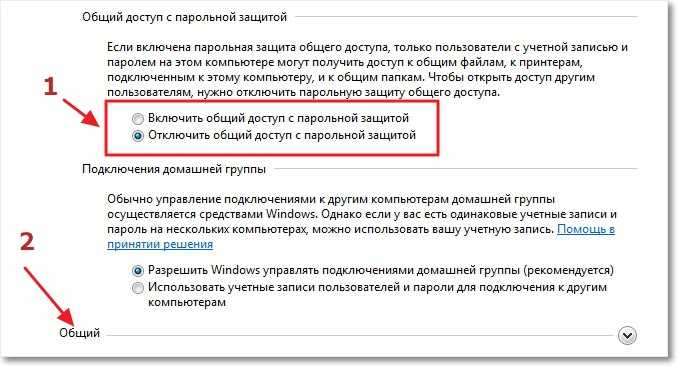
We also need to disable the password request when accessing a computer on our local network. Scroll the page and find the item “Sharing with password protection”, select “Disable password protected sharing”. Then open the “General” tab, look for the same item, and disable the protection. Don't forget to press the button “Save changes”.
That's it, the network settings are complete. Restart both computers, or however many you have. For some reason, it then seemed to me that the Home Group could not have been set up, everything would have worked just the way it was, but oh well.
Let's see if our computers can see each other. Let's go to “My computer” and on the left click “Network”. Everything works for me, both my computer and laptop that are connected to the router via Wi-Fi are displayed. The network works the same way on a laptop.

If we log into a computer on the network, we will only have access to the Public Folder. In order to open general access to, for example, the entire “D” drive, you need to make some more settings.
If you have different operating systems, say Windows XP and Windows 7, and you encounter problems setting up the network, then read the article.
Opening shared access to folders on the local network
Go to the folder or local drive that you want to share and click the button at the top “Sharing”, “Advanced sharing settings...”.
 A window will open in which click “Advanced setup”. Check the box next to “Share this folder” and click “OK”. If you want, you can also specify the name of the share.

Now all devices connected to the network will be able to share access to this folder.
What we got. We have set up local network via Wi-Fi router TP-Link TL-WR841N. One computer is connected to the network via a network cable, the second via Wi-Fi. Basically, you can have more computers, and they can be connected in different ways.
How to connect an Android smartphone (tablet) to a local Wi-Fi network?
I was already thinking about finishing this article, but I decided to try connecting my HTC One V to the newly created network. To do this, I advise you to install the “ES Explorer” program. Really cool program. Launch it and go to the tab “Local network” (phone number must be ), click the “Search” button.
My smartphone found two of my computers on the local network, I can connect to them and go to folders that have public access. I even started the movie on my phone from my computer, wow technology :).

Now that’s all for sure, well, it took a while to write this article :), I hope it’s useful to you. For some reason, I’m sure that many questions will arise about that article, ask, we’ll try to figure it out. Good luck friends!
Also on the site:
How to set up a local network via a Wi-Fi router? Detailed instructions on example TP-Link TL-WR841N updated: February 7, 2018 by: admin
Good afternoon, Friends! I am very pleased to welcome you to our educational Internet portal http://site. We continue our conversation about setting up a home network. The topic is broad, but interesting and very important.
Today we will be engaged in network education or network settings. In order to be able to set up a home network yourself, you need to gain a minimum understanding of how a local area network works.
We will talk about local network terminology, setting up network adapters, and also take a detailed look at connecting two or more computers to a network.

Let's look at the network connection settings:
1. For Windows XP: Go to the “Start” menu -> “Control Panel” -> “Network Connections”. If your computer has a network card, a network connection icon will appear in the window that opens. Right-click on it and select “Properties” from the menu that opens.
2. For Windows 7: Go to the “Start” menu -> “Control Panel” -> “Network and Internet” -> in the first item “Network and Sharing Center” select the sub-item “View network status and tasks” –> click on the “Local Area Connection” link and then the “Properties” button.

In the list box that appears, select “Internet Protocol (TCP/IP) (version 4, if specified)” and click on the “Properties” button.

A window will open in which the main ones will be displayed.
adapter network settings
– a certain formal designation of your computer in the global or local information space. Most likely, the network we create will operate using TCP/IP (Transmission Control Protocol/Internet Protocol).
A protocol is a set of standard algorithms and rules in accordance with which data is exchanged on a network.
In accordance with the operation of the TCP/IP protocol, each network device is assigned a unique IP address. It consists of 32 bits (or 4 bytes), which are written as four decimal numbers in the range 0-255, separated by dots, for example: 192.168.0.10.

Please note that addresses 0.0.0.0, 127.0.0.1 and addresses ending in 0 and 255 are reserved for service purposes and cannot be assigned to network devices.
When setting up an Internet connection, pay attention to the IP address input field: if your provider has provided you with an IP address, then enter it in the appropriate field, but if it was not provided to you, then simply select “Obtain an IP address automatically.
2. Subnet mask. As a rule, a large network is divided into subnets, each of which is assigned its own unique address, like a separate computer. The full IP address, which we discussed above, contains information about both the address of a specific host and the subnet address.
To separate these sections from one IP address, you need to know the subnet mask. It also consists of 32 bits and takes the value 0 or 1. If you superimpose a subnet mask on an IP address, then the numbers under the ones will mean the subnet address, and under the zeros the address of a specific node. The subnet mask is written the same way as an IP address, four numbers separated by dots, for example: 255.255.255.0.
For reference, computers can only be connected to a network without the help of a router if they are on the same subnet (or have the same subnet address). If the subnet addresses differ by at least one, then information will not be transferred between them.
3. Types of IP addresses and default gateway. As you already understand, the number of unique IP addresses on the Internet is limited, and the number of computers wishing to access the World Wide Web is growing every day. It was decided to divide the addresses into private and public.
- Public IP addresses can be connected to the Internet directly. They are visible to every computer on the Internet. To get a public IP address, you need to pay money. Pleasure is not cheap. As a rule, such addresses are distributed to providers and dedicated servers, and sometimes to clients.
- Private IP addresses are addresses that are not visible from the Internet. They are assigned to computers located on subnets connected to the Internet through a router. A router is a device that connects two subnets: local and global (Internet), and therefore has at least two network ports (IP addresses): public (for connecting to the Internet) and private (for working within the local network). Because Since subnets do not interact with each other, the same addresses can be repeated many times in different subnets.
To create a home network, it is best to use private IP addresses. A common option is to use an address like 192.168.x.x, where x is a number from 0 to 254.
 4. DNS servers. We looked at what an IP address is. But everyone will probably agree that it is difficult to remember so many numbers. Which is easier to remember: 94.100.191.204 or mail.ru? Of course, it is easier to remember the letter address of the site (domain name). To replace IP addresses with understandable nominal values, special servers were invented - DNS servers. If the IP address changes, the DNS server is immediately informed about this, and your access to the site remains under the same domain name.
To set up Internet access, you must specify the IP address of the DNS server (usually it is issued by your provider or is assigned automatically). If this is not done (or the DNS server stops working), then to access sites you will have to specify their IP addresses.
home network for two
If you need to quickly connect two computers to a network (for example, to transfer information, create a backup copy, or just to play), then it is not at all necessary to buy a router or switch. We will consider two connection options:

I will not consider setting up wireless access in this article. On this option We'll stop later when we look at router settings.
Having selected the type of cable connection, you can proceed to the network adapter settings.
First of all, make sure that the computers are in the same workgroup, in the same address range and with different network names. Let's see how it's done:

Next, you need to set IP addresses and a subnet mask (the subnet mask is set automatically when the IP address is specified) for each computer. We discussed how to choose IP addresses above. Let's see how the IP address is configured:

If you connect several computers to a network using a switch ( network switch), then repeat the above settings on each computer on the network.
network troubleshooting
1. The first thing you should pay attention to when troubleshooting a network is whether the network connection is established. Those. is there physical connection computers (are network cables connected to network adapters and network devices such as routers, is wireless enabled? wifi adapter, for example, on laptops it is disabled by a special key combination). You must immediately determine whether the network adapter is working properly. As a rule, sometimes it is enough to see if the yellow-orange diodes of the network connector blink when the cable is connected.
2. It is necessary to check that IP addresses are not repeated in a given subnet. All computers must have different addresses so that there are no conflicts when exchanging data.
3. Make sure the subnet address is correct. Those. you need to check that the subnet mask is on all network adapters was installed the same.
4. Check that the same group is specified in the computer properties (we talked about this above).
5. If a specific site has become unavailable, this does not mean that the network has disappeared; perhaps the DNS server has failed. Check other sites. To control the operation of the DNS server, enter 94.100.191.204 into the address bar of the browser instead of mail.ru. If the site loads, then the DNS is definitely faulty.
