How to install an interior door. Step-by-step instructions for self-installation of an interior door How to mount an interior door
Sections of the article:
Success in self-installation of interior doors can be achieved if you approach this task correctly. On the one hand, such work is not difficult to carry out, but on the other hand, there are a number of nuances that must be taken into account during the installation process. Before installing an interior door, it is important to think over the algorithm of actions. At the same time, if you do the work without being prepared, then this may affect the final result. Of great importance is theoretical training in the question of how to install such door structures. Even in the absence of experience, you can install interior doors correctly and reliably.
Preparatory work
Before you study the theory of installing interior doors and proceed with the installation of the structure, it is necessary to consider the issue of preparatory work. In no case should this stage be ignored, otherwise a simple and quick installation of doors can turn into a real nightmare. First of all, you need to pay attention to two points.

First you need to make sure that the door block is in full compliance with the opening. The optimal situation would be if, after the installation of the structure, a gap of 2-3 centimeters remains on all its sides. This will make it possible to easily set the door frame in the same plane with the opening.
This is easy to achieve. If the opening is too narrow relative to the door block, then it can be expanded with a hammer drill or impact drill. In the case when the doorway is too wide, it is possible to reduce its dimensions using a wooden beam. In general, a gap of up to five centimeters is considered normal.

For the perfect installation of the door block, you can use one simple device. It is required to attach three even wooden slats across the box. One from below, the second from above, the third - in the middle of the structure. These rails will allow you to set the door block in the same plane with the opening.
To avoid damage to the surface of the door frame, you can fix the slats by placing wooden linings under them. They should be screwed to the end of the box. In addition, the length of the rails must be chosen in such a way that after installing the door frame in the opening, the rails rest against the walls. By the way, there are a few more nuances that will help you complete the installation without unnecessary difficulties.

First of all, the rails need to be fixed on the side of the door block into which the door will open. In addition, they must be fixed after the door frame is installed in the opening and gaps of the required size are formed between the opening and the opening.

To fix the box, you can use double-folded thick cardboard. It is very important at the stage of preparatory work to perform the above two steps. Without the implementation of these procedures, it is not recommended to proceed with the installation of the door block, because in this case the risk of skew of the entire structure increases significantly. After the implementation of these manipulations, you can proceed directly to the independent installation of interior doors.
Independent installation of interior doors
After completing the preparatory work and preparing all the necessary tools, you can begin to install interior doors. Of the tools you will need a hammer, a short rack level and a crowbar. In addition, it is necessary to purchase a cylinder with low-pressure polyurethane foam during polymerization. An example is Macroflex 65 foam. Wood wedges should also be prepared. To date, there is a proven technology on how to install interior doors correctly. You can see the installation process in the video.
The first step is to put the door block in the opening. During this process, it is important to pay special attention to the side on which the structure is being installed. When installing, it is advisable to be where the door will open. Now you should set the structure in the center of the opening. By moving the door block to the right or left, it is necessary to ensure the same gaps between the structure and the walls on both sides.

At the next stage, you will need to make sure that the vertical position of the door frame racks is correct. To do this, you can use the rack level. It must be applied from below the upper transverse jumper. If the level is not respected, you will need to use a crowbar, lifting the desired rack with it and placing wooden wedges under it.
After that, you should fix the door block to the partitions. To do this, it is necessary to drill holes with a diameter of 6 mm in the protruding part of the wooden lintels. Then dowels are hammered into these holes. In the process of fixing the door block, it is necessary from time to time to check the position of the structure relative to the side walls.

After that, the door frame and opening should be wetted with water. This procedure is carried out in order to increase the polymerization of the mounting foam and its adhesion to the walls of the opening. Then you need to once again make sure that the correct position of the door frame is maintained. To do this, use the rack level. In addition, it is necessary to check the presence of gaskets made of cardboard between the door leaf and the boat. If some fell out in the process of performing work, then they must be returned to their place.
At the next stage, it is necessary to fill the gaps between the door block and partitions using mounting foam. After that, you need to let the foam grab and dry. This will take several hours. As a rule, the polyurethane foam completely hardens in 6-10 hours. By the way, it will be said that polyurethane foam is a poisonous material. To avoid the unpleasant consequences of skin contact with it, you can use protective gloves. In addition, it is necessary to protect the surface of the products with masking tape, pasting the door block around the perimeter with it.

After that, you must remove all aids. Now they are no longer needed. So, with the help of a screwdriver, dowels and self-tapping screws are dismantled, which secure the jumpers in the door frame. Then you need to remove the rails themselves and open the door. Cardboard pads should fall to the floor on their own after the door is opened.
Finishing doorways
The question of how to properly install door blocks is not limited to the installation of the structure itself. After the interior doors are mounted, it is necessary to carry out work on finishing the doorway. The method of carrying out this procedure depends on the width of the doorway, as well as the type of mounted door unit. In the case of a thin wall, as, for example, at the entrance to the bathroom, it is possible to finish using only architraves. This option is the simplest and most labor-intensive. The purchased set of platbands is fixed on both sides of the door structure, closing the gaps between the frame and partitions filled with foam.

If we are talking about wide doorways, then their finishing is carried out using the same platbands or additional trims. They may differ from the color of the door leaf, especially since recently contrasting solutions have become popular. The sentinel strip can be cut to the required width, and it should be fixed with construction adhesive.
In addition, it is worth emphasizing that one of the ways to finish the doorway is to plaster the slopes. This method is especially appropriate when installing wooden door blocks. The fact is that the cement-sand plaster mortar favorably emphasizes door structures made of natural wood. At the same time, this type of finish is not recommended for fiberboard door frames. This material is not compatible with the high humidity of materials used in plastering.

After installing the door block, installing the platbands with your own hands is not particularly difficult. It is necessary to cut the edge of each architraves at an angle of 45 degrees and fix them on the door frame. For these purposes, you can use glue, finishing nails or self-tapping screws. The caps of the studs are subsequently overwritten, and the self-tapping screws are hidden with the help of decorative plastic plugs.
As practice shows, installing interior doors is a fairly simple procedure. But, only subject to the installation technology and the sequence of work. A reasonable approach to business will allow you to perform all the manipulations without much effort and problems.
Caring for interior doors
It is important to remember that a technically competent and accurate installation of interior doors can easily be leveled by the lack of care for the structure and improper operation. Interroom doors are recommended to be used indoors at a temperature from +15 to +35 С°. In this case, the humidity of the air should not exceed 70%. It is important that the door unit is not affected by sudden temperature fluctuations and changes in humidity in the apartment.

By the way, it will be emphasized that special attention should be paid to the operation of interior doors in rooms equipped with sealed windows. If the rooms are not ventilated, excessive humidity may occur in them, which is likely to cause damage to the structural elements of the door structure. So, the door can swell, the finishing material can peel off.
In addition, it is strictly forbidden to install MDF doors in those rooms in which there is a constantly elevated air temperature and humidity. These facilities include swimming pools, saunas and baths. At the same time, it is not recommended to install such structures in rooms without heating, with cement or earthen floors. At the same time, it is allowed to operate interior doors with short-term exposure to moisture. In this case, ventilation of the premises is a prerequisite. An example of such an object is a bathroom.

During the use of interior doors, the opening and closing of the leaf should be carried out exclusively in ways that do not entail damage to the structure and platbands. In addition, even if the door is equipped with a wear-resistant finishing coating, rough mechanical impact on the structure should be avoided. Otherwise, chips, cracks, burrs and scuffs are likely to appear. Such defects will significantly worsen the aesthetic appearance of the door unit.

The interior door, like the furniture in the room or other interior items, needs careful treatment and attention. To maintain the aesthetic appearance of the structure, it is enough to periodically apply special care products. It is necessary to clean the door unit from dirt and dust with a soft cloth or a damp cloth. Contact of the structure with various solvents, acidic and alkaline compounds should be avoided. If you follow these simple rules, then interior doors will delight their owners with aesthetics and a long service life.
In conclusion, it is worth emphasizing that the whole process called “we put interior doors on our own”, carried out in compliance with the technology and recommendations of professionals, will take about three hours. True, this is not counting the time spent on the preparatory work before you start installing the structure with your own hands.
In any country house or apartment, the question of replacing or installing interior doors may arise. A wide range of doors offered on the market allows you to choose a product according to your taste, design of the room and the state of your wallet. You can trust installers to install doors for a fee, or you can save money and install the door panels yourself.
Mounting the canvas is not an extremely difficult task, but requires some knowledge and skills. Before installing any structure, you need to know what it consists of. The door block consists of the following parts - a frame, a door leaf, fittings, platbands.
If the width of the wall is greater than the inserted door block, then an additional element, an extension, can be used.

The most common materials from which interior doors are made are MDF, laminated chipboard and wood. There are various designs, but swing doors are more popular.
The order of assembly and installation of the door:
- Assemble the door frame;
- Fix the hinges on the door leaf and box beam;
- Insert the door frame or block into the opening;
- Install fittings (handle, latching mechanism);
- Install platbands.
You can install the fittings yourself, but if there is no self-confidence, then in order not to spoil the doors, it is better to trust the professionals. The installation sequence may vary.
Proper installation of interior doors
To put interior doors from scratch, in addition to desires and skills, you will need some tools and fixtures. In addition, you will need mounting foam and a gun. To cope with the installation of a heavy structure, for moral and real support, an assistant is needed.
What tools are needed to perform the work:
- Screwdriver or screwdriver;
- Level;
- Hacksaw, electric jigsaw or circular saw;
- Chisel;
- Drill;
- Fasteners: self-tapping screws, finishing nails, anchors and others.
Door frame elements and architraves are often cut at an angle of 45ᵒ. To perform this operation accurately and accurately, a miter box is used. Before installing new interior doors, you need to check the condition of all elements, their coatings, and the availability of components. If defects are detected after the installation of the door block, then it will be almost impossible to prove something.
Instructions: how to install an interior door
Before installing an interior door, it’s a good idea to read the instructions with pictures and use some professional advice in your work. First of all, you need to assemble the door frame. It can consist of 4 parts or be U-shaped. It depends on the availability of flooring. The boxes are produced with universal dimensions for doors from 600 to 900 mm, so the elements of the box have to be cut. Doing the job requires care and attention.

Door frame assembly instructions:
- Cut off long pieces. Take into account the size of the gap between the door leaf and the floor covering (for residential premises 10 mm) and the thickness of the floor covering.
- Cut off the top piece. From the side of the door leaf, the size is equal to the width of the leaf itself plus 7 mm. Using a miter box, cut the elements at an angle of 45ᵒ.
- If a threshold is provided, then the elements are sawn off perpendicularly from below. It is also possible to wash down the upper elements in 90ᵒ.
- To connect elements, especially for MDF doors, it is necessary to drill holes at an angle of 45ᵒ using a drill with a diameter of 2.5 mm, separately in a long element, holes of 4.5 mm must be drilled. Connect the elements with screws.
Next, you should attach the door leaf to the assembled frame, observing the gap between the box and the door of 2.8 mm. To establish the gap, packing cardboard can be used. If the door is double-leaf, then the distance between the two halves must be at least 4 mm.
Only having determined the side and direction of opening the door, it is necessary to mark the place where the hinges are attached.
Usually they are placed at a distance of 20 cm, retreating from the top and bottom of the door leaf. The third loop is attached at intervals of 46 cm from the top. Hinges have their own characteristics that must be considered during installation. If necessary, a place for fastening the “flag” of the loop is prepared with a chisel. Depending on the design of the hinges, the methods of their fastening may be different.
Installation options for interior doors
The next step is to insert the door frame into the opening. Technology may vary. If the opening is too wide, you can reduce it by attaching a wooden beam to the wall with anchors from the hinge side.
You can insert a whole block, together with the canvas or a separate box, then spacers will be required. The size of the spacer must take into account the technological distance between the bottom of the door and the frame, 6 mm must be added to the width of the door leaf. If the frame is installed separately, after hanging the door, the gap must be checked. It must be the same everywhere. If necessary, adjustments are made.

The box is fixed in the opening with wedges. First, the upper wedges are clogged, and then, after checking the level of the box, the lower ones. The distance between the box and the wall is filled with foam. In order not to stain the surface, masking tape is used. When the foam dries, the wedges are removed and the protruding part of the foam is cut off.
Door frame mounting methods:
- The box is fixed with 6-8 self-tapping screws of the required length through the through method (wooden spacers can be used).
- For fastening, 3-4 points are used in the places where the fittings are inserted, which hides the screws.
- Dowels, long bolts with nuts are used as fasteners, mounting strips are attached to the box. The whole process is regulated by level. In this case wedges are not used.
The stage of installing platbands is no less responsible than the previous ones and requires accuracy. To put the trim, you need to measure the length of the trim, cut the trim with a miter box at an angle of 45ᵒ, attach the trim with nails, having previously drilled holes 1/2 or 2/3 of the diameter of the nail in the attachment points.
Installation of fittings can be performed at different stages.
In some cases, all fittings crash after installing the door block. The door fittings include: 2 or 3 hinges, handles with latches and a locking mechanism. The location of the handle is determined individually, the standard requirements are 0.8-1.3 m from the floor.
We figure out how to install the door correctly
You need to install the door yourself in compliance with building codes. When properly installed, there should be no distortion. The canvas should not open on its own if it is not held by a lock, or close. A correctly installed door with a slight push in the open state should close smoothly.

The quality of the door installation depends on the following reasons:
- Properly made measurements, according to which the door block is made. To perform measurements of room openings, it is better to invite a specialist.
- Working conditions (temperature, humidity). It is desirable to install canvases at the end of all work and complete drying of the floor and walls.
- All required clearances must be observed.
- All structural details must be level, even if the walls are not even.
To keep interior doors in good condition, you need to use furniture care products, avoid exposure to aggressive substances. To process a wooden door, mastic can be used.
Proper installation of interior doors with your own hands (video)
Installing interior canvases with your own hands seems like a daunting task. But, if you do the work, observing all the necessary rules and regulations, this task is feasible. Approaching the matter with due diligence, you can save the budget and gain valuable work experience. The result will definitely justify all efforts. Beautiful doors to the room will decorate the interior.
Step 1. The box is assembled along the door with a minimum gap of 2-3 mm on each side. It can be fastened with both nails and long self-tapping screws. Just be careful not to crack the wood. When fitting the edges of the box, the joints should be cut with a hacksaw and the excess removed with a chisel
It is more difficult to assemble cheap, so-called "paper" doors. They are more gentle. The gap between the frame and the doors is slightly larger, about 2-5 mm at the top and bottom, and 2-4 mm at the edges. It is better not to try to knock down the corners of the box with nails or self-tapping screws. Since the compressed paper will burst anyway. It is better to assemble such boxes with the help of corners (either those used during assembly or furniture corners).
You can not try to assemble a box with right angles at 90 degrees. At the moment, even very expensive doors have a slight curvature.
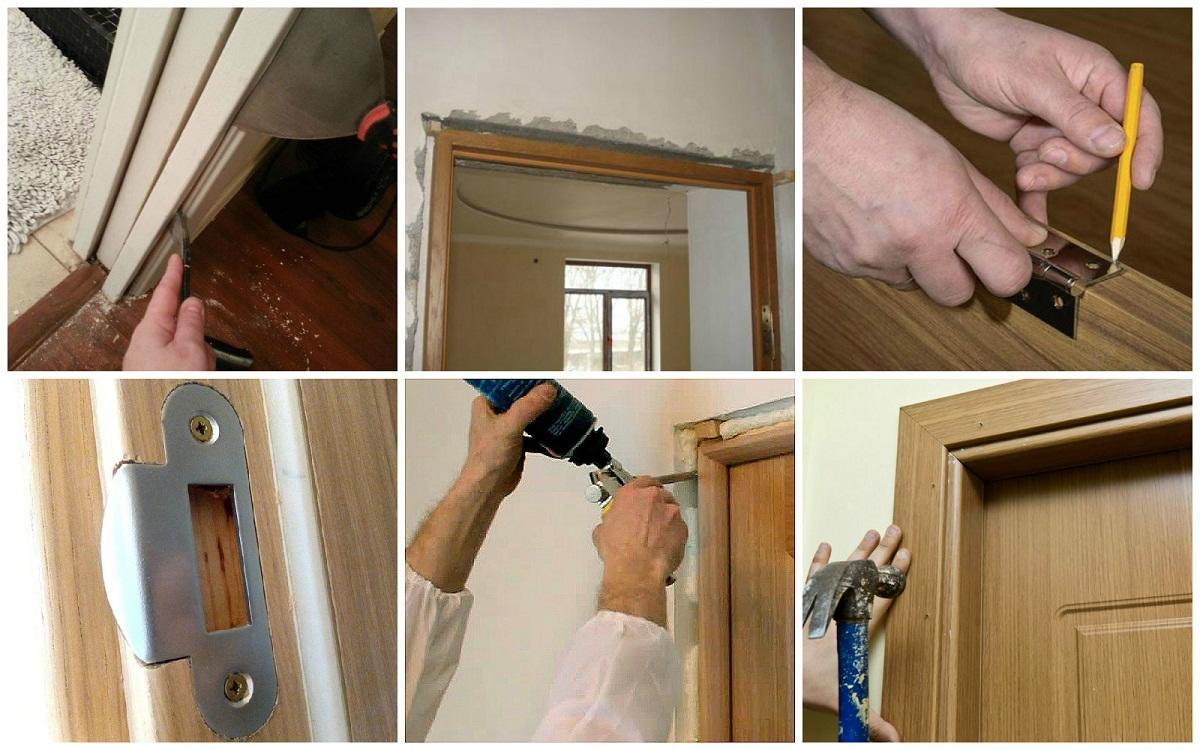
Step 2. The next step, explaining how to put the door correctly, will be the fastening of the canopies, there are left and right ones. They are placed on the side in which the door should open. This point is very important, and in order not to be mistaken, you can double-check everything several times.
First, the hinges are attached to the canvas of the box. To do this, they should be attached and circle the contours with a pencil. Then, along this contour, a recess is made a couple of millimeters deep, so that the loop “drowns” in the tree, but does not sink. In the same way, the hinges are installed on the door. Then everything is fixed with self-tapping screws that come with the hinges.
Step 3. Now let's proceed directly to the very answer to the question that torments everyone who is in a state of repair: how to do it right after assembling and attaching the hinges. The door is set in the opening according to the level. It is desirable to “throw” the level from all sides of the box, to be sure.
So that the exposed door does not “run away” anywhere, it is desirable to drive wooden wedges along the edges and in the middle. But they should not be too thick, otherwise they will bend and the door will not close. But too small wedges will not work, they should not fall out.
So, the wedges are clogged, the door is installed in place. Now it should be fixed with anchors. First, holes are made through the box into the wall with a drill or puncher. Then an anchor is screwed into them, it fastens the box to the wall. They are screwed in 2-3 pieces on each side. The commit ends
Before foaming, you need to properly “spread” the door frame. For example, put loose cardboard on all sides and close the doors tightly. Now you can fill the voids with foam. But different foams have different degrees of swelling, so it is better to fill the openings halfway.
It is important not only to choose a way to properly install an interior door, but also to give it the due date for final fixing. This time will be 6-12 hours, during which you do not need to open the doors. This is how you need to let the foam grab and then you can carefully cut off its excess with a clerical knife.
Now it is clear how to properly install an interior door. True, the work has not been completed on this, since the process of cashing it out is ahead (that is, it is necessary to put platbands), perhaps varnishing (depending on the type of door). But that's a completely different story.
At first glance, there is nothing difficult in installing doors: just install a door block in the opening, blow it out with foam, embed locks, nail trims and that's it. This is how the installation process looks in general terms, let's take a closer look at it in order to determine a rational sequence of actions.
To install an interior door, you will need:
Tools:
- a hammer;
- plumb;
- roulette;
- drill;
- feather drill for wood Ø 24 mm;
- end saw or miter box and hacksaw;
- level;
- screwdriver or screwdriver;
- milling cutter or chisel.
Materials:
- wooden wedges;
- mounting foam;
- self-tapping screws;
- handle, door latch, hinges;
- door, box, platbands, extensions.
Preparatory work
Preparation of the doorway for installation depends on the initial condition of the room. In a new building, install doors upon completion of all the “dirty” construction and finishing work: the ceiling and floor must be ready, the walls must be plastered. You can even paste wallpaper: installing doors is a clean job, if everything is done according to the rules, there will be no dirt. When replacing the door block, it is necessary to dismantle the old door frame, clean the surface of crumbling plaster and repair the chipped areas.

Assembling the door frame
The dimensions of the door frame parts are determined based on the dimensions of the door leaf. In the assembled state, the gaps from the door leaf to the frame should be 2 mm on the sides and top and about 4 mm from the bottom. In a U-shaped door frame (without a threshold), the side posts should be 1-1.5 cm longer than the height of the door leaf. Cut the parts to the desired size and assemble the box by connecting them with self-tapping screws. For greater strength, the joints of the box can be glued.

Insert hinges
Lay the door frame on the floor, place the door leaf in it. Using strips of cardboard, set the gaps indicated above, mark with a pencil the attachment points of the hinges on the box and door leaf. The edge of the hinge should be at a distance of 20 cm from the edge of the door leaf. If the doors are heavy, you can install a third hinge. The main part of the load falls on the upper loop, so it is advisable to install the third loop not in the center, but closer to the top.

Attach the door hinge to the installation site and trace around the perimeter with a sharp knife, cutting through the wood to the depth of the thickness of the hinge plate. With a sharp beveled chisel or handheld electric mill, remove the layer of wood so that a seat is formed exactly the size of the plate. Install the loop, it should fit snugly in the recess and not protrude beyond the edges. Screw the screws into the holes. Thus, install all halves of the loops.

Hang the door leaf on the hinges and check the gaps between the leaf and the frame. Next, install the door block vertically and check the opening of the doors, the canvas should open freely and not spring when closing.
Door block installation
Remove the door leaf from the hinges. Position the door frame in the center of the opening and fix its position with wedges. Check the location of the box relative to the edge of the walls - they should be in the same plane. The hinged side of the box is attached first. Align the rack vertically with a plumb line or level. Drive in the wedges just above the junction of the box post with the top rail, secure the entire box by placing the wedges at the corners. Hang the door leaf on the hinges and, tapping the box riser with a rubber mallet, adjust the position of the door so that the door closes freely and, when closed, adjoins the porch with the entire plane.

Next, close the door, insert strips of cardboard folded several times into the gap between the door leaf and the box. This is done in order to prevent the box from being deformed by mounting foam, which expands when it solidifies. Fill the space between the door frame and the wall with mounting foam, after it has completely dried, cut off the excess with a knife.

Platband fastening
To join the trim, the trim must be cut at 45°. It is most convenient to work with an electric end saw, if such a tool is not available, use a miter box and a hacksaw. The vertical racks of the casing are cut and fastened first, then the upper horizontal bar.

Installation of interior doors with additional trims
Additional strips allow you to beautifully decorate the doorway in a situation where the width of the frame is less than the thickness of the walls of the doorway. Dobory on the door frame can be installed in the groove or in a quarter. In the first case, in the box, on the side opposite to the opening of the doors, a groove is made along the thickness of the extension. The slats are attached with glue after the box is installed. The space formed between the extension and the wall is filled with mounting foam. The platbands are nailed to the extension after the foam dries and the excess is cut off. In the case when the extensions are installed in a quarter, the slats are attached to the box before installation in the doorway with self-tapping screws from the outside.

Insertion of latches and handles
Decide on the height of the handle from the floor, usually it is 95-100 cm. When choosing a distance, be guided by the convenience and design features of the door leaf.
Let's take a look at the cutout of a door latch with separate handles. Mark the places for drilling the holes for the handle square on the door leaf rack and for the latch itself in the center on the end side of the door. The distance from the edge of the canvas to the center of the hole for the square is determined based on the measurements of the latch, for most latches it is 45 mm.

Using a drill and a Ø 24 mm wood drill bit, make a hole for the square. To make the edges neat, stop drilling as soon as the tip of the drill appears on the opposite side. Continue to work, but on the reverse side. Then drill a hole for the latch.
Insert the latch into the end hole, temporarily fix with self-tapping screws for convenience. Cut the wood along the perimeter to the depth of the thickness of the latch plate. Unscrew the screws, remove the latch and remove the wood under the seat with a chisel. Insert the latch into place, check the alignment of the hole for the square and fix it with self-tapping screws.

Now let's move on to the handles - remove the decorative trims from them, insert a square into one of the handles, fix it with an internal screw using a hexagon, which usually comes with the handles. Install the handle in place by inserting the square into the latch, then screw it with self-tapping screws to the door. Install the opposite handle and also secure with self-tapping screws, do not forget to tighten the inner screw that fixes the square. Check the handle for operability, after which you can screw the decorative trims.

The next step is to install the counter bar on the box riser. In order to determine the place where the latch tab will rest, apply a little paint on it (it is better to use water-soluble paint). In the marked place, make a recess under the tongue with a chisel and a hammer.

Screw the counter plank with self-tapping screws, outline the perimeter with a knife, remove the bar and select the wood for the seat. After installing the counter bar, screw in the screws, close the door and check the operation of the latch.
Doors are one of the few types of joinery that does not forgive mistakes. If you took the dimensions incorrectly or cut the parts at the wrong angle - that's it, you won't be able to correct the dimensions, you will have to redo everything again and use new materials. If the sawing angle does not match, then it is useless to seal the resulting gap with sealant. It may become invisible (although this is unlikely), but the strength of the structure will be significantly reduced. The individual elements of the box will not touch over the entire surface, but only at a few points. Accordingly, the loads on the bars increase significantly, such a door will not last long. Moreover, you have to use the door very often and with various efforts.
We mean that all work on assembling the door frame must be done very carefully and carefully. Technological gaps between the canvas and the box, the threshold and the floor are 2 ÷ 3 millimeters, with the same accuracy it is necessary not only to measure, but also to cut off all individual workpieces, to make accurate allowances for the width of the cut.


You must know your instrument and its "specs". The tool must be sharp and serviceable, and the hand "firm and confident." We strongly recommend that all cuts be made with an electric saw with a rotating table.

Why not in a chair? The answer is simple. If you use a miter box, then with great confidence you can say that you rarely do gashes, otherwise you would have bought an electric saw a long time ago. And since you rarely trim materials at an angle, then there is not enough practice.

How to measure
First, measure the doorway. Standard door leaf sizes are 2000 mm high and 900 mm, 800 mm and 700 mm wide. The internal dimensions of the door frame are increased by 3 mm around the entire perimeter (technological gap), the outer dimensions of the frame are 70 mm larger than the dimensions of the door leafs. This is the standard thickness of the box rails. If your rails are of a different size, then the external dimensions of the door frame also change. And the gaps between the doorway and the box should be at least three centimeters.


Now you can check if your doors fit the doorway. If not, you will either have to expand or reduce the doorway. This is the worst option, the dimensions of the doorways must be carefully controlled at the stage of assembling the log cabin of the bath.

Another important point in size is the gap between the door frame and the floor. Depending on the specific location of the door, this gap is regulated by the provisions of SNiP 41-01-2003.
Set of rules. Heating, ventilation and air conditioning
The gap varies within 10 ÷ 15 millimeters and should provide the minimum required air exchange rate for each room. Any natural ventilation of premises works on the principle of supply and exhaust. If there is no influx of fresh air, then, of course, there will be no exhaust air either.

Some owners, in order to save heat in the premises, want to put doors without a ventilation gap, for baths this option is possible, no one is going to spend the night in them. But here inexperienced builders can create a problem for themselves. The minimum gap between the door leaf and the floor within 1÷2 mm can cause them to jam or difficult to open / close. The fact is that the flooring in the baths rarely has such horizontal accuracy. To avoid problems with the door leaf and not cut it after installation, you need to measure the floor level at the corners of the box.


This is quite difficult to do, we will tell you in detail about two methods.
- With the help of a hydraulic level. Very carefully place two marks on the doorway on both sides. The distance from the marks to the floor level is approximately 20÷30 centimeters. Using an accurate ruler, measure the distance from the floor to the marks made. In most cases, the discrepancy will be at least 2÷3 millimeters. This must be taken into account during the manufacture of the vertical sidewalls of the box, and the minimum gap between the door leaf and the floor will increase by the amount of the discrepancy between the horizontalness of the floor. In one position, it will be, for example, two millimeters, and in the opposite place it will increase to 4 ÷ 5 mm. If you do not take into account the level of the floor, then the door frame may not open completely at all or will open with a large “creak”. You will have to remove and cut the canvas, and this is highly undesirable.
- With a laser level. Align the laser beam exactly horizontally at a distance of about 10 cm from the floor level. With a ruler (preferably on a square), take measurements at the corners of the doorway, take into account the violation of the floor height during the manufacture of the box. This method is much simpler, measurements are made faster, but on one condition - you have a rather expensive device available.

Door frames can be with or without a threshold. With a threshold, they are often installed as entrance doors and rarely as interior doors; without a threshold, doors are installed only as interior doors.


door frame prices
door frame
Assembling a door frame without a threshold
Let's start with the easier option. Initial data: the material for the manufacture of boxes is a profiled beam made of natural wood. For MDF doors, the technology is almost no different.
Step 1. Bring the elements of the doors into the room.
Very important. Never put them near heaters, you don't need to dry them, you need the wood to gain equilibrium moisture and stabilize its linear dimensions!

What is equilibrium humidity? It is necessary to dwell on this topic a little, it concerns not only door frames, but all wood products. Wood has two moisture indicators: absolute and relative, they depend on various conditions and processing technology. But all varieties of wood have a sorption effect - the ability to absorb moisture from the air. Initially, the humidity can be at least zero, when it enters the room, the humidity rises to an equilibrium state under these specific conditions. If the products were stored in damp conditions in the warehouse - the doors will dry out a little, if they were stored in very dry conditions - the doors will pick up moisture until they stand in equilibrium. We hope that this is understandable and now you will not believe advertising that claims that the moisture content of their products is 8-10%. Such moisture may be at the exit from chamber or vacuum drying, but over time the tree will inevitably take on water and increase performance.
Step 2 Check the height and width of the openings, make sure that the box will fit into them with a gap of about 3 centimeters. Using a hydrolevel or laser level, find out the horizontalness of the flooring at the corners of the doorway.

Step 3. Bevel on a circular saw with a turntable of the box blanks - they may have been damaged during transport or storage. You can cut with a regular hacksaw, but there is a high probability of veneer peeling. If you still have to work with a hand tool, then you need to cut the blanks from the side of the veneer, let the chips be on the invisible side of the bars. It is better to use a special hacksaw with fine teeth or a hacksaw for metal.

Step 4 Mark the top of the box. To do this, place a bar on top of the door leaf and make marks with a gap of 2 ÷ 3 millimeters. For the gap template, you can use packing cardboard, it will just fit in thickness. Markings can also be made with a pencil, but it must have a very sharp end. It is better to cut off the workpiece later, first you should install the hinges on the door frame.


Step 5. Place the door leaf on its side in an upright position. You can rest it against the walls or make an elementary device to hold it in the desired position. On a piece of board at an angle, nail two spacers at a distance slightly greater than the thickness of the door leaf. To prevent the possibility of damage to the corners of the blade, place a piece of soft cloth on the fixture. The device is very simple, embedding loops with it is much more convenient.
Step 6 Measure the location of the loops.

It is recommended to place them at a distance of 20 centimeters from the bottom and top of the canvas. But make a specific decision yourself, it all depends on the characteristics of the door leaf. The main thing is that at the place of installation of the hinges, the sidewalls of the canvas are as strong as possible. Measure twenty centimeters at the top and bottom of the canvas, attach loops to the marks and make marks along their length.
Step 7 Now you need to mark the position of the hinges on the door frame.

In order for them to match exactly, put one of the boards of the box on the side of the door, measure the gap between the floor and the canvas at the bottom. It is recommended to do it within 10 millimeters.
Important. If you want to have a minimum gap between the door and the floor, then you need to take into account the indicators of the difference in floor height at the corners of the opening. With a sharp pencil or a construction knife, make notches on the location of the loops on the board of the box. On vertical bars, be sure to make a difference in floor height, otherwise one of them will either sag or not enter into place. Watch from which corner of the doorway the floor is higher, from this side of the door frame the side board should be shorter by the same value.
Step 8 Cut the door frame boards on the machine according to the marks made. If your door boards are veneered with natural veneer, then problems may arise during gashing. Natural veneer has a thickness of up to 1 mm, with the same slope the board will rest against the guide during cutting. With a sharp chisel, carefully remove the strip of wrapped veneer from the back of the board. For the entire length is not necessary, only washed down in places. This is the only way to guarantee a perfect cut and the tightest fit of the individual elements of the box.
Step 9. Saw down two side and one transverse door frame blanks at an angle of 45 °. We remind you once again - check the dimensions several times, if the box came out shorter, you will have to throw it away and buy new materials.
Step 10 Install the hinges, they should hang with the manufacturer's logo up. Place the loops exactly on the notches made earlier on the bar and circle the outline. You can choose the material for the loops using a manual milling machine or an ordinary chisel.

We cut out the grooves under the loop with a chisel
If you have a hand saw, great. By the way, it will always come in handy during the construction of a bath, and not only a bath. Set the cutting width on the machine according to the width of the buttonhole and the depth according to the thickness of the buttonhole. Place the machine on the board of the box and mill the hinge seat according to the marks. Remove the roundness in the corners with a chisel. Work carefully, do not allow cracking of the material.
Video - Milling under the loop
Working with a chisel is somewhat more difficult. First, along the drawn contour, beat off grooves with a chisel, approximately equal to the thickness of the loop. Then carefully begin to select the material for the loop. If you have an MDF box, then work is somewhat easier. If the box is made of natural wood, then pay attention to the direction of the fibers. Never work against the wool with a chisel, you will always have deep scratches or cracks. The first layer of wood is removed by tapping the chisel with milk, a more precise fit must be done manually. The chisel should be sharp, while working, watch the angle of the tool. If the loop is a little drowned in the canvas, there is nothing to worry about. The main thing is that she does not speak, this can prevent the door from closing. The loop must enter the socket with little effort, otherwise a strip of material will be visible.
Step 11 Before screwing the hinges to the box, drill holes at the attachment points with a drill with a smaller diameter than the diameter of the self-tapping screws. This technique will prevent cracking of the box board.

Hinge attachment
Step 12 In order to prevent the heads of the screws with which the door frame will be attached to the wall from being visible on the door frame, you need to make a recess under their heads under the hinges. Take a wood drill of the appropriate diameter and drill holes for the sweat on the loop nests made. You have already drilled holes for the screws, this will help you choose a place for a large screw or dowel so that its head does not fall under the self-tapping screws. Holes for screws or dowels should be located exactly in the middle of the box board.

Step 13 Gather together all the elements of the box. Self-tapping screws must enter at an angle of 90° to the surface of the cuts. Make sure that they do not overlap the technological slots of the telescopic box. During assembly, precisely align the parts, do not allow mutual displacement, then it is very difficult to correct this displacement. To facilitate the connection, you can first drill holes of a slightly smaller diameter than the diameter of the self-tapping screw.
Important. While assembling the parts, press them with maximum force. The fact is that a self-tapping screw can, before starting to screw into the second part of the box, turn a little in the first - a gap forms between them.
The box is assembled, now it needs to be installed in the doorway. The work is very important and accurate, we will tell you how best to do it.

door panel prices
door leaf
Installing a box in a doorway
Step 1. Carefully place the box in the doorway, temporarily securing it with pieces of Styrofoam or packing cardboard. By level, check the verticality of the box from the side where the hinges are attached. Wedges are needed to firmly install the box in terms of level and adjust the gaps. They can be cut from the waste bars of the box on the machine at various angles.
Step 2 Install wedges under the hinges, dowels or a fixing screw will be placed in these places. Drive in one additional wedge in each top corner. To prevent the box from moving during wedging, two wedges must be driven in from opposite sides with the cut parts overlapping each other. Check the position of the box with a level, do not rush, accurately check the position of each element. The door frame should be flush with the outer wall of the room, on the other hand, extensions will be installed. Make sure that the wedges do not protrude beyond the plane of the wall.


Step 3. Fasten the box through the holes made for the screws in the hinge seats.
Very important. There must be wedges next to these screws. Otherwise, the box will be deformed during the tightening of the screw. The feigned side of the box has not yet been exposed, but is only slightly fixed in the wall.

They are engaged in the installation of the feigned side after hanging the doors, in this way the maximum accuracy of dimensional compliance is ensured. When setting the side of the box, constantly check the horizontal position of the upper jumper. If you correctly take into account the problems with the horizontalness of the floor at various corners of the doorway, the horizontal part will lie in the correct position.
Step 4. To make the elements of the box more stable, when hanging the door leaf, you need to partially foam them.


Before this, the surfaces should be cleaned of dust and dirt and be sure to moisten with an ordinary sprayer with water. Most employees of construction companies neglect cleaning and wetting surfaces, but in vain. The coefficient of adhesion of foam to wet surfaces increases by an order of magnitude. Keep this in mind. Foam the feigned part of the box in only one or two places, it will still have to be moved.

Step 5 Attach hinges, latches or locks to the door leaf. The installation algorithm depends on the specific type of fittings. While you were doing this work, the foam on the door frame dried up, you can hang the door leaf on it.

Step 6 Place a lining of the desired thickness under the door leaf and first attach the upper and then the lower hinges of the door to the frame. Close the door and finally, with the help of wedges, expose the feigned part of the box. Everything is fine - foam the door frame around the entire perimeter.

Prices for mounting foam
polyurethane foam
Video - Assembling a door frame without a threshold
Assembling a door frame with a threshold
Now it is worth considering the process of assembling a door frame with a threshold. We will connect the elements of the box, for a change, not at an angle of 45 °, as in the case described above, but at an angle of 90 °. We do this on purpose in the hope that extra knowledge will not hurt anyone.


In addition, such a connection of the elements of the door frame is considered more durable. If in the first case the length of the self-tapping screws was limited by the thickness of the corner joint, now these restrictions are removed, the self-tapping screw can enter the body of the bar by 2–3 centimeters. A stronger connection increases the stability of the threshold of the door frame, and significant forces can act on it.

Checking the condition of the doorway, checking the level of the floor in the corners, taking measurements, preparing places for installing hinges and drilling for screws fixing the frame is no different from assembling a door frame without a threshold. And then the differences begin.
Step 1. Saw off the top horizontal bar of the box. Its length should be equal to the width of the door leaf plus 6 millimeters for gaps on both sides of the box. There are two such blanks to be made - one is used under the door threshold.

Step 2 On the vertical bars of the box, you need to remove the protruding persistent quarter. Keep in mind that when clean, the size of the vertical posts should be equal to the height of the door leaf plus 6 mm for gaps on both sides. In addition, the left and right vertical posts of the door frame must take into account the difference in floor height at the corners of the doorway. We have already described all the technological operations in the first example, there is no point in repeating.
To remove a quarter, attach a horizontal part to the end of the vertical post of the box and mark its width. Take measurements with maximum accuracy, do not allow gaps to appear in the connection. No matter how you close them up later, a real master will always see flaws. Carefully file the protruding quarter along the marked line, the depth of the cut should be equal to the height of the quarter. Saw only with a hacksaw with fine teeth, the tool, as always, must be in proper condition.


Step 3 Remove a quarter from the end of the vertical bars with a chisel. Do your work very carefully. The plane of the bar after removal should be perfectly flat across the entire width. While working, hold the chisel correctly. It has a bottom flat part, and the top is sharpened at an angle. The upper plane must always be visible, otherwise the chisel will spontaneously crash into the tree, a flat surface will not work. This rule applies to all cases of working with a chisel. Do the same work on all sides of the door frame.
Step 4 Lay the parts on a flat surface and connect the top of the door frame first. Before screwing in, you must first drill holes in the parts with a slightly smaller diameter than the diameter of the self-tapping screws. This will eliminate the possibility of cracking or the appearance of a gap between the parts during connection.


Corner Assembly Diagram
Step 5 We advise you to check the conformity of its dimensions and the correct location before assembling the threshold. To do this, carefully place the assembled box frame of two vertical and one horizontal elements on a flat area and put the door leaf in place. Mark the exact position of the hinges on the leaf, check all the gaps around the perimeter of the door frame and leaf. While there is no threshold, the vertical posts can be moved a little. Check the distances again, check the correct manufacture of the threshold and, if necessary, correct the mistakes made, in this position you have the opportunity to slightly correct the dimensions.


Door frame installation - photo

Video - Assembling a door frame with a threshold
Pay special attention to the reliability of fixing the door frame from the hanging side of the doors. It is pointless to increase the number of dowels or screws, they should be used no more than two. Why? The loads on the door frame from the door leaf are transmitted only through the hinges, which means that the frame should be fixed in these places. No matter how many screws you put between the hinges, they won't work. Only drill extra and noticeable holes in the box. And under the hinges, fastener hardware can be hidden. The main thing is that these two hardware sit with maximum reliability. The slightest staggers were found - immediately eliminate them, do not hope that the foam will withstand. Only unscrupulous or inept builders can do this. The foam holds lateral forces well, but almost does not work in compression at all, always remember this.


Don't be discouraged if some of the self-tapping screws were a little too long and showed up on the back of the box. This does not affect either the strength of the fasteners or the appearance of the door. The main thing is that the frame does not crack.
If you have a door frame made of natural wood, then you need to use self-tapping screws with a large step, if from MDF - with a small step.
Video - Revolutionary mounting system for all types of door frames
Video - How to properly assemble a door frame
