DIY metal flower. How to make a forged rose. Master Class. Cutting without sewing, technical stages of work
We need pieces of sheet iron with a thickness of 2-2.5 mm: 120x120 \u003d 2 pieces, 100x100 \u003d 1 piece.Round rolled O10, square # 10. Cut out petal blanks from the sheet. 
We heat the rod O 10 and, stepping back from the edge of about 40 mm, we forge the transition to O8. 
Then we clamp the workpiece in a vice and upset the remaining end to O 12-13. We trim the boss and make a cut on the backing chisel at a distance of 5-10 mm from the edge - this will be the rod for the rivet. 
Pull back the rod by # 6-7mm.
In crimping, we roll the rod to O 6mm. 
Now let's get to the spikes. To forge a spike, the stem is forged up to 8, leaving part of the rod (l = 10mm). 
Then, on the edge of the anvil, with two or three sharp blows of the hammer, we delay the performance. You have to hit very accurately. 
Then we clamp the workpiece in a vice and plant the protrusion through the adapter (bar). 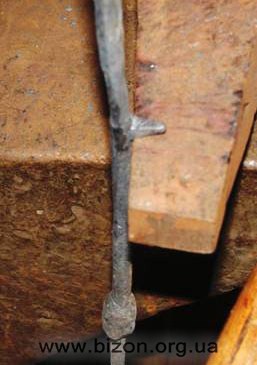
The spike is ready. We forge others (how many we planned) and complete the stem. 
It's time for the petals. On the petals, it is necessary to lower (make thinner) the edges and outline the veins. Well, you can do without veins, but I'll do it. 
Let's form the petals. 
As well as the lower petals. 
And the middle of the corolla. 
It's time to "grow" the leaves. To do this, heat # 10, pull the end onto a cone and, leaving about 45 mm, make a neck for the handle. 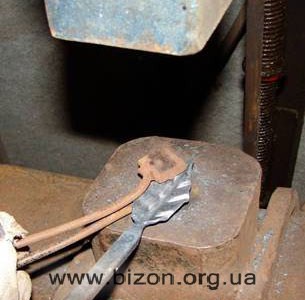
We break the workpiece, giving it the shape of a sheet. 
We put veins on the leaf.
And we pull the cutting.
You can collect "to the heap".
Assembly order forged roses
Let's start assembling the flower. We clamp the stem in a vice, put the whisks on the rivet rod and seal them. We rivet st
I am with you again and will rejoice new articles about homemade products every day!
This work is done with a minimum of tools and is available for repetition by almost anyone.
Tool 
I also forgot to add a hammer and a soldering iron (burner), but metal scissors turned out to be superfluous.
A round threaded contraption :) is part of the Zhiguli ball joint.
Let's start with petals, cut out such blanks from tin 
We anneal, put it in a spoon and begin to slowly bale the ball, giving the shape we need 
In the photo, the initial version with petals already bent, later made uncurved and first polished, and only then bent.
Then we make a hole in the tail, collect a few pieces and see how it turns out

A total of 7 petals were made.
And then I ran into a problem: I can’t make the petal smaller than the ball one ...
It was a two-day plug. In the end, a solution was found. Cut out this strip of metal. 
We make cutouts on it 
Then we take a bolt, saw it with a hacksaw for metal 
soldering 
and roll it up :) 
Slightly put forward and begin to bend the petals.

Then we solder the tip so that the circle becomes rigid.
Now let's move on to the sepal.
We take a ball joint and BLOW with a hammer so that the necessary recess is formed in the tree. 
We burn a strip of copper tin. 
We pound on it with all our urine. We cut it out as we need, then I think it’s clear from the photo 


We drill a hole and collect the flower.
Now we make a receptacle.
I didn't have the required copper ingot... so I had to do this:


We solder (do not forget to solder a nut into the wide end :)), clamp it into a drill, process
in the narrow part we cut the thread (or also solder the nut) 
The stem is a copper tube (in my opinion from the refrigerator).
We twist everything together 🙂 
Now twigs and leaves.
Twigs are ordinary wire, we drill a hole in the stem and solder it there: 
The original version of the leaves 

It had to be abandoned, because when punching recesses (under rhinestones), they are strongly
warped. Therefore, they were made by the LUT method. 
Well, a few words about fixing stones
We grind two such punches onto a cone, with cones equal to the cones of stones
From rough metal, if desired and the availability of suitable materials, you can make an elegant flower, for example, such a rose. Its bud turns out to be lush, textured and resembles its natural prototype as much as possible. In such a flower there are even metal spikes, which are very simple to make, knowing some tricks of working with steel.
materials
To create a rose from metal with your own hands, you will need:
- thin steel sheets;
- steel rod, 0.6 mm, 38 cm long;
- tig for manual arc welding;
- a hammer;
- pliers;
- acetylene torch;
- a hammer with a well-sharpened edge;
- manual coffee grinder.
Step 1. Before creating a rose, you need to make a template for all the parts that make it up out of paper.
- The very first layer of a rose is a small bud with three petals, 7 cm in diameter.
- The second layer consists of five petals, the diameter of which is 9.6 cm.
- The third layer of petals consists of five units with a total diameter of 12 cm.
- The fourth and fifth layers consist of six petals with a circle diameter of 14.4 cm.
- The final layer of petals is five identical petals with a diameter of 9.6 cm.
Cut out all these blanks from thick paper.

Step 2. Prepared templates should be attached to a sheet of metal, and transferred with a remnant or chalk. To use the material as economically as possible, apply the templates close to each other.

Step 3. Cut out each tier of rose flowers. Do not throw away the remaining trimmings at this stage. They will be needed to form leaves. In the center of each of the resulting blanks, make holes with a diameter of 0.6 cm. They are necessary to string the blanks onto the stem.


Step 4. After plasma cutting, scale may remain on the edges of the workpieces, it must be removed. To do this, pass the components of the flower through a small section of a manual coffee grinder.

Step 5. Now you can start shaping the flower. You will just need to bend the first two tiers, without giving them a particularly realistic texture. This will be extra work, since the petals of the bud will be closed and not visible. String the first tier of petals on the rod. Move it to the edge. Heat the petals to red metal and bend them with a hammer and pliers, forming a dense center of the bud. In order to heat up a steel billet, you can use an oxygen torch clamped in a vise. In this case, you will need a lot of time. If you want to get the job done faster, use a foundry furnace.

Attach the second layer of petals to the stem in the same way, which also form a dense central bud.

Step 6. Continue stringing all other layers of petals in the same way, but make their ends more textured. Their wavy bends should resemble a real rose flower in shape.


Step 7. Bend the layer with rose sepals down.
Step 8. Having thus collected the flower, make a weld along the stem, which will strengthen this elegant metal sculpture.
Step 9. Cut the rose leaves from the remaining scraps, give them the desired shape and weld them to the stem.
Step 10. On the stem you need to make thorns. To do this, turn off the gas on the welding machine for a moment. Without the shielding gas, the metal will bulge out on its own. Similar cuts must be made throughout the stem. The advantage of such metal spikes is that they are not sharp. In some places it will be necessary to glow the rod itself in order to give it the curves characteristic of a living flower.

The metal rose is ready!

Flowers have always been one of the main gifts for women. And how to make the bouquet memorable for a long time? A rose made of metal for this purpose is the best fit. And such a flower will please its owner much longer than usual.
A metal rose is not an easy craft. Its creation requires special tools and materials, increased security measures and specially equipped equipment. But the result obtained at the end of the work will exceed all expectations.
We bring to your attention a master class called "Do-it-yourself metal rose". Photos are attached to each stage.
List of tools and materials
Tools for making a metal rose from metal:
- Bulgarian;
- angle grinder;
- two types of discs for the machine - grinding and cutting;
- drill;
- drills for working with metal with a diameter of up to a centimeter;
- gas heater;
- pliers, round nose pliers, long nose pliers;
- pliers;
- wire cutters;
- file;
- anvil;
- a hammer;
- felt-tip pen;
- welding machine.
The necessary materials for making such crafts as a metal rose with your own hands (dimensions are given for a specific master class):
- a metal rod with a diameter of about 8-12 mm (the stalk of our rose is made from it);
- sheet metal, it is better to take a thickness of half a centimeter (automotive is also suitable, for example, from the hood);
- unused motor oil, about 400 grams.
Do-it-yourself metal rose: drawings of petals
From a metal sheet, cut at least four squares measuring 10x10 cm, to give the rose splendor, prepare more squares.

Draw rose petals on the squares, and on one of them draw a figure similar to the wind rose. This square will serve as a blank for the sepals of our rose. To make the product look more natural, do not try to achieve perfect symmetry.
Using or a grinder, cut out the petals of our rose, but do not cut to the end, i.e. not to the very center, as in the photo.
Now we need to flatten the ends of the blanks of rose petals, sepals and stem leaves. For this we need an anvil and a hammer. With light blows of a hammer, spitting the tips of the blanks. After that, using the back of the hammer, we apply the texture of the leaves. It is enough to do it on one side.
If you need to make a metal rod shorter, use a grinder. Usually the length of the stem is from 40 to 50 centimeters. But you can do more or less as you wish.
Option 1 - work with a drill
Drill a hole clearly in the center with a drill. Its size should be equal to the diameter of the metal rod that serves as the stem. Remember that the rod must fit snugly into the drilled hole. This will make it easier to weld. If the diameter of the selected stem did not match the size of the hole (it turned out to be a little smaller), then just drill a few more holes nearby so that they connect into one that will be the desired diameter.
Option 2 - work with a welding machine
Bringing the electrode to the middle of the petal, set fire to the arc. Press an electrode about three millimeters thick into the metal, penetrating it through and through. The current value should be set to 100 A. The hole will burn easily, so be careful not to make it larger than the diameter of the stem of the rose.
In order to properly weld and not lose the strength of our structure, it is better to make the holes not perfectly round, since a contact of at least 50% is necessary. To control the process, apply the stem to the hole from time to time.
Do-it-yourself metal rose: a scheme for shaping the petals
Step back a couple of centimeters from one end of the rod (rose legs) and put a blank of petals on it. Each new layer must be positioned so that they form a cross shape. Attach each ball in turn by welding. It is better to melt the stem more than the petals, since their metal burns out very quickly. Bend the bottom petals down.

Now you can start working on shaping the petals:
- turn on the gas heater and heat even petals with it;
- using pliers or round-nose pliers, bend the two central petals inward;
- bend the rest around the first two;
- when all the petals are connected, slightly bend the edges of each.
Leaves for a rose
The rose will not be complete if you do not attach leaves to it.

Operating procedure:
- Draw the layout of the leaves on the metal sheet.
- Cut out the leaves using a grinder.
- Make small notches along the contour of each sheet.
- Give them a natural, slightly wavy shape.
- Weld the finished leaves to the stem.
The metal rose is ready. Now it can be decorated with spikes, which are also cut in the form of triangles from a sheet of metal and welded to the stem.
Anti-corrosion treatment
So that the metal craft does not deteriorate over time, it must be treated with an anti-corrosion agent. It can be varnish, spraying, paint.
Another option is engine oil. Before applying it, the rose must be heated. All the details of the craft should be treated with oil, after which the flower is exposed to fire again to remove the excess.

Remember that all work is best done either outdoors or in a specially equipped room that is well ventilated. And most importantly - do not forget about safety when working with metal.
From the moment of human development, when he began to actively use his hands in labor activity, the results of his labors became more and more complex, more perfect and more beautiful. At first, the purpose of making this or that thing was purely practical, later we began to make art objects just like that, for aesthetic pleasure, without any underlying use.
Forged metal products have always been appreciated and admired. This is also due to the fact that looking at a well-made forged item, we involuntarily imagine what a huge amount of work has been done. After all, metal is metal and it is not as malleable as, say, wood.
Forging a rose from metal with your own hands
Artistic forging of rose metal can be carried out both from a single sheet of metal (which is more difficult to perform), and from component parts. The second option will be considered here. The whole rose will consist of four elements:
- a stem, which will be imitated by a thin iron rod;
- metal leaves on the stem;
- stars at the base of the bud;
- three four-leaf shapes carved from a sheet of metal.
Forging a rose from metal, process
Naturally, artistic forging of roses, and indeed any work of this kind, begins with a drawing of the future product. The principle by which the clover-shaped elements below will be cut is that they will be of different sizes, depending on the size of the planned product. If you correspond to the average natural size of a rose, then the first detail will be about 80 millimeters, the second 90, and the third 100.
First you need to find thin metal sheets with a thickness of about 1 to 1.5 mm. Then make the markup of the form that is in the photo, corresponding to the above dimensions.
You can cut it with a plasma cutter, if it is not there, then use either metal scissors (if the sheet lends itself) or carefully cut it out by welding. It is preferable to cut with scissors and choose a sheet of metal that is soft enough for this, this will guarantee the accuracy of the cut.
- After cutting out the elements, their edges must be cleaned. This can be done with a grinder. The end result should look like this.
- On the left is an element after cutting with a plasma cutter, and on the right after cleaning the edges (with a grinder disk).
- The asterisk must be marked on the same sheet. Its diameter will correspond to the largest size of the element, i.e. 100 millimeters. She will look like this.
- The next step is to stuff the texture of the petals with this hammer.
- It turns out such a surface on the edges of future petals.
- Now we come to the most crucial moment. At this stage, the bowl shape of the cut out elements is formed. It is achieved with a special shape and a rounded hammer.
- Due to the fact that the elements are of different sizes, the smaller one should fit freely into the larger one.
- Now the most interesting and creative part of the work: Shaping the petals with the help of bending. To do this, it is necessary to heat the workpiece and use a hammer or tongs to shape the future rose.
- The final part of the work will consist in bending the base (asterisks) and painting in the color you need after the product has cooled.
Photos of finished products of various shapes and configurations
In order to determine the shape, size, color of the future product, it will not be superfluous to see how other people make forged roses. They can differ in color, be rather dull or, on the contrary, very bright.
For example, this one is made in bronze color with rather large petals.
This forged rose is the exact opposite of the previous one. She has a huge bright red bud on a neat, thin gilded stem. Looks great.
You can make a rose on a solid rounded stand, as in the next photo.

- The stand can also be made with a recess, in the form of a plate, so that you can put small things there.
- The golden color of the forged rose is perfect for a gift. Complete with it, you can make a stand for a rose.
- The bronze color of the rose will perfectly decorate the living room.
- Forged candlestick, which is decorated with a rose of bronze color.
- An unusual solution would be a gilded bronze color.
- The stand may not be solid, but in the form of a twisted rod. It also looks good.
- A very original idea. A twisted wide rod at the base of the rose with an abrasive pattern on it.
- This type of rose imitates a rose just beginning to fade, thanks to the petals hanging down to the ground at the base.
