Self-calculation and construction of a fence from corrugated board. How to build a fence from corrugated board - a step-by-step instruction for beginners without construction experience Calculating the number of transverse lags
Many owners of suburban areas are concerned about the security of their possessions. Many modern building materials allow you to choose the material for the construction of the fence according to your taste and cost, but not at the expense of quality. In this article, we will tell you how to make a fence from corrugated board with your own hands with posts, and also show photos and videos on installing the fence.
The metal profile fence can be of any height. Usually, for sites far from the city, a height of 3–5 m is chosen. Such a fence not only visually protects against unwanted witnesses, but also shields sounds from the federal highway, for example.
Construction from a profiled sheet is technologically quite simple and does not require the involvement of expensive equipment or teams of workers.

Note! Brick can also be used as a decorative element by overlaying metal or wooden poles with it.
Installing lags

Then you can install logs - a transverse profile for attaching canvases. A profiled timber with a section of 40x25 mm or pipes of the corresponding diameter is suitable here. The number of horizontal lags depends on the size of the fence. If it is less than 1.7 m, two rows are enough. They are fixed with an indent of 4 cm from the top of the future fence and from the ground. With a higher fence, the number of horizontals should be increased to three.
Note! The best way to fix all metal parts together is by welding.

If you use a wooden beam, then the life of the fence will decrease.

Note! After installation, the entire steel structure must be primed to protect against rust.
Metal profile fastening

The last stage is the fastening of profiled sheets to the logs. This should be done on self-tapping screws for metal with a length of 35 mm and in increments of 500 mm. Neighboring fragments are overlapped.
Such a fence does not require special care. It may be necessary to spray paint the canvases from time to time to hide scratches or corrosion.
Outside, such a fence looks solid and durable, reliably hiding the house and the adjacent territory from prying eyes.
Video
A photo


The idea is very attractive. Here you have not too expensive material, and the opportunity to become the owner of a completely reliable, modern and beautiful fence. Moreover, building fences from corrugated board with your own hands is a simple matter, because the main thing is to know the technology.
Why corrugated board?
More recently, this material, which seemed simple and nondescript, was used only for erecting fences around construction sites, roofing garages, hangars and production workshops. Today, corrugated board has reached a completely different quality level: its protective properties and external data have significantly improved. That is why around modern buildings, whether industrial facilities or private property, you can increasingly see multi-colored fences made of corrugated board.
Decide which material suits you best. Galvanized corrugated board is cheaper than painted, but not as beautiful. As for the thickness of the sheets, the strength of your future fence depends on this parameter, so use a material with a thickness of at least 0.5 mm. And remember that you have yet to choose a corrugated profile - C8, C10 or C20, although in practice the first type with a profile height of 8 mm is most often used.
Calculate how many sheets of corrugated board you need by dividing the total footage of the fence by the working width of the material, and then add one spare sheet to this figure just in case. By the way, the corrugated board is fixed with an overlap on one wave.
Additional materials:
Profile pipes (60x60 mm, wall thickness 2 mm) are ideal for pillars. To make the finished structure sufficiently rigid and flexible, install them every 2-2.5 meters.
The height of the column depends not only on the parameters of the corrugated board you have chosen, but also on the soil. If you are lucky with the site (smooth clay soil), a recess within 90 cm is enough, and with sandy and loose soil, you will have to drill a hole of 120 centimeters.
Wondering how many poles you will need? To do this, it is enough to divide the length of the perimeter of the fence by the distance between the posts and take in reserve two posts for the gate and one for turning.
To find out the required length of the lag (a profile pipe with a rectangular section, 40x20 with a wall thickness of up to 2.5 mm), double the length of all sheets used, and then add the length of the pipes with which the gate and gate will be made. For high-quality fastening of sheets, purchase special self-tapping screws or rivets equipped with corrosion protection - special gaskets.
And finally, stock up on tools: a welding machine, a drill, a sledgehammer, wedges and pegs made of wood, a level, tape measure, cord, metal paint, cement and gravel.
How to mark the territory? Measure the entire area, decide how many poles you need in general, drive in pegs at the locations of the main poles and pull a cord between them, and then perform the same operation for the intermediate poles.
How to fix the poles? Drill holes in the places marked with pegs. Start the installation from the extreme posts, fixing them strictly vertically with wedges and pulling a cord along their upper points. Now you can "bury" the remaining poles by adjusting their height along the already stretched cord.
Lay gravel in the holes with pillars, compact the fraction and cover with sand. To make the composition more dense, fill the sand with water, and the rest of the recess with a cement solution. While the solution has not set, check once again whether the posts are vertical, whether their upper points correspond to the cord.
How to install lags? Usually, the logs are welded (welding in this case is the most reliable and durable method of fastening) in two rows parallel to each other, but in order to strengthen the structure, additional diagonal pipes can be added. Coat the finished frame with primer and paint.
How to fix the corrugated board? Take your time - first attach a couple of sheets to the joists and think about how to organize the optimal overlap. Start fastening the sheets (the distance between the fasteners is 20-25 cm, the location of the fasteners is on the hollows) from the far corner of the site so that the joints of the corrugated sheets are less visible to an outside observer. And do not forget to constantly check the accuracy of your work with a building level.
How to make a gate and gate? Having built a frame from a profile pipe, fix the corrugated board on it. Weld the hinges to the doors and pillars, and then “put on” the gate and gate on the hinges.
As you can see, the work is not that difficult, but only for those who have certain skills and experience. Do you want to have a guarantee that the fence from the profiled sheet will last for many years? Contact us! We will take care of the construction of the fence and suggest several effective ways to save money without losing quality. Zavod Zaborov knows how to make your life easier!
If you still have not decided to build a fence with your own hands, then order from professionals
The capital arrangement of the estate, with all the traditional attributes - a gate, a gate, a convenient entrance and flower beds, cannot be imagined without a reliable and durable fence that would not only protect the territory of the estate from the annoying looks of neighbors, but also instill a sense of security and confidence that it will protect and from uninvited guests.
Today, among the various options for fences from a wooden palisade to a chain-link fence, the most interesting and expressive is a fence made of profiled metal sheet - corrugated board, this material is so suitable for implementing even the most complex projects.
Why choose a corrugated fence?
Among the materials used for the construction of fences, profiled sheet is used almost everywhere - from the construction of technological fences around construction sites to the construction of fences for private estates.
Decking, today it is not only a demanded material, which makes it easy to build a fence of almost any height from 1 to 6-8 meters, it is also an excellent material for the implementation of unusual fence projects that perfectly combine stone, metal, forged lace and the correct geometry of parallel profiled lines.
The profiled sheet, unlike the standard metal sheet, due to the shape of the profile, has much greater rigidity, therefore, in the manufacture of the fence, additional reinforcement with transverse logs or the construction of a span frame will not be required.
At approximately the same price, the profiled sheet does not require additional painting, it has a protective layer of paint on both sides of the sheet, and the galvanized profiled sheet, unlike conventional galvanization, in addition to the greater thickness of the metal, also has a thicker layer of zinc spraying.
Corrugated board, as well as ordinary sheet materials, can be cut to size spans, it is suitable for both horizontal and vertical installation. A fence made of profiled metal sheet is more reliable and durable.
Preparatory work

Traditionally, the beginning of work should be carried out the necessary measurements and calculations, drawing up a work plan and drawing, thinking over the methods of fastening and methods for optimizing work.
Before starting work:
- The length of the fence is measured;
- The profile of the site on which construction is planned is studied and prepared;
- The marking of the route of the fence is carried out;
- Lighthouses are set up and places for installing pillars are marked.
For corrugated board, a flat area is usually chosen, because the material is quite difficult to bend, the only way out in this situation is the vertical installation of sheets on curved logs.
In terms of the relief of the site, if there are no large elevation differences, then it is recommended to simply level the area by adding or removing excess soil, but for large elevation differences, it is worth considering installing small spans on the slopes with an inclined cut of the top and bottom of the sheet.
Material calculation

When calculating materials, depending on the selected project, the following indicators are calculated:
- Profiled pipe 60 * 60 according to the number of pillars;
- Professional pipe 20 * 40 or 30 * 40 at the rate of 2 or 3 logs for each span of the fence;
- Decking along the length of the fence + 10% when building a solid fence and the exact number of running meters when building a fence with decorative stone or brick pillars;
- Fasteners in 6 self-tapping screws when mounting on 2 logs and 9 self-tapping screws when mounting on 3 logs per linear meter, the stock of fasteners is usually taken at 10% of the total.
In case of independent production of racks from a profiled pipe and individual concrete pouring of each individual support, for the stability of the support during installation, a crosspiece from a corner or reinforcement with a diameter of 12-14 mm is usually welded in the lower part of the support. Therefore, when calculating the material, 0.5 meters of reinforcement are usually added to each support.
When installing the fence in the form of separate spans, material is provided for forming the frame of the span and fasteners.
Construction stages
Starting the construction of the fence, the construction site is initially prepared, the necessary materials are stored, and the necessary tools are assembled.
After preparing the construction site - clearing shrubs, pruning trees, removing excess soil, the fence line is traced.
Fence marking

Typically, the marking of the fence is carried out using a marking cord and wooden pegs. The first stake is hammered at the beginning of the fence, and the last one is at the end and along this line a marking cord is pulled. If the route has a complex perimeter, then for convenience it is divided into several straight sections.
The segment between the extreme posts is divided evenly into equal segments for a solid fence and into clearly defined dimensions for a fence with separate spans. Wooden pegs are installed at the installation sites of the supports.
Usually, when marking a fence for a profiled sheet, the following indicative standards apply:
- Fence span length - 2.5 meters;
- The maximum slope of the site is up to 5 degrees;
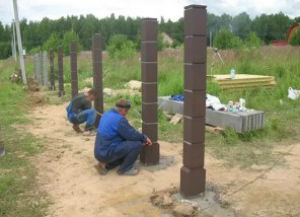
Installing support poles

The end posts are installed first. When excavating a foundation pit for the installation of supports, a garden drill is usually used; it is rather difficult to dig a hole 1-1.2 meters deep with a shovel.
Reinforcement is welded to the bottom of the support, while it is necessary to do this as accurately and accurately as possible so that the rods are strictly at an angle of 90 degrees to the vertical axis of the support.
The strength of the support is provided by concrete pouring, using crushed stone, stone or broken brick as a filler. A sand cushion 10-12 cm thick is poured to the bottom of the pit. After that, a support is installed and its strict vertical position is displayed using a level.
Tip: it is recommended to install the supports in 2 stages, at the first stage, the extreme supports are installed, when the concrete gains minimum strength, after 2-3 days, another check of the verticality of the installation of the supports and their height is carried out. At the next stage, having two guide supports, it is easy to install all the other supports.
Other supports are installed using a similar technology.
We install corrugated board on logs

The installation of corrugated board on logs is preceded by the operation of installing horizontal logs. This operation can be significantly reduced in time by using installation templates as the main tool.
As templates, a pair of metal or wooden templates is usually used, which are temporarily mounted on support pillars; the required height is set using a hydraulic level. The templates have cutouts for attaching horizontal lags and their temporary fixation.
The lag installation technology is as follows:
- Templates are installed on two adjacent support columns;
- With the help of a hydraulic level, they are aligned;
- The distance between the posts is measured along the lag installation line;
- Logs of the required size are cut off with an accuracy of 1 mm;
- Logs are temporarily fixed in templates with clamps;
- The structure is welded together by electric welding.
- Templates are removed, and final welding is carried out around the entire perimeter of the attachment point of the log and the support column.
Installation of corrugated board on logs is carried out using metal screws. The profiled sheet is installed at the place of attachment and leveled in height; when leveling, special attention is paid to all parameters - both the top of the sheet and the distance from the ground.
For ease of alignment, wooden wedges can be used. If the work is carried out independently, neodymium magnets or welding magnetic holders will help to press the profiled sheet. In addition, welding clamps can also help as an additional tool.
The decision to build do-it-yourself fence from corrugated board requires certain skills and knowledge. Installation of a fence from a professional flooring requires a preliminary study of some of the nuances, it is important to understand the types of construction, draw up a work plan, choose the appropriate components and materials. This overview will help you understand how to build a fence, a video at the end of the article will be useful for beginners.
Varieties of designs
A variety of landscape and aesthetic requirements determine the features of the structure:
- Solid fences. Sheets of corrugated board cover the supports. Most often, this option is used.
- Sectional. They are not in demand so often, they are built in the presence of stone or brick pillars. The length of the section depends on the features of the relief. Accurate calculations of the length of the spans allow you to reduce the amount of waste from trimming the profiled sheet.
In addition, fences are divided into:
Fundamental. The pillars are included in the design of the strip foundation. It increases the wind resistance of the fence. The gap under the fence is completely covered with profiled sheets, in addition, dust from the street will not blow onto the site. Increased construction time and the cost of its arrangement. This is how permanent facade fences are built.
Supporting - fences are mounted on supporting pillars that are not connected to each other. This results in significant cost savings. However, the high height of the building significantly reduces the reliability of the fence. But it provides good circulation of soil and water on the surface of the earth. These advantages are especially noticeable when building on a slope or on loose, creeping soils, as well as soils with high humidity. Fences between neighboring plots are usually made as reference.
It is better to determine the type of construction after creating a complete sketch of the building.
Necessary materials and tools
To install a fence of any kind, you will need:
- Decking, wave height 8-20mm.
- Fasteners, rivets, screws.
- Sand, gravel, cement.
- Coating against metal corrosion - paint for metal.
- Marking ropes, pegs.
- Tools for earthworks (shovels, drill).
- Welding machine, electrodes, fasteners for transverse logs.
- Rivet device, drill, screwdriver, cutting tools.
- Supports from a profile pipe 60x40 up to 3.5 m long for support.
- Measuring tools (tape measure, level, plumb line).
- Crossbars - profile pipe 40x20.
- Roofing material, another insulating material that prevents mixing of concrete and earth in holes.
Measurements and a sketch of the fence allow you to calculate the required amount of materials.
Watch the video! Errors when installing a fence
Carrying out work according to plan
Step-by-step instruction to create a fence from a profiled sheet is proposed below. Installation involves the implementation of 6 stages of work. It is better to study these steps in advance in order to make a corrugated fence strong and reliable.
markup
The future location of the fence is marked with pegs that are driven into the corners around the perimeter. After measuring the distances, the number of openings can be determined. The locations of the supports are marked with pegs. You will need to designate a place for the gate, gates. Pegs are also driven in there.
Advice! For a sectional fence, it is better to make the width of the spans a multiple of the dimensions of the sheet. For solid - a standard 2.5 - 3 meters is suitable.
Installation of a fence on a strip foundation, including a stepped type, provides for the installation of levels. Marks are placed on the appropriate posts installed in the corners along the perimeter, and on inclined sections - at the beginning and end of each section.

The marking of the territory is carried out independently, no sophisticated equipment is needed.
Create a project
To create a plan, the perimeter of the territory, slopes are measured, obstacles that cannot be moved or removed are indicated. It can be pipelines, electrical poles. According to the measurements taken, a plan of the fence is drawn. Depending on the type of soil, relief features, economic opportunities, choose:
- foundation type;
- rack design;
- material for poles and additional structures (cross beams, connecting brackets, mortgages);
- types of fasteners used, finishing.
Drawing up a detailed sketch allows you to carry out exhaustive calculations, determine the number of required components.
Installation of supports
The use of such types of racks is practiced, providing a strong fastening of sheets:
- ordinary tubing pipe diameter from 73 mm to 89 mm or profiled 60x60 or 80x80 mm;
- pillars made of reinforced concrete or wood;
- brickwork;
- screw piles.
Installation of a profile pipe as supports
In the designated places, holes are drilled with a depth of 1 to 1.5 meters, with a diameter of 20 to 40 cm.
Comment! With a large fence height of 2 meters, the depth of the embedment of the supports should increase by 35% underground and 65% above the ground.
Racks are placed in one line, using a plumb line. Verticality and linearity eliminate the possible difficulties of joining sheets of corrugated board.
 The supports will need to be concreted. Before pouring the solution, the edges of the pits are covered with roofing material, you can use plastic wrap. This will eliminate the mixing of concrete and earth, and maintain high structural strength. The solution is poured to a depth of 1 meter, the rest is covered with sand and compacted. This method contributes to the compensation of soil deformations during temperature changes.
Important! Concrete always has air pockets that need to be removed. The air is removed by bayoneting with the available tools. It is acceptable to use fittings or a metal corner.
The remaining types of work can be performed only three days after the concrete has been poured.
Before installing the profile pipe requires:
- Make a top cap to prevent rainwater from entering. You can use plastic plugs, decorative tips. It's a good idea to just weld the top of the rack.
- It is better to immediately cover the supports with paint of the required color.
- It is necessary to weld metal heels on the base of the supports (a square made of sheet iron). This will make it easier to align the posts. Fastening will be more reliable and reduce draft.
Installation of reinforced concrete or wooden poles
 The installation of wooden or reinforced concrete supports is carried out in the same way as when installing tubing or a profile pipe. Wooden supports are short-lived.
Reinforced concrete poles are too heavy, crossbeams are difficult to attach to them. It is better to install such elements on a strip foundation.
Installation of brick pillars
The installation of brick pillars implies the presence of a strip foundation, since the weight of the structure is very large, the pressure on the ground increases. It is difficult to install such pillars, significant costs and additional waterproofing are required.
The installation process repeats the installation of a profile pipe, which is later lined with bricks.
Important! When installing brick pillars, it involves the installation of metal mortgages, which are used when attaching the transverse elements of the fence.
Watch the video! Corrugated fence. Very budget option
Fence on screw piles
Installation advantages:
- creation of a traditional foundation;
- applied on any soil;
- no need for special equipment, high installation speed.
Proper anti-corrosion treatment ensures a fence service life of more than 50 years.
However, there are also disadvantages. Screwing into stony soils breaks the protective coating, visual detection of damage is not possible. Racks to piles are attached by welding. Its implementation requires certain qualifications and experience. Installation of columns on piles using screw connections is carried out after welding the flanges.
Installation of transverse logs
 The next step in the installation of the fence is the installation of transverse logs. This is done by welding, clamps, bolted connections. Electric welding is the most efficient and reliable way. Logs are placed parallel to one another and the base of the structure. For a fence with a height of less than 1.7 m, 2 logs are required, if the height is greater, 3 logs will need to be installed.
The created structure is a frame. Everything is painted with anti-corrosion paint. Particular attention is paid to the welding points to prevent corrosion.
In addition to welding, it is allowed to use:
- Staples, clamps for pairing logs with supports.
- Brackets allow you to fix the logs to the pole (front butt, with pads-holders, on the side of the supports).
Installation of corrugated board
The fifth stage is the fastening of corrugated board sheets to the transverse strips using screws. Docking of canvases is usually done with an overlap.
Important! One edge of the sheet should have a full wave, the second - not a full one. The joint is made in one direction only. This point is important if the marking of the sheet and its cutting is done gradually as it is installed. The joint should be fixed with rivets.
 Self-tapping screws are screwed onto the lower front wave:
- loose screws will cause leakage.
- too much twisted self-tapping screw causes deformation of the gasket, destroys the metal coating.
- a crooked screw will break the metal, cause a loose fit of the gasket, this threatens with premature corrosion.
Correctly screw the screw at an angle of 90 degrees to evenly press the gasket without touching the metal surface. It is allowed to fasten self-tapping screws to every third wave.
Completion of installation work
The end of construction will be the installation of a U-shaped bar on top of the fence. The element is optional, but creates a smooth edge. The plank is secured with clips.
Some features of the installation of a fence made of corrugated board
Uneven areas or heaving soils require special techniques.
Fluffy soil
 This aspect is taken into account by those who want to install sectional or combined fences with heavy stone pillars. The danger is sandy loam, loam. In other words, the earth that retains moisture during frost has the effect of heaving. The soil rises sharply when it freezes. The foundation behaves like plasticine.
You can solve the problem in various ways:
- Complete removal of soil to the freezing depth and its replacement with sand. The soil around the foundation is also subject to removal.
- Installation of the foundation below the freezing point. But the pressure of the swelling will remain on the walls of the base.
- Lightweight structures can be installed if the foundation is insulated with a special material. The insulation is laid to a width equal to the freezing depth.
- A good solution is drainage. It is a trench with a depth equal to the depth of the foundation. The bottom of the trenches must be equipped with a pipeline wrapped in filter material. The trench is dug at a distance of 30-50 cm from the foundation. Ready drainage is covered with rubble.
uneven areas
If leveling the site is too expensive, you can put the fence on uneven ground. A territory with sharp slopes can be fenced with sectional or combined fences that fit perfectly into the terrain. It is necessary to calculate the height and width of each span. Aesthetics will provide a stepped foundation.
On a slope of less than 35 degrees, it is allowed to make fence spans 2.5 meters wide. With an uneven slope, you can make a fence from spans of different lengths. Increasing the slope requires reducing the length of the section. On uneven areas, it is better to install fences on a strip foundation.
- The connection of sheets at an angle must be closed with corner strips, which are obtained on bending equipment.
- Working with corrugated board requires the use of work gloves, since the material has sharp edges.
- Sheet cutting is performed with metal shears. The edges must be painted over. Bulgarian can not be used, it destroys the decorative coating.
Features of care
It is practically not necessary to take care of a fence made of corrugated board with a polymer anti-corrosion coating. The polymer provides excellent protection. The barrier along the road can be damaged by stones, gravel. Places of damage should be periodically painted over with a special paint.
Watch the video! How to make a fence from corrugated board with your own hands
Reading time ≈ 4 minutes
Before you start building a new land plot, you should take care of a practical and reliable fence. In addition, it is important that your future fence has no defects, has excellent aesthetic qualities and blends seamlessly into the surrounding landscape.
To date, there is a whole mass of different designs, installation technologies and materials for the construction of a protective barrier of the site. It should be noted that each type of fence has both positive aspects and its weaknesses. One of the most successful, economical and easy construction is to highlight the construction of corrugated board (it is also called profiled sheet or metal profile), as in the photo.
It will not take much effort to build a fence from corrugated board with your own hands. All that is needed for this is high-quality building materials, as well as strict adherence to the technological rules of construction. So, how to make such a fence?
The advantages of a fence from a profiled sheet
Why you should opt for metal profile fencing:
- Ease of installation;
- Excellent strength and resistance to aggressive environments;
- Excellent degree of reliability, protects from unwanted views;
- Long service life;
- Not demanding in care;
- Impeccable sound insulation;
- Laconic and elegant appearance;
- Availability.
Blueprints


Do-it-yourself materials for mounting a fence from corrugated board
Of course, the main material of such a design is a profiled sheet. This material is made of durable galvanized steel, has a neat ribbed shape. The main advantage of this material over its counterparts is its low price, durability and ease of use. So, the list of materials that can be included in estimate:
- Professional sheet C8 or any other brand
- Metal poles 60x60x3x3000 mm, which will act as supports for your fence;
- Cross beams 40x25x2x6000 mm
- Fastenings: roofing screws or steel rivets 3.2x10 mm
- Roofing material or casing pipes for holes, so that the soil does not crumble and does not mix with concrete when concreting pillars
- Concrete brand M200 or M250
- Sand, crushed stone and cement (if you make concrete mortar by hand)
- Primer for metal
Step-by-step instructions for installing a fence from a profiled sheet
I. Marking of the adjacent territory.

Before marking, it is important to take measurements of the perimeter of your land. Next, we calculate the orientable number of required supports (step 2-3 m). Only then can we proceed to the markup itself. We start by "breaking" the peg in all corners of the site. Alternately connect the pegs with a well-stretched thread. With the help of a tape measure, we take the final dimensions and prepare a complete fence project.

II. Support installation.

As the supporting pillars of your fence, metal pipes of both round and rectangular sections can serve. When ordering supports, it should be noted that ideally 1/3 of the length of the post will be buried. For example, for a fence 2 m high, you will need a foundation pit with a depth of 1-1.5 m (the depth of soil freezing), that is, we order pipes with a length of at least 3 m.
After the pits are ready, you should take care of the concrete solution (concrete grades M200 and M250 are suitable).

It is very important to carry out the installation of the supports strictly vertically, which means that when pouring the mortar into the pit, do not forget to apply a level and check that everything is even!
III. Mounting transverse fence lag.

The fence should be designed at the rate of 1 lag per 1 m of the height of the fence. That is, for a fence no more than two meters high, you need to install a pair of logs in parallel.

IV. Installation of corrugated board.

The final stage is the fastening of corrugated sheets to the fence frame. We join the sheets with an overlap, at least 1 “wave”. For fastening, we use roofing screws or rivets.
