Options for stroking walls in a monolithic, brick or panel house: is it possible to strobe without dust. Proper chasing of walls for wiring Why do we need strobes
During a major overhaul or redevelopment, we always face the question of laying wiring, pipes, laying cables, moving switches and sockets. All these works are connected with wall chasing. Let's try to find out what kind of work it is, why it is needed and what tool is needed for wall chasing.
So, gating is the gouging of grooves in the walls and ceiling for laying electrical wiring, piping systems. To lay and hide electrical, antenna or telephone wires and cables, we also use gating.
When we install the air conditioner, the wall also needs to be ditched.
If you need to hide the existing wiring, we make a channel (strobe) in the thickness of the plaster or concrete, lay the wires or cable there and putty it.
We also ditch walls when it is necessary to mount internal models of electrical sockets or switches.
Such models are built into the wall, so you need to cut a round hole that matches the size of the switch or outlet.
Choosing a tool depending on the wall
Chasing is carried out with the help of special tools, the choice of which depends on the material of the wall in which the channel needs to be made. For this, a grinder, a puncher, a wall chaser, a chisel and a hammer are used. We can make gates on concrete partitions with a grinder, a puncher, and a wall chaser.
The panel wall is processed in the same way as a concrete wall. But you can not do diagonal chasing. The maximum depth of the channel should not reach the reinforcing cage, so as not to damage the structure. If the depth of the channel reaches the reinforcement, then it is better to make an additional layer of plaster or level the surface with drywall. We make grooves in a brick wall with a wall chaser.
Bulgarian
This is a manual angle grinder, which is used when chasing hard concrete walls, when you need to punch many long grooves for wires. We install a special disc for concrete work on it, for example, a diamond disc.

The thickness of such a disk is usually sufficient to obtain a strobe of the desired size.
If the width of the channel should be greater, then we make two channels in parallel at a distance of at least 5 mm, and then we hollow out the gap with a perforator.
It is impossible to expand the strobe by moving the grinder disk perpendicular to its plane: the machine is not designed for this, and this is very dangerous.
When making strobes, we use heavy tools, the power of which exceeds 500 watts, and high-quality concrete discs. When working with such a tool, do not forget about the safety rules. We work carefully, we hold the car firmly in our hands.
You can't drop the tool either. Although it will turn off, the rotation of the disc will not stop immediately, and the surface of the floor or even the legs may be damaged. Tighten the disc fastening nut tightly so that the cutter does not fly out during operation. This also happens, and it is extremely dangerous. Shtroblenie with a grinder is ideal. The only drawback of this tool is a large amount of dust.
Perforator
We use this tool if we need to make strobes in concrete. Working with a puncher, we insert a "shovel" into it. This is a nozzle, the shape of which allows you to gouge a narrow and elongated hole corresponding to the shape of the strobe.
Do not forget that when making a direct cut, the blade cannot be placed across the basting, since pieces of wall material may break off. If you need to make a recess for the socket, we use, in addition to the “shovel”, the “bayonet” nozzle. We mark the hole with a bayonet, and with a spatula we make it wider.

Performing wall chasing with a perforator, we can use another method. We insert a drill with a diameter of 6 to 10 mm into the puncher and set the mode of the impact drill. We drill holes along the channel at a distance of 10 mm, then insert the spatula, set the bumper mode and punch the gaps between the holes. We do the same when making seats for sockets or switches.
To get a hole of the desired depth, on the drill (at the required distance from the tip of the drill) we wind electrical tape, which will be the mark of the desired depth.
I must say that the channels punched by the perforator may be uneven, and they will have to be processed additionally.
To make wall chasing with a puncher quickly and easily, you need special skills, so using this tool, you need to be careful and careful. The rotary hammer makes a lot of noise during operation.
wall chaser
This tool is designed specifically for chasing any wall and is considered the best tool for punching grooves. Using a wall chaser, we make recesses for electrical wiring, for water supply or heating systems. It works on the same principle as the grinder, but differs from it.

In the wall chaser, there is not one, but several diamond discs, the distance between which can be adjusted. It is possible to adjust the depth of the strobe. The tool is equipped with a dust collector that directs the waste into the vacuum cleaner or takes it to the side.
Starting to make channels and holes, be sure to check the thickness of the walls. If the wall is thin, we take into account the loads and make strobes closer to the ceiling or to the floor, so that there are few of them on the wall itself. If the wall thickness is more than 10 cm, we cut the grooves along the shortest distance, saving time and effort. In addition, do not forget to check if there is electrical wiring in this area.
Chisel and hammer
The cheapest, but also the most time-consuming option. We use these hand tools if we need to make short channels in plastered walls. Hammering concrete or brick by hand is impractical.

If you still have to hammer the wall with a hammer and chisel, then we follow simple rules:
- first we make a recess along the marked edges;
- we make a cut across the future recess, and then with a hammer we punch the desired groove by 5-10 mm;
- we go deeper to the same depth, and as a result we get the desired channel.
Knowing about the features of using tools for chasing, you can choose the right device and do all the work yourself.
If the wiring in the house changes, it is not always laid through the old channels. In order not to violate the aesthetics of the interior, to ensure fire safety, to protect the wiring from possible damage, it is made hidden and hidden in strobes - longitudinal recesses hollowed out in the wall or ceiling. The process of preparing surfaces for wiring is called gating.
Basic norms and rules for wall chasing for wiring
Chasing walls and ceilings for wiring is a critical type of work, and the procedure for its implementation is regulated by a number of regulatory documents in the field of construction.
- Chasing channels in a load-bearing wall can affect its bearing capacity, so such operations require mandatory coordination with the architecture department. It is possible to obtain permission for chasing load-bearing walls in brick houses; as a rule, the ban on panel houses is categorical. The problem can be solved by laying wiring in walls made of. We talked about the installation of such walls in.
- It is also strictly forbidden to carry out gating in floor slabs, horizontal wiring is laid at a distance of 15-20 cm from them.
- An embroidered seam between the plates cannot be used as a strobe.
- The distance from corners, door and window openings to the gates should be at least 10 cm.
- Shtroblenie should be carried out at a distance of at least 40 cm from the gas pipes.
- Do-it-yourself wall chasing for wiring should be done strictly horizontally or vertically, in planes parallel or perpendicular to the floor. The only exception is attic rooms, where chasing of an inclined surface is possible.
- The maximum continuous length of the strobe can be 3 m, depth and width - 2.5 cm.
- If the thickness of the structure is more than 8 cm, the wire should be laid along the shortest path, if less - parallel to the construction lines.
Wiring diagram
Video instruction on how to ditch the walls
What tools will be needed?
Chasing for electrical wiring can be carried out using different tools, their choice is largely determined by the base material on which the chasing will be carried out. It can be plaster of different composition, brick, stone, concrete of different hardness, including cellular or with a high content of crushed stone.
- If the layer of plaster is thick enough, a strobe can be laid in it for wiring without affecting the base. In this case, it is permissible to ditch along the ceiling and load-bearing walls.
- In a brick wall, it is most convenient to lay horizontal strobes along the seam between rows of bricks, and for vertical chasing, cutting bricks is indispensable.
- Concrete is the most difficult to ditch, it is the most durable material.
The following tool can be used for chiselling for wiring:

In addition to this tool for chasing walls for wiring, you will need:
- indicators or testers for detecting old hidden wiring;
- level;
- a vacuum cleaner;
- personal protective equipment - goggles, gloves, respirator.
How to prepare for work?

Chasing walls for electrical wiring should be carried out according to the markup, which is carried out using a level and a pencil in accordance with the above standards
If it is necessary to shred the walls in a panel house, the wiring must necessarily pass along the load-bearing wall and ceiling, it is necessary to check the thickness of the plaster layer. If it is not enough to lay the strobe, you will have to additionally plaster the surfaces. An alternative is to cover the walls with plasterboard, arrange a suspended or stretch ceiling - communications will be hidden under them.
Chasing walls for electrical wiring should be carried out according to the markup, which is carried out using a level and a pencil in accordance with the above standards, taking into account the location of openings, niches and protrusions that form additional corners, communications, and old wiring.

Chasing under the cable must be done taking into account the fact that it must be laid inside the corrugated sleeve, the thickness and depth of the strobe is determined taking into account the dimensions of the latter.
If it is not dismantled, it must be identified before starting work, referring to the old plan, in its absence, using a tester or indicator, and de-energized. The new wiring must not match or overlap with the old one.
With a pencil, 2 parallel lines are drawn for each strobe. Not only strobe routes are marked, but also places for switches, sockets, junction boxes.
Chasing under the cable must be done taking into account the fact that it must be laid inside the corrugated sleeve, the thickness and depth of the strobe is determined taking into account the dimensions of the latter. A plan is drawn up for laying electrical wiring and placing electrical products.
If the room is residential, it is necessary to take out the furniture and office equipment, if possible, or carefully preserve it with a plastic film.
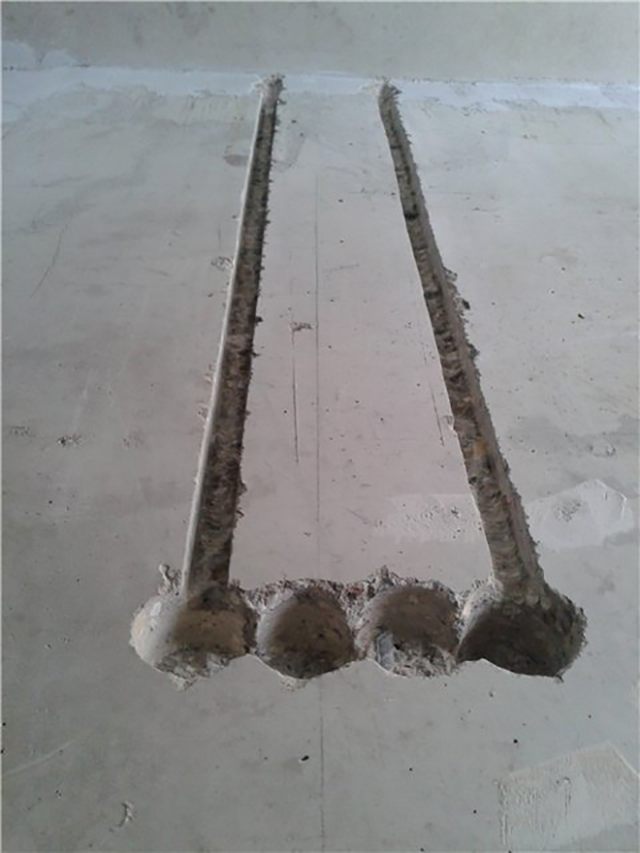
Gating technology: step by step instructions
Work is carried out in a certain sequence:
- Parallel grooves are made at a distance equal to the width of the strobe. The wall chaser allows you to make both grooves at the same time.
- The strobes are selected to the desired depth using a hand chisel or a puncher with a chisel attachment.
- The strobes are cleaned of dust and primed, after which you can proceed to laying the wiring.

Parallel grooves are made at a distance equal to the width of the strobe.
When using a perforator, the technology is slightly different:
- The material between them is selected using a perforator, which must be held at an angle of 45⁰;
- The edges are aligned with a nozzle - a semicircular chisel.

First, along the entire length of the route, with an interval of 10-15 mm, holes are made with a drill to the depth of the strobe perpendicular to the surface.
- If you do not have the right power tool, you can rent it, it is better to opt for a wall chaser, the cost of renting it (from 260 rubles per day, depending on the brand and model) is comparable to the cost of renting a puncher (from 200 rubles) or a grinder (from 240 rubles), and the advantages are obvious.
- It is better to rent a wall chaser or a grinder complete with an industrial vacuum cleaner, it is better to catch dust than a household one. The average rental price is 400 rubles. per day.
- It is better to grind the walls with a grinder together, the assistant should either moisten the surface with a spray bottle to reduce dust formation, or hold the vacuum cleaner nozzle at a safe distance from the tool to ditch the walls without dust.
The cost of specialist services
Wall chasing for wiring is the simplest type of chasing (in comparison with chasing for pipes), these works can be done independently. The cost of their implementation by specialists depends on the material of the walls and the tool used.
Most companies provide this service at the following prices:
- in plaster, gypsum wall - 100 rubles / meter;
- in brick - 200 rubles / meter;
- in concrete - 300 rubles / meter;
- on the ceiling - double coefficient;
- the cost of gating a non-standard shape is calculated individually.
By entrusting gating to specialists, you can count on the fact that they will offer the best plan for laying electrical communications.

Gating scheme in a panel house
Chasing surfaces for wiring is a job that you can do yourself, but you must strictly follow the rules and make sure that there are no prohibitions on chasing. Labor costs depend on the tool used and the material of the surface on which the chasing is performed. To avoid the formation of dust during the work will allow the use of a special tool - a wall chaser along with a vacuum cleaner, it can be rented.
Electricity today is an integral part of life, so it is impossible to imagine a house or office without appliances powered by this energy. But how to conduct and disguise the wires on the wall so as to hide them from prying eyes and not spoil the look of the interior. Here, the chasing of walls for wiring comes to the aid of the master. And it is worth considering how to ditch the walls for wiring without dust correctly, given the material from which the structures are made.
Basic requirements for the performance of work
What requirements and recommendations should be taken into account in the process of chasing walls for wiring? The first thing that is required from the master starting work is to draw up a plan for the wiring of the room. It must include the entry and exit points of the cable, the location of sockets and grooves for wires. In this case, it is worth considering the mandatory conditions:
- according to regulatory requirements, it is unacceptable to ditch load-bearing structures;
- since in panel houses all walls are load-bearing, this process is possible only for small partitions;
- it is also forbidden to ditch the ceiling, especially when it comes to reinforced concrete floors;
- strobes for wiring are allowed in vertical or horizontal directions;
- diagonal arrangement of wires is possible only in a wall located at an angle;
- the distance of the channel to the ceiling cannot be less than 15 cm;
- the distance from the gas pipe must be more than 40 cm;
- the depth of the strobe cannot exceed 25 mm.
If we are talking about the reconstruction of the power supply system, first you should find the places for laying the old wiring so that you do not accidentally stumble upon it during the work.

To do this, first remove the wallpaper and check the surface with an indicator screwdriver. After completing the work, do not forget to take a picture of the new circuit to take into account the location of the wires, if necessary, drive a nail into the wall.
And, since working with some tools is accompanied by a lot of noise, it is worth starting the activity so as not to disturb the neighbors. Otherwise, you can earn a negative reputation among people living nearby.

If a brick wall is to be shredded, it is worth planning to lay the wiring along the seam. A cement mortar used as a binder between bricks that form a wall. can be chiseled under the electrical wiring with a chisel and hammer. The amount of dust in this process of such work will be minimal.
To use a hammer drill, several factors must be taken into account: a power of more than 600 W, the functions of regulating turnover and reverse rotation. The device must have an impact mode when drilling and a self-tightening chuck. Since drills of different diameters will be needed to make a strobe, the hammer drill needs to support diameters from 0.5 to 12 mm.
Before you gouge a brick wall, it will be good to mark up so that you do not go to the side during the work. The puncher should be held strictly vertically and do not press hard on the wall. All this will help to avoid a quick breakdown of the device.
When working on a brick wall, the drill can get very hot, and high temperatures can cause it to become dull quickly. To prevent this from happening, you can periodically lower the drill into a container of water. But it is worth making sure that the liquid does not end up in the electric motor itself.
If black dust is visible on the brick, this means that it was fired longer than expected. Such bricks must be ditched at low speeds of the perforator using the impact mode.
If the required strobe width is 15 mm, do not immediately use a nozzle of this diameter. To get started, you need to take a drill 4-6 mm.
After obtaining the desired depth, the hole should be expanded with an 8 mm nozzle and gradually brought to the desired size. Existing irregularities can be removed with a chisel.
Features of working with concrete, wood and aerated concrete
When chasing a concrete wall, the main thing is the protection of the reinforcement. Any damage to it can reduce the strength of the material and have a devastating effect on both the repair and the premises.
In the process, concrete creates a lot of dust, so before ditching a concrete wall, it is worth taking measures to protect vulnerable parts of the body: eyes and respiratory organs.
Work with a puncher in such conditions is possible in shock mode. Instead of a wall chaser, you can use a grinder with diamond or turbo-diamond blades up to 125 mm. Do not immediately go deep into the wall to the desired distance. To begin with, it is better to correlate the grinder with the strength of concrete walls, so as not to break the tool with an overload. And only after that it makes sense to fulfill the specified depth.

When arranging a strobe in a wooden wall, you should not use a puncher. To work with this material, a chisel and a circular disk for wood are used.
To gouge the walls for wiring in a gas block, you should choose a wall chaser for working with foam concrete. Its design includes a special tube for removal and collection of dust. Instead, you can use a grinder with a circular nozzle, but there will be more dirt in the process.
To ensure dust-free wall chasing, the surface is sometimes moistened with water, but this complicates the work. The choice of special tools than to ditch the wall does not completely solve the problem. More often, a household or construction vacuum cleaner is used to clean the premises.
How to make a socket for an outlet
In addition to wires, sockets, switches and junction boxes are an important part of the electrical system. Recesses for these devices in a wall or partition must be made taking into account the following factors:
- first you need to drill a hole in the center of the proposed hole with a diameter of not more than 10 mm;
- with the help of a crown, the contours of the socket for the socket should be marked;
- after that, you can start making a hole of a given depth;
- if the fittings are exposed during operation, it is better to remove the outlet to another place.
Places for the socket must be planned so that it is convenient for connecting appliances, safe and does not require serious interventions in the design of load-bearing walls.
How to make strobes less noticeable
After the chasing of the walls for wiring with your own hands is completed, you need to hide the wires. Even if the change made is small in scale, it is required to close the hole with the wires.
A connector left open with wires and cables can become a place for dust and dirt to accumulate. This factor will negatively affect the adhesion of finishing materials, which can spoil the look of a beautifully made repair.
Also, a plastered strobe can cause the wires to wear out quickly, creating electrical failures. Therefore, in order to protect the wiring, they are removed into the box, which is fixed with a special solution. This is done according to the following rules:
- the channel is coated with a deep penetration primer;
- after this layer dries, it is important to moisten the wall with water to avoid shrinkage;
- a layer of plaster is applied to the box with wires;
- the solution is leveled and smoothed with the outer side of the spatula;
- movements are applied in a zigzag and perpendicular to the channel;
- if the composition is applied to a vertically located strobe, the work is done from the bottom up;
- for a horizontal direction, it is sufficient to apply two layers, made opposite to each other;
- a trowel is needed to remove excess mortar;
- if the dimensions of the plastered surface are too wide for a trowel, this tool can be replaced with a rule.
If, in the variant of how to hide the wires, a composition with concrete was used, it is necessary to periodically moisten the surface with liquid during operation. Otherwise, such plaster will crack. After the box is closed and the hidden channel with the wiring is aligned, you need to give time for everything to dry. And only after that it is time to decorate the room.
To see how to make wall chasing with your own hands, you should watch the following video:
Summing up
A person who does not have much experience in construction can master the skill of how to properly ditch walls for wiring. For this, the desire and willingness to follow the recommendations of people with experience in this field is important.
It is important to draw up a wiring diagram and take into account the minimum distance to the ceiling, the direction of the channels and their depth. Before chasing the surface, you need to select the tools according to the type of wall. So it is necessary to pierce a concrete wall without touching the reinforcement, and in a panel house, such work can only be done with partitions. In other cases, the outer decorative box will protect the wiring and hide it. You can take care of this decoration in the process of finishing the apartment in a panel house.
When the master begins to make a strobe, he applies the markup. This allows him to get an even streak. Then you should get the most even depth and diameter along the entire length of the wire laying. To properly pierce a wall, you should adhere to the following principle: it is better to first get the desired depth with a narrower nozzle and then expand it than to immediately chisel the wall along the entire diameter.
There are several ways to reduce the amount of dust in the air: using special tools, moistening the wall, or collecting debris with a construction vacuum cleaner.
If work is being done in a concrete house or an old building, it is important to be aware of rebar or old wiring inside the wall. In this case, there is a risk of stumbling on something in the process of gating. Knowing that this can happen, you either need to check the presence of old wires with a special device before starting work, or have a spare option for laying power supply.
After priming the channel made, it should be plastered. This will level the wall and improve the adhesion of the next layer. In the end, it remains only to decorate the room. And, if everything is done correctly, the tenant of the apartment will enjoy high-quality repairs and uninterrupted power supply.
Almost everyone who decides to start repairing their apartment, cottage or house is faced with the need for wall chasing.
wall chaser

The process of making a strobe with a strobe cutter is similar to how it is done with a grinder.
The difference is that the wall chaser there are two disks, thanks to which two gutters are laid in the wall at once, as well as the fact that the distance between the disks can be adjusted.
But, in this case, the material that remained between the gutters, must be removed with a perforator.
Hammer and chisel

Hammer and chisel are used for making strobes in soft materials, which include almost all types of plaster.
To gouge a wall with a hammer and a chisel, you need to take a hammer in one hand, and a chisel in the other, and, putting a chisel to the right place on the wall, hit her with a hammer resulting in a hole in the wall.
By creating potholes in this way and expanding them in the right direction and size, you can create a strobe.
Strobe dimensions such as depth and width determined by cable dimensions or pipes, but may not exceed 30% of the width of the wall.
How to get rid of dust?
For dust control during chasing various methods are used:
- The most common and affordable way to deal with dust is to wet the surface on which the strobe is to be made.
- Sometimes a home vacuum cleaner is used to trap dust during gating.
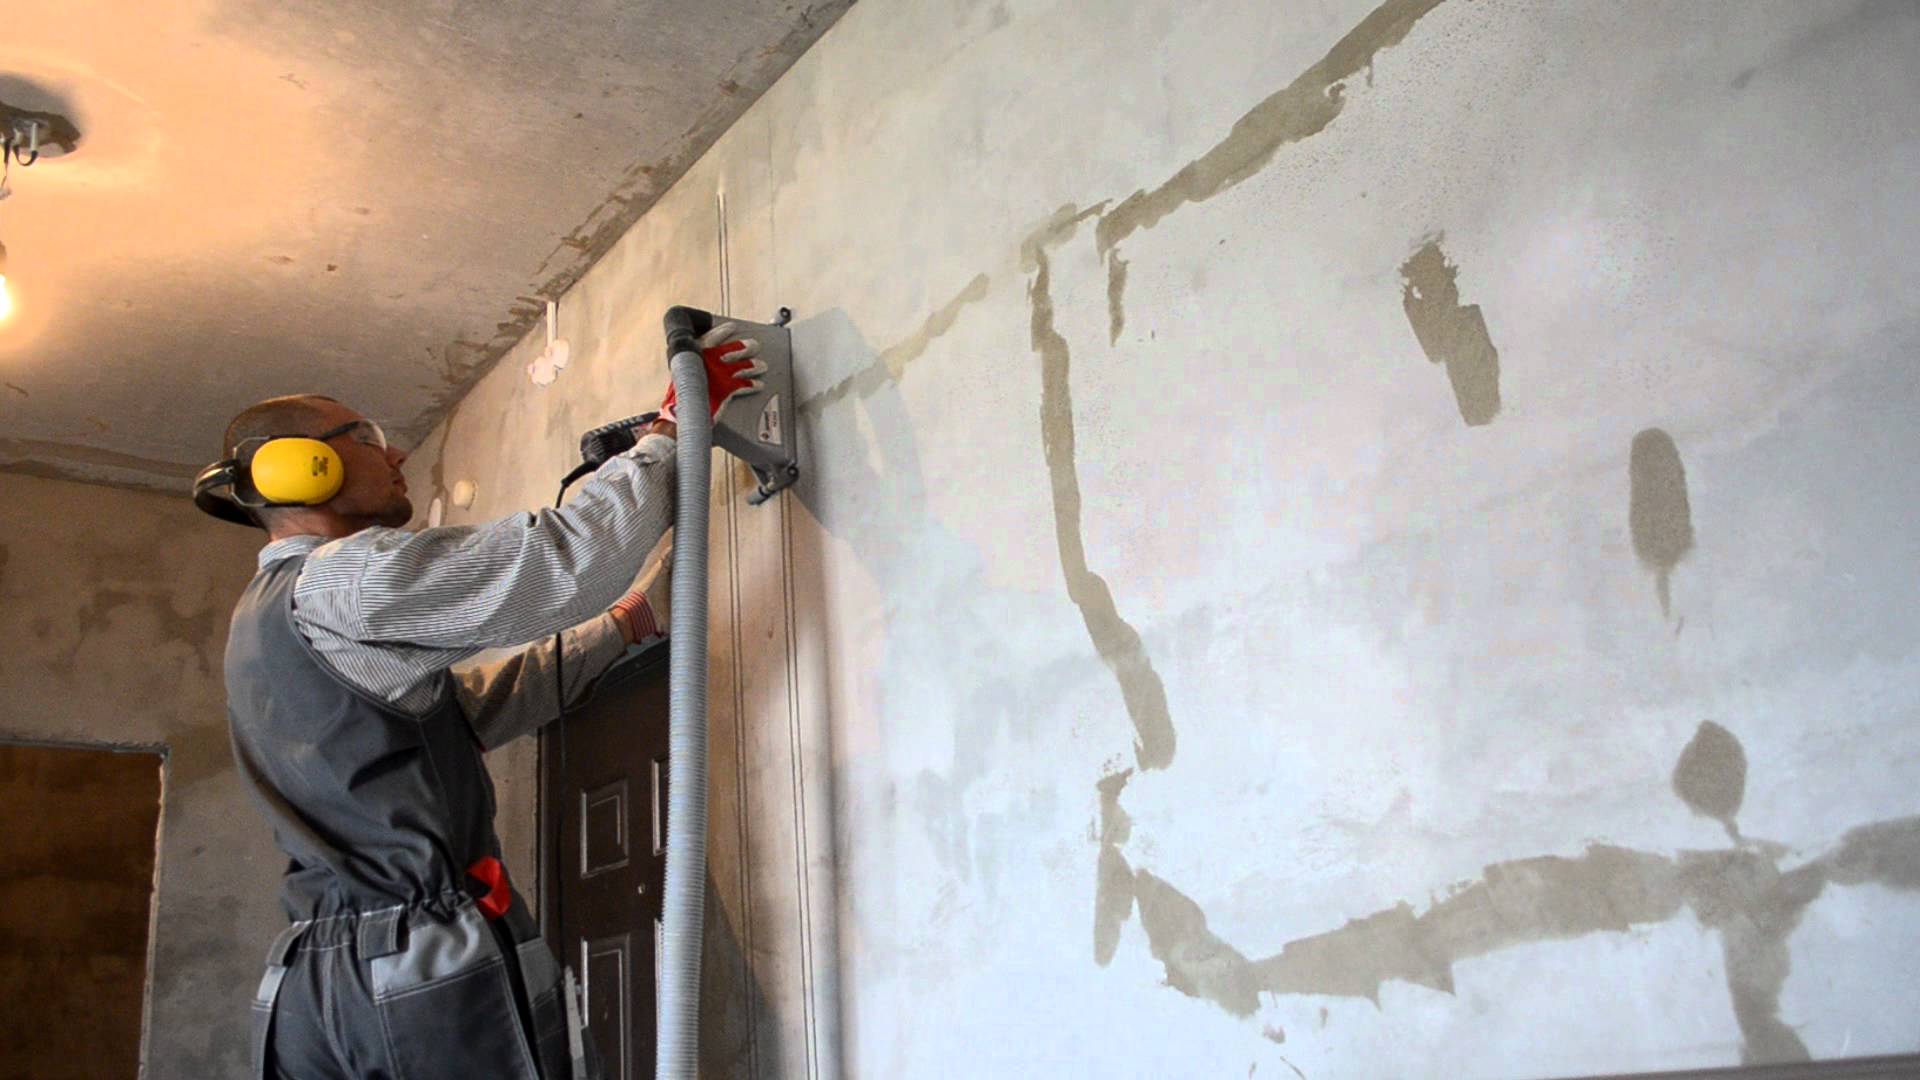
- However, the most effective way to deal with dust is to use a wall chaser, to which a special vacuum cleaner is connected, then all work is carried out without dust.
In this article, we looked at the main ways and tools for wall chasing. As you can see, this process is not very complicated, the main thing is to follow the safety rules.
Proper wall chasing: video lesson.
When performing repairs in an apartment or scrap, every home master is faced with the need for wiring. This is necessary for the installation of new outlets. Many people think that for wiring it is enough to buy a cable and invite an electrician. However, shaving can be done independently. It is enough to carefully read the instructions on how to ditch the walls for wiring.
How to ditch the walls
First you need to draw a drawing of the future wiring location. To do this, take a pencil and clean paper. It is necessary to draw a diagram according to which the wiring will be mounted. However, before compiling it, you should definitely familiarize yourself with the rules for conducting wiring. Various requirements are recorded in SNiP 3.05 06-85. The master's confidence in the accuracy of the actions performed is not always supported by real experience. At best, in such a situation, the home craftsman will be at an impasse. Therefore, it is very important to find out the main subtleties of gating at the planning stage.
It is important to comply with six basic requirements:

Important! It is forbidden to make horizontal strobes in load-bearing structures. This principle of work is applicable to any region. If it is a panel house, each wall is the carrier.
By following these rules and drawing up the correct wiring layout, gating can begin. It is worth remembering the safety rules. All construction work is carried out carefully and carefully.

Preparing the walls before chipping
First you need to understand if there are hidden wires in the wall that are located in the path of the strobe. For this work, you need to find a special device. It will help determine exactly where the old wiring is located. This should be done for security reasons. So the power tool does not stumble on a wire that is energized.
Marking lines are marked on the wall, which represent the route of the strobe. The marking starts from the junction box and goes to the switches, sockets, light sources.

Before starting chasing, be sure to close the doorways with a cloth soaked in water. So the dust will not scatter around the house.
Choice of tool for chasing
There are many tools that can be used for chasing a wall. For this purpose, a simple chisel and hammer, wall chaser, grinder and perforator can be used. When using a wall chaser, the work will be expensive, but the furrows will turn out perfect. When working with a perforator, the price of gating will be average, and the procedure will be completed fairly quickly. In the case of a grinder, you can get fairly even furrows, but there will be a lot of garbage. The cheapest method is using a hammer and chisel. However, this is its only advantage.

The choice of tool for chasing depends on the preferences of the owners of the house and their capabilities. It is worth remembering that it is better to choose a quality tool with which you can create the perfect strobe. In this case, you don't have to redo it.
Punching walls with a perforator
When performing a strobe using a perforator, a lot of money and time are not spent. Wall preparation is also carried out when choosing other tools. The steps of the procedure are very simple. Every home master can perform them:

After finishing the preparation, you can start chasing the walls. For this, a puncher is taken and several holes are drilled along the marked line. They must be placed 1.5 cm apart. Then the tool switches to another mode of operation - specifically for strobes. To do this, you need to put on a certain nozzle. The holes are connected to each other, resulting in a single furrow.

Important! In the absence of experience in such work, do not neglect the implementation of holes. Otherwise, it will not be possible to make the strobe even.
Bulgarian for shtroblenia
Another popular tool for making shtrob is a grinder. It is quite simple to make furrows in which the wiring will be placed using this tool. How to perform shaving a concrete wall with a grinder? It is necessary to prepare a diamond-coated disc. This is due to the high strength of the concrete wall. The main advantage of a diamond blade is its durability. Plus, it's pretty fast to work with.

First you need to cut two strips on the section of the wall that is already marked. It is necessary that the slots are parallel to each other. A distance of 2 cm should be made between them. Then you will need to use a puncher to remove the wall material between the cuts. After completing the strobe, the wiring can be laid in the opening and sealed with plaster.
Important! The recess for the wires should have such a depth that, upon completion of the work, the plastering of the wall is comfortable. When the cables are hidden quite deep under the finishing material, it is much easier to finish the wall.

Chasing a wall with a chisel
If chasing is performed in a concrete wall, you should not use a chisel and a hammer. Concrete is a fairly strong material that cannot be pierced by such means. However, when working with a brick wall, this method is optimal. Work is carried out according to the following scheme:
- First you need to outline the recesses along the edges of the future furrow.
- The chisel is placed across the groove and hammered into the wall.
- The strobe is deepened in layers by 2-2.5 cm.

When the gating is completed, the grooves should be cleaned. Then you need to open the surface with soil. When the composition dries, the wires should be laid in the groove and sealed with plaster. Only with the right tool for making strobes can you do the job quickly. With modern devices, you can carry out all the procedures yourself. This will make repairs cheaper.
Dust-free chipping
These methods of gating have a common drawback - when they are chosen, a lot of dust is generated. Its layer often becomes too large, which does not allow to completely clean the room even when using special equipment. Those who care about keeping cleanliness during work will be interested in the dust-free strobe method.

To do this, you need to prepare a wall chaser for making slots. This device resembles an ordinary grinder. However, it is already equipped with diamond wheels. The device is equipped with a casing that allows you to adjust the thickness of the strobe. In addition, the depth of the created furrows is also controlled. A vacuum cleaner is installed in the wall chaser, which draws in the resulting dust during operation. This allows you to make repairs as clean as possible.
The only drawback of such a tool is its high price. For a one-time strobe, buying a strobe is an unwise decision. However, the device can be rented. These tips help you figure out how to ditch the walls for wiring without dust. Some craftsmen make a wall chaser from a grinder. However, this tool has some limitations in its use.
Before work, it is important to remove wallpaper from the walls, as well as other interfering elements. If the surface is not prepared, wallpaper particles will become clogged into the casing of the apparatus. In this case, the dust outlet will be blocked, which may lead to an emergency situation. Thorough cleaning of the walls will help to avoid this situation.
Before finishing the walls, it is important to mark the distances from the corners of the ceiling and walls to the furrows with a marker. Then their photo is taken. The next time a repair is needed, these photos will help you locate the wires.

Holes for socket boxes or boxes should be made in this order:
- a hole with a diameter of 8 mm should be drilled in the center;
- using a crown, make a notch to mark the contours of the future hole;
- in accordance with the contour, make 10 of the same holes;
- drill a hole with a crown.
When creating such holes, you can get on the bars of the reinforcement. In panel houses it is strictly forbidden to damage them. This will negatively affect the strength of the walls of the entire house. If the socket is installed at a low height from the floor of the room, the amount of work is reduced. In this case, the wiring is laid in the floor.

Gating cost
The procedure for making a strobe in a concrete wall has a certain price. The indicator may differ depending on the criteria for the performance of the work. It is more profitable to do the process yourself. However, for this it is necessary to prepare tools and materials. The cost of the entire event depends on their price when creating a strobe with your own hands. When choosing a puncher, only the price of wires and finishing materials will be included in the final amount. Usually such a device is available in every household.
You can order shtrobleniye from professionals. However, in this case, the cost of work cannot be called acceptable. You have to pay a large amount. Such work is dangerous, therefore, the price for it is set accordingly.

conclusions
When repairing a home, you can not do without the implementation of channels for conducting electricity. Therefore, it is important to know the main rules for wall chasing in advance. In addition, you need to follow the safety requirements.
Each home master can do the wall chasing for wiring in a concrete wall with his own hands. To do this, you need to prepare certain tools and finishing. Working time depends on the experience of the master.
