Installation of two-level stretch ceilings. Do-it-yourself two-level stretch ceiling: a problem to be solved. Prices for spotlights
One of the types of decorative finishing of the ceiling space is a two-level stretch ceiling. Moreover, such designs are very popular in the implementation of various design projects. A wide selection of textures and colors allows you to use stretch ceilings in the design of the room in almost any style and create a unique interior, filling the room with warmth and comfort.
It is quite possible to install two-level stretch ceiling structures with your own hands, for this you need to choose the right materials and tools, as well as understand what two-level stretch ceilings are, and learn a few lessons about installation rules.
Design features
At the heart of a two-level stretch ceiling is a canvas made of polyvinyl chloride film. To fix it, the frame is pre-assembled, after which the surface is brought to an ideal state by stretching the main canvas. Stretch ceiling structure increases the aesthetic characteristics of the surface, and in some cases visually increases the main parameters of the room. The canvas can have a glossy or matte surface, the choice in this case depends on the height of the ceiling and the final result.

The design of a two-level stretch ceiling is characterized by some features that you should familiarize yourself with before proceeding with the installation of the structure:
- The place where it is planned to install a stretch ceiling. This factor should be taken into account for one reason, if the structures are installed in a room with a high level of humidity, then moisture-resistant drywall sheets will be required to create the frame. In rooms with normal humidity, it is quite possible to use ordinary material.
- Stretch ceiling shape. Before proceeding with the installation of the structure, it is necessary to draw its diagram and calculate the parameters. With all the correspondences of the base ceiling and the future design, you can safely begin installation work.
- Frame material. You can assemble the basis of the tension structure from wooden bars or a metal profile. It should be noted that using a profile for two-level stretch ceilings, you can create structures of almost any shape, thanks to their ability to easily bend. Various types of profiles for stretch ceilings make it quite easy to do.

A two-tier stretch ceiling has the following advantages over other similar structures:
- Fast assembly and installation.
- Perfectly flat finished surface.
- Aesthetically attractive appearance.
- Protection of the premises from water ingress in case of flooding from neighbors from the upper floor.
However, there is one, but a serious drawback of stretch ceiling structures. In particular, we are talking about the fragility of the canvas. In this case, it is important to remember that the stretched canvas requires careful handling during installation and operation. In addition, you should know the temperature regime for stretch ceiling structures. As for the high cost of this type of decorative design of the ceiling space, it should be noted that the practicality and durability of the structure make it possible to recoup all the costs of installation and purchase of materials.
Types of two-level ceilings
The design of a two-tier stretch ceiling involves the installation of two steps, each of which can have a different shape. Tiers can be made from any fabric, combine several textures and colors. The first step in the installation of a two-level structure is the creation of a frame with a base coat. The main material of this process is plywood, wooden bars, metal profile and tires.

All ceiling structures, consisting of several tiers, are divided into several types:
- An ordinary ceiling is a surface that consists of two tiers of tension material.
- Combined ceilings are a plasterboard box and stretch fabric.
- In the backlit design, one stretch fabric can be installed or with the addition of a plasterboard insert.

Before stretching a two-level ceiling, it is recommended to draw a diagram, take accurate measurements and calculate the components.
To create a conventional design, a simple frame is assembled from plywood, wooden bars or an aluminum profile. A combined stretch ceiling requires a different base, so steel profiles are used in this situation.
If we are talking about a backlit ceiling, then for the manufacture of their base it is best to use metal tires and corners. In this case, the calculation of the frame is carried out taking into account the implementation of hidden lighting and the corresponding wires. Therefore, it is recommended to entrust the installation of a backlit ceiling to experienced craftsmen who perform all actions in accordance with specific instructions.
Features of the installation process
You can install a multi-level stretch ceiling in the room with your own hands, the main condition is compliance with the requirements and rules. All activities must be carried out in a certain sequence. Moreover, for beginner home craftsmen, the first step in installing a two-level stretch ceiling should be drawing up a sketch of the future design.


In general, the assembly and installation of a stretch ceiling involves the following steps:
- Frame assembly. At this stage, they determine what shape the structure will be, make rough sketches and fix the main structural elements on the base surface. For the correct imposition of tiers on each other, it is necessary to take accurate measurements and alternately connect the tiers. It should be borne in mind that the multi-level structure must be strong enough, so it is best to use an aluminum profile. Such elements are fastened using a simple technology, which involves fixing the guides and attaching profiles to them using self-tapping screws.
- Installation of the upper tier. At this stage, the contours of the structure around the perimeter of the room are marked, due to which the location of the first level becomes visible. For more accurate marking, professional craftsmen recommend using a laser level. Adjusting hangers should be placed in increments of 50-60 cm, while also checking the location using a level. Profiles are installed at a distance of about 30 cm from each other. Plasterboard sheets are applied to the finished structure and fixed with self-tapping screws.
- Installation of the ceiling of the second level. Installation of the second tier is carried out taking into account the location of the ceiling of the first level. In the case of rectilinear structures, there are no particular difficulties. As for curvilinear figures, it requires fitting the profile to the appropriate shape. For this purpose, make several cuts in the profile and bend it. The profile fastening starts from the wall, and the guides are placed in the central part. In this case, the frame is more durable. The completion of the work is the sheathing of the frame with plasterboard sheets and the tension of the main canvas.


To facilitate the work with drywall sheets, first cut out the strips in accordance with the sketch of the future design, then moisten them and give the desired shape. Wet drywall bends better, which simplifies the installation process. After drying, the drywall strip acquires strength and can be fixed to the frame using self-tapping screws. After assembling the structure, it is imperative to seal the joints of the drywall strips. Next, a lighting system is installed, the surface is covered with a primer layer and a finishing material is applied.
Two-level stretch ceiling structures can decorate any interior, but for this you need to understand the question of what a two-level stretch ceiling is, and take the installation process very responsibly. Particular attention should be paid to the independent installation of individual structural elements. To create an aesthetically attractive stretch ceiling structure that fits perfectly into the overall design of the room, it is necessary to correctly determine the shape and color of the future stretch ceiling, choose the material depending on the design style.

Masters who are engaged in the installation of stretch ceilings at a professional level are advised to adhere to the following rules:
- To emphasize the shape of the structure, several shades should be combined.
- For a combined type ceiling, it is recommended to combine canvases with a glossy and matte surface.
- In addition to the tiers, you can use fragments of drywall sheets.
- You should not refuse original patterns, drawings, ornaments and photo printing.
- A multi-tiered structure should have an unusual shape in the form of a wave, circle, cone or oval.
- To separate the ceilings, it is recommended to use various inserts and colored lamps.
Installation of a stretch ceiling structure is carried out using harpoon or wedge technology. The first option is distinguished by its simplicity, therefore it is more suitable for beginner home craftsmen. For proper installation, it is required to correctly measure the edging of the ceiling and connect all structural elements tightly enough.

To resolve the issue of how to stretch a two-level stretch ceiling with a large difference in levels, it is recommended to use the wedge method. It involves uniform heating of the main canvas and its clamping under the baguette in accordance with the markings. It is recommended to warm up the air in the working room to 40-45 degrees before stretching the canvas. In this case, the material becomes softer, which simplifies the installation process several times.
For a more even tension, experts use a building hair dryer. With its help, the material is smoothed and acquires perfect smoothness.
Two-level stretch ceilings in the interior
Multi-tiered stretch ceiling structures are suitable for any design, with their help they make out the ceiling space in rooms of different sizes. When decorating small rooms, it is better to give preference to white, which visually increases the size of the room and makes it more comfortable. To create a romantic atmosphere in the bedroom, light shades should be selected, and the multi-tiered structure on the ceiling should be supplemented with hidden lighting.

Some feature can give a small room a ceiling with a glossy surface. However, if bright light irritates the body, then you can use matte canvases. Also in small rooms it is not recommended to use structures of complex shape, which in turn tend to visually reduce the size of the room.
A two-level stretch ceiling is the best option for decorating the ceiling space in a children's room. A wide variety of colors and the ability to create almost any form of plasterboard sheets allow the designer to realize the most daring and unusual ideas. As for lighting, the ceiling in the children's room can combine various chandeliers and spotlights. The illumination of each tier individually fills the entire room with light as much as possible and, if necessary, highlights separate zones.

With the help of a two-tier stretch ceiling, a small apartment can be divided into appropriate zones, where most often the kitchen is combined with the living room. In such situations, the ceiling structure is complemented by the installation of various geometric details or delimits space through straight lines.
To give such a room a festive look, a two-tier white composition is created on the ceiling, which is complemented by lighting in the form of a chandelier and several lamps, including spotlights.
The idea to turn the ceiling space into a masterpiece of multi-level design with the help of a stretch film always rests on the need to build a rather complex frame. Installation of a stretch two-level ceiling requires special care in the performance of work. Any negligence can affect the supporting structure in the most unexpected way. It often becomes clear how correctly the work was done only after the completion of installation work on a two-level decor.
Stretch decor in two levels looks much nicer
The design of a two-level stretch ceiling
The main idea in the construction of the decor is to install several film canvases on the ceiling base, creating the effect of a three-dimensional structure. It is clear that such an idea can be realized only with the use of a special frame and fasteners.
The essence of the design is as follows:
- A two-level ceiling is always built using a central supporting frame, which accounts for the bulk of the load that occurs when installing a stretch fabric;
- Most of the baguettes and profiles are attached to the main part of the frame, with the help of which the PVC decor is stretched at different levels;
- With the help of additional overlays, it is possible to mask the lines of the slot and the lines of joints, to close the supporting profile of a two-level ceiling at the inflection lines.
Important! All baguettes and profiles used to install a two-level stretch fabric must be reinforced with embedded strips and slats.

The frame under the film has to be seriously strengthened
The main difficulty in building two-level structures is that the tension fabric stops on the frame with a force of at least 5-7 kg per meter of PVC film. This ensures uniform and high-quality tension of the entire panel. But, on the other hand, it is necessary to install additional ribs and strips that reinforce the frame in order to prevent deformation and displacement of the support frame.
Installation options for two-level stretch ceilings
The number and variety of lines and transitions in the design of the ceiling decor, which consists of several levels of decorative film, is limited only by the imagination of the customer and the capabilities of the craftsmen.
If the task is to build two-level stretch ceilings with your own hands, then it is best to limit yourself to one of the most popular and at the same time affordable and easy-to-arrange schemes:


- Variant of a soaring two-level stretch ceiling.
Of course, the project of the future film decor is chosen based on the characteristics of the interior of the room, the experience and capabilities of the master. But even the simplest designs can look quite spectacular, especially if you make them yourself.

A successful combination of a dark upper level and light boxes and a chandelier
Two-level stretch ceiling on a box
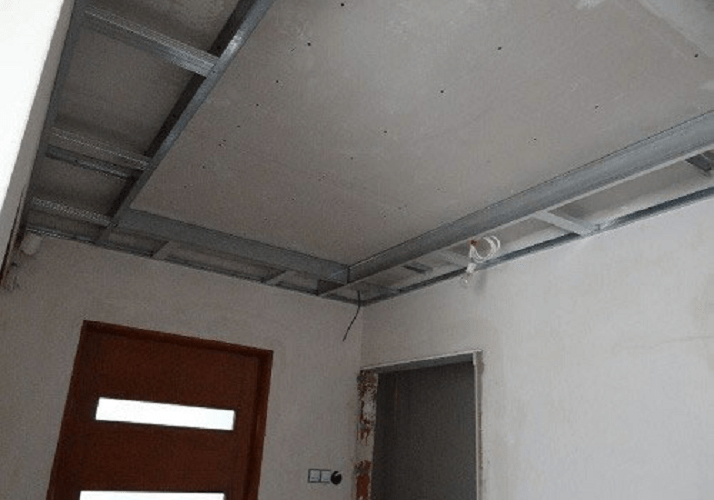
The ceiling structure with a second level installed along the perimeter of the surface can be made in several versions. In the simplest case, the second level is assembled in the form of a box installed in the area where the ceiling adjoins the wall, photo.
The basis of the ceiling decor from the profile
In this case, to build the base of the upper part of the two-level tension decor, a double profile or a special design is used, in which two edges of the upper and lower panels can be fixed simultaneously.
In order to securely hold two stretched film decors at the same time, the frame of a two-level stretch ceiling must be sufficiently rigid, therefore, aluminum corners and galvanized steel profiles, sometimes timber and even plywood, are used for fastening.

Prefabricated frame option
In such a design, an unusual method of fixing the tension web is used, when the lower level film is installed on the ceiling frame with a bend at an angle of 90 °.

Scheme for a box of timber
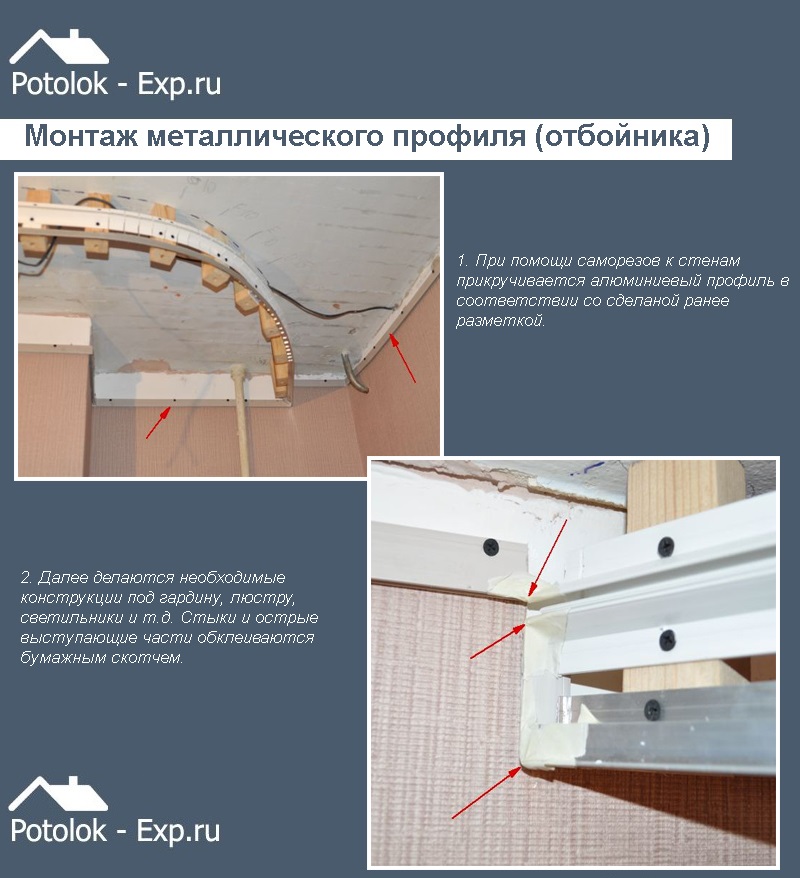
If the frame is made of lumber and plywood, then an additional profile with a rounded edge, also called a chipper, is used to bend the panel.
Advice! Instead of a chipper, you can put any wall baguette, in which the bearing part is made with a tide along the edge.
It is clear that the edge or outer corner of the supporting frame does not have to be straight, very often the upper level of a two-level ceiling is made in the form of a complex curve, rounded arched frames can also be used.
Soaring two-level ceilings with lighting
Stretch decor can be built according to a more complex scheme. In this case, top-level lighting is used, which creates the effect of a floating ceiling.
A more sophisticated version with backlight
Structurally, such a ceiling is assembled on a frame made of aluminum and steel profiles. The upper level is mounted on a conventional wall baguette, fixed on the main frame in a horizontal position.
The lower level is more complex. Firstly, the place of attachment of the tension web is shifted relative to the supporting console by 60 mm; an aluminum corner 40x60 mm is used to remove the system from two baguettes.
The upper level is raised above the second canvas to a height of only 40-50 mm, a niche of 60x60 mm is formed between the frame parts, into which the backlight will be laid in the future.
The lower web of a two-level ceiling is stretched onto the h-profile installed upwards with a lock, the tension material bypasses the second fastener element and is fixed on the wall using a standard wall baguette.
A similar scheme is widely used for arranging suspended two-level ceilings with an insert or niche located in the center of the room. Technologically, the assembly of such structures is no different from conventional box-shaped schemes, the only condition is the use of split embedded rails, to which the stretch ceiling profiles are attached.
How to make a two-level stretch ceiling with your own hands
Installing a ceiling decor with two levels of vinyl film is not a particular problem, but first you will need to decide how to assemble the supporting frame.
There are two options for frame frames used for two-level ceilings, which are quite simple to assemble at home with your own hands:
- The wooden frame is assembled from timber and lining, to install the canvas in the corner and the lower tier, baguettes for the film are mounted;
- They use a ready-made aluminum alloy ceiling profile with already built-in locks.

The simplest option on an aluminum frame
It is only an experienced craftsman who can independently make a complex structure for a two-level canvas with rounded edges and curvilinear transitions; in an amateur version, such designs are rarely obtained. According to reviews, even experts prefer to use standard profiles, resorting to home-made frames only in the case of arranging non-standard stretch ceilings in shape and size.
How to make a frame of two-level stretch ceilings
If the simplest design with the arrangement of the box around the perimeter of the ceiling is chosen as the scheme, then it is easiest and fastest to use a standard profile of the PL75 type.

Under the installation of the profile you need a bar
The use of prefabricated aluminum frame parts greatly simplifies the installation process, especially since the range of fasteners is large enough to produce the most complex multi-level structures. You only need to select the desired type of profile and prepare the base for mounting under stretch ceilings.

Box under the stretch ceiling made of plywood
If a two-level ceiling decor needs to be installed at minimal cost, then the frame for the canvas can be assembled with your own hands from pieces of plywood and boards 20 cm wide and 25 mm thick, and in addition, you will need a beam, which ensures the longitudinal rigidity of the entire structure.
Preparation for installation of a two-level stretch ceiling
Before proceeding with the installation work, it is necessary to clean the ceiling from the old finish, remove dust, debris, and treat the surface with a reinforcing compound. It will be useful to coat the concrete surface once with a disinfectant solution that blocks the formation and spread of fungal growths.
It will also be necessary to repair all the cracks and joints between the plates with a repair mortar. This is done in order to avoid possible sagging of the fasteners, if suddenly the installation site of the dowel or self-tapping screw falls on the defective part of the concrete ceiling.
Necessary tools and materials
To make a two-level ceiling, the following tools are required:
- Perforator with a set of impact drills with a diameter of 6-12 mm;
- Screwdriver with a set of bits and drills;
- A marking tool, a laser level, a construction cord or a bubble device for drawing the horizon over a long overlap;
- Scissors for metal, electric jigsaw with a set of saws.
In addition, you will need dowels with self-tapping screws and plugs with a diameter of 8 mm, “bugs” fasteners, corners, an aluminum carrier profile if the frame for a two-level decor is made from a standard baguette. If the frame structure is planned to be assembled with wood, it will be necessary to prepare a board or pieces of plywood 20 cm wide and 15-20 mm thick.
It is clear that you will need the stretch fabric itself, a glazing bead or a harpoon, as well as glue and decorative overlays that will close the slots and joints in the junction areas. Depending on the scheme of the frame structure, a wall and ceiling baguette will be required, it may be necessary to purchase a double W-shaped profile for joining several stretch ceiling sheets.
Installation of structures of two-level stretch ceilings
The simplest is the installation of a standard profile PL75 or any of its analogues. Before installation, markings are applied to the ceiling. First of all, a lining beam is mounted on a concrete slab, its task is to level the horizon of the base of the future frame, otherwise the two-level ceiling will turn out to be not quite even.
The frame is reinforced either with wooden bars or triangles from the profile

It takes a lot of time and effort to cut and fasten a wooden part, so the craftsmen try to replace the bar with washers or short fiberboard linings. In this case, PL75 is mounted directly on the floor slabs using standard fasteners and embedded plugs.
Upon completion of the installation of the carrier profile, you can determine the height at which the lower plane of the two-level ceiling will be located. Only after transferring the markings to the walls, you can install “n” or “h” - baguettes for fixing the stretch fabric on the wall surface.
If the frame of the future two-level ceiling is supposed to be built of wood, then first of all it is necessary to apply the markings and contours of the future decor to the ceiling. The next step is to attach vertical plywood partitions using aluminum corners.
The next step is the installation of horizontal crossbars from a bar, they are fixed with ordinary carpentry screws. After you managed to align all the details of the frame, you can install baguettes to stretch the decorative canvas.

Top level first
If the design of a two-level ceiling decor consists of curvilinear arcs and lines, for example, the frame is made in the form of an oval or in the form of a complex rounding, then the profile for the film has to be reinforced with additional supports and corners.
For example, you can use a standard profile to fasten the frame of plasterboard ceilings, just cut the material into segments, make an incision and bend it into a mounting bracket.
The technology of mounting the canvas of a two-level stretch ceiling
The main problem encountered at the final stage is related to the correct distribution of the tensile force of the PVC film during installation.
Important! If a two-level ceiling consists of several sections, then the installation of the tension material must be carried out sequentially, mounting sections located at opposite ends of the ceiling.
This is done in order to compensate for the tensile force on the frame.
For the simplest structures in the form of a box, the installation of a stretch fabric begins with the upper tier. After heating and sealing the edges of the first level panel, you need to proceed to the installation of a decorative film in the center of the frame.
How to make backlighting in two-level stretch ceilings
PVC film does not tolerate heat well, so LED lamps are the only acceptable option for organizing backlighting. They are laid directly in the grooves of the baguettes, or mounted in frame niches specially equipped for lighting a two-level ceiling.
In the latter case, instead of a strip of LEDs, you can use recessed lights fixed on jumpers laid on the frame even during the assembly of the box. In this case, the wiring and fasteners are hidden on a wooden or aluminum frame, bearing ceiling panels.


Rings under the lanterns must be installed before the installation of the stretch fabric
Conclusion
Installation of a two-level stretch ceiling for the simplest structures does not require special knowledge and skills, it is enough just to choose the right ceiling profile and conscientiously fix the carrier bar and tension material. For complex curved PVC structures, experience and the ability to correctly assess the reliability of the assembled frame are needed. Therefore, multi-level and exclusive projects are best left to professionals.
A two-level stretch ceiling with lighting is a decorative structure made of metal and plastic profiles, mounted on the main ceiling to hide irregularities and laid communications. All this is covered with an elastic fabric without the formation of a rigid metal frame, as in the installation of suspended ceilings. This solution looks very attractive. Today we will find out how to make such a ceiling at home with our own hands.

Preparatory stage
Installation of a two-level stretch ceiling begins with the preparation of a draft level. The old finish is removed, the whitewash is completely washed off up to the concrete layer.

Already at this stage, it is necessary to draw up a preliminary sketch of the future project. The main thing is to determine the location of future lighting fixtures. With this design of the ceiling, it is recommended to create two levels of illumination - the main one (chandelier, lamps) and local (hidden illumination based on LED strips, recessed spotlights).
Stretch ceiling prices
stretch ceiling

The installation of the stretch ceiling and its frame begins only after the rough finish has dried. In the room where all this will take place, it is necessary to maintain low humidity (about 75%) and a relatively high air temperature (about 24 ° C). This is necessary to properly straighten the stretched fabric and prevent it from sagging.
At a time when the primer and plaster dries up, it is necessary to prepare the sketch of a two-level ceiling itself. Clearly determine what shape the contours of each of the levels will outline, where the main lighting (chandelier) will be located. First, all this is done with a pencil on paper, then transferred to the ceiling.

Curved lines are most conveniently drawn on a plastic profile applied to the ceiling. It flexes easily while maintaining smooth transitions.
Having drawn up a drawing according to which the levels will be created, you need to set the height at which it is planned to place the lower level of the stretch ceiling. The optimal size is from 15 centimeters or more. If the main ceiling has irregularities and bevels, then you can use the laser level and make marks on each of the walls where the profile will be fixed in the future, on which, in turn, the elastic base will be stretched.
Prices for ceiling profiles
ceiling profile

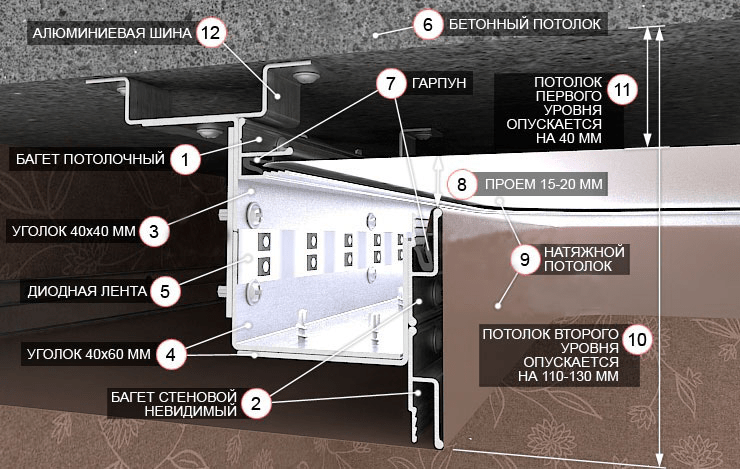
Scheme 1. Design with hidden lighting: 1 - aluminum design with hidden lighting; 2 - auxiliary beam; 3 - wall baguette; 4, 5 - harpoon tension fabric; 6 - backlight; dimensions are in millimeters.
Scheme 2. The construction of a multi-level stretch ceiling in the section (mounting of the 'harpoon' type): 1 - the upper level of the tension structure; 2 - separator; 3 — stubs of separators; 4 - chipper; 5 - base ceiling; 6 - inner frame; 7 - the lower level of the ceiling; 8 - wall profile, as well as a plug to it; 9 - walls; 10 - decorative plinth.
In those places where the lamps and the chandelier will be located, wooden bars are attached to adjust the level. Already after the formation of the tension level, it is necessary to make holes here (by soldering) and attach the lamp with brackets, covering the installation site with a decorative insert.

Installation of a plastic frame
Step 1. The installation of the plastic frame begins with the fastening of wooden retaining bars for the future profile. They are attached to the main ceiling with dowels. This is a simplified variation of the stiffening frame. You can replace it with metal U- and C-shaped profiles, but without experience it will not work to create such a design. Therefore, it is better to use wooden blocks. They are fastened with an indent between each other in 20-30 centimeters.


Another option is to install a stretch ceiling frame.
Step 2 Now the installation of the plastic profile itself is carried out along the previously drawn line. It is attached to the bars with ordinary wood screws. The ends of the plastic profiles are connected with an additional plastic insert. It should also be attached to a tree. The lower part of the plastic profile is closed with a corner flexible perforated insert - it is glued to a polyurethane or similar adhesive. This is done so that when the web is tensioned, there are no sharp corners about which the elastic material can tear.
Prices for spotlights
spotlight


You can also use an aluminum profile - you need to file it with a grinder, and you can’t rush here, the final cut is finished with a hacksaw
Step 3 During the installation of a plastic profile, it is important not to damage the communication cable (for example, a fire alarm). They are either covered with a plastic narrow box, or fixed to the ceiling with brackets. At the junction of the cable and the frame, a small incision is made in the latter.
Step 4 The plastic profile sets the height of the lower level of the future ceiling. Be sure to check the reliability of fastening. The best option is a point load of 15 kilograms. Such a margin of safety will be sufficient even taking into account the possible flooding from the neighbors (if we are talking about an apartment).

Step 5 In places where the plastic comes into contact with the wall, the corners of the profile are crimped. It is more convenient to do this with a grinder with an emery sheet or a regular file. It is necessary to create a smooth bevel to the wall so that the point of contact is smooth, without a rough transition. A metal profile with a harpoon is attached at the point of contact, since tension material will also be attached along this line.
After fixing the plastic, you can begin to install metal profiles. They are mounted around the perimeter of the wall at a previously set level (using a laser). In this case, a special profile is used specifically for a stretch ceiling. Its key difference is the presence of an elastic pressure insert inside (called a harpoon). It is she who will hold the ends of the canvas stretched over the frame. This profile is attached to the wall. Dowels are used as fasteners.
The same metal profile is attached to the plastic one (on the outside, where there are no bars). Self-tapping screws are used as fasteners. Next, you need to cover all noticeable caps of fasteners with light masking tape. Otherwise, they will be noticeable if a glossy light base is used - in bright light it is translucent.
The most difficult thing in the installation of profiles is to maintain a given level, therefore, after each stage, it is necessary to check the maintenance of straight lines. If an error is found early, it can be easily corrected. But when everything is already covered with a canvas, then even minor flaws will be evident. To fix them in this case, you will need to dismantle the frame.
Stretch ceiling materials
There are 2 main types of materials for stretch ceilings:
- PVC film (polyvinyl chloride);
- the cloth.
Which among them is better? You can list the benefits of each.
Table. Comparison of the advantages of fabric and film ceilings.
But fabric material for stretch ceilings is much more expensive. It is allowed to use several materials at once. For example, the first level will be made of glossy PVC film to visually increase the space, the second will be made of fabric with a satin texture. This is the optimal combination that designers often use.

Be that as it may, the final choice is up to the consumer. It is recommended to visit specialized stores and independently evaluate the attractiveness of each of the materials by examining their texture. You can even order a photographic film on the ceiling according to your own drawing. Everything is limited only by the flight of fancy and the size of the wallet, nothing more.
Is it possible to combine stretch fabric and suspended drywall in two-level ceilings? This option is possible, but it makes no sense. An exception is forced zoning of space. This is done when, for example, it is necessary to divide one large room into a sleeping and guest area. An aluminum frame made of C-profiles must be mounted under a rigid base.
Stretching the canvas
The selected canvas is stretched in the following order:
- first the lower level (the one closer to the floor);
- then the upper level (the one closer to the main ceiling).
Below is the algorithm of the required actions.
Step 1. It is imperative that when the canvas is straightened, it is blown with a gas heat gun (if a PVC film is mounted). This is done to smooth and eliminate wrinkles, to prevent accidental tears.
Prices for fabric stretch ceiling
fabric stretch ceiling

Step 2 Then the canvas is straightened and hung at a height of at least 1.5-2 meters with special clothespins with rubber "sponges" - after them there is no trace left. From below, the canvas is re-blown with a gas gun to straighten all the folds. As a result, the material looks like it was ironed. The temperature in the room will rise up to 30°C, but the windows cannot be opened.

Step 3 Next, you can start stretching the canvas. They start from the side of the plastic profile, from the corner (it is called the "base"). As practice shows, it is most convenient to use plastic spatulas. They simply “put on” the edge of the canvas on them and push it into the harpoon. There, the canvas is securely fastened with an insert, and it will not work to pull it out without the same spatula. This is done in every corner, after which the material is re-treated with a heat gun. This time the canvas should be completely straightened and smooth.

Step 4 After the film has cooled, fasteners are carried out around the entire perimeter of the level. There is no need to rush here. Be sure to monitor the uniform distribution of tension so that screeds do not form. The place where the canvas is attached to the plastic profile is sealed with reinforced tape. A new profile for the upper level of the stretch ceiling will be attached there. It is mounted with the same self-tapping screws (you can use self-tapping flea screws with recessed hats). Next, you can start straightening the second canvas.

The execution technique is similar and includes:
- straightening;
- hanging;
- heating with a heat gun;
- fastening in the corners;
- reheating;
- final fastening on harpoons.
It remains only to close all the seams with decorative rubber inserts (harness). It is manually pushed into the profile with a thin side without glue. If necessary, it can be quickly removed to pull off part of the canvas. This will be needed to access wiring, communications, closed by a stretch ceiling.

Installation of lighting and fixtures
How to determine in which place it is necessary to make a hole in a stretched canvas? It is easily pressed by hand, thereby finding pre-attached bars or plastic rings. It is impossible to cut through the canvas - it must be burned through. You can simply heat a piece of rounded reinforcement under a hot air gun and make a hole of the required diameter with the end (but not more than 2-3 centimeters). The main thing is that the ends must be melted so that the canvas does not tear. Cutting is allowed only if a special thermal ring made of thin plastic is used, which is glued in the center of the future hole. Then, along the inner contour of the ring, the material is carefully cut out.


Next, all the fixtures are fixed (with a suspension, if necessary), the fasteners are closed with decorative inserts (complete with lighting fixtures). If necessary, power supplies, automatic devices (for LED lighting or some energy-saving lamps) are attached to the draft ceiling. When performing these works, it is necessary to de-energize the room.
What other lighting options are combined with stretch ceilings? Hidden LED strips look attractive - they are hidden behind the ceiling cornice. You can even use LED-lighting with a changeable color of lighting. Optionally, you can put a remote control unit - manufacturers offer any variations. The choice depends only on the preferences of the owner of the house.
Prices for LED strips

If a glossy PVC film was used as a stretch fabric, then along the perimeter of the room, lamps directed to the ceiling can be attached to the wall. You get the effect of a mirror, which visually doubles the free space. Actual for small cramped rooms.
After the installation of lighting devices is completed, the arrangement of a two-level stretch ceiling can be considered completed. The control is performed by a laser level. There are no rules for the care of the canvas. If necessary, wipe it with a damp sponge (applies to PVC film). The service life of such a ceiling reaches 20 years. Most manufacturers of tension materials give a guarantee of 5-12 years. Be that as it may, with repeated cosmetic repairs, it is not necessary to change the frame. It is enough to remove the old tension material and replace it with a new one. Simplicity, attractiveness and cheapness are the main advantages of such ceilings!

And at the end - a few more examples of bunk stretch ceilings
Video - Installation of a two-level stretch ceiling with lighting
Two-level stretch ceilings only at first glance seem to be complex structures. In fact, their installation does not require encyclopedic knowledge and incredible skills.
Everything is done by hand. To do this, it is enough to have a clear idea of \u200b\u200bthe desired type of bunk ceiling and read the step-by-step instructions for its installation.
The stretch ceiling is two-level because it is called that because it consists of two planes located one above the other. Wherein the shape of these surfaces can be different, and have both strict geometric outlines and intricate figured ones. Having decided to mount a multi-level stretch ceiling, you must first select its "pattern". At the same stage, it is necessary to determine the location of the lighting fixtures.
Each tier of the ceiling consists of two elements:
- frame;
- stretched fabric (PVC or fabric).
The frame can be made using the following materials:
- wooden bars;
- metal profile strips, which are used in the installation of plasterboard structures;
- plastic profile.
Necessary provide electrical wiring to which lighting fixtures will be connected. Two-level stretch ceilings with lighting can have a different "pattern" of the location of the lamps. It is also possible to have a device "floating" ceiling, which is mounted using LED strips.
Advantages and disadvantages of two-level stretch ceilings
Multi-level stretch ceilings are so beautiful and stylish designs that it is difficult to find the “cons” of their design and operation. But they still exist. The most significant disadvantage is significant amount space occupied by these structures. Typical apartments in modern high-rise buildings are small-sized, with an average wall height of 240-260 cm.
Attention! Installation of a two-level stretch ceiling provides for lowering the upper floor by at least 15 cm.
This cannot but affect the amount of free space in the room. But this inconvenience can be neglected, since the many advantages of bunk structures cover all their shortcomings. Among the advantages:
- variety of visual effects;
- the possibility of creating a unique design;
- no need to level the top floor.
Lighting options for a two-level ceiling
Spotlights
A two-level stretch ceiling with lighting can be done in many ways. Any combination of lighting fixtures will do. Indispensable attribute - spot lighting. They can be placed at an equal distance from each other around the perimeter of the room or they can be used to highlight one or more zones. Any, the most daring decisions are possible.

Spotlights are installed in the following way:
- lifting the stretched canvas, they find the previously installed mortgage with wires;
- glue a thermal ring in this place;
- make cuts inside it with a knife and cut out the film inside the ring;
- lead the wires out;
- connect the lamp;
- fix it in the canvas, closing the connection points with a decorative insert (included in the lighting device package).
Chandeliers

The classic version is installation of a chandelier in the middle of the ceiling, and along its perimeter - spotlights. This option is ideal for rooms whose function is to create maximum comfort and coziness. These are bedrooms, halls, living rooms.
Reference. Two-level stretch ceilings in the kitchen are most often made with spot and central lighting in different combinations.
In bathrooms, one of two types of lighting is predominantly used: either a single lamp in the center, or multiple light sources around the perimeter.
LED Strip Light
The most spectacular bunk stretch ceilings with built-in led strip providing low illumination from below. It gives a feeling of airiness, so these 2-level stretch ceilings are called "soaring".

The tape is built into the side ledges of the lower tier, and when turned on, it illuminates the tension fabric of the upper one. This type of lighting can be both primary and secondary. With it, you can implement the most daring design solutions based on the play of light and shadow.
Reference. With the help of LED strips, you can also make fully luminous 2-level stretch ceilings.
Spectacular option- creation of various patterns from curved ribbons. The system is placed above the lower tension canvas and when the lighting is turned on, all the beauties of the pattern are reflected on it.
In order to arrange a 2-level stretch ceiling in this way, you will need a tape or LED, or duralight. The second is more durable, since the distance between the bulbs is filled with polyvinyl chloride. But she has her drawback: a dimmer glow than the LED.
Two-level stretch ceiling with lighting around the perimeter - the simplest and most affordable solution for self-assembly. It will not require significant financial costs.
starry sky
Original and impressive backlit designs "starry sky". It consists of many fiber optic strands, at the end of which, when the system is connected to the mains, a spot dim light. "Starry sky" can also be made using separate LEDs, the effect will be similar, but differing in a lesser degree of light scattering.

Two-level stretch ceiling "Starry Sky" made of fiber optics is a whole system of devices that can be controlled remotely. To create the effect of twinkling stars and the movement of planets, there are special projectors(light generators). Inside these devices are light filters that rotate, thereby creating the effect of moving points of light.
Reference. In order to obtain luminous dots of different diameters, the ends of the fiber optic filaments are burned with a soldering iron.
Computerized systems are equipped with programs that allow you to change the picture of the night sky. Often such two-level stretch ceilings are mounted in the bedroom or nursery.
Design of stretch ceilings for rooms for various purposes
Do-it-yourself two-level stretch ceiling can be made in any room. With the help of stretch films, not only planar, but also volumetric elements in the form of curved and rectilinear figures. The design is chosen in accordance with the functional purpose of the room.
The most striking and structurally complex make two-level stretch ceilings for the hall. In this room, any color combinations of films that are in harmony with the style of the interior are appropriate.

Made from drywall beautiful curves along walls or shapes located over the entire area of the upper floor. Two-level stretch ceilings in the living room can be made from matte or glossy canvases, as well as from their combination in different versions.
Requires a different approach bedroom decoration. In these rooms, a calm, peaceful atmosphere is needed. Bright, "flashy" tones are out of place here. A two-level stretch ceiling in the bedroom should have a simple design and have a calm, diffused backlight. Great choice - "soaring" or "starry sky".
Two-level stretch ceiling in the kitchen most often done glossy in pastel colors. With the help of spotlights, the dining area is emphasized, the cooking area is illuminated more brightly. If the room is large, zoning is performed using drywall structures.
A multi-level stretch ceiling in the kitchen of a small apartment should not hide the volume of the room. Therefore, the lower tier is best placed along the walls. How to make a two-level stretch ceiling with your own hands, prompt instructions for the selection and calculation of materials, the installation of supporting structures and the tension of the canvases.
Choice of mounting system
There are three ways to fix the stretch fabric to baguettes:
- harpoon;
- clip-on;
- glazing bead.
The most commonly used and most convenient for self-assembly - harpoon. It has such a name for the reason that stretch fabrics edged with a special plastic insert- harpoon. It is he who is brought into the slot of the baguette. This system has good ceiling maintainability. The harpoon can be removed from the baguette and eliminate the defects of the canvas and re-stretch it.
Attention! The harpoon fixing method is suitable for any films.
Designed specifically for fabrics clip system. For its device, baguettes with special latches - clips are required. Installation is simple:
- with the help of a spatula blade, the clip is bent and the edge of the web is inserted into the opened gap;
- remove the spatula and snap the clip.
At the final stage of installation excess film is cut off with a knife. For this reason, multi-level fabric stretch ceilings cannot be retensioned: this fabric is not as elastic as PVC.

The most rarely used method of fixing stretch ceilings is glazing bead. It is uncomplicated, but unreliable. Consists of the following:
- fix a U-shaped profile to a wall or plasterboard structure;
- the edge of the canvas is brought into the gap between the shelves of the profile;
- a glazing bead is inserted between the shelves of the profile, which fixes the edge of the canvas.
How to make a multi-level stretch ceiling is decided at this stage. Since the choice of components directly depends on the mounting system.
Selection and calculation of materials for the installation of a two-level stretch ceiling
For self-assembly of a suspended two-tier structure, you will need to calculate the number of components required for its device and determine the dimensions of the stretch fabrics. The construction of a multi-level stretch ceiling begins with the specification of the dimensions of each structural element.
Their device will require:
- baguette made of plastic or aluminum (can be reinforced, wall, ceiling, perforated, for floating ceilings, dividing, for curved sections);
- tread rings for lamps;
- contours for pipes;
- suspensions;
- corner brackets;
- decorative inserts t- and g-shaped.

Tools that will be required during the installation process:
- spatula with a rounded blade;
- heat gun (for small rooms, you can use a powerful building hair dryer);
- screwdriver;
- bubble level;
- roulette.
Reference. At the design stage, it is necessary to make a drawing of the future structure, as multi-level stretch ceilings are built according to the given dimensions.
The following parameters should be displayed:
- room dimensions;
- number and location of levels;
- figured elements are drawn with indication of sizes;
- height transitions are indicated;
- the locations for the fixtures have been determined.
Choice of accessories
First of all, they determine what material the guide profiles will be made of (they are also baguettes). There are two options: aluminum and plastic. The former are stronger, the latter are cheaper. But both species will perform their task flawlessly. Choose according to functionality:
- wall (guides) - for fixing to vertical planes;
- ceiling - for fastening to horizontal planes;
- perforated - for fixing to curvilinear figures;
- glazing bead (wedge) - for installation by glazing bead method;
- dividing - for the design of corners and openings;
- clip - for clip systems.
Multi-level structures of stretch ceilings provide elevation transitions from one level to another. This can be done in many ways.
- If a film (fabric) of the same color is used in the ceiling device, the height transitions are “beaten off” using the fastening of a special profile, which is called “flip”.
- On ceilings with canvases of different colors, level transitions are made using the most suitable profiles in this case: KP-400, PP-75, etc.
- For the installation of floating ceilings and the installation of LED years, the PL-75 profile is used.

Installation of multi-level stretch ceilings is carried out not only with the use of baguettes. They need fixing, which is performed by fasteners: galvanized self-tapping screws. In order to calculate the required number of them, take into account the step between the attachment points:
- for aluminum profiles - 150-400 mm;
- for plastic - no more than 100 mm.
Reference. The number, type and length of the profiles are calculated in accordance with the drawing.
Regarding the size of the canvases, it is difficult to give recommendations, since these materials differ in varying degrees of elasticity. The exact dimensions of the canvases required for installation will be indicated at the point of sale when purchasing them.
Installation of a two-level stretch ceiling
Step 1. Preparatory.
At this stage of work, reinforcing the base ceiling, opening all poorly held places of plaster and sealing cracks with putty. Remove finish coat.
Step 2 Installation of multi-level stretch ceilings begins with wall markings for the lower and upper tiers. To complete the task, you will need a level or laser level. Lines should be drawn along all walls of the room at a distance equal to the transition in height between the tiers of the structure.
Step 3 Installation of mortgages for fixtures and chandeliers.
In places corresponding to the drawing, attaching wooden planks such a thickness that it corresponds to the indentation of the level from the base surface of the upper floor.
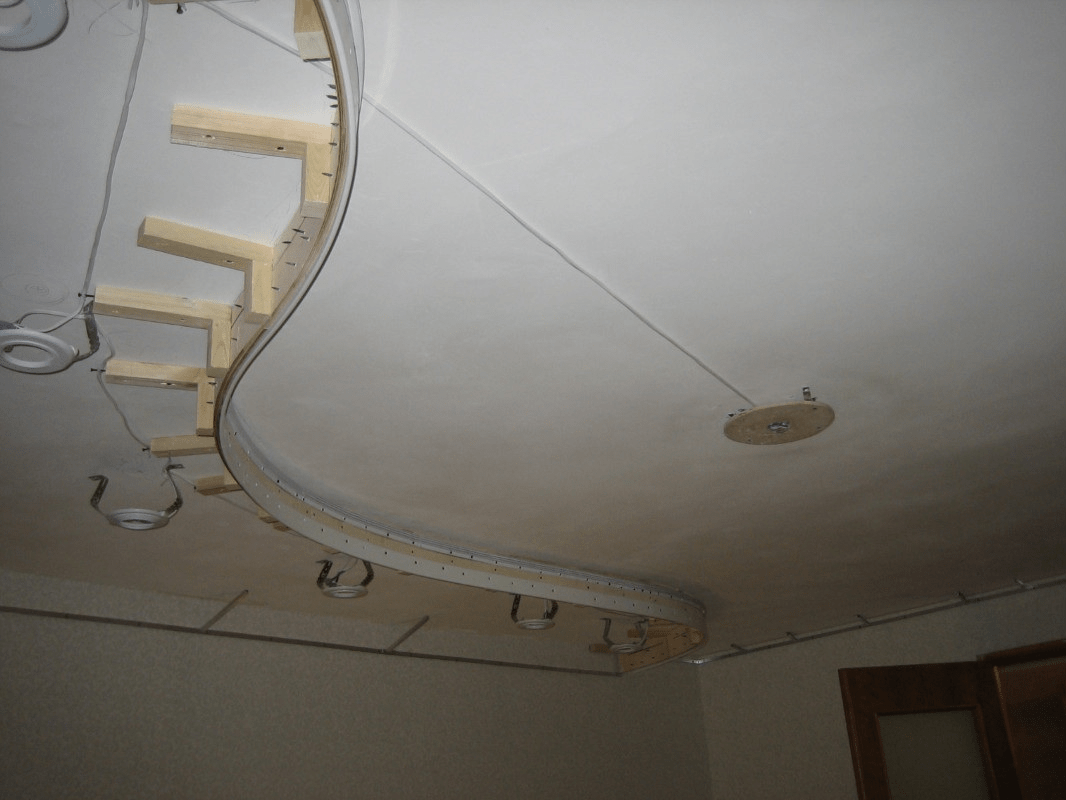
Step 4 Mounting curly elements of the lower level.
Installation of two-level stretch ceilings with curly elements is carried out using wooden bars and flexible plastic profile. The ends of the bars are brought "into the plane" using a laser level or by pulling the threads between the markings on the walls.
- The desired pattern is drawn on the base ceiling.
- Along its lines, at a distance of 10-15 cm from each other, wooden bars are attached to the ceiling with a height corresponding to the height of the tier.
- A profile is attached to the bars, having previously filed it in those places where the sharpest bends are.
Step 5 Installation of the upper frame.
To accomplish this task, use aluminum profiles, which are attached to the walls in accordance with the markings. Fasteners - plastic dowels with self-tapping screws.
Step 6 Fabric tension.
Two-level stretch ceilings in a hall or other room are mounted using heat gun. First of all, the lower tier is pulled, then the upper one.
- Close all windows and doors, take measures to eliminate drafts.
- Turn on the heat gun, and slightly heating the canvas, gently straighten it on the floor.
- Hang the film by the edges to the frame using plastic clothespins or other devices (for example, automobile "crabs").
- The room is heated to a temperature of +30°C.
- Alternately moving from one wall to another, they tuck the edges of the canvas into a baguette.
- Similarly, stretch the film on the second level of the ceiling.
- Close the joints with decorative stakes.

Step 7 Installation of lighting devices.
Two-level stretch ceilings with lighting in the hall or other room, mounted in the same way. They feel for wooden mortgages, stick a thermal ring, cut a hole and connect the lamp to the wires.
Double stretch ceiling can be mounted with LED lighting. The tape is inserted into a pre-fixed plastic profile before stretching the sheets.
Caring for two-level stretch ceilings
The most careful maintenance requires a white two-level stretch ceiling. On it more than on others, dust and dirt are visible. To remove them, use a damp rag, soft sponges and any detergent. It is most convenient to clean ceilings with a mop with a soft, water-absorbing cloth. In a similar way, it is performed with fabric surfaces.
Useful video
Below we will see a short video with a detailed installation process of a two-level stretch ceiling:
How multi-level stretch ceilings are made, it became clear from the step-by-step instructions. Now it will be easy to independently calculate and select the materials necessary for their device. Do-it-yourself installation of a stretch ceiling will also not cause difficulties.
The original way of interior design in the apartment will be a two-level ceiling with the arrangement of a suspended or tension structure. This option is perfect for the living room and bedroom. Decorative design can be complemented by a unique lighting system, so that the appearance of the room will become exquisite.
Design features and advantages
By choosing a two-level design for arranging the ceiling in your room, be prepared to incur additional financial costs.

Therefore, decide in advance which installation method and ceiling design will be preferable for you:

The upper level can serve as a previously equipped ceiling plane. Drywall will be attached only to the hotel areas, which allows you to visually zone the room. You can also mount boxes around the perimeter, but the main condition will be a flat and smooth surface of the upper level.

Drywall is placed on one tier, and on the second - a tension system. This can be realized if the surface finish is excessively expensive.

The choice of installation option remains with the owner of the apartment. It is necessary to take into account the state of repair, the layout of the premises, and your own financial capabilities.


Among the advantages of two-level technologies are:
- concealment of rough finish defects;
- the ability to cover communications;
- zoning of the premises;
- visual control of the space in the room;
- creating an original design using various lighting methods.

Ceiling construction with plasterboard box
A fairly common way to decorate the interior of rooms is the arrangement of a plasterboard ceiling.

You can solve this problem yourself, although you will have to work hard, following our instructions.


Surface preparation and marking
At the very beginning, you need to free the room from furniture and other things. The floor should be covered with foil. The surface to be treated is cleaned of the old coating.

If necessary, gaps and cracks should be repaired, primed and plastered. Finishing will be superfluous if you plan to cover the entire ceiling with drywall.

After that, you can start marking. Pre-measure the height of the corners and identify the lowest of them. To ensure a smooth horizontal structure, you should focus on this particular angle.

As a markup, you can draw a straight line on the wall used for mounting profiles. Marking with dots will help you navigate the straight suspension.

If the length of the opposite sides is different, then it is necessary to align horizontally and then make the necessary markings. It is determined by the project you have chosen.


Installation of the frame of the first tier
UD guide profiles are fastened at intervals of 600 mm around the perimeter. For the ceiling, a step of 400 mm is required.

If rounded solutions are assumed, then in such areas on the surface of the profile it is necessary to make notches with an interval of 25 mm, successively making bends taking into account the desired radius.

Suspensions of a direct type are mounted on pre-planned points on the ceiling. A step of 600 mm must be observed. After that, the ends should be bent and carefully cut.


Ceiling-type CD-profiles are mounted on these suspensions. Where a second level of construction is planned, it is advisable to install "crabs" in advance.

At this stage, you can take care of heat and sound insulation. To do this, a heater is laid in the interprofile recesses and fixed with the “tails” of the suspensions.

Then the frame of the first level is sewn up with drywall. In places where the modules are cut, it is advisable to remove a part of the material with a knife, forming a chamfer. This is necessary for greater strength of the seams.

Installation of the second tier
In the process of arranging ceilings with your own hands, you must carefully consider the installation of profiles for the second level. A contour for the UD profile is drawn on the wall.

The drawing according to the project must be applied to the surface. The presence of such markup makes it possible to visually evaluate the future design. According to the markup, a frame from the profile is attached. If necessary, the desired places are rounded off.


To lower the frame under the tier, you must:
- cut the CD profile to the length required to lower the frame;
- cut tongues (side parts) on one side of the cuts, which facilitates installation;
- insert the cuts with a flat side into the UD profile fixed to the ceiling;
- using the “flea” design, fix the cuts in increments of 500-600 mm;
- if it is necessary to fix the curved pieces of the CD-profile, then the step should be reduced to 200-300 mm;
- put a UD-profile on the installed cuts, followed by a strong fastening.

After the sidewall is ready, you need to cut off part of the CD profile. The length should be taken equal to the gap between the sidewall and the profile on the wall. Then they are firmly fixed on both sides. The frame will be completely ready.

Drywall fixing
To fix drywall sheets on the constructed frame, you must use the run-up. The first row starts with a full size sheet, which is mounted on profiles.

The second row also begins with a solid canvas, but from the opposite edge. The mounting technology can be seen in the photo of two-level ceilings.

To make figured parts, you must first design a template from cardboard. And then on it and cut the blanks. If the sidewalls are bent vertically, then it is necessary to mold by rolling with a spiked roller.


Then the surface is sprayed with water, and when the gypsum craton is saturated (after about an hour), an incision is made on the convex plane of the bend. The workpiece is placed on the edge, the desired bend is formed, fixed by the load and left to dry.

If you are creating illuminated ceilings, then you need to check all wiring and communications.

Drywall fastening is carried out with self-tapping screws with a pitch of 150-200 mm. To improve the quality of the future finish, the caps of the self-tapping screws must be deepened.

If at the same time the canvas is pressed through, then the mount is redone, moving away from the previous place by 40-50 mm. From the opposite edge, another sheet is fastened.


Remember, first you need to fix the upper level, then go to the side parts, and at the end - the decor of the lower part.

After that, you can start finishing. First, the surface must be primed. After drying at the joints, a sickle tape should be glued, the seams and the places where the self-tapping screws are deepened are puttied.

It is advisable to fix the outer corners with corners. It is desirable to use a metal corner for even contours, but curved surfaces must be fixed with plastic ones. Corners can also be fixed by pressing into a layer of previously applied plaster.

Sheets of fiberglass are attached to the PVA glue, and a finishing putty with a layer of 15 mm is laid on top. The surface is then sanded and primed. In conclusion, it is necessary to carry out the finishing and fix the lighting devices.

Features of the arrangement of the tension structure
Two-level stretch ceilings also look great in the living room or bedroom. In this case, the perimeter of the room will be sheathed with gypsum craton, and there will be a stretch fabric in its center.

The installation process is as follows:
- Marking and installation of drywall boxes around the perimeter.
- At a given height, a profile is attached, which will be the basis for fixing the canvas.
- Heating the room and heating the canvas with a heat gun.
- Web tension between profiles. First, diagonally opposite corners are attached. Then the other two in turn.
- Along the perimeter, the canvas is stretched in turn along opposite edges - first one side, and then the second, lying opposite. Then the third and fourth.
- Installation of lighting points and decorative elements.

Two-level ceiling structures are a fairly popular way to give the interior of rooms an original and attractive look.

However, the installation process is quite laborious. First you need to carefully work out the project, prepare the base, fix the frame, and only then proceed with the installation of the main sheet or drywall sheets.

Photo of two-level ceilings


