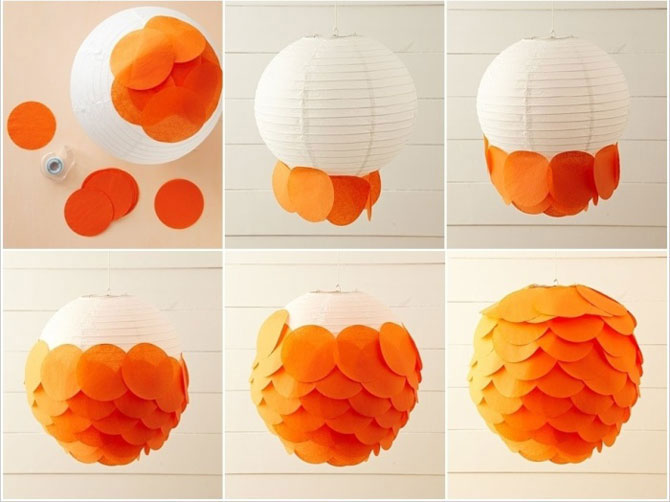
Homemade ceiling lights. Beautiful do-it-yourself chandelier shades: a step-by-step master class (photo). From paper tapes
Lamp - the item is extremely practical, because, unlike a bulky chandelier, it is very compact and can be placed anywhere, even on the floor. In the process of creating an interior, it is quite often forgotten about, since it plays a secondary role. However, in the setting of a small apartment or room, it will be almost indispensable, and will also help add comfort and warmth to the room. In modern lighting equipment stores you can find a lamp for every taste, but isn't it more interesting to create it yourself? In this article, we will tell you how to make a beautiful and unusual lamp using completely ordinary materials that are in every home.
1. Lamp-garland
To create such a lamp, you will need a wire base, fishing line, paper or plastic bottles, as well as patience, patience and more patience.
From the wire you need to create a frame of the required shape, and cut out circles or figures from paper or bottles. Then you either simply attach them to the wire itself with glue, or string them onto a fishing line. The thinner the fishing line, the weightless your design will turn out, so from a distance it will seem that your butterflies are "fluttering" on their own.

2. Bead lamp
To create such a product, you will need wire, as well as, if desired, fabric. In a simpler version, you simply string multi-colored beads on a wire and bend it in a chaotic manner. Then a regular light bulb is fixed in the center.

If the soul desires something softer, with an oriental flavor, you can create unusual fabric shades decorated with beads. To do this, you will need old CDs, to which you will attach both fabric and beads strung all on the same wire. - an irreplaceable element, stock it up in abundance!

The fabric should be translucent: organza or tulle will do. It is sewn from one edge and fixed only from above. Then you can string a wire with beads on it. Please note that it is better to choose transparent or "chameleon" beads, otherwise they will look too gloomy when the light bulb is lit. Instead of a light bulb, you can place a flickering New Year's garland inside the lamp: this way you will create a festive atmosphere in the room.
3. Light cloud
Incredibly cute and gentle option that will suit both children and adults. It may seem that it is quite difficult to perform, but it is not at all the case.

To create it, you only need a paper "Japanese" lantern, cotton wool and a lot of glue. Cotton wool in large quantities is glued to the flashlight to make a lush lump. Additionally, it can be decorated with pendants in the form of stars, a crescent or raindrops. That, in fact, is all.

It is better if the cloud stays on a thin line, - in this way you will create the effect of weightlessness in the room. This is a great idea for a themed party, so stock up on some cotton and go!
4.Light lock
A similar solution is suitable for those who, as a child, liked to cut pictures from magazines. A surprisingly simple lamp that will create a mysterious, almost mystical atmosphere in the room.

You will need to find a photograph (or print a picture) of an old castle, carefully cut it out and roll it into a kind of tube. Then fix the structure with tape, and put a small light bulb inside. On dark evenings, your castle will be illuminated from the inside, and mysterious shadows will flicker against its background ... well, how can you not tell a scary tale? Also in the castle, you can cut out "windows" through which light will pour out.


5. Lamp from old things
Old dishes, fragments of furniture and even old, shabby lamps are in every home. It's good that you didn't throw them away, because now they will function again, you just need to decide on the style. In some cases, you don't even have to decorate anything, you just need to put the lamp (or what is left of it) in a suitable environment.


Most often, the case is limited to a drill or glue with a dead grip. Such lamps can be placed in any part of the apartment, the main thing is to observe the overall compatibility.

And a few last tips:
1. Use only energy-saving light bulbs in lamps! You don't want to see flames in the place where your beautiful creation was just now?
2. Make sure that the material you choose does not hide the light - after all, first of all, the lamp should illuminate and only then decorate the room.
3. Do not be afraid to experiment, you will succeed! Who knows, suddenly a designer-decorator is dozing in you? It's time to wake him up!
Photo: homedit.com, millax.com, museum-design.ru, idejnik.ru, reduktor-union.ru, happy-giraffe.ru, magdekor.ru, secondstreet.ru, decorateme.com
The cosiness and comfort in the room depends on the lighting. You can make your home atmosphere full of warmth by making a lamp with your own hands. Ideas that will help you make an exclusive and fashionable lampshade with your own hands and at minimal cost can be gleaned from this article.
Pendant lamp in the interior
Training
What you need to know before making a lamp:
- It is recommended to use LED or energy-saving light bulbs, creating your own designer lamp. Standard incandescent bulbs get too hot and can damage its structure.
- If the finished lamp is disassembled, you need to be extremely careful with the wires, and after finishing, make sure that they are intact.
- There are bulbs of several color temperatures. When creating a pendant lamp for the home, it is worth opting for a “warm” shade.
A clear example for distinguishing color temperature: the larger the number on the box, the higher its temperature, and the colder the shade of light it has.

Light bulb color temperatures
Frame selection
Before you make a lamp, you need to prepare the base. Most often, it is a pair of rings to which a backing of cardboard or plastic is attached to give shape.
The following ideas will help resolve the issue of finding the basis of the future lampshade:
- You can make this type of frame yourself, with only wire and pliers on hand.
- Frames are sold in hardware stores or in needlework shops.
- Often in the flea market there are old lamps, where you can get the frame.
- Instead of a frame structure, the lamp holder can hold the neck of a 5 liter plastic bottle. Therefore, there is a solution in the figure below.

DIY lampshade
Lighting Ideas
There is nothing complicated in decorating a pendant or table lamp with your own hand. But it is better to draw a sketch on paper before starting work. The process will be simple and fast, and changes can be made along the way.
"Live" lamp
This designer lampshade is called "Photosynthesis". It was designed and implemented by an author from Tel Aviv. The frame here is represented by a metal mesh, at the base of which a houseplant is placed. As it grows, the flower fills the entire interior space of the lamp and makes the design of the room look summery and fresh. It is not necessary to use a special light bulb here, a regular LED light is suitable for plants. Making such a pendant lamp is not too troublesome. You can add variety to its decor, given what accessories and tools will be available.

Suspended "live" lamp
When making such a lamp with your own hands, you can not use an overly heavy pot with a plant. Particular attention should be paid to the insulation of the wiring and run it along the supporting wire.
Making a lamp with your own hands from fabric is a great solution, because a large selection of colors and textures allows you to realize many creative ideas and create decorative lampshades for a room with any interior. First of all, you need to prepare the necessary materials:
- the cloth;
- adhesive tape or self-adhesive film;
- ruler or centimeter;
- scissors;
- simple pencil;
- metal rings for the frame;
- binders;
- tassel;
- glue;
- strip of paper.
Sequencing:
- Before you make a lamp, you need to determine its shape. For a fabric product, a cylindrical base is ideal.
When deciding on the height and width, you should take care that the base is not too close to the light bulb.
- It is necessary to cut a rectangle from the adhesive film and a flap of fabric, the edges of which are 5 cm larger. Attach the fabric to the table with the film, face down.
- Find the most beautiful pattern on the fabric that should be on the lamp and use a ruler to draw corners and a dotted line.
- Align the fabric and stick a film on it.
- Using paper clips-binders, fix the lampshade on the surface of the frame from below and above.
- With a pencil, mark the edges and the side that will be on top. Glue the parts of the lampshade to each other, let them dry.
- Turn the structure over, apply glue to the edge and insert a wire ring. Fasten with binders, let dry. Repeat the procedure on the other end.
- Glue a strip of paper from the edges. After it dries, glue the fabric strip on top. Do the same on the seam on the side of the lamp.
DIY fabric lampshade
If you make small triangular cuts in the paper while gluing it, it will bend better.
There are other ideas on how to make a lamp with your own hands. Using various materials and accessories, you can create no less impressive decorative lampshades from threads, paper and other improvised means.
photo collage
To make such a designer lampshade-photo frame, you will need:
- frame, as in the previous example, or a finished purchased lamp with a clean white lampshade;
- several sheets of tracing paper;
- scissors;
- PVA glue;
- simple pencil;
- printer (recommended to use an inkjet).
Having chosen the most beloved and beautiful photos, you need to make a collage with the help of photo editors. You can collage images by cutting them out of paper. This method leaves a lot of space for a creative idea: any decor can be applied to the lamp, not just a photo: a drawing of a child, a motivating aphorism or a map of a favorite area.

DIY table lamp photo collage
Before you make a lamp out of photographs, you should make sure that the paint dries. It is strictly not necessary to bend paper sheets of tracing paper, because the place of bending will always be evident.
Rope Sun
Creating such a pendant designer lamp is much easier than it seems. Required tools:
- threads;
- glue (for wallpaper or PVA);
- petrolatum;
- balloon.
Initially, the already inflated balloon is lubricated with petroleum jelly. This is necessary so that threads do not stick to it. The threads are dipped in glue and wrapped around the ball. After the product dries, it is blown off and removed. Rope sun crafting completed.
What needs to be done to make the decor of the lamp as successful as possible: firstly, you should first “get your hands on it” and make a couple of small lamps for testing. Secondly, before winding the threads on the ball, you need to mark the place where there should be no threads. Through this hole, the ball will be removed, and the light bulb will be inserted.
Making a lamp
To carry out the decor of the lamp is half the battle. The main thing is a quality work done without sad consequences. Therefore, the following factors must be taken into account:
- If a luminaire hanging from the ceiling is connected, the junction of the wires and the product itself must be covered with a protective cap.
- If during operation, the light bulb becomes very hot, the designer lampshade surrounding it should not be too close. That's why you should use low incandescent bulbs.
- If the product is heavy, it is strictly forbidden to hang it on wires. For this, special rods, cables or brackets are specially provided for mounting on walls or ceilings.
- To illuminate a room with high humidity: a bathroom, a sauna or a bath, it is better not to implement your own ideas for making a lamp with your own hands, but to buy and install a special product that contains moisture protection.
- During the installation of the lamp, the wiring must be insulated to exclude the possibility of injury to the master and his relatives.
With my own hands. Video
How to create a LED lamp with your own hands from improvised materials, this video will tell.
Decor made of paper, photographs, threads, fabrics and any other means has its own advantages over finished products bought in a store. With a minimum of costs and time, decorative lamps not only decorate the home, but also emphasize the originality of its owner. DIY modeling of lighting fixtures is an opportunity to realize your creativity, decorate the interior and bring relatives together for joint work.
The chandelier in the room is not only a lighting fixture. Without exaggeration, we can say that she is the main decoration of the room. Handmade items are considered especially valuable. This allows you to highlight the special taste of the owners of the home, as well as an outstanding and creative mind. Of course, this type of work is quite complex and requires increased concentration. But at the same time, when creating decorations for your home, you can find many interesting and extraordinary solutions in it!
This article presents some ideas for decorating a chandelier with your own hands, as well as instructions for them. Everything is written so simply and clearly that anyone can do what they have planned at home.
In order to make a chandelier, sometimes the most unusual materials are used. For example, everyone is already familiar with glass or wood, plastic, and so on. But sometimes, when you want something completely “unusual”, wooden skewers, and glass wine bottles, and cans, and all kinds of tree branches, and cardboard, and even straw come into play. You need to choose depending on the idea of \u200b\u200bthe creator and on the wishes of the owners of the apartment. It is also necessary to take into account the general interior of the room where the finished product is supposed to be placed.

An interesting idea for a chandelier made of plastic spoons
Plastic disposable spoons are one of the simplest and most readily available materials for creating a chandelier for a room. Their advantages are low price, a variety of colors and such material will last for quite a long time. To create such an extraordinary chandelier, you will need a minimum of investments, both physical and material.
Materials:
- empty bottle of drinking water, 5 liters;
- plastic spoons (their number depends on the size of the bottle);
- glue for plastic;
- an old chandelier (or rather, a cartridge from it);
- sharpened knife.
Process of creation:
- First you need to prepare a plastic bottle for the next step. Remove the label in advance, cut off the bottom, dry well.
- Then you need to get the plastic spoons out of the package and carefully cut off unnecessary handles with a knife, leaving about 2-3 centimeters above the level of the "scoop".
- You need to glue the “scoops” blanks to the base of the bottle. Apply a large amount of glue to the left "tail" and press it to the surface (with the convex side of the spoon out). It is necessary to cover the entire bottle in a circle until the entire perimeter is occupied by plastic "spoons". It is advisable to arrange them in a checkerboard pattern and slightly move them together. This will leave fewer "free spots".
- You need to remove the cartridge from the old unnecessary chandelier, and then place it in an already glued and dried bottle and fix it on the frame.
- A decorative bowl can also be made from plastic spoons: stick "scoops" around the neck of the eggplant.
- Install and connect the chandelier, check its operation.

Note! The option of decorative painting or painting of spoons in absolutely any color is possible. Thus, your product will look even more beautiful and more original!


Chandelier made of plastic bottles in the form of leaves
Another unusual option in the interior will be a chandelier made in the form of leaves. It is created from simple plastic bottles, the variety of colors of which allows you to work in the most unusual colors and embody the most daring ideas.
Process of creation:
- Cut plastic bottles into blanks shaped like future leaves.
- Each blank has to finally fix the shape of the sheet.
- With a soldering iron with a thick tip and a one-sided bevel, you need to slightly fuse the sections of each leaf in order to give the future product the greatest effect.
- In the same way, thanks to the soldering iron, you need to give the blanks a sheet structure. You need to act very carefully and accurately, because you can easily make a hole in the plastic. Such a leaf with outlined contours of veins and slightly fused edges will look complete.
- With a hot needle at the "leg" of each leaf, you need to melt several holes in order to attach them.
- Thanks to a thin wire, form branches and screw them to a steel wire frame.

It would also be a great idea to make a new chandelier in the form of a ceiling lamp for a floor lamp or a table lamp. Thus, it will be a great addition to the previous product!

Chandelier with paper butterflies
The most common version of the product is a chandelier with butterflies. And this is no accident. To begin with, this option looks luxurious and expensive, and secondly, its manufacture does not require special physical costs. Thus, even a child can participate in the creation of a chandelier.
Process of creation:
- The basis is either an old chandelier or a similar frame. If this is not available, then you can take the simplest wooden or metal rim. If there is no such material, then, as an option, you can take a thick wire and make about 2-3 skeins, so that a circle forms.
- Cut paper butterflies according to the pattern. You need to take a butterfly template and fit it to the desired size. The option also looks very unusual when butterflies of several sizes are located on the chandelier at once (again, depending on desire). Transfer the outlines to paper and carefully cut out, preferably with a sharpened clerical knife, or small non-rounded scissors. The material for the templates themselves is better to use dense, not very dirty and does not attract dust. For example, velvet paper is very bad for a product, because in the future you will need to vacuum the chandelier quite often.
- Take a thread from a nylon or a transparent fishing line and attach butterflies to it. You can attach it in two ways: either pierce the bodies of butterflies, or stick them on silicone glue.
- Next, we attach threads with butterflies to the base of the frame and decorate it.
- You can also try an interesting variation if you make a wire ball! It should be based on a suspension from a chandelier and place several butterfly patterns on it using a glue gun.


fabric chandelier
This chandelier is also based on the frame. As in the previous version, either old metal frames or dense wire are suitable for its manufacture.
After you have pre-prepared the base, proceed to cutting out the fabric from which the lampshade will be made in the future. How long the finished product will be depends on your desire, but it should be borne in mind that the width of the fabric must be the same as the diameter of the frame! Once you have finished the pattern, you need to try on.
Another nuance is that the top of the fabric will need to be sewn directly on the frame, which means that it (the frame) must be solid. Otherwise, if it is possible to thread it directly into the fabric, then you should first fold the upper edge of the pattern and stitch it, and then iron it. Then we sew a seam on the side of the product.
In order for the lampshade not to lose its shape, due attention should be paid to the material. If the fabric is too light, "airy", then the bottom of the product should be weighted. To do this, you can use cardboard or fishing line.
A neatly sewn fringe, lace or braid will also look beautiful. But do not "overload" the product! The process of making a fabric chandelier is similar to making a lace chandelier. So you can safely experiment with materials that are located on the frame.


Plafond of threads and a balloon
Materials:
- dense threads, such as woolen, cotton, or jute rope - at least 1 meter;
- cartridge;
- petrolatum;
- PVA glue;
- a brush to apply glue and petroleum jelly (it is desirable that the brush does not shed);
- 1 or 2 pieces of balloons (the first to work with it, and the second to check the finished product, if desired);
Process of creation:
- Inflate the balloon to a certain size, secure. Remember that the finished work will exactly repeat the shape of the ball! With a marker, draw a couple of circles at the top and bottom, in order to determine the boundaries of winding threads.
- Using a brush, smear the ball around the entire perimeter with petroleum jelly.
- Pour PVA into a plastic container and thoroughly process the threads with it (It is not advisable to apply glue to the entire length of the threads at once! Treat them as you wind them around the ball!).
- Given the borders that you applied with a marker, wind the threads around the ball. Do not forget that depending on the density with which you wind, the future appearance of the product depends.
- After winding, you need to leave the product for a day until it dries completely; After complete drying, you need to burst the ball and remove it through the holes.
- Cut a place at the top and insert the cartridge.
- In order to be completely sure that the product turned out to be strong, you can insert a ball into it and inflate it. Similarly, you can check the flexibility and reliability of the lampshade.
Alternatively, you can paint the structure with a spray can or acrylic paint, attach all kinds of decorative ornaments to it, such as butterflies, artificial flowers or beads. It's also a great idea to arrange a few balloons in the form of a bunch of grapes and fasten them together.


Wine bottle chandelier
This version of the chandelier is a little more complicated than the previous ones. Making a chandelier for this is quite difficult, the manufacturing process will require accuracy and care. However, you will love the result!
Materials:
- a bottle of wine;
- glass cutter;
- sandpaper for sanding edges;
- cartridge;
- electric wire;
- metal or wooden frame, rim.
Process of creation:
- First you need to prepare the bottle itself for further manipulations with it. The first step is to draw a straight line around the perimeter at the level you need. This is required in order to cut off the bottom of the bottle with a glass cutter;
- In order not to cut yourself on the glass, you need to grind the sharp edges with sandpaper;
- Pull the wire through the neck of the bottle and then connect the cartridge;
- Attach the bottle to the frame.
You can also decorate the bottle with all kinds of decorative items, or leave it in its original form. In any case, it will look original and spectacular.
The number of products on the frame depends on your desire. You can either leave one bottle, or fix four or more bottles at once.


Chandelier idea from laserdiscs
This idea is great for those who have a large number of laser discs left in the house, and the hand does not rise to throw them away. It is immediately worth noting that the manufacturing options and the result can be very different. It all depends on your imagination and creativity!
Materials:
- two round wooden planks of different thicknesses, and which are slightly larger in diameter than the disks;
- racks made of metal or wood;
- Fluorescent Lamp;
- magnetic switch;
- disks.
Process of creation:
- Make a hole in a board with a greater thickness and install a starter with a switch in it.
- Then connect it all to the lamp.
- String disks on the lamp.
- Install the racks around the discs and secure the top.
The finished product will delight its owners for a long time, and it does not require special care. It is not advisable to place this type of chandelier in the children's room so that the child cannot harm himself (only if the chandelier hangs out of reach).


Shabby chic chandelier
To create spectacular lighting in the room, you can also make a chandelier from fabric or beads. The result is a kind of chandelier or ceiling in the style of "shabby chic".
Materials:
- a finished metal or wooden frame (or it can be made from an old hoop, garden basket, thick wire);
- cartridge and lamp;
- chains and threads for decoration;
- all kinds of beads and beads.
Working on such a ceiling is not difficult, but it is a very painstaking task. Such chandeliers usually consist of two or three levels of rings, which are located one above the other. It all depends on the size of the selected bases. If you take rings of the same diameter, then the finished product will be made in the Art Nouveau style.
One of the important points is that before you start decorating the chandelier, you need to paint and wrap the frames with decorative materials!
The approximate consumption of beads is:
- For the lower part of the lampshade - 16 mm beads, about 15-17 pieces per thread;
- For the upper part of the lampshade - 12 mm beads, about 35 pieces per strand.
Naturally, when stringing beads on a thread, you can increase or decrease their number or the degree of thread tension. But it is still desirable to stock up on materials in excess of the norm.
The essence of the work is to hang threads with beads "waterfall" or "cascade" so that they flow down the structure.
In order to make the effect of "muting" the light, you can sheathe the frame with a thick fabric.

A handmade chandelier will definitely bring a fresh touch, originality and beauty to the interior. You will immediately notice how the room will sparkle with new colors, and your guests will sincerely admire your creativity, diligence and original taste!
90 photos of DIY chandelier ideas


Lighting is the most important component of the interior. The coziness and comfort level of our home depends on the lighting. The play of light and shadow allows you to beat the winning moments of the interior and divert attention from bad moments. And also - lamps, floor lamps, chandeliers and lamps create the atmosphere that we call "home". Unique lamps will help to make a dwelling only “your own”, personal, individual, and the best way is to make a lampshade with your own hands. Homemade plafonds and lampshades are the thing that will make your home stand out from the rest.
A few words about security
In the manufacture of lamps, floor lamps and chandeliers in industrial conditions, the minimum distance from the "body" of the lamp to the materials is preliminarily calculated. This distance depends on the power and thermal radiation of the lamp and on the type (combustibility) of the material from which the ceiling / lampshade is made. At home, hardly anyone will bother with such calculations. And in order not to create a dangerous situation, it is worth adhering to certain rules.
And in general, having made a lampshade and installing it, in the first few days, pay attention to whether the ceiling heats up. Heating is any increase in temperature above ambient. If the lampshade feels “warm”, change the light bulb to a less powerful one. Check again. So until the homemade lampshade warms up.
Where to get a frame
If you want to remake an old lamp, floor lamp, sconces in which the old lampshade has become unusable, you can simply use the existing base by peeling off the old material. Before starting work, inspect the frame well, if there is rust or a damaged coating somewhere, maybe it’s worth stripping everything off and painting it again? At the same time, the color can be changed. If there are no old frames, you can buy an inexpensive lamp (in a store or at a flea market) and do the same operations with it. Good lampshades can, by the way, be made from waste baskets. They are wire, there are plastic. The main thing is to find a suitable shape and size. Then make a hole in the bottom for the cartridge. Further - it's up to decoration / plating, and here there are a lot of options.

If this method is also not available, you can make a lampshade without a frame (there are some) or make a frame yourself. The material for making a frame for a lampshade with your own hands is: wire, wood (wooden or bamboo sticks, specially cut elements), plastic bottles.
How to make a frame for a homemade wire lampshade
The wire for the lamp frame needs aluminum or steel. Aluminum is easy to work with, but wrinkle easily. This is not very important when the lampshade is already in use, but this fact must be taken into account during operation: you can ruin the shape. On the other hand, such plasticity allows easy and simple changes in the shape during operation. So that's a good option. Aluminum wire can be "mined" from electrical cables. You will have to remove the protective shell and you can use it.
Steel wire is more elastic, so it retains its shape well. It can be found in the construction market. It's harder to work with her. It is desirable that there were strong male hands nearby.

In addition to the wire, you will need powerful wire cutters and pliers to work. The frame of the lampshade usually consists of two rings and racks connecting them. The shape of the future lampshade depends on the size of the rings and the shape of the racks. Questions may arise regarding the number of racks and how they are attached. The number of posts depends on the size of the rings and how "round" you want the lampshade to be. The more posts, the more “smoothly” the fabric will lie. So it's up to you to choose, but the optimal distance between the racks in the lower circle is about 5-6 cm.

Techniques for creating a frame for a wire lampshade
Methods for attaching the stack to the lampshade rings depend on the thickness and type of wire, as well as the tools you have. The easiest is to make a small hook at the end, then clamp it tightly. And so that the ring does not slide left and right, pre-treat the wire at the attachment point with sandpaper with a large grain. This is an option for thick aluminum wire. If the wire is steel, and with a diameter of 1.2-2 mm or more, the best way is. Thinner wire can be bent and wrapped around the ring or also made a hook.
If you make hooks, wind the wire, the appearance is far from being as ideal as that of factory frames. But this imperfection will be covered by the lampshade itself. If she still worries you, find a ribbon of a suitable color (usually matched to the color of the lampshade) and carefully wrap the resulting frame. It will get much better. The tape can be smeared with PVA glue and, wet, tightly, turn by turn, wrap the frame around.
wire mesh
If you can find a fine wire mesh, you can quickly make an almost perfect cylindrical shade for a floor lamp, table lamp, night lamp, candle shade, etc. All you need is to cut off a piece of mesh of the desired length and width, roll it into a ring and fasten the wires by wrapping them around the racks.

To prevent the mesh from straightening when cutting off a piece, cut so that long free ends remain on both sides. They will fasten the ceiling of a cylindrical shape. And the imperfection of the upper and lower rings can be masked with a tape of the desired color.
From a five-liter plastic bottle
An interesting shape lampshade can be obtained from a large plastic bottle. There are bottles of 5-6 liters and even 10. Here they can be used. From the container we cut off the top or the bottom - depending on what you like best. In the cut off part we make a ring for the cartridge. If the top is cut off, a neck can be used for some cartridges. For those with a larger diameter, it will have to be cut off.

Then we cut out the excess plastic, form the rims and racks of the ceiling. In order not to be mistaken, you can first draw all the lines with a marker. Cutting will be easier. Everything is elementary. Then we just decorate. And yes, it is necessary to cut out the plastic, otherwise the warm air will have nowhere to go.
We make lampshades on the frame
There are enough options on how to make a lampshade cover:

From tapes
The easiest and fastest way to transform an old lampshade for a floor lamp or table lamp is to use ribbons. You need a frame or lampshade in the form of a cylinder. It can be "naked" or covered with fabric. If you use a "bare" frame, the light will break through the cracks, which will create interesting lighting effects, but the lighting will not be uniform. Reading in this light is inconvenient - this is an interior solution. If you need even lighting, cover the frame with fabric first. It can be the same color as the ribbon, a couple of tones darker or lighter, it can be contrasting. Everything depends on your desire. And remember that the darker the fabric, the less light the lampshade lets through.
We take a tape 1-2.5 cm wide. We fix it from the wrong side of the lampshade with PVA glue, additionally fixing it with a pin. If you took a wire frame without fabric, we attach it to the upper or lower rim (you can sew it on with your hands, you can use glue). Then we begin to wrap the entire frame, from top to bottom, placing the turns of the tape close to each other, but without overlap.

Having finished the circle, we unfold the tape 90 °. We fix it in this position (with a needle and thread or PVA glue, glue from a gun, temporarily fixing it with a pin, pressing it with a clothespin). Then we skip the tape under the first tape, pull it out, lay it on top of the second one, then pull it down again, pull it up through one tape. So, gradually, we create an interlacing, filling the entire lampshade.
Alternatively, you can skip two vertical tapes. But then you need to make sure that each next row moves one crossbar. Then you get a different type of weave. Such a lampshade is ideal for floor lamps, since it will direct the light downwards, scattering through the walls will be small.

In this version, the ribbons can be the same, they can be of the same color, but of a different texture, they can differ by a couple of tones or be contrasting. In a circle, the tapes can be started all the way, or you can - after a certain distance. If you find a wide tape and apply it with an overlap, then horizontal ones will not be needed at all. And if you use a braided or twisted cord (in the lower photo on the right), we get a completely different lampshade in appearance. So only this technique of finishing the lampshade gives a lot of options.
Let's briefly present the ideas. There are many options for how you can design standard frames for lampshades in a non-standard way. The first method has already been voiced: you can knit a lampshade cover on knitting needles or crochet. Several options in the photo.

Not everyone knows how to knit. It is easier to work with beads, especially if you glue them. You can decorate an old fabric with beads, sequins, beads of various shapes and sizes. You can make such a “new-old” lampshade with your own hands in a couple of hours. You select the decorations that match the color, coat the fabric with PVA glue, stick the decorations. To complete the look, you can assemble pendants from beads and beads that are attached to the lower rim, but this is already painstaking work. Although the effect is interesting.

You can sew a new lampshade out of fabric. But it is not necessary to make it an updated copy of the old one. Fantasy must be turned on! If the lamp or floor lamp is in the girls' room, a new cover for the lampshade can be made in the form of a skirt. The style of the skirt is up to you. Interesting look in the fold. With and without ruffles.

In the boy's room, you can use an old geographical map. They are on thick paper. If the paper is not thick enough, first you need to stick the card on cardboard, and then glue the lampshade from such a blank.

Original shades are obtained if the finished frame is braided with threads or ropes. Ropes can be natural. In this case, they are gray, brown beige. You can find thin synthetic colored cords. Of these, more "fun" in color products will turn out. The situation is even simpler with knitting threads. They are thin, thick, textured, with a smoothly changing color. In general, there are a lot of options.
We take the frame and braid it according to a certain pattern. You can start with racks. Braid each rack with a pigtail (the length of the threads should be 3 times the height of the rack). When this work is finished, we begin to stretch the threads / ropes between the racks. They will need to be passed through pigtails, so it is more convenient to do this with threads with a needle, and the ropes can be pushed through like that.

The second option is to first entangle the entire frame horizontally, and then braid the racks. A pigtail will no longer work here, you just need to fix the turns on the rack with oblique stitches with a certain slope. This version is somewhat simpler in execution, but the “pigtails” look more decorative.
Homemade ceiling lamps without a frame
Many materials are rigid enough to hold their shape on their own, yet malleable enough to be made into something interesting. There are a lot of such homemade lampshades. And almost all of them are worth your attention. We give here only a part, the other part will go in the photo section (see below).
From knitted lace doilies
Many people have crocheted napkins and they lie in the “stash”, because it’s a pity to throw it away and they don’t know how to use it. There is a very interesting idea - to make a lampshade for a hanging chandelier out of them. In addition to napkins, you will need a large balloon or an inflatable ball, glue for heavy wallpaper (vinyl, silkscreen, etc.), a brush.

We soak the glue according to the instructions, wait until it swells. Inflate a balloon or take a ball, hang it up. When the glue is ready, lay out a napkin on some clean surface, coat it with glue, put it on a ball.

It is necessary to lay out with such a condition that in the center there will be a hole for the cartridge. Glue the napkins one by one. They need to be laid out so that the edges overlap slightly. When all the napkins are laid, once again coat them with glue and leave to dry. When the glue is dry, blow off the ball or ball (the ball can be pierced if you don't mind) and take it out through the hole. That's all, the lace lampshade is ready.

In some cases, there are problems with how to hang the finished lampshade on the cartridge. The problem is solved simply - take a transparent plastic bottle, cut off its neck, if necessary, expand the hole to the desired size (so that it fits tightly on the cartridge), then cut off the plastic so that you get a ring 5-7 cm wide. Lubricate this ring with PVA glue , and glue it to the lampshade from the inside of the ball.
Round plafonds made of threads
Almost the same technology can be used to make round and semicircular stylish shades. Choose the thread of the right color. Their composition is absolutely unimportant - the color, thickness and texture are important. They can be shaggy, smooth, twisted, thinner and thicker. It depends on the appearance. It is most convenient to work with cotton threads of medium thickness. They absorb glue well and then, after drying, keep their shape perfectly.

You will also need a ball or ball. This will be the base of the lampshade, which sets the shape. Choose the size of the base as you wish. The threads will need to be glued, for this you need PVA glue. It is poured into a container, diluted with water in a ratio of 1: 1.
You can use other glue. It is important that it becomes transparent after drying. These are WB-29 from TYTAN Professional and D2 joinery adhesive. If you use any of these types of glue, read the instructions.
On the ball or ball, draw a circle, which will be slightly smaller in size than the lamp socket. On the opposite side, draw a larger circle - this will be the lower edge of the ceiling. Now everything is ready, we can start.

We coat the threads with glue and wind them around the ball in a chaotic manner. It is more convenient to do this if the glue is poured into a container - you can lower the entire skein there, and just pull the thread slowly. With glue in a tube, everything is not so comfortable: you have to coat sections up to a meter long, wind them up, and coat them again. Time goes much longer. This is if you do not use PVA. But on the other hand, the products turn out to be more rigid and do not sag, do not change shape over time, as can happen with filament lampshades on PVA.
When winding threads around the ball, we carefully go around the drawn circles. If you accidentally climbed into the "forbidden territory", we simply move the threads, forming an even (more or less even) edge. When the threads run out or you decide that there is enough density, the process can be stopped. We fill the edge of the thread between others. All. Then we coat the ball with wound threads again with glue (PVA can be watered) and leave to dry (at least 2 days). To prevent the ball from rolling, we find a bowl or pan and use it as a stand.

The last stage is to blow off the ball or ball. If the ball has a nipple, press it with a thin wire, releasing air. Take out the dropped ball. That's all, you can thread the lamp inside and test the lampshade.
The technology is the same, but the appearance is very different…
According to the technology described above, it is possible to make not only round shades. Rectangular, triangular, trapezoidal. Choose a base that is easy to remove, wrap threads soaked in glue, braid, even sticks, newspaper tubes, etc. After drying, remove the base and, behold, you have made a lampshade with your own hands. A couple of examples in the photo below.


You can also use chopsticks... Just wrap the ball with cling film too and use not PVA glue, but transparent carpentry

It's a paste-like polymer clay in a tube that's been applied to a milk carton, then dried and the bag removed...
Creative homemade shades for lamps, floor lamps and chandeliers
You just wonder what people don’t make beautiful and unusual things from. Plafond from a cup, grater, bottle, beer or glass can, metal parts and beer can rings ... It seems that everything can be used ...


Lampshade from an old sieve ... stylish


Candlesticks turn into lamps ... without lampshades


You can’t tell in life, but these shades are made of hooks used to open metal cans for drinks and canned food… if they are painted, it will be even more interesting


Don't know what to do with grandma's crystal? Make plafonds out of it ...
Independent production of decor items is a creative and interesting process. It is not at all difficult to make wall lamps with your own hands, which can beautifully complement the interior of the room, giving it, in addition to additional lighting, comfort and homely warmth. The convenience of making such crafts also lies in the fact that it does not require large material costs for the purchase of material. So, you can make, for example, a wall sconce with your own hands even from improvised means that can be found in every home. In our article, we will consider examples of self-design of wall lighting fixtures with examples of photos of finished samples.


DIY wall lamps: what you need to make
In order to make a sconce with your own hands, you need tools, a base, an electrical wiring system with a base and a light bulb, and materials for a lampshade.
As for the tools, we will not list a huge amount of everything that may be needed in one case or another, but we will only say about the main ones that will come in handy one way or another, namely:
stationery (pencil, rulers, eraser, possibly compasses);
- roulette;
- electric jigsaw or small file;
- a drill with drills in order to install a wall sconce with your own hands;
- a heated glue gun (it glues a variety of materials much stronger than any other);
- scissors;
- paint or colored spray.
DIY wall lamp: making a frame
The basis for the lamp will be a round or square board, sawn from an MDF sheet. It should have the dimensions of a future sconce with your own hands (photos are presented in the article). At the base, it is also necessary to make slots for installing cartridges with light bulbs. Their number will depend on how bright the lighting should be. When making cuts, be sure to take into account the thickness of the light bulbs in order to correctly calculate the distance between them.
It is also necessary to cut out the sidewalls for the perimeter of the base, and make a small gap in the bottom of them in order to pass the electrical wire. The sides are fastened with self-tapping screws, the places of the caps are smeared with putty. It is advisable to use sandpaper for even grouting.
Do-it-yourself wall lamps can provide color design. The entire frame can be coated initially with a primer, which will ensure a long service life and painted in the desired color.
Fasteners or hooks are installed on the back side of the side parts, with which the lamp will be mounted to the wall.
We equip the lamp on the wall with our own hands with electrical wiring
For power supply equipment, you will need a power cord with a plug and a switch (you may have to buy it or use the one left after the non-working lamp). The cartridge can also be removed from obsolete lighting fixtures.
Do-it-yourself wall lamps, or rather, their lampshades, are often made from combustible materials such as fabrics, paper, threads, etc. In order to avoid fire, it is worth using energy-saving fluorescent light bulbs that have a high light output with low heat.
Light bulbs with cartridges are attached to the finished frame, the wire is led out through the equipped hole. On this, we can assume that the lamp on the wall with your own hands is half ready. Now it's time to start making a lampshade.
Do-it-yourself lampshade for wall lamps from improvised materials
There are many ways here using materials such as wood (various branches), fabrics, threads, etc. It is imperative to have a wire that can hold its shape well for a long time, but at the same time bend well.

DIY wood wall lamp
After pruning large trees, various branches and snags remain, which can be successfully used when decorating wall lamps with your own hands. The photos show how an ordinary, at first glance, snag turned into an elegant sconce. To do this, it was only necessary to cut and grind the points, and make a hole inside for the electrical wire.
Another way to make a spectacular wooden sconce with your own hands is to decorate it with vine branches, arranging them in different sequences. Such a lamp will become a real decoration of the room in an eco-style.
Beautiful do-it-yourself wall lamps (photos are presented below) can be made from a vine. They can be made in many different ways of weaving, but for beginners, it is worth stopping at first with simple designs.


DIY sconce with thread lampshade
Such a lamp on the wall with your own hands is quite simple to make. To do this, you need to have a dense thread of any color (you can take white, and paint the finished structure in the desired color), PVA glue and a balloon. The technology is very simple. First of all, we inflate the balloon to the size that the lampshade should have and tie it tightly. We pre-soak the threads in glue, and then, attaching the tip to the base, we begin to wrap them around the ball in a chaotic manner. The winding density can be anything, it all depends on how bright the lighting should be emitted by the wall sconce with your own hands.
After finishing the winding, you can once again smear the entire workpiece with glue with a brush and hang it to dry. From a completely dried blank, we remove the ball - for this it must first burst. The lampshade is ready. If necessary, it can be painted in any color using spray paint. It is noteworthy that such sconces with their own hands (photos are presented in the article) can emphasize any style of interior, depending on the color of the lampshade: white will suit minimalism, black will favorably emphasize high-tech, bright yellow or red will complement modernity, etc.


