How to install a stretch ceiling. Installation of stretch ceilings: measurement, preparation of a draft ceiling, fastening of the profile and canvas, alternative methods, installation of fixtures. Types of stretch ceilings
Many of us would like to know how professionals install stretch ceilings in order to do the installation of such ceiling structures at home with their own hands. Our article will help you acquire such knowledge.

Briefly about stretch ceilings and their advantages
To understand how stretch ceilings are installed, you first need to figure out what they are and why they are so popular. Stretch ceiling structures consist of a mounting kit and the stretch fabric itself made of a film or fabric made of impregnated synthetic threads. The material is attached to the structure around the perimeter of the room and stretched. Film webs are stretched after preheating using a heat gun, and fastened without heating.
Advantages of stretch ceilings:
- High aesthetic values. A wide range of colors and textures allows you to choose a canvas for your interior. And thanks to photo printing on the panel, it is possible to achieve originality and even greater beauty of the ceiling.
- There is no need to prepare the base ceiling. The installation itself is quick and easy, without a lot of debris. Furniture during installation is not required to be taken out.
- PVC film can withstand large volumes of water, which will save your apartment from being flooded by neighbors.
- Coatings can be mounted in any room (bathroom, kitchen, living room or bedroom), humidity does not matter.
- Ceilings can be installed after finishing the room without fear that your wallpaper or panels will be damaged.
- Cloths do not attract dust, do not support combustion, are harmless to humans.
- The stretch ceiling can be washed and cleaned with detergents.
- The durability of fabrics. The service life of such a ceiling leaves 15-20 years.


Ways of fastening stretch ceilings
When answering the question of how stretch ceilings are installed, it is impossible not to mention the various ways of attaching canvases. There are the following mounting options:
- harpoon;
- clip-on;
- wedge.

The differences in the method of fastening are in how the canvas is fixed in the wall fastener - baguette. Moreover, a certain type of fastener is suitable for certain types of canvases.
Harpoon mount
Using a harpoon mount, stretch ceilings made of pvc film are installed. This is due to the fact that only on PVC films can a small thickening around the perimeter, called a harpoon, be made at the factory. For installation by this method you will need:
- aluminum or plastic profiles for wall mounting with a groove for a harpoon (baguettes);
- pvc canvas with a harpoon at the edges.
Fastening takes place as follows: first, baguettes are attached to the walls along the perimeter of the room at the desired height. Then a harpoon on a film is inserted into the groove of the baguettes and snapped into place. It turns out a reliable fixation of the canvas. By the way, the baguette can be mounted on drywall constructions.

Clip fasteners
Do you want to know how fabric stretch ceilings are installed? Yes, using a clip connection. The difference between a clip-on baguette and a harpoon fastener is that it is a single element without additional clamps. Plastic for such a baguette is very durable. It is able to withstand heavy loads. The method is named in the same way as the well-known brand of Clipso canvases, for which the baguette was invented.
The canvas is inserted into the fasteners and securely fixed thanks to the clip lock. Such a fastening scheme has one indisputable advantage - the canvas can be inserted into the fastener and pulled out as many times as necessary. This is especially useful for fabrics. After all, they are mounted without heating, which requires a good stretch and straightening of the panel.

wedge fastener
To understand how stretch ceilings are installed using a wedge connection, take a look at the photo below. For fasteners we need:
- U-shaped baguette made of aluminum;
- wedge;
- wooden or plastic fixing bar.
The essence of the method is as follows: the canvas is inserted into the groove of the baguette and fixed there with a wedge. Then the excess web is cut off, and the groove with the wedge and the baguette are closed with a plastic insert. This insert performs additional fixing functions. This installation method is the easiest and most affordable for self-execution.

Taking measurements
Before stretch ceilings are installed, measurements of the room are performed in order to determine the required dimensions of the canvas. To properly perform this procedure, you must adhere to the following recommendations:
- If your room is rectangular in plan, then you need to measure not only its length and width, but also any of the diagonals of the room. This is necessary for the reason that the angles in the room are not always equal to 90 degrees.
- If the room has a complex polygonal shape, then in addition to measuring the lengths of the walls, the distances from any corner to all other corners in the room are measured.
- Before installing curved stretch ceilings, they build a diagram of the room on paper. There are two options for drawing a diagram. 1st: the ceiling is broken by a conditional grid with the same cells. Then, on these squares, a curved ceiling line is drawn on paper on a scale. 2nd: conditional chords are built to the curved ceiling line. Then all sides of the resulting triangles are measured.

Taking ceiling measurements
Tip: if the room has a very complex shape, it is better to measure distances not from one corner, but from several. Thus, the diagram will turn out to be a room divided into many triangles with measured sides.
Surface preparation
Although we wrote a lot about the fact that before installing stretch ceilings, preparation of the base ceiling is not required, there is still something to be done:
- Remove loose plaster from the surface of the old ceiling so that it does not damage the new stretch ceiling after falling.
- If stretch ceilings are installed in rooms with high humidity, it is better to treat the base ceiling with an antiseptic solution. This will prevent the formation of fungi.
- Take care in advance of the new wiring for the lamps, as well as places for their attachment.

How to install stretch ceilings: sequence
After we figured out the fasteners, it remains to find out how stretch ceilings are installed, or rather the exact sequence of actions. As you already understood, there is some difference between the installation of fabric sheets and PVC film sheets. The most difficult installation process occurs with pvc films, since their preheating is required.

To install the ceiling, you will need the following tools:
- heat gun;
- gas cylinder;
- drill;
- screwdriver;
- laser level;
- roulette;
- putty knife;
- square.

Stretch ceilings are installed in the following sequence:
- First you need to decide on the place of attachment of the baguette. To do this, it is necessary to indent from the base ceiling at a certain distance (for fabric sheets 1.5 cm, for PVC film sheets 4-5 cm). We work with a laser level.
- Then, along the marked lines, baguettes should be fixed for the fastening method we have chosen. To do this, we drill holes along the line on the wall and hammer dowels into them. We fasten the baguettes with self-tapping screws. We install fasteners every 20 cm.
- Do not forget to lay the wiring and make the attachment points for the light sources.
- Next, we lay out the canvas in the center of the room and, using special clamps, fasten one of its edges in any corner of the room.

- In the same way we hang other corners of the canvas.
- Warm up the heat gun. The canvas should warm up to 40 degrees.
- After that, they begin to insert the canvas into the baguettes. Stretch ceilings are installed from the middle of the baguettes, moving towards the corners.
- When the canvas is completely fixed in the baguette, ceiling plinths are mounted, which cover the installation site of the baguette.

How to install the canvas
Interesting information: a canvas with a harpoon mount in a rectangular room can be installed in 2 hours. It may take 6 hours to install a fabric web in a large room. The installation time of a two-level ceiling may be longer, because the amount of work is significant.

Cutting the canvas
Rules for fastening baguettes
How to install stretch ceilings, we have already figured out. However, there are some nuances that will be useful to you in the process. In addition, our tips will help you during the installation of profiles:
- When choosing between aluminum and plastic profiles, give preference to a more durable aluminum baguette.
- If you want to get the minimum distance from the base to the stretch ceiling, you can mount the baguette to the ceiling. Otherwise, the mounting profile is mounted on the walls.
- If you want to install built-in lighting fixtures, then at least 7 cm should be retreated from the base ceiling.
- The largest allowable pitch of self-tapping screws when attaching a baguette to solid walls without plaster is 20 cm. If the walls are thin and have a thick layer of plaster on them, the pitch is reduced to 80 mm.
- Since the cooled pvc sheet gives a load on the walls of 70 kg / r.m., you should not fasten baguettes to thin partitions. In this case, you should choose a ceiling mount.


Rules for mounting canvases
Usually, before stretch ceilings are installed using a heat gun, flowers and animals are taken out of the room. This is due to the fact that the air warms up to 40 degrees. In addition, during installation, you should adhere to the following rules:
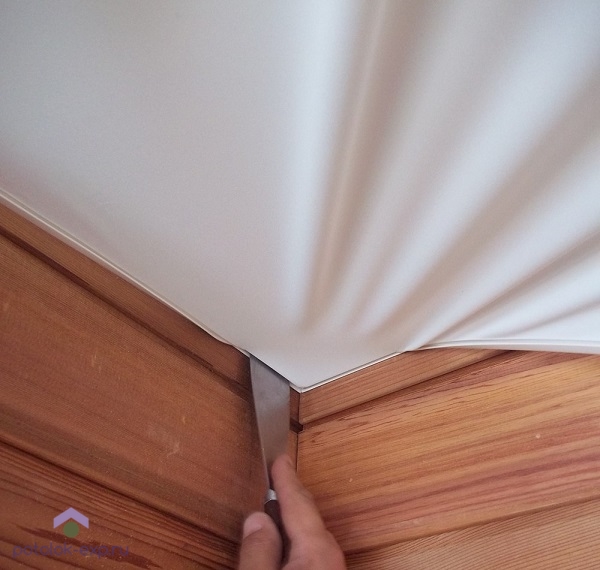
- For mounting canvases with harpoon fastening, it is convenient to use a special spatula or spatula with rounded corners.
- During the installation of PVC, the canvas must be constantly heated with a heat gun. Otherwise, it will quickly cool down and lose its elasticity.
- Stretch the PVC fabric from the middle of the baguettes to the corners of the room.
- When installing fabric sheets, a heat gun is not needed.
- Fabric canvases are inserted into the baguette from the corners to the center.

Rules for installing luminaires in stretch ceilings
How stretch ceilings are installed, you already understood. But what ceiling will do without lamps? The process of installing lighting fixtures in a stretch ceiling is as follows:
- On the base ceiling, places for fixing fixtures are pre-made.
- After that, reinforcing rings are glued to the film in the area of the places where the fixtures are attached.
- The canvas is neatly trimmed along the inside of the rings.
- The wires are taken out into the resulting hole and connected to the lamp.
- Then the lamp is fixed on the site and adjusted.
- Heavy lighting fixtures are mounted on special hooks in the base ceiling.

For high-quality installation, knowing how to install stretch ceilings is not enough, because one inaccurate detail can ruin the whole thing. A certain experience and skill in handling a gun is needed, which give knowledge of many nuances that are useful in this matter. However, with our tips and helpful tips, you can act like an experienced craftsman. So, before installing stretch ceilings, take into account the following tips:
- The cylinder for the gas gun used in the process of installing a stretch PVC ceiling must be with an unexpired expiration date.
- Make sure that the heat gun does not blow into the place where the cylinder is.
- Do not fill the cylinder more than 80%.
- Give preference to translucent composite cylinders. It is easy to see the gas level in them.


An interesting video on how stretch ceilings are installed:
T Now you know how stretch ceilings are installed. However, if there is some self-doubt, choose fabric canvases for installation. They are denser due to the texture of the fabric, so they are more difficult to damage for inexperienced craftsmen. In addition, the installation of fabric sheets is carried out without the use of a heat gun.
The installation of stretch ceilings is rightfully considered one of the most progressive and modern methods of finishing ceilings, firstly, because of the speed of installation of stretch structures, and secondly, in terms of design. However, the seemingly simple system of PVC ceilings is actually very laborious and difficult to install on your own.
In this regard, most customers prefer to turn to the services of professionals who have sufficient experience and have specialized installation equipment and tools.
Do-it-yourself installation of a stretch ceiling with a great desire, of course, is possible, but, one way or another, a call to specialists is necessary: only they can make qualified measurements and manufacture PVC sheets of the required parameters in accordance with them (see). Read on to learn more about stretch ceiling technology.
Building materials and fasteners used during installation

To install stretch ceiling structures, the following materials will be required:
- PVC profile (baguette) designed for stretch ceilings;
- a canvas made from a polyvinyl chloride film (PVC) - it is joined by soldering from the required number of pieces of material and bordered around the perimeter with a harpoon;
- flashing - a decorative element that will close the gap formed between the wall and the stretch ceiling;
- self-tapping screws and dowels - will be needed for attaching profiles to walls or a ceiling base.
Profile for stretch ceiling systems
Manufacturers offer to purchase not only a PVC baguette, but also aluminum (see). The classification of the profile depending on the method of fastening is as follows:
- wall-mounted - the most popular type of baguette; it is fixed on the walls and, according to the method of installation, resembles the fastening of the guide profile during the construction of false ceilings from plasterboard;
- ceiling - fixed to the ceiling and used in cases where it is not possible to install the profile on the walls;

- separation - a connecting baguette used when it is required to install a ceiling in large areas (60 m 2 or more); in this case, the probability of PVC sheet sagging under the weight of its own weight is quite high, so stretch ceilings are installed in the form of separate mounting groups.
Advice! As a rule, a profile for stretch ceilings is produced with a length of 2.50 m, but during installation it can be cut with a “grinder” into segments of the required length.
Installation of a stretch ceiling involves the initial installation of a baguette to the walls or ceiling around the perimeter of the room, as well as further fixing and tensioning the PVC film (see).
PVC web and harpoon system

The canvas is made, as already mentioned, from rolls of PVC film. Rolls of film with a glossy texture are produced in widths of 1.3, 1.5 and 1.8 m; matte width is 1.5, 2.0 and 2.7 m. The required number of segments of the same color is prepared, which are then connected by soldering.
The joints are thin and straight, after installation they are almost invisible. The pattern of the canvas is made with a smaller area relative to the ceiling by 5-15%, which is necessary to stretch the film and obtain a high-quality result - a perfectly flat ceiling (see).
A harpoon is a flexible but rigid PVC plate of a special shape, fastened by welding around the perimeter of the canvas and used to fix it in a baguette. The harpoon has a greater density than the canvas itself, and is quite simply inserted into the profiles. The device of stretch ceilings assumes a reliable fastening of the harpoon in baguettes, it occurs without any effort. This fastener is named so because of the similarity with the design of a well-known fishing tool.

Experts call the harpoon fastening system one of the strongest and most reliable: it can handle not only the load formed by the weight of the stretch ceiling, but also additional effects. For example, it is able to withstand a significant amount of water in the event that your apartment is flooded by neighbors from above.
Stretch ceiling installation
Installation of stretch ceilings is carried out in this order:
- Marking is applied to the walls - a horizontal line along which the profile will be attached.
Advice! Marking on the walls before mounting the baguette should be applied using the building level. This will ensure perfect evenness of the lines and a high-quality end result.

- By means of self-tapping screws, a baguette is installed on the markup.
- The PVC sheet is hung with hooks from the draft ceiling.
- The room where the installation is made is heated to a temperature of 50-60 0 C, for which a heat gun is used.
- After a certain time, the film acquires elasticity and softness, becomes easily stretchable. This means that it is the turn of attaching the canvas to the baguette. The PVC sheet is stretched, the harpoon system is inserted into the profile with a construction spatula. After the harpoon cools down, it straightens inside the baguette, forming a strong connection.

- The room is cooled to room temperature, after which the film is compressed and stretched. During this process, the canvas is finally straightened, and the surface of the ceiling becomes smooth and beautiful.
- The final step is the installation of a decorative flashing. He "hides" the gaps between the baguette and the walls. The flashing is fixed on the profile by means of specially provided teeth placed on both fasteners. The decorative element is made from the same material as the harpoon and is purchased together with it.
The installation of stretch ceiling structures is presented in the video of the relevant topic, presented on our portal.

This is how the installation of stretch ceilings looks like. Despite the complexity of self-installation, now you know its technology, and this will help to control and evaluate the work of invited specialists. Choose stretch ceilings for your home, and it will be a model of style and beauty not only for you, but also for your friends and acquaintances.
Stretch ceilings are made of synthetic fabrics or PVC. They are attached in several ways, but the general principle of mounting such canvases is related to their tension around the perimeter of the ceiling surface of the room.
general information
When carrying out repair work, dust is not generated, there is no debris. A wide selection of colors and textures allows you to create a unique interior in the house. Although there are many materials, often consumers make a matte white ceiling. It is great for bedroom and living room.
There are two options for mounting stretch ceilings:
- harpoon;
- harpoonless.
The first method involves the installation of a rigid PVC profile around the perimeter of the room, which looks like a harpoon.

Harpoonless ceilings are installed in various ways - with a wedge or with the help of fastening the canvas to a cord. The first option involves heating the tension material and fixing it with a spacer profile. Installation by cam method is possible.
Installation depends on the preferences of the user. Cloths are divided into two types.
- PVC. This is the largest group. The material is very soft, does not contain cadmium.
- polyester fabric. To ensure the required properties, it is impregnated with polyurethane.
Choose your material carefully. It is better not to save money, but to immediately buy high-quality products.
How to choose a stretch ceiling
First of all, the canvas must be durable. Pay attention to environmental friendliness, ask the seller for a product certificate. Quality material is odorless, lightweight and durable. Products of well-known manufacturers are safe for health.
Polyvinyl chloride film is almost weightless and strong. It is thin, but withstands great pressure, does not tear when stretched. The advantages of the material include the fact that it does not burn well and does not pass water.
It is worth mentioning separately the coefficient of light absorption. For glossy ceilings, it is 30%.
The surface reflects the sun's rays, so the room seems higher than it actually is.
Designers use glossy materials to create spectacular interiors.

Matte ceilings practically do not reflect the rays of the sun, the light absorption coefficient is 95%. They are perfect in classic interiors, bedrooms, offices and rooms where a glossy surface is out of place.
PVC film is dyed in more than 100 shades. When it comes to texture, the options are huge. It is possible to imitate the surface of wood and metal, embossed ceilings look beautiful.
Preparation for work
If you need to mount the canvas yourself, carefully study the rules and the process of installing tension structures. Since all the work is carried out on our own, then the calculations will have to be carried out by ourselves. Appropriate design drawings will be required.
Pre-measure the length of the walls at their highest point using an electronic tape measure. When working with an ordinary one, invite an assistant to hold the ruler.

In order to avoid errors in measurements and not complicate the process of doing work, you need to know how to start mounting tension structures in an apartment. To simplify the installation will allow a regular sheet of paper. On it draw a plan of the room with openings.
The surface of the ceiling is leveled, measurements are taken in each corner of the room with a laser or water level.
To draw a straight line from one mark to another, you must use ready-made upholstery thread.
First, it is applied, then pulled and released. As a result, a straight line will remain, allowing you to install a baguette.
Before stretching the canvas, prepare the room. Make sure that plaster and pieces of old whitewash do not fall on top of the film. Secure the exposed wiring so that it does not come into contact with the film. The walls in the places where the baguette is fixed must ensure reliable fastening of the profile (tearing force of at least 50 kg).

Separately, you should take care of the suspension of the chandelier, if it is planned in the interior. The distance between the base of the ceiling and the canvas of the tension structure is approximately 5 cm, which is how much lower the chandelier is hung.
The length of the installation wires must be sufficient to compensate for this distance, or they will have to be increased.
In the case when the design of the luminaire implies its mounting on a suspension hook, you must make sure that the length of the chandelier stem provides normal fixation or build up the luminaire holder with a metal ring or an S-shaped extension.
If the design of the lamp includes a mounting plate that is fixed to the ceiling with self-tapping screws, the situation becomes more complicated. You will have to make a ceiling mount that lowers the level of fixation of the bar exactly to the stretch ceiling. For this purpose, the easiest way is to use a mortgage in the form of a wooden bar, to which the plank is attached. Its thickness is equal to the distance from the draft ceiling to the canvas or a little less, but not more, otherwise it will show through the film.

How to take all measurements with your own hands
Work begins with finding the starting side - from the left wall from the front door. To avoid confusion in the drawings, mark each corner with numbers. Then find the distances from the corner to the left of the door.
The length of the web is determined along the line connecting the wall to the ceiling. If there is no desire to climb, it can be measured at the middle or lower level, but this is inaccurate due to the unevenness of the walls. The difference sometimes reaches several centimeters. This is how the lengths of all sides are determined. However, you will need to measure the ceiling diagonally, that is, between the third and first, as well as between the second and fourth corners.
When using a bead baguette, the film is taken with a margin.
If it is planned to install a PVC stretch fabric with a harpoon, accurate measurements of the ceiling will be required. Otherwise, when pulling, difficulties will arise. When using a glazing bead, the material is adjusted in size, and the size of the film with a harpoon does not change.
One of the disadvantages of the material is that the removal and installation of the film is a problematic type of work. This should be taken into account when choosing a mounting method. To determine the number of meters of film, measure the perimeter of the room using the above method. Mark the outline to strengthen the baguette. Pre-determine the lowest corner in the room, then step back from the ceiling to the required distance, making a mark on the wall with a pencil.

How to install a baguette yourself
Before installation, determine the contour that allows you to evenly stretch the canvas using a laser or hydraulic level. The first tool is more accurate and easier to use.
From the lowest corner of the room, lower yourself 3 cm from the ceiling. At this point, place a laser level showing light stripes on the walls. They create the required contour, allowing you to mount the PVC stretch ceiling evenly.
Baguettes are fastened around the perimeter of the room with screws. To this end, every 30-40 cm in the walls, you will need to drill holes with a perforator, insert plastic dowels. Before installation, it is necessary to carefully attach the baguettes to the walls, starting from the corners.
On the reverse side of the product in the center, a baguette is cut with a hacksaw for metal. The front surface must not be touched so that cracks do not appear. The required angle is given by bending the material. For washing down, you can use a miter box, but here you can not do without subsequent adjustment. This work is difficult and time consuming. In any case, the choice is up to the master.

Using an electric drill, holes are made along the entire length at a distance of 0.1 m, indents from the corners of 0.08 m. For a plastic or aluminum baguette, you will need to use a metal drill. Then the product is applied to the wall, focusing on the line drawn previously. It must pass through the finished holes drilled to the required depth.
Dowel-nails are hammered into these places, and screws are carefully screwed into them. After installing the baguette, the connections must be processed. Here you need a sharp knife that allows you to cut off the edges of the product. On the front side, the baguette is connected with adhesive tape, which will protect the film from damage.
Ways of fastening the canvas
Proper installation requires adherence to a clear scheme. Stretching a PVC ceiling comes down to the fact that the material to be fixed is attached in baguettes. There are two types of attachment methods. The choice of a particular option depends on the material from which the film is made.

The harpoon method is only suitable for PVC sheets. The design of the stretch ceiling consists of two parts.
- Aluminum profile. Element mounted on walls with a special groove.
- Harpoon. Polymer product made of PVC, equipped with a spike.
During the installation of stretch ceilings, the profile should be installed tightly, and then the harpoon should be inserted. When it snaps into place, the connection will be secure.
The clip method is associated with the use of only one product made of durable plastic that can withstand heavy loads. This option is used in the installation of fabric sheets.
In the wedge mounting method, which is also called glazing bead, a U-shaped aluminum baguette is used. It is not difficult to install a stretch ceiling in this way, since it is mounted using a glazing bead made of plastic or wood. This method is the simplest and most reliable.
Before installation, the canvas unfolds and its edge is hung in one of the corners of the room. You can not fix the film in a baguette, but use special clip-on tongs that resemble the mouth of a crocodile, which is why they got this name from specialists.

Continuing the installation, the corners of the canvas are hung around the perimeter of the walls on which the baguette is fixed. Start fastening should be from the center. This leads to the formation of a kind of tent. Next, the edges of the canvas are inserted into the baguettes, while heating it. Lastly, skirting boards are installed to close the joints of the walls and ceiling structures.
Before installing the tension web correctly, an important point should be taken into account. It consists in constant observance of the temperature regime, a slight deviation from which leads to a violation of the installation technology.
As the fabric cools, it stretches. Trust the installation of the film on the ceiling should only be professionals.
In the place where it is supposed to place the chandelier, a thermal ring is attached with special glue. Then the film is cut inside with a sharp knife. Next, proceed to the installation of the overhead chandelier. Between the wall and the stretch fabric, you will need to leave a small gap under the ceiling plinth.
Tsugunov Anton Valerievich
Reading time: 5 minutes
When you enter an apartment after renovation, your gaze involuntarily stops at the ceiling. Plastering and whitewashing are a thing of the past. Today, stretch ceilings are gaining more and more popularity. Glossy or matte, white or colored, plain or multi-color, fabric or PVC film - they can become a real decoration of the room. Moreover, it is really possible to carry out the installation of stretch ceilings on your own, without resorting to the services of specialists.
What will be required
For installation, working tools and special accessories for stretch ceilings are required.
Most tools can be found in the arsenal of any man. The missing ones will have to be bought or rented. Their list is as follows:
- tape measure or laser meter;
- level, for greater accuracy it is better to use a laser device;
- perforator;
- a hammer;
- screwdriver or screwdriver;
- angular and straight blades;
- sharp knife;
- a heat gun or a special building hair dryer (needed if a PVC structure is installed).
The list of accessories and consumables looks like this:
- aluminum or plastic profiles;
- decorative cap;
- platforms and thermal rings for mounting recessed lamps and chandeliers;
- pipe lines (if necessary);
- dowels with screws for concrete or self-tapping screws for wood;
- glue;
- canvas of the future ceiling.
The canvas can be made of two types of material:
- PVC film (polyvinyl chloride);
- made of specially woven fabric impregnated with polystyrene.
If the installation of stretch ceilings is carried out on their own without the participation of professionals, it is better to use fabric sheets. The technology of their installation does not require the use of dangerous equipment in the form of a heat gun.
Where to begin?
First you need to free the room as much as possible from furniture and household appliances. If this is not possible, move everything to the center of the room, providing unhindered access to all walls, and cover with dust protection.
Next, you need to conduct a thorough revision of the old ceiling base. Clean it of everything that can crumble, peel off and fall off. If there are floor slabs on the joint surface, the seams formed by them must be cleared, filled with mounting foam and properly processed. It is recommended to cover the entire surface of the cleaned ceiling space with a special primer that protects against mold, rot and other similar troubles.
Then you should plan the location of the lighting fixtures on the future ceiling surface. For self-installation, built-in or overhead spots for stretch ceilings are ideal. Electrical wires must be fixed on the base ceiling, they must not sag and touch the stretch ceiling material.
Measuring work
After the completion of the preparatory work, the question arises: how to measure the stretch ceiling? A number of tips will help in this responsible matter.
- Measurements should be made using tools that give the most accurate results. A laser meter is best, in extreme cases, you can use a tape measure.
- Measurement work must be fixed on the drawing, which will look like a view of the room from above.
- Mark the corners in the drawing in Latin letters and connect them with diagonals.
- Measure the perimeter and diagonals of the room as close as possible to the ceiling and record the results on the drawing.
With the result obtained, you can go shopping for a ceiling canvas.
Stretch ceiling installation
The installation technology of a PVC tension structure is divided into stages, the sequence of which is fundamental.
- Drawing markings on the walls. To do this, you need to measure the height of the walls in all corners of the room and mark at the required level. Connect them with a straight line.
- Profile mounting. The profiles should be fastened to the wall with dowels or self-tapping screws with an interval between them of no more than 7–8 cm. The attachment point must coincide with the marking line.
- Ceiling sheet installation.
- Before unpacking the stretch ceiling, it is necessary to clean the floor of dust and debris that can damage the thin PVC material.
- According to the installation technology, the room must be warmed up to 40 degrees. This is a prerequisite that will allow you to evenly stretch the canvas and correctly assemble the entire structure.
- The canvas is hung with the help of special hanging clips, pre-installed in the corners of the room. The base corner of the canvas is attached first. It is marked on the ceiling material by the manufacturer. Then you need to fix the opposite corner. The procedure is repeated until all corners of the canvas are fixed in the clamps.
- The hung canvas is heated with a heat gun to 70–80 degrees to give it elasticity.
- Further, the ceiling material is fixed in the profiles in all corners of the room using a special tool - an angled blade. The order of fixation is the same as when hanging. Then straight sections along the walls are fixed.
- If there are seams on the canvas, it is recommended to fix them first. It should be remembered that they stretch and fix the ceiling in small pieces opposite each other.
- Installation of lamps. A thermal ring is glued to the place for mounting lighting fixtures, then a hole is cut in the stretch ceiling with a sharp tool. Spots for stretch ceilings are mounted on special racks, which are pre-attached to the base ceiling.
- Attaching a decorative cap. An alternative would be lightweight foam skirting boards that need to be attached to the wall rather than to the ceiling material.
The technology for installing fabric stretch ceilings goes through the same steps, with slight differences in the process:
- the room and the canvas itself do not require heating,
- fastening of the fabric ceiling to the profiles is carried out from the middle of the wall to the corners.
Tip: before starting work for the first time, it is worth watching videos on how to install the master's stretch ceilings. This will help to avoid possible errors during the installation of the ceiling and comply with the entire process technology.
Types of fastening stretch fabrics
For the installation of a stretch ceiling, several types of web fastening are used:
- Harpoon - suitable for installing only PVC ceilings. Along the entire perimeter of the canvas is a special flexible element made of polyvinyl chloride, called a harpoon. The fixation of the canvas in the baguette is carried out according to the principle of the tool of the same name. For fastening, an aluminum profile specially designed for this purpose is required.
- Clip-on - used exclusively for the installation of fabric ceilings. Based on the latch principle. A special plastic profile is used for fastening.
- Bead or wedge - used for installing PVC sheets and fabrics. For their fixation, an aluminum profile in the shape of the letter P is used. The canvas is attached to the profile by means of a glazing bead (wedge) made of wood or plastic.
Schematically, the types of fastening look like this:

Stretch ceiling technology was developed in Europe for interior decoration. In fact, a stretch ceiling is a thin membrane-panel stretched over a solid frame-profile. The shape of the installation is determined by the profile, the general appearance depends on the panel itself, which is made in any color, finish and degree of gloss.
Advantages of a stretch ceiling
The installation of a stretch ceiling consists in fixing a lightweight, durable film or fabric made from high quality material in a framing structure that will keep the panel taut. According to the material of the panel, stretch ceilings are fabric or made of polyvinyl chloride (PVC) film.
- Plain weave fabric looks like a canvas and can be made using seamless technology up to 5 meters wide. B about Larger widths will require stitching the canvases or using a special dividing profile. The fabric is made from polyester and treated with a special polyurethane coating. Such material is lightweight - one square meter of a fabric panel weighs from 180 to 250 grams. The thickness of such a canvas is 0.35–0.44 mm.
- At PVC films many more color options, it can be matte or reflective, layered and include decorative lighting elements. The thickness of the film membrane reaches 320 mm, the width is less than that of the fabric web and reaches 2.5 meters. Wider panels are welded, forming an almost imperceptible joint. Often a printed image is applied to the material. An illuminated ceiling can give the impression of a starry night, a stained glass window, or a southern sunny sky. Such a panel is modern and high-tech, it will retain a fresh glossy look for many years.
Stretch ceiling is an environmentally friendly design with waterproof, dustproof, anti-allergic properties. The material is non-combustible, easy to clean, allows repainting in the future and the additional installation of sound-absorbing materials.

Mounting profiles for membranes are created in various shapes, including rectangular, oval, curved, three-dimensional. The web tensioning profile is usually made of rolled aluminum or PVC with a special fastening system to ensure a smooth, wrinkle-free tensioning of the membrane. A 3D ceiling will require the installation of a specially designed curved frame. The flexibility of mounting such a ceiling gives freedom for the realization of creative abilities, allowing you to create an arbitrary design.
Stretch ceilings are suitable for installation in rooms from living rooms to large commercial centers. Such ceilings have a thermal insulation function, forming a layer of air insulation in the ceiling space, thereby reducing the heating and cooling needs of the room. Modern technology improves indoor air by preventing dust and bacteria from settling on gypsum or concrete ceilings, justifying the demand for such ceilings in medical facilities.
Another advantage of this design is that it improves the acoustics of the room.. The canvas after installation can withstand significant loads without breaking - up to 100 kg per square meter. If the membrane is stretched by an external force (for example, water has accumulated from a broken pipeline), it will completely restore its shape after the external load is removed.

Characteristics of stretch ceilings in comparison with other types of ceilings are shown in the table. Given the short installation time and the lack of specific installation equipment, the stretch ceiling can be installed by hand.
Table. Comparison of stretch ceilings with other types of ceiling structures.
| Characteristic | Stretch ceiling | Paneling | Suspended ceiling | Plasterboard sheathing | Boarding |
|---|---|---|---|---|---|
| moisture resistance | Yes | Not | Not | Not | Yes |
| Installation time (20 sqm) | 2 hours | 4 hours | 15 hours | 20 hours | 5 o'clock |
| Room height loss | 2.5 cm | 1.5 cm | 10 cm | 5 cm | 5 cm |
| Update | Not required | 2–3 years | 3–4 years | 2–3 years | 3–4 years |
| Life time | 10 years | 3 years | 2 years | 15 years | 3–4 years |
| Multi-level capability | Yes | Not | Not | Yes | Not |
Choice of fixing profile for PVC film
The choice of frame for stretching PVC film is determined by its size and thickness. Several different profile types can be used.
Stretch ceiling prices
stretch ceiling


Types of profiles for the frame under the stretch ceiling: 1 - Universal aluminum profile, 2 - Wall-mounted aluminum profile, 3 - Ceiling aluminum profile, 4 - Dividing aluminum profile
The listed profile types use the so-called harpoon fastening of the panel, which requires preliminary welding of the ceiling membrane with a special clamp.
When installing a stretch ceiling yourself, you will have to use other types of mounting profile with a wedge or bead fastening or order welding with a harpoon fastening from a PVC film manufacturer.

When choosing the dimensions of the panel, it should also be taken into account that the PVC film stretches up to 6% during installation. This ensures that the ceiling remains flat and does not sag.
Prices for fabric stretch ceiling
fabric stretch ceiling
Satin stretch ceiling - pros and cons
Read on for all of this. You may also be interested in material about which ceiling is better -.
Choice of fastening profile for fabric web
The fabric ceiling is produced in the form of a wide-format panel, the weight and elasticity of which differ from the properties of PVC film. Therefore, to install such a ceiling, a different type of frame is needed. Most often, two types of profiles are used for fabric stretch ceilings.
- Plastic AP profile used for linear perimeter sections and provides a very thin air layer between the membrane and the ceiling slab (1 cm). This profile guarantees the stability of the panel in case of drafts and gusts of wind. The profile is attached with the wide side to the ceiling and may have a thin plastic part on the wall side of the profile, which seals the space and prevents the accumulation of dust, moisture and bacteria.
- Plastic AM profile used when extra space is required between the membrane and the ceiling. The height of such a profile is 30 mm. One of the most common uses for this profile is for additional acoustic isolation of a room using sound-absorbing materials.

The fabric web is prepared 10-15 cm larger than the width of the ceiling and fixed in the grooves of the profile without a harpoon method using a special plastic wedge or glazing bead. Excess fabric is carefully trimmed after mounting the entire panel.
Preparing for installation
Installing a stretch ceiling does not require much effort. The only prerequisite for the preparation of premises - electrical wiring must be completed prior to ceiling installation. The location of the fixtures can be marked with a marker on the floor below the corresponding position of the lamp on the ceiling.
Stretch ceiling kit prices
stretch ceiling kit

The ceiling slab, which will be located behind the membrane, does not require additional processing. Finishing work after installation is also not needed, since the ceiling does not require the use of adhesive materials, plaster or painting. If there is furniture in the room, it is better to remove it when installing a PVC ceiling, since the room will heat up to at least 40 degrees, which can adversely affect the condition of some materials.
Installation of a stretch ceiling will require the use of some construction equipment.
- Spatula or spatula for attaching the ceiling panel to the profile - you may need several spatulas of different shapes.
- Mounting profile along the length of the perimeter of the room.
- Clamps according to the number of corners in the room for the initial stretching of the panel.
- Perforator, screwdriver and self-tapping screws for fixing the profile on the wall or ceiling.
- Stepladder providing height access to the ceiling.
- Level, water or laser, for marking the location of the mounting profile.
- Air heater (only for PVC ceiling) - ceiling installers bring a heat gun and a gas bottle to work it. When installing the ceiling yourself, you can use a room heater to heat the room and a hot hair dryer to smooth out wrinkles on the canvas.
- Mounting PVC rings are used to strengthen the ceiling panel around pipes, fixtures and other utilities.

It is recommended to provide ventilation grilles in the stretch ceiling panel, which will provide ventilation in the interceiling space and protect this area from condensation and mold development. The location of the ventilation grill is usually chosen in an inconspicuous corner of the room.
Profile and panel preparation
Before direct installation of the ceiling, it is necessary to prepare a profile for attaching the panel.


Video - Preparing the room before installation
Installation process
As a rule, the entire installation process takes about two hours and leaves no debris. The essence of the installation is to tension and fix the membrane to the attached profile.

Installation of fixtures
Light fixtures, fans and other objects hanging from the ceiling should have an independent suspension mechanism that is attached to the ceiling plate so that it does not rely on the support of the tension web. A stretch ceiling is an interior design element, not a structural component.
To decorate the lamp you will need:
- mounting PVC ring;
- cyanoacrylate glue;
- sharp knife.
After installing the ceiling, it is necessary to make holes for lighting fixtures. If there are several lamps, it is better to make projection markings on the floor directly under the lamps in advance. Apply glue to the mounting ring and stick it to the film in place of the lamp so that the centers of the ring and the lamp coincide.
Prices for ceiling lights
ceiling lamp

Installation of fixtures in a stretch ceiling
After the ring has bonded to the film, carefully cut the film inside the ring. Adjust the height of the lamp so that it is at the level of the ceiling panel and screw in the lamp. Use conventional lamps with a power of not more than 60 W or halogen lamps up to 35 W to avoid strong local heating and deformation of the panel in the luminaire area.
Video - Installation of a stretch ceiling
