Tiebacks for curtains - the need for use and modern design (108 photo ideas). Do-it-yourself curtain ties
In this master class, we will make a tieback for curtains and a fabric flower.
A curtain tie is an element that supports the curtains on both sides of the window.
The tie-back not only supports the curtains, but also drapes them with beautiful, voluminous folds.
In this master class, we will make a tie-back for curtains and a fabric flower for it:

Using the same technology, you can sew such a pickup:
 And how to make flowers for this pickup, you can see.
To do this, first we measure the length of our pick-up we need:

Now on paper we are building a pattern for picking up:


We take adhesive interlining (dublin, any cushioning fabric is possible), fold it in half, outline our pattern on it, cut it out, taking into account processing allowances of 0.5-0.7 cm:


We cut out two parts of our pickup from the fabric according to the same pattern , also adding processing allowances:

<<<ПОДПИШИСЬ НА НОВЫЕ СТАТЬИ САЙТА>>>


We glue the cut interlining to the wrong side of one of the parts of the pickup with an iron:


Now we will make loops for our pickup from an oblique inlay. To do this, fold the inlay in half lengthwise and lay the line:


We impose our loops on the front side of one part of the pickup on its side part, departing from the upper edge of 1-2 cm and fix them with tailor's pins like this:


We fold the two parts of the pickup with the front sides inward and lay a line where our loops are fixed, on the sides:


We turn the details on the face, sew on the side, and fasten the details in a circular stitch. Then we overcast the unfinished edges:


We process the upper and lower edges of our pickup:


Here is the take we got:

Now let's make a fabric flower for our pickup to cover the loops. To do this, cut out a strip of fabric 60 cm long and 14 cm wide. Fold in half lengthwise and iron:


Overlock or any overcast, we process together the raw edges of our strip, and also sew the side parts together (also overcast):


Here's what should happen:

We lay a basting along the entire strip in a circle from the overcast side:

We tighten the thread, securing with arbitrary stitches. We get this socket:

And this is the view from the inside:

Let's decorate our rosette with a flower, and at the same time cover its middle. To do this, take a strip of fabric, of arbitrary length and width. Fold in half. Let's lay a line. We build one of its side parts so that it is convenient to turn it out:


From the resulting strip, we arbitrarily fold the flower, fastening it from below with a thread with a needle. We insert it into our socket, and fasten it together with arbitrary stitches. Turned out so cute fabric flower, with which we will cover the loops of our pickup:


Everything, ours and fabric flower ready:


Do you want to make such a pickup with a brush, and all with your own hands, and without even touching the sewing machine?:


Then you should familiarize yourself with the master class
The free video course "Sew by myself" will help you learn how to sew for yourself, your loved ones.
To get the course, click on the picture:
I bring to your attention a video about what kind of original pickup can be made from a men's tie:
Decorating the window opening plays an important role in shaping the interior of the room. Interesting pickups are capable of transforming the look of simple curtains. The second function of the practical detail is the regulation of the degree of illumination. Buy a ready-made copy or make a curtain holder with your own hands, everyone decides on their own. Familiarization with the options for pickups and original ways of decorating the window will help you make the right choice.
Variety of holder shapes
There are many details designed to fix the curtains in a certain position. Classification can be carried out according to several criteria. Production material:
- textile;
- metal;
- plastic;
- wooden elements;
- beads;
- ribbons and ropes;
- belts;
- chains.
Elegance is distinguished by magnetic accessories that allow you to drape the curtains in a different way every time. They may be collected in whole or in part. In addition to vertical folds, with the help of magnetic ties, you can create a horizontal original drapery on tulle.


At the location of the holders can be fixed:
- exclusively on the wall;
- on the curtain;
- have a combined model when the curtain catch is fixed on the wall.
Features of choice
When choosing a model of pickups, they are primarily guided by the style of the room. For a laconic interior, simple curtain holders are suitable. Heavy curtains with fringes will organically decorate laces with a brush. The loft style is complemented by curtains with a chain or belts. Various options are shown below in the photo:


Determines the type of holders and the functionality of the room. The interior of the living room and bedroom is decorated with classical forms, whether it be hairpins, hooks or beads. Craftswomen who have mastered the kanzashi technique are given a huge scope for needlework. For the kitchen, you can sew an original element in the form of a teapot or a mug. It is interesting to beat the holder for curtains allows a children's room. A popular technique is to use soft toys as holders, as shown in the photo:

Comment! When purchasing finished products, the kit will include hardware for fixing the holders to the wall. In the case of designing pickups on your own, you should consider the need and option for fixing to the wall in advance.

Often, when choosing an accessory, the characteristics of the cornice (color, material, shape) are taken into account. Plays a role and the size of the part. If a large window is decorated with heavy curtains, the holder should easily accommodate the collected textiles. For light kitchen curtains, you will need a more modest pickup.
The degree of desired lighting is taken into account. Holders that leave the curtain in a semi-closed position contribute to good shading and are suitable for a bedroom or a room overlooking the sunny side. The room on the north side, small in size, needs bright light, so the holder is selected with the ability to choose the curtain as much as possible.

Mounting options
The level of fixation of the tiebacks is determined based on the height of the room, the length of the curtains and the location of the window sill. Traditionally, the accessory is placed at the level of the windowsill. But if there are two conditions: the length of the curtain goes to the floor, the window sill and the room itself have a standard height.
If the window curtain does not reach the floor significantly, the curtain holders are placed above the window sill, usually at a distance of 30-40 cm from the bottom edge of the textile. With very high ceilings, the accessory can be placed below the level of the window sill. A wide field for experiments is provided by magnetic parts, the location of which can be changed daily.

Self-manufacturing
Demonstrate skill will allow holders for curtains made by hand.
Method one
For work, you will need multi-colored decorative laces. A tourniquet or an original pigtail is formed from them. The ends will effectively decorate pompoms or brushes. The process of making a curtain holder tassel:
- On thick cardboard or a thin board, the width of which is equal to the length of the brush, yarn or other material of a suitable color is wound.
- The skein is carefully removed from the frame. When winding, the thread is left a little loose so that it can be removed without difficulty.
- On the one hand, the skein is tightly tied with a thread, on the other, all the loops are cut. For a fluffy pickup brush, you will need a large bunch of yarn; a thin skein will not look spectacular on the curtains. Photo examples will help you enjoy the beauty of curtain holders with tassels.


Method two
A popular option is when curtain holders are made from CDs. Step-by-step instruction:
- Using a compass, a circle is drawn on the disk, the radius of which is 1 cm less than the part itself.
- The inside is cut out with scissors, a drill or a file.
Advice! Processing the inner cut of the part will avoid cutting the fabric with sharp ends.
- You can decorate the resulting ring in different ways. Usually, a thin layer of glue is applied to the workpiece, after which it is wrapped with tapes. Additionally, curtain holders are decorated with beads, rhinestones or flowers made using the kanzashi technique. The knitting needle performs the function of fastening.
The procedure for using the holder: at the place of collection of the curtain, it is pulled into a ring, and on the reverse side it is fixed with a knitting needle. Original examples of holders show photos:


Method three
It is extremely easy to arrange the following fabric holder for the curtain:
- A strip of fabric is folded in half and sewn from the wrong side.
- Then the future pickup is twisted and ironed.
- A ribbon or cord is inserted inside the fabric holder.
Such pickup allows you to adjust the degree of drapery of the curtain. The detail itself can be additionally decorated with lace or beads.


Method four
Tacks in the form of soft toys will become a bright decoration of the children's room. There are several options for use. The soft toy can be fixed on the wall. A ribbon with a loop should be sewn on one paw, and a button on the second. When the curtain needs to be fixed, the toy will, as it were, hang on the curtain.
The second option - wall mounting is not required. It is convenient for light toys that will not slide down, but additional fixation on textiles with threads will not hurt. Animals with long paws look interesting, which do not need additional decoration with a ribbon.
In addition to toys, curtain holders in the children's room can be made of bright plastic beads.
Attention! The option is suitable for matured children who will not put small parts in their mouths.


Conclusion
These are not all examples of how to make original holders for curtains with your own hands. Your own imagination will help develop new interesting models.
How to make DIY curtain tiebacks, how to attach them and how to tie curtains with tiebacks, these are the questions for which you will find the most creative answers here. And we will make pickups from a plastic bucket, and from expensive jewelry, and from buttons, and from portraits of pets. Knitting lovers will discover the ideas of knitted tiebacks, harmonious and stylish. Ordinary curtain holders will be decorated with luxurious fabric flowers.
Tiebacks are needed to hold the curtains, dosed and beautifully covering the window leaf. And optional curtains should swing open like a book. They can break the idea of everyday life by simply “fastening” a button to the wall.
And how the tiebacks are attached, what they can be attached to to emphasize the charm of the room. Yes, and the clothes of the window will be unfinished without tiebacks, which will emphasize the style, color, purpose of the interior in general and curtains in particular.
This creative selection of photos and master classes will help you make the most outstanding DIY curtain tiebacks.
How tiebacks can hold curtains
Let's start with the fact that the pickup can open the curtain like this:
You can decorate a standard holder with a photo of your favorite cat, stick the photo on the holder and varnish it. Well, after that, who will say that an expensive sophisticated holder is cooler than his own, homemade, striped one.
Compare. After all, you must admit that the one on the right is nicer. Let's not forget that our handsome men live in our houses, which I belong to, at the same time, and their houses,

Since the article turns out to be long, let me remind you that you can find in this article:
Pick up schemes
Most likely, the process of understanding what you really want will go faster if you consider the following diagrams.


Pattern and layout on fabric
Here is such a pickup - the base can be sewn using a pattern:


Pickup from a plastic bucket
Magnificent to genius ideas from talented people - grabs from mayonnaise buckets.

Pickup from CDs
It is simply impossible to pass by such beauty. Here's how it's done:

Option one - The curtain is threaded through a hole in the disk.

Option two - The curtain is not threaded through the hole in the disk.

Knitted ties
Suppose there are already curtains, and there have been for a long time. How to update the curtains, which are already a little tired. Tiebacks do not require a large amount of yarn and it will not be difficult to knit the most beautiful thing on the windows using the leftover yarn, which at the same time will allow you to make a color accent. Here are the ideas:


Many knit toys. On the forums you can find discussions on the use of small treasures. Most craftswomen accumulate toys at home, because the number of friends they give is finite, but you want to create all the time. Here's a great idea to apply to such works. And how pleasing to the eye is the exact copying of the colors of the curtains with a knitted cat.

flower decoration
There is an incredible amount of techniques for making flowers. Surely you also own a couple, three of these techniques. And here is a case to apply them in interior decor.


How to make ruffled tiebacks
Do not be biased towards ruffles. It's like a joke: "You just don't know how to cook them"
The simplest in execution and the most delicate magnificent tie-backs with ruffles. And it's easy to do. Tie ribbons of a thin mesh onto a cord, this is how tutu skirts are made, and decorate with a pink bow.

And here a strip of curtain fabric is assembled on a wide elastic band to make a beautiful frill, then, on the wrong side, the tie is strengthened with braid, the length of the lace is determined by the length of the tie. And decorated with beads.

How to make pickups on magnets yourself
Craft stores sell magnets that are useful for work. Here's what it takes to create these beauties.

And some more beauty
And a few more ideas for reading the article to the end.


I was interested in collecting material. I hope you enjoyed reading.
Anyone who has ever thought about the interior of their home has noticed how important accessories play in it, combining utility and attractiveness. Tiebacks for curtains are just such an attribute of the situation: the use of curtains with them will become more convenient, and the room will receive another bright touch. They can be made in the form of solid holders or soft fabric products attached to the finished curtains. However, a more interesting option would be not to buy factory products, but to make them yourself. So you can match them to the design of a particular room and emphasize your taste and personality.
Varieties of pickups and materials used
These accessories perform several functions:
- first of all, they hold the curtains so that sunlight enters the room;
- decorative: making an ensemble with curtains and lambrequins, they improve the overall appearance of the room;
- they can visually change the shape of the window opening: when they are located in the upper third of the curtain, the window seems higher, and in the lower one - wider;
- with their help, it is also possible to partially hide the old ugly window sill.
Pickups are performed in different versions.
Holders must be combined with the curtains themselves. The same (or contrasting color) fabric is used, the same decorative elements: fringe, tassels, cords, etc. The general style must also match.
The appearance of this accessory depends on the style and materials of the curtains and the design of the room:
- fabric tie-backs are suitable for classic curtains;
- magnetic tiebacks are a good choice for light curtains, such as tulle, lace, sewn from organza, and the material for them themselves can be lace, braid, cords, ribbons, beads and beads, etc .;
- plain tiebacks are suitable for curtains with a pattern, while they can be additionally decorated with flowers, beads, embroidery, kanzashi-style decorations, etc.;
- rigid tiebacks are usually buckled or ring-shaped and are more suitable for thicker curtains of more modern styles.
With handmade tiebacks, even ready-made curtains will take on a more individual and stylish look. It is important at the same time to choose the right size so that the pickup holds neither too tight nor too loose. Then the fabric will drape beautifully.
You may also be interested in the material on the manufacture of roller blinds:.
How to make a do-it-yourself curtain tie - step by step instructions with photos
There are quite interesting options for pickups here. Some are more difficult to make, others do not even require sewing skills.
Products on a magnet
Magnetic holders are convenient because they do not require additional hooks on the wall - the curtains can be grabbed with them anywhere. Such curtain accessories are made of fabric, with cord, braid and other decorative elements.
In the manufacture here are used components such as:
- fabric, cord or cable, beads - for the main part, which may be different;
- magnets - 2 for each pickup;
- hot glue and glue gun;
- bows, ribbons, buttons, various metal decorative elements, shells or small flat stones in the case of a room in a marine style - to decorate the product.
Magnets are sold in craft stores. The required size depends on the severity of the future pickup and the thickness of the curtains. The heavier the pickup and the thicker the curtains, the more powerful (and, therefore, more) the magnet should be.
Laconic, convenient and simple - such features of this type of accessories are very attractive.
Step by step master class:
- A strong braid or cord of a suitable length is taken. If there is fabric left after sewing curtains, you can sew strips from it.
- A magnet is attached to each end with hot glue (on the wrong side). First you need to make sure that the magnets on one pickup will be attracted to each other, and not repelled.
- On the front side, if desired, the holders are additionally decorated. Beads, ribbons, braid are sewn on, embroidery is done. Small decorative elements are attached to magnets.
If it fits into the decoration of the room, you can stick rhinestones and sequins. Sometimes holders with high-quality artificial flowers look good.
There are more complex options for decorating.
Video: magnetic pickup with a rose
From beads
It is quite simple in execution, but stylish and effective option. In the manufacture here, both beads are used, matched to the color and texture of the curtains, and just old unnecessary jewelry.
For work you will need:
- soft durable cord (better than rope weaving);
- fishing line;
- wire;
- beads, seed beads, glass beads, etc.;
- scissors.
Materials must be selected so that the pickups are the same. You can use glass, wood, plastic, metal and other decorations. Depending on this, pickups are obtained in a different style.
The combination of a decorative cord and matching beads looks quite impressive.
Step by step process:
- Cut off about 50 cm of wire or fishing line. It is folded in half, a central bead is put on it. The wire is twisted into several turns. The same bead is strung on both ends of it. This is repeated several times. Then, by twisting, the ends of the wire are fastened.
- They are threaded into a cord and fixed. Gets a pendant. You need to make several of these, placing them at a small distance from each other. The same is repeated for the second curtain.
- In addition to brushes, the cord is decorated with a braid. To do this, a long fishing line is wrapped several times at the base of the cord and fixed. Then beads and/or glass beads close to the tone of the cord or contrasting colors are strung on it.
- The fishing line is wrapped around the cord, fastened with threads of a suitable color. Then its end is attached in the same way as the beginning.
This decoration looks good with and without bead tassels.
There is also an easier option. A good curtain holder is obtained from old long beads. One of its ends is thrown on a special hook. Beads must be strung on a strong fishing line, as an ordinary thread will not withstand the weight of the curtain. You can also additionally decorate such a pickup with antique keys, pendants, etc.
Thus, unnecessary jewelry turns into a useful accessory.
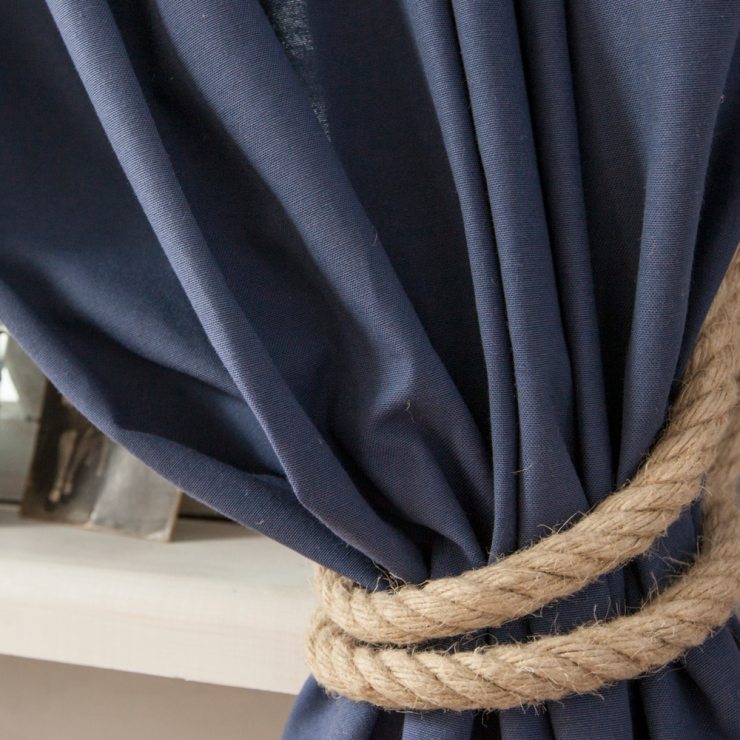
Cord (macrame)
Macrame is a type of nodular weaving. Using this technique, decorative napkins are often made, but tiebacks made in this style look original and elegant.
Such pickups are woven from thick ropes.
You will need:
- jute, linen rope or a thin rope of both natural tones and dyed - only 24 pieces of cord about 2.5 meters long, two or three colors can be in harmony with each other and with curtains;
- pillow for needles;
- button to secure the pattern.
This type of product requires the least types of materials.
Step by step:
- Curtain holders are woven with flat knots. The cords are folded together and folded in half to find the middle of the segments. It is attached to the pillow with pins. 5 flat knots are made from a third of the threads in any direction (left or right). Then the pad is turned and the same number of knots are made, but in the opposite direction (that is, right or left).
- The knots are folded to form a loop. If weaving is made from threads of different colors, the cords of the used color are hidden in the middle of the bundle, and two knots are made with segments of a different color for fixing. For this, 8 cords are used.
- All cords are divided into three parts. Flat knots are woven from each part. For the extreme you need 7-8, and for the middle ones - 5-6 knots. Then they are connected together and again fixed by two knots. It turns out a chain link.
- Weaving continues to the desired length. At the end, it is fixed in the same way, with two flat knots. The ends of the cord can be left, you get a beautiful brush. A button is sewn on. Its size should match the diameter of the first loop.
It is not necessary to strictly follow the instructions. You can take more or less threads, then the pickup will become thicker or narrower. When changing the number of nodes in the links, their size changes. The main thing is that the general appearance of the product is in harmony with the curtain.
This option will give the room an ethnic character.
Video: an interesting pickup in a marine style from a rope
Pay attention to master classes in the manufacture of Roman curtains:.
From disk (hard)
The original pickup can be made from an unnecessary CD. It will not fit into a classic interior, but it will perfectly suit a more modern one.
There are also few constituent elements here:
- a few old CDs - it's better to take them with a margin in case you can't immediately cut the core correctly;
- twine, ribbon, braid or leather cord for decoration;
- knife or scissors;
- glue gun.
Step by step:
- First you need to cut out the inside of the disk. To do this, a circle is drawn on it. It is convenient to mark it by attaching a mug, vase, etc. The inner circle is cut out. To make it easier, you need to heat the knife.
- Then the resulting ring is tightly wrapped with twine or ribbon. The beginning and end are fixed with hot glue. Then the product is decorated. You can stick bows, buttons, beads, twine folded into patterns, etc.
The work is painstaking, but the result already at this stage looks elegant
On the curtain, the catch is held with a stick. It is decorated with the same materials: wrapped and glued in the same way.
Butterfly decoration looks very nice here
Sometimes the pickup is done without a stick, then the curtain is simply threaded into it.
This option is reminiscent of the disco style
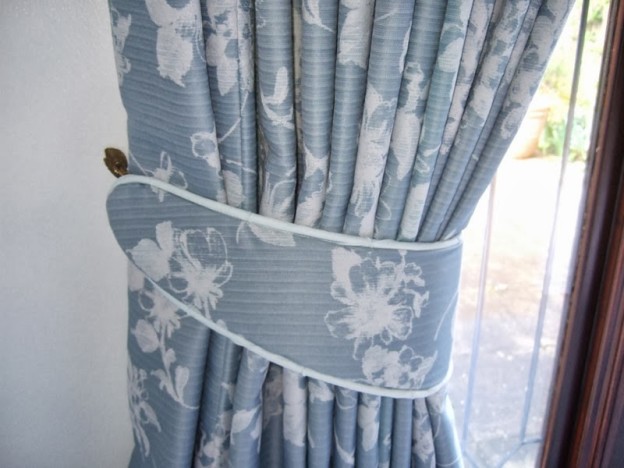
From fabric
This option is suitable for curtains in a classic style. Fabric tiebacks are made in different shapes. Curtains are beautifully draped with such tie-backs in the form of a crescent. At the same time, the material is collected in beautiful folds and is not deformed.
For work you will need:
- thick paper (for patterns);
- piece of fabric;
- threads that match the color;
- adhesive sealant (for example, interlining);
- braid for ties (in tone with the main material or in harmony with it);
- pencil, chalk or a special fabric marker;
- scissors;
- iron;
- sewing machine or needle.
Very little paper is required here.
The length of the cut should be slightly longer than the width of the curtains. In width, it can be quite narrow, from 20 cm (for two products - from 40 cm). The tieback is often made from the same fabric as the curtains themselves. It also looks interesting such an accessory, made in a contrasting color. Purl details can be any color.
The pickup, as a rule, is attached to a special holder driven into the wall at the desired height. These fasteners come in a variety of sizes, shapes and colors.
Step by step master class:
Kanzashi technique
In this technique, such decorative elements as flowers, leaves, individual petals and more are made from silk ribbons. Initially, they were used to decorate women's hairstyles and outfits, and then moved to the interior.
To pick up in the style of kanzashi you will need:
- satin ribbons;
- pieces of tulle or organza;
- scissors;
- threads;
- glue;
- beads (optional)
- thin wire (also optional).
Step by step:
- First you need to make a base. Then it is decorated with flowers or other elements using the kanzashi technique. The base itself can be anything. For its manufacture, the following master classes are suitable:
- on a magnetic holder;
- tissue;
- or hard.
- In order to get flowers, ribbons and fabric are cut into squares. The diagonal of such a square is a little more than the length of the petal. For example, the dimensions can be 3x3, 5x5 cm, etc.
- The edges of the resulting squares are carefully processed with a lighter or a wood burning tool. So they won't crumble. Then these squares are folded according to the scheme and fastened with a thread.
- Flowers are made from ready-made petals, also fastened with a thread. In their middle, you can stick a bead or a rhinestone, make “stamens” out of wire.
Snowflakes, butterflies and other figures made in this technique look interesting. They are attached to the pickup with hot glue.
Thus, gradually the squares of the fabric turn into petals.
The result of this long work looks much better than using any artificial colors.
Fairy Ties
Such decorations are well suited for a girl's room. Colors are selected taking into account the entire interior.
You will need to prepare the following materials:
- pattern paper;
- thin fabric (flesh or white, cotton is better);
- satin, tulle or organza in bright or pastel colors (for dresses);
- satin ribbons and lace;
- filler (synthetic winterizer, synthetic winterizer, cotton wool, etc.);
- threads in the color of fabrics;
- floss threads for face embroidery;
- beads, buttons, etc.;
- magnets for fasteners;
- of the tools you will need needles and scissors.
The fabric for this pattern here makes sense to choose flesh-colored
Step by step:
- The pattern is transferred to the fabric. For one fairy, you will need 4 parts for the legs and arms, and 2 for the head and torso. They need to be cut a little larger (2-3 mm) to get seam allowances.
- Details need to be sewn with small neat stitches, leaving small holes. Then the parts are turned inside out and stuffed tightly. For convenience, the filler can be pushed into the arms and legs with Chinese chopsticks. After stuffing, the hole is sewn up with a blind seam (except for the neck). In order not to knock out the filler, it is better to use the “needle back” seam. Then the parts are sewn together. Legs and arms should be symmetrical. It is desirable to turn the head to the side. Then the fairy will look into the room, and not hide her face in the curtain.
- Eyes (can be closed) and lips are embroidered on the finished face. Hair is made from thread. They are pulled through the head tissue and then cut to the desired length.
- The dress is made from ribbon and small pieces of fabric. For example, you can take two trapezoidal shapes. From above, they are cut in a semicircle, and from below they are made wavy or remain straight. Pieces are applied to the toy and sewn together. Ribbon ties are attached at the top. The feet are either left bare or wrapped with ribbon so that it looks like pointe shoes. You can make and sew wings.
- To attach to the hands, magnets are glued or ribbons are tied. Depending on the width of the curtain and the density of the fabric, one or two fairies will be needed for each. In the latter case, the couple's hands are neatly sewn together.
With a dress, hair and wings, she looks really magical.
You can independently make not only unusual ties for curtains, but also lambrequins. In our next material, you will find out what types are, how they are combined, and also find patterns and step-by-step master classes:.
Ideas for inspiration
There are many more options for making curtain tiebacks than one article can cover. For this, the most unexpected materials and various technologies are used, allowing you to make exclusive accessories with your own hands, not only adding convenience to everyday life, but also pleasing to the eye.
This option looks good on folk-style curtains.
Wrapping this accessory with a thread in the color of the curtain connects them into a single composition.
This decor looks good on thick fabric curtains.
The contrast of thin fabric and natural dense thread looks impressive
This version of the product will fit perfectly into the interior of the kitchen.
Metal, stones and key - a good combination
On thick fabric looks concise and cute
Sometimes the curtains are held on by such unusual items as ties or belts. The straps, if necessary, are shortened and attached to the wall. Or they simply pull the curtain down, like ties.
The pattern here must either absolutely match, or be on one of the elements - a combination of two different textures is undesirable
In children's rooms, you can decorate curtains not only with fairies, but also with other toys.
Delicate colors and themes of teddy bears and honey look very positive
One such large and bright initial will convey to the child a warm attitude from the parents.
A mosco knot tied on it will add interest to the composition.
Such an accessory looks very beautiful precisely due to the combination of colors of the same range and the naturalness of the materials of the entire composition.
Curtain ties are an important element of window design. They hold the curtains, which allows light to enter the room, as well as visually adjust the shape of the window, complete its appearance. Plus, it's easy to make them yourself. For this, improvised materials are used: fabric, ribbons, ropes, beads, etc. Such products will give the room comfort and individuality, and their options are limited only by your imagination.
How to make DIY curtain tiebacks, how to attach them and how to tie curtains with tiebacks, these are the questions for which you will find the most creative answers here. And we will make pickups from a plastic bucket, and from expensive jewelry, and from buttons, and from portraits of pets. Knitting lovers will discover the ideas of knitted tiebacks, harmonious and stylish. Ordinary curtain holders will be decorated with luxurious fabric flowers.
Tiebacks are needed to hold the curtains, dosed and beautifully covering the window leaf. And optional curtains should swing open like a book. They can break the idea of everyday life by simply “fastening” a button to the wall.
And how the tiebacks are attached, what they can be attached to to emphasize the charm of the room. Yes, and the clothes of the window will be unfinished without tiebacks, which will emphasize the style, color, purpose of the interior in general and curtains in particular.
This creative selection of photos and master classes will help you make the most outstanding DIY curtain tiebacks.
How tiebacks can hold curtains
Let's start with the fact that the pickup can open the curtain like this:
You can decorate a standard holder with a photo of your favorite cat, stick the photo on the holder and varnish it. Well, after that, who will say that an expensive sophisticated holder is cooler than his own, homemade, striped one.
Compare. After all, you must admit that the one on the right is nicer. Let's not forget that our handsome men live in our houses, which I belong to, at the same time, and their houses,
Since the article turns out to be long, let me remind you that you can find in this article:
Pick up schemes
Most likely, the process of understanding what you really want will go faster if you consider the following diagrams.
Pattern and layout on fabric
Here is such a pickup - the base can be sewn using a pattern:
Pickup from a plastic bucket
Magnificent to genius ideas from talented people - grabs from mayonnaise buckets.
Pickup from CDs
It is simply impossible to pass by such beauty. Here's how it's done:
Option one - The curtain is threaded through a hole in the disk.
Option two - The curtain is not threaded through the hole in the disk.
Knitted ties
Suppose there are already curtains, and there have been for a long time. How to update the curtains, which are already a little tired. Tiebacks do not require a large amount of yarn and it will not be difficult to knit the most beautiful thing on the windows using the leftover yarn, which at the same time will allow you to make a color accent. Here are the ideas:
Many knit toys. On the forums you can find discussions on the use of small treasures. Most craftswomen accumulate toys at home, because the number of friends they give is finite, but you want to create all the time. Here's a great idea to apply to such works. And how pleasing to the eye is the exact copying of the colors of the curtains with a knitted cat.
flower decoration
There is an incredible amount of techniques for making flowers. Surely you also own a couple, three of these techniques. And here is a case to apply them in interior decor.
How to make ruffled tiebacks
Do not be biased towards ruffles. It's like a joke: "You just don't know how to cook them"
The simplest in execution and the most delicate magnificent tie-backs with ruffles. And it's easy to do. Tie ribbons of a thin mesh onto a cord, this is how tutu skirts are made, and decorate with a pink bow.
And here a strip of curtain fabric is assembled on a wide elastic band to make a beautiful frill, then, on the wrong side, the tie is strengthened with braid, the length of the lace is determined by the length of the tie. And decorated with beads.
How to make pickups on magnets yourself
Craft stores sell magnets that are useful for work. Here's what it takes to create these beauties.
And some more beauty
And a few more ideas for reading the article to the end.
I was interested in collecting material. I hope you enjoyed reading.
