How to remove page numbers from the title page. Removing page numbers
For any literate person, the ability to draw up a document is one of the most necessary. Whether you are a student, a doctor or a businessman, existing realities oblige you to know the rules according to which the text must be processed. It is necessary to comply with the required font sizes, indents, headers and page numbers.
Removal
The first option that is usually implied when preparing documents is the absence of any page markings. All sheets must be clean. They contain only the necessary information without unnecessary frills. How to remove page numbering in Word if you received such a document? There is a universal and simple method. It will help you quickly solve the problem:
- Open the desired text document and scroll any sheet to the very bottom.
- Then double-click on the page number with the left mouse button.
- The number will be highlighted. And you can delete it with the Backspace key.
- Click the "Close" button on the header and footer panel that appears.
Now the calculus of sheets will disappear throughout the text. Having figured out how to remove page numbering in Word throughout the entire document, you can proceed to special cases.
Word 2003
The fundamental principle of any document, report or project is to have title page without numbering. On it, a person indicates only the title and author. Let’s say you often use the Word program, but you don’t know how to remove numbering from the first page. Don't worry. This shouldn't be a big problem for you. The first thing to do is to get rid of all page numbers in the document, as was described just above. Then select the "Insert" menu. Click on "Page Numbers". Select the position of the numbers on the sheet. And uncheck the box next to "Number on the first page". Now nothing will be displayed on the title page.

If you need to know how to remove the numbering of some pages in Word, and not all of them at once, then you will have to try very hard and carefully work on it. You have to do the following:
- Review your document carefully. Identify places where page numbers are not needed.
- On previous sheets, use the function “Insert” - “Break” - “New section from next page”.
Each section has its own numbering. And you will have to insert numbers into them separately each time. But now you can choose which pages should not be numbered.

Word 2007
With the release of this version software it has undergone many dramatic interface changes. Therefore, the last considered tasks differ in how they are performed. So, how to remove page numbering in Word 2007 and later versions? We do it like this:
- To create a cover page, select "Page Layout" from the top menu. Click on the small arrow next to "Page Options". After that, add a checkbox to “Difference headers and footers for the first page.”
- To change only some numbers, insert breaks. Do this exactly the same as in the old version. This menu is also located in the "Page Layout" menu.
In addition, there is little trick. She will tell you how to remove page numbering in Word. Sometimes it works too. If no one is going to seriously check the document, then some numbers can simply be painted over in white.
When working with text documents, there is often a need to number pages. Numbering allows you to create a correct table of contents and simplifies navigation through the document.
In text Word editor Page numbering is enabled using the “Page Number” button on the “Insert” tab. Most users know about this and usually there are no problems with it. However, sometimes page numbering needs to be adjusted to the specifics of a particular document, for example, removing numbering from the first page, and not everyone can cope with this task.
Now we will consider just such a problem. The material will be relevant for users of modern versions of Word. Such as Word 2007, 2010, 2013 and 2016.
To remove page numbers from title page First, make a simple page number that will appear on all pages of the document, including the first. After that, go to the “Page Layout” tab. Here you need to click on the small button, which is located in the lower right corner of the “Page Options” button block.
After clicking this button, the “Page Settings” window will open. Here we go to the “Paper Source” tab and turn on the “Distinguish between first page headers and footers” option.

Then close the “Page Settings” window using the “OK” button. With this simple manipulation we removed the numbering from the first page Word document.
But there is one important point, now there is no number on the first page of the document, but on the second page there is a number “2”. If this numbering option suits you, then you can finish here. If you want the numbering on the second page to start from number “1”, then you need to go to the “Insert” tab, click on the “Page Number” button and open “Page Number Format”.

The result will be small window with numbering parameters. In order for the number “1” to appear on the second page of the document, here you need to enable the “Start with” option and set the value to “0”.
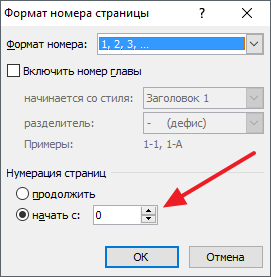
Thus, after saving this setting, Word will begin numbering pages not from one, but from zero. This means that on the second page we will get not “2”, but “1”, as needed.
It should be noted that this method removing numbering works fine only for the first page of a Word document, but if you need to leave the first two pages or more without numbering, then it will not work. In this case, the document must be separated using section breaks. You can read about how this is done.
Beginners or inexperienced users may have difficulty editing a Word document. Most often, difficulties arise with deleting page numbers. To ensure that this question does not arise again, we advise you to read the instructions below.
For convenience, we have described how to remove page numbers for each version of Word. In addition, in the article you will find information on how to remove numbering only from the first or from a specific page. You can also watch the video, which shows how to remove page numbers in Word 2010.
How to remove page numbers in Word 2003, 2007, 2010
Word 2003
If Word 2003 is installed on your PC, then editing the page numbering in the document is carried out as follows:
If you numbered the sections using the “Insert” - “Page Numbers” menu tab, then in this case:
- Point the cursor at the page number to make a frame appear.
- Then click on the frame and activate the “Delete” key.
Word 2007, 2010
Owners of Word 2007 and 2010 can remove numbering using these methods.Another way is to remove the numbering manually:
- Hover your mouse over the page number.
- Double-click.
- After this, Word will advise you to edit the page.
- Next, when you activate the “Backspace” key, erase the numbering.
- Exit the header and footer mode by pressing "Escape" or by double-clicking on an empty field.
How to remove the first page number?
The design of some text documents requires starting numbering from the second page. This is accomplished by a certain sequence of actions (let’s look at the example of Word 2010):
How to remove a number from a specific page in a Word document?
Some printed texts require numbering to begin again with new sections. In Word, this is feasible if you perform the following step-by-step actions:
You can remove a page break by following.
Removing numbering from all pages
It is possible to eliminate all page numbers in a Word document by following these steps:
Or:
- Open the Insert menu.
- Select the "Page Numbers" section.
- Check the “Remove page numbers” box.
Video instructions
The following is a video instruction that visually explains how to remove page numbers from a Word document:
As a rule, pages in Word are numbered. This is done not just for the visual appeal of the document, but in order to better navigate it, especially if we are going to print it. After all, if you just mix up the sheets, it will be quite difficult to arrange them in the right order. In the article we will look at how to do and how to remove page numbers in Word (in versions 2003, 2007 and 2010).
Numbering in Word 2010
Let's start with one of the most popular versions of this text editor:
- To create page numbers in Word 2010, you need to go to the “Insert” tab and select the “Page Number” menu.
- A window will pop up in which you should select the numbering location that you prefer: at the top of the page or at the bottom, in the center, on any edge or on any of the fields of the page.
- When you select the desired option, the numbering in Word will appear automatically.

Removing numbering in Word 2010
Removing numbering is accompanied by even more simple actions:
- To do this, open the “Insert” tab.
- Open the “Page Number” item and left-click on the “Delete Page Numbers” item.
As a result of these actions, all numbering in the document will be deleted.

Numbering in Word 2007
Now let's look at an earlier version - Word 2007. It’s also easy to insert page numbers into it:
- Here we still have the same “Insert” tab and the “Page Number” button with a drop-down menu containing the same lines.
- Here we can choose the future position of the page numbers: in the margins, at the top or bottom of the document pages, in the center or on the right and left edges.

Removing numbering in Word 2007
As in Word 2010, deleting page numbers in Word 2007 is very simple. Still in the same “Page Number” menu, click on the “Delete page numbers” item. Page numbers will be automatically removed.

Numbering in Word 2003
Let's look at how to make it and how to remove it numbers in Word pages for the 2003 version. Almost everything is the same here, just a slightly different design of menu items.
- So, in order to insert numbering, we will use the “Insert” tab.
- In the drop-down window, select the line “Page numbers...”.
- As a result of this, we will have a window where we can select the required numbering position.

Unlike subsequent versions, there are the following options:
- at the bottom or top of the page;
- left, center, right, inside, outside
It is worth noting that there is no option to put a page number on the side margins of the document, which may make some users refuse to use this version of this text editor.

Removing numbering in Word 2003
Now let's look at how to remove numbers in Word pages. Unlike subsequent versions, Word 2003 does not have a special button that allows you to automatically remove numbering. Therefore, you will need to double-click the page number with the left mouse button and manually delete it by clicking the Delete button. But this action only needs to be done on one page, after which the numbering will disappear throughout the document.

It is also worth noting that in all versions of Word presented in this article, from the 2003 version to the 2010 version, there is a “Page Number Format” item in the “Page Number” menu.

In versions of Word 2007 and 2010, this item is located in a pop-up window after clicking on the “Page Number” menu, immediately after the numbering placement options and before the “Deleting page numbers” item. When you click on it, the “Page Number Format” window appears.
In the Word text editor version 2003, this window can be opened in the “Page Numbers” menu of the “Insert” tab by clicking on the “Format...” button.

Formatting Types
In this window in all versions of Word are absolutely available same actions. For example, you can choose the following number format:

In addition, here you can include the chapter number by checking the box next to the line of the same name. After this action, the following items will become active: “Starts with style” and “Separator”. In these items you can also select the right option. If we don’t need chapter numbers, then the checkbox can be unchecked.

You can also select numbering options. There are two points here:
- "Continue." This item indicates sequential numbering from the first page of the document.
- “Start with” - this item allows you to start numbering the document with an arbitrary number, which can be specified here. For example, you can start numbering from the 5th page, in which case the number “5” will be located on the first sheet of the document, “6” on the 2nd sheet, and so on.

In conclusion
We looked at how to do and how to remove page numbers in Word for versions 2003, 2007 and 2010. Very useful feature, which allows us not to get confused in sections of the document, especially after we have printed it. An important advantage is that it is quite simple to make and remove page numbers in Word in almost any version, since the design of these text editors is very similar.
For many novice Word users, when preparing text (thesis, course work, report) it is not possible to remove page numbers, set the style of the header and footer and the location of numbers.
This article is intended to help with solving these problems in Word. They are not that complicated. Removing numbering from some pages or from an entire document takes just a few clicks.
How to remove a number from the title page?
To remove a number from the first sheet of a document, follow these steps:
1. Essentially Word menu Click the "Insert" section.
2. Click "Header" or "Footer..." (depending on where the page number is located).
3. In the header and footer settings panel, under the catalog of number templates, click the “Change... header” option.

4. To prevent numbers from being displayed on the first page, on the “Designer” tab ( last section in the top panel of Word) click the “tick” in the “Special header for the first page” box.

5. Click the red button with a cross “Close Header and Footer Window”.

If you want to set the numbering count not from the first, but from the second page (that is, the number “1” should be displayed not on the title page, but on the 2nd sheet of contents of the document), do this:
1. In the “Insert” tab, click the mouse to open the “Page Number” drop-down menu and select “Format...”.

2. In the “Format...” window, in the “Page numbering” block, click the “start with” option and set the number “0” in the adjacent field. Click OK.

How to remove a number from the second page?
1. Place the cursor at the end of the first page.

2. Create a new section: on the “Markup...” tab, open the “Breaks” subsection and click “Next...”.

3. After inserting a “break”, if you already had a missing number on the first sheet, it will also disappear on the second, since this is the beginning of a new section, and the numbering will be displayed only starting from the third sheet.
If there is a number on the first page and you want it to be there, place the cursor on the second sheet, open Insert → Header or Footer → Edit → enable “Special Header” → close the header and footer window (red button at the top right).
How to completely disable numbering?
Method #1
1. Double-click the left mouse button on the page number (first or last - it doesn’t matter).

2. While holding left button, highlight the number with the cursor. Press the Delete key.
Method #2
1. Open the "Insert" section.
2. Click the “Page Number” subsection and select the “Remove Page Numbers” option.

Selective numbering
1. Break your project in Word into separate sections:
- place the cursor at the end of the page (at the intended section boundary);
- open the “Markup…” tab;
- Click "Breaks" and select the "Next..." option.
2. Click: “Tab” → “Number...” → select a template (“Top...”, “Bottom...”).

3. Go to the beginning of the section in which you want to edit the numbering (indicated in the header markup).
Attention! Any changes made within a section do not apply to other sections.
4. Set up the numbering format:

- remove the number from page 1 of the section: Designer → Special footer;
- setting the style of numbers: Page number → Format...;
- numbering countdown (from which digit): Number... → Format... → Numbering... → Start from...
Good luck in mastering the Word editor!
