Do-it-yourself cast-iron bath repair. Do-it-yourself cast-iron bath repair: common damage and their elimination. How to repair chips or small restoration of damage to the bath
We tell you how to update an old bath at no extra cost.
The easiest way to get a new white bathtub is to throw out the old one and buy a new one. But it is expensive and unreasonable. It is cheaper and more correct to update an old bath, especially since all the methods that we offer are affordable, quite simple and easy to implement at home.
Why do-it-yourself bathroom renovation?
Enamel restoration or a complete restoration of an old bathtub will be much cheaper than buying, shipping and installing a new one and disposing of the old one. We do not argue - this is not the easiest job, but it is quite within the power of an unprepared person. The main thing is not to rush and do exactly according to the instructions, then everything will definitely work out.  If you are afraid of spoiling something, call the experts. Finding such masters is not a problem: websites and newspapers are full of ads. In addition, probably someone from your acquaintances has already done a similar procedure. But remember: to the cost of consumables that we calculated for each option, the cost of the master's working time will be added. For example, one of the companies offers a bathtub restoration service for only 4500 rubles. It seems to be a small overpayment for the saved time and quality. But this price does not include preparatory work: cleaning the bathtub, dismantling and re-installing the drain, removing paint and enamel, and a bunch of little things. In total - about 8000 rubles. There is a difference.
Method number 1. Restoration of the bath using bleaching and polishing

If the enamel of a cast-iron or steel bath does not have large visible cracks or chips and has simply darkened or turned yellow, we restore whiteness and smoothness by polishing and bleaching. The procedure is simple and safe for enamel: the coating of a good bath can be polished several times. It changes its color because microcracks appear on its surface. As a result, dirt and other deposits accumulate there - we will fight them.

In the hardware store we buy a cleaning bleach for the bath. In any supermarket you will find a dozen items. You can also use folk remedies: vinegar, chlorine bleach, car cleaner. You will also need a rotary or vibration type grinder. Rent it from friends or buy it - a useful thing, it will come in handy on the farm.
2. Whitening

First, thoroughly wash the bath with detergent and scouring powder, remove all dirt with a sponge or a stiff brush. Then apply a bleaching agent to the clean surface of the bath. After the time specified in the instructions, rinse off the bleach with plenty of water. If acid is used as a bleach, add soda to the water: alkali neutralizes the acid (chemistry, grade 7). Repeat the treatment in those places where darkening or yellowness remains.1.
3. Polishing

Before you start polishing, try bleaching and polishing some of the most heavily soiled areas. If visible cracks remain, it means that the enamel coating has worn out, restoration or even its replacement is needed. If everything went well, great. Start polishing with coarse emery, then medium, and finish with polishing paste. The products that are used to polish cars are perfect.
Pros and cons of bleaching and polishing

The main advantage of this method is its low cost: a grinder will cost you from 500 to 2500 rubles, a bleaching agent - about 500, sandpaper - 200 rubles per pack. Total: 1200 - 1500 rubles, if you buy the cheapest grinder. In terms of time, you can meet in one day: the bath will be ready for use on the same evening. Unfortunately, polishing will last for a year or two, no more: the enamel layer becomes thinner, but the temperature and mechanical effects remain the same. Then - just a replacement.
Method number 2. Restoration of a bathtub with bulk acrylic

Renovating a bathtub with acrylic is a little more expensive and takes longer. It is necessary to peel off the old enamel from the bath and apply a new coating based on acrylic resin.
1. Preparation of the necessary materials

Arm yourself with a grinder with a coarse abrasive, a drill with a metal brush, or ordinary coarse sandpaper. You will also need putty for metal. Where to buy? Any hardware store. In the same place, buy a special bulk composition for bathtubs based on acrylic resin. For example, "Stakryl" or "Liquid acrylic".
2. Removal of old enamel and surface preparation

First, carefully remove all old enamel. It will be noisy and long. Then rinse the bath with a degreaser and dry thoroughly. Large irregularities and roughness (and they will certainly be) close up with a putty for metal already familiar to you.
Next, disconnect the bathtub from all plumbing: remove the mixer if it interferes with the process, and be sure to disconnect the drain. Place a container under the drain hole - excess of the finished mixture will drain there. Prepare composition. To do this, mix liquid acrylic with a hardener in the proportion indicated in the instructions, and mix well. The mixture should be viscous and fluid.
3. Filling the bathtub with acrylic
 Gently and evenly pour the composition onto the edges of the tub so that it flows down to the bottom of the tub. No need to correct or "help" the composition - it will drain to the bottom and leave a coating of the desired thickness. Please note that a Creel coating is applied in one or more layers. Before applying the next layer, let the previous one dry properly (at least a day).
Leave the updated bath alone for a few days: the acrylic composition needs 3 to 5 days to completely dry. If you covered the bath in several layers - wait at least a week.
Pros and cons of using acrylic

We have good news for you: the service life of a new self-leveling enamel (subject to careful maintenance) is up to 5 years. Then the procedure will need to be repeated. However, this method will cost a little more than the previous one: a grinder costs from 500 to 1200 rubles, liquid acrylic for a 1.7 m bath - about 2000 rubles (for one layer of coating), detergent - about 200 rubles, putty for metal - 700 Total: 3400 rubles (with the most inexpensive grinder). Another minus is that you have to spend more time. The whole process will take two to three days: a day to clean off the old enamel, wash and putty, and a day or two to pour and dry the mixture. The bathroom can only be used after 5 days.
Method number 3. Restoration of the bath using an insert

And finally, the most expensive and most effective way to update a bath is an acrylic liner. The principle is clear already from the name: an acrylic liner is installed in the old bathtub in size. It is not necessary to remove the old enamel. Something to remove and remove, of course, will have to. But first things first.
1. Preparation of the necessary materials

You will need bath detergent, mounting foam to fix it, waterproofing sealant and the liner itself.
2. Surface preparation

Rinse and degrease the inside of the tub thoroughly and allow it to dry thoroughly. Next, remove the decorative screen or false panels and carefully remove the row of tiles that are in contact with the tub.
3. Installing the liner

First, apply a fixing composition to the inner surfaces of the old bathtub - a two-component mounting foam. Insert the finished liner into the tub. After that, treat the joints with mounting foam or waterproofing sealant. Replace the tiles and false panels.
In principle, you can use the bath immediately, but it is better to pour water into it and leave it for a day. Under the weight, the liner will “sit down” and take the shape of an old bathtub.
Pros and cons of using an insert

The main plus of this method is that a bathtub with an acrylic liner will last at least 15 years. But there are also disadvantages: ready-made liners are sold only for baths of standard sizes. For a non-standard bath, you will have to make it to order, and this is more expensive, you know. Also, the high cost is not encouraging: a standard acrylic liner with a size of 1.5 costs about 4,000 rubles, a 1.7-meter one - from 4,800 and more. Mounting foam for fixing will cost about 300 rubles. Silicone sealant for joints - about 200. Bath detergent - 200. In total, according to the most conservative estimates, it will turn out to be about 5,000 rubles.

- Enamelled steel and cast iron bathtubs, as well as bathtubs with acrylic coating, wash with hot water using detergent or laundry soap.Wipe the bathtub dry: the water contains impurities that are deposited on the walls of the bathtub and eat into the enamel. Remember the scale in the kettle - these are the very deposits. In order not to damage the enamel or acrylic coating, do not use metal sponges and abrasive powders to clean the bathtub. Give preference to brushes made of plastic or natural bristles. Means like "Komet" or "Domestos" contain aggressive substances that can corrode the enamel. Use them as little as possible, and only for the toughest stains. Do not use them to clean acrylic bathtubs - special products are sold for them. Do not put objects in the bathtub that can scratch the enamel or acrylic coating: stools, metal buckets and basins. Be careful not to drop heavy objects into the tub that could chip the enamel or damage the acrylic.
When the cast-iron bath began to lose its whiteness, roughness and grayness began to appear in some places, or the surface became covered with cracks, chips formed, then the question is rightly brewing - how to repair the bath so as not to replace it with a new one.
There is such a way, and not just one. Let's consider this issue in more detail.
Do-it-yourself bath repair features
One of the ways to restore the bath to its original appearance is to try to repair the bath with your own hands. This procedure is quite painstaking and time-consuming. If you follow all the rules with, you can achieve an excellent result, and the updated bathroom will last at least a couple more years.
Such a short service life of the coating is explained by the fact that in production the enamel is hardened or applied to a hot bath. At home, enameling is more like painting. But anyway, it is this method that helps the owners out if, for example, you just need to delay the time to purchase a new product.
Initially, the bath must be prepared by degreasing and cleaning its surface. This is done simply, and the more time-consuming process will be further grinding of the surface with a grinding wheel or sandpaper. Next, it is necessary to apply enamel in two layers, while taking breaks between applying layers of 15 minutes.
Bath restoration - repair of chips can be performed using nitro enamel, super cement glue or BF-25 glue with dry whitewash. But it is better that this type of work is performed by a master.
There are currently three more methods available:
- Repair of old bathtubs with a special polymer composition using a brush. Made by hand by a master. Most often, the warranty for this type of repair is one year, but the coating can last up to 3 years.
- (bath in the bathroom).
- Bulk bath - stakryl.
Let's analyze the second and third methods in more detail.
Acrylic bath liner
This method is the most expensive way to restore the bathroom, but at the same time the most durable. After this type of restoration, the bath can be used for another 15 years, of course, if proper care is provided.
This method can also be used to repair bath chips.

When restoring a bathtub using an acrylic liner, the specialist performs the following work:
- Eliminate binding.
- Bath preparation.
- Edge cutting.
- Marking holes and fitting the liner.
- Application of 2-component foam around the perimeter of the product and sealant in the drain area.
- Direct installation of the liner.
- Mounting the piping and filling the bath with water.
During the day, the bath must be left filled, then the water is drained and the product can be used.
Bulk bath - stakryl
This method of bath restoration is not as expensive as repairing a steel bath with an acrylic liner. It takes no more than six hours of continuous work, but the result is worth it.
Stages of preparing a bath for applying bulk, liquid acrylic or glass:
- The tub trim needs to be removed.
- It is necessary to thoroughly prepare the surface of the bath. The preparatory work is very similar to the work of enameling a bathtub. Initially, a means is applied to the bath to eliminate plaque and rust. It is important to read the instructions for the selected tool to work with it.
- Next, the surface of the bath must be cleaned with sandpaper to a matte state.

Preparing the bath for restoration
- Re-clean the bath with pemolux. Between cleanings, it is necessary to thoroughly rinse the bath with a large volume of water.
- Dry the bath. For additional degreasing, it can be treated with Thinner 646.
For reference. Bath refurbishment specialists prepare the surface of the bath a little differently. Before stripping, they carefully examine the surface and only then (depending on the condition of the product) begin to clean the bath, using various means.
There is no need to describe all the nuances, since there are a lot of them. For this reason, the simplest surface preparation method is described.
Preparation and direct application of the composition for the bulk bath

Bathtub before and after restoration
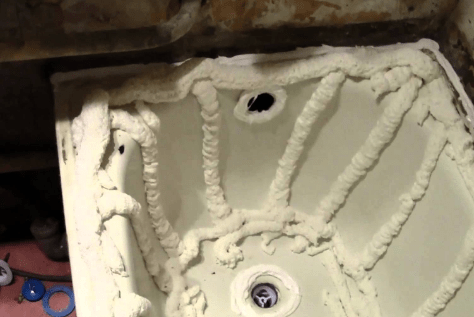
The composition of the enamel for the bulk bath includes two components - a hardener and a base. To dilute the material, you need to add a hardener to the container with the base and mix thoroughly. You need to mix for about 5-10 minutes. Next, you need to let the finished mixture brew for another 10 minutes and mix thoroughly again.
Repairing an old bathtub is pretty easy. First you need to pour a strip of the mixture along the side and introduce the mixture under the tile or other finishing material with a spatula, depending on how the walls of the bathroom are finished. Then the remaining solution must be applied in a spiral over the entire surface of the bath.
Refurbished bathroom care
Bathroom care must be carried out in accordance with the following rules:
- Different hard washcloths can harm the coating. It is also impossible to use acid-containing products, for example, Sanoks.
- Do not clean the bath with cleaning products that are designed for cleaning tiles and toilets, as they contain various abrasive substances and acids. As a result of exposure to these drugs, the enamel is quickly destroyed, the bath rusts and turns yellow.
- It is forbidden to allow prolonged accumulation of water in the bathroom, it must drain freely. It is necessary to keep the bathtub dry when not in use.
- Faucets and showers must be functional, otherwise water leaks will lead to rust and a yellow indelible coating.
- It is also not recommended to soak colored laundry in the bath.
- The coating can be destroyed if metal basins are placed in the bath. If you can’t do without it, then you need to put a wooden pallet or soft rags under the basin.
The bathroom will last longer if there is not a very sharp temperature contrast, in other words, it is not recommended to start cold and then hot water.
As a result of this impact, cracks and chips appear on the bath.
Bathroom restoration is always much cheaper than buying a new one. Therefore, carefully following our advice, feel free to take on the restoration of the coating of the old bath.
Tsugunov Anton Valerievich
Reading time: 4 minutes
Over time, any plumbing wears out and loses its original appearance. Rust, chips, scratches, cracks, loss of gloss and whiteness are the inevitable consequences of daily use and improper care. Do-it-yourself bath restoration can restore a decent look to old plumbing. In order for the renovation of the bath to take place with the least cost and effort, you need to have a good understanding of the algorithm of this procedure at home, understand how to restore the bath, how to paint the inside of the bath, what products to choose.
There are three ways to restore a bathtub on your own. Depending on its initial state, you can choose one of them:
- Enamelling.
- Restoration with liquid acrylic.
- Insert installation.
Bathtub enameling
Enameling a bath with your own hands is a feasible procedure for any owner. To understand how to restore the enamel of the bath, you need to pay attention to the condition of the container.
Repairing a cast-iron or steel bath with enamel is justified if there are no deep chips and cracks. Otherwise, the enamel, even applied in 2-4 layers, will not hide serious damage.
How to restore a cast-iron bath yourself at home? When choosing how to paint the bath inside, preference should be given to high-quality epoxy enamel from trusted manufacturers, guided by the following criteria:
- The choice of enamel application method: brush, roller, aerosol or bulk method. The most acceptable are the application with a brush or bulk, since the roller can give an unnecessary porous texture, and aerosol spray can be used only in the case of repair of individual areas.
- Completeness of a set for restoration of a covering. It is convenient to purchase a kit, which includes everything you need for repairs - enamel, auxiliary components, application tools and compositions for preparing the bath.
Important! High-quality epoxy enamel, due to its thick consistency, is able to create a smooth, even surface and repair small chips. But it should be understood that self-repairing a bathtub at home is inferior to the industrial method of applying enamel: there may be a change in the color of the new enamel, increased vulnerability to bumps and chips, and restrictions on care products.
Self-enamelling of the bath takes place in two stages: preparatory work and enameling.
Enamel application
How to restore the enamel of the bath, it becomes clearer after reading the instructions for the purchased composition for enameling. The important points here are:
- Composition preparation. Following the instructions, prepare the enamel by combining the active ingredient and the hardener in the required proportions.
- Coating with the first layer of enamel. Cover the surface with a thin layer of enamel using a hard wide brush, starting from the top, gradually descending deep into the bowl. You can especially carefully walk along the bottom of the bath and the drain as the most worn out places.
- Application of the second layer of enamel. A new enamel layer is applied after some time specified in the instructions. After that, it can be left to dry for 15 minutes.
- Leak correction. All detected smudges of enamel must be smeared with a brush, moving up and down and from side to side. This must be done quickly before the enamel dries.
- Re-enamelling. To achieve a more reliable result, increase the strength of the enamel and protect against new chips, a cast-iron or metal container can be painted over with one or two more layers of enamel.
And how to restore the enamel of the bath, if the chips are deep? It is necessary to repair chips with putty, polish and degrease. All chips and cracks must be carefully repaired:
- using sandpaper soaked in water, polish the edges of the chip;
- degrease cracks with a solvent or white spirit;
- dry the surface;
- apply enamel.
After enamelling, the bath should dry for 7-8 days. Proper bathroom care should exclude the use of abrasive detergents.
Restoration with liquid acrylic
Repairing a bathtub with liquid acrylic is an easier process at home than enamelling. Acrylic is resistant to chemical and mechanical stress, unpretentious in work. With the help of liquid acrylic, you can get a beautiful smooth surface that is resistant to temperature extremes and hard water.
Due to the way the acrylic is applied, this method is sometimes referred to as a "fill bath". A do-it-yourself bulk bath is a suitable economical way to update cast iron products.
Acrylic brand "Stakryl" is often used - a two-component high-density enamel, including a base and a hardener.
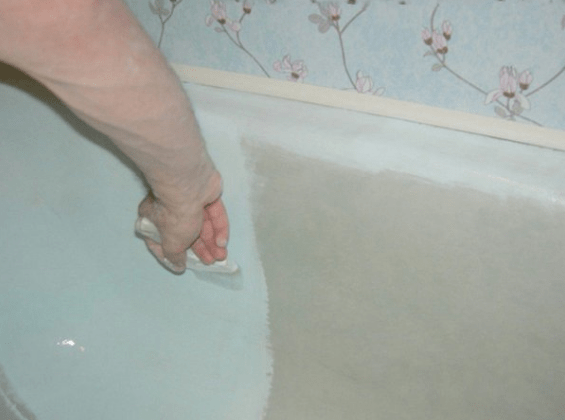
Do-it-yourself acrylic bath coating consists of the following steps:
- Surface preparation. This process is similar to preparing for enameling: you need to clean the bath from the old coating, degrease, repair cracks.
- Acrylic application. Having combined the components according to the instructions, acrylic is poured from a convenient container in a thin stream onto the side of the bathtub, pushing it under the edge of the tile. The acrylic layer should be approximately 4-6 mm and flow down to the middle of the container. Moving along the side, you need to pour acrylic evenly. After applying acrylic along the outer edge, continue to pour it into the middle of the container, gradually narrowing the circles and moving in a spiral. The rest of the mixture flows into the prepared container through the drain.
- Drying. Liquid acrylic can dry from 6 to 24 hours. But still it is better not to rush to immediately use the updated bathroom, but to wait a few days.
Restoration with acrylic inlay
The third way to repair is to install an insert or "bath in a bath". It is impossible to make an insert at home, it is made industrially and is an insert that repeats the shape of the bath itself. This is an easy and quick way to renovate a bathtub yourself. But it also has disadvantages:
- Installation requires the removal of the bottom row of tiles to secure the bead of the insert.
- The impossibility of repeating the exact shape of a cast-iron bathtub with an insert. This is due to the fact that cast iron is a complex material for molding and has various depressions and protrusions, which, when the liner is installed, provoke the formation of voids. All this negatively affects the quality of the new bath.

The main defects in the coating of the bath include cracks, scratches and chips. Damage occurs after inaccurate installation of furniture, plumbing and heavy objects falling into a bathing bowl. Calling a master to fix problems will be expensive, so it would be nice to learn how to repair a cast-iron bath with your own hands, agree?
We will help you resolve this issue. The article provides detailed instructions for removing chips, small and deep scratches, and also describes effective methods for restoring cracks. By studying the material, you can restore the attractiveness of the cast-iron bowl and extend the life of the bath.
The use of multi-component cleaners, cleaning the contaminated surface with a stiff brush, careless handling of metal objects during repairs - all this leads to the formation of shallow scratches.
Such scratches should be immediately eliminated, since the ingress of moisture, caustic chemicals into the resulting gap leads to the formation of rust, the multiplication of moisture-loving microorganisms and an increase in the size of the scratch. Which will lead to further destruction of the surface of the bath.
Minor scratches are damage that does not expose the metal. These minor damages can be repaired even without priming the surface.
Ways to restore cracks
Bathing bowls made of cast iron have become popular due to their high wear resistance and strength. But even such durable products have defects in the form of enamel chips, corrosion or cracks.
The occurrence of a crack as a result of plumbing work or natural changes in water and air temperature becomes one of the reasons for replacing the bath. In some cases, it is possible to close the defect.
Methods for repairing a crack in a cast-iron base of a bathtub: by cold welding, by applying epoxy resin, by soldering with lead-tin solder.
Option #1 - cold welding
At the first stage, the bath is degreased and cleaned with Pemolux or soda. If there is rust around the edges and inside the crack, a harsh abrasive such as Sanox or Chistin Sanitary.
The anti-corrosion agent is applied to the surface of the crack in a thick layer, wetted and left on the damage for 20 minutes. After washing off the cleaning agent along the visible edges of the crack on one or both sides, depending on the location, locking micro-holes with a diameter of 3 mm are drilled.
After degreasing, the surface is ground with a grinder, an electric drill with a grinding wheel or an abrasive. Not only the crack is cleaned, but also the enamel around it 1.5-2 cm wide.
The grinding wheel removes the coating down to the metal. At the site of the crack, a hollow is machined for the entire length of the fault.
After grinding, the tank coating is cleaned of saw cuts and dirt. When the bathroom dries, the crack must be degreased with a solvent, alcohol or cologne.
Hot water is poured into the bowl for half an hour, after draining it, the surface is dried with a hairdryer. Now the processed coating defect can be covered with cold welding.
You can use the bath not earlier than after 24 hours. To even out the tone of the coating, the crack can be painted with a two-component acrylic or epoxy enamel.
Option #2 - Epoxy
The process of preparing a surface for applying epoxy resin is practically the same as the technology for preparing a bath for applying cold welding.
Scheme of work:
- cleansing and degreasing;
- grinding and turning grooves;
- additional degreasing.
After completion of the preparatory work, it is necessary to prepare epoxy resin or epoxy-based putty. A layer of epoxy resin is applied to the place of the crack, fiberglass on top and again adhesive mounting material.
After the structure has dried, it is necessary to repeat the procedure: epoxy - fiberglass - epoxy. The result should be a patch above the enamel level, if not, then the procedure is repeated a third time.
Epoxy resin is the best way to fix cracks in a bathtub. The liquid texture of the material allows you to penetrate into each microcrack, provides increased adhesion and protection of the metal
Option #3 - soldering the crack
If you have soldering skills, then you can solder a small crack in a cast-iron bath. This requires a thorough cleaning and release of the metal from the enamel.
Soldering is done with a 100-200-watt soldering iron using lead-tin solder and a special flux for steel and aluminum.
This way of solving the problem takes time and skill. The seam will not last long, but it is suitable for temporary elimination of the problem.
To prolong the attractiveness and life of the renovated bath, you need to properly. To clean the surface, do not use hard brushes that can damage the smooth enamel.
Conclusions and useful video on the topic
For reliable adhesion of materials and durability of the coating, it is necessary to follow a clear sequence of preparatory and restoration work:
High-quality repair of a cast-iron bath is a careful restoration of the most important plumbing fixture in an apartment.
Restoration of the damaged surface is possible as a result of the "jewelry" work of the master. The result of painstaking work and many hours of waiting will be a bath without visible chips, scratches and cracks, which will last another ten years.
Share with readers your experience in restoring damaged cast-iron bathtub enamel and carrying out restoration work. Please leave comments, ask questions on the topic of the article and participate in discussions - the feedback form is located below.
Over time, during operation, the bath fails. In particular, this applies to Soviet-made cast-iron bathtubs. But what to do? Buy a new one or repair a cast-iron bath yourself? Of course, it is up to you to decide, but it is worth noting that buying a new bathtub is quite expensive, so we recommend doing repairs. But before that, you need to study all its features.
Methods for repairing a cast iron bath
Considering the options for repairing the bath, only two can be distinguished:
- Enamel application. Which, in turn, can be divided into the device of enamel and the application of liquid acrylic.
- Acrylic liner.
Each of these options has features that must be considered when carrying out work. Let's look at each repair method in more detail.
Enameling
The first way is . Note that it is available for use only when the bath itself is intact, and you are only embarrassed by its appearance (which has pretty deteriorated over many years of operation).
Restoration work of this type is divided into several stages:
- Enamel selection.
- Bath surface preparation.
- Coating.
In order to perform all the work qualitatively, it is necessary to study the features of each of the stages.
The choice of enamel for the bath
The first, and very important, is the choice of enamel, which will later be applied to the surface. Accordingly, to choose, you need to know several features:
- The coating can be applied in several ways: with a brush or roller, as well as in the form of an aerosol. Note that aerosol application is not suitable for a full-fledged restoration.
- Also, bath enamel should be presented as a set with all the components necessary for work.
- For two-component formulations, a hardener is required, which is selected in accordance with the shade.
And let's look at the most suitable compositions for such work:

Any of the presented types, which are most popular today, is suitable for work.
Now that the material is selected, you can proceed directly to the execution of work.
Foundation preparation
Before you start directly applying the composition to the surface of the bath, you must carefully prepare it. The preparation itself is carried out as follows:

Upon completion of the preparation, you can proceed directly to the application of enamel, and it will differ depending on the choice made. Namely, ordinary enamel and liquid acrylic are applied in different ways. We will analyze each of them in some more detail.
Enamel application
Upon completion of the preparation, we proceed to repair the bath using enameling, which is performed as follows:
Allow the tub to dry completely when finished. It is recommended to use it no earlier than 2-3 days after applying the composition.
- The process of restoration or repair of a cast-iron bath using this method lasts about 4 hours. It begins after the replacement of the enamel is completed.
- The method is the application of an additional (fourth) layer of enamel on the surface of the bathroom.
- If a new coating has been applied before, then it should dry completely, after which an additional layer is applied.
When performing reinforcement, it is worth considering some features:
- After applying the last layer, the enamel should dry well.
- The bathroom cannot be used for three days.
- Such repair of a cast-iron bath can be carried out independently, taking into account the detailed instructions for the enamel jar.
- You can also use the services of a restoration company. However, there are some nuances here.
- You must take into account the fact that such enamel has a service life of one and a half years.
- Such a bath should be used with care. Since the enamel is scratched, you need to wash it only with soft rags and gels.
- After a year and a half, a new repair will be required.
But nevertheless, although the method is short-term, it is not expensive. In this way, you can maintain an attractive appearance of the bathroom for many years, and prevent it from rusting and completely deteriorating.
liquid acrylic
And the second way to restore cast-iron plumbing is the application of liquid acrylic. The whole process is carried out in accordance with the technology:

Acrylic liner
Another way to repair a cast-iron bath is
- When the base of the bathtub is in poor condition, and it is impossible to do just by replacing the enamel.
- In cases where there is a desire to give a new look to your old plumbing.
- In addition, it is actively used for the "reconstruction" of the bath. As you know, metal transmits and absorbs heat very well. And usually in any metal and cast iron products, the water cools down very quickly, preventing you from enjoying it. That's when the acrylic liner comes to the rescue.
In addition, it is worth noting a number of advantages of such a solution:
- The insert is wear resistant.
- Pretty durable.
- During operation does not change color and its properties.
- It has sufficient moisture resistance.
- Easy to maintain and operate.
- In addition, it has a smooth coating, due to which it repels dirt.
- Immune to household dyes, as well as household chemicals.
- It heats up fairly quickly and cools down slowly.
But let's take a look directly at how the repair process itself goes:
Important! When buying an acrylic liner, be sure to ask for a quality certificate for it. Also, check its integrity at the place of purchase.
Conclusion
As you may have noticed, there are not so many ways to restore and repair a cast-iron bath, and at the same time they are as simple as possible, therefore it is possible to do all the work yourself (even without someone's help). We also recommend that you watch a few videos that will clearly show all the repair methods, and you will once again see how easy it is to do it yourself.
