How to make a landscape page in Word? How to make one page portrait and the other landscape in a Microsoft Word document
Using the instructions below, you can learn how to make a book page in Word (for different versions program), in case your pages are displayed in landscape format.
Competent work with such a large word processor as MS Word requires the user to have knowledge of document formatting.
The portrait orientation of a document page is also called portrait - the text on the sheet is printed from bottom to top, and the height of the page must be greater than its width.
Classic documents (various reports, course and diploma papers, abstracts, etc.) are usually printed on sheets of portrait orientation.
Changing orientation in Word 2003
This version of Word is older and is no longer supported by Microsoft.
Some new editor formats may not be reflected correctly, and as a result, almost all file formatting may be lost.
Quite often, the page mode setting also gets confused - instead of portrait, it becomes landscape, and vice versa.
Also, the text moves beyond the document margins, so the file may require additional formatting and restoration.
Since the interface of this version of the program is somewhat different from the new versions, it is necessary to consider in more detail how to change the page to a book page.
Follow the instructions below:
- Create a standard document and open it;
- In the main program window, select “File” and open the options window. It will look like this;
- The window consists of several tabs with which you can adjust the settings of document sheets. Find the Orientation field. It is located in the "Fields" tab. Select portrait as shown in the image above. Click OK.
In this version of Word, you can also control how the layout of sheets is applied to the entire document.
To do this, in the sample field, set the application mode: to the entire file or only to its individual pages.
Advice! When creating a document in portrait orientation, you may need to adjust the margins. They can also be configured in the document page formatting window. This is especially useful when creating cheat sheets.
Changing orientation in Word 2007
This version of the word processor from Microsoft has an updated interface that is more open and user-friendly.
Due to the fact that the program supports most of the new file formats with office documents, you can open them without encountering formatting problems, as often happens in earlier versions of the program.
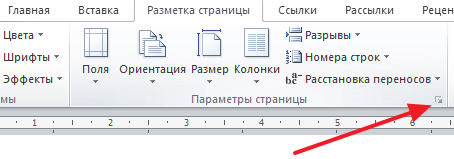
To change the page orientation in this version of the program, follow the instructions below:
- Go to the page layout tab, which is located on the toolbar in the program window;
- Select the "Orientation" field and open the drop-down list;

- You will be offered two options for possible layouts. Select bookstore. All pages will automatically accept the selected option. If necessary, adjust the document margin sizes so that the text does not extend beyond the page.
Make book orientation in Word 2010 and 2013
New versions of Word are practically no different in interface from the previous version.
However, when you try to change the page layout, the margins are automatically adjusted so that the text does not extend beyond the page.
To change the page mode, open the layout tab, select “Orientation” and in the drop-down list, click on book page view.
This process is shown in the figure below.

Creating landscape and book pages in the same document
To set up display of both portrait and landscape orientation in one document, follow the instructions:
- Select all the text you want to change;
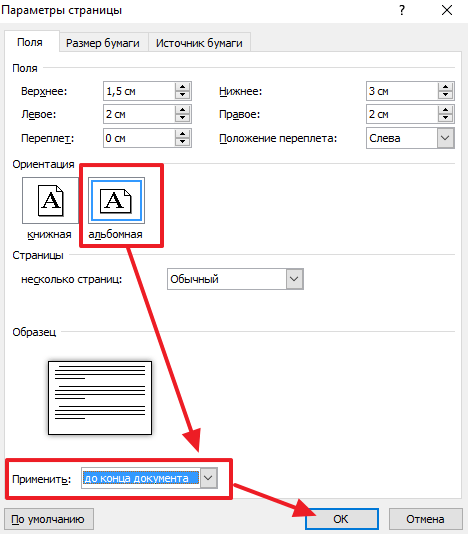
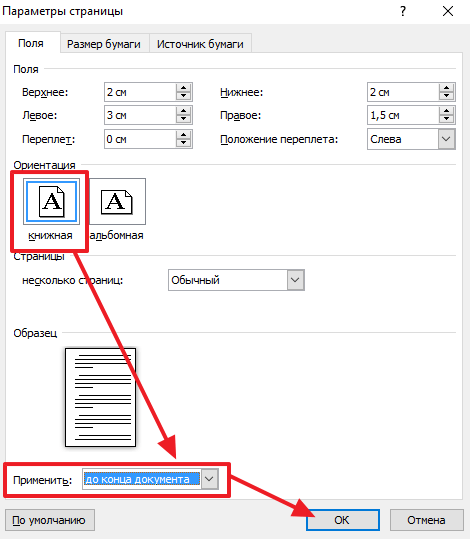
- In the markup tab, select “Fields” and use the drop-down list to go to the document custom fields window;
- Select portrait orientation and in the Apply box select “to the end of the document.” Click OK.

The selected pages will have portrait orientation; to set up landscape for other selected pages, use the instructions above, only select landscape in the orientation column.

Using the same principle, you can make only 1 page portrait or landscape. Select the required page and customize its appearance according to the example shown in the figure.
Also, after all the manipulations,
To design a document professionally, you need not only to understand how to customize the appearance of the text, but also to know , How to make a landscape page in Word.
By using Word programs from the package Microsoft Office you can draw up any type of document by applying to it various styles, formatting objects.
Thanks to a word processor, you can significantly save time on editing large files and texts.
Creating landscape orientation in Word 2003
In the old version of Word, the process of changing some page parameters is significantly different from the new editions. That is why you should consider how to change the position of the page in this case.
Follow the instructions to change the orientation to landscape:
- In a new document, open any page and select the menu item called “File” on the toolbar. Then open a window to change parameters in the drop-down list;
- In this window, you can manually adjust the margin size and determine the size of the paper used. To change the position, find the corresponding field and select landscape as shown in the image above.
Remember! In the old version of Word, after changing the page orientation from portrait to landscape, it is necessary to change the margins, because the text will move and go beyond the edges of the sheet.
Changing the orientation in a Word 2007 document
This version of the Word word processor is the first to receive an updated user interface.
Now the program menu items on the toolbar are divided into logical blocks: for formatting appearance text, markup conversion, working with tables, pictures and other tabs.
To change the orientation in this version of Word, follow these instructions:
- Open the desired Word file and find the page layout tab on the toolbar;

- Select orientation item. A drop-down list will appear. Select the required type. After completing this action, all pages will become landscape;
You may also find it helpful to read these articles:
- Creating and Inserting a Formula in Word - Step-by-Step Guide
Landscape view in Word 2010 and 2013
Since all newer versions of Word have a similar interface, changing orientation occurs in the same way.
For greater clarity, we will give an example of replacing the page position in new versions of Word.
- Open the markup tab;
- From the orientation field drop-down menu, select landscape.

How to make only one page landscape
In Word it is also possible to change the orientation of only one page of a document, for example, the second:
- Open the page layout tab;
- Click on “fields” and in the window that appears, select custom fields. A separate window will open;

- In the window that appears, select landscape orientation;
- In the "apply" field, select to apply to the end of the entire document. This way you can make several pages landscape. To make a few more pages with a book view, select necessary sheets and follow the steps indicated in steps 1-3.

Setting orientation for an individual sheet
And vice versa. But, the button that is responsible for changing the orientation changes the orientation for the entire document at once. Therefore, if there is a need to change the orientation for only one page, then you have to resort to various tricks. In this material we will look at two ways to make one page landscape and the other portrait in Word.
The instructions are written using Word 2010 as an example, but it will also be relevant for Word 2007, 2013 and 2016. And with the right skill, the information from the article can be applied in Word 2003.
How to Make One Page Landscape Using Section Breaks
Perhaps the easiest way to make one page landscape and the other portrait is to use section breaks. To do this, you need to separate the page you want to make landscape with two section breaks. There should be one section break before this page (at the end of the previous one) and one section break after this page (at the end of the page, which should be landscape).
So, let's say you have a text document. And you need to make one of its pages landscape, while the remaining pages of the document should remain portrait. To do this, place the cursor at the end of the previous page, go to the “Page Layout” tab, click on the “Breaks” button and select the “Next Pages” option. After this, place the cursor at the end of the page that you want to make landscape and click “Breaks - Next page" If you have Word 2003, then to insert a break, use the “Insert - Break” menu.
This way you will separate the desired page from the rest of the document using two breaks. To make sure that section breaks are in the right places, go to the “Home” tab and turn on the “Show all characters” function.

You will then be able to see where the section breaks are set. They should be located immediately above the landscape page and at its end. If the breaks are placed incorrectly, you can edit the pages so that the breaks fit correctly. In the screenshot below you can see what the break at the end of the page should look like.

After the section breaks are set to the required positions, you need to place the cursor on the page that should be landscape, go to the “Page Layout” tab, click on the “Orientation” button and select the “Landscape” option.

If everything was done correctly, then you will have one page landscape, and the rest portrait. If something doesn't work, then most likely the problem is in the placement of breaks.
How to make one page landscape using page options
There is also another way to make one page landscape and the other portrait. It's a little more confusing than the one above, but it can still be used.
In order to use this method, you need to place the cursor on the page that comes before the one that should be landscape. After that, you need to go to the “Page Layout” tab and use the small button to open the “Page Setup” window. If you have Word 2003, then to open the “Page Setup” window, use the “File - Page Setup” menu.
After that, you need to select the "Landscape" orientation and apply this "To the end of the document" setting.
After saving the settings using the “Ok” button, all pages below the selected one will switch to landscape orientation. Now you need to place the cursor on the page that you want to make landscape and open the Page Setup window again. This time you need to select portrait orientation and apply it to the end of the document.
After saving the settings using the “Ok” button, you will receive one page in landscape orientation, and the rest in portrait orientation.
The orientation of pages in an MS Word document can be portrait or landscape. Most often, when formatting text, pages are in portrait orientation. But it also happens that a drawing, graph or inscription in large font does not fit on the page in width. In this case, you can make one or several landscape pages in Word. I will talk about this in this article.
How to make all pages in landscape orientation in Word
This is the simplest question. Open required document, then go to the tab "Page Layout". In the section "Page Options" Click on the “Orientation” button and select the appropriate item from the menu. After this, all pages of the document will become landscape orientation.
How to make landscape orientation for several pages in Word
Now imagine that you have several pages in a Word document for which you need to set the orientation to landscape. All other pages should remain in portrait orientation.
To do this, select all the text on the desired pages, go to the tab "Page Layout" and in the section "Page Options" click on the small arrow in the lower right corner.

A dialog box will open. In it, in the “Orientation” section, put “Landscape”. Then, in the Apply field, select "to selected text" and click "OK".

Selected pages became landscape orientation, while all others remained portrait.

There is another way to make several landscape pages in MS Word. To do this, put italics at the beginning of the text, on the page from which the landscape ones begin, go to the tab "Page Layout", click on the “Breaks” button and select from the drop-down list "Next page".

Now place italics at the beginning of the page where the portrait pages begin again, and repeat all the steps. When non-printing characters are enabled, the following message will be displayed: "Section break (from next page)".

Put italics on one of the pages that will be landscape, go to the tab "Page Layout" and in the section "Page Options" click on the arrow. In the next window, select landscape orientation, and in the "Apply" field select "to current section". Click OK.

All pages that were in the current section became landscape orientation.

How to make one landscape sheet in Word
If you need to make one landscape page in Word, then you can use the methods described in the previous paragraph. Only apply them to one page.
Now you can easily make book or landscape pages in a document. Moreover, you can change the orientation for both several and one page.
Rate this article:Using text Microsoft editor Word, we most often work with sheets that have a portrait orientation. Most documents are based on this view. But often there is a need to use the so-called landscape orientation. In the picture below, you can see both types. This will help you get your bearings if you still don’t know the difference.
A striking example of a document with landscape orientation is an invoice. Surely you have come across a similar option.
In the instructions below you will find detailed description how to do album sheet in Word. This is suitable for the popular versions of the editor 2007 and 2010.
Apply landscape orientation to all sheets of the document
If you need to ensure that all sheets of the future or current document have a given orientation, follow the instructions below.
Please note . We already worked with tapes when we made . Check out this article.
In the menu bar, go to the ribbon " Page layout". Here we click the "Orientation" button.

When you click the button, a drop-down menu will appear. Here you need to put the switch in the "Landscape" position.

If everything is correct, this type of orientation will automatically apply to all sheets of the document. In the future, if necessary, you can return the book orientation by analogy.
Landscape orientation for one sheet in a document
Please note . You can use all sorts of tools to create a document. would be perfect for this role.
As you can see, adjusting the orientation settings for all sheets at the same time is not very difficult. It will be a little more difficult to solve the problem when you need to adjust the orientation for one or more sheets. For example, we have a document consisting of 15 pages. We need to make sure that page 13 has a different orientation from the others. Let's see how this can be done.
First, we need to go to the sheet (page) whose orientation we want to change. Go to, this means that the cursor should be on this sheet.
Now go to the tape" Page layout", and click the "Page Setup" icon in the lower right corner:

In the menu that opens we select desired type orientation (different from document settings). And in the lower drop-down menu "Apply", we select the item " Until the end of the document". Then click OK.

Now all sheets up to the end of the document will have the selected orientation type. But we only need to do this for one thing. Therefore, let's move on to the next step.
We skip the sheet for which we have configured the desired type of orientation and place the cursor on the next one after it. We repeat the operation, orientation settings. Thus, we will return all remaining sheets to their original type. If everything was done correctly, you should get the desired result.

To cancel changes, go to the very first sheet, set the desired orientation type in the parameters, and select the " Apply to entire document".
Video for the article:
Conclusion
This instruction can be used in all kinds of technical documents. There the task often arises of publishing tables and graphs on the entire page, and it is advisable to use landscape orientation.
To insert, please download it first.
Why look for information on other sites if everything is collected here?
